

John Martin
-
Posts
1,324 -
Joined
-
Last visited
Content Type
Profiles
Forums
Articles
Gallery
Downloads
Events
Everything posted by John Martin
-
Making my own anvil.
John Martin replied to John Martin's topic in Anvils, Swage Blocks, and Mandrels
Dodge, I'll see if they can cut it when I go there. Mike, I have a stick welder, but I'm going to weld it up my friend's dad who is a welder. He has a gigantic stick machine. I'll be sure to keep one handy because me and my friend really don't want to have to try HT the face after its on the anvil. I'll keep you all updated, but that probably won't be for another four months. I'll also take lots of pictures. Thanks for the support. -
This is more of a brainstorm that a problem. I was looking into buying a bigger shop anvil towards the end of this summer, and I did some research, and I could make one for little money compared to buying one that is the same size and model. This anvil is going to be a combination of a euroanvil, hofi anvil, and the german pattern. It will have three pritchel holes, and a 1" hardy. Once I have some extra money for this project (this whole project should cost around $700), I am going to buy two 12"x12"x5" A-36 plate drops from the local metal supplier. I am also going to buy a 1"x5"x36" piece of 4140. I will use one of the 12x12 pieces as the main part of my anvil. The other one I will cut into halves, and than rough cut to shape after that. The anvil will be 13-14" tall, 5" wide, and 34-36" long. Anywhere from 350-450lbs. I am going to HT the face plate prior to welding onto the anvil body. Do I have to worry about losing my HT when welding? The plate is 1" thick. The welding area will be preheated with a torch to 300-350 degrees. I am going to grind a 1/4" - 1/2" space between the anvil and faceplate on both sides of the body, leaving a 1" tab running down the middle of the anvil body. The first bit of welding will be to run a deep penetrating bead done both sides of the tab where there is direct contact with the face plate. After that, it will be just plugging and filling for maximum weld strengh, and obviously, to fix the gab. Will I have to worry about the plate seperating down the road? It will be heated again to 300-350 degrees after welding for stress relief. Is this the right way to do it, or do I not need that much welding? Will I have to worry about the welded area itself pushing out or the top of the anvil mushrooming? The heel and horn will be welded on the same way. The hardy hole will be milled out of the horn before welding it on. I have attached a rough picture that I just quickly drew up in paint. In the picture I have a cross section of how I want to weld it, and the blurry parts are areas that will be welded, the whole face plate will be welded, I just didn't want do the whole thing blurry. I have four sheets of paper that have detailed drawings of the whole process and anvil that I will upload once I can get them scanned. Also, do i want the side shelf and upsetting block on the same side or on opposing sides? This won't actually happen for quite a few months, but I want to learn and plan as much as possible to create the best possible anvil. I welcome any tips, comments, or concerns.
-
-
Steve sells made that blade. And it's a pattern-welded blade as well. MOD correction: I did NOT make that blade, tho I have made some on steel and bronze. As I clearly stated in the gallery posting. I posted the photo because of the many statements assuming that it can not be done. Facts, and Photos speak louder than opinions.
-
Avadon, here is a much humbler version of your's and Hofi's, but it's based off of the same design as your guys'. I made with what I had laying around, and it works great even though it's 1/4" plate. I wish I had your 2" plate. With the legs, I did the wire thing, and it wasn't quite level, the legs on the ground. So I would set a level on the anvil face, and tilt the anvil and stand until level, and then grind a little bit off of whichever foot needed it. Works great now and is perfectly flat. The anvil itself is held in place by the two U shaped pieces of metal on both sides of the anvil. Will be ordering some sika glue when I have money for it. But this is the best stand I could come up with being 15 and not really having a lot of money to dispense. Your's looks great.
-
So you sharpen the V end like a cold cut chisel, like 60 degree angle or around there?
-
I'm a bit confused. So you're saying that if I am going to slit the eye in my hammer head, I should make the slit chisel as long and wide as the finished eye, or just as long as the finished eye, and then drifting will stretch the sides out?
-
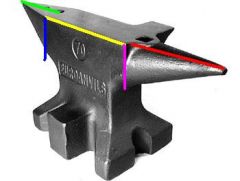
Mind sharing how you accomplished your three colored sword?
-
Talk to steve sells, he has made a pattern welded blade out of steel and brass or bronze. You'll learn tons from him!
-
Hey all, I was looking at different peoples side draft coal forges. I noticed - seemed to have somehow never noticed this before - but some people have a side-draft where it's a "short table" & "you work straight into it" - excuse my lack of better terms. Example - Picture 1 While on the other hand people have a side-draft where it's a "long table" & you work through the side of it". Exmaple - Picture 2. Are there advantages to either of them, I know that in the past forges were usually built for a specific type of work, farriery, wheelwright, blades, etc... You can usually store more fuel on the longer table, and you support larger pieces of them as well. Why are they built that way - just felt like it, nessicty, wanted it that way, advantage??? Don't know if this is the right place or not, maybe this belongs in everything else.
-
Lol Quenccrack, say a prayer before the sermon. . The heat is incredible, and I can forge at a high orange color, very low yellow at 4psi in my two burner knifemaker, and weld at 6-7psi. Should be about the same for you, best of luck. After about an hour or two of running at normal forging temp, you can weld real quickly, and use little gas. The floor is indestructible to flux, however, I can't seem to get the flux off of the bricks now. & when I'm not welding it gets onto my work, so I have to grind it off when I use it next time. Make sure to use a sacrificial floor, or grind a shallow channel in the firebricks to let the flux drain out of the front or back.
-
Quench, it took me all of five minutes to have the forge up and running. Bolt the burner(s) done. Connect regulater to hose to forge. Done. I didn't think it was a big deal. But lemme know how the itc-100 works for you.
-
Dave's demo trailer
John Martin replied to FieryFurnace's topic in Blacksmithing, General Discussion
Great job dave! You have to be quite happy. Let us know how it works at the demo! -
Hey guys, I was just skimming through the internet looking at different kinds of anvils and I came across Euroanvils. Does anyone have one or have a comment about their anvils. They seem really inexpensive, but high quality. I'm just wondering if this would be a good choice for a main shop down the road.
-
I have never used a forgemaster, but I would highly recommend a http://www.diamondbackironworks.com forge. Worth the money, low-medium cost. Super efficient, even more if you get a idler valve. But from what I've heard about forgemasters is that they are a very good brand as well. Good Luck, hopefully someone who has used one will comment on it for you.
-
Pictures Quench, PICTURES! :)
-
That is one sweet forge, however, you are somewhat limited by what you can do, but I don't think that matters for what he is doing. Thanks for the link.
-
Ok Sam, enough teasing us, have you finished this one yet? ps - King of Unfinished Blades
-
Seems that everyday, I learn one more thing that can be made that has an edge. I like this one a lot. I might have to try to make one for my grandma.
-
mini-chopper (kevin's #6 and counting)
John Martin replied to kevin (the professor)'s topic in Knife Making
I like this one a lot, great job. Also, the wood choice for this knife seems to be perfect. -
That's all that is necessary to waterproof antler or horn?
-
Great to hear MetalMuncher, I really like this knife so far!
-
Glad to hear your back, can't wait to see some knives from you!
-
Stand and let your arm hang by your side in a loose fist. Measure that distance. That is where the top of your anvil should be. Or a tiny tiny tiny bit lower. 1/2"-1". That's my take on it. Many ways, and all are correct to an extent. Just like Mr. Aspery said.
-
Chimney effect is going to be there no matter what. The forge is made to heat evenly, so it's going to try to do that. Also, if you turn a burner off, and put a cap on the bottom, as soon as the cap reaches the forges temperature, the burner will draw heat from it. Heat rises. Only way if you are going to have seperate burners is to put a firebrick that fits your forge opening in the forge between the off burner and on burner. That would stop any heat from reaching that burner, still it's not recommended.