Bruno C.
-
Posts
104 -
Joined
-
Last visited
Content Type
Profiles
Forums
Articles
Gallery
Downloads
Events
Everything posted by Bruno C.
-
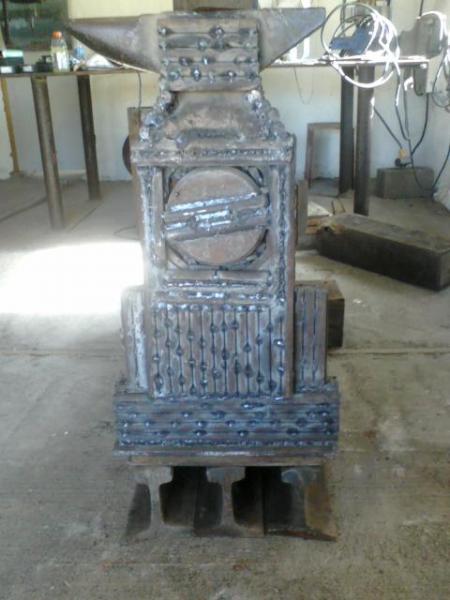
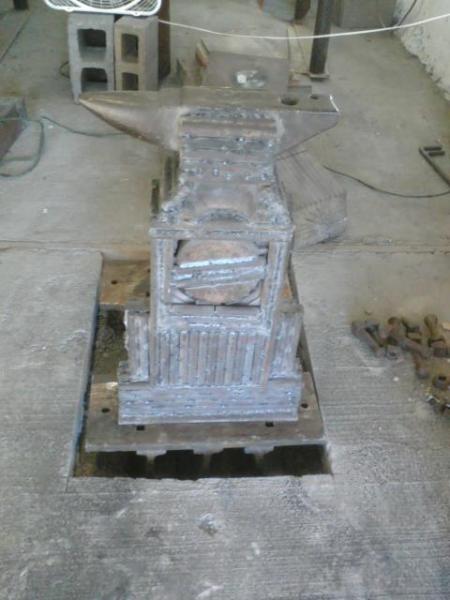
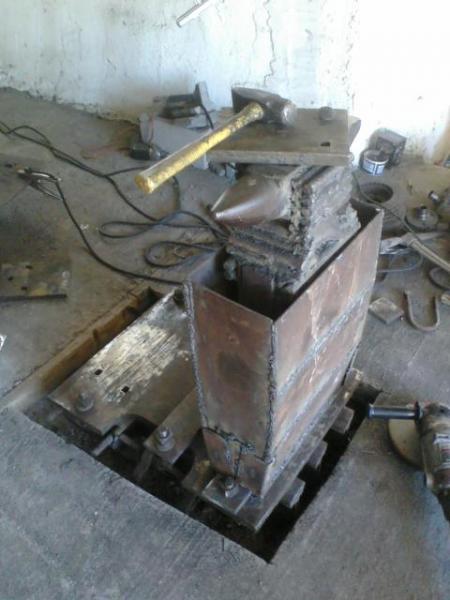
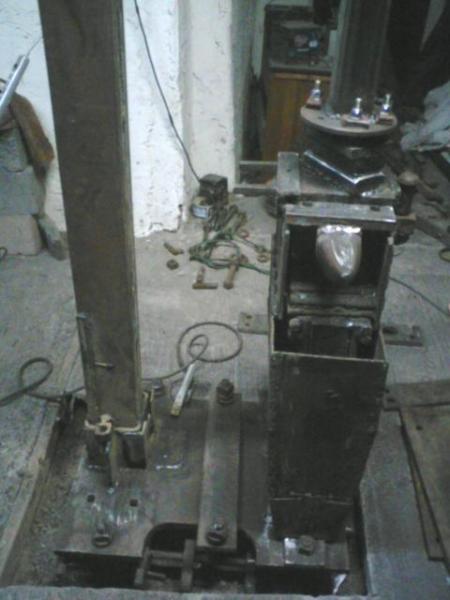
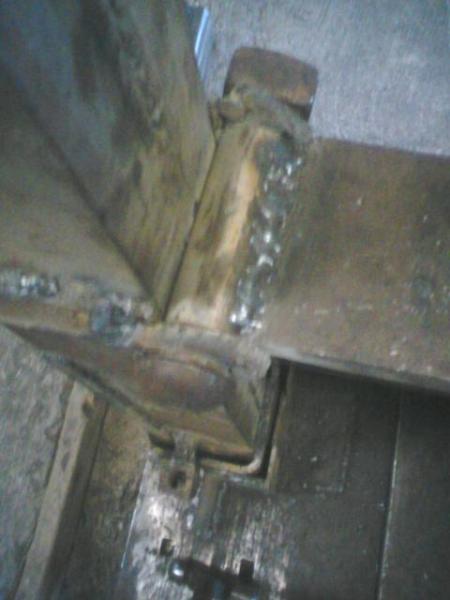
Live and learn. I know I spent 1 day with a 9" grinder smoothing out the horn, not fun. And the face would have been ground down to the table to get it smooth and even, and that was several days worth of work I never got to. Timothy Miller, you are correct sir, I most likely did not follow correct welding procedure as I am self taught and was probably too excited when I started, as well as lacking proper equipment necessary for the task at hand. I figured as much too, so I welded supporting plate around the anvil. Probably won't do much good. I don't care. At this point I would be happy to complete the main ram and drive portion of the contraption. If I ever get that far, and if the anvil fails or proves to be ineffective, I'm glad I only used 3 bolts to hold it down. And having learned much since I started, including where my junk yard is, how much oxy/acetylene as well as grinding disks costs, as well as how much cursing doesn't change existing stupid, I hope that if it does fail, I now have a better knowledge of what to do better next time. And if not, then I guess I'll just go find a big rock somewhere and just use It to hit stuff against. I know the rebound wouldn't feel right, but that's what apprentices are for, right?. All the extra fun work. I'll just tell them I know what I'm doing, it might work. I like this forum because it's a good place for information. I see these forums as a good place to bounce idea's off of random's. Helps me learn about a subject I have limited access too. Building a bad machine might help me get to building a good machine. any information is better than no information I think. I'd better get to welding. Damndable drive roller. -bruno P.S.: just realized, if it really is a cast anvil, and given I don't know proper procedure, then all the welds should knock off with a hammer, so the serviceable anvil can be saved with some hammering and minimal grinding to return it to it's previous serviceable state. LoL :P I'll wear my steel toe that day.
-
Great Idea using the razor knife handle. Nice Job. -bruno
-
JB Weld works nice, however there are many binary type epoxies out there. Some in a syringe, some in tubes and such. Even gorilla glue makes an epoxy. Most will work well with a knife if constructed properly. Can't hurt to stick at least 1 pin in it though, right ? There are even marine type epoxies out there that one would have to research more, if that sort of strength is necessary. I've even seen a friend use plumbers goop used on one occasion, when he had an unusually glue/epoxy resistant unknown plastic scales that wouldn't stick to the metal. The goop is still holding up great, hadn't budged at all with no pins in place. JB weld and a pin or two if for heavy use, has worked well for me. Even some super glue works on occasion. If you are new at knife making, other than the standard do this, that and learn it all, I'd add that any epoxy you can find at your local hardware store will be adequate for starting out with. -bruno
-
MadMike: LoL :) In Soviet Russia Anvil Pound You!! And bread line is one big circle :p LoL
-
Thanks for the lead. You guys sure are sensitive about your anvil's huh ? I just figured, leave it in the corner to collect dust, or use it for something better. I know it will get more service as part of a bigger machine than as an object in the corner. Guess that's why I'm building a Junk Yard Hammer instead of buying a nice $5000 air hammer, so I can use all the junk I haz laying around, and have the joy of deciding between bolting something up nicely or just slap some weld on there and call it good enough. :) But hey, I'm not the type to put low profile tires and big rims on a Hummer so I can drive it to the car wash. I'd rather dive bomb it into the mud and let the poor machine get some use. Thanks for the info, -Bruno
-
I'll cut a pinky off for the anvil later. Does anybody have any thoughts on a drive roller? Or are my transgressions against the Anvil kind too great to warrant anything other than scorn and hisses?
-
It wasn't that good an anvil. Cast iron and the face of it was all pitted. Don't worry, I have another one for normal pounding. I made it before I found my local scrap yard, so I used what I had at the time. I made the anvil before I had a base. Prolly bass Ackwards, but so what, I'm new at this and going at it pretty much solo.
-
Best Glue for IronWood to HardWood??
Bruno C. replied to Bruno C.'s topic in Finish and Polish for Knives
I ended up using JB weld in the new putty form that they got out now. Couldn't find the tube stuff anywhere, so I think I used it all up on the knife handle. The tung oil I have is just that little bottled stuff I find at local hardware stores. Probably not the Tung oil son_of_bluegrass is talking about, as it does dry pretty fast out here in the desert. Usually 15-30 minutes, if not sooner. I think that is the stuff I'm gonna end up using to finish the sheath. Not the optimal solution, but hey the knife itself has a couple hairlines from the failed weld (gotta finish my darned power hammer :angry: ), and is far from perfect. So, I'm gonna finish it the best I can, and send it out to my friend for 'testing'. Calling it a Beta #1. In the future there are several things I would do different with the whole process. Probably would go all synthetic for the sheath and knife handle, something like micarta or a heavy stabilized wood atleast. And I'm always in envy of those with those fancy heat treatment oven, or even the home built ones. Maybe I'll sell a knife one day :wacko: As always, it has been a learning experience, and I Thank everyone for their input. I'll try to upload a pic, after my friend gets it, if they don't mind. -Bruno -
There are plans on the internet for building a belt grinder without need for welding. Basically using square tubing and locking screws/bolts. The hardest part is finding the contact wheels and bearing gizzards for a reasonable price. I bought one of those coote beltgrinders: http://www.cootebelt...rinder.com/ <--- good design, not the cheapest, and you still need a motor, but at the time I wanted to focus on my projects without adding another one. Had money, did buy, still happy. Around $400 at time of purchase, plus another $150 for a new 220v 1HP motor. Arrg, not to mention wiring cost's... Everything is always a process :mellow: Otherwise, if I were to build one, I would look into the no weld type of grinder, as they are relatively easy to make, modifications are only limited to your imagination and funding. http://www.mickleykn...ld_grinder.html http://usaknifemaker...y-50-pages.html Some moderate googling will bring you more results on the subject. I still drool over the KMG's whenever I see one. A friend of mine, bought one of those cheap Harbor Freight , something like 4x36 belt sanders: http://www.harborfre...nder-97181.html and has had good results. Not the best thing for production type work, but nice to learn on, will do the job, with a little patience and practice. At $80, it is not a bad option, in my opinion, for learning on, or doing a small project now and again. As always, you get what you pay for. Somewhere maybe on this forum or another knifemaking forum, someone built a Japanese style grinder using 2x152 or something belts, Basically had a giant contact wheel, and only the top part is where you would make contact with the work. Something like an old timey pedal powered Stone Grinding Wheel (about the same size as one), except it had more of a tabletop design to it, with interchangable belts and a motor. I'd build me one of those if I had the materials... Can't find the website, but here are some pics I've found along the way...
-
Best Glue for IronWood to HardWood??
Bruno C. replied to Bruno C.'s topic in Finish and Polish for Knives
Thank you All for the replies. Looks like JB weld will do the trick with proper preparations. I wasn't sure about the TiteBond. I'll give it a try and see how it works. Using a wrap around the sheath didn't occur to me, since the wood I am using is really nice looking, but I will keep that in mind for future projects. I'm using a combination of Black Walnut for the main body of the sheath with some nice Red manzanita for the top portion which will house the locking mechanism. The ironwood will be more of a hidden piece, with only slight visibility, as I plan on glueing more wood onto the entire surface so I get a more of a one piece feel to it. Still need to add some beltloops, thinking about brass. All the wood I have been using has been sitting in my shop in the desert for the last 3+ years, so it is Very dry. But, none of it has been stabilized, which I'll have to look into howto for future projects. So, I was planning on using Tung Oil for a finish on the entire sheath, inside and out. Wish I did the inside first before I glued it, but this has been a sort of seat of my pants type of project, with many modifications since I started. So I was just gonna Tung Oil the heck out of the whole thing. But since, I am not using stabilized wood, and the entire knife+sheath will be traveling from the super dry desert, to basically the Ocean, I'm somewhat concerned now, with the whole mention of expansion and contraction of the woods. Would Tung oil be sufficiant ? Or should I use something else to finish the sheath ? Linseed oil or something more artificial ? I found some cool clear acrylic spray paint at home depot a while back that I used on some cow bones I found in the desert, went on easy, made it shiny, and is totally clear. Made a cool halloween mask. Thanks all for the replies. -Bruno -
Hi, I'm working on a sheath for a knife I made, and I want to incorporate a piece of iron wood (found in AZ), into the sheath. It will be a small piece that will basically be used to "catch" the point if it is re-sheathed improperly. I want to use iron wood to minimize the denting (vs. manzanita or oak), should such an action happen. It's the best I have available at the moment. Really dense, heavy stuff. My question is, what would be the best glue for a flat piece of iron wood to a flat piece of Manzanita wood (a local hard wood)? The manzanita is on the top (knife entrance?) part of the sheath, and I want to glue a piece of Iron wood on top of it. From some googling, i guess iron wood is somewhat oily, so I wasn't sure TiteBond II would work, so I was thinking JB Weld ? Only other thing I have available is Gorilla Glue. Would any of these work, or do I need something else? Does anyone have any experience with this, or these woods ? I can theoretically glue around the piece of iron wood with other wood to wood contact, but I would rather it not wiggle in the future, and I need to add another piece of manzanita on top of the iron wood. Btw: this knife is destined for a salty, watery environment. And it's oddly shaped with the need of a wood sheath, so I kind of want the wood(point catch) in there, as opposed to having it wide open and again, wiggly. Any advice would be much appreciated. Thanks, -Bruno
-
how to make a flanged mace?
Bruno C. replied to Joseph Tinsley's topic in Spears, Arrows, Pole arms, Mace/hammer etc.
Joseph, I've made a flanged mace. I thought it would be a fun project, and allowed me to test some of my skills. It took a while to make. But basically what I did, in a few "easy" steps was. 1) Forged the handle, made of some Sucker Rod, I had laying around. I used the top portion of the sucker rod, the part with threads on it, for the top so as to add weight. Added a couple twist's. 2) Made 4 flanges out of spring steel, nicely ground and shaped. 3) Made some spikes 4) Used an arc welder (6011 rod) and steady hand to weld the flanges and spike's in place. Cheating, I know. But was within my realm of equipment and knowledge. 5) I used an angle grinder to gut out the nasty weld lines, and formed it as smooth as I could without removing too much weld. 6) I heat treated the whole head in my forge. Then the handle. For strength. 7) A nice oil coat for color, and some leather to save mine tender fingers from the handling. I don't normally show my work on the internet, so this hurts like cherries. Jealousy I guess, but I get so much from this Forum, I felt the need to contribute on something. Some Pics: Weigh's about 6 pounds, but nicely balanced so it can be swung single handed. A decent temper. I've broken rocks with it, without damage. And does some nice tearing of the softer stuff. Still need to add some chain to the handle for the ultimate mace experience. :) Hope I could help. -Bruno. -
UHMW for Rusty style JYH Ram Guides
Bruno C. replied to Bruno C.'s topic in Power Hammers, Treadle Hammers, Olivers
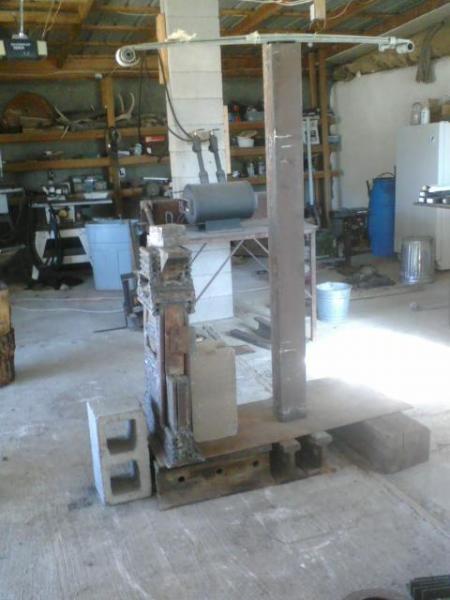
Hi Again, Changed my display name since my previous one seems to raise Moderator eyebrows, so hopefully I can get off Mod Queue. DonS, Ptree, thank you for the suggestions. 3/8" does seem a little light, and I just don't think those ebay bearing would last a few hours under all that stress. So once again my plan is being modified again and going back towards simple. Waiting on some UHMW now, and hoping I can get back working on it soon. Thanks again for the info and suggestions, -Bruno C. Formerly R.D. :) -
UHMW for Rusty style JYH Ram Guides
Bruno C. replied to Bruno C.'s topic in Power Hammers, Treadle Hammers, Olivers
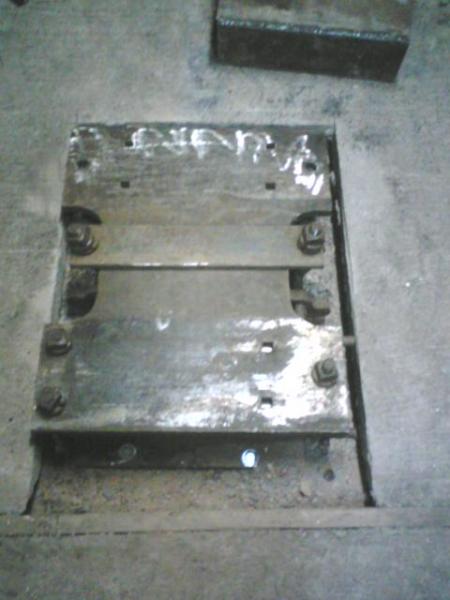
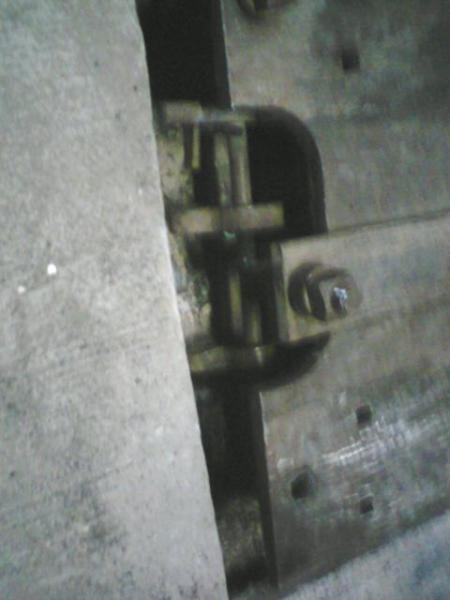
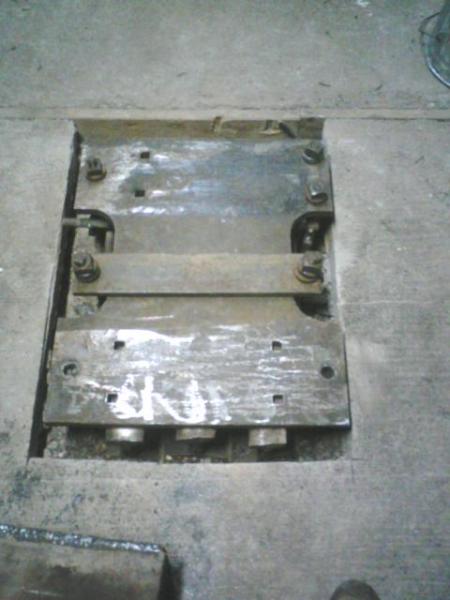
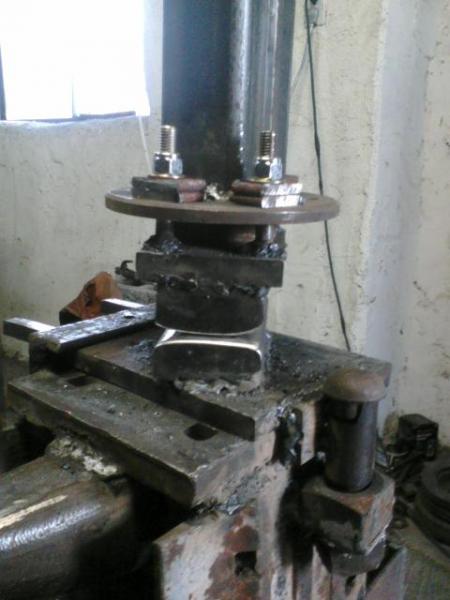
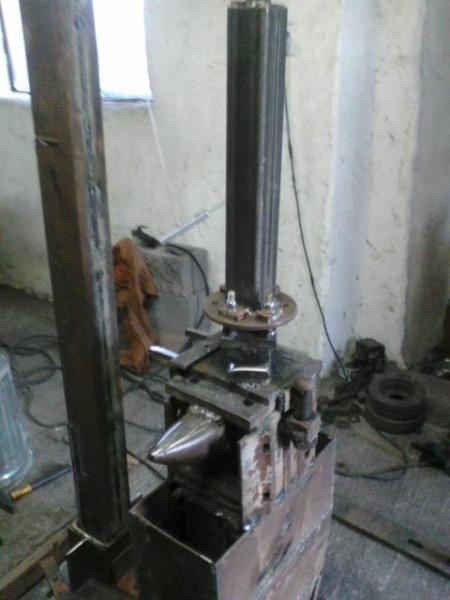
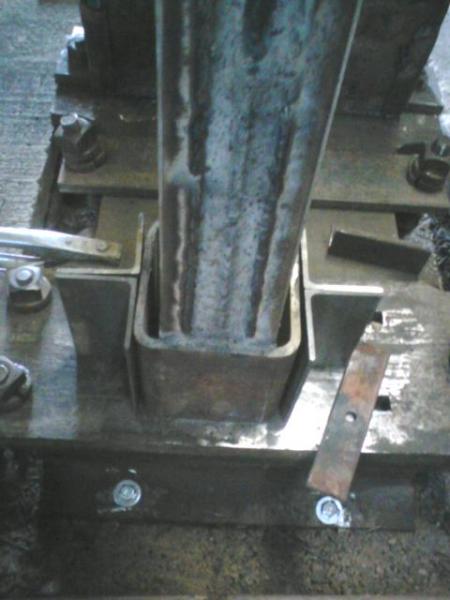
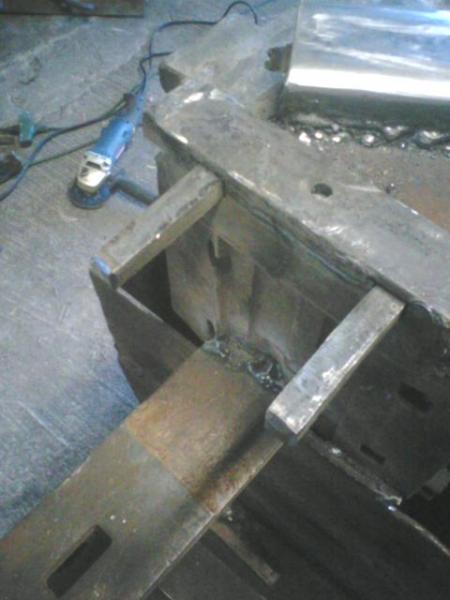
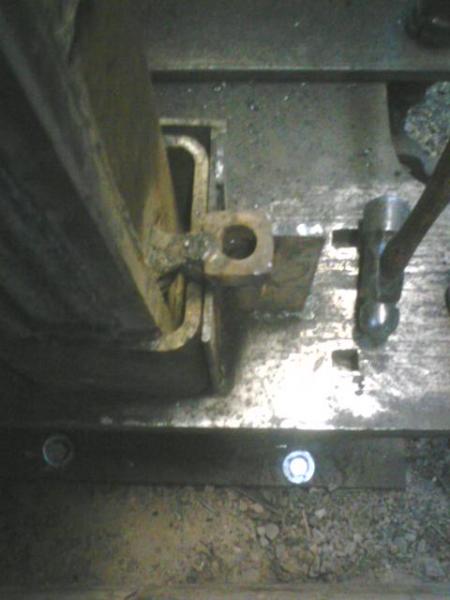
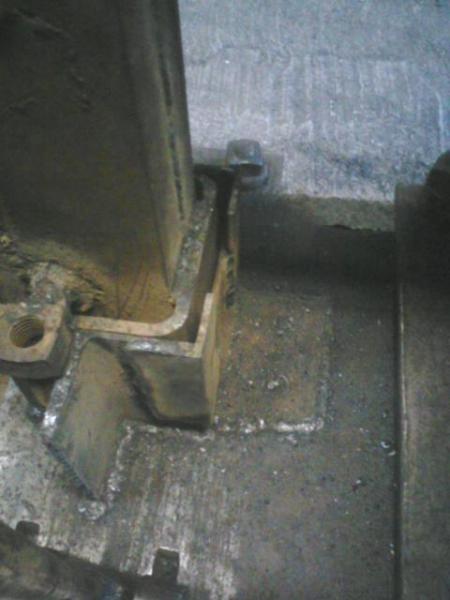
Don, Thanks very much for the images, they are a great help. Also, it never occurred to me to use less UHMW. WOW, just makes sense. My current plan was, using material I already have, to use a 9 inch piece of 4" x 1/4" thick wall square tubing, which when my ram is inserted which is made up of 3" x 1/4" thick square tubing, leaves me about 1/4" on all side with the ram in the center. works out about perfect for some 1/4" UHMW. might be a little tight though. I was gonna use 3"x9" long piece of uhmw on all sides, but your suggestion makes sense. Using a 3"x3" or a 2"x3" piece of uhmw on all sides top and bottom seems like it would create a lot less friction which is a good thing. My ram is currently contains about 18" of 3" square tubing as a usable slide area, and with a 9" ram guide, in theory I can get a maximum of of a 9" stroke, there is a little wiggle room, and I can gain another inch or two usable slide, if I shorten the die bolts I currently have on it. Do you use any lubricant, oil or otherwise with this type of setup ? Also, a question slightly off topic... The rollers on top of the ram, or the ram to spring linkage I guess, what is typically used ? A bolt/sleeve setup seems a bit to frictiony, to make up words. From my previous failure with a roller system for the ram, I purchased a bunch of 3/8" x 1" bearings from ebay. That is a 1" long bearing, with a 3/8" center whole for bolts and whatnot. These rollers happened to fit perfectly in some 1 and 5/16" pipe (1-5/16", 1-1/8" center diameter) I had laying around. with a little bit of electrical tape, the bearings made a perfect fit. So the roller is basically, a 3/8" threaded rod, with some washers and nuts in the center, and 2 of these bearings on the outsides wrapped in a light layer of electrical tape, and an end cap on both ends made up of plastic cutting board material cut with a whole saw. They are functional rollers. However, being that my ram currently weighs 65 lbs with the die attached, probably will be cut down to 55 or 60 pounds after I cut the excess off the top, I wonder if I use two of my created rollers for the linkage, how are the bearings liable to hold up ? With lifting 60+ lbs, then smacking it down on some hot metal repeatedly, I wonder if I would just eat these bearings up in short order. So, again, what do you guys typically use ? Again, thanks for the info.. tis much appreciated. This project is long overdue. -R.D. -
UHMW for Rusty style JYH Ram Guides
Bruno C. replied to Bruno C.'s topic in Power Hammers, Treadle Hammers, Olivers
Thank you for the info Gentleman, I can't wait to order some up. Seems like the ideal material. I'm hoping I can complete my long stalled JYH soon and get back to forging. Dunno why I thought I could improve a simple design with overly complicated rollers, live and learn I guess. I welcome anymore information or tips, as it does a good job keeping me up nights :) Back to riffling through the forums again... Thanks Again... -R.D. -
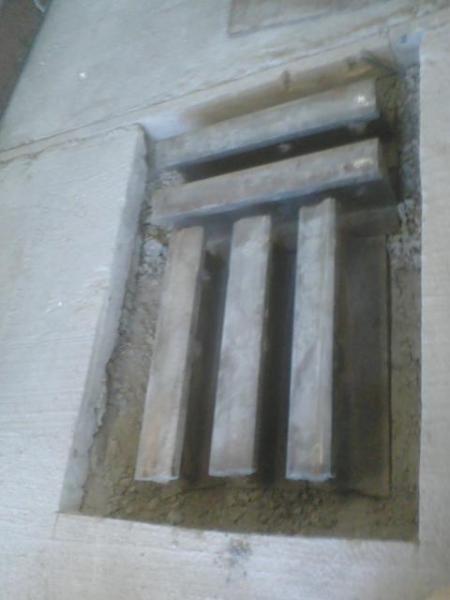
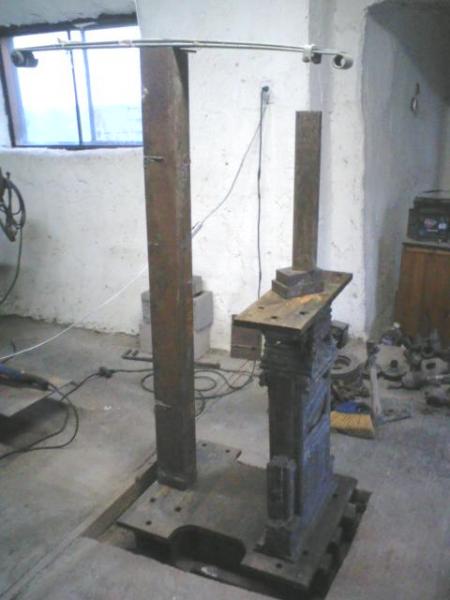
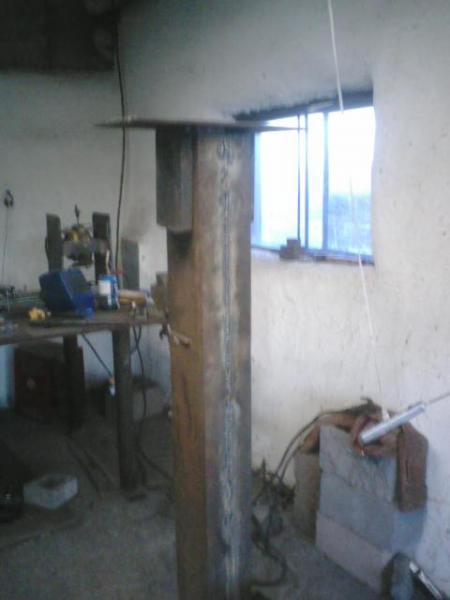
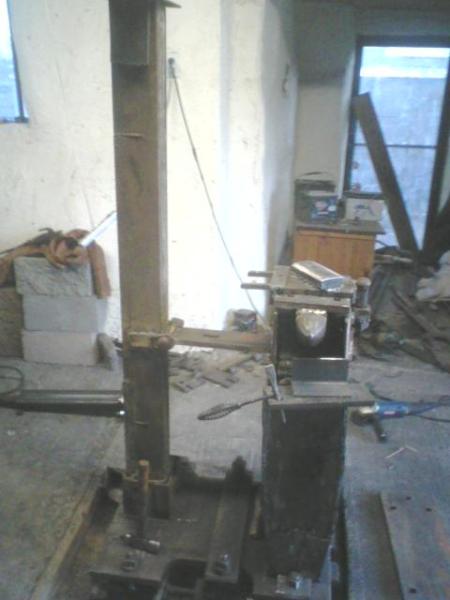
Greetings everybody, Long time troller, don't post much, but much enjoy the benefits of this forum. I was wondering, I'm building a Rusty style Power Hammer, and after a few duh moment's, and a long pause in the build, I've decided to rebuild my ram guide using UHMW plastic. It appears mcmaster-carr is a good source for the material, but they have several varieties including, Ultra-Abrasion-Resistant UHMW Polyethylene, Impact-Resistant Slippery UHMW Polyethylene, and oil filled UHMW polyethylene amongst others.... My question is to anyone with experience with JYH or UHMW, which would be better for the ram guide of the Power hammer ? What material or source have other builders used (asking you builders out there)? And what is a good thickness to use ? As in how fast does UHMW wear and degrade? I was thinking a good 1/4" would be sufficient all the way around a square iron tube, but if it wears pretty fast then maybe 1/2" thickness would be better ? I dunno, just trying to make the best purchase for my limited funds, unlike those danged bearing I bought attempting to make rollers. The rollers work fine, I just decided not to trust them for the like of my facial and cranial features I've grown accustomed to. Would hate to have one hit me in the face... A little background on my working environment: I'm working in a small garage where I do all of my grinding, cutting, torching and the like. So particulate dust is usually floating around, and I imagine will find it's way into all the tight places of the power hammer and the like. Also, as it stands right now my Ram weighs about 65 pounds, and I hope I have enough anvil for it. All bolted together to a 1" plate, bolted to 5 18" railroad tracks , bolted to two railroad ties buried in good hard desert ground. My primary purpose for this hammer will be for Pattern welding, I'm hoping to be able to get a 4" long x 3" tall stack welded together and flatish in 10 minutes as opposed to 3 hours. So, there will also be lots of scale and flux floating around, likely getting into the UHMW I'm sure. Also, as a side note I have one 1/2 horsepower washing machine motor, and one 3/4 horsepower old (30+ year, 3450 rpm) motor which I think works. I imagine neither or these are strong enough for my 65 Lbs ram, but I will see. I'm more interested in hard,solid consistent hits at less than 100bpm. Not that interested in a high BPM at the moment. But if anyone could recommend a good motor to use for the ram weight, I'll keep a look out. I'm limited to 220v 100amp max in my fuse box. Anyways, any input would be much appreciated. Thanks in advance. :) -R.D.
-
Thanks for the info, very close to what I am looking for... Google is usefull only 30% of the time anymore, so I was hoping more towards good user feedback.. Hard to trust anyone online anymore, or ever for that matter. Those chosera stones are real expensive, hope I will be in real need of one those high grits in future. Need to find some cheaper ones though... Amazon works, but **** its hard to find one like the one that walked away with someone, for cheap anyways. ***** it, wish I bought 10 of those when I found them... Anyways, I appreciate the info and welcome more thoughts on the subject. -R.D.
-
Hi, Long time noob here, with my first post. Someone walked off with my sharpening stone >:-[. So I need a new one, or several. The one I lost was a 300/400 grit, I believe, water stone. I'm looking for a good, reliable, trusted, preferably online, source of sharpening stones in various grits from 200 - 1000+. My 300 grit stone that is now lost to me worked well for most tasks, was quick and easy, good 2" x 6" x 1" stone. got it for 3 bucks when some shop was going out of business. Don't know where to get a new one like that, and I found a nice oil stone of some higher grit which works real nice, but not good for most of my now dull kitchen knives. I get bored easily so a nice 300 grit stone is handy for tedious tasks. So, anyone know a good place online with good variety where I can get a good water and or wet stone of with a good large dimension such as 2"x6" or longer for a reasonable price ? Thanks, -R.D.
-
Nice work. Has a glassy appearance. Looks cool. -R.D. aka. other guy <----- Nooob!!!