

DocJohnson
-
Posts
30 -
Joined
-
Last visited
Content Type
Profiles
Forums
Articles
Gallery
Downloads
Events
Everything posted by DocJohnson
-
MrDarkNebula, Thanks for the reassurance, and thank you for being one of those who will keep the craft alive into the future, Doc
-
JJordan, Nice tongs, much like some I have made, and still use. MrDarkNebula, Your simple forge looks perfectly functional, but all the leaves and wood scrap beneath and around it cause me some concern. I know it would be better, to not burn down the building. Respectfully, Doc Johnson
-
Smiths near Minneapolis?
DocJohnson replied to antigoth24's topic in Blacksmithing, General Discussion
The Guild of Metalsmiths is an active local organization in the Twin Cities area. Check www.metalsmith.org -
Blacksmithing Classes in Minneapolis?
DocJohnson replied to a topic in Blacksmithing, General Discussion
Daniel, Check the Guild of Metalsmith's website at <metalsmith.org> Classes are held mostly during the school year, but there are threshing shows during the summer, and a corn feed in August. The group is quite active and people are welcoming and helpful. I'd say welcome to Minneapolis, but being from St. Paul, I don't go there, so, welcome to Minnesota! Doc Johnson -
The Same Old Questions And Comments?
DocJohnson replied to thingmaker3's topic in Blacksmithing, General Discussion
Another I have heard is, "Is that real, or did some one make it?" On several occasions, I have heard a parent tell their child that, "You had better do your school work or you will end up doing a job like this." I will respond to the child saying, "And if you would like to this, you need math, geometry, drafting, art, and metallurgy, at the very least. So work hard in school, it is worth it." I think some of the folks that refer to their grandfathers as being blacksmiths, may just be trying to connect in some way with the smith. I will ask some of them if their grandfather did his work in the barn, or did he have an outbuilding? Their answer can be telling. I had two great grandfathers that actually were blacksmiths. They worked in the big Great Northern Railway shops, steam hammers and such. I doubt they ever made a nail. It was, at times, difficult to remain in that character, circa 1827, with the landing pattern of the international airport right overhead. I am loud, but not that loud. And a big thank you to all those that do demonstrate smithing, DocJohnson -
Best way to heat soldering coppers/irons
DocJohnson replied to Armand Tatro's topic in Copper Alloys
Gotta love the corn cob handle on the soldering copper in the first picture! -
Also check the ABANA website affiliate list, <abana.org> the Badger Blacksmiths list one of their contacts in Eau Claire.
-
2 years and still no anvil
DocJohnson replied to kalaharijay's topic in Anvils, Swage Blocks, and Mandrels
In addition to what all the others have said, make the connection with the local organization. The Guild of Metalsmiths in Minnesota has its Fall Conference, The Madness, in September. That takes place a few miles south of Hastings, MN. On line it is metalsmith.org. Upper Midwest Blacksmithing Association is umbaonline.org. You will find people who are like minded, with skill levels varying from just learning which end of the hammer to pick up, to world class artists and craftsmen. There are lots of classes and other opportunities for learning. If you get to the Madness, bring a camera and a note pad, the conference gallery will provide inspiration to last a year, and perhaps that will reduce your frustration. Best of luck in your search. If you get to the conference, say hello. I'm a short round guy with a white beard, and while there may be others of the sort, I think I am the only one with three gold earring in the left ear, DocJohnson -
I have seen it done quite easily by heating the tubing, slipping it over a piece of pipe, and then twisting. The pipe keeps the tubing from collapsing, though as it is stretching, the flats will come in a little, giving a bit of a fluted look. The pipe can be held in a vise with a stand positioned so that when you slip the tubing over the pipe,it will slide into the twisting wrench on the one end. Have the other twisting wrench ready to do the twist. Remember also that as it cools, the tubing will shrink, don't want to have it stick on the pipe, so get it done quickly and get it off. you might want to run through it cold a couple times. Good luck with the project, Doc Johnson
-
Musika, I'd like to ad to the other's answers to your question. In using charcoal versus wood, charcoal allows for a more closely packed fire, which is necessary to heat the stock. A wood fire burning enough carbon to attain necessary temperatures would be large enough that one could not work near it. I know some do small things that way, I have too. Charcoal to some extent, also acts as its own refractory. A good fire made of it will burn steel just as easily as a coal fire. Charcoal was the earliest of fuels used in metalworking. It was called "coal." People who made charcoal were called colliers. Much of the forest in Europe was cut down for making charcoal. Forests in the new world were also used extensively. "Mineral coal" was mined from the surface and used, but it was not until the centrifugal governor was used to regulate the steam engine, allowing water to be pumped from deeper mines, that mineral coal was used on an industrial scale. For me, learning the history of the technology is a big part of what I enjoy about smithing. I hope this helps, DocJohnson
-
How do you forge items with smooth surface
DocJohnson replied to ichudov's topic in Blacksmithing, General Discussion
A smith can achieve quite smooth surfaces with just the hammer. It require practice, some more practice, then some repetition. I see beginning smiths try to chase the hot metal with the hammer, swinging through a different arc with each blow. Imagine your hand hammer as being the ram of a power hammer, striking the blow in the same place each time. Then move the hot metal beneath the hammer. Work to do the basic shaping at the highest part of a heat, then as the heat drops, use lighter overlapping blows to smooth and straighten the piece with every heat. Note the term, "overlapping blows." Try these things with a piece of scrap wood to see the effect of the hammer blows on the wood. Most smiths will not make swords, but they will do tapers and scrolling. Smooth even tapers make scrolling easier. Even scrolls fit into a design better. Every project is built using basic skills, and building on them. Best wishes, I hope these comments are useful. DocJohnson -
I suspect you will get many opinions on this question. Blacksmiths learn to position themselves to get the job done. For drawing, using the horn or a well radiused anvil edge works well. After 18 years I am still learning how to use my cross pein for forging. I have decided accuracy is more important to me than hammer collecting. The collecting may be important to others though, and I admit to having more than a dozen. In the mean time, welcome, and enjoy the ride!
-
Thomas Dean and Sask Mark, Thank you for providing the DOB of my Hay Budden. Its ring was piercing until I made a proper stand and clamped it down well. I do love it. I now also have a 260# Old World Anvil. The H-B will travel and holds all my hardy tools. It is really handy having two anvils when going from one process to another. Again, thanks, DocJohnson
-
I am the current owner of H-B A35186. It is 125#, and in great shape. I gave $50 for it about 17 years ago. I do not know the age, but it is older than I and will out live me, just like my Little Giant.
-
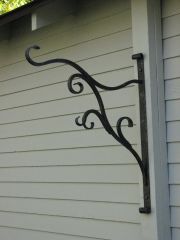 mortice and tenon top member, hand made rivit assembly, The customer wanted two like the one I have in my yard, as mine was freehand, the second pair was more difficult. I must remember to take notes and measurements.
 -
 Filework and pattern detail
 -
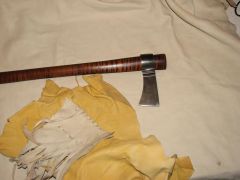 damscus trade ax by Jim Moenck and DocJohnson
 -
 picture showing all surfaces are textured
 -
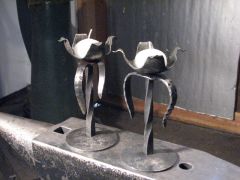 stems are tapered, mortise and tenon joinery on each end
 -
Seems it did not paste the thumbnail, I'll try again.
-
markb had asked to see a picture of some Altoids tins. It has taken me since 6-20 to get the picture and figure out how to post it.
-
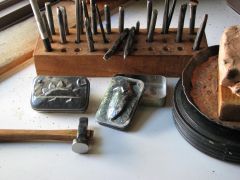 Altoids tins, tools, hammer, bowl with plastacine
 -
Grant, With a bit of a grin, I note that unwanted marks on my work are due to errant blows or a misplaced tool. I suspect I will always need more practice. I am in no way, an expert. As far as finishing the tools, I use progressively finer grit wet or dry paper, hand sanding, to take out scratches. I use 320, 400, 600, looking for scratches in good light before proceeding to the next finer grit. I then use a cotton polishing wheel with a fresh charge of polishing compound. The six inch wheel is mounted on one side of a bench grinder. I have a "rake" to clean any grit out of this wheel, before I put on the polishing compound. In a few moments I have a mirror polish that does not transfer scratch marks and that will move over the work with less friction. The configuration of the working ends of any tool is very important and I rarely see it discussed. A chisel with an uneven cross section will tend to move sideways. To check for symmetry, I use a well lighted, white background, and keeping the tool out of the light, so I see just its dark outline. I look at the sides and edges for flat spots or other errors. If I am intentionally making an asymmetric tool, I check it in the same way. My first attempt at repousse was a result of a workshop taught by Gene Olson from Elk River, Minnesota. We made tools and decorated the lids of Altoids tins. I have given many of them as gifts, resulting in people giving me all the tins they have been saving. I use hard plasticine for a matrix or backing material for most work, saving the pitch for finer lines. My thanks to Gene. Grant, I hope this helps, DocJohnson
-
I use propane from a 100 pound tank, keeping a 30 pounder filled for a spare. I keep two 35 gallon plastic, wheeled trash cans with lids filled with coal, several five gallon plastic buckets filled with metalurgical coke purchased a few years back, and about forty pounds of lump hardwood charcoal in the shed, which I use mostly for cooking various critters.
-
How about: "Ever since I started dying my beard white, I haven't been able to stop." or; "It's good enough for who it's for."