
ornametalsmith
-
Posts
221 -
Joined
-
Last visited
Content Type
Profiles
Forums
Articles
Gallery
Downloads
Events
Everything posted by ornametalsmith
-
I just brought these two foundry furnaces home this weekend. The lil one is a commercial model, called a Foundryette. And I made the Beer Keg model.
-
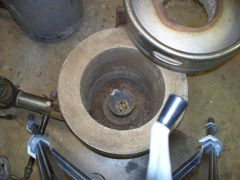 10" dia. opening. it has the number 2 crucible in it for scale.
 -
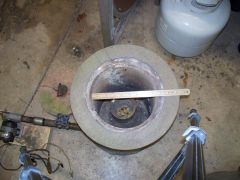 8 1/2" dia. opening in the small one. It has a number 2 crucible.
 -
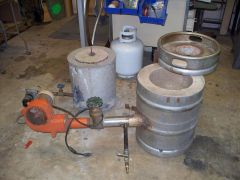 Look what followed me home
 -
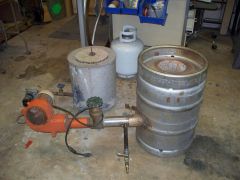 Two foundry furnaces. Lil one is a commercial model, called a Foundryette. And I made the Beer Keg model.
 -

Kinyon hammer countdown.
ornametalsmith replied to Torin's topic in Power Hammers, Treadle Hammers, Olivers
Couldn't agree more......these drills make a project like this.....almost easy. The first hammer I built....all I used was a drill press....the next few a friend rented a magnadrill and I was a "done deal". It is Soooooo much easier to take the drill to the Huge metal parts....than the other way around. AND.....those cutters are FAST. They aren't that much to rent, I'd highly recommend it to anyone thinking about fabbing with Large metal components. -
Kinyon hammer countdown.
ornametalsmith replied to Torin's topic in Power Hammers, Treadle Hammers, Olivers
Torin, great to follow along with your progress. One lil tip I would pass along, that helped me......is that I drilled the holes into the Hammer Head stock the size that was required to tap for the bolts that I used to hold the dies on before I cut off the slabs that I used to make my die sets.......then all I had to do was redrill those in the slabs to accommodate the size bolts after cutting the slabs from the HEAD stock. I of course took into account the number of "slab slices" that I planned to cut off and went deeper to leave some for the tapping. This made sure all the holes lined up and saved some time. I actually got a separate piece of the 4"x4" and have it predrilled so I can just cut off more 1/2" slabs for future sets of dies. AND even though I originally followed the simple air hammer plans and drilled 4 holes........Chris Ray convinced me that I'd only really need two holes....not four. Made for quicker change out of die sets. I've found that the two bolts, w/lock washers, are more than enough and never work lose, even when doing cold surface texturing on mild steel. thanks for sharing the "making of your hammer". inspirational. -
4 way valve question.....
ornametalsmith replied to ornametalsmith's topic in Power Hammers, Treadle Hammers, Olivers
just a quick note..........I appreciate ALL the feedback that was offered. Took the valve over to a pneumatics guy.............and after a lil tweakin.....got the hammer back to working order, last night. I'd thought about takin this opportunity to try the Mark Linn VERSION of the plumbing....but after being without the hammer for a bit.......and having work that needs to get done..........well I'm going to have to wait til later to try that. Or maybe just do that on the other hammer that I've got almost completed. The frames done, all it needs is the pneumatic parts. That way I've always got a working hammer and won't have any down time. thanks again.........what a great resource this site is. FWIW, WRH51......mines plumbed the same as the Simple Air Hammer plans. This hammers been running fine with that configuration, for the last 12 years. In hind sight I'm pleased that the 4 way valve lasted that long. I want to try the reversed method.....but will have to wait til I plumb the new frame. Got a nice SMC valve that I believe will let me reverse it. :D -
Kinyon hammer countdown.
ornametalsmith replied to Torin's topic in Power Hammers, Treadle Hammers, Olivers
Torin, great to be able to follow your progress. Maybe it'll motivate me to finish the I-beam one I started years ago. -
4 way valve question.....
ornametalsmith replied to ornametalsmith's topic in Power Hammers, Treadle Hammers, Olivers
John, dablacksmit and arftist.......I appreciate the input. I'd hoped I could learn a lil more about the pneumatic components..........but.......guess I'll just have to take it to the pro. It was worth a shot.. thanks again, -
4 way valve question.....
ornametalsmith replied to ornametalsmith's topic in Power Hammers, Treadle Hammers, Olivers
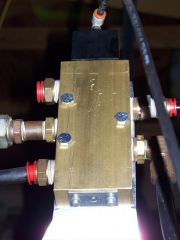
Thanks, Guys. I downloaded a Air-Mite pdf.....looks like mine is the #V4416, it's a single port 4 way valve. The D-body type. Here's a shot of mine on the hammer: -
 Simple air hammer valve.
 -
 Simple air hammer valve.
 -
4 way valve question.....
ornametalsmith replied to ornametalsmith's topic in Power Hammers, Treadle Hammers, Olivers
thanks for the reply, Arftist. Let's see: the 4 way valve is a ROTORAM valve. By AIR-MITE Devices,Inc. Not sure of the model # but if I find it I'll post it later. The air is plumbed exactly as described in the Simple Air Hammer plans from Ron Kinyon. It IS a shop made hammer. No transposed hoses....took old 4 way valve out......installed new one. I've used this type of AIR-MITE valve on another hammer that I built years ago....but as I said........ran into the same problem .....took the valve back to the supplier and he "made an adjustment" so that it could control the action via the exhaust(footpedal). I can actually use the hammer.....and control the hammer blow by controlling the "air pressure IN". Without the footpedal even attached. Naturally it doesn't have the control I was accustomed to. I've given thought to installing a "ball valve" footpedal inline to control the air in. But I'd really just like to go back to the standard plumbing. I know this info may not help at all...........if so....I understand. I was hoping that with all the folks here......that have built these simple air hammers.....someone may have run into the same problem. -
4 way valve question.....
ornametalsmith replied to ornametalsmith's topic in Power Hammers, Treadle Hammers, Olivers
hmmmmmmmmm, I was always taught that if your not getting good answers.....ask better questions. :D soooooo I'll try again.....are there any pneumatic wizards in the group? thanks in advance........ -
fwiw, The technology works, there are many water torches used in the jewelry field, which was where I first saw the Aqua Torch(mid 80's). They don't use "tons of electricity". Can you get your O/A torch to burn at almost 5800 degrees? Mine won't. :confused: Flame temperatures * 2200
-
Got a question for the pneumatic wizards in the group. MY 4 way valve went out on my Simple Air hammer .....after 12 years . Got a NEW one.......installed it......and for some reason it won't let me control the hammer action by the Exhaust. I can make the head cycle by adjusting the amount of air pressure IN.........but I want to control it by the footpedal/exhaust. I had this happen a LONG time ago on another hammer I built and I remember taking the valve back to the supplier and he "adjusted" it so that it did enable me to control that hammer with the exhaust. So..... MY question.....I removed the bottom access plate which only exposed a "compression spring on a post"....nothing to adjust. The top side of the valve is where the air line to the 3 way valve that changes the direction of the head IS. IS there something on that side that I should be able to adjust? Or is the fix somewhere else. I'd appreciate any insight. I've got a "get together " planned for the "international blacksmiths day" and I'd really like to have this TOYL working normally. As usual.......Murphy came.....and he wasn't invited. :D
-
Just thought I'd toss this out there: YouTube - Hydrogen Technology And their website, which has other interesting videos: Hydrogen Technology Applications, Inc. I've got an invitation to go down and Play with the TOYLS.......I'll post a first hand experience report afterwards.
-
a little help for school
ornametalsmith replied to noob blacksmith's topic in Blacksmithing, General Discussion
NOMMA.org might be helpful. fwiw, I go by "ornamental metalsmith" good luck with your paper.......It would be neat to see what you come up with. -
Some images of projects completed
ornametalsmith replied to AdrianWood's topic in Metal Sculpture & Carvings
I always enjoy seeing your work, Adrian. Beautimous as usual. The designs and execution is top shelf. thanks for sharing... -
Elmer Roush Webcast
ornametalsmith replied to primtechsmith's topic in Blacksmithing, General Discussion
Peyton, really enjoyed the webcast. great demos. 3 1/2 hours just melted away. -
Elmer Roush Webcast
ornametalsmith replied to primtechsmith's topic in Blacksmithing, General Discussion
I've got the video playin in a Quicktime window.....is there supposed to be sound? I've got my volumes UP....:mad: ;) -
BLACKSMITH DAY MAY 24 th 2008
ornametalsmith replied to yesteryearforge's topic in Blacksmithing, General Discussion
sounds like a fun time, Mike. I already had a "play day" planned at my shop for the 24th when I saw Johan's post about the International Blacksmithing Day. Figured it was some kinda divine intervention of the Smithin Gods. Think this is a great idea and hope it becomes an annual event. Anyone else in the Central FL area? as it stands now we'll be doing some inflating...(like E. Brim pillows) some large scaled foldforming.....some playing with an english wheel. A lost wax casting demo, a patina/finish demo.......and I've forgotten what else LOL:D -
Frosty, it's great to see your V.V. forge design. Really like the "jack" height adjustment. I've also been wanting to build one for a few years. I first got to work with one at Enrique's shop in '01. His didn't have the jack, the burner top was VERY heavy and he used the overhead crane to lift it for reconfiguring. And his had two "rows" of burners(6 total), three in each row. The burners were the Sandia style burners, that preheated the intake. You could run all or any combination of burners depending upon the need. I saw the incredible potential of this design, and have wanted one ever since. I'm glad I've waited because the burners are so much simplier to make now. AND now that I see your modifications.........ya got me thinking about building it again. Thanks for sharing and the inspiration. Can't wait to see yours in action. Happy Hammering
-
cost estimate for railing
ornametalsmith replied to thomastaranowski's topic in Blacksmithing, General Discussion
With all due respect....that question.....has to many variables. Be about the same as walking on to a car lot and asking......so........what'd the goin rate of an automobile?...... They have "something for every budget" LOL One man's "basic" is another man's "decorative". and visa versa.... Maybe we could be more helpful if we knew what your design was. And material.