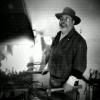
November 13, 201015 yr Hello All. To start I want to apologias for the size of the pictures, and to see the videos you need to click the linked words. And although we have been mistaken for brothers, we are not, and that is Scott in the pics. I started Blacksmithing using coal. I love the smell, feel, sound of it burning, pretty much everything to do with using it, including the dust. The downside to coal up here is how hard it is to acquire enough to use it on a daily basis without it costing an arm and leg or driving for hours and having to buy tonns at a time. I can buy it at a store but that is 55$ per 50lbs. So this problem has made me think and then switch to gas. A fellow local Blacksmith, Scott, has shown me his in action. With the research on the net and here on IFI as well as Scott, I started to build my gasser. Since I work in a steel shop I got alot of the parts free. I used 3/16 sheet cutoffs, thinnest we had, some 3"X3" 1"X1" angle, and 4 nuts and bolts for the legs. The forge I put together and welded at work since we were slow. The forge turned out to be 14"X18". I went to a local refractory company and talked with them about getting some refractory board and how much it would cost, my lucky day. Turns out that they had 4 sheets of board 24"X36"X3", I could have them for free if the thickness was ok (I had wanted 2" thick). Well, for an extra cost of nothing and an over all cost of nothing to get the 3", I said sure. Next I needed to build my burner. I chose A Ron Reil Type Burner with Gary Overman modifications. Between them both I think I found what would work best for me and my skill level. Scott and I were able to get together on fri to get all of the parts together. We drilled a #60 (0.040") orifice in the nipple. At this point I would like to say that without Scotts help I would not be able to do this. I suggest that if you are not a fully loaded shop find friends or other smiths to give a hand. We attached the top bell, nipple and bottom bell (flare) together and welded the nipple onto the top of the large bell. . As you can see in the pic, there are 2 rings on the nipple, these are washers I used to steady the burner when down the hole into the forge. You can also see little tabs at the bottom of the hole, these stop the burner from falling into the forge. The piece beside is the cutout of the fire board for the burner. The burner itself when seated is aprox. 3/8 - 1/2" back into the board, this is to protect the "flare" end. After the welds had cooled we attached the fittings to the hose and Acct regulator. At this point we were ready to test fire the burner. With the test fire a success and no leaks found and all equipment working it was time to try it in the forge. After the forge test we took out the inline valve as it was not working perfect. During the firing there was alot of cracking and pinging noise that turned out to be the board. I have little cracks but nothing serious or any chunks coming off. We found that the design for the back does not work and allows flame out the top, this I will fix by removing 1/8" of the steel sides to allow a flush fit up. Today is sat and I will be moving this new forge into my shop and using it. I hope to add more to this post on how this day goes. Thanks for having a read.
November 13, 201015 yr Looks good Dennis. I will be following your progress as I will probably be building a gasser in the not-too-distant future. By the way, where's all the snow? We've had 2 heavy snowfalls already.
November 13, 201015 yr Lookin' sharp, Dennis! If I can make a suggestion, coat the board with a few coats of high-temp cement wash (unless you have plans for ITC or satanite or something), letting it dry in between. This should provide a harder shell so accidentally poking something into the side is less damaging and (if I'm interpreting things right) act as a tension binder, reducing the chance of further cracking (sort of like shot-peening for metals). Mark- you got snow already? We're still green (well, gray/brown) here in 'Toba.
November 13, 201015 yr Yeah, we've had probably about 1 1/2 feet of snow so far. There were guys snowmobiling on Thursday.
November 13, 201015 yr Dennis, The new forge looks great! Good luck with it. Hopefully I will always be able to get coal but understand that changes happen. Thanks for posting the pics and your work steps. Mark<><
November 14, 201015 yr Looks good Dennis. There's a pretty good chance the cast iron bell reducer you're using for a flare is going to melt sooner than later. Have you thought about setting the forge so the burner's horizontal? While my forges have vertical down burners I really liked the horizontal burner forges I've used. About using the acet reg. Unless it's rated for propane it won't last. Propane is much more reactive than acet or methane and WILL cause the diaphram in the reg to "rot" and fail. Same for the hoses, make sure they're propane rated. Action pics Please. Frosty the Lucky.
November 21, 201015 yr Author As Per Frosty's request, I have added 2 more vids of the forge going and what I worked on. I will say that once you get a piece to temp and work it, getting it back up to working temp is easy. I have also found that I do not get scale on my pieces. This leads me to believe that in my forge I am burning all the oxygen in the interior atmosphere and during the mix/burn. Am I right? Toreus, I am looking into types of coatings I can use/ best suited, for the board I am using. Thanks for the suggestion. I have noticed some cracking on the surface. Since I don't know how to embed the vids, here are the links (edit: wow just putting a link embeds)..... enjoy and do respond please if you have anything to say or add. I have thick skin and have a special place I can go to and cry in private LOL
November 21, 201015 yr Hey guy, nice little forge. If you are frosting your tanks up there are a couple solutions. raise the temp by putting the tank in a bucket of water, or increase the available gas. I use 2 small tanks at the same time and don't have a problem with frost. Also I just coated a couple forges with ITC and recommend it, but it is expensive. and you will want extra for maintenance. Best price I could find was at seattle pottery supply. http://www.seattlepotterysupply.com/ I noticed faster heating in mine once I added it. Good luck!
November 22, 201015 yr Kudos to you Dennis - your design looks great and of course the cost factor makes it a beautiful thing that you have created. Please let us see more as you do the inner coating and let us know about how it handles your work versus using the coal. Tried to use coal here but my neighbors couldn't handle it ... comes from living in the city. Going to build a gasser myself soon. Your work is always inspirational as you seem to do the familiar in an unconventional way.
November 22, 201015 yr Way to go Dennis! Looks great! I love the videos. I am going to have to learn also at some time how to post them too. On my gas forges I find if I crack the back open it will reduce the amount of dragons breath you get in the front. I think you will find having a gas forge will be more convenient because you can just shut it off go do something for the wife and then come back and turn on and go right to work.
November 22, 201015 yr As Per Frosty's request, I have added 2 more vids of the forge going and what I worked on. I will say that once you get a piece to temp and work it, getting it back up to working temp is easy. I have also found that I do not get scale on my pieces. This leads me to believe that in my forge I am burning all the oxygen in the interior atmosphere and during the mix/burn. Am I right? 3" thick board for free ??? If I weren't so jealous I would say thats a great looking forge and you did a really nice job on the shell. I would switch back to coal any day but like you, practical considerations force me to use gas. If you aren't getting much scale then you are running neutral or slightly rich. From the video I would say slightly rich but it's hard to tell. Doesn't matter much either way so long as you get the temps you want. Like everyone is saying, you definitely want to coat the inside with ITC100. Im guessing you got something like kaobaord. That stuff doesn't do well when directly exposed to combustion gases. ITC 100 does make a significant difference to the performance of the forge too. The cost of the coating will repay itself in savings on gas. The work rhythm with gas is quite different from coal. There is much less pressure to get things done in one heat. It's nothing to pop the piece back in the gasser to bring it back up to temp. IMO with propane, it's the slow leaks that are most dangerous. Propane is heavier than air and has a rather wide ignition range. A leak can pool on the floor or even in a cavity under the house and then suddenly 'splode. In addition to checking for leaks, I like to keep a fan blowing to disperse anything that manages to escape.
November 22, 201015 yr Author Thanks for the replys guys. Maddog, I like to keep a door open (seen in vid) to make sure I have good air flow and I hope that will help if I get any leaks, but I will check the connections periodically, thanks. The board is not a kaoboard but a cement like board, cuts easy with a table saw, my friend (seen in one of pics) uses the kaoboard and his is fibrous. I will post a close up pic of side shot of some of the board. I am also going to be looking into coatings asap. I still have a few bags of coal left as well as buckets of coke, but those I will hold onto for special days and when I go demoing, but I do miss the smell of a coal fire. HWH11, Thats another thing I found with the gas forge, I can leave and come back and continue. Now, thats not to say I can't do that with coal, but with coal I use up precious fuel while it is in holding and then if it goes out I am at the start again. I have my back closed right off at the moment, I have some pieces for openings so that I can do longer work, but I just keep it sealed. Tim McCoy, My neighbors are cool with me using coal, just harder and more expensive now to obtain. I am not rich with $$, as most I think in these times, but I have brain's oozing with ideas so I think cheap and what will work hence my home made forge with the high efficiency furnace blower for a fan, and a home made anvil (pics are gone). Yeah, I "do the familiar in an unconventional way". Teenylittlemetalguy, I'd try the tank in the water thing but up here it is now freezing winter, -20+C, so too cold to keep things in water. Might have to look at connecting tanks together. Frosty, How is it working with the supply coming in on the side, do you have pics of yours to show?
November 22, 201015 yr Thanks for the replys guys. Teenylittlemetalguy, I'd try the tank in the water thing but up here it is now freezing winter, -20+C, so too cold to keep things in water. Might have to look at connecting tanks together. Frosty, How is it working with the supply coming in on the side, do you have pics of yours to show? Looks good burning Dennis. The dragon's breath shows it burning slightly rich (reducing) so there's no surprise it isn't scaling in the forge. Keeping the door open when in use is a good idea as it's making a little more CO than is good for you. I've put pics of my forge up before but here's to NOT making you search for one. I just tried several times and don't know if any got loaded, it doesn't look like it. I wonder what's up with my system, it won't open a lot of the pics either. darn! Frosty the Lucky.
November 22, 201015 yr Thanks for the replys guys. Teenylittlemetalguy, I'd try the tank in the water thing but up here it is now freezing winter, -20+C, so too cold to keep things in water. Might have to look at connecting tanks together. Frosty, How is it working with the supply coming in on the side, do you have pics of yours to show? Looks good burning Dennis. The dragon's breath shows it burning slightly rich (reducing) so there's no surprise it isn't scaling in the forge. Keeping the door open when in use is a good idea as it's making a little more CO than is good for you. I've put pics of my forge up before but here's to NOT making you search for one. I just tried several times and don't know if any got loaded, it doesn't look like it. I wonder what's up with my system, it won't open a lot of the pics either. darn! Frosty the Lucky.
November 23, 201015 yr Looks good burning Dennis. The dragon's breath shows it burning slightly rich (reducing) so there's no surprise it isn't scaling in the forge. Keeping the door open when in use is a good idea as it's making a little more CO than is good for you. I've put pics of my forge up before but here's to NOT making you search for one. I just tried several times and don't know if any got loaded, it doesn't look like it. I wonder what's up with my system, it won't open a lot of the pics either. darn! Frosty the Lucky. Frosty, thanks for taking the trouble. Posting PIX on this forum is a PITA. How are you retaining the fire brick in your roof? It looks like they are clamped. I'd like to know how well that is holdin up.
Join the conversation
You can post now and register later. If you have an account, sign in now to post with your account.