October 22, 20178 yr 1) Viking style hammer (17 ounce, 1045) 2) Mini hammer (in process, will do cross peen on back side, 1018) for a 4 year old 3) large Japanese style bladesmithing hammer (head is 6” x 1 1/2”, 1045)
October 22, 20178 yr Author Two more shots....simple forms but I have to start somewhere relatively easy!
October 24, 20178 yr Author Thanks. Spent tonight trying again to forge weld.....pretty sure that it is some form of witchcraft!
October 24, 20178 yr Get someone from the ABANA affiliate up there to show you how. MUCH easier and faster than to try to figure it out on your own---and also the "traditional" way this knowledge was passed on.
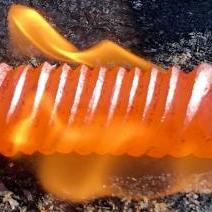
October 24, 20178 yr Author Good idea, Thomas. I feel as if my NC Tools gas forge has a little trouble getting up to the necessary heat (barely get past orange) but I can get partial welds so maybe that isn’t the issue.
October 24, 20178 yr If your forge is running a bit cold it can be really tough to weld mild steel in my experience. Try welding high carbon. Really clean your surfaces, flux as soon as you get a hint of color in the metal. Adjust your flame to be reducing, and don't bash the two pieces together on the first weld pass. A lighter tap should be all you need initially. Oh, nice hammers. How have you been quenching your 1045? I used to use water, but have had a couple crack or surface check recently (even after a normalizing pass).
October 24, 20178 yr Latticino the 1045 that quench cracked did it happen right at the time of the quench or later if not right at the quench how long after? could you have tempered before the crack? I guess I am hijacking, really curious I have had 4140 crack and some that was fine after water quenches. MillwakeeJon very nice hammers for the first 3.
October 24, 20178 yr Author Thanks for the nice comments. I’m quenching the ends of the 1045 hammers in safflower oil that I’ve warmed up with a heated rod. Don’t really have enough experience to say whether this works well or not but the faces seem to be nicely hardened. Gotten some good edges on sharpened pieces as well (knives, herb choppers). Regarding the forge welding, on my NC Tools forges (one burner and three burner) you can’t really adjust the flame. I played around tonight with angling up the piece I’m heating to get it into a different part of the flame. That appeared to help a bit but still it seems hard to get to a yellow heat or to the point where the metal is sparking.
October 24, 20178 yr Good Morning, Sometimes the 1045 will crack, if you were too hot before quenching. How did you quench? I quench both ends of a Hammer at the same time, and, leave heat in the middle to draw the tamper, both ends in the same heat. I have a Hammer a friend gave me, he hardened it and was in a hurry, so he didn't immediately draw the temper. He put it in a drawer in the basement and forgot about it. He found it a year later, remembered why he did what he did (stupid me). The faces are like Road Maps, lots of cracks. It was caused from too much tension in the Hammer, it found a way to release the tension, by itself and in the dark. There is no reason you can't use water on 1045, I do it everyday. You have to immediately draw the Temper, NO WAITING!!!! DO NOT QUENCH from TOO HOT, just above critical temperature works just fine, not orange. Neil
October 24, 20178 yr Author Appreciate the info, swedefiddle. I heat treated these hammer heads in a similar manner, although being new to the game I’m still learning to watch the colors run. Haven’t quite found the best abrasive to create a good surface to watch this happen after quenching. Do you find that you need to quench a couple of times as the colors keep running to the ends of the hammer?
October 24, 20178 yr Good Morning, Jon I always start with the hammer face first, with the pien end up. I get a good quench on the face, ALWAYS MOVING up and down a bit (you don't want a quench line). Then i flip the Hammer over and quench the pien end. If the temperature start to run too fast for the temper, you will have to keep flipping it back and forth. A garden hose with a low flow/fast dribble, will keep the Hammer face cool while you are quenching the Pien. It is a Dance. If you miss the straw to almost light blue colour, reheat and start again. Neil
October 24, 20178 yr 9 hours ago, swedefiddle said: There is no reason you can't use water on 1045, I do it everyday. You have to immediately draw the Temper, NO WAITING!!!! DO NOT QUENCH from TOO HOT, just above critical temperature works just fine, not orange. That was probably the issue with the set hammer I most recently quenched in water. It seemed fine after the quench, but I waited a while before tempering (elected to use the dragon's breath in front of a gas forge for that, running the heat up from the struck end and watching the colors). Probably just left it too long and have some interesting face checks. I'll use it for a while and see if it holds up.
October 24, 20178 yr Author 11 minutes ago, Latticino said: That was probably the issue with the set hammer I most recently quenched in water. It seemed fine after the quench, but I waited a while before tempering (elected to use the dragon's breath in front of a gas forge for that, running the heat up from the struck end and watching the colors). Probably just left it too long and have some interesting face checks. I'll use it for a while and see if it holds up. Could the checks have come from the fact that the dragon’s breath was heating the face rather quickly and aggressively while the rest of the body of the hammer was heating much more slowly? Sort of a differntial expansion/shrinkage situation?
October 24, 20178 yr Certainly possible, but I did have the face of the set hammer facing away from the dragon's breath. Now that I have my heat treat oven fixed I won't do that again.
October 24, 20178 yr Author Interesting. By constantly monitoring and adjusting the hammer head, were you able to keep the colors kind of consistent at a certain point during this dragon’s breath tempering process?
Join the conversation
You can post now and register later. If you have an account, sign in now to post with your account.