June 29, 201610 yr its not done yet, but i just came in from working on it and decided if i didnt get pictures put up now i might never remember. I am upgrading from my forge i through together in an afternoon about 6 months ago? it was made from a disc blade, some tubing, a truck rim, and a blower out of a dishwasher.( i did all of this before doing any research, but the general idea worked, just not great haaha) It got metal hot, but wasnt ideal for me, so i sold that one for a six pack and started this project. table is made out of 2" angle, and 1/4" plate. at some point im going to notch the sides for a pass through. fire pot is 9x11x4 i believe out of 1/2" plate, havent decided how im going to do my air grate yet, was thinking about just welding in some 5/8 square stock. and just cutting them out when they get mangled and need replacing. the bottom will have a expanded steel shelf. and i cant decide which side im going to be working from the most so my ash dump will have a handle on both sides. I am thinking about making a fixed hood on the forge itself, but haven't decided yet. still some research to do in that department. Half way done, lots of touching up to do....really wish i had a plasma table or more skill with a torch . so far im pleased cant wait to get it finished. cheers. total investment so far--150$ luckily for me my work has lots of scrap that just goes in the bin that i get to raid!
June 29, 201610 yr Your fire pot looks deep, maybe 5-6" based on the 2" side angle. That plus the 2" angle may put your steel above the sweet spot in the fire, or cause you to build a larger than needed fire and waste fuel. I cut two "depressions" in mine on opposite sides that roughly correspond to the raised "lip" on my fire pot. That way I can get my steel down where I want it in the fire. Down side is that with long stuff I'm occasionally knocking some coal/coke out when I put stuff in the fire, but it's not much if you pay attention and keep it raked in tight. My pot is about 4" deep and the top of the pot is maybe 1/2" below the cutout shown. That seems to put the steel roughly in the sweet spot of my fire on average .
June 29, 201610 yr Author 6 minutes ago, DSW said: Your fire pot looks deep, maybe 5-6" based on the 2" side angle. That plus the 2" angle may put your steel above the sweet spot in the fire, or cause you to build a larger than needed fire and waste fuel. I cut two "depressions" in mine on opposite sides that roughly correspond to the raised "lip" on my fire pot. That way I can get my steel down where I want it in the fire. Down side is that with long stuff I'm occasionally knocking some coal/coke out when I put stuff in the fire, but it's not much if you pay attention and keep it raked in tight. My pot is about 4" deep and the top of the pot is maybe 1/2" below the cutout shown. That seems to put the steel roughly in the sweet spot of my fire on average . yeah, it looks a bit odd in the picture, but it is 4" deep i got the plans off of here somewhere lol. the sides are im guessing only about 1 3/4" tall because i laid 1/4" plate on top of the angle. and i do plan on cutting out a pass through with a removable piece on one end to get the metal into the fire ball i also plan on making another fire pot only 2" deep that i can use on smaller stock to save coal.
June 29, 201610 yr I hadn't really given a whole lot of thought to simply making up a temporary "dam" to close off the far side when not in use, but it makes a lot of sense and very easy to do. Thanks. Every year mine evolves in some small fashion. That might be the one for this season. The idea of replacing the fire pot with a shallower one is another interesting twist. Personally I have too much time/effort in building the one I have to simply swap it out for a different job, but it's certainly thinking outside the box. Not a bad thing overall.
June 29, 201610 yr Author 15 minutes ago, DSW said: The idea of replacing the fire pot with a shallower one is another interesting twist. Personally I have too much time/effort in building the one I have to simply swap it out for a different job, but it's certainly thinking outside the box. Not a bad thing overall. yeah, i tried to pick a size that would be sort of "all purpose" for now. but, i have a feeling in the future ill be making another more shallow fire pot once i find out how much coal i consume with this one, and what size stock im going to be using more often. obviously the smaller stock wont need such a big fire ball. and since my fire pot just drops in it should be as simple as taking 4 bolts loose (or using the hot ratchet lol) and swapping them out.
June 29, 201610 yr I think you'll be happier using rd stock for the air grate, it'll last longer not having the corner thin spots. If you put a counter weight arm on the ash dump you'll be able to access it from anywhere by just lifting it with anything long enough to reach. tongs, hammer, piece of stock, etc. You can reach right around the tuyere from the front, easy peasy. Frosty The Lucky.
June 29, 201610 yr Author Thanks frosty. I'll swap out the square for some round. I know I have some laying around somewhere lol. I like what you're saying for the ash dump as well. I was going to extend arms out to each side that one could lift to open, but I like your idea better. It's easier and I can make it more compact so it won't take up as much room. -Sam
July 4, 201610 yr My table top forge with firepot has a cut--out at far side. I use a gate to forge smaller items and remove The gate for longer sections . To keep coke off floor I have a tray under gate about 5" by 12" long. I dont push out more than I have to but what falls out is held by the tray. Likewise I use a similar set up for front of forge. Also serves as a tool/workpiece rest. Keeps me from stepping on coke.
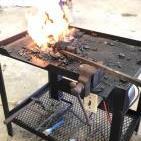
July 6, 201610 yr Author Yes, I've added made passthroughs on both sides. The opposite side I stand on is a gate type opening. The side I work from will be a gate/sliding tool rest for working with longer stock. Just haven't got to that part. I was to excited to wait so I went ahead and fired it up for the first time today. And holy cow it's creates a much hotter fire, much faster than my old one I burned the end of my tong blank today on accident. Now im in the process of building my hood. (Ignore the improper placement of the stock. The vise made a good holder while i snapped a few pics.) also it Took me a bit me to figure out how to keep the flames to a manageable level. Never had that issue with my disc blade forge
July 6, 201610 yr I have that same chisel. I cut it in half. Used the bulb on the end for the cutting end of a hardie and the handle portion is squared and forged to fit the hardie hole. The opposite end that is already a cutter was left alone. I fullered the handle and squared it to fit the hardie hole as well. Two hardie cutters.
July 6, 201610 yr And here I was going to suggest mounting a handle to it to make an easier to use hot chisel---especially for new smiths who might have a tendency to miss and push the holding hand down towards the hot piece....
Join the conversation
You can post now and register later. If you have an account, sign in now to post with your account.