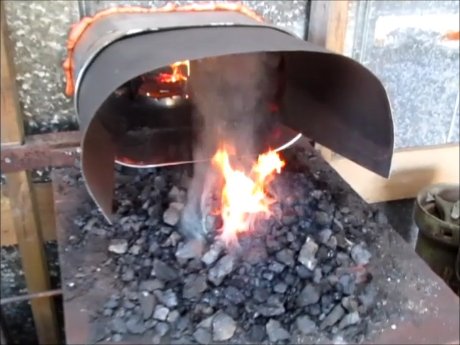
February 18, 201610 yr Thought I'd show ya'll the gas forge I finally made. I used a half of an old muffler for the shell and my Atlas Knife Company 100k btu burner, I think its the Graham Forge model on there website. I made the base out of 10 gauge and 1" angle Lined it with 2" of ceramic wool, I think it compacted a little when I put the rigidizer on it though. I have a fire brick for the floor. Then coated all of it a few layers of "Fireworks" brand kiln wash. Welded 2" angles to hold the firebrick doors. I welded a couple of pieces of pipe, around 5/8" ID from front to back to hold a sliding part holder made from 1/2" round and 2" angle. Overall I think it works pretty good and I am very happy with it. I checked it with a digital thermometer and thermocoupler, just laid it in the door, and it was well over 2000° F. I stopped there because the thermocoupler looked like it was going to melt. I hadn't known about using kiln wash until I read it here during this build. I was going to try some of the reflective coatings that Mr. Wayne Coe sells but I had already ordered the other so I thought I'd see how it did first. I did contact him with a few questions and he was very helpful. Half way through this build I realized that I would probably build a bigger one in the near future, so I will probably go that route at that time. I wasn't sure if the wash I got would work but it seemed to really help seal my insulation, and I have some left over to recoat if I have too. Anyway thanks again for all the great info here it helped me a lot. That's it in nut shell but there's a 9 minute build video just for kicks.....
February 18, 201610 yr Nice forge! I saw that video a few days ago. You did a pretty good job at it! What's the diameter of a muffler?
February 19, 201610 yr Author 2 hours ago, Forging Carver said: Nice forge! I saw that video a few days ago. You did a pretty good job at it! What's the diameter of a muffler? Hey thanks man! It was fun way to practice a little MIG welding. The outside of the muffler is approximately 9"x7". The inside of the finished Forge is about 5"x3 1/2"with the 4" brick floor. Can't wait t fire it up this weekend!
February 19, 201610 yr Oh nice, it is about the same size of a freon bottle. At first I thought these dimensions were going to be too small, but then I realized that I only do small stuff. Bottle openers, occasional knife, tools, and small pocket stuff. I think when my forge is finished, I will be very satisfied with it. I wish you the best of luck with your new forge and smithing!
February 19, 201610 yr Pretty nice build. I looked up the Fireworks kiln wash and the MSDS. It looks like a good high alumina and kaolin wash. If you were to come up with some Zircopax it'd turn the Fireworks into a high IR reflective wash. When you going to do a few welds in it? The wash will go a long way towards resisting borax. Frosty The Lucky.
February 19, 201610 yr Author 1 hour ago, Forging Carver said: Oh nice, it is about the same size of a freon bottle. At first I thought these dimensions were going to be too small, but then I realized that I only do small stuff. Bottle openers, occasional knife, tools, and small pocket stuff. I think when my forge is finished, I will be very satisfied with it. I wish you the best of luck with your new forge and smithing! Yeah that sounds like it will work good for you. I do small stuff too, for now anyway. I hope to be able to do more now that I'm not dependent on coal. Good luck to you too. 52 minutes ago, Frosty said: Pretty nice build. I looked up the Fireworks kiln wash and the MSDS. It looks like a good high alumina and kaolin wash. If you were to come up with some Zircopax it'd turn the Fireworks into a high IR reflective wash. When you going to do a few welds in it? The wash will go a long way towards resisting borax. Frosty The Lucky. Thanks Frosty, i appreciate the info too. I guess I'll be looking for some Zircopax. I plan on trying some welds sooner than later.
February 19, 201610 yr The Alaska club got a pretty good deal from Seattle Pottery Supply. I THINK that's the name but I'm blanking. A search for Zircopax should hit on plenty of suppliers. Frosty The Lucky.
February 19, 201610 yr Brilliant!!! What an excellent idea for use as the steel shell of a small oval forge; I'm going to steel this idea (only if you give permission). Need to know your name so as to give you the credit you're do. Michael Porter Here is my email address in case you don't want to use your given name in a group post [email protected] Without even using a kiln wash or other high-emissive finish coating, the forge interior is showing white in the photo, which is strong evidence that your forge design is working in the excellent range!
February 19, 201610 yr Ups, you did use kiln wash, but I don't think it was a high-emissive type, so you can still squeeze more performance out of the forge.
February 19, 201610 yr Author 6 hours ago, Mikey98118 said: Brilliant!!! What an excellent idea for use as the steel shell of a small oval forge; I'm going to steel this idea (only if you give permission). Need to know your name so as to give you the credit you're do. Michael Porter Here is my email address in case you don't want to use your given name in a group post [email protected] Without even using a kiln wash or other high-emissive finish coating, the forge interior is showing white in the photo, which is strong evidence that your forge design is working in the excellent range! Hey thanks for the comments! Have at it, no need to ask permission. Don't worry about credit or anything either. If that makes you feel awkward you can just mention this thread or the YouTube video and/or channel. But honestly it's not necessary, really. Just let me know if you make something similar, I'd like to see it. Thanks again.
February 20, 201610 yr norrin_radd, Thank you, And I will mention the YouTube; video. I've already figured out a practical method for building larger oval forges, but for small oval forges, I don't think your idea can be beat; in fact I don't believe any other method will ever come close to it for practical good sense!
March 7, 201610 yr norrin_radd, Can this thread be found again in a a couple of years? I would like to list it too, but not if it just frustrates my readers. As with the first book, I'd like to include three or four pieces of heating equipment in the next book; different equipment for each book of course. After Vortex Burners, I want to do a general survey and build text on each type of burner; naturally aspirated linear and jet-ejectors, ribbon burners, ordinary old style fan-blown, and powered vortex; with a couple of examples of heating equipment for each type of burner. And what I've learned over the last sixteen years about homemade rigidizer, high-emissive coatings, and superior refractories. Frosty, I'm going to try your kiln wash soon; now that it is for certain available at Seattle Pottery Supply, which is a local store, and famous for reasonable prices on all of their raw materials, and also because zirconium silicate will insulate better in thicker coatings, just like any zirconium based product, while ITC-100 can only be used in pretty thin layers
March 13, 201610 yr norrin__radd, Using wood forms, its easy to screw sheet metal onto them, forming any oval shape you wish; removing the screws to release the forms after brazing or welding stiffening faces at both ends to keep the oval shape rigid. The harder part is making decisions as to size, shape, and number of burners. You can do a lot to settle those questions in you mind by giving a close look to the various forges on the Chili Forge website. Please note that all those forges are meant to be high production models that are heated by oversize burners, and having very large openings; you might want to tone down that performance with smaller burners and openings. You would also need to decide on the approximate location for the burners in advance, so the the sheet metal can overlap in that area, providing more strength for mounting burner portals; and then run screws, etc. down the length of both edges. this in reply to your considering making much larger oval forges; not as a critique on your brilliant design for the miniature oval forge shown on this thread.
July 28, 20169 yr After reading Mikey's comments on the Forge 101 thread and it got me thinking. I believe one could accomplish an oval forge in a round shell by layering strips of ceramic blanket on the top and bottom between the two rolled layers. Any thoughts? Viking
July 29, 20169 yr Sure. There are two basic methods of making a two liner forge, #1, hard inner refractory liner, #2 the insulating or backer layer outside it. You can roll or other wise form the insulating outer layer and then plaster or cast the inner hard liner. The other basic technique is to form the hard inner liner and simply wrap or otherwise surround it with the insulating layer. My first naturally aspirated forge was built in a pipe. I cast the hard inner liner (flame face or contact layer) by nesting sonotube, cardboard concrete cylinder forms. The OD of the inner tube was the same as the intended inside diameter of the forge chamber. The outer tube's inside dia was the same as the outside dia of the hard liner. The target wall was 3/4" thick. I rodded phosphate bonded extreme duty refractory in the annulus, gap. Once dry enough I pealed the outer tube and after another couple days drying with a light bulb inside I lit a few pieces of charcoal and burned the innter tube out. That made my flame face and I wrapped it with 1" 8lb. Kaowool and used news paper and tape like a ring compressor to slip it in the shell. A little time with a masonry hole saw made my burner port and it was ready for hot curing. So yes you can make the hard inner liner first and then pack it in blanket. A trick I hadn't thought of was shared a while back and I don't recall who turned us onto it but he uses linoleum for forms and simply lets it loose when the refractory is dry enough. Easy peasy. Frosty The Lucky.
Join the conversation
You can post now and register later. If you have an account, sign in now to post with your account.