January 26, 201115 yr I got an email about a month or so ago from another forum member about the possibility of casting some blower shells so they could make themselves a hand cranked blower. Even though he found an old one to refurbish, I decided to go ahead and make the patterns up and build one anyways. I don't know if there would be a lot of interest in them, or a market for them, but the only new hand cranked blowers I could find on the Web had "Made in China" on them somewhere. They were also fairly modern looking. I have been experimenting on and off with a molding method that used to be used for making large pipes and bells, called the "sweep" or "strickle" method. Here's the initial patterns for the blower shell; Yes, that is the full pattern for the shell, just some 1/8" hardboard. Basically you ram up a blank cope and drag and carve out the unwanted sand instead of using a solid pattern. Pretty neat method, and shows some potential for a lot of things. The surface finish leaves a bit to be desired, but I'm working on that. Here's the rough shells; I don't have pics of the mold, nothing really exciting about that anyways. I am going to use this first casting as a pattern to make the final patterns, more or less a three step process. After much grinding and sanding, and a bit of bondo (hides many a patternmaking boo-boo and sin...) here's the intermediate pattern; I will be casting the final shell patterns in the next few days, and starting work on the gears and gearbox. I am going to try cast gears, they might be a bit chunky at first but I think they will work okay, until I get set up with a dividing head and miller to make regular style gears. And yes, I am thinking of selling them, or at least the castings so you could finish your own. Let me know what you think, guys.
January 26, 201115 yr OddDuck, That is really great! I have an old 1901 Lancaster hand crank blower that I know will one day cease to function. I would love to replace it before it dies and would be willing to save up for one of yours. Not a big fan of imported goods these days. Been burnt too many times in the past. I would be proud to have one of your blowers. I'd like to be able to say, "I got one of the first ones made." Keep us posted. I'll be watching for it. Mark<><
January 26, 201115 yr Sounds like you are having fun. That's the important part. Nice looking cases, so far. Keep us posted. :D
January 26, 201115 yr That looks great! I would be interested in a shell and fan, But personally I would like to see just a little belt pulley on it instead of gears. I like the little portable forges you see in Europe that have a large flywheel driven by a foot treadle, with the flywheel driving the bower. Keep us updated!
January 26, 201115 yr Author Thanks, guys. I hope I'm not breaking forum rules, but I suppose where I don't have a kit done yet I'm not actually selling anything. Glenn, if I am please let me know and I shall cease and desist. I'm not sure of a price point, either, I hope to be able to offer it for under $150US. I do know that I have some stiff competition in the sheer number of good units out there on the used market, but they will be getting rarer as the years go on. Also, it would be nice to be able to know where you can get replacement parts easily. Besides, you can't have your forge name cast onto the side of a used one... ;)
January 26, 201115 yr That looks like a great product! I hope there is a lot of demand. I think there are plenty of people willing to spend a little more for a domesticly produced high quality item. Very inovative to use a sweep to produce a pattern too. Kudos to you! Do you plan aluminum gears as well?
January 26, 201115 yr Author Mlmartin, nice thing about this is that if you have an idea or a drawing about the part or parts that you want I can probably do them. I could easily offer several different kits with the same basic shell. I am also planning on doing a "hairdryer" shaped one, it's just been too durn cold here lately to do much casting. Kind of difficult when your greensand is a frozen block... :blink:
January 26, 201115 yr Author Arftist, the first gears I do are probably going to be aluminum, but they are going to be fairly big and chunky. I am cast iron capable and will probably do them in either brass or cast iron, but I'm kind of curious to see how well aluminum ones will hold up.
January 26, 201115 yr Arftist, the first gears I do are probably going to be aluminum, but they are going to be fairly big and chunky. I am cast iron capable and will probably do them in either brass or cast iron, but I'm kind of curious to see how well aluminum ones will hold up. Great work on this, OddDuck. I've thought about this, but never had the time or the gumption -- or probably the skills -- to make it happen. Why not offer a few different attachments for the shaft -- handle for hand cranking, pulley for belt drive, sprocket, etc.
January 26, 201115 yr Author I've actually got a vintage handle that I am going to be reproducing to go with it. It was off an apple grinder or something and has a really nice serpentine look to it. I'm flexible, I can make a kit from soup to nuts, or as few parts as you think you need. The other nice thing is that these should fit into a flat rate box so shipping won't be a killer either.
January 26, 201115 yr Arftist, the first gears I do are probably going to be aluminum, but they are going to be fairly big and chunky. I am cast iron capable and will probably do them in either brass or cast iron, but I'm kind of curious to see how well aluminum ones will hold up. That's awesome. I am curious about the aluminum gears too, but brass sounds real good. Glad to hear you can do cast iron, I have been aquiring parts for a cupola for years now. Too many projects, too litle focus. I had a 500# tilt-pour but I lost it in a move. Now I just play with a Johnson.
January 26, 201115 yr Arftist, the first gears I do are probably going to be aluminum, but they are going to be fairly big and chunky. I am cast iron capable and will probably do them in either brass or cast iron, but I'm kind of curious to see how well aluminum ones will hold up. I have a home built propane fired furnace for aluminum (works great !!) and I hope brass. wondering what your using for iron ???? I would like to do some small stuff in iron,
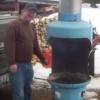
January 26, 201115 yr Author Meet Hellina Bucket. This is my WMO fired beastie, due for a rebuild of serious proportions sometime this spring. You can do cast iron with propane, but you (to the best of my knowlege) need a blown propane burner and pretty good insulation. Cast iron is hard on your furnace, both temp wise and as those who here have a propane forge know, it makes a dandy flux for refractory at high temps. This pic also shows one of my first blowers with a cast shell, using more or less the same process. This one is spun by a 1HP 3500 rpm motor. Makes beaucoup air, more than i even need for this furnace. Here's a closer pic: and the impeller setup:
January 26, 201115 yr Arftist, the first gears I do are probably going to be aluminum, but they are going to be fairly big and chunky. I am cast iron capable and will probably do them in either brass or cast iron, but I'm kind of curious to see how well aluminum ones will hold up. I have a lancaster blower and gear box close to 20 years ago I had one of the gears made in aluminum , it's still going strong (was not cast but round stock) seems to be holding up even working with cast iron members
January 26, 201115 yr There are some pretty cool gears inside of a three speed bicycle hub. It's a planetary system so if you cranked the ring and held the planet gears, the sun gear will spin a lot faster. Do they still make those? Actually, holding the ring and turning the planet carrier will spin the sun even faster.
January 27, 201115 yr Author Grant, I think the geartrain is going to be a bit more straightforward than that. That's a bit beyond my design skills at the moment, but might be something to mess around with on a future redesign. I did the planning for the layout of the gearbox today, so I will probably start on that sometime in the near future as well. Too many projects, not enough time. Oh, well.
January 30, 201115 yr Author Did some more work on it this weekend. I cast the two patterns for the shell sides with the bolt tabs installed, and started work on the gearbox. Here's some pics of the shells, fresh out of the sand and then with some cleanup work: I'm very happy about how well the halves matched up, I screwed up locating one of the tabs and had to re-mount it, burt since these are patterns it's not a problem. I ground off the lettering on one of the halves to allow mounting the gearbox. And here's the plan for that: I glued up a couple of boards (I'll skip that pic, not exactly earth shattering) and pasted the gearbox sheet and the gear sheets to another board with some thinned woodglue. I managed to get the center of the box pattern cut out, even though my jigsaw crapped out on me, I had to use my bandsaw, but it came out okay. I just had to goop some 5 minute epoxy in the saw kerf to rejoin the box. I'll have some more work done on it in the next few days.
February 2, 201115 yr Author Next steps, I got the gearbox side cut out, and the two gear blanks. I didn't spend too much time in the shop today, it was pretty cold in there and my pathetic excuse for a heater wasn't making a dent. The gearbox side is pine (or something, just an old board I had kicking around) and the gears are oak. There are only going to be these two sizes of gears for simplicities sake, final gear ratio should be 16 to 1, two stages of 4/1 increase. More progress to come. Oh, this is the site I used to get the gear templates: http://woodgears.ca/gear_cutting/template.html
February 2, 201115 yr This is looking great! I am very interested. What is the diameter of the blower fan? I am looking forward to the final product. I will be buying the kit from you! I was thinking of making one myself but i was going to machine the whole thing. Thanks for doing this!
February 2, 201115 yr Shells are looking pretty nice. Interesting concept doing the gears that way. What did you cut them with? Oh, also, do you think 16:1 overall will be fast enough? The Canedy Otto which I acquired has a ratio close to 45:1, and the impeller is more than 8" in diameter. That's a neat site about doing gears in wood that way. I would not have considered doing it that way before.
February 2, 201115 yr Author Tlrief, that will probably be the next pattern, the impeller should be near 9" in diameter, give or take. The kit will consist of raw castings, so you may be doing some machining anyways. I'm going to try to keep it to a minimum. Hand tool finish, if necessary. Luke that was my trusty bandsaw, with the questionably sharp blade. It's just a small benchtop unit, but works great for small patternmaking. The large gear is a 48 tooth, and the small gear is a 12 tooth so if my math is right it should be 16 to 1 all told. If it isn't enough I'll just have to add another stage. A little more compact than trying it with belts.
February 6, 201115 yr I like your work so far.. I will be interested in a kit if you keep on making them.
February 18, 201115 yr Author Progress report, I am finished with the gearbox matchplate, and I am nearly done with the impeller matchplate. A little sanding and some fillets at the base of the vanes and it's off to the paint shop. Sorry for the pic quality, I had to revert to my old camera because my daughter absconded with the newer one and the USB cord for it. I hope to have a full set cast this weekend, and I'll get pics of the outcome, good or bad.
March 8, 201115 yr Author I cast the gearbox this weekend, and I am fairly happy with the results. I had one small section that didn't fill, but I think I have a solution. Here's the casting with the gating still attached: You can see the spot that didn't quite fill, but where this one will be for my use a little JBweld will fix 'er right up. Here's the back of the castings: I think if I add a connecting gate between the two on the end that didn't fill it will fix that problem. The cover side filled first, so it should help feed that end of the casting. Here's a closeup of the serial number, I decided to number them so when they are being sold 100 years from now they can tell when it was made... One can only hope. This one is # ODF03110001, the first four numbers are the month and year.
Join the conversation
You can post now and register later. If you have an account, sign in now to post with your account.