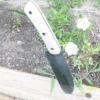
January 24, 201115 yr This is the first high carbon blade that I have forged out. I have done several rail road spike knives and forged out other stuff, but not a high carbon knife. It was for a friend of mine. The blade is 1084 steel, that I quenched in oil and tempered to a medium straw color (almost 400 degrees by my oven) in three seperate one hour intervals. The black ring on the handle is water buffalo horn, followed by some kind of oak that I got from a cabinet maker friend of mine. Finally, the brass at the butt is some bullet casings that I "recycled" (melted them down and then cast a billet). I hammered the bevels in and they looked pretty good until I started sanding the blade...Oh well, you live and learn I guess. I also soldered the butt cap onto the tang, I'm not sure if this is the best way to keep it on or what. I didn't get the gap all the way filled too so you can see a little bit of a gap. I guess filing it to fit tighter would also work... Thanks, Adam P.S I would love to hear any hints, tips or suggestions you guys have.
January 24, 201115 yr Hi Adam. Nice looking knife. I also think that the new owner will be pleased. I really love the grain and curl in the wood. Very nice. :)
January 24, 201115 yr It looks great. One thing i have learned from brass guards and end caps is that marking out the slot smaller before you cut it tends to help out. I mark the slots smaller so that way i have to file then until everything fits perfectly. Instead of marking out the tang and trying to cut the slot to exact size. Keep up the good work.
January 24, 201115 yr Fit and finish are great. As it is the squared handle reminds me of the Japanese schools. You may consider removing some of the meat from the centre of the wood, essentially creating a 'wasp-waist' (how much would be up to you). This would eliminate the illusion of a convex handle and help to distinguish it from the relatively untapered blade. You may also consider faceting the corners of squared handles like that, either down the entirety, or just the wood. I would be concerned that the blade has not been drawn back enough. 'Straw' is generally listed for small blades like lancets and pen knives. These are low torque/impact applications where edge retention is the only demand. The comparatively 'low' carbon and simple nature of the alloy may be a saving grace in this regard though. Even for small knives with 1095 I take the temper to spring blue just to insure against breakage. Whatever the bevel problem was could probably have been remedied by careful drawfiling while the blade is annealed. I drawfile, then peen (reheating if necessary) to straighten before giving it a few more licks with the file.
January 24, 201115 yr Author Thanks for the tips guys, I'll definitely keep that in mind on my next one.
January 24, 201115 yr looks really good..gotta agree that for ur pommel drill small and file to fit... Gene
February 13, 201115 yr Looks great! As for the pommel you could always go old school. Leave the tang just a little long and pein it like a rivet. The first knife I ever saw made was done like that...I bought it and the handle is still tight on it after 25 years. I have also seen the end of the tang threaded with a matching thread in the pommel. Just a few ideas hope it helped. TC
February 13, 201115 yr i agree on riveting the pommel on, ive dine this on a fev blades and they didn't need any adhedives at all, but you gotta remember to countersink the hole in the pommel so it can be filed flush when done. the first successful knife i made was made like this and its going on 5 years old now with no issues. only thing else i can mention is that you should clean up the face of your anvil so it takes less work to clean things later. just my 2 cents on the matter. its a great start, keep it up and keep posting pictures. Ed Steinkirchner
Join the conversation
You can post now and register later. If you have an account, sign in now to post with your account.