

CTBlacksmith
-
Posts
66 -
Joined
-
Last visited
Content Type
Profiles
Forums
Articles
Gallery
Downloads
Events
Everything posted by CTBlacksmith
-
Whenever i make billets i do it in a stainless steel foil bag with charcoal inside. The billet is compressed between the torque plates as tight as they can go. For copper and bronze i heat to 1625 for ten hours, take the bag out, cut it open, tighten the bolts as far as they will go again and let it cool to room temp. I have always been told to cut the edges off to get rid of delamination and then reduce the billet to 1/3 the original thickness with hot forging while the billet is at a black heat. Then cut into the pieces you want and roll out or forge and pattern to your desired results. And i've always wet sanded them down to 220 and rinsed in distilled water, never with soap or any detergent. The book Mokume Gane in the Small Shop by Steve Midgett is excelent. He actually gives you plans for making a small kiln out of two soft fire bricks that you fire with a torch.
-
You could make a wooden form for it and do die forming. Figure out the size of the disc you need to form the dome by taking the depth of the finished form and adding the diameter without the flat lip. Then add for the flat lip you want plus a little extra. Take this disc and screw it to the face of your form after you anneal it. Now you can form the dome and the lip at the same time because the lip will stay flat while you sink the center. Its very effective if you need something with a lip.
-
Great video. I love seeing the shops from other countries and how they have everything set up. The foot he soldered on in the end was actually just a handle for planishing the vessel. And i think that he used brass filings mixed with borax as the solder/flux solution. So really he was just brazing the seams together. As for tinning the pot the solder used would be more than enough to hold together while tinning. Tin melts somewhere around 400 deg. i think so the brazed seam would be fine.
-
Artist blacksmithing question
CTBlacksmith replied to Countryboy39067's topic in Blacksmithing, General Discussion
Ya curtain rods are pretty simple to start with. Check out the book Blacksmithing for the Homestead. Its more on homestead stuff but it does have a good deal of projects for the typical house like coat hooks and candle holders. -
I would love to be a professional blacksmith but i know that it just isn't the best idea at the time with the given economy. But i also enjoy fine metalworking and silversmithing. So i decided to go to college and become a metal shop teacher. This way i will have the summers off to completely immerse myself in blacksmithing and when i work i will still be working with metal, just with finer projects. I love being in college because i get to take all different classes that will help me out in the future, like economics and business courses. I guess what i am trying to say is to not rule out college completely. You could always just be a part time student and take certain courses that interest you.
-
Well i don't make a living at my craft, yet. But there are still a few things that i have noticed definitely help out. One of the handiest things i have is a nice mig welder. You will be amazed by how much it helps out in the shop. Within the first 3 months of getting mine i made back more than the cost of the welder doing oddball jobs for friends and family. Not to mention it helps out with fabricating tools, repairing things and making jigs if you are making multiples of a piece. Before i got the welder i picked up an oxy acetylene setup. Its a pretty handy thing to have around for heading up the center of a long bar or cutting a thick section of steel. I don't know if you have an angle grinder or not but that is another tool that will certainly save you time and make back the cost of it within the first few projects.
-
It looks great. One thing i have learned from brass guards and end caps is that marking out the slot smaller before you cut it tends to help out. I mark the slots smaller so that way i have to file then until everything fits perfectly. Instead of marking out the tang and trying to cut the slot to exact size. Keep up the good work.
-
So it isn't new but it is new to me. I picked up an arbor press today for 26.50 from a junk shop. The tin plate on it says Phase II Arbor press and then a stock number. The only thing it is missing is a handle. Everything is in great condition. No rust on it and all the parts move freely. Here is a link that has a picture of it. So is it a 2 ton press? And do you guys think it was a good deal?
-
Those look great. Keep in mind that when you add a grove or notches to the jaws they tend to leave marks on your piece. I like to keep at least one pair of flat jaw tongs without any marks on the jaws for handling fine work or if i'm hot forging some copper.
-
Looks great. I like that it can hold tongs and hammers. Looks like you have a nice set up for your shop.
-
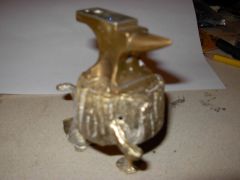 Looks good. I have been casting a bunch of bronze and copper anvils of about the same size. I used them as weights for a gram scale. Keep up the good work.
 -
They look great. Im sure anyone would be proud to carry one on their belt. I know i would. Keep up the great work
-
I have a few handle blanks of hickory that i have been air drying for a few years. I learned the hard way that i had to wait to use them.I made a few tomahawk handles that dried out on me and let the heads slip. Whenever i make handle blanks i just split the log and continue to split the pieces until they are around the right size for a handle. The biggest concern is just letting them dry long enough so they wont shrink once you shape them to the final size. You could always have the wood sawn into slabs and make something out of it like a nice workbench or table. They have portable sawmills that will com right to your house and cut the logs into whatever size boards you want. i have a big stack of rough sawn oak in my garage waiting to get put in my house parents house in Maine.
-
Is this a sow block?
CTBlacksmith replied to Sask Mark's topic in Power Hammers, Treadle Hammers, Olivers
Im not sure what it is but i noticed that the same seller had a 25lb little giant for sale and the current bid is 800. -
i use one of those or one similar to it in my college metal class and uses a similar one in high school. I love the design of them and they are very rigid and versatile. You can even cut circles out with them if you give have the correct feed rate and cut rate.
-
Another Monster Anvil
CTBlacksmith replied to Jose Gomez's topic in Anvils, Swage Blocks, and Mandrels
Nice anvil! looks like it will have no problem handling heavy work. That's a nice gift! -
I get my coal from Aubuchons hardware for 9$ per 50lb bag. Its good coal and creates a nice clean fire. The last time i was there the guy told me i could get broken bags at a discount when i come back.
-
Quenching: Water or Oil?
CTBlacksmith replied to 30cal_Fun's topic in Heat Treating Knives, Blades etc
You can use whatever oil you prefer. I use motor oil simply because it is what i have on hand. You can certainly use vegetable or sunflower oil and it will be much cleaner than the motor oil. I have been meaning to go to a fast food or Chinese food place and ask if i can take some of their used cooking oil. -
Nice work. I never thought of making plans for one on CAD. I cast a couple in copper and bronze a few weeks ago and a small one about 1/2 inch tall in silver last week.
-
What is the name of your shop or business
CTBlacksmith replied to Iron Clad's topic in Everything Else
The name of my shop is Fitch Ironworks. My last name is Fitch and i read something a while back about an iron mill or factory that distant relatives owned that had the name. I looked for any records of it but i couldn't find any. So i adopted the name and it stuck. -
My grandpa gave me an old wine barrel and i cut it in half. I use one half for my slack tub and the other holds my coal. I haven't had any problems with it leaking as long as i keep it mostly full. I really like the look of it sitting in my shop and i don't have to worry about it getting rusty or burning any plastic if a piece of hot metal touches the side.
-
Blacksmith tool box
CTBlacksmith replied to CTBlacksmith's topic in Blacksmithing, General Discussion
Is it just me or does that hinged fuller in the picture that Junksmith posted look like a dragon? The angle iron in the back is the ears, the tack welds on the dies are the teeth and the striking plate is the nose. -
Here is my setup. The large one stays in the shop on a nice oak stump. It's off the stump for now so i can move it around. It's a little small for the large work but i manage. The small one is the one i take to demonstrations and move around for smaller work.
-
I can think of two ways that i might do it. The first one would be to probably just use my cross pein and keep my hits as accurate as possible. Like he said just a little bit at a time, dont rush it. The second and more time consuming one i might consider if i was going to make a few of these tongs would be to make a spring fuller that would only have a top section. The top would be probably a 1/2 or 5/8 round bar that would extend past the face and use the horn as the bottom of the fuller. I dont know how well this would work but it is just an alternate idea.
-
How hard would it be to make an anvil hardy cone on a lathe? And would i need any special tooling to make it?