M.G.
Members
-
Joined
-
Last visited
Everything posted by M.G.
-
Also, with a little more planning and work and some thrifty sourcing of components, you could build your own 2x72 grinder for right around 500 bucks. It is a great way to learn some useful skills along your journey. I recently put up a thread about my 2x72 build in this forum. Take a look, and if you have any questions feel free to ask.
-
Thanks Larry. I feel like I agree. A progressive thread is likely what I will put together.
-
Thanks Frosty, I did go straight in from my phone. They are kinda big I guess, it's all relative. But I think it's like 160mgb....I'll look into a video editing app that lets me reduce the file size and try to get better at this. But, yes the grinder is doing its job. Here are a couple of pics for ya, of the blade I was practicing with. Just to make up for the poor video expirednce I made you wait so long for.


-
Alright, Ive made you all wait long enough... Here are a couple clips running the 2x72. Doing some rough grinding on a blade I forged out last week. Running some combat abrasive ceramic belts in 36 and 60 grit. Then a clip running a J weight flex belt in 220 grit. I tried to keep em short so they have a better chance to load for everyone, but no promises. I'm not too handy with video editing and all. PXL_20250408_171044207.TS~3.mp4 PXL_20250408_210949322.TS~3.mp4 I'm still a long ways from being competent at grinding knives, but the machine seems to do its job. Hope you have enjoyed the build thread. Probably gonna be a bit before my next big machine build. But I'm already starting the planning stage of a hydraulic press build. Should I start a thread that follows the build as it goes episodic style, or should I hold off and do one big project dump thread where you guys get the whole thing all at once? Let me know. Well, I guess let me know if the video clips work at all for anyone. If not please let me know how I can make them smaller files? Or some other fix.
-
Hey, sorry guys. If you have been waiting on a video. I will try and get one next time I am running the grinder. Mostly just using it to dress tools, and do clean up while forging from time to time. I have been forging a bunch of simple forgings lately that don't require much in the way of finishing work. But the machine is running great, and doing a fine job at that. But I will try to get some footage soon.
-
Single phase, Buzzkill. I think you are correct, I would need a 3 phase motor to run a VFD. Also, I took this opportunity as motivation to equip my workshop with a 220v 40a power source. In doing so, allowed me to set up the grinder to run on 220v and to ots full in this configuration. So I guess that brings us to the completion of the 2x72 grinder build. And an update for Frosty, the tracking runs true and allows for manipulation of the belt across the width of the flat platten. I couldn't be more pleased with how this project has come together. And I am looking forward to running this as part of my daily kit in the workshop. I may pop back in here in a few days with some clips of the machine in action if I can.
-
The motor for this build is 1.5 hp, 1750 RPM, and I have a 5 in drive wheel. This puts the belt at 2289 sf/m And MikeBR I know how to forge several styles of hinges, I've even done up some quite large strap hinges for my 200+ lbs shop doors. I just didn't feel like a forged hinge was the way I wanted to go here, so I went fabricated instead. That being said, I'm always interested in learning a new way to do things, so I'm all ears.
-
That's correct Buzzkill. The I made the tracking hinge from half inch plate that I drilled and cut corresponding notches from the drilled end and used a long stainless bolt and locking nut and a few washers n a shim to tighten up my sloppy hinge. There is also a tiny bit of adjustment in the mounting of the hinge that allows for wheel alignment adjustments to be made as needed. Also I appreciate the input from experience. And I already assume that I will end up running this at its limits pretty quickly and will be wanting to upgrade the motor and add the VFD at that point. I hardly got by with out having a belt grinder in the shop. But I'll be honest, besides not wanting to spend the money, I kind of hate grinding for the most part. It's a super messy part of the job so I avoid it where I can, and spend a lot of time getting to know the limits of my patience with hand files. But really I mostly do forgings that require very limited grinding, lots of hammers. A bit of ornamental work and hardware. But I've always wanted to have one. And have used them in the past, so I knew what I was missing out on, but just kept working as I could. The remainder of my electrical components should be here next week then I'll get to test it out and see how it really runs.
-
Thanks Irondragon, it's been pretty satisfying to get to this point. And if I'm honest, it's was cheap for the most part. 75. Motor 100. steel 200 ish on hardware and disposables for the project. 90. Maybe for the wheels. I won't count the drill press, it will pay for its self. But it was only 100 bucks. So my guess is right around 550 all said n done. Considering I still need a control switch and some wiring. And I will not be counting the time invested towards cost, it was not tracked effectively. And a horizontal band saw is definitely on my list of tools to keep an eye out for good deals on.
-
Good eye Frosty! I will be sure to run belts in the correct direction for operation purposes. I was running the belt by hand back and forth to get everything tracking properly. I am still a couple weeks from having it running on its own power. I still need to order some controls and a power cable before I can call it done. I probably could have used a hacksaw to cut the tubing, and it would have been more cost efficient and less messy, but in all honesty, the Hacksaw is probably my least favorite tool in any shop. And I treat it as more of a last resort/ life saver only when it is the only tool for the job. Otherwise I would be more likely to use a sawzall. But the cut off wheels did me okish enough to get the job done. Thanks for checking out the build, hope you are doing well Frosty!
-
I feel bad that I've been such a ghost around here lately, the last half a year has been way super busy, and full of projects. I will get you guys caught up a little bit here, with a focus on a 6 month journey that has been a thought egg for years. Back in June of last year I had come to a realization that, the time had come in my creative process to fulfill a tooling need. Always an exciting prospect that I'm sure everyone here understands. As well as you are likely familiar with, the struggle and time old question that comes hand in hand with that excitement. "Do I build or buy?" Well...the fact that I myself am quite a frugal maker, and I have a strange attraction to the world of digital marketplace type things. The answer came to me while scrolling the place of market and having a cup of coffee. Just listed, near me, like literally around the corner from my workshop. A used Baldor 1.5hp TEFC electric motor. It has been on an older belt driven lathe that was being sent to scrap. And the price was too good to pass it up. So I ran out after I finished my cup and snatched it up. Now I was faced with the fact that I would need to build a grinder from and by scratch and by scrap. With minimal machines at my disposal I would be free handing most of the build. But I knew the precision in the build would need to come into play with hole alignment and squareness. So I guess I would be adding another new tool to the workshop as well. Oh bummer, it was time to buy a standing drill press. (Found one quite readily on the faceplacemarketbook). But as far as cutting was concerned, I would have to use my 4 1/2 in. grinder and cut off disks. As well as grinding disks and a wire wheel. I knew I would need to build some telescoping tube sections, as well as a frame and some plates for motor mounts, tooling and wheel attachments, as well as a platten and D plate. It's a small list as far as raw material goes really, so I was on my way to the local scrap yard to see what the had on offer this week. I was able to come up with a bit of 1/2" plate, some 1/4" plate, and a bit of 1/4 wall square tube in 1 1/2" and 2". I would also need to track down some wheels, these I decided to go the rout of bought not built. (Maybe I'll end up with a lathe some day, but it wasn't in the budget for this build.) I picked up a CNC machined aluminum set. With a 5" drive wheel, and domed tracking wheel. As well as wheels for the D plate. It was a really exciting day when that package arrived! I mean dang! I now had a 2"x72" belt grinder. This is great! I thought as I set the box on the pile of raw materials on the shop floor...... Where they, would. SIT................ For nearly 3 months without more than a fever dreams nightmare throughout the weeks as life took over.... As the summer hotted up, and house projects and responsibilities took over my immediate attention I took some time to sketch up and revise some plans, as well took some time to really dive in to see and analyze how other grinders were being built in all ends and corners of the internet. Then returning to my sketches and making revisions and changes, which continued up to and throughout the build process, and there will likely continue to be modifications and upgrades to the grinder as it is used and as I need more tooling. As my wife and I finally wrapped up the biggest and most pressing project at the house and the summer was quickly drawing to a close, I got some downtime that I was able to translate to some up time in the workshop. I needed to fulfill an order for a custom hammer, so I would fire up the forge and spend a couple days breaking down squaring up some bar stock from truck axles to make a few heads from. While I was waiting on heats I prepared most of the stock material for the grinder and started mocking up the frame and tower. At this time I needed to remove the interior weld beed of all of the 2" square tubing that would need to accept some 1.5" tube as tooling arm or work wrest components. I did this with hand files and patience. I worked on it any time I had 10 minutes to kill. It took days. And days. And days. The progress was but fleeting, and life takes over yet again for another couple months, while I study and prepare for, and test and obtain a few structural welding certifications, to add to my arsenal of skills in my workshop. After I wrapped up with my certification training and testing, I finally had a small block of a couple weeks before the holidays, to really put in the time and effort in the workshop to finish fabricating all the components for the 2x72. At this stage everything that would need to be welded or telescopic got a nice long bath in white vinegar to strip all the Mill scale and rust from the scrapyard. Just over 24 hours and most of it brushes right off. WIth everything clean and prepped it was now time for the dance of squares and clamps, as I fought with the table and clamping positions trying to get each piece fixtured and fit up. It was time for welding. Time for the fun. I got the frame the receiver and the tracking tower all welded up. After some grinding and rewelding, I decided to take a break from all the fab and welding. I needed, I wanted to do some hot work from the forge. So I took a day to hammer out a handle to release tension from the tracking wheel during belt changes. Then forged a piece of leaf spring into a flat platten face plate that could be heat treated to resist wear. Now I was ready to mock up fitment and alignment of all the components and wheels. After a bit of fiddling around with alignment, I could mock up the motor placement and mounting alignment. When I was happy with how all of this important nonsense looked, I drilled and tapped the motor mounting plate. Then got the baseplate and motor mount welded to the frame of the machine. At this point we are almost caught up to the present, the new year celebrations were about to get started all across town, there were drinks to be had and hats to be worn. But not before I wrapped my creation in the warm embrace. I mean what was I to do, just let her sit there in the nude to shiver and rust? It is time to do the final take down and prep for paint. Meticulously stripping hardware from components and tossing it in a number of hardware store baggies with secret codes and costs scribbled on their faces scattered across my "workbench", amongst dirty tools, bottles and jars of who knows what and the reminanc of projects past. Then got to work giving everything to be painted a solid wire wheeling, and acetone wipe down. I was able to get a few coats of automotive primer on everything that was to be painted, just as night set in. The next day I was able to get everything painted up and ready to assemble. This morning was final assembly and tracking system, drive wheel and motor alignment tuning. In running the belt by hand the alignment seems pretty spot on, and the tracking controls the belt from side to side across the platten easily. I still need to decide on if I am going to invest in a VFD for total control. Or if I will take the frugal route and opt for just a power switch. Once I decide, and get it installed. I will report back with final results and a running machine. I hope everybody is doing well, and I hope you all I enjoyed the build thread. Once I wrap up this project I will try and be more active in sharing more blacksmith related work again, and more productivity.


-
Got it, Frosty. I'll get those, maybe on Wednesday. I promised my wife that we could go in to the city and do a run around of things tomorrow. Catch ya later.
-
Thanks Irondragon, great point. I overlooked that in the first few heats of this attempt, the one that failed. But at that time I took a moment to think about what I was doing, and started cleaning scale and excess flux off that second round. I neglected to mention that in the write up. Good catch. I made a few adjustments toy process on the re weld, I'm looking forward to firing it up again and getting another few goes at it.
-
Awesome! Thanks Frosty. Will do. Although, I may try running it without the choke. And see how it does, I can't say I've attempted to run it like this before. So I'll run it unrestricted and let you know how it goes. Also thanks, M3F I hope to have more progress to share in the coming weeks and months. Now that the weather is keeping me out of the forest as much I'll be spending more of my free time in the workshop again.
-
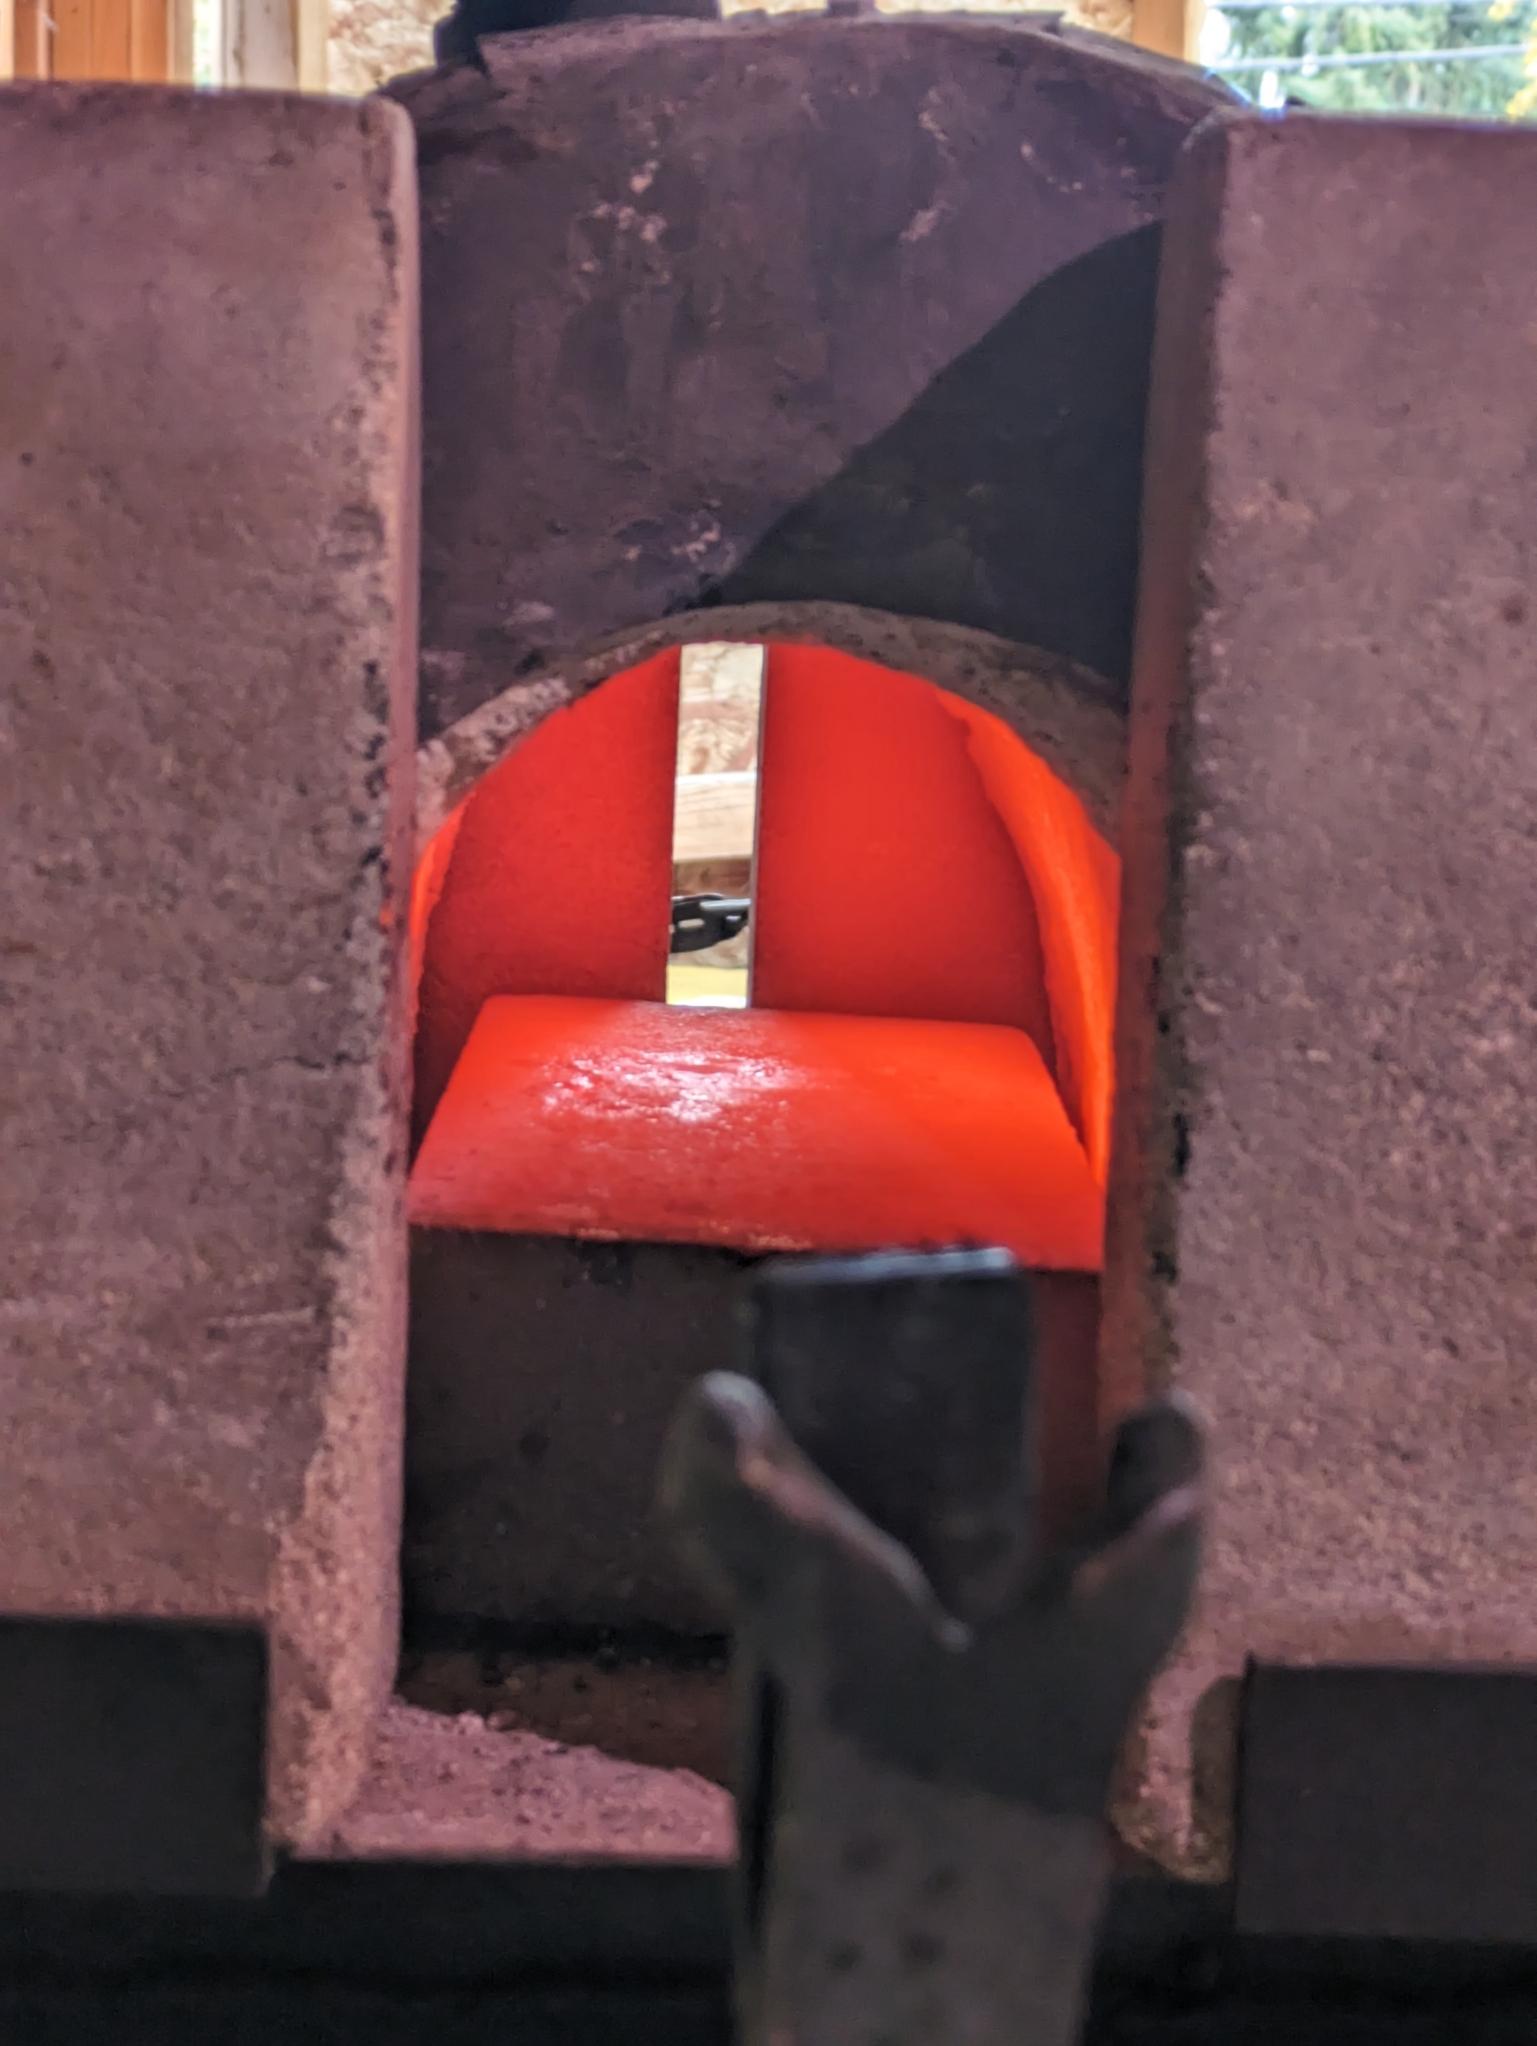
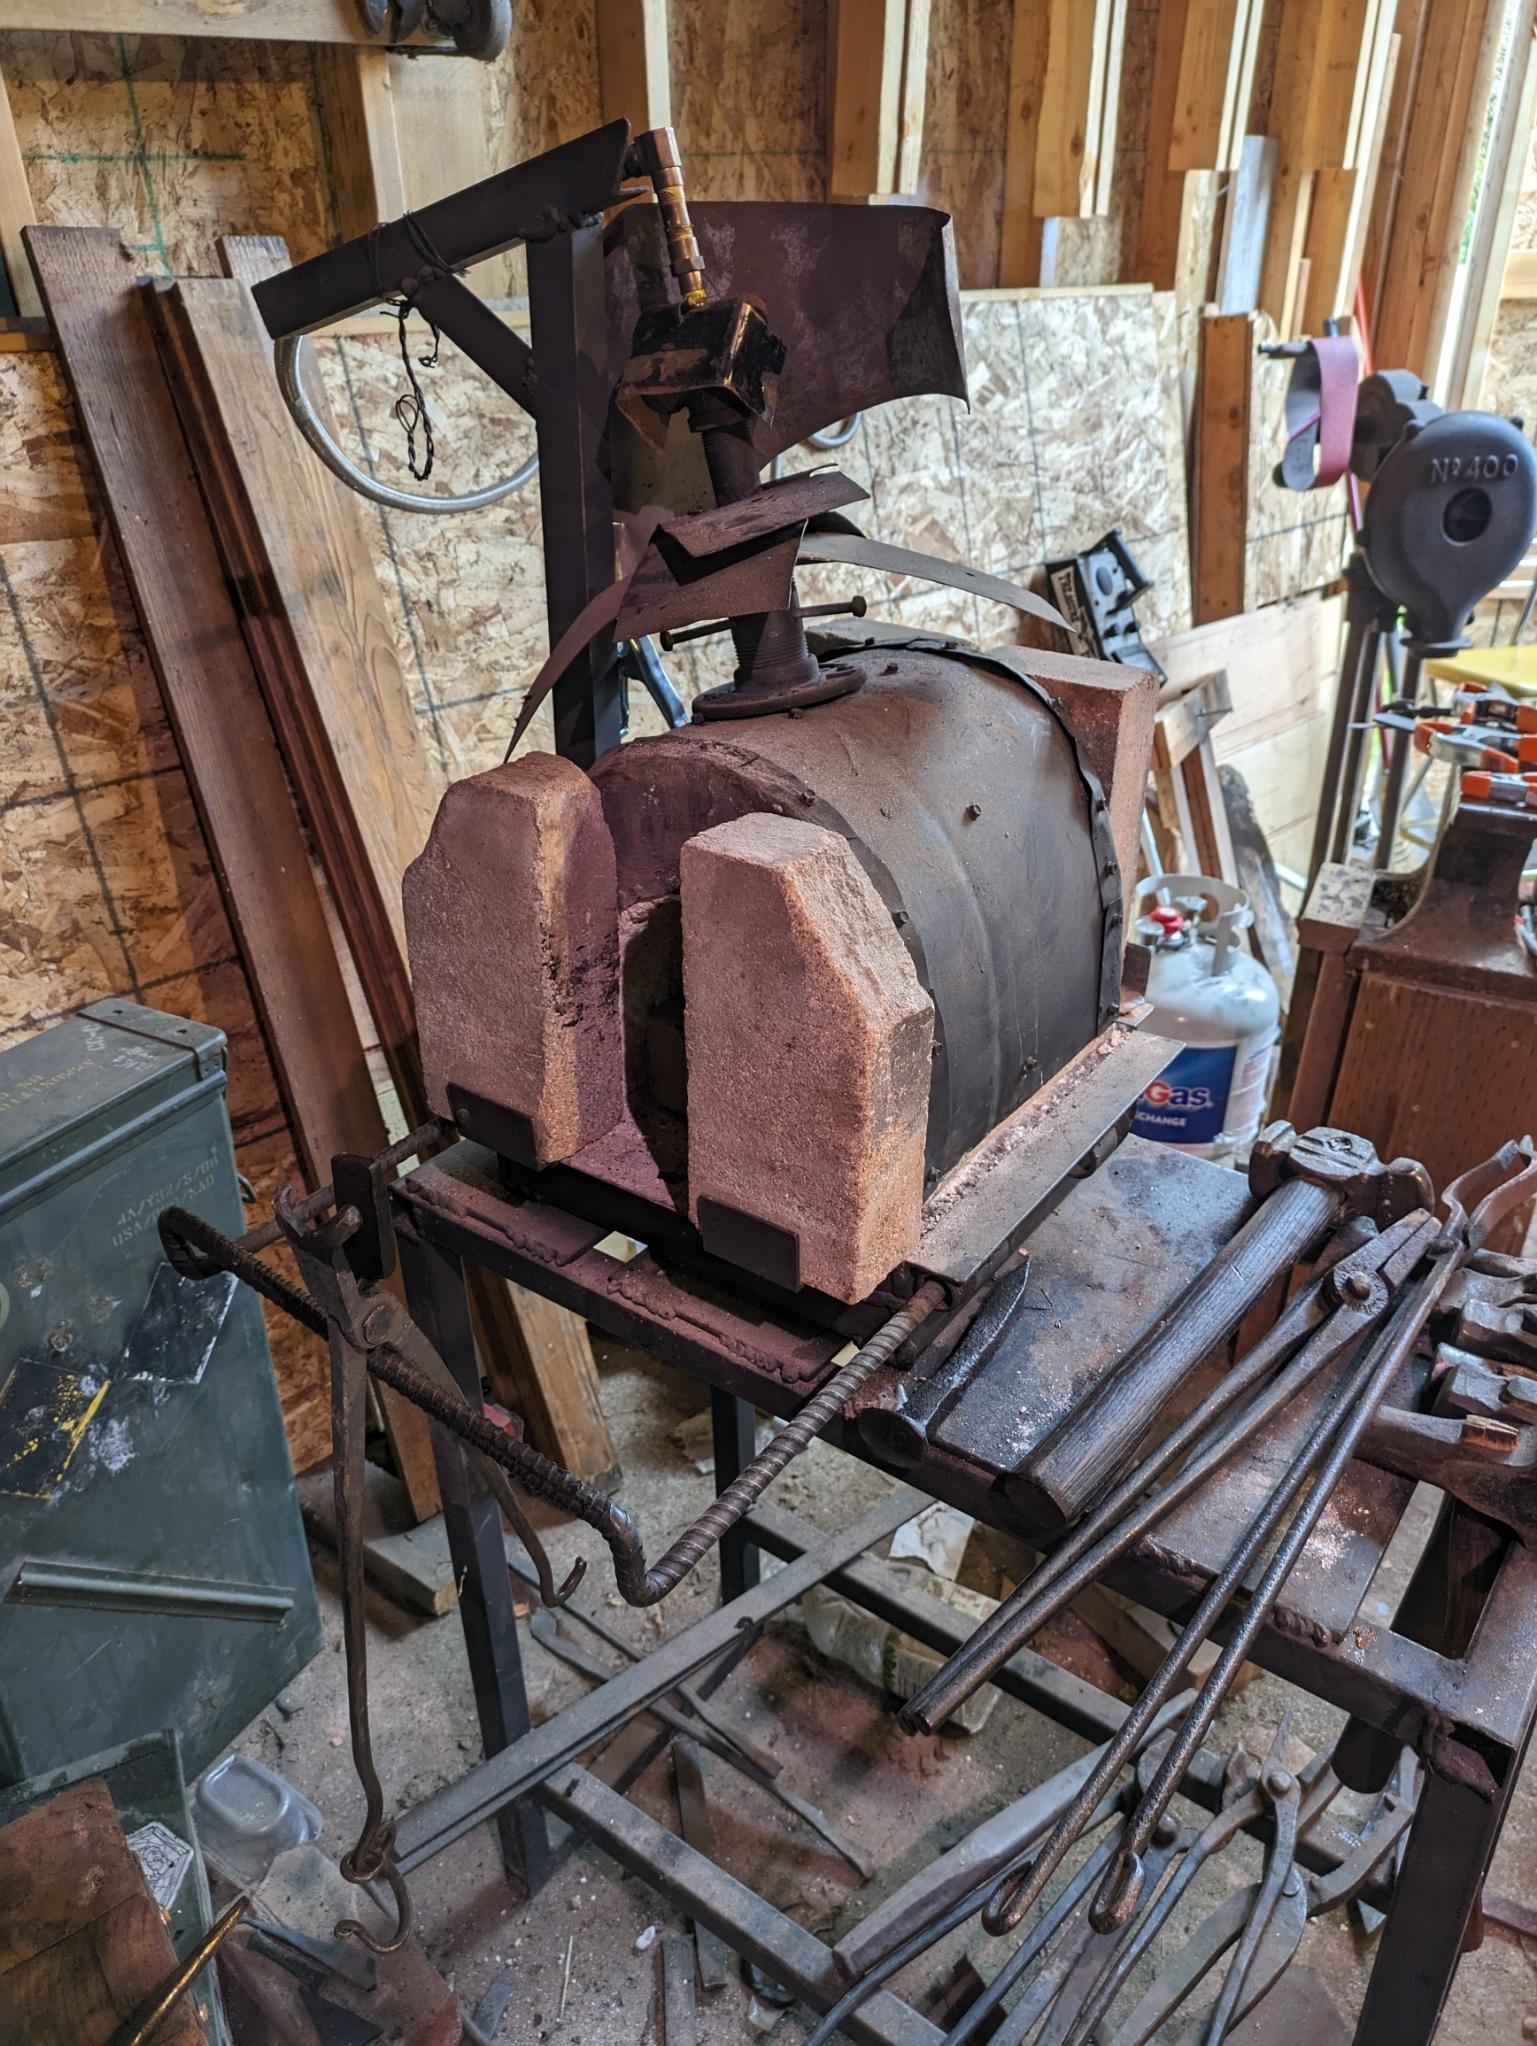
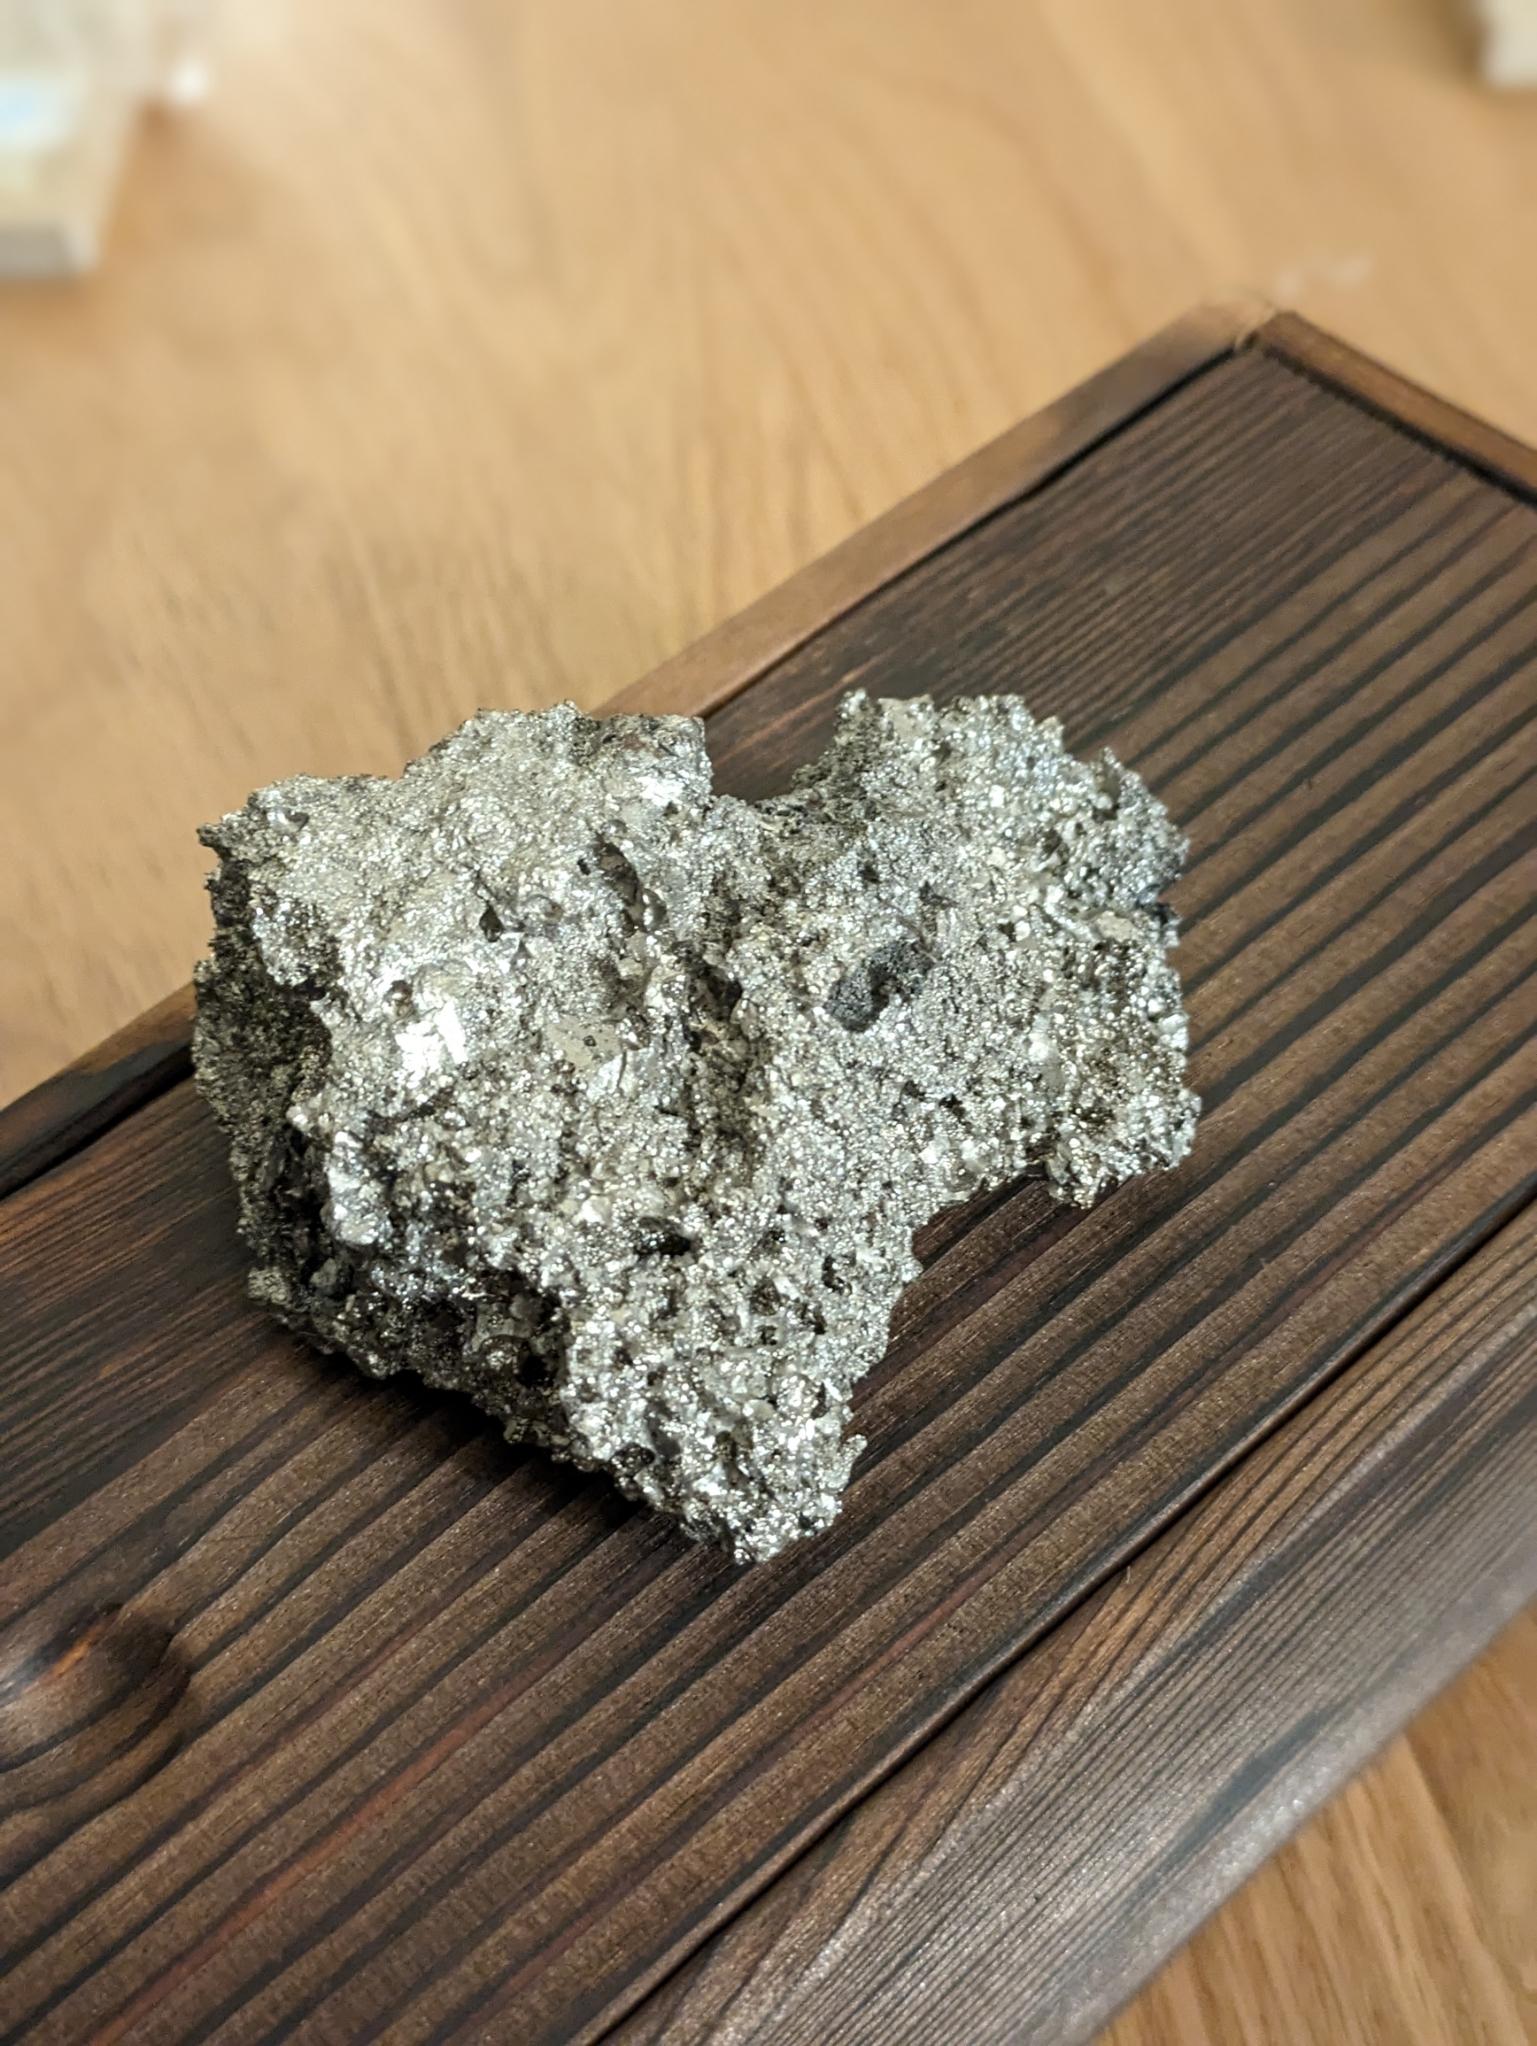
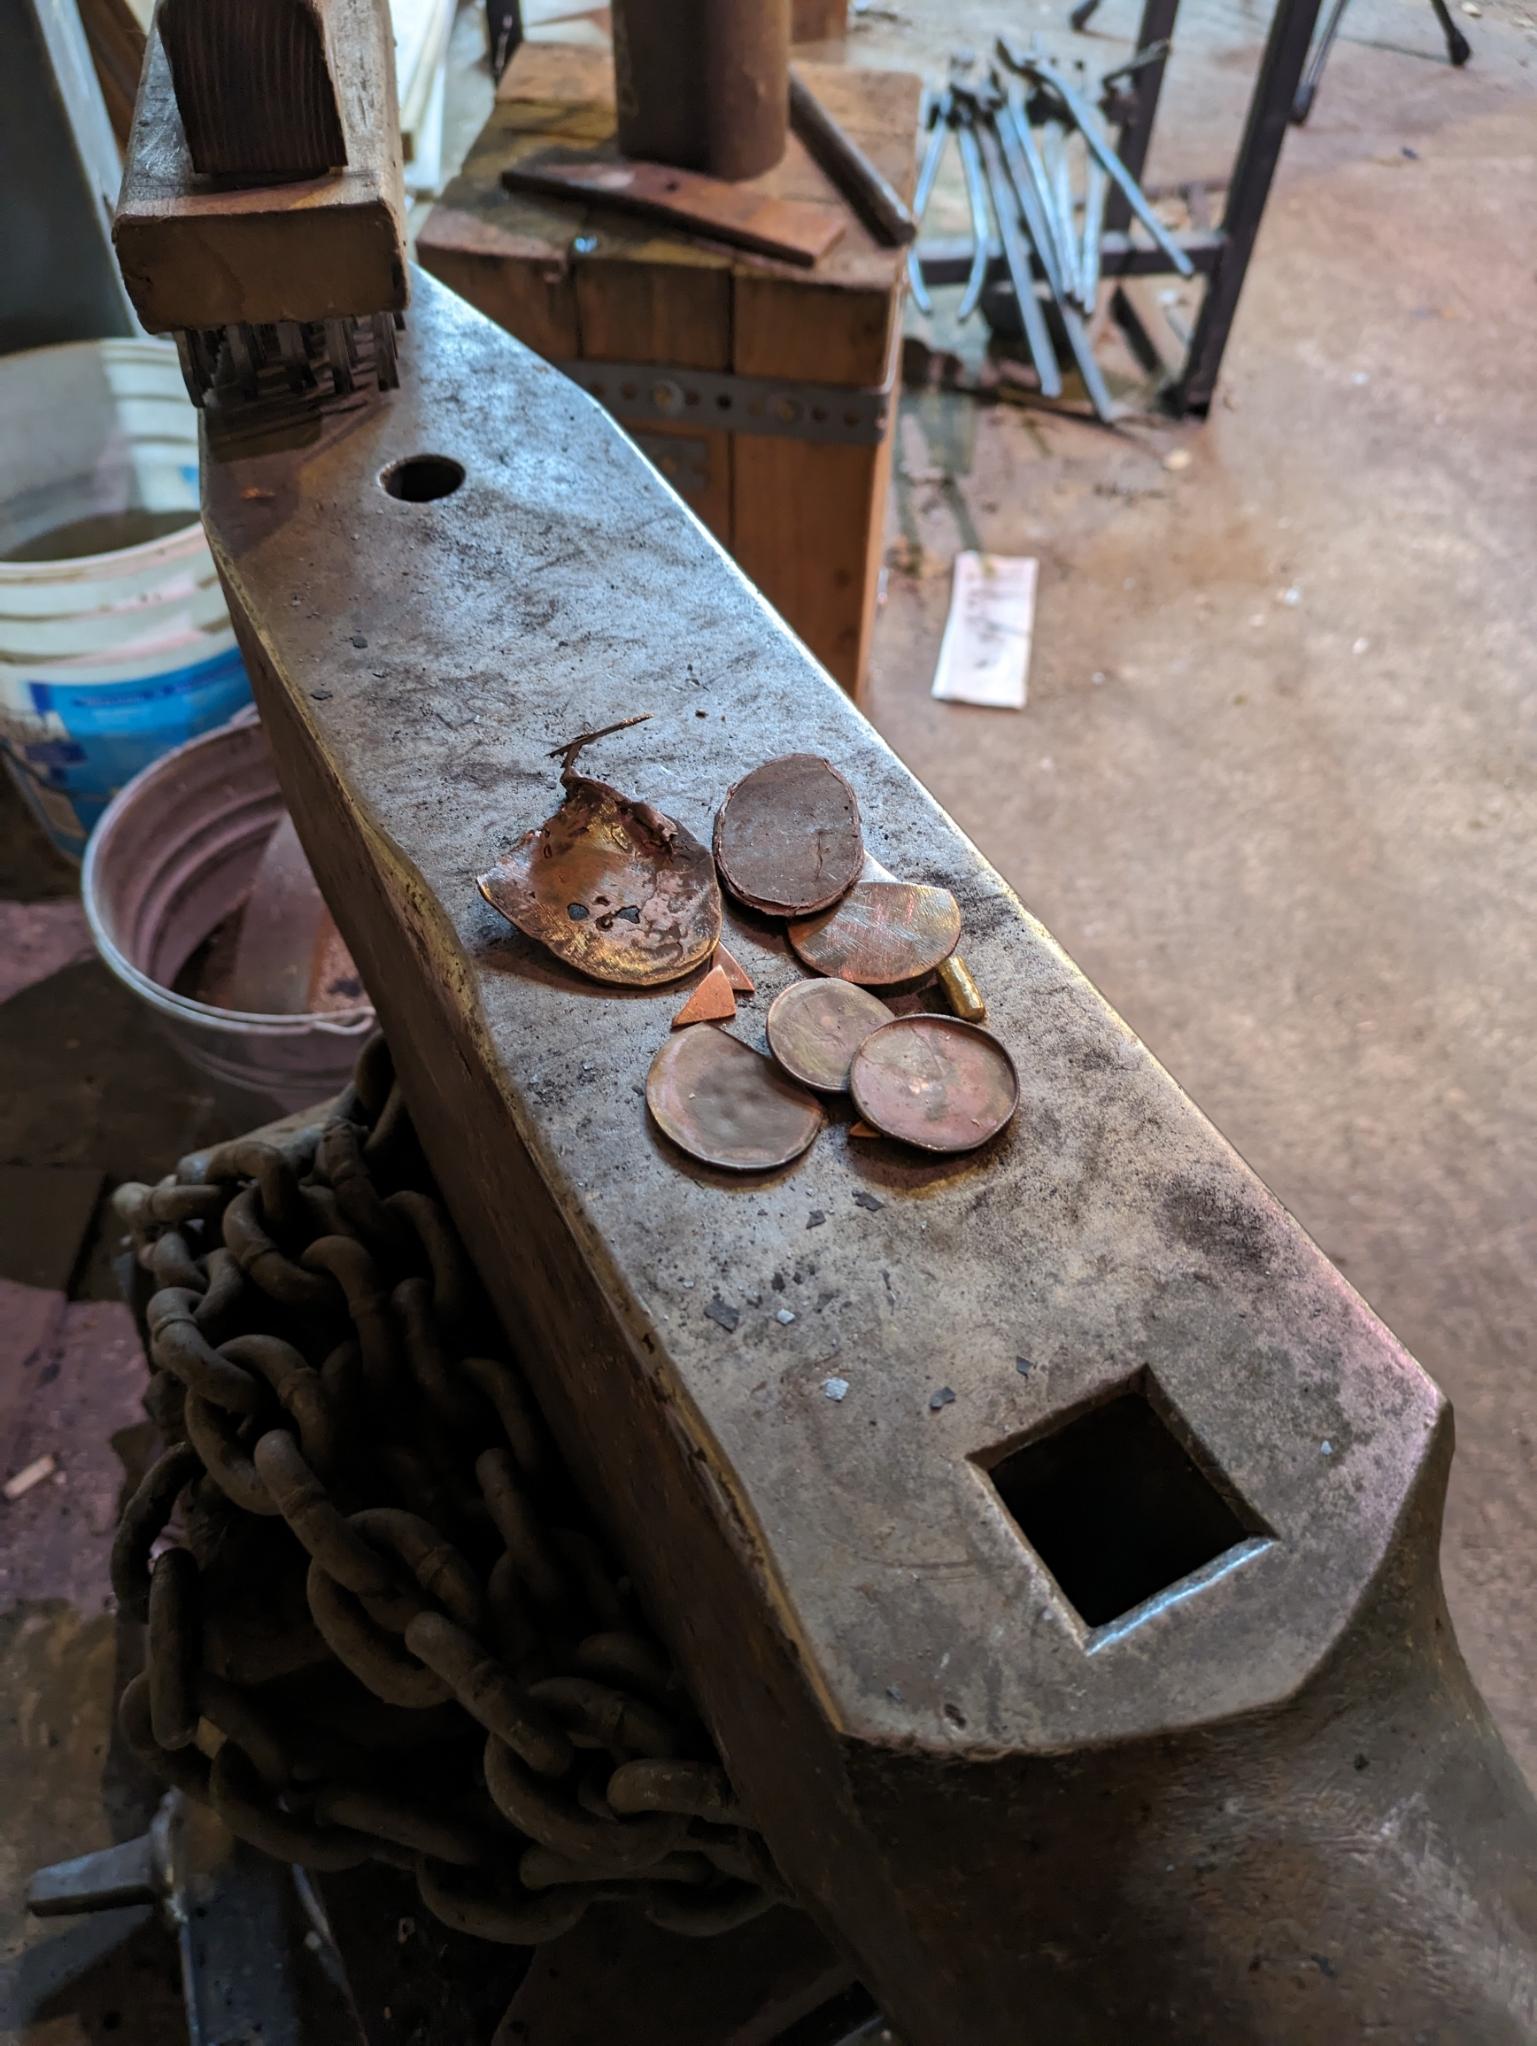
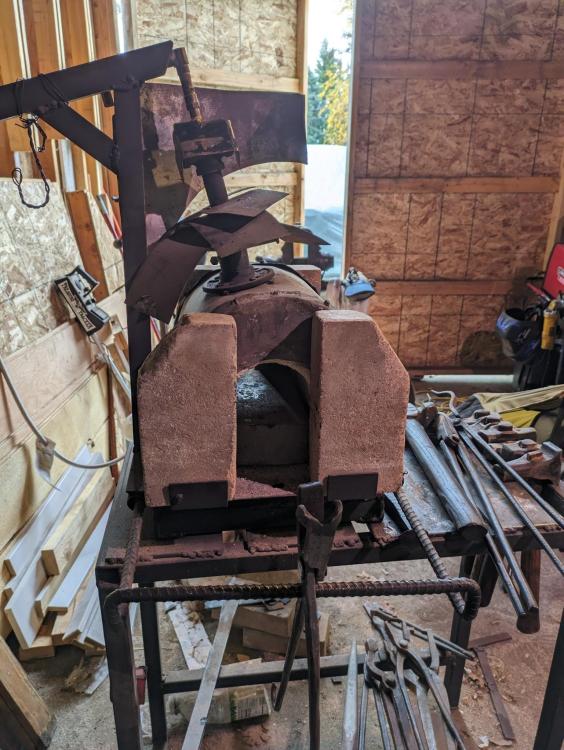
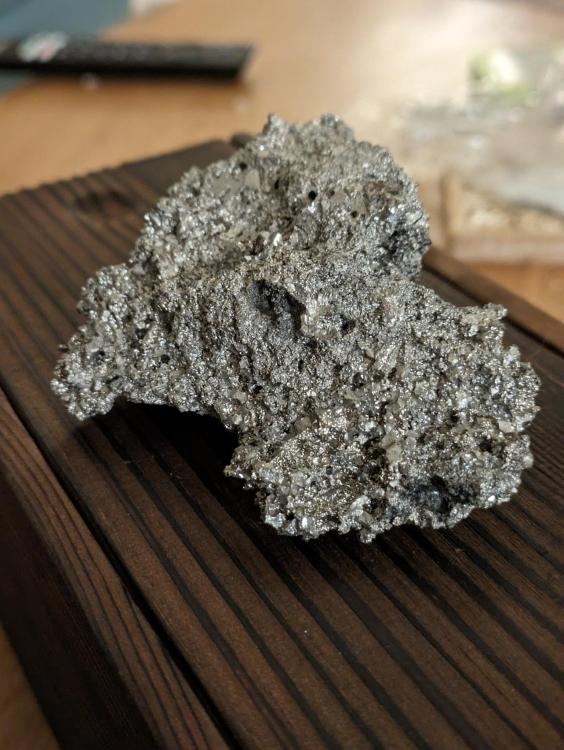
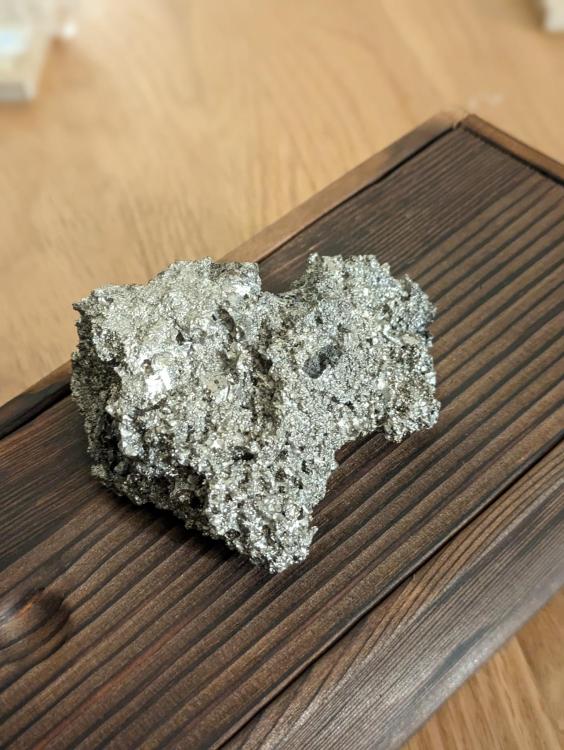
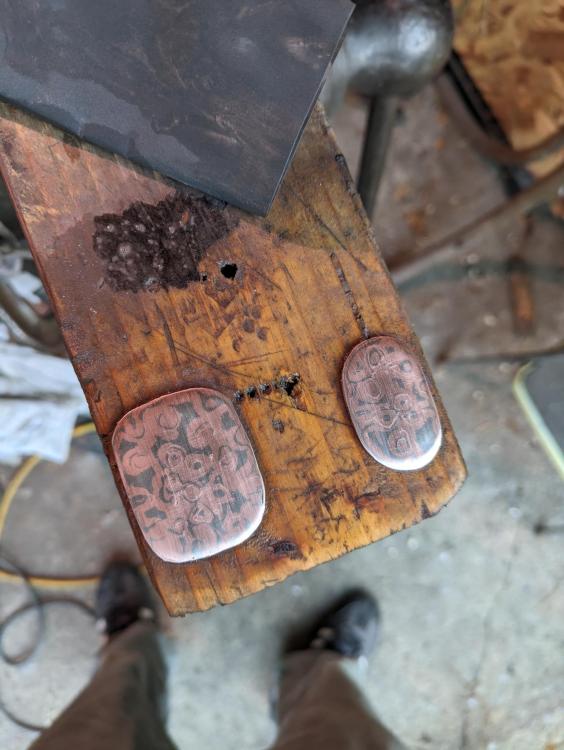
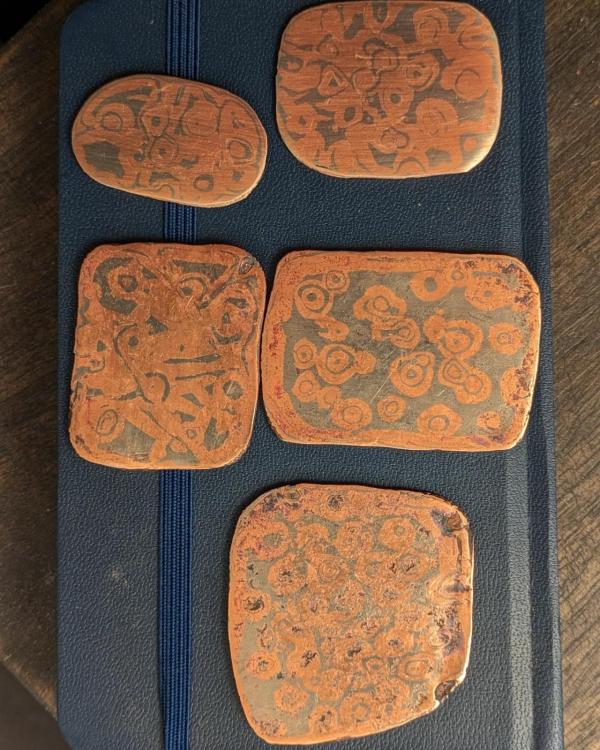
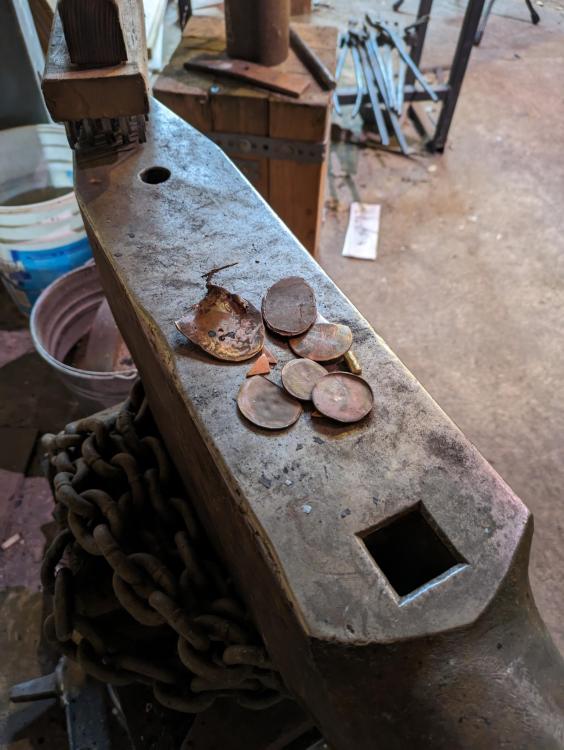
Hey guys, I know it's been a while but I figure it's about time for an update. I know it's a bit of reading, but I promise a load of photos as well. I'm sure a few of you have seen some of the projects I've gotten up to in this forge over the last 6 months or so. So we know it does it's basic job just fine. But one of two of my main concerns with this build from real early on in the all the way back to the planning and design stages was "will it forge weld !?!?!" Also "can I forge weld?" The other being the question of fuel efficiency. At this point, all I can really say is at general forging temps I can get about 12 to 14 hours of forging off of a 5gal lpg tank running the pressure around 7-12psi. Not really sure what that looks like up in the higher psi ranges (15-25psi), so I'm sure at forge welding temps it could for seeably be double the usage. Now back to the important question, the one I have been dancing around as a blacksmith for the last couple years, can I forge weld? After a few failed attempts early on, working in my first forge, charcoal, modified JABOD style, with a hand crank champion blower. I shyd away from it in hopes that I could connect with someone in person who could show me the "magic" firsthand. Alas, I got sidetracked, by a local tool maker, and ran down the road of hammer making. But always in the back of my mind that burning question, am I really a blacksmith, if I can't......? (And, yes, I know some may say, "that's not what makes you a blacksmith", but I know it sure helps, big time.) So this morning I decided to make sure my forge could weld. And in turn making sure I can forge weld. I started by tossing a full sized firebrick on the floor of the forge, to protect the cast floor from the mess I was about to make. As well as reduce the overall volume of my forge, by about half. Then I cut a quick n dirty baffle system for my T burner, from some scrap sheet. And slowly started heating up the forge. While the forge was heating up I took a scrap piece of mold flat bar, cleaned up one side of the flat and ground a quick bevel on the opposite side to form a scarf. once the forge hit about 1000°c I tossed in the flat bar brought it up to heat and folded it over so the clean faces were nearly touching, fluxed it with some borax tossed it in and turned up the propane to about 17psi. At first the forge was just teetering back and fourth around 900-1000°c, but I figured I'd pull it out close the gap and give it some more flux and try and get it hotter. I closed up the doors a bit more, and got my Lazer to say it was around 1160°c. So I got the piece back up to heat and pulled it out gave it a few quick blows, tickled it with borax and back in the forge. Well, that felt pretty good I guess. When it was back up I pulled it out and gave it a few more good hits with my bigger hammer. Re fluxed, then back in. I'm not so sure I felt as good about that last heat but, I can only really look at the next right now. This heat I worked the sides perpendicular to the plane of the weld, then flipped it back flat to straighten it up and knock the wrapped eye that had been created with the fold, over to one side of center as if it was going to be a wrapped eye hinge of some sort. As I knocked the eye off center line the weld popped almost wide open. Bummer....but forward we go. I fluxed it up. Then brought it back up, and closed the weld nice and tight. More magic powder then back in the heat. While I was doing this I was checking the temp of the forge with my laser thermometer and was seeing it riding just below 1200°c so I bumped up the gas a little more closed down the baffle as much as I could kicked the back doors nearly closed, and went in for a re weld. This time it felt good. And so did the following welding heats, I then moved back to the sides and re aligning the eye. At this point I felt like it had stuck but I needed to be sure, so I grabbed a hinge eye drift and ran it through the eye a couple times. Now I know it stuck. After working down the weld a bit I decided to test the weld again, by punching a hole through the weld, and being pretty unforgiving about it. It was pretty cool buy the time I sheared out the plug. But it was still stuck. I'm the end I'm pretty pleased, although I feel like my scarf is still a bit too visible and could have been welded a bit better in one corner. Next time I will make sure to thin it out just a bit more, and focus on the scarf of the weld a bit more. All that said, I hereby present to you, my first forge weld and a home made forge with a diy Frosty T burner , that can in fact forge weld! Couldn't have done it without you guys here on IFI, thanks. And as a bonus, I have some pictures of a couple experiments in making copper and nickel Mokume Gane. Made from coins in my forge, I was using my 13lb sledge to get em stuck together. I know I still have a long way to go with this before I am getting the results I am looking for. I also have a pretty good collection of failures from this run of experimentation. And a double bonus, because you made it this far in the thread. The real motivating factor in today's adventure. I decided that I need to make myself quite proficient at forge welding, before taking on a couple of really special projects. Two days ago I was gifted a very special bloom of authentic Tamahagane. Roughly 3lbs. At that moment, I realized that I have a lot to learn before I accept that challenge. Any way I hope you guys are well.


-
-
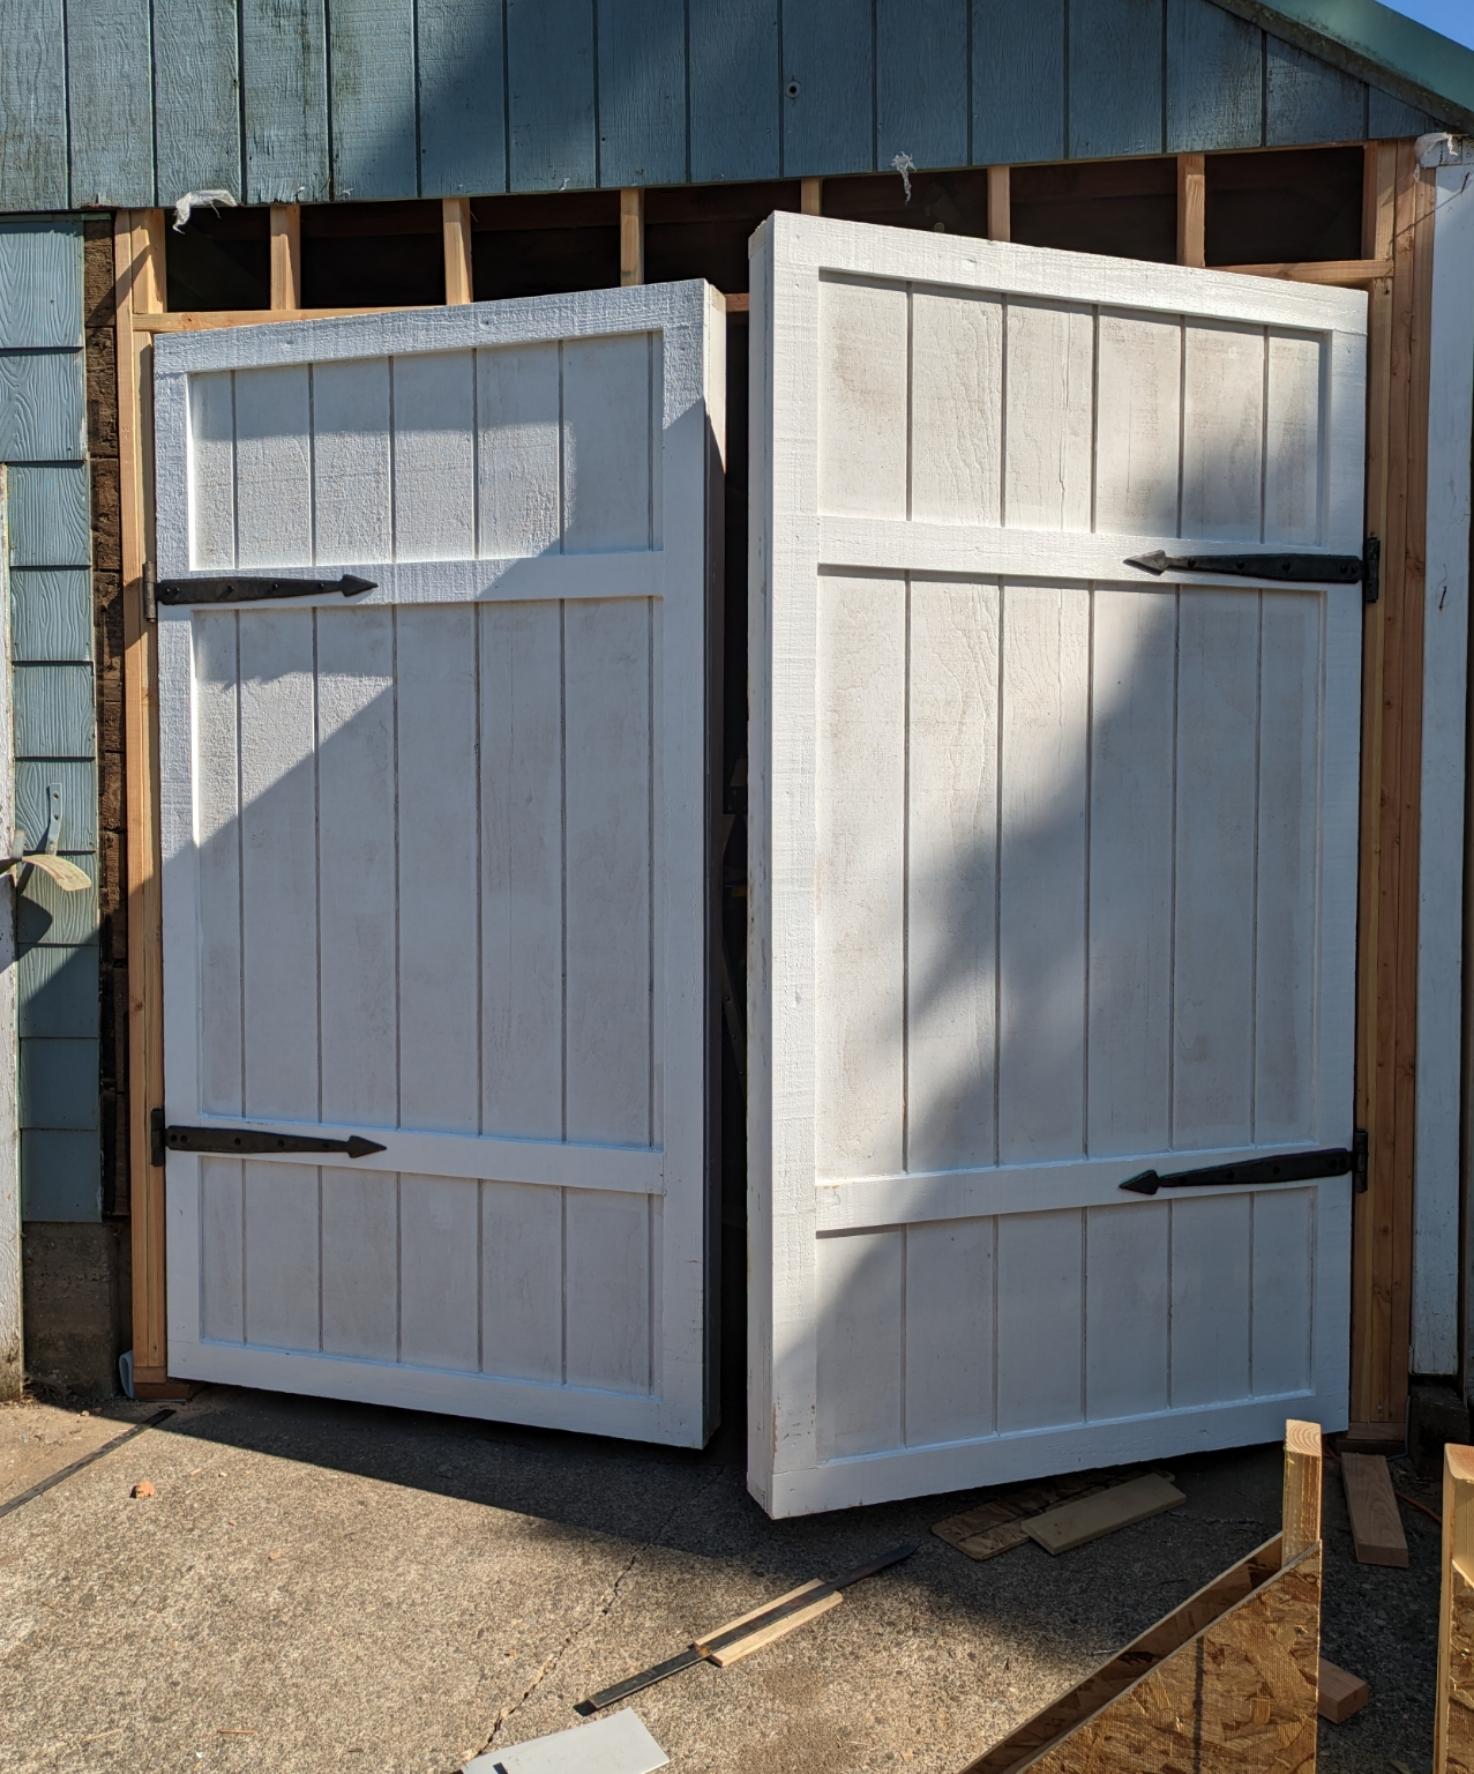
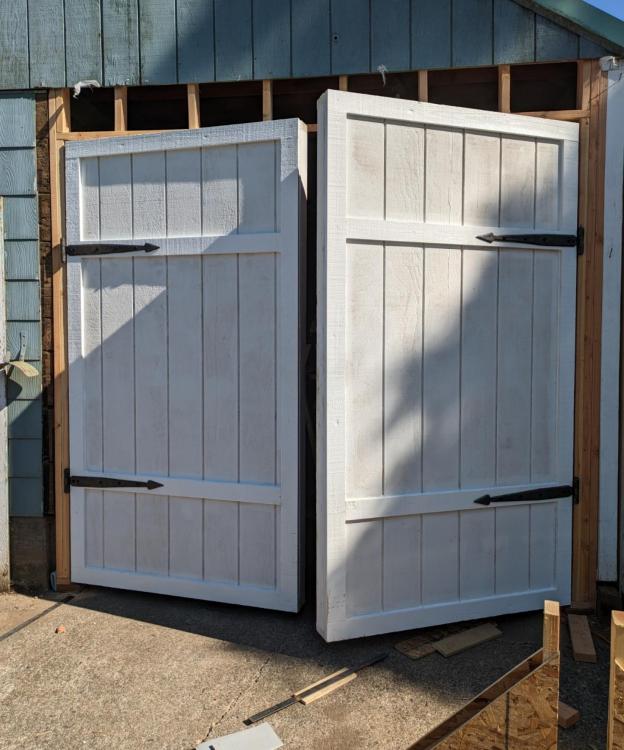
Oh yeah, that's a good thought. Would of saved me like 90+lbs of weight. But I really wanted the straps visible. The doors are 2x4 framed with 1/2"OSB and 1/2" T111 siding then 1/2" trim board. Lots of weight.
-
Yeah, no day but Billy. I hope none got injured. And happy independence day everybody!
-
Hey, if they function. I think that's the important part. And having a reminder of the progress you are making is totally a bonus.
-
Thanks Anvil. It's always nice when a project comes together.these were my first hinges I have attempted.
-
Thanks Frosty! It feels pretty good getting the shop closer to setup and running full swing.
-
Thanks George. My wife helped me a bit, when it came to shimming to level and helped guide all of my blocking and the door while trying to get them to line up well enough. I did the lifting. I also built a "door jack(??not sure what to call it)" type of tool out of some leftover OSB and 2x4s. To help hold the door in an upright position. but it's basically a fixture that the door sits down in and it supports the door from front and back so it wouldn't fall over and flatten me or the wife. Which was nice because we were able to set it up and move around it and move it around without having to always have hands on the door.
-
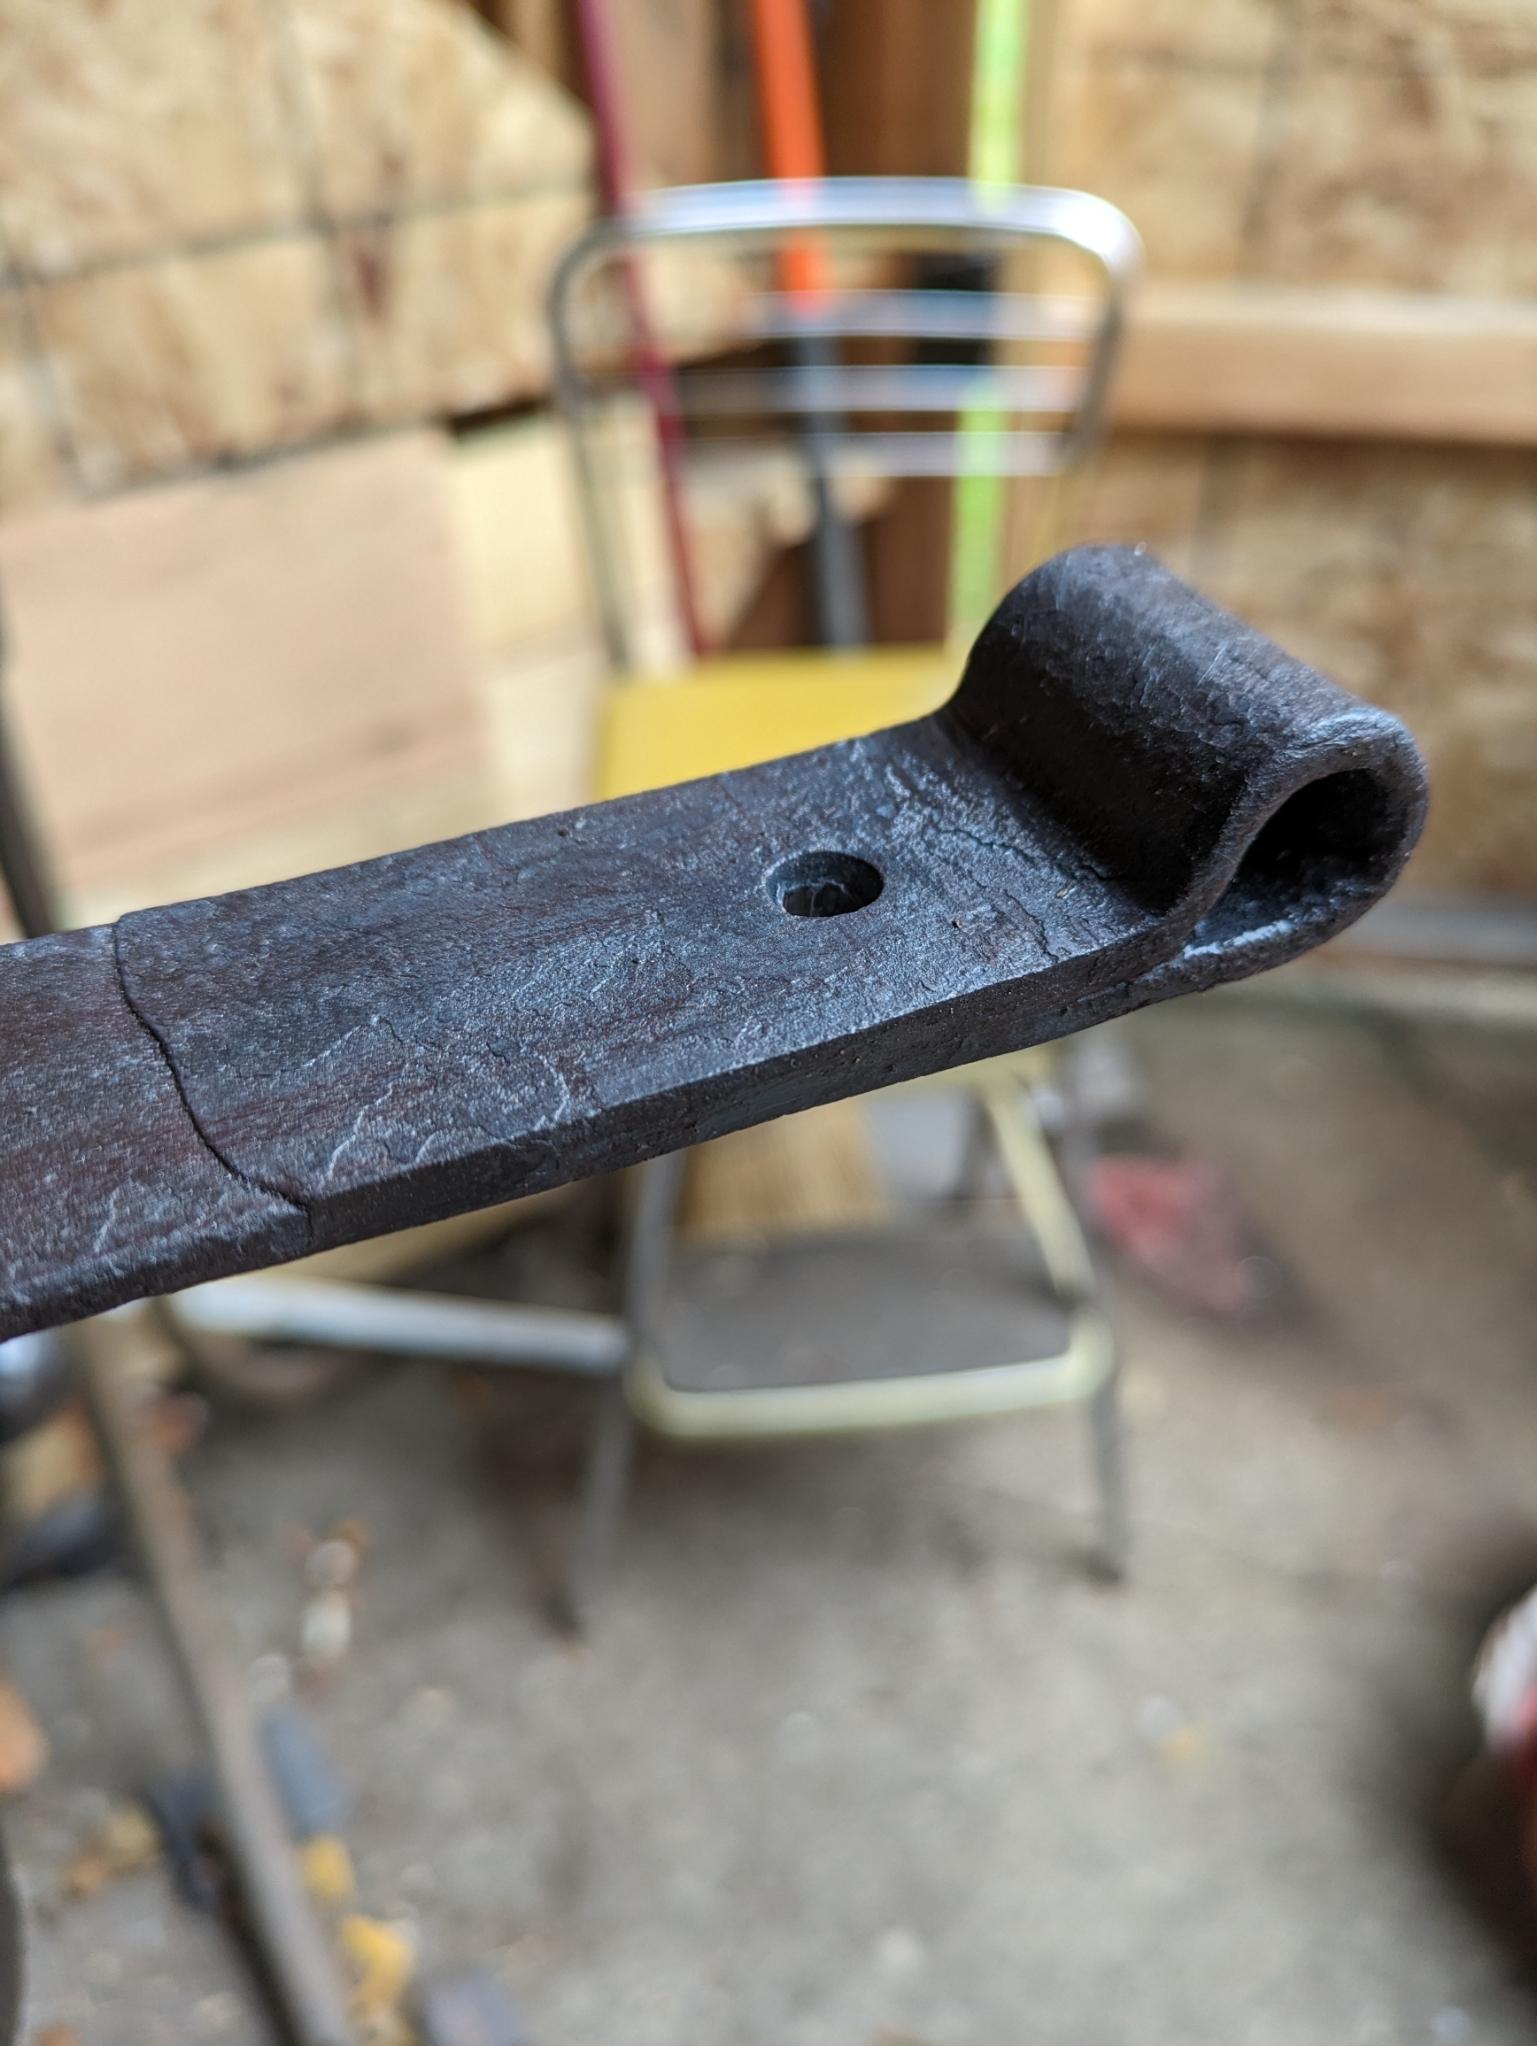
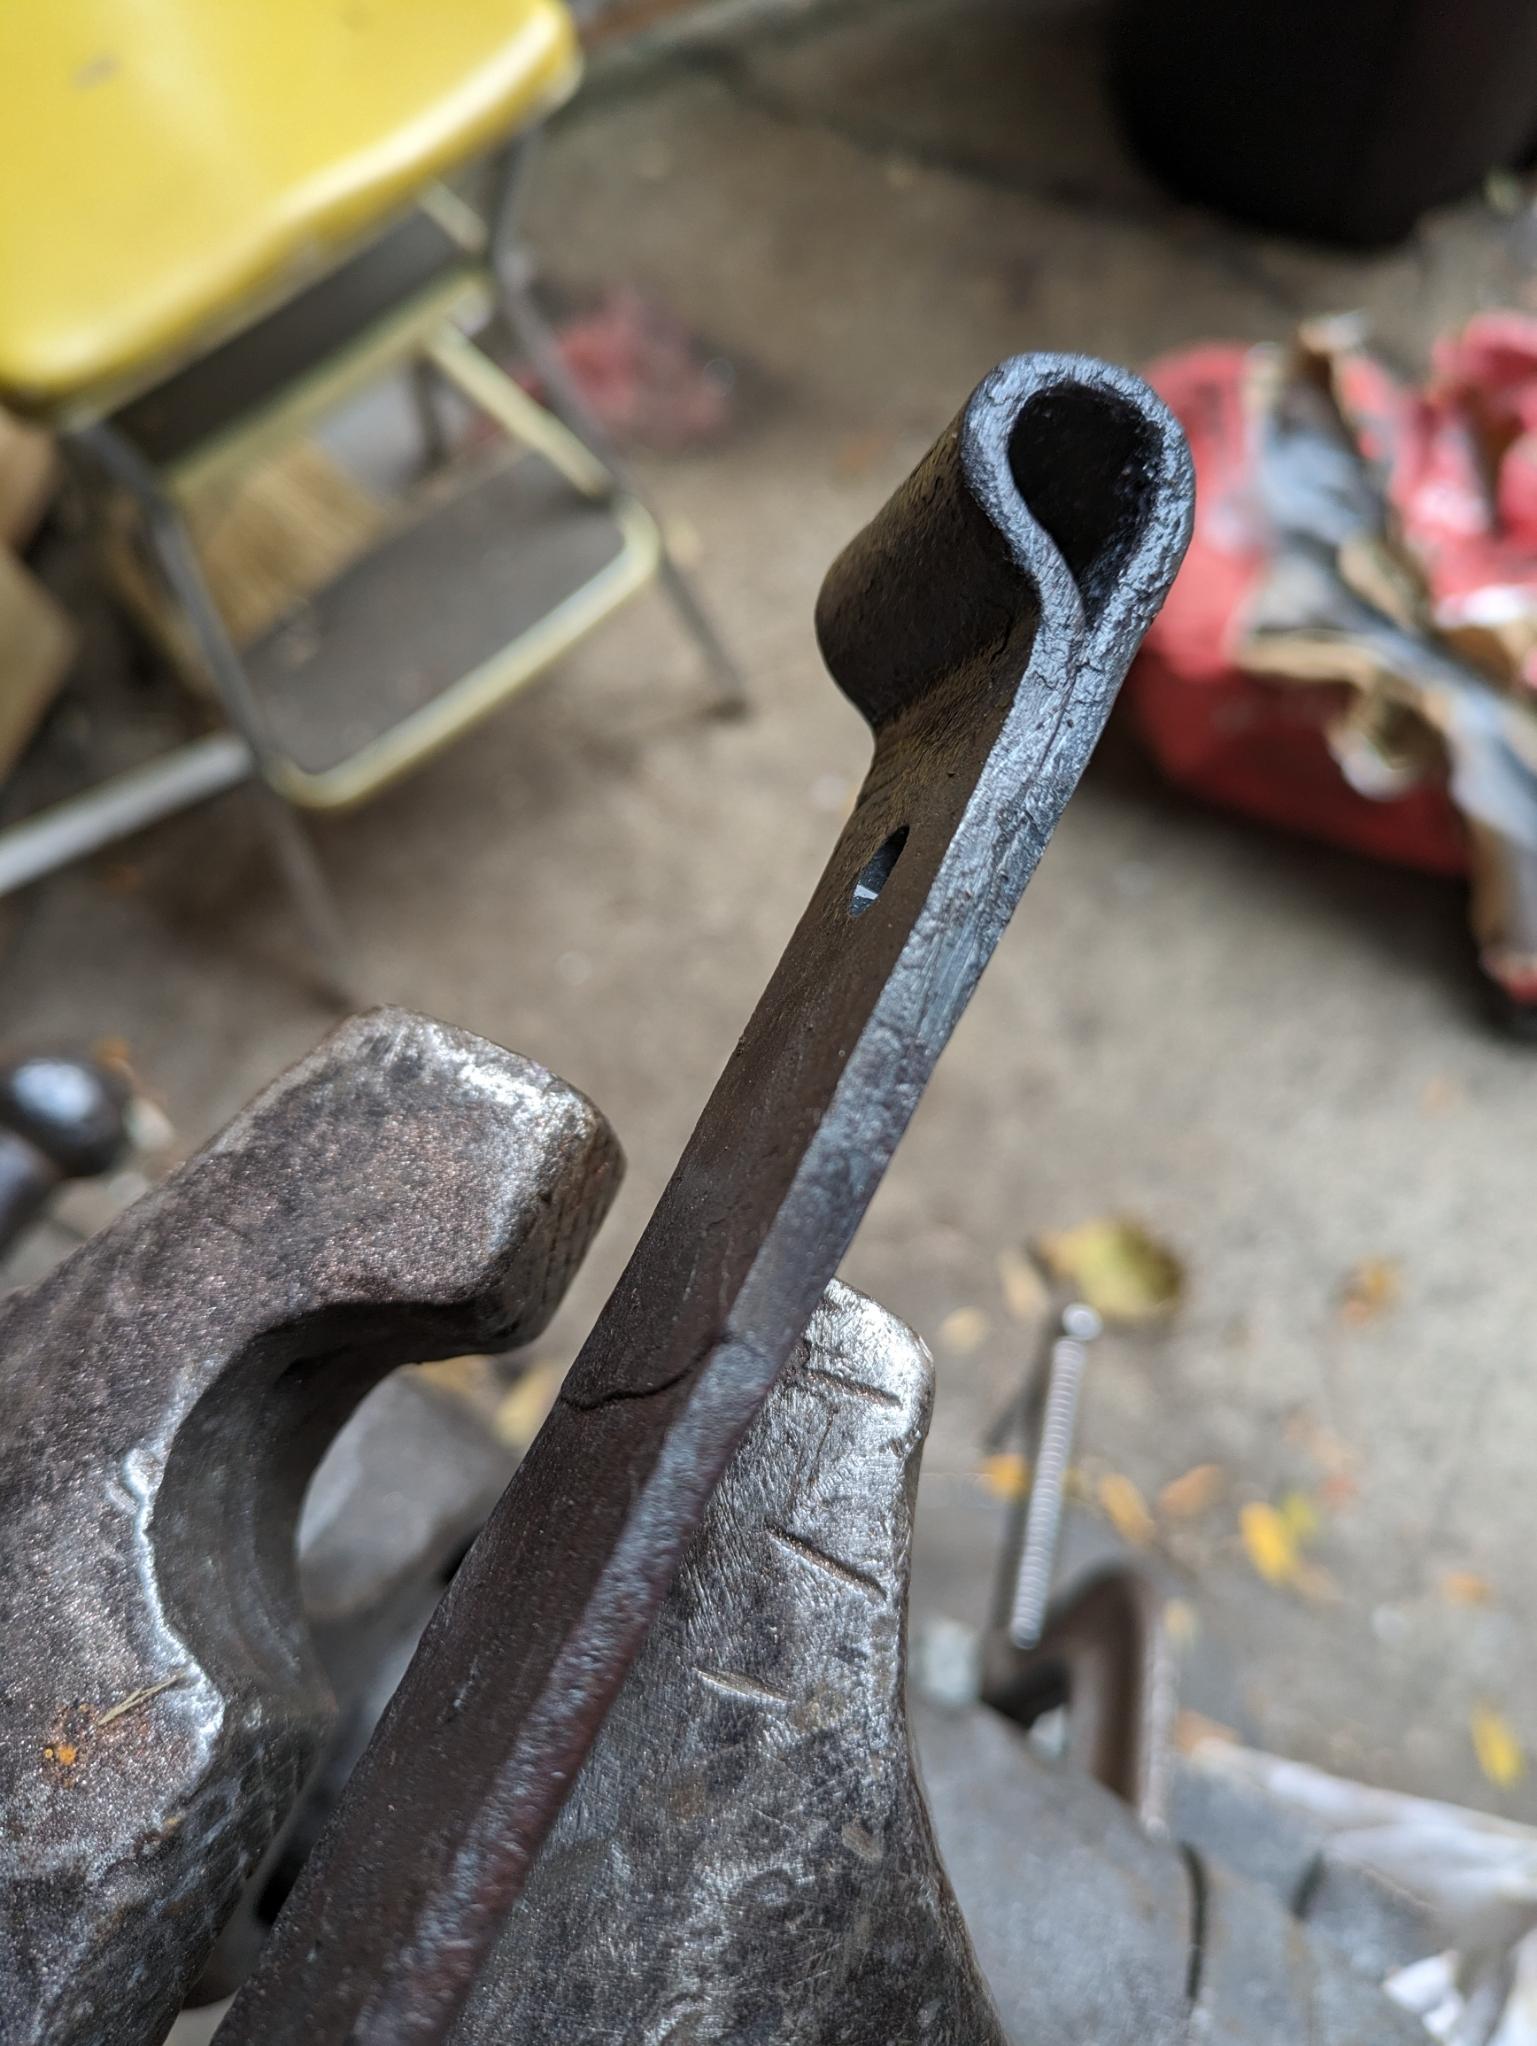
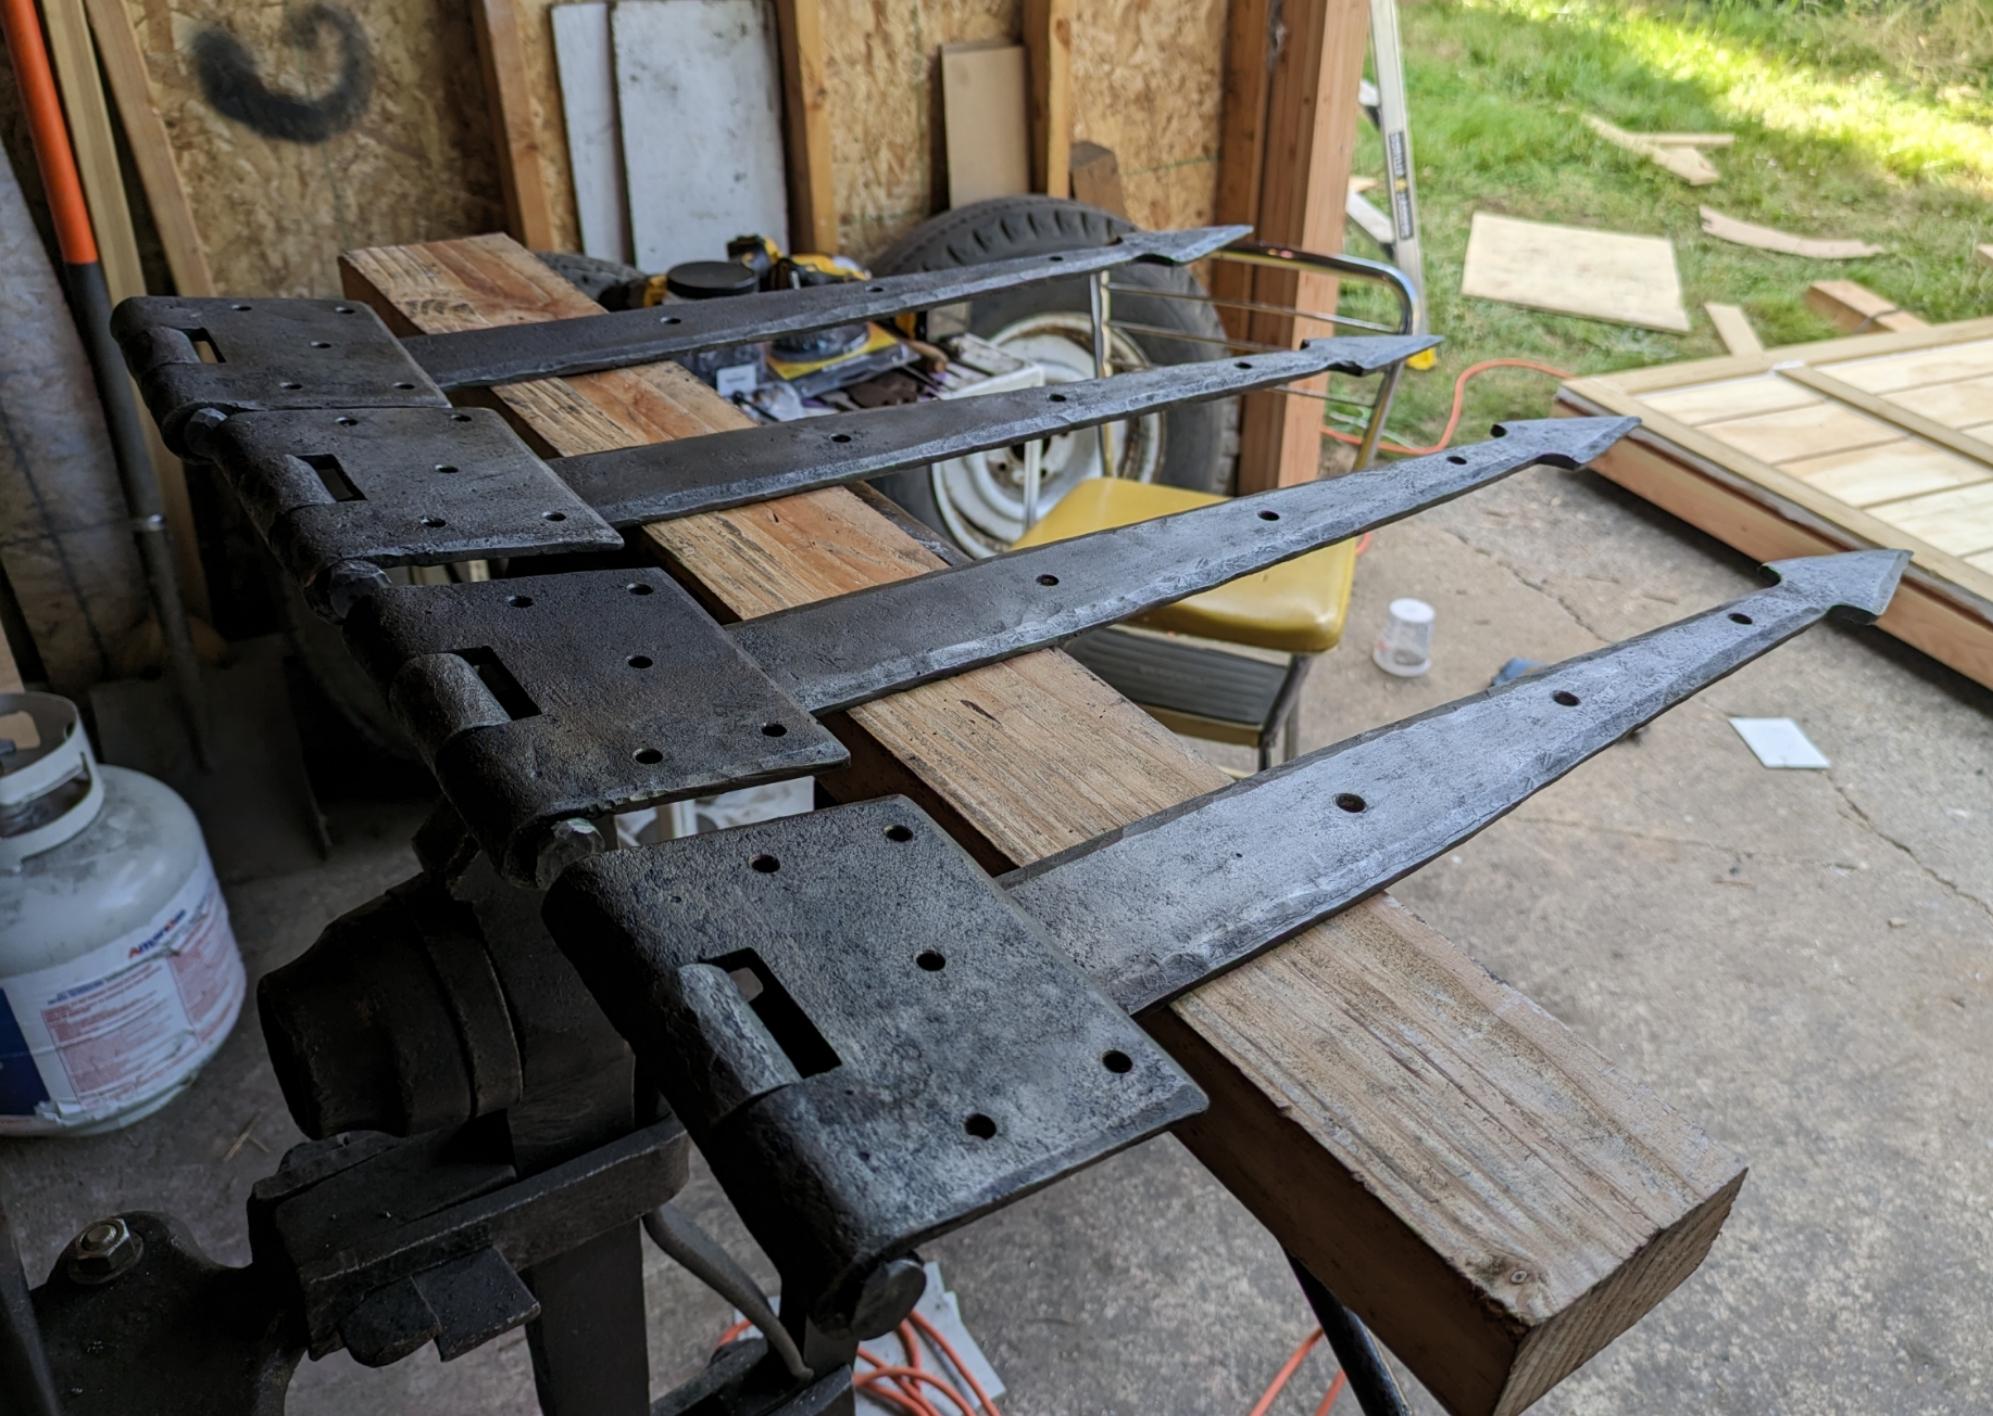
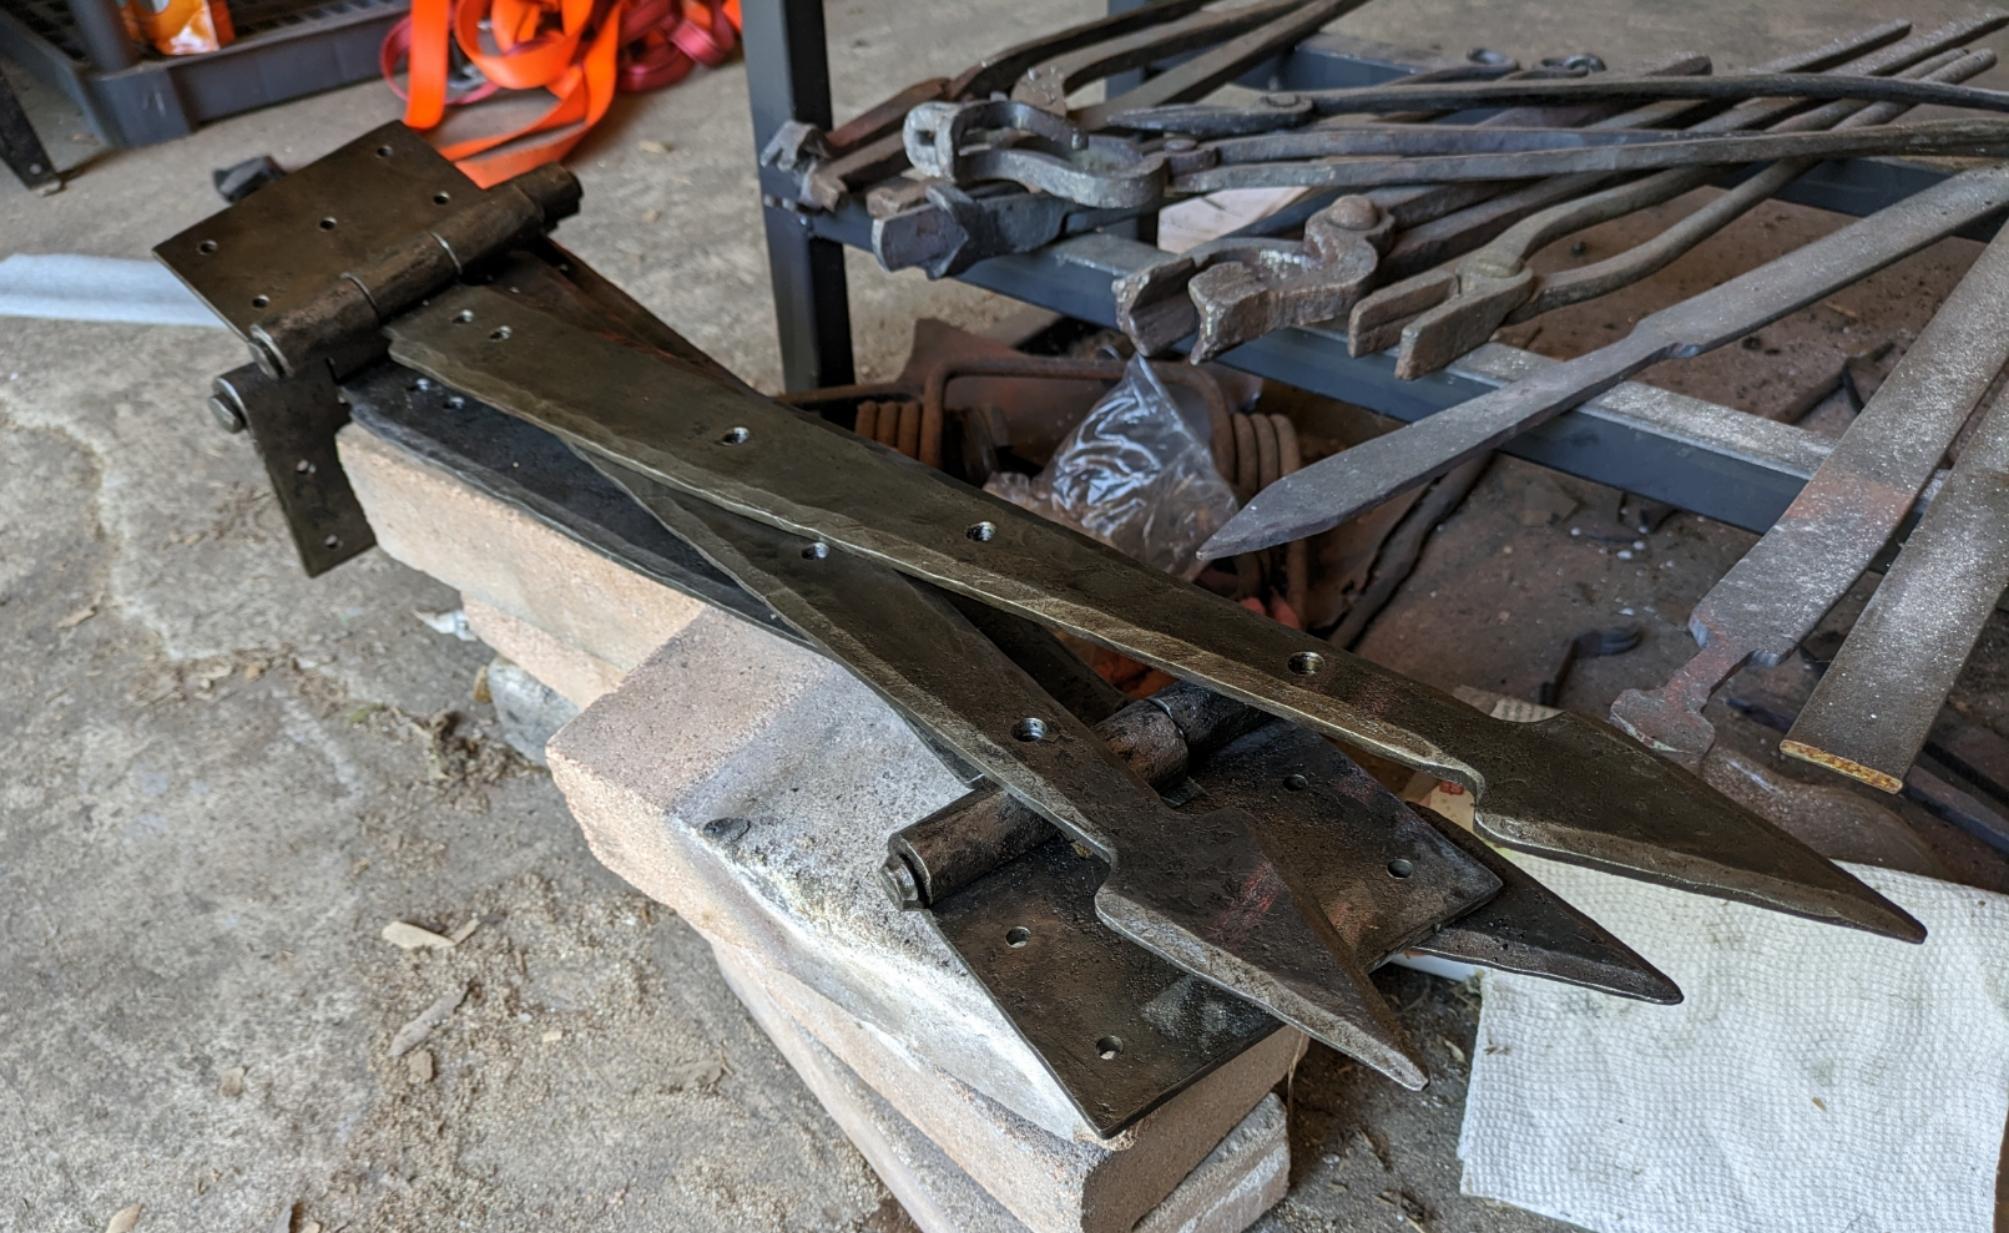
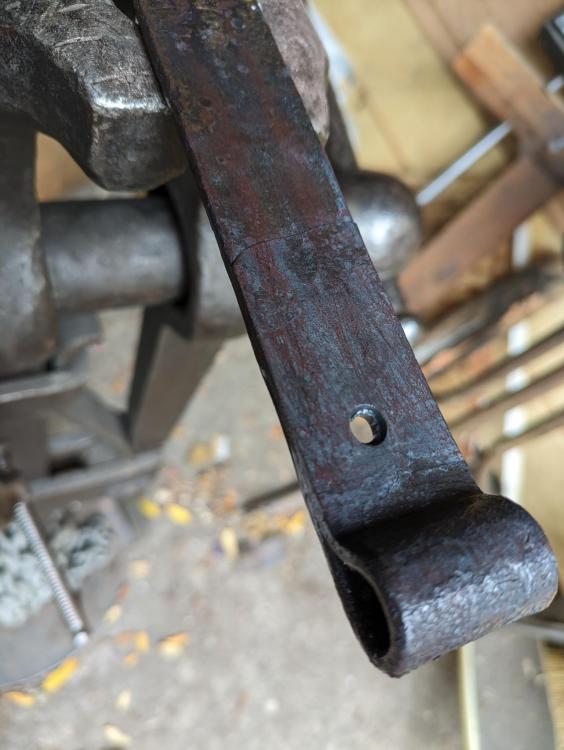
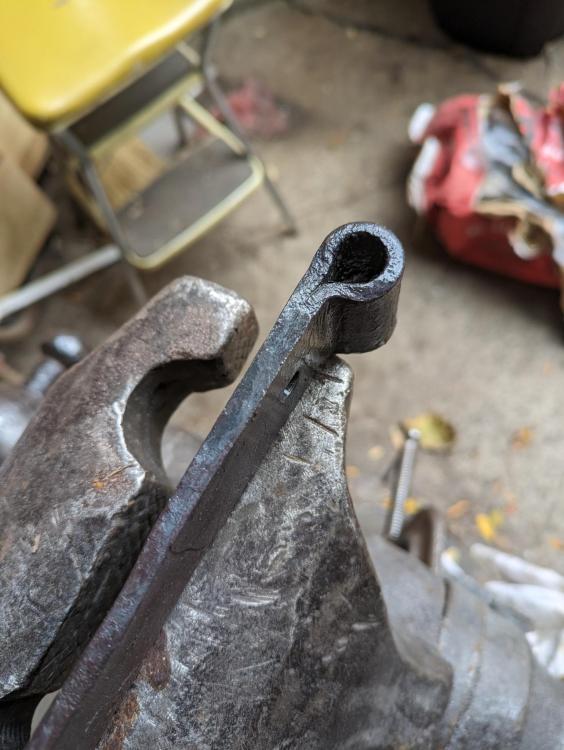
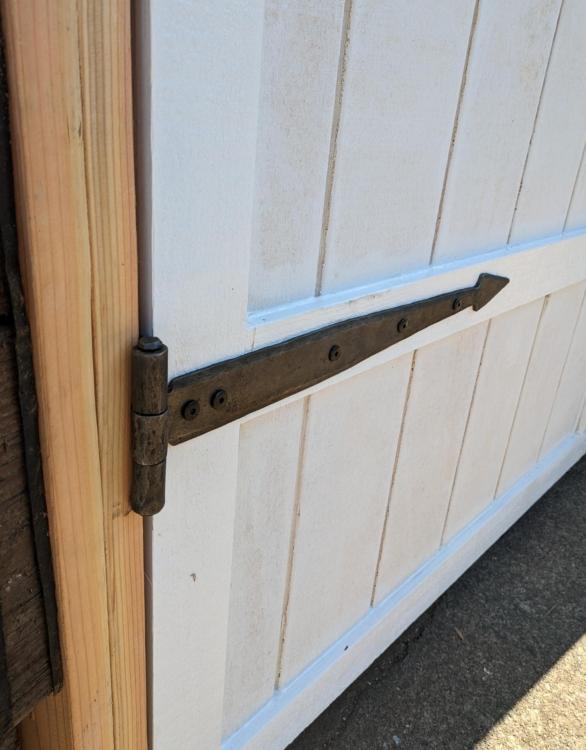
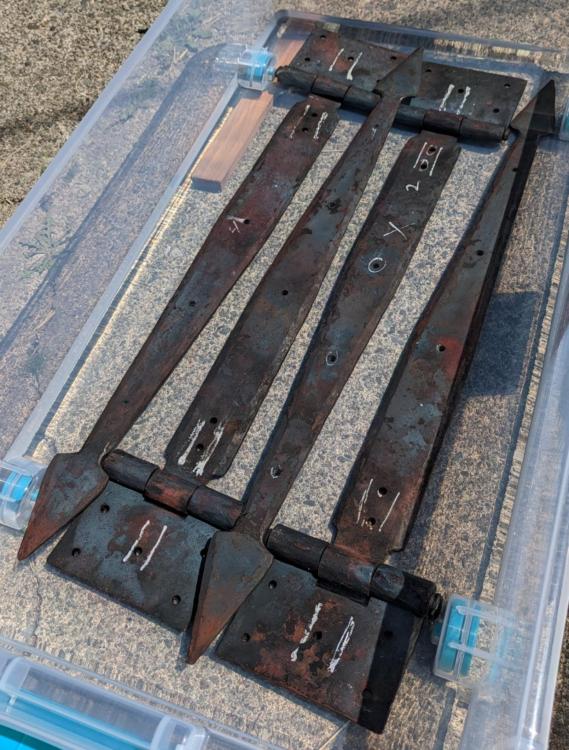
Hey guys, sorry I've been out of the loop again broke my phone a few weeks back and finally got a new one. Unfortunately, that means I have lost all of my photos from the last few years, as well as a bunch of progress shots of a bunch of my projects, this one included. So you will just have to use your imagination a little. Well... Just to catch you up, I have slowly been working on building out my smithy. It started as an attached carport adjoining my detached garage. Over the last year or so I have been working on different aspects of the shop build in-between other home renovations. Started out by framing in and enclosing 2 of the open walls. Leaving the front wide open. I then built out my new (and first) gass forge. And a new anvil stand. Once I had those I couldn't help but move a few tools into the space and start working. After a handful of projects made in a half a** and half built half of a space, I decided it was time to make it a full a** space. But before I could move the rest of my tools into the smithy and out of the domestic garage, I needed to make the space secure. It needed a set of barn doors. And a set of hand forged strap hinges to hold em up. So I set out on making a big old set of hinges. The doors are about 4 and a quarter feet wide and 8 feet tall, weighing just about 180lbs. each if not more. So I needed the hinges to be sturdy. I decided to make them out of 1/4 inch plate of mild steel for the straps and the jam plates. I started out by cutting the stock plate down to size for the jam plates, and straps. I then forged bevels up n the jam plates and rolled the hinges barrels and drifted them to size. Next I fullered down the material for the spade finial using a spring fuller I made a little while back. Then chased that taper back to about the midway point of the strap. Followed by bevels to knock off the corners. Then to rolling and drifting the barrel, followed by straightening and tinkering for a while. I cut the hinges barrels with an angle grinder and and some hand files to clean them up. Next I made my hinge pins and started with an upset on one end to become rivet head. Once all the pins were cleaned up and cut to length I fitted them to straps and plates, and riveted over the ends of the pins. And tried to true everything up at the anvil. Then I got all the holes drilled and counter sunk. Now that I had the hinges put together, I dropped them all in a vat of white vinegar for about 24 hours,to eat all the forge scale off. Pulled em out and scrubbed em down with baking soda water. And hit em with a wire wheel to finish cleaning them up. I then used a bit of heat and some "blacksmiths finish paste" mostly BLO, bees wax and terp. With a bunch of charcoal dust mixed in. Then I built the doors, I'll save you the carpentry stories. But I got the doors hung today and the hinges seem to swing freely with no issues. Other than I kind of stink at hanging doors, and there are some slight fitment issues that I will need to address before they will close securely. Next I will forge/fab a simple bolt lock and forge some handles.


-
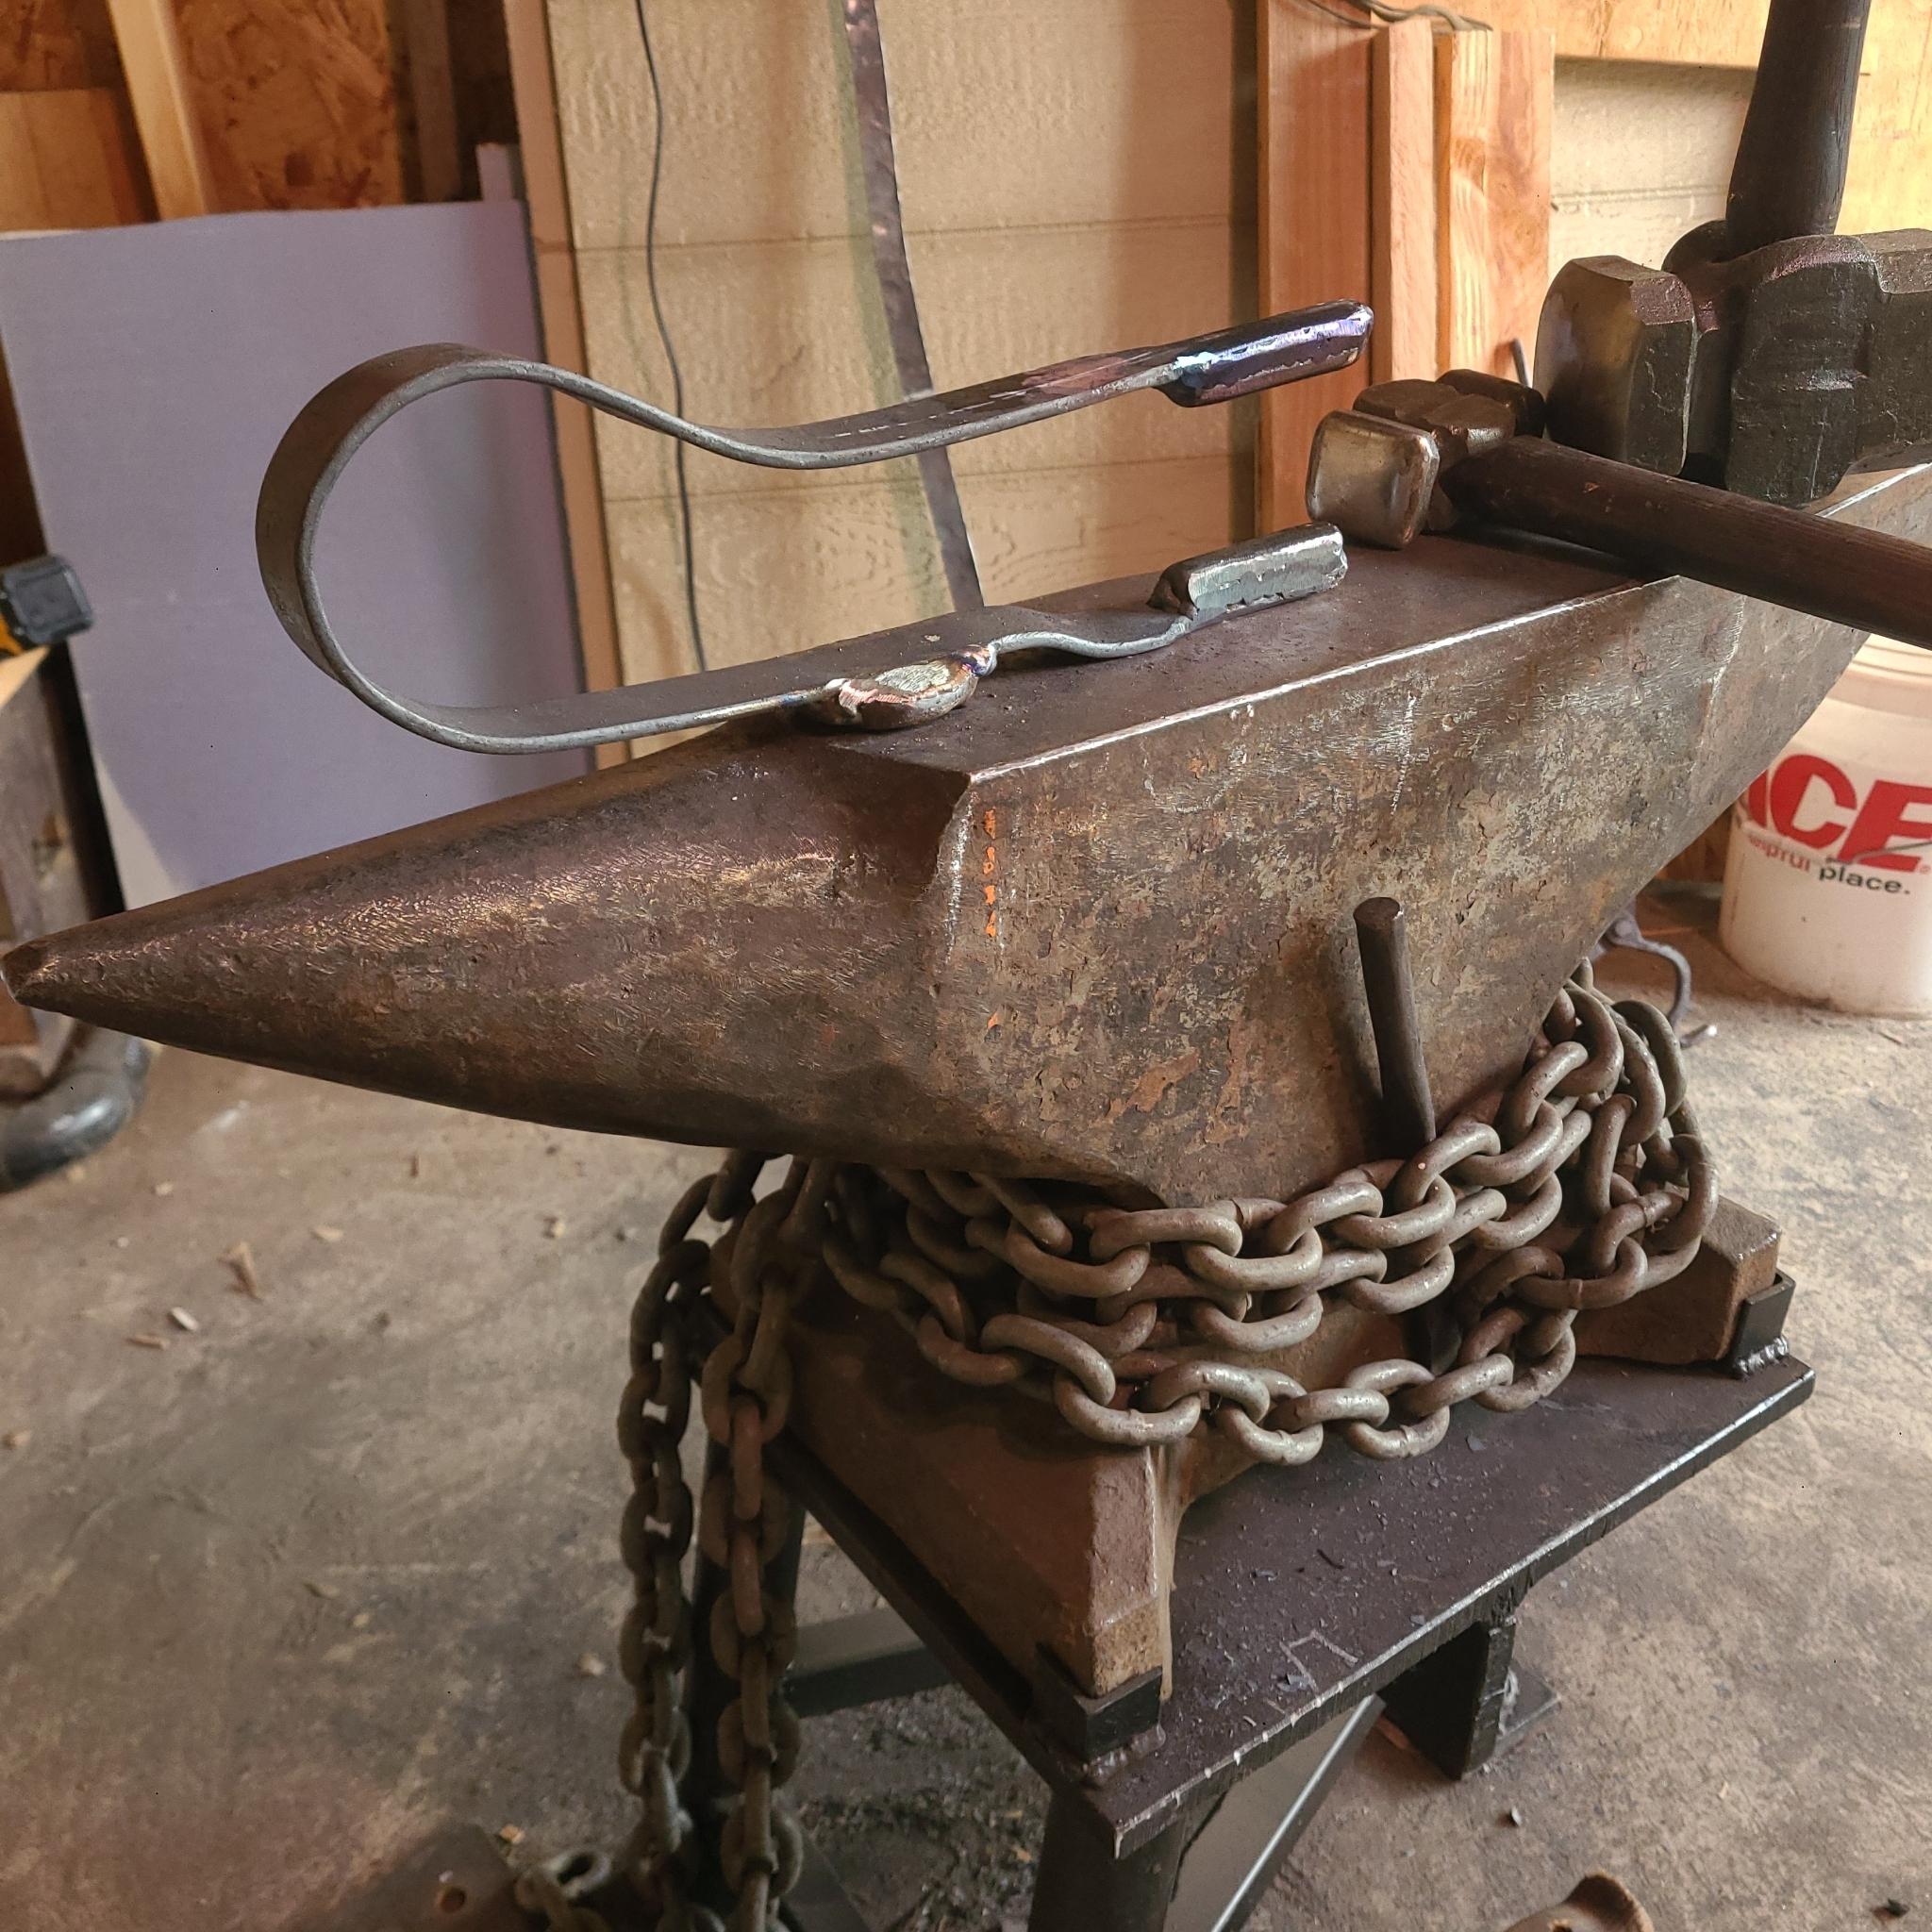
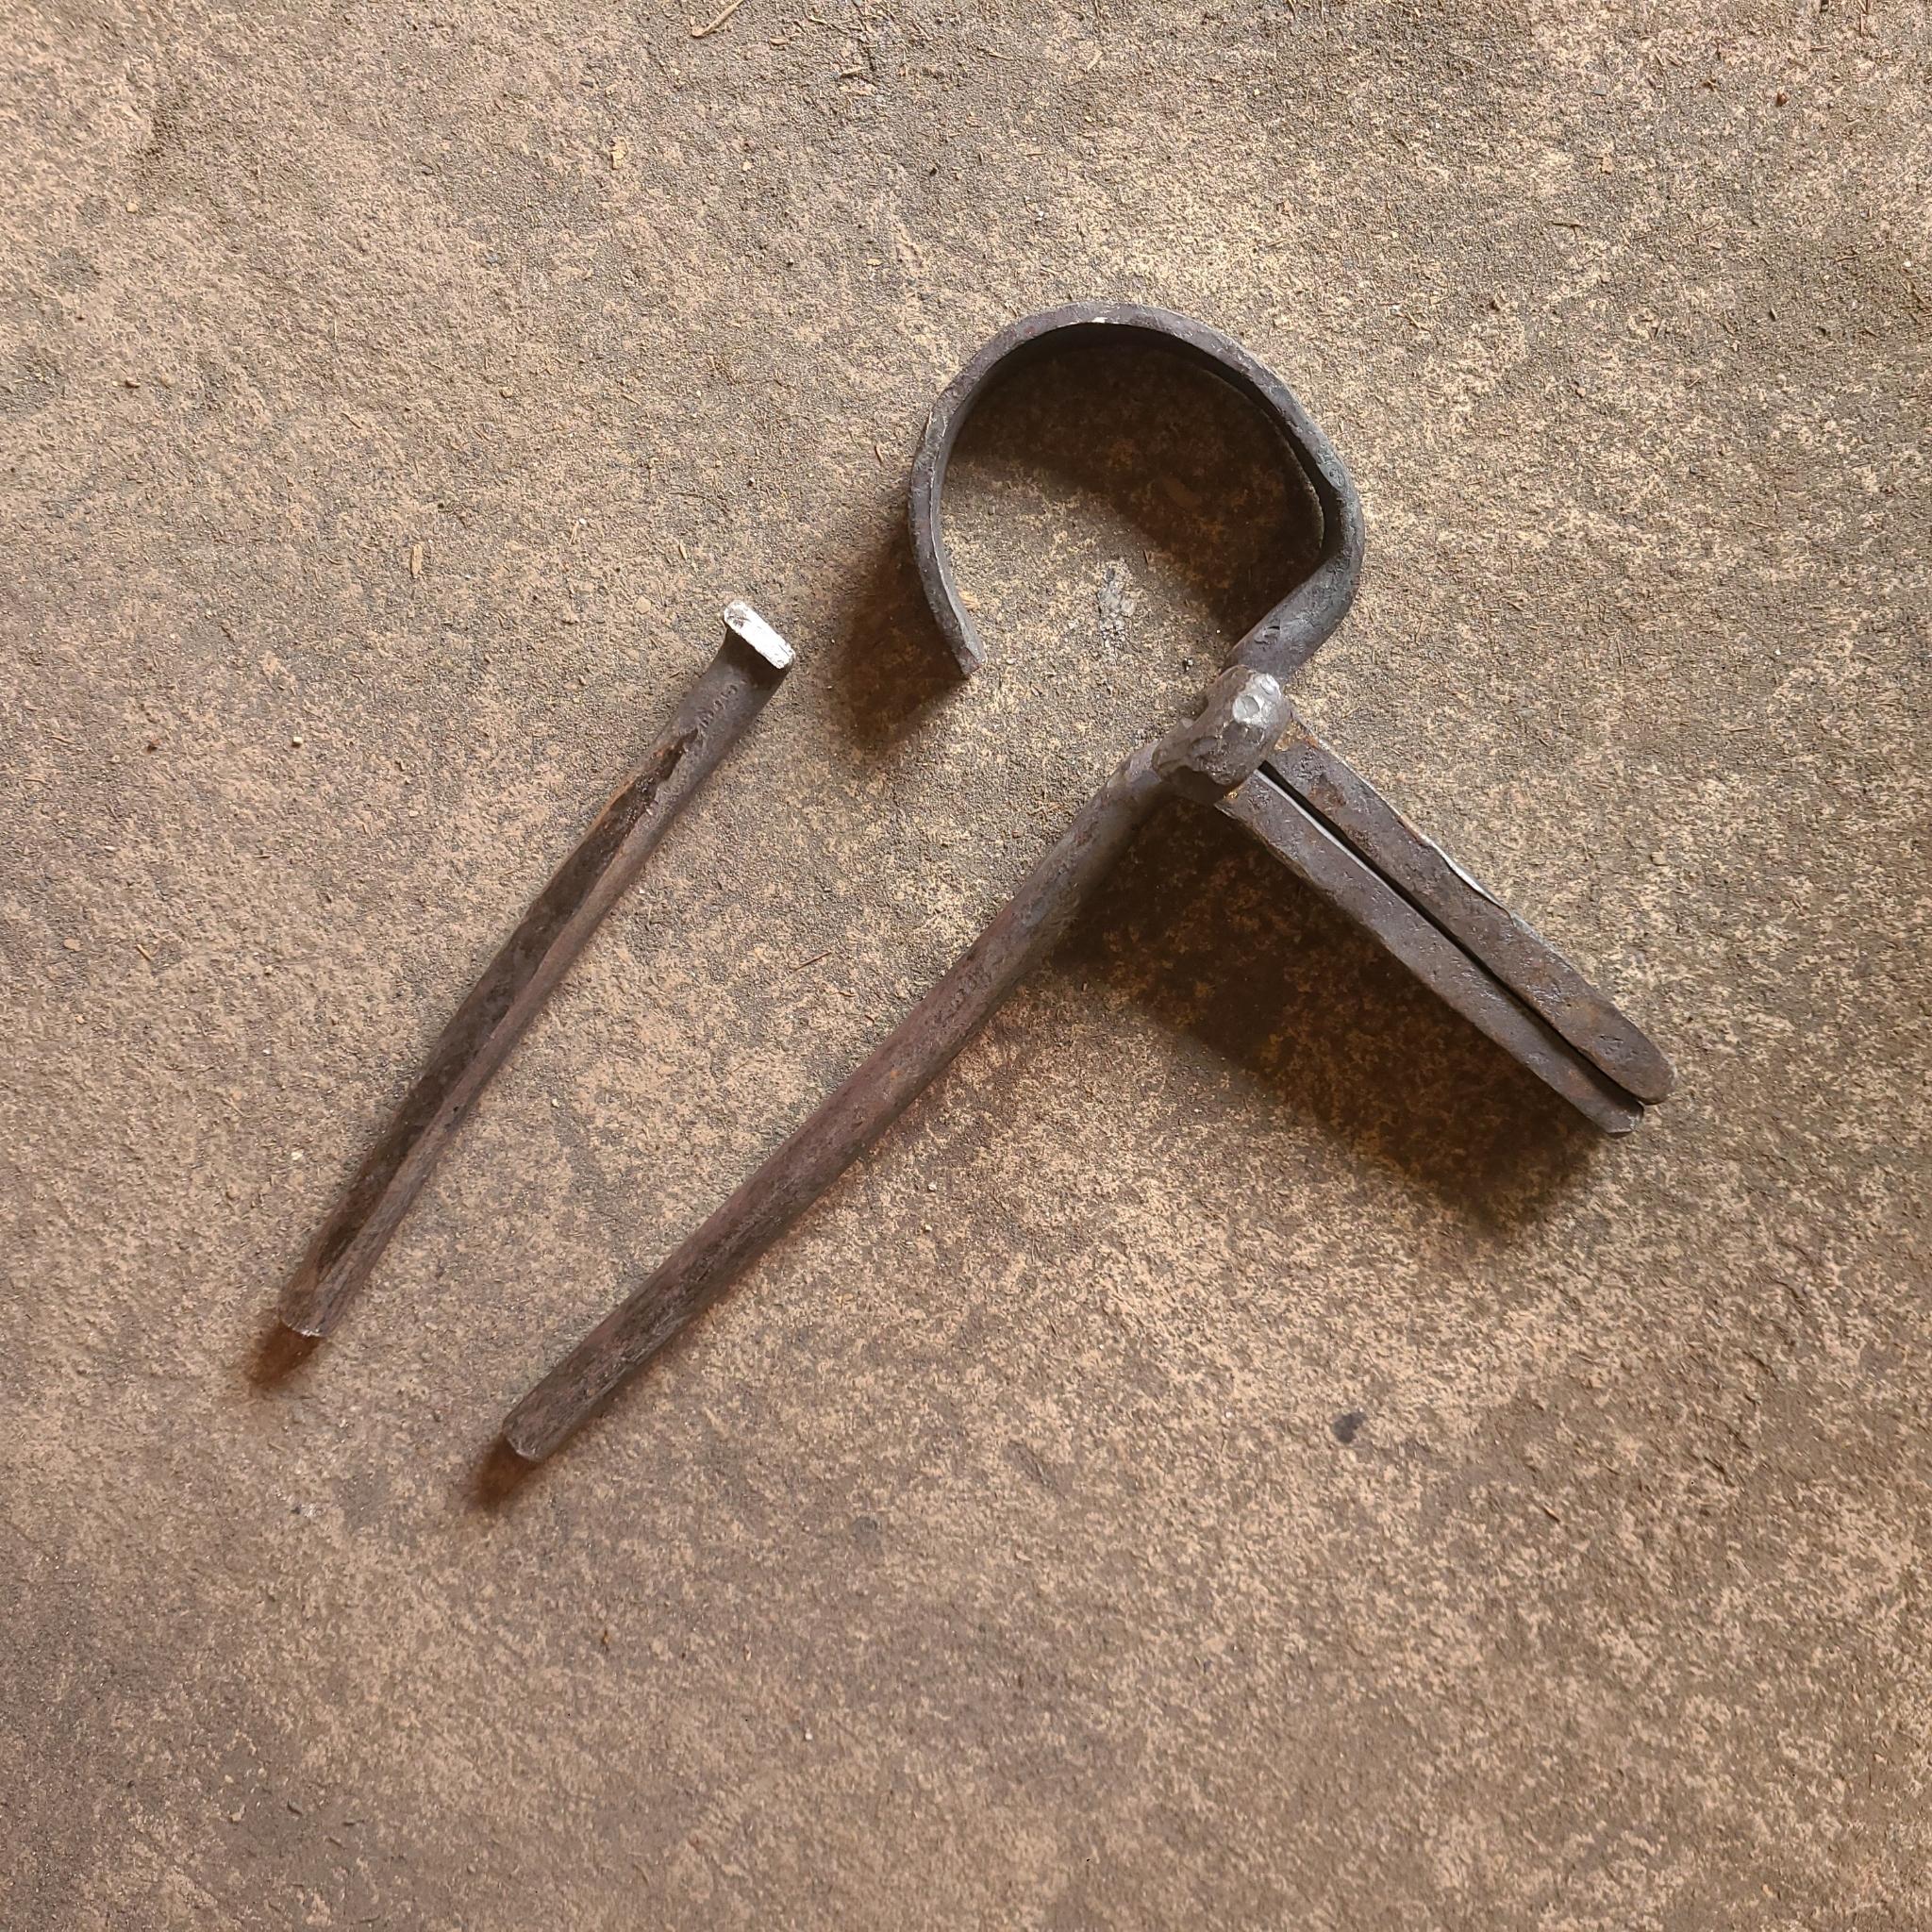
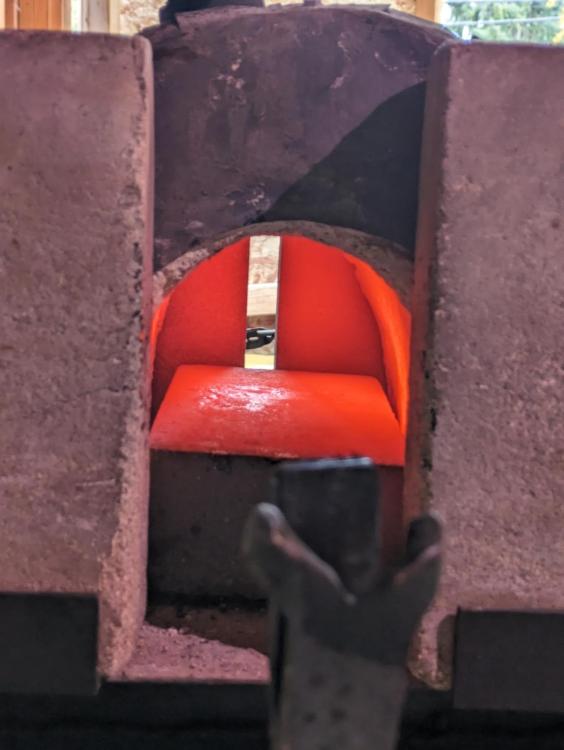
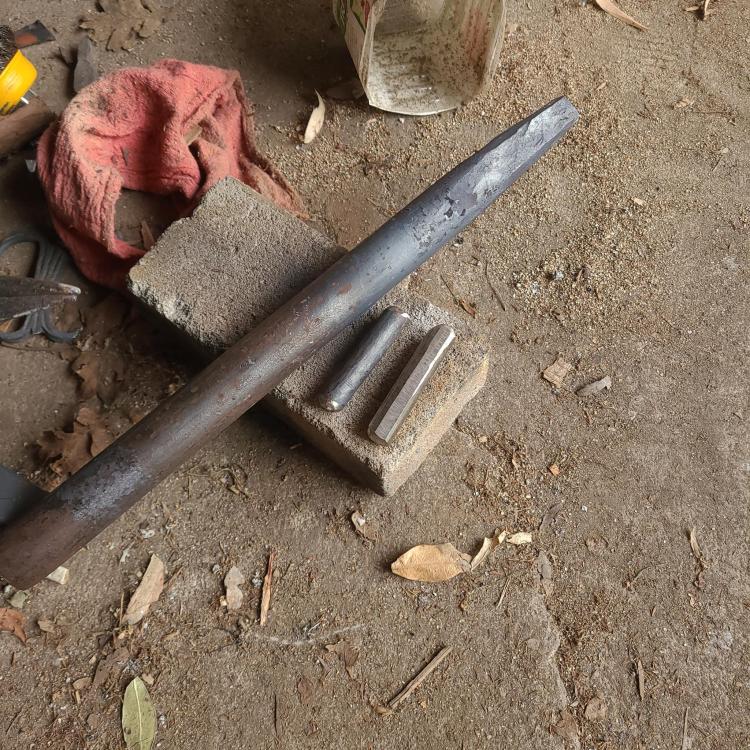
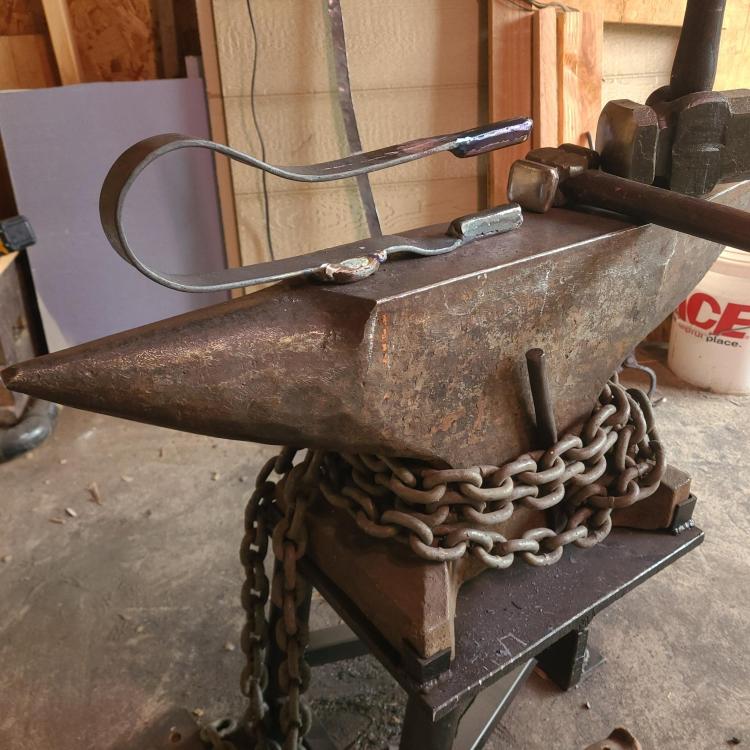
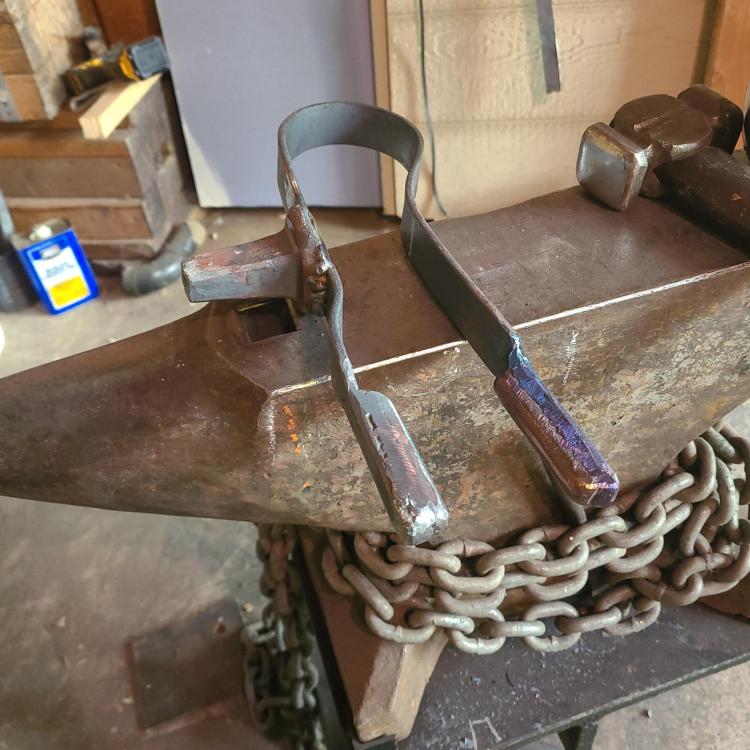
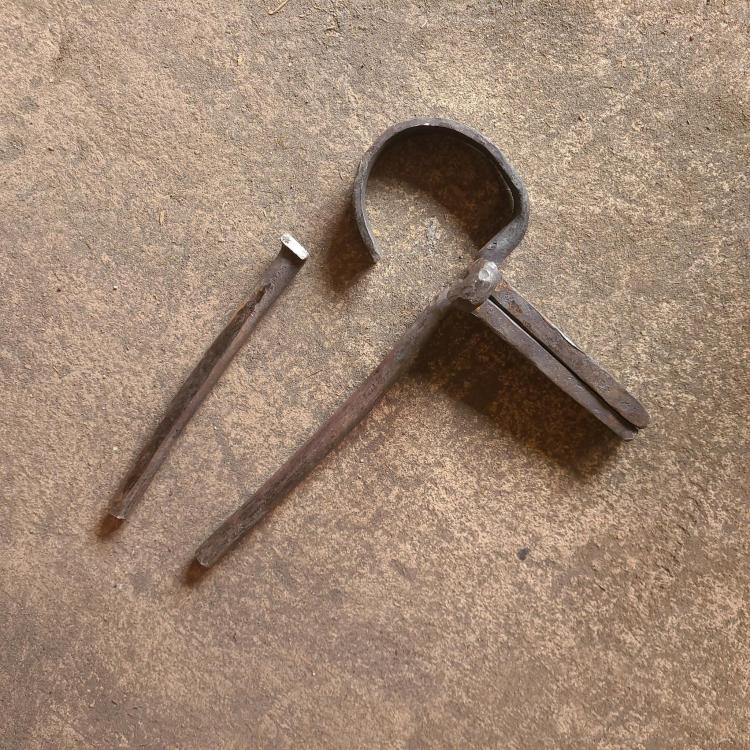
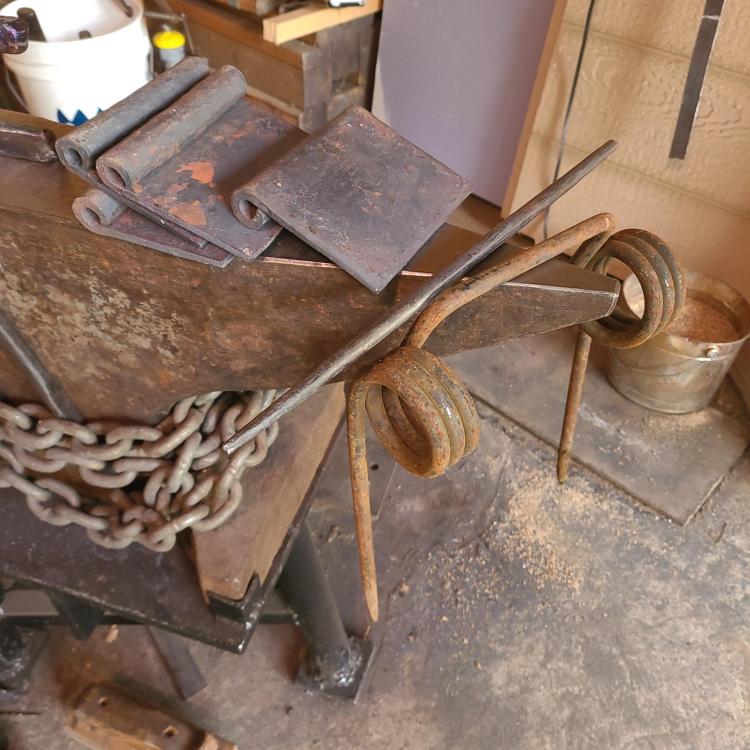
Yesterday I fired up the forge and as I was collecting myself and my tools to start working on some strap hinges for my shop doors, I reached down to pick up my spring fuller and realized that it was bent out of alignment. Mind you, this was just your run of the mill quickie spring fuller made from bent up mild round bar, with a flat spring section. It has had some pretty heavy use over its time, so it's already on its way out. but as I took a closer look I noticed a small fracture at the step between the round stock and the flat spring section. Gave it a light tap and it let loose. I guess making the straps that session wasn't in the cards. So I figured I should take the opportunity to make a more long term solution tomorrow(today). But, with the forge hot, I went ahead and rolled my hinge plate barrels. I'm making the hinges from 1/4 inch plate. And I needed a 5 inch section rolled for the barrel on the plate. Way more work than I was expecting. But it's done. I had to make a pretty long drift for to fit the long barrel, I picked up some random farm equipment springs from the scrap yard, i left it in a normalized state for use. Today I got in to the scrap yard first thing and made it home to light the forge by 9 am. I picked up some inch and a quarter round bar to make some hardie shanks from. Once the forge was hot I threw that in to heat up while I preped a couple of 3 inch pieces of coil spring and a length of 1 1/4" flat bar. I forged down each end of the flat bar to about a 3.5" section at 3/4"x3/8". Then I knocked a square taper on about 3 inches of my 1 1/4" round, and broke the corners to fit my hardie hole. Then cut it off and upset it in to the hardie hole using my 13lb sledge for the first time!!! Made real short work if it. Only took 3 heats to upset about 1 1/4" of 1 1/4" down to about a quarter of an inch. I love it! I also used the time between heats to bend up the flat bar into my spring shape. I preped all of my welds. Grinding a flat on the back of the coil spring steel, so it doesn't try to roll away and sits flat on the surfaces of mild steel spring ends, which will also be the struck portion of this tool. I gave the spring steel fuller bits a good long pre heat with a torch before burning them on to the spring section with my mig welder. I also mig welded the hardie shank to the bottom of the spring. Taking special care to orient the shank correctly with how it fits the hole in my anvil. Gave it a clean up with the grinder, and a final tweak or two for alignment. And finished up before noon. Back on with the hinges tomorrow.
-
Thanks Shainarue! I'm glad you all are enjoying it.