ChiefLittleBair
-
Posts
77 -
Joined
-
Last visited
Content Type
Profiles
Forums
Articles
Gallery
Downloads
Events
Everything posted by ChiefLittleBair
-
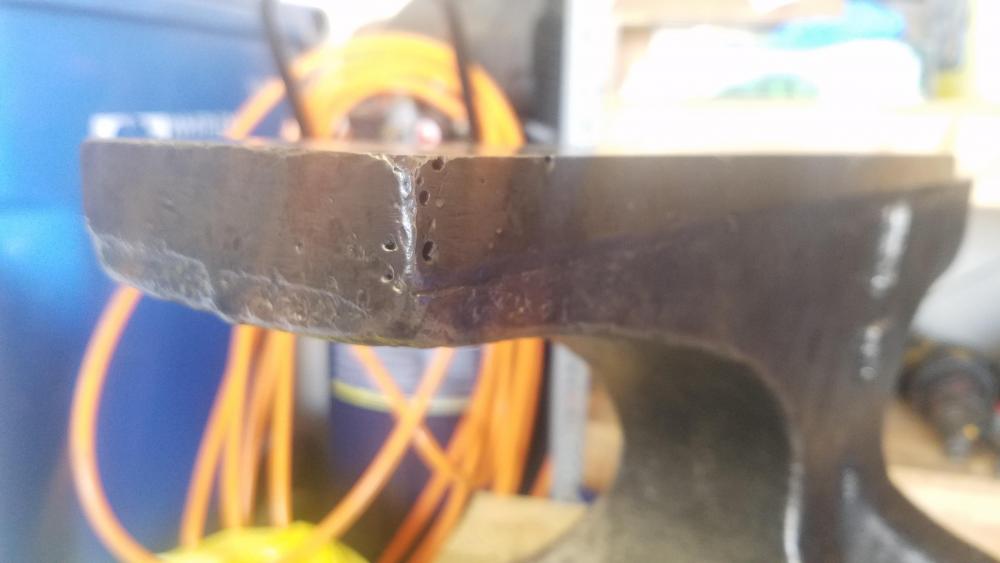
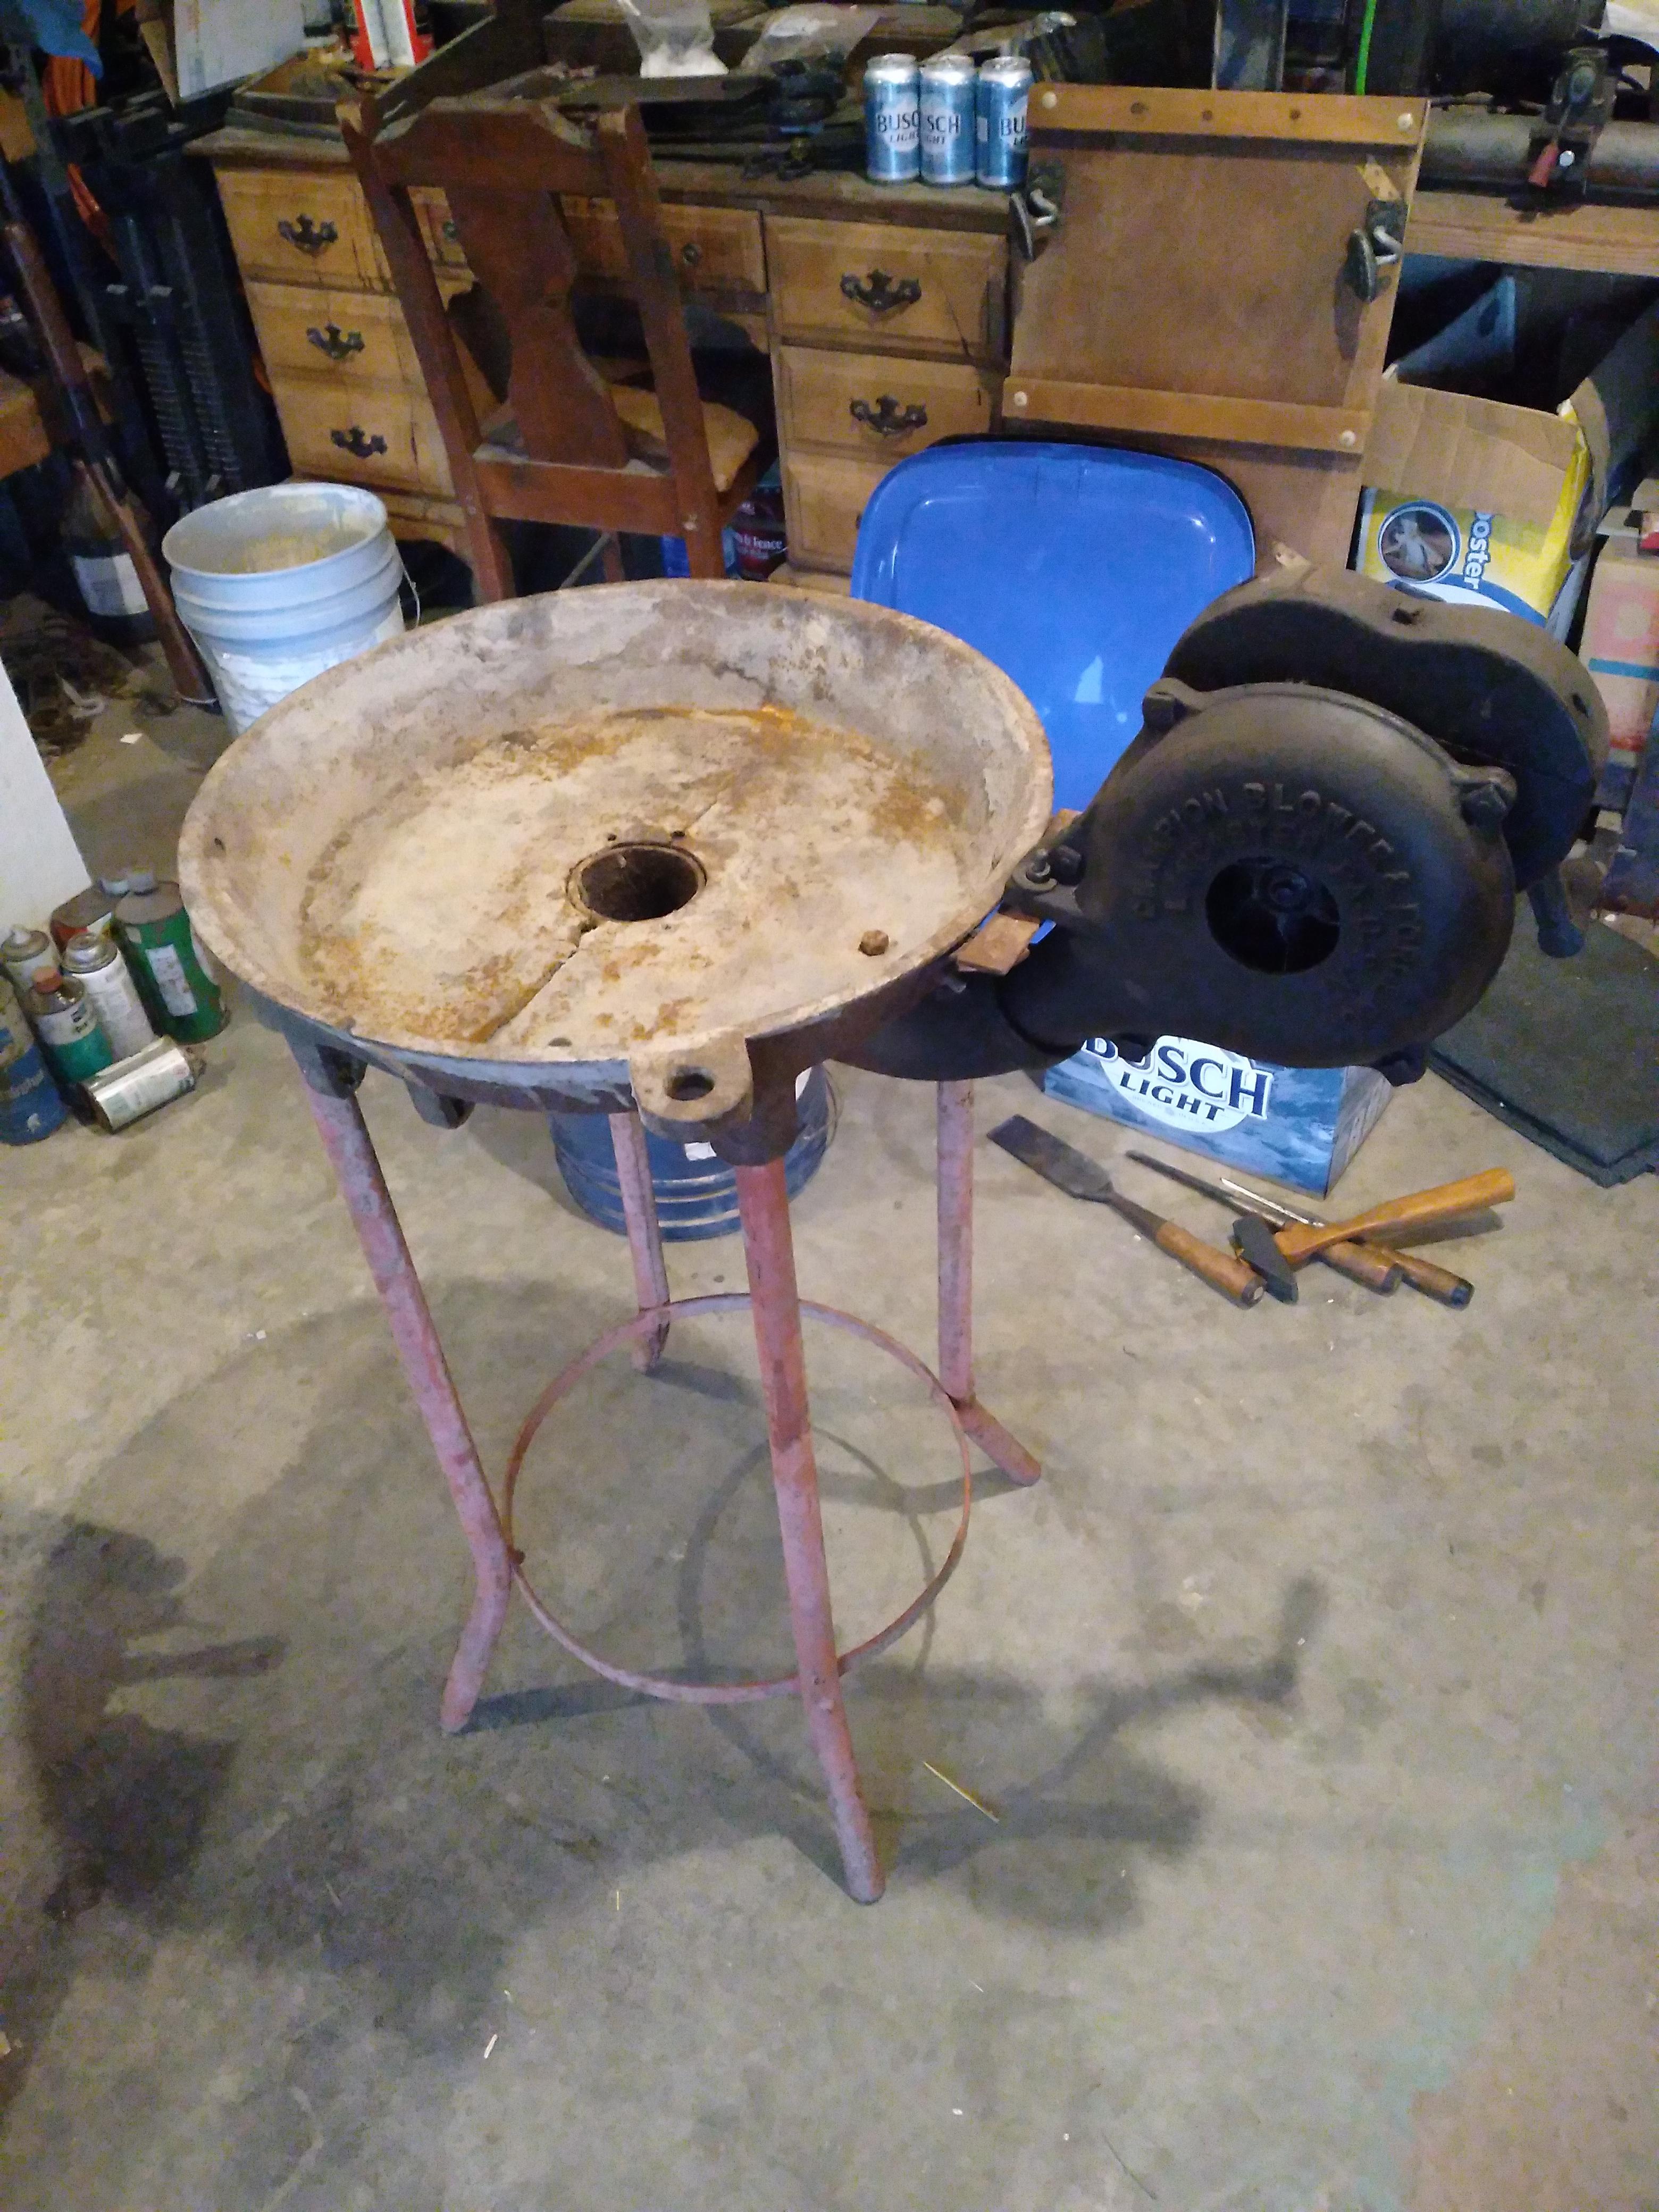
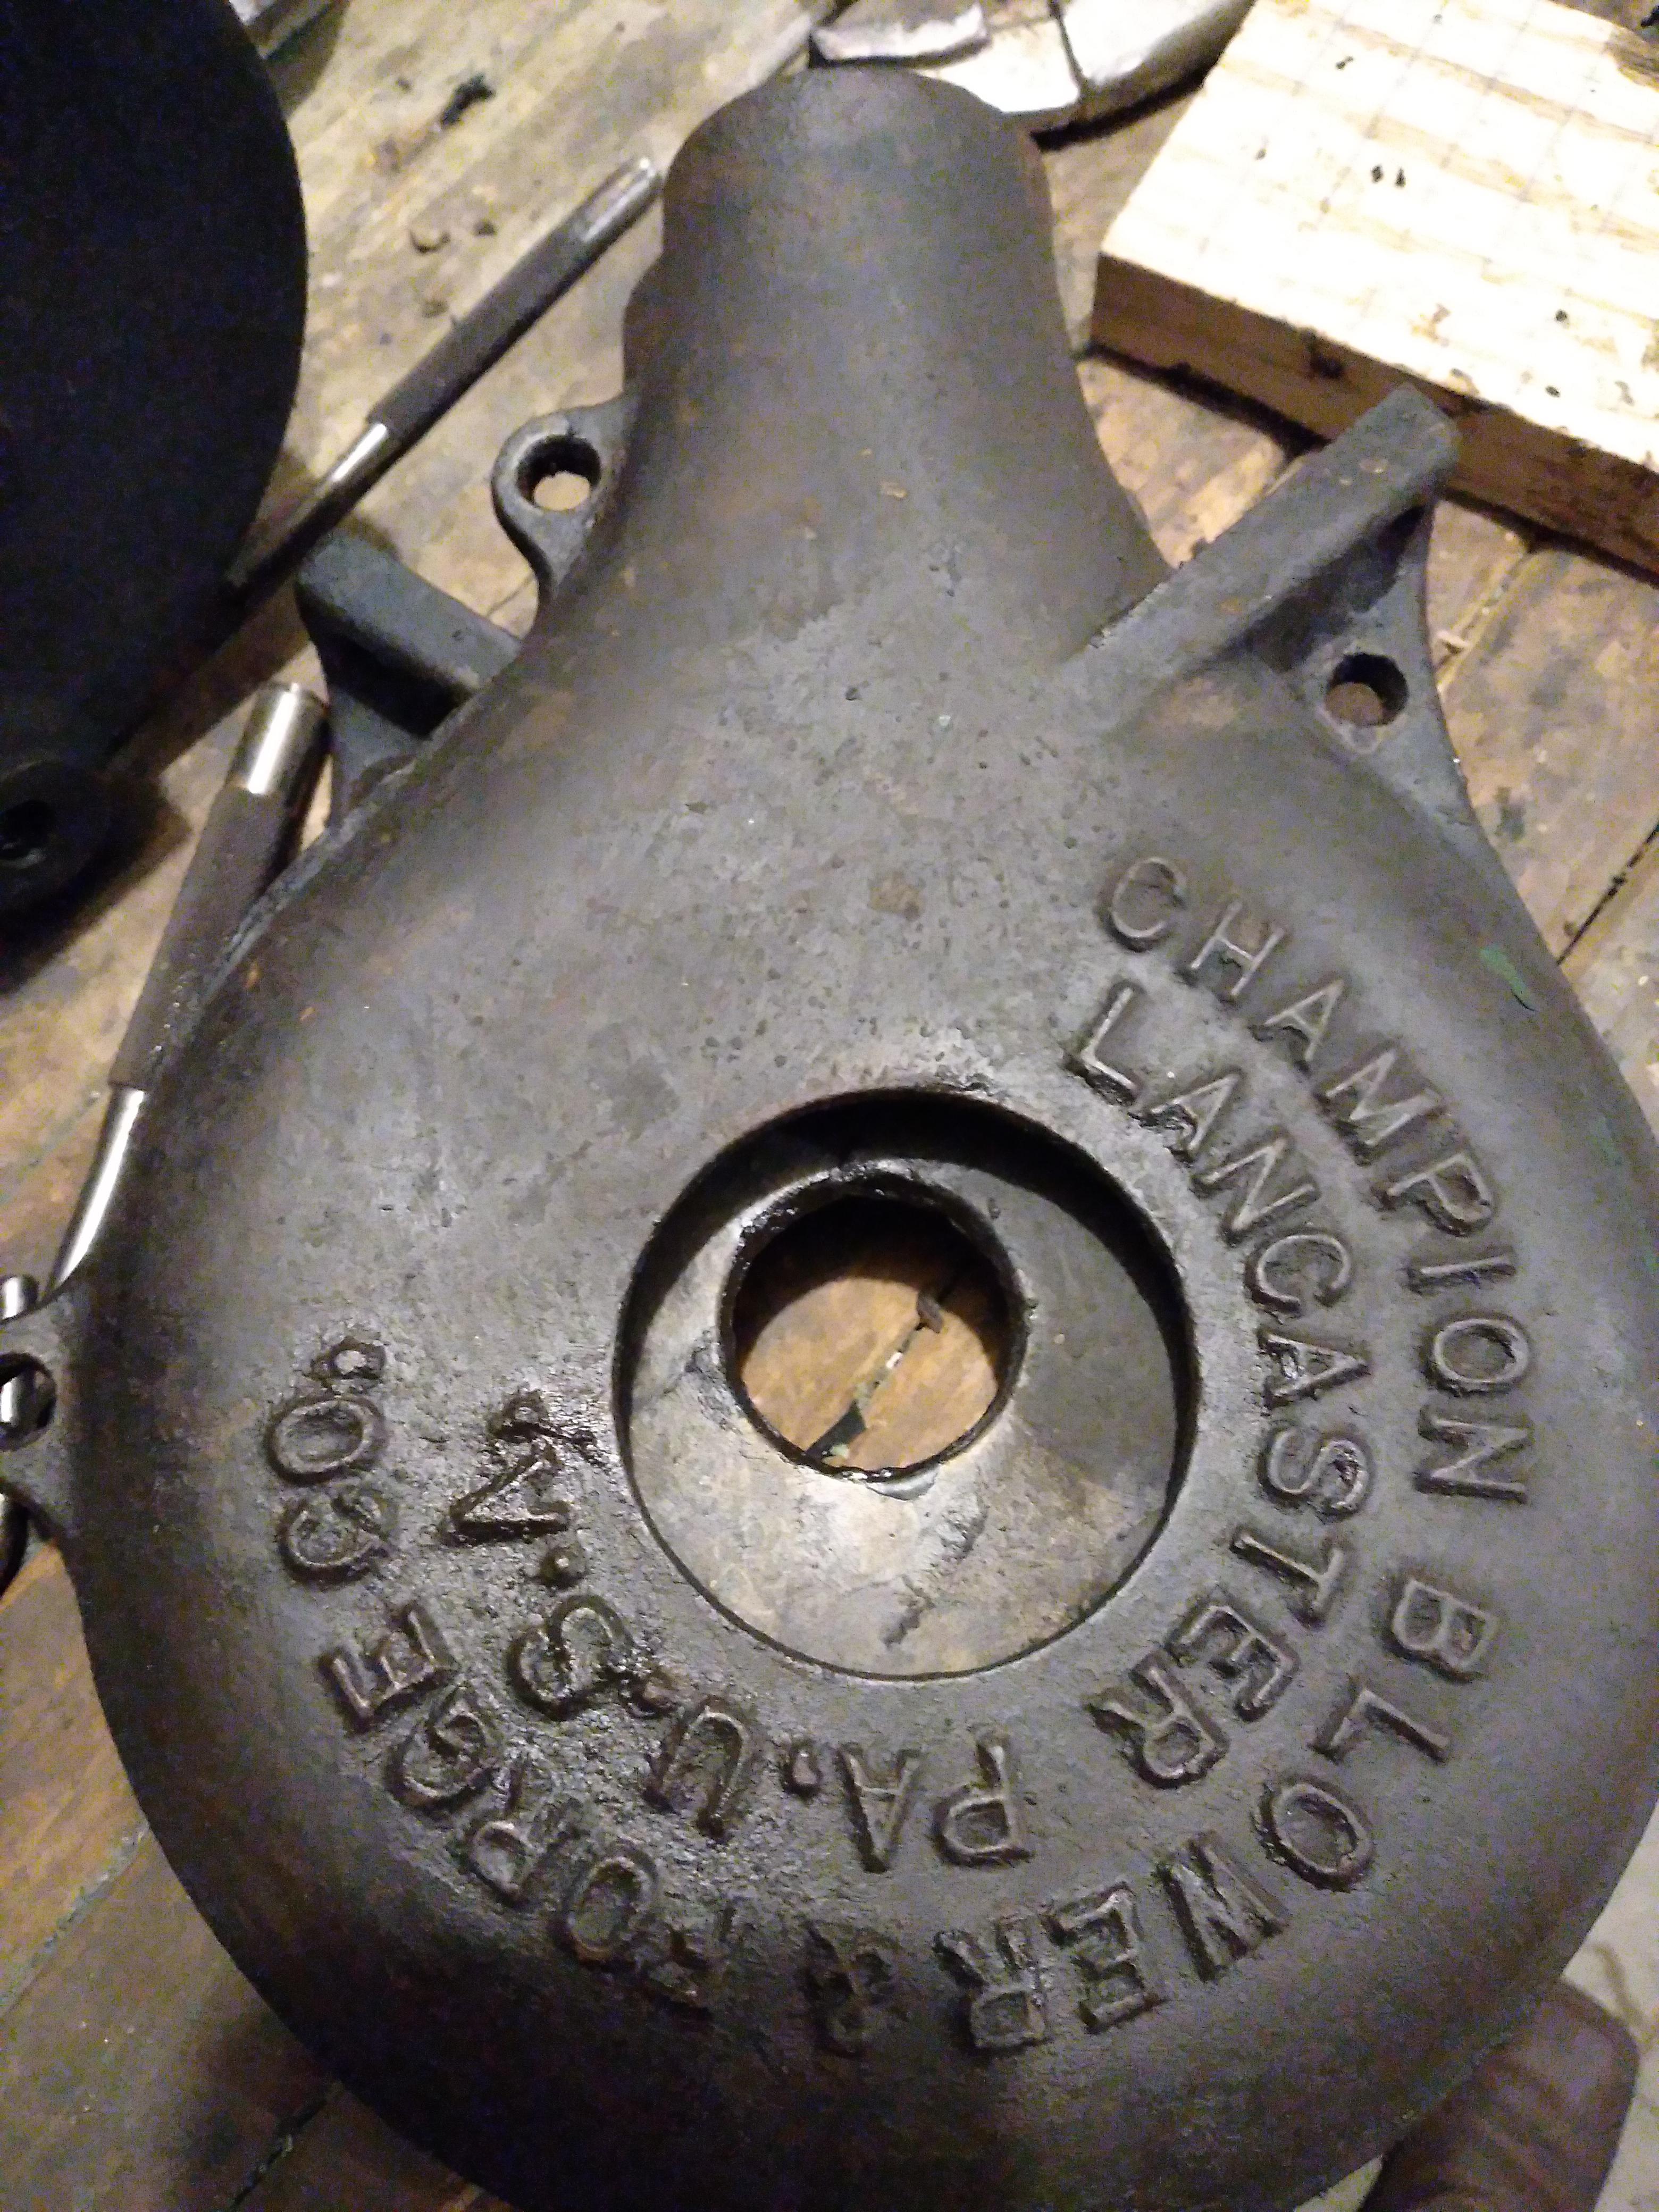
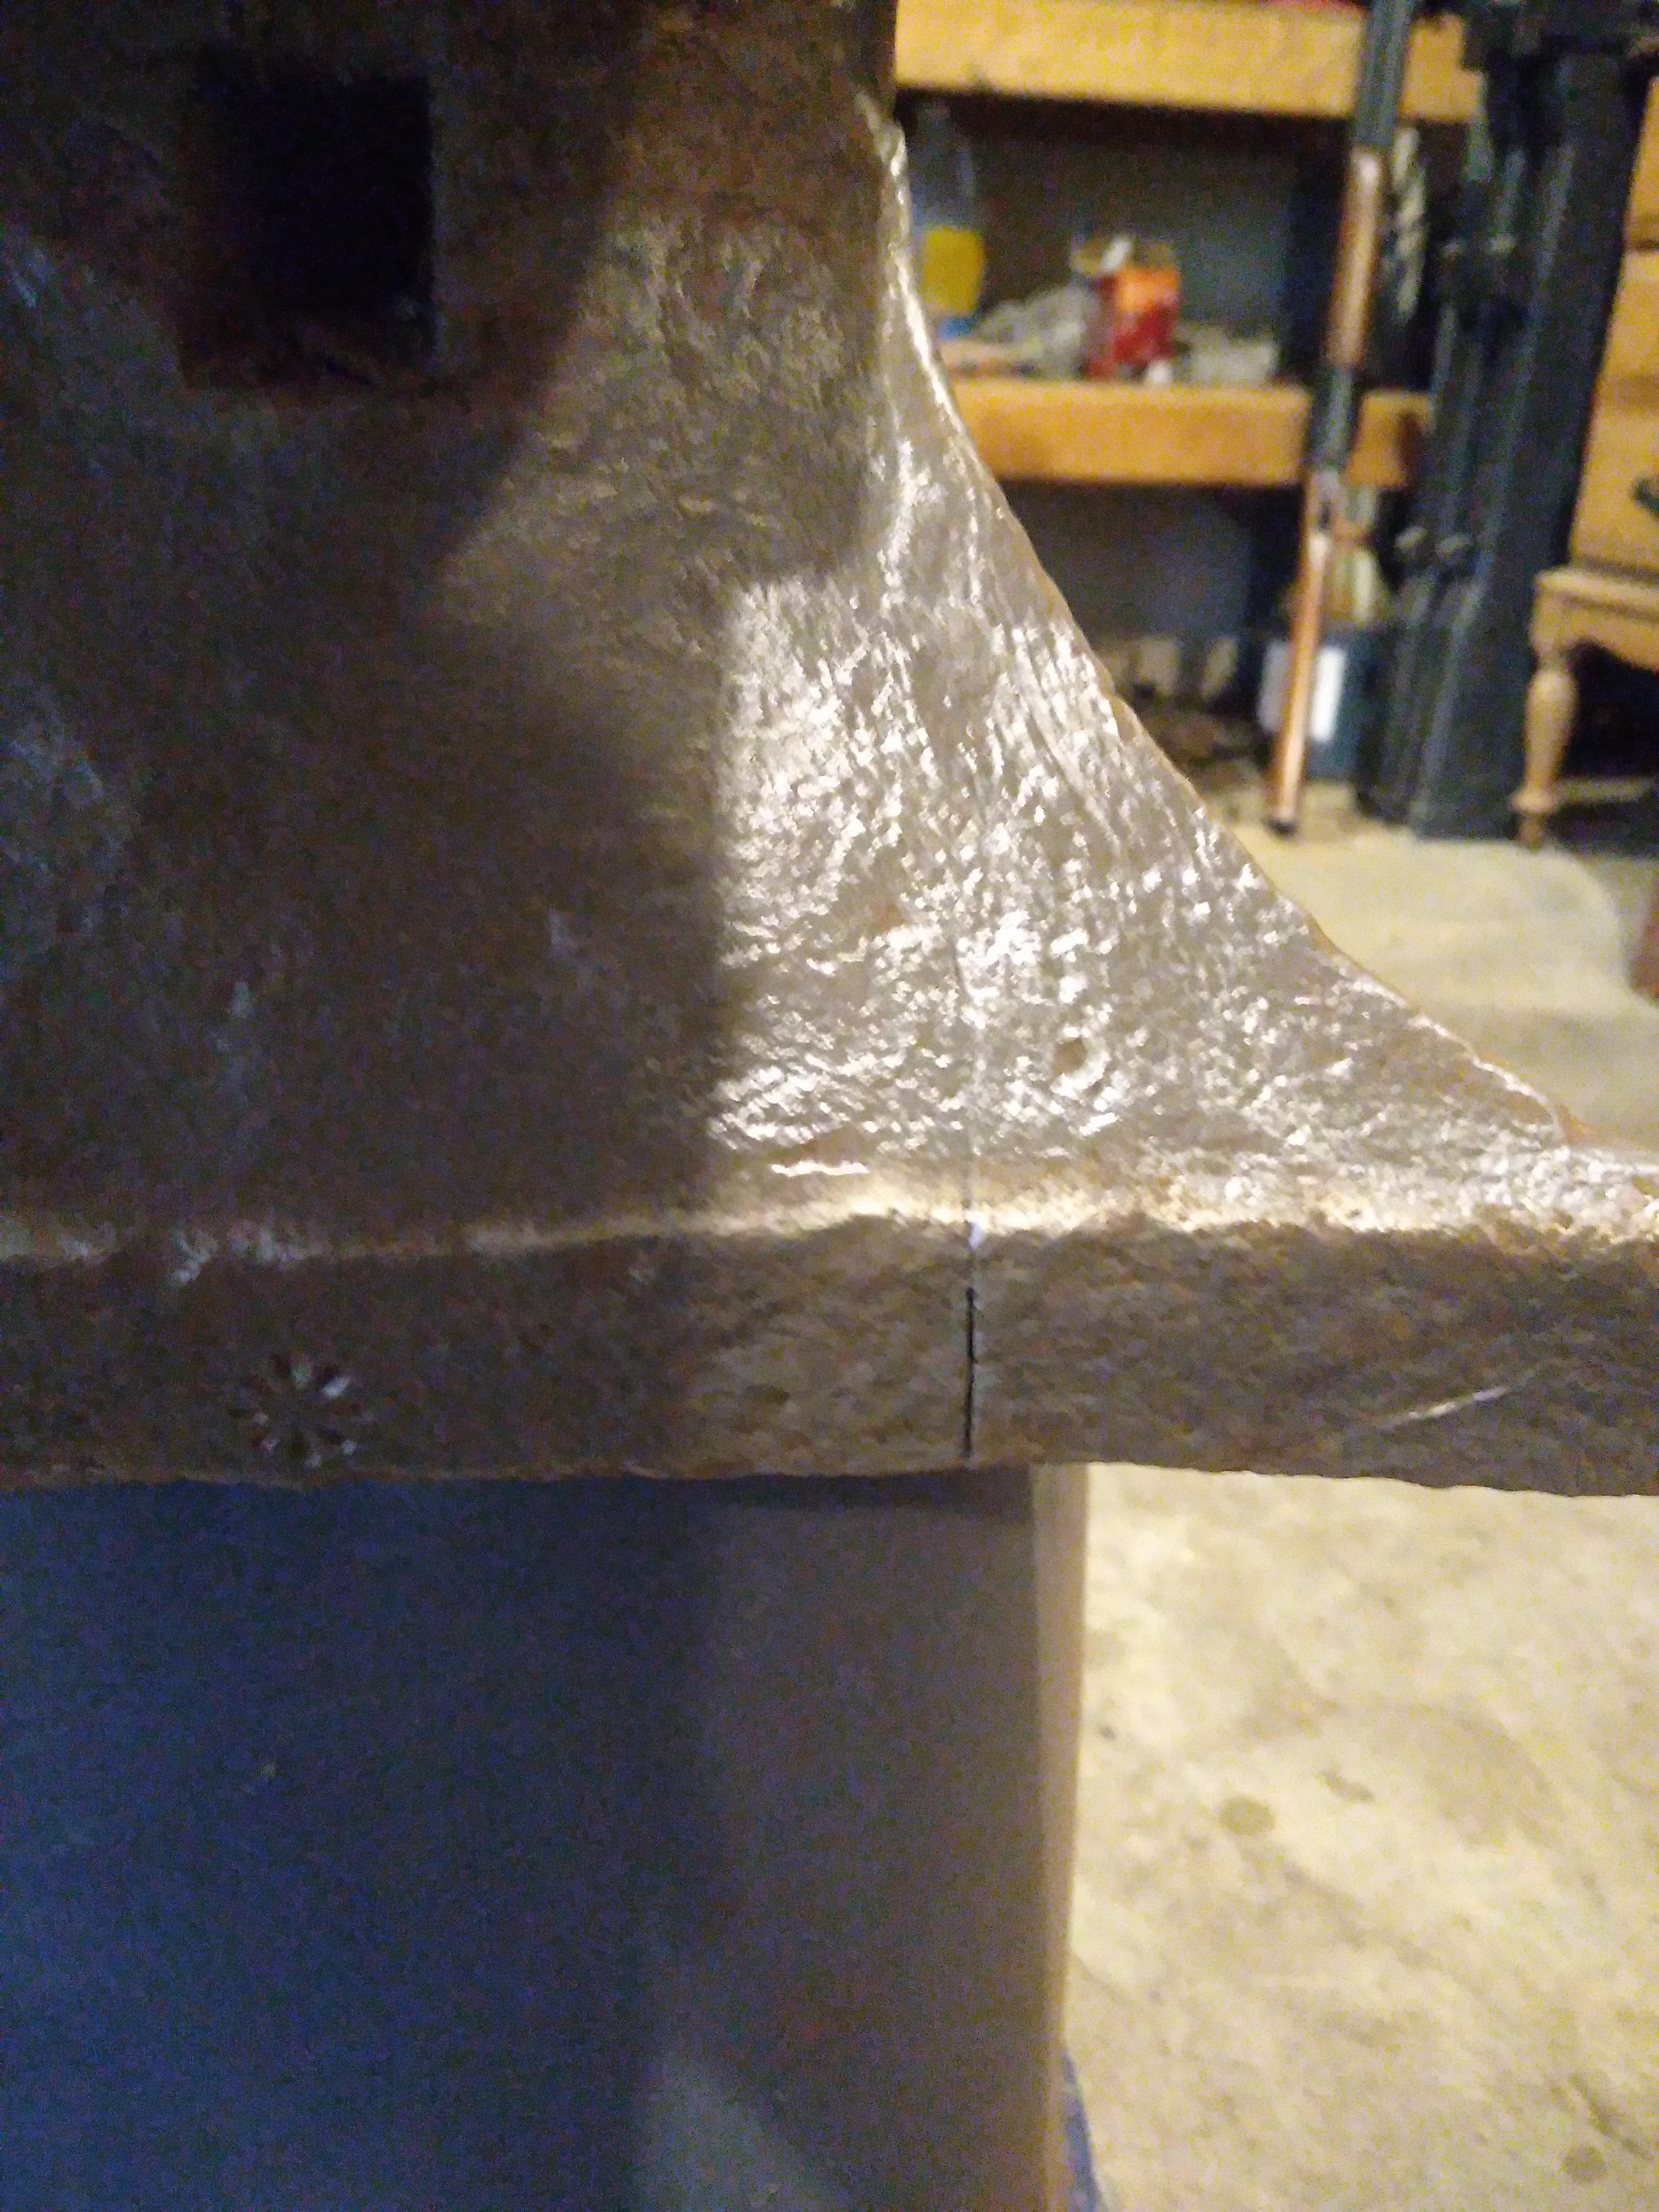
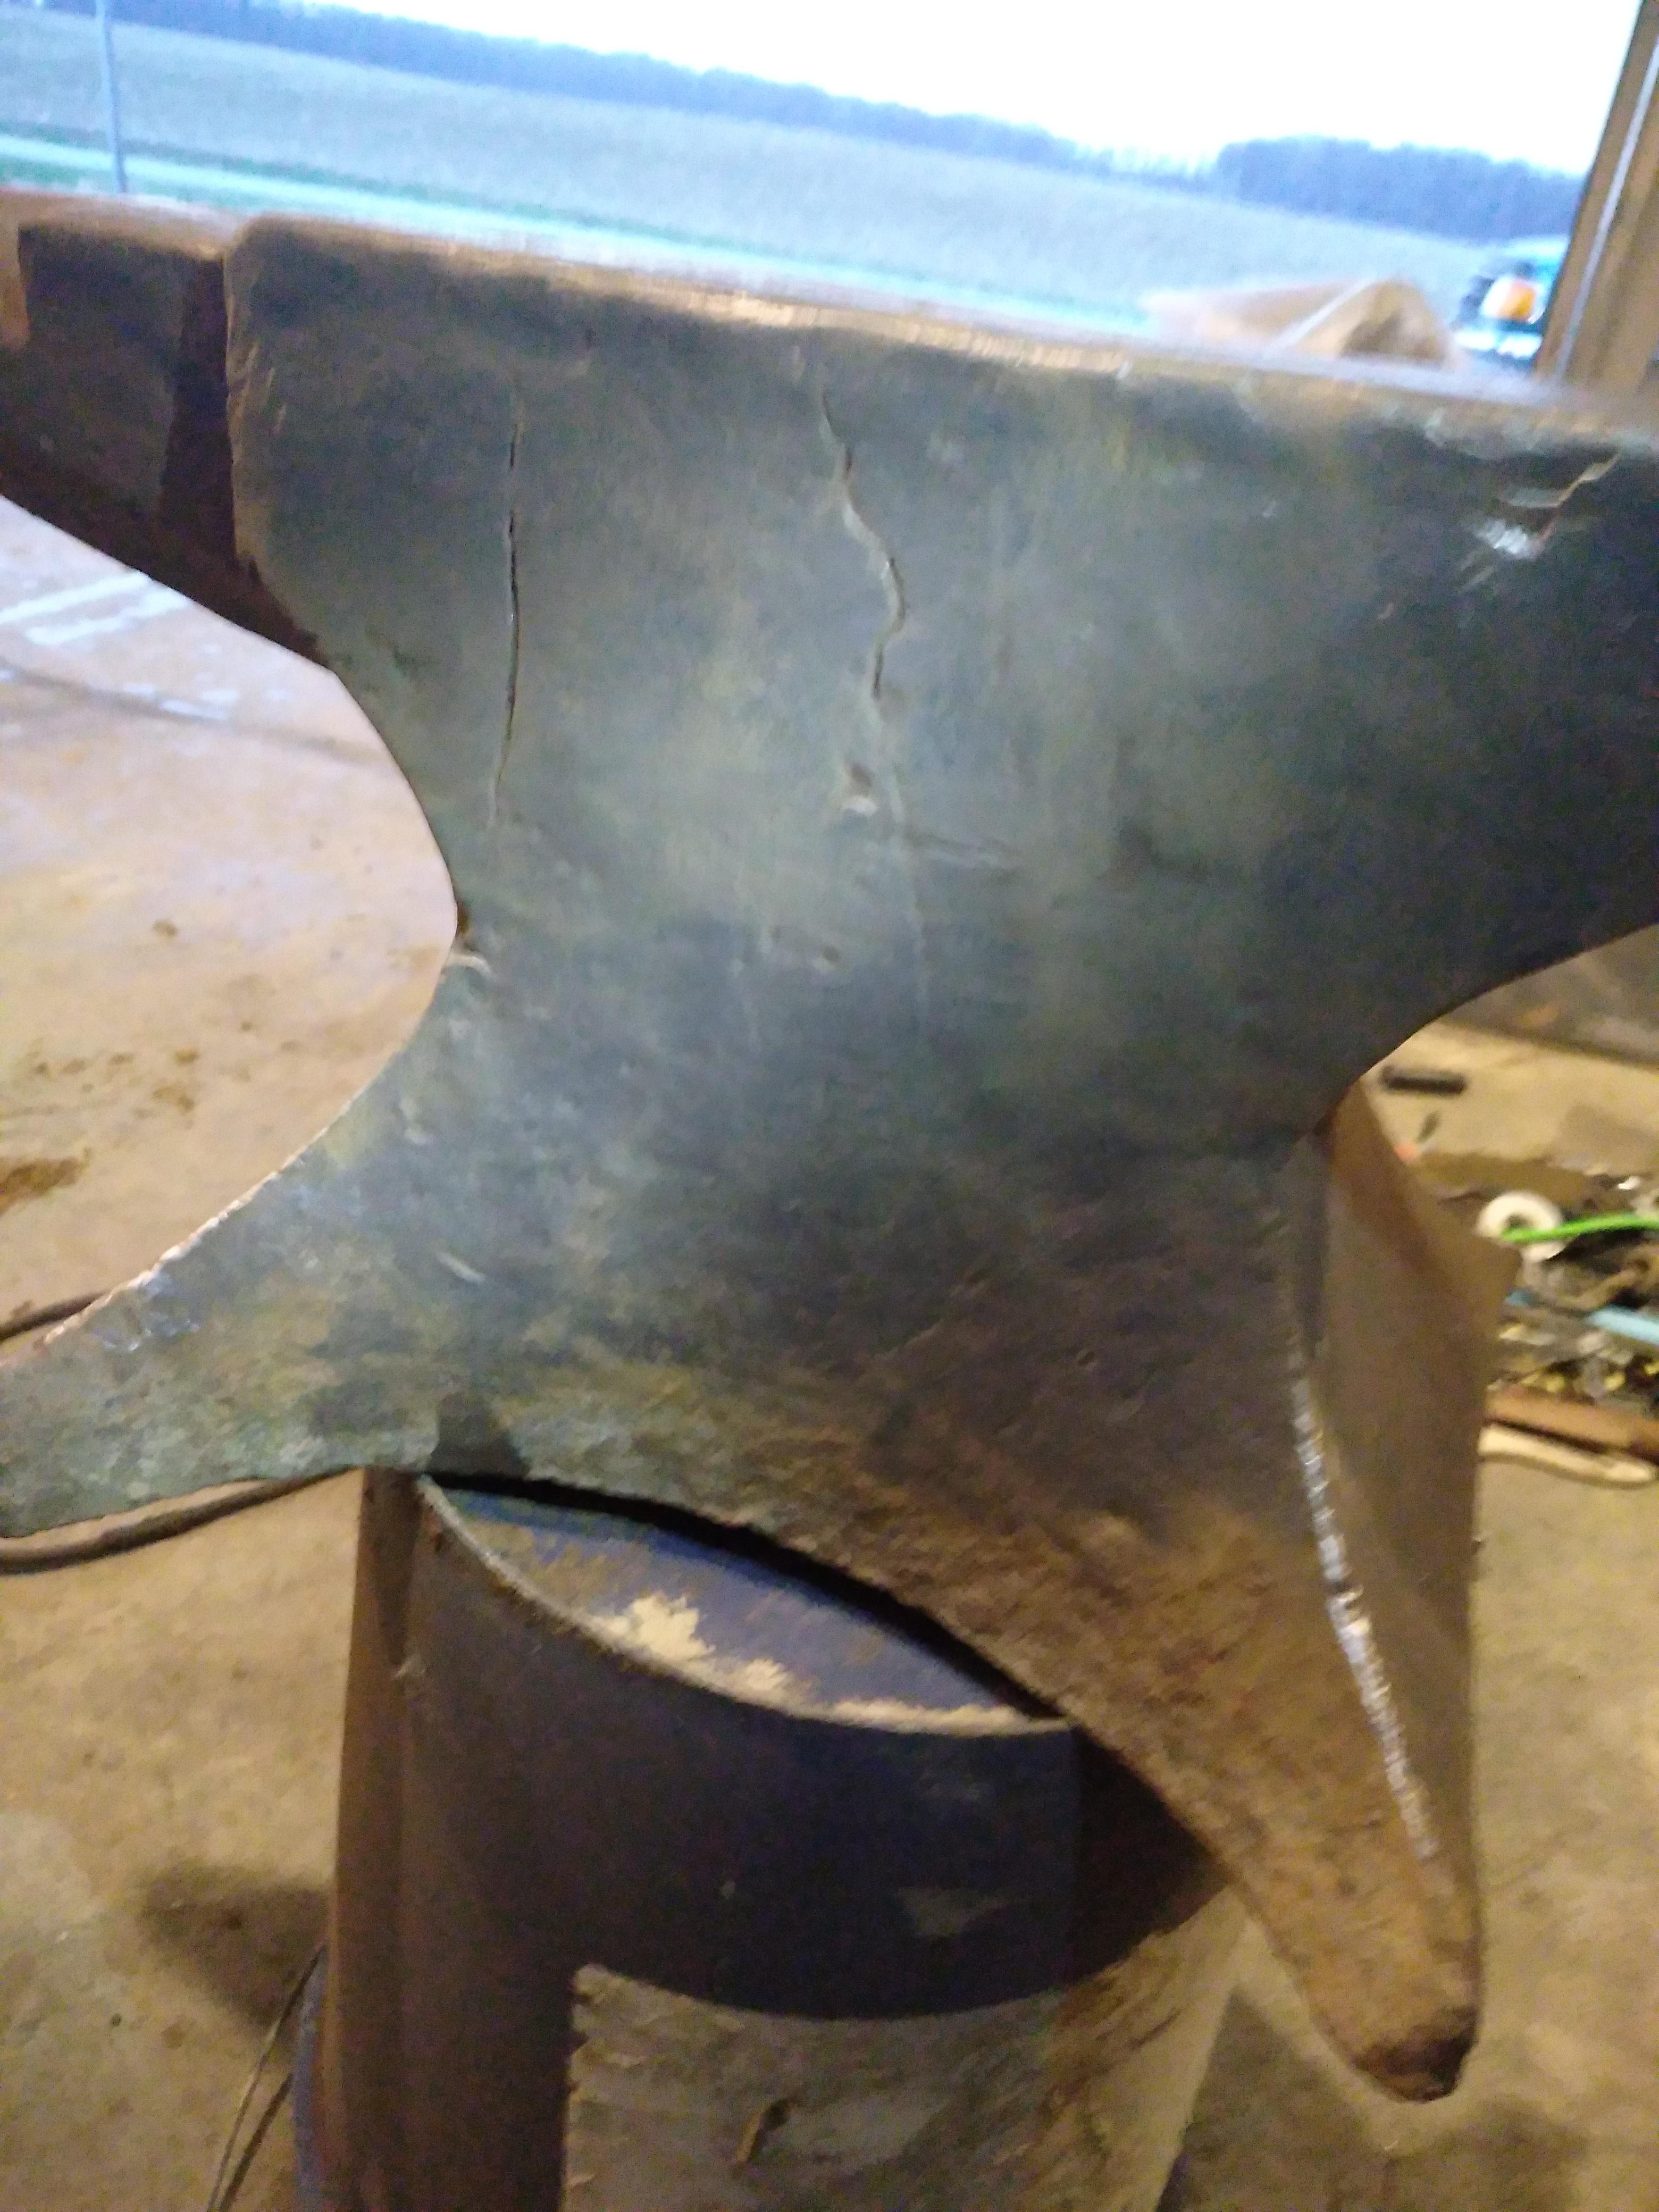
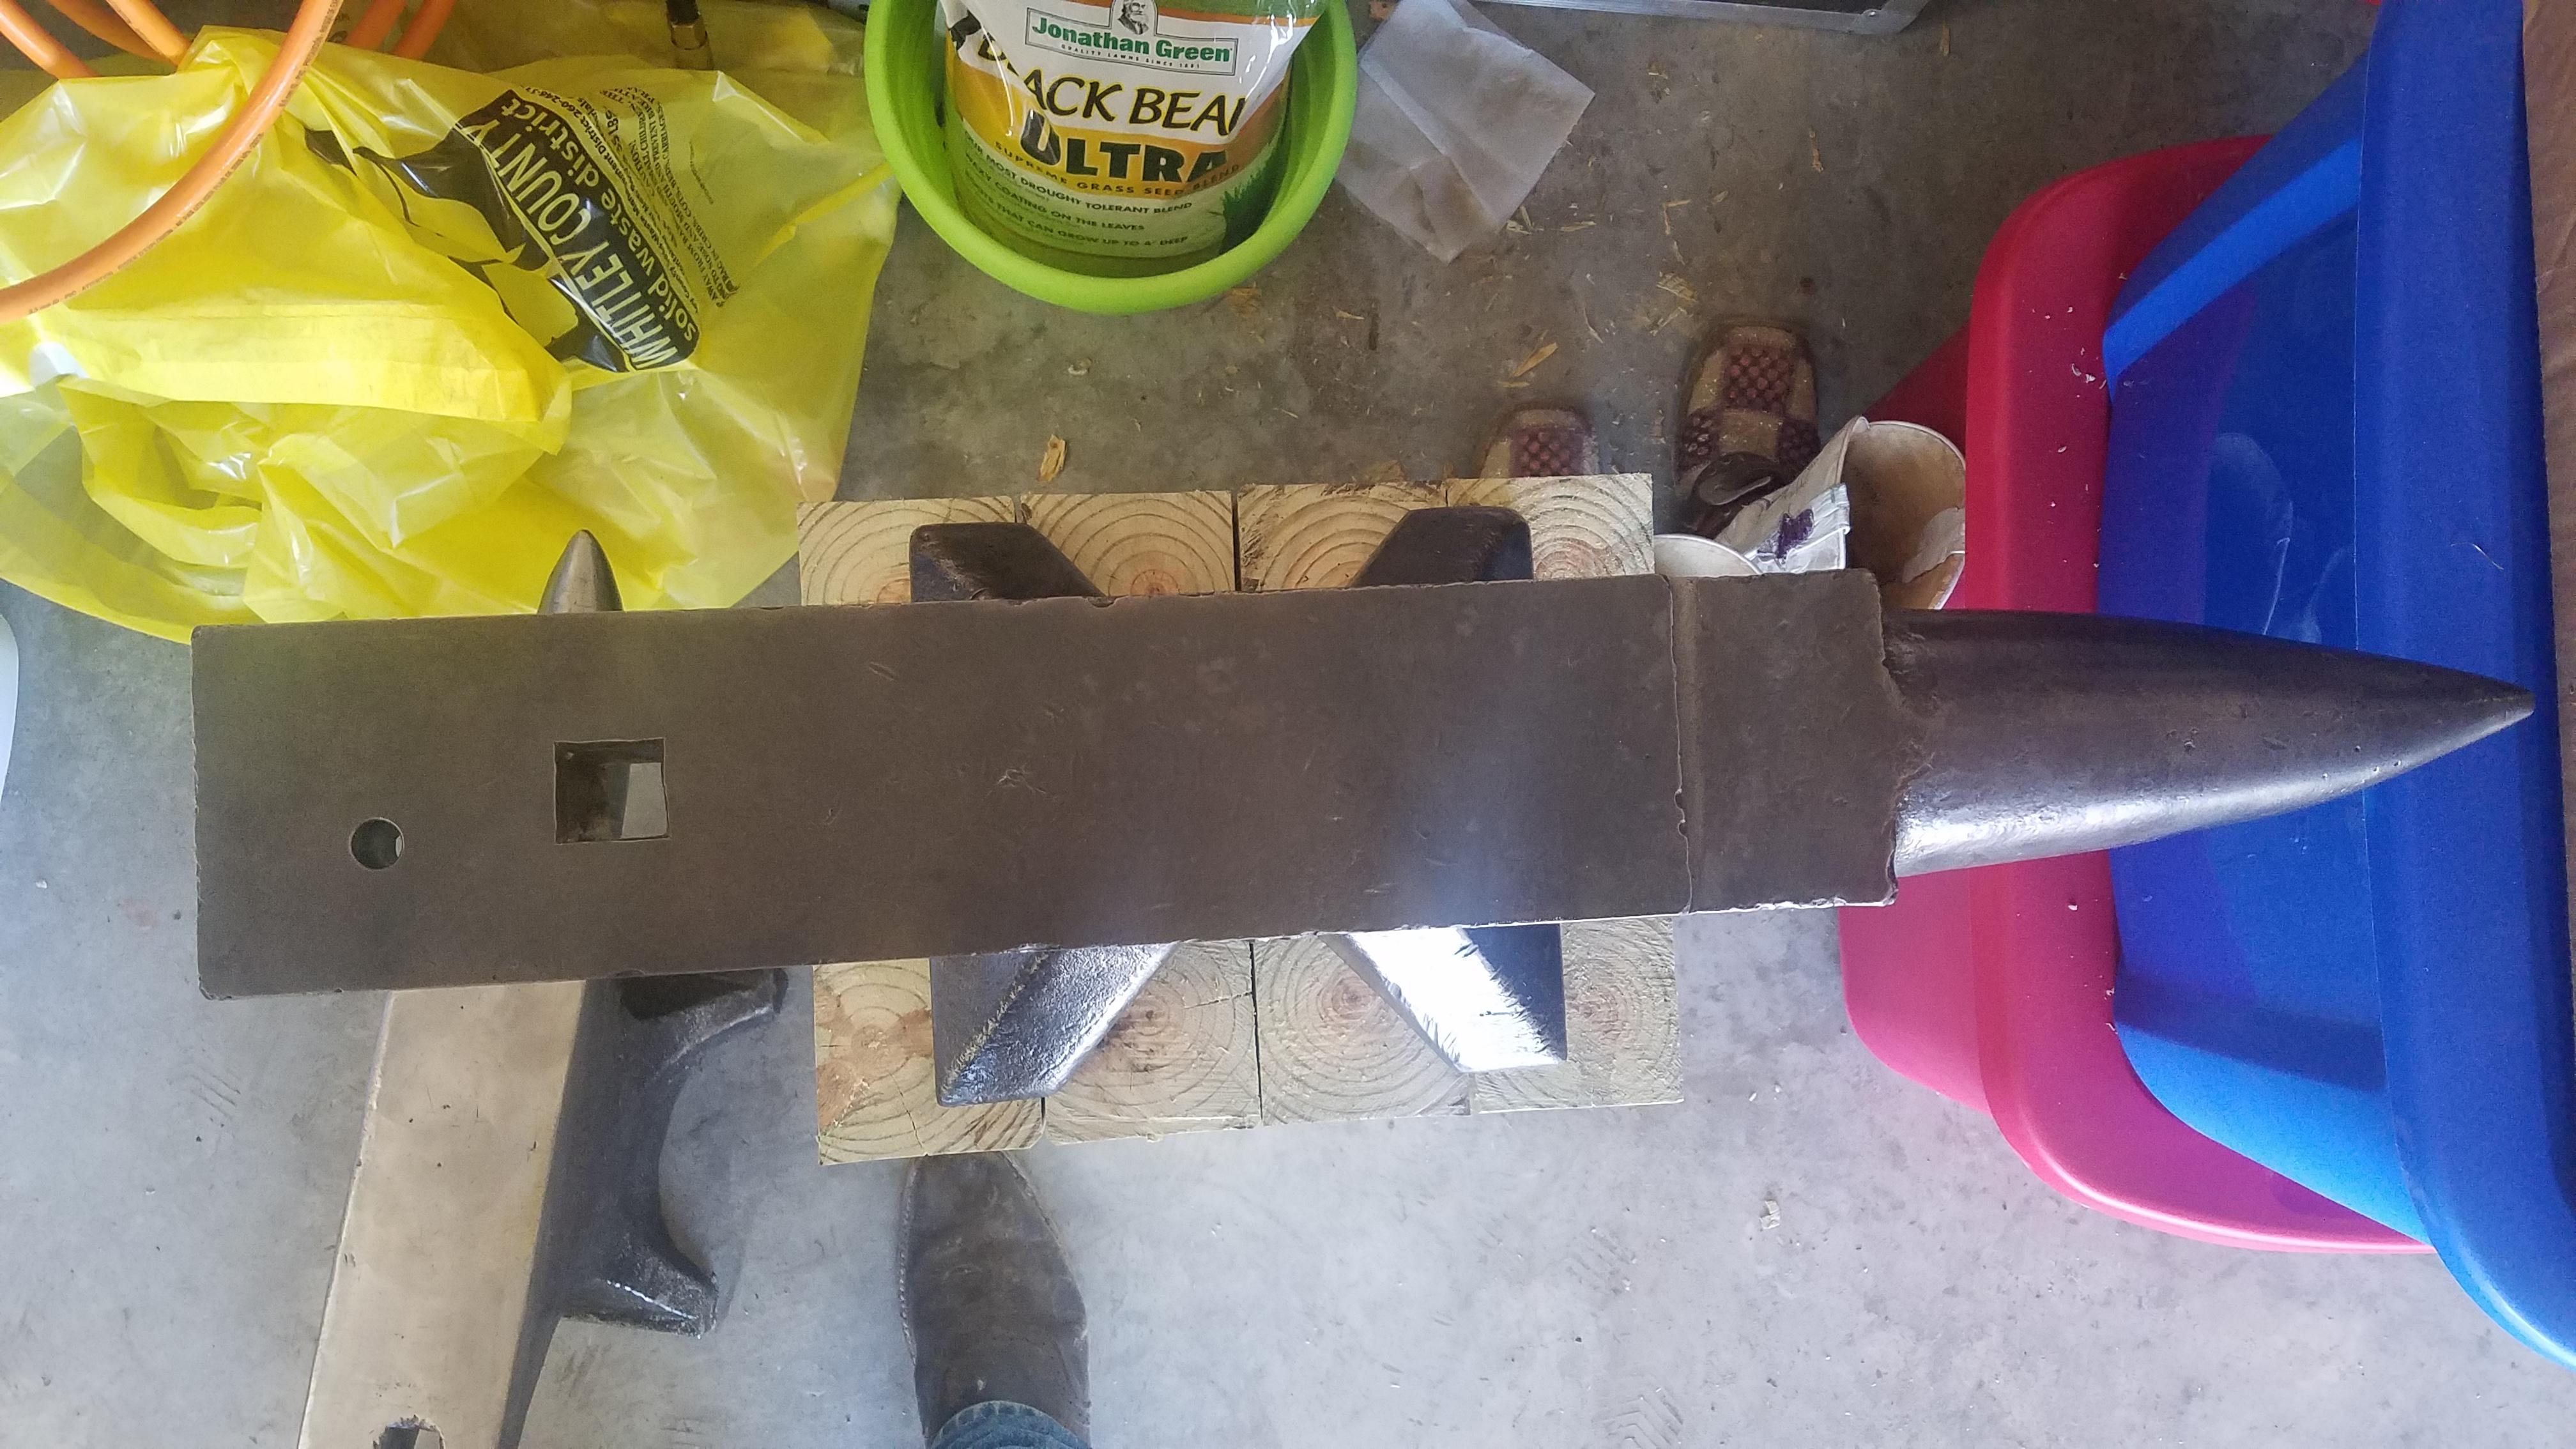
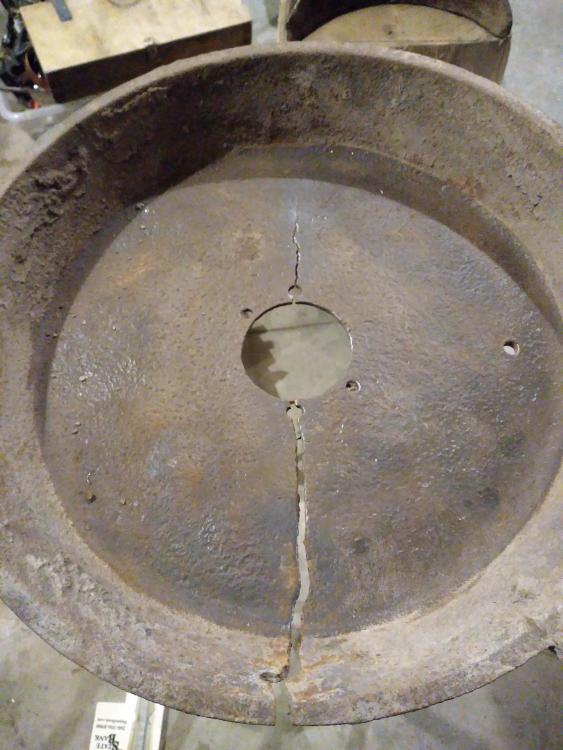
Hello all. I just picked this forge up for a song and can't find much info on it. It has a champion blower but no model number. From what little I've been able to find, it's a portable "rivet forge" being as the blower is attached without a stand and there's no counter weight on the crank. The pan is cast and has one nasty crack. My guess is it was ran without any refractory to keep the heat away from the casting. I have a brother who is a welder as a profession (and quite good at it, not just a mig monkey) who said he could pre heat the pan and fill the crack with nickel rod. Should I go this route or just "stitch" the crack with a couple mild steel straps riveted in place and cover with refractory? Also, does anyone have any sort of date for this setup or if the forge is even factory with said blower? The plan is to get this rebuild along with the old Mouse Hole anvil I had posted about as my first mostly permanent set-up at our new house. Im itching to get swinging a hammer again after about a year break.... Thanks, Keith


-

Large Armitage Mouse Hole info
ChiefLittleBair replied to ChiefLittleBair's topic in Anvil Reviews by brand
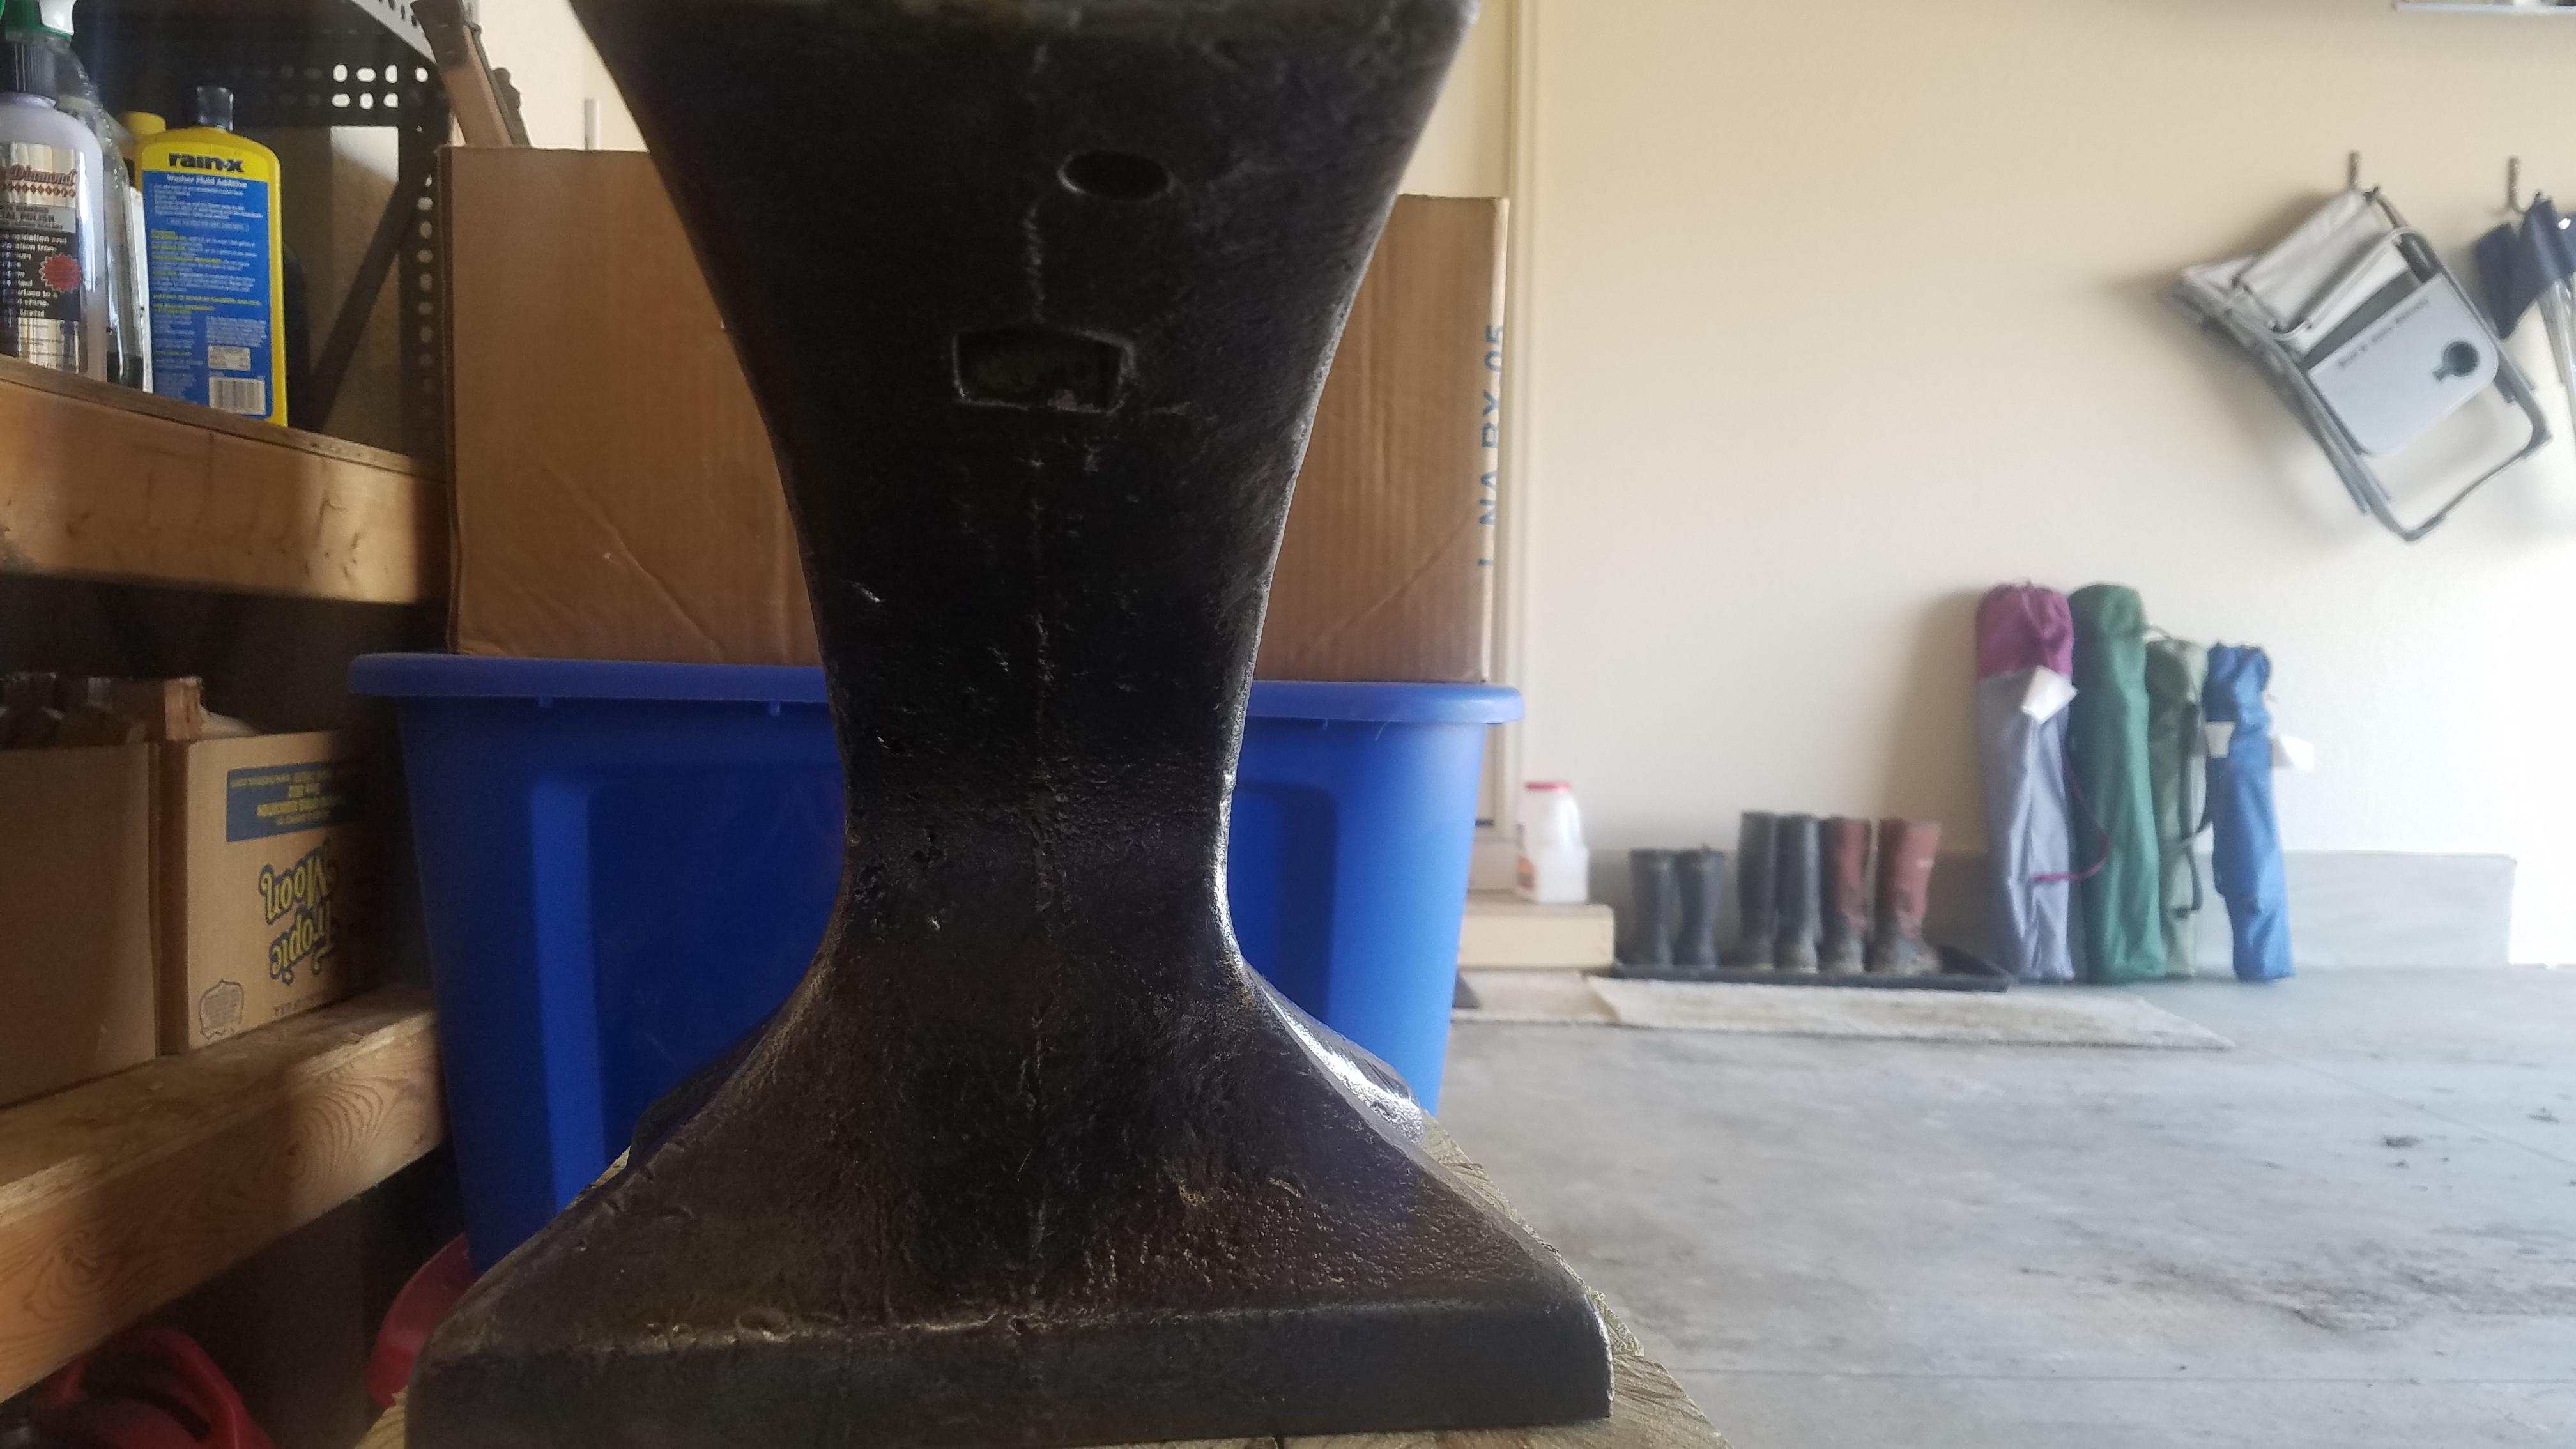
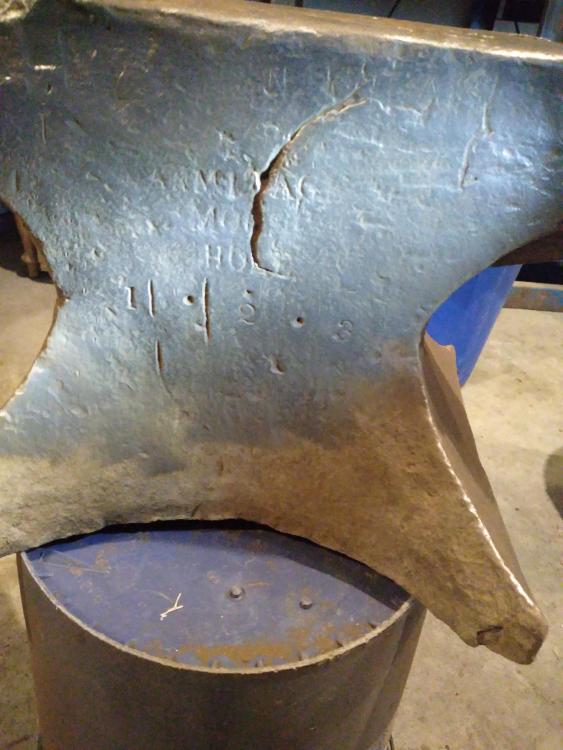
There is a little bit of a bulge on the under side of the hardy hole suggesting it was drifted, but the underside of the pritchel hole is smooth so I believe it was drilled aftermarket (retrofitted). Based on this and the logo stamping which I believe I can see the remains of a "M H" stamped above the "ARMITAGE", that would place this anvil in the 1820-1830 manufacture? -
Large Armitage Mouse Hole info
ChiefLittleBair replied to ChiefLittleBair's topic in Anvil Reviews by brand
Would anyone with an AOA book be able to get a rough date on this for me based on the markings on the side? -
Large Armitage Mouse Hole info
ChiefLittleBair replied to ChiefLittleBair's topic in Anvil Reviews by brand
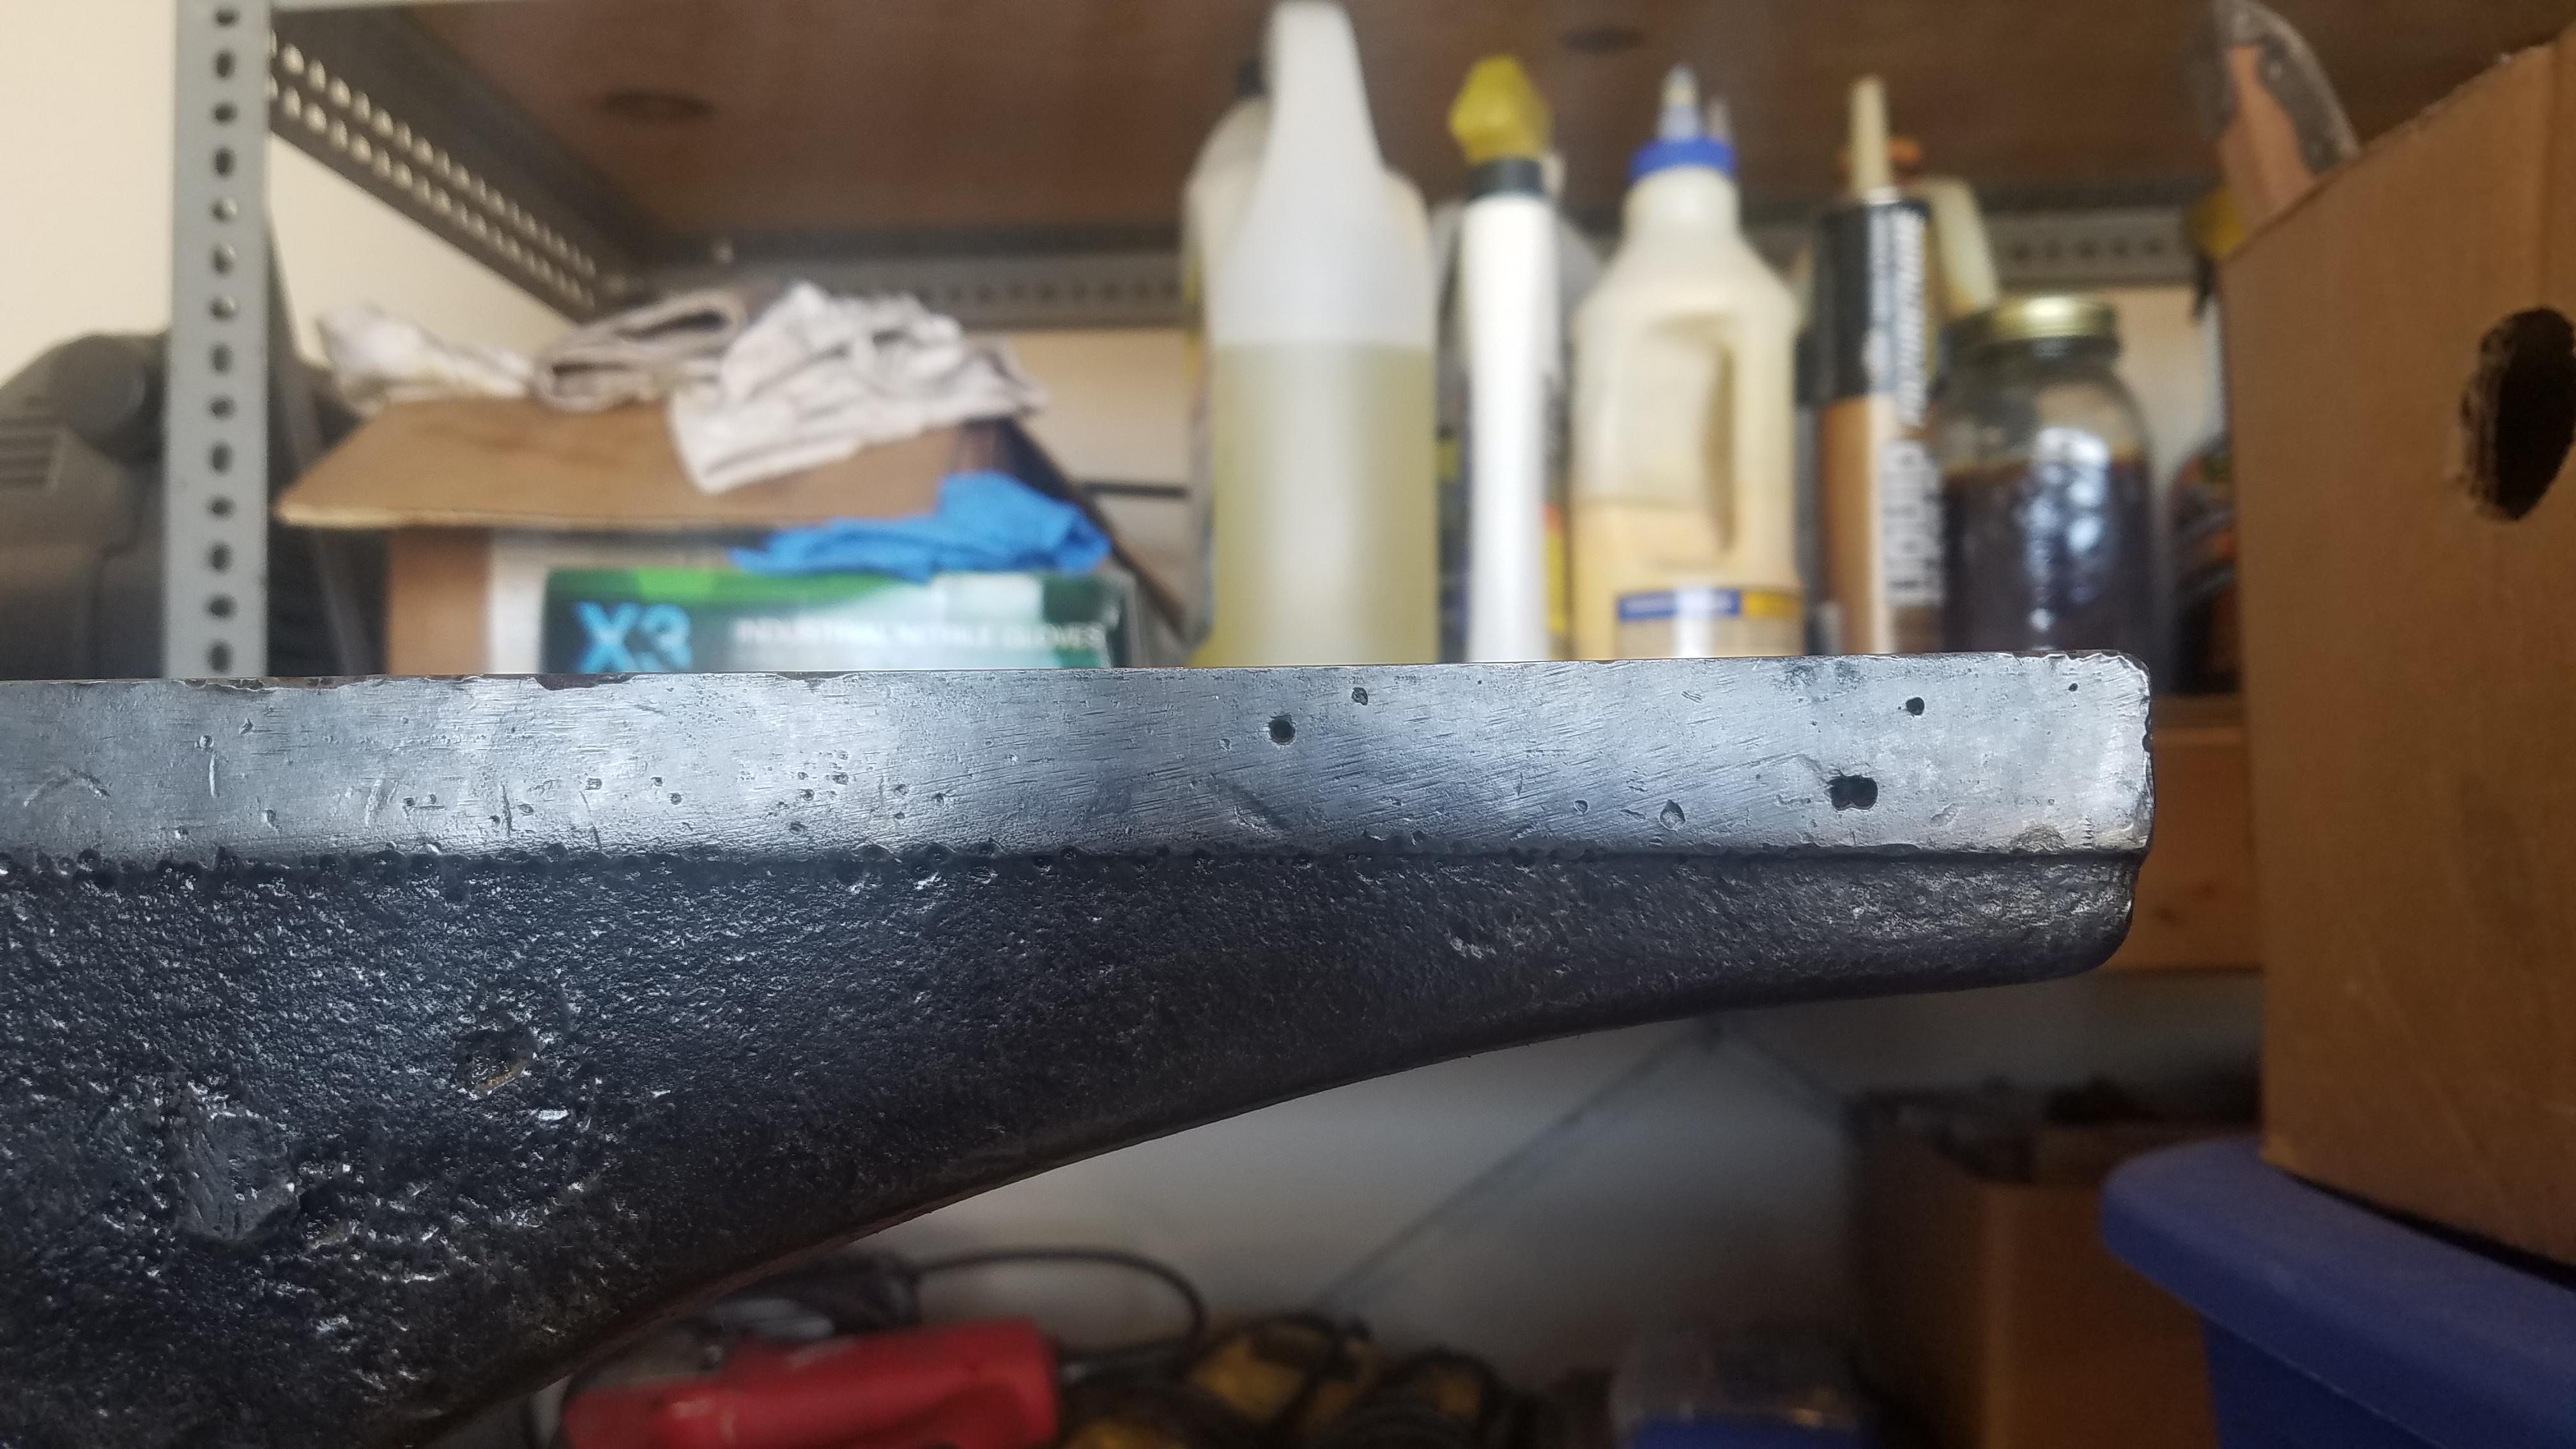
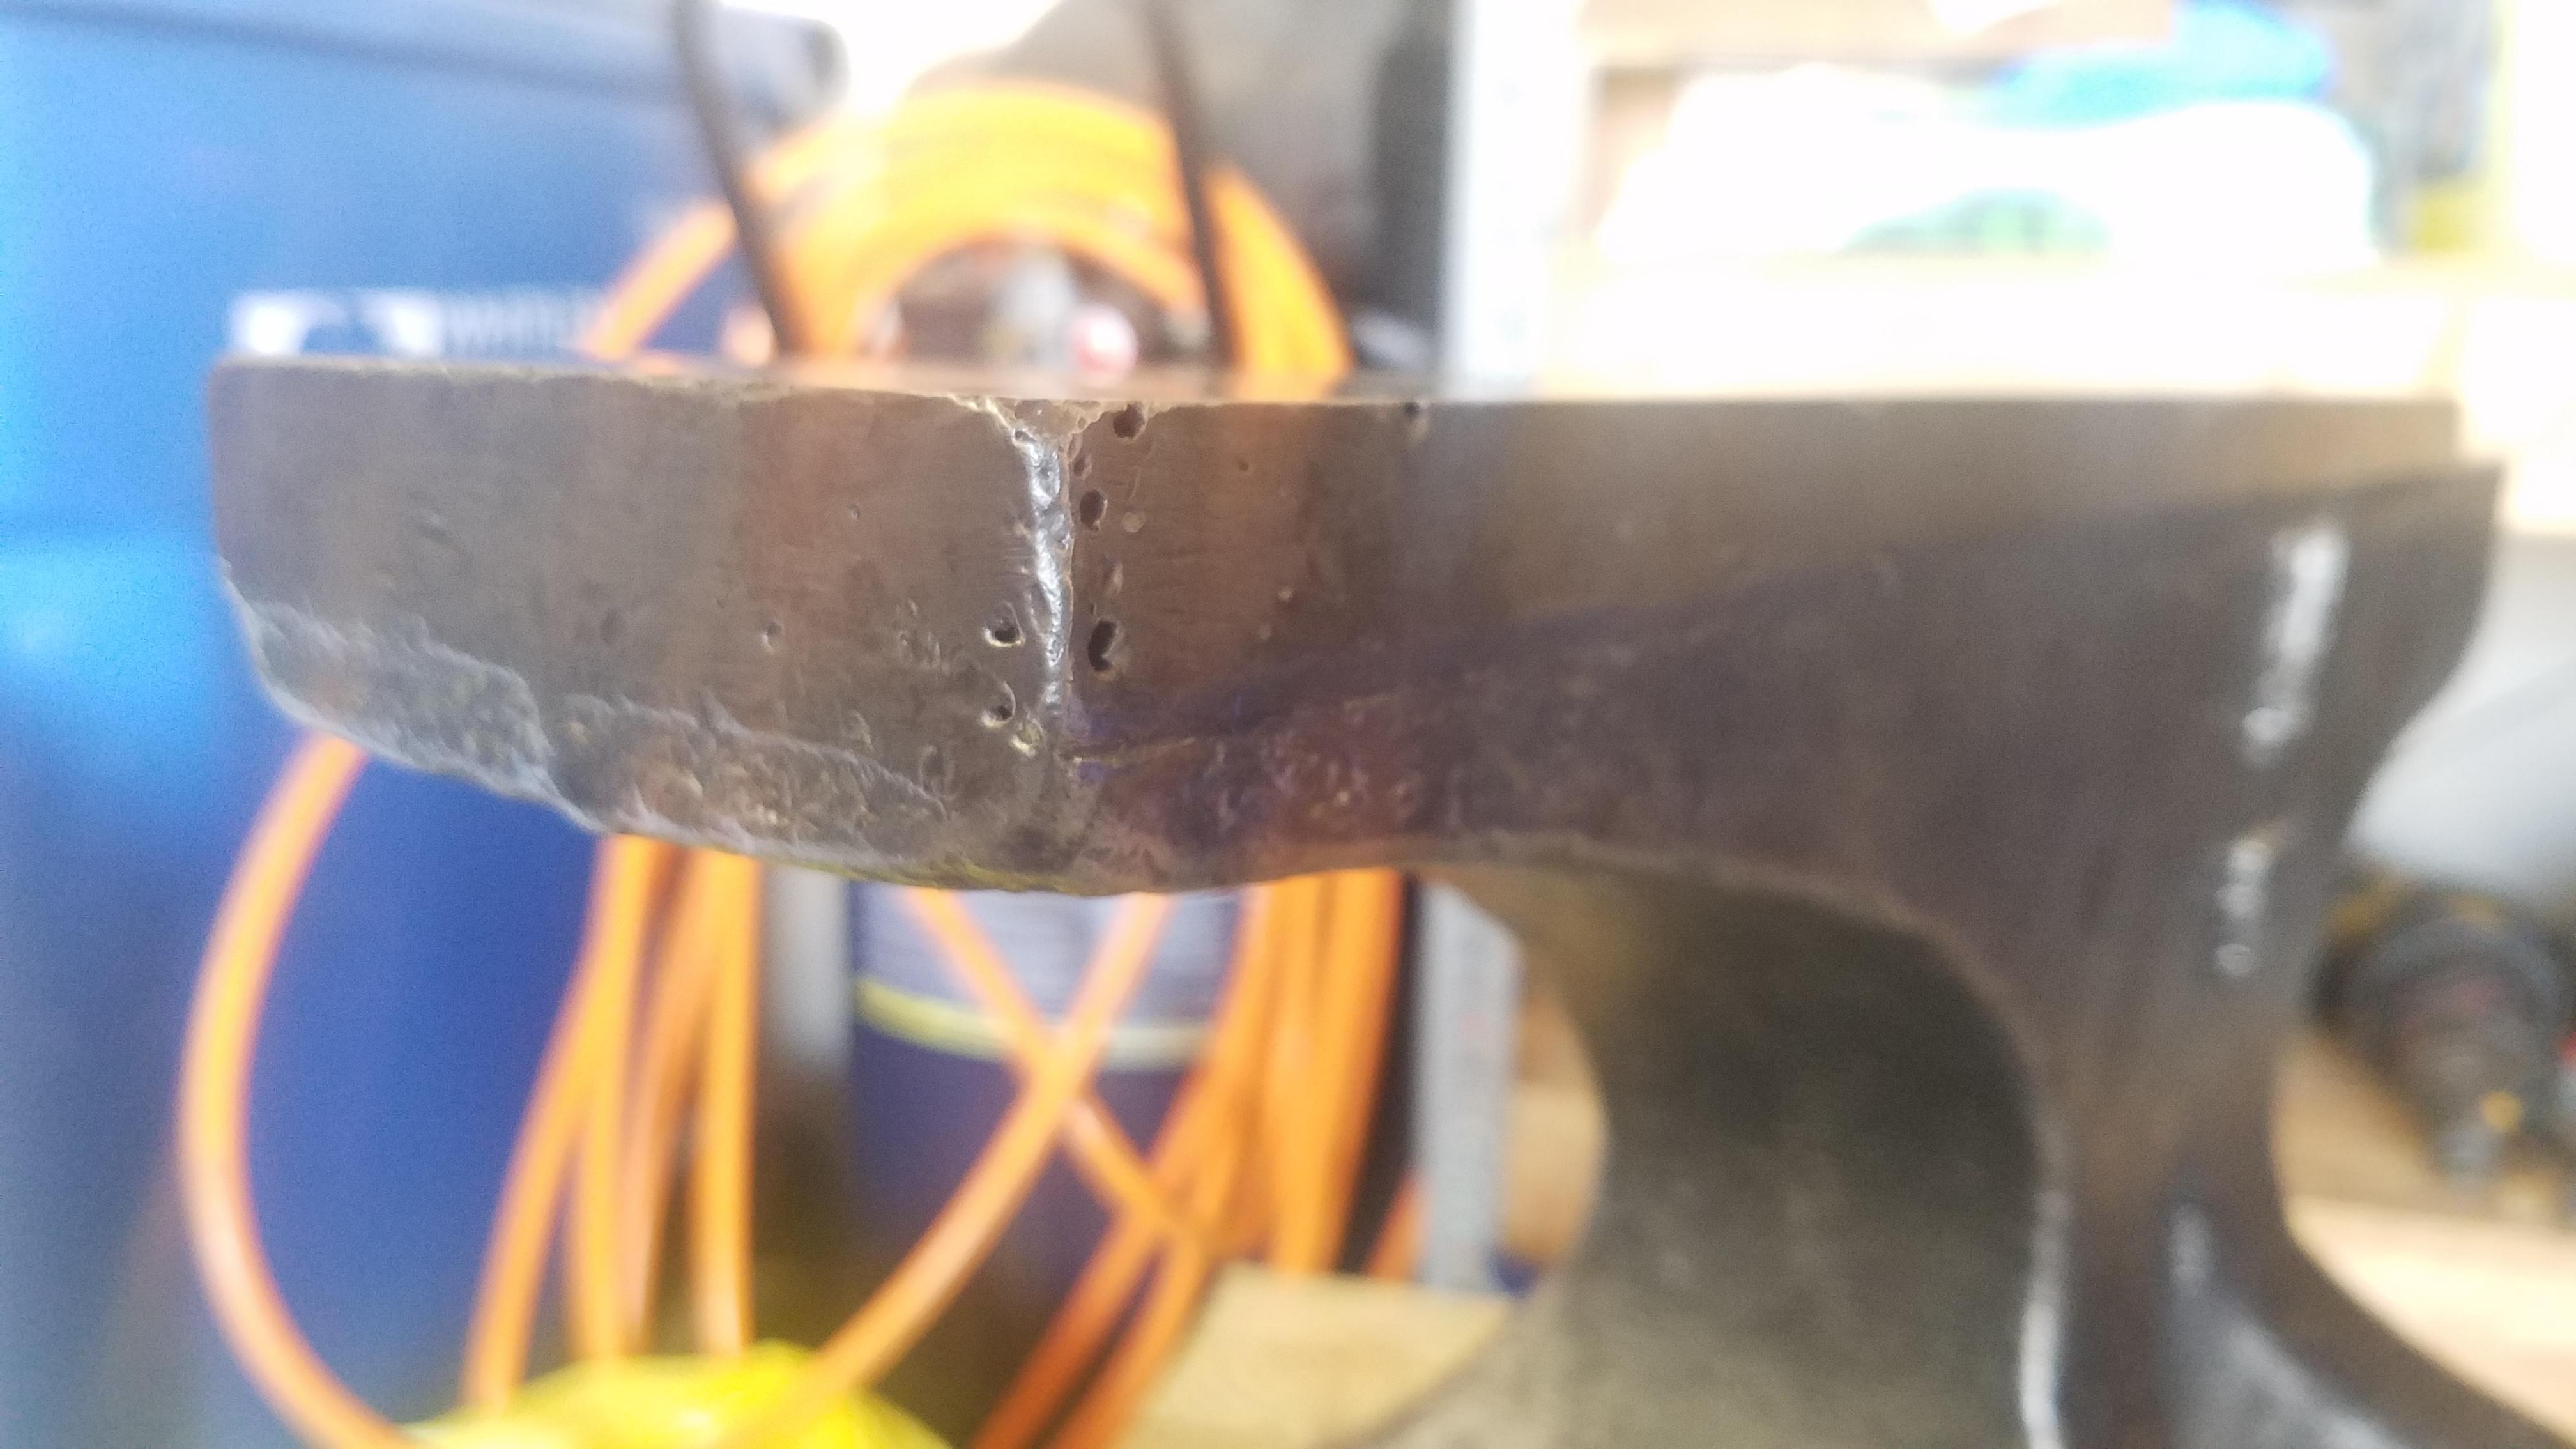
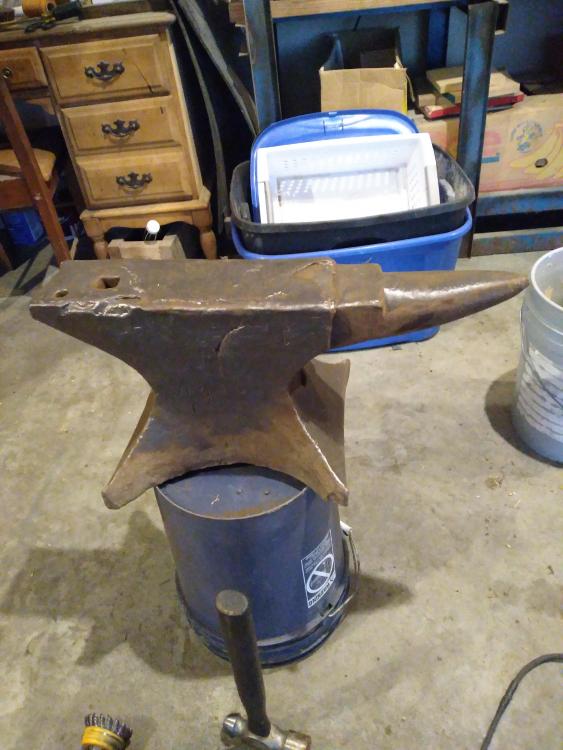
I've been doing a bunch of research on the Gunther/Schuler method of repair. The anvil has good ring except for right around one edge of the delam on the face. It sounds a little fuzzy so the face is delaminated a tad beyond the missing part. Im considering grinding the delam out to get rid of all the crack, then having my brother weld it up for me. I'm a machinist and my brother is a welder so we are capable to do whatever lol (sarcasm, we have welded up a beat up PW before without ill effect. Just takes time and care and its not "just like welding or machining at work") Proper anvil repair I actually find quite fun and you have to be almost tedious, not just throwing a bead of 7018 down and calling it good. Found it on Facebook marketplace. The guy who was selling it just buys and sells in the auction business for a living. He must have gotten a steal on it and didn't know what he had, he had it listed for $200 and it was described as 100+ pounds without much more description. I told him I'd buy it pretty much sight unseen at that price as he was about 2.5 hours away from me. When we met and I saw the cracks I got kinda worried because I didn't have anything to ring test it with to see if the cracks were more cosmetic or if they went through. I mentioned that maybe it had been through a fire and the stresses of heating and cooling at too fast a rate made the wrought split. All I was doing was making an observation, and right off the bat he goes, "oh, well $180 and you can have it". It was already sold before he said that, but that really set the deal in stone. -
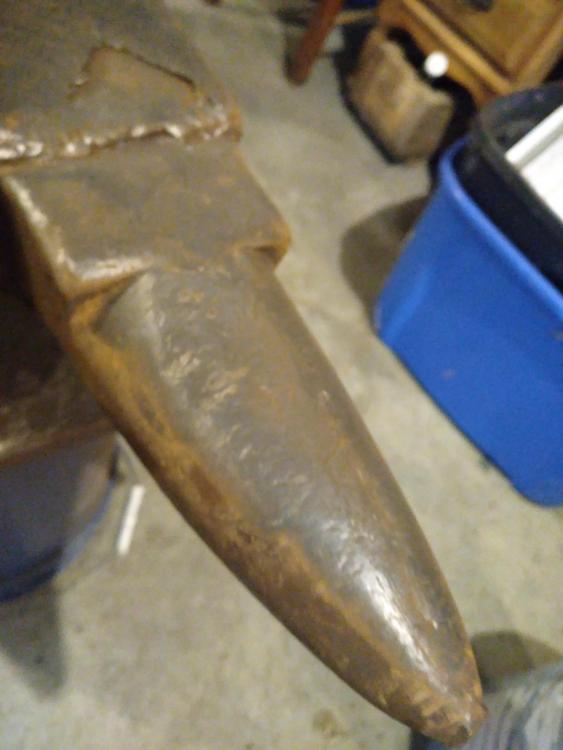
Hello everyone, I just picked this up yesterday. With the number of cracks in the body, I'm wondering if this anvil has been through a fire? A file bites the face, although not as easily as dead soft steel so my guess is its high 30s to mid 40s on the hardness scale. Weighs 171 pounds if im not mistaking. I was wondering the age on her. Markings are as follows ARMIGAGE MOUSE HOLE 1*2*3 Theres no sheffield stamped above the weight nor is there room for it as if it were worn off. Also a weird escutcheon stamp in the front of the base under the horn? She appears to not really be that used, but just abused. No signs of major use of the horn nor the chisel plate, the main bummer would be the piece of plate missing from the face, but for $180 I couldn't pass it up..... Rings really well, and rebound seems decent with a hammer. I can't find my big ball bearing at the moment to really test rebound. That kinda sways me from thinking it was in a fire since ring and rebound are still good. No idea why the cracks in the body....


-
Show Me Your Antique Drill Press
ChiefLittleBair replied to Brenton's topic in Drills, Post drills, Mag drills, etc
I can see both sides, but as Thomas said, this guy reached up to advance the drill bit so he must have had the panel flipped back and was using the handle on the spindle to have a "feel" as you mentioned. I can for sure see an accident happening on something like that. I've drilled anywhere from 1/8 inch to 1/2 inch holes holes with this press and don't find it too laborious at all. I am only a hobby guy when it comes to stuff like this though, and if I were to do this stuff as a full time job, I would look into a modern drillpress. I'm a machinist as a day job and mainly run a manual mill. It kinda nice to mess around in the garage after work and go back to something simple like a hand cranked press. -
Show Me Your Antique Drill Press
ChiefLittleBair replied to Brenton's topic in Drills, Post drills, Mag drills, etc
+1 on that. I was just saying that I would explain why that shaft was so long, if someone had rigged it up for a flat belt before. I also imagine that it would case premature failure of the gears and bearing bores, as the "bearings" are just reamed holes in the cast body. -
Show Me Your Antique Drill Press
ChiefLittleBair replied to Brenton's topic in Drills, Post drills, Mag drills, etc
I never thought about the shaft being longer to have a flat belt pulley on it. I'll have to look for set screw scars on it to see if there's any evidence of that being the case. I was honestly thinking about chopping the shaft but I may leave it as is -
Show Me Your Antique Drill Press
ChiefLittleBair replied to Brenton's topic in Drills, Post drills, Mag drills, etc
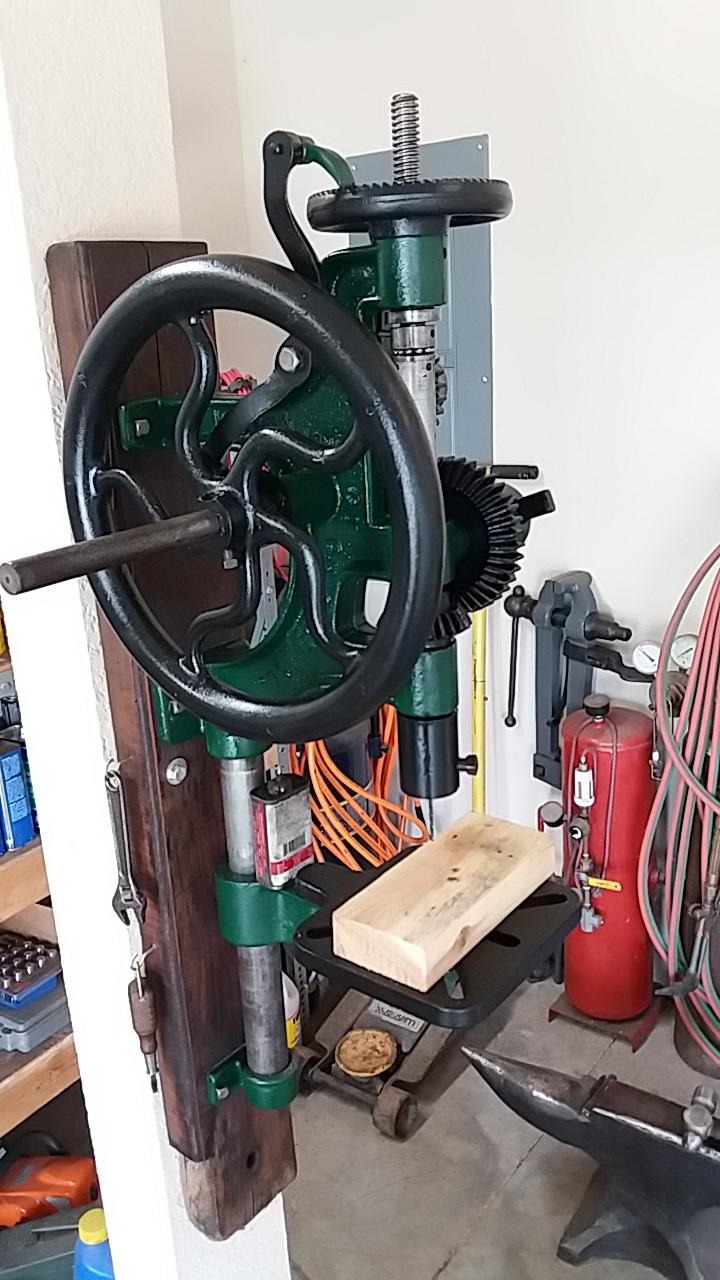
Just posted a topic about this beauty that I refinished. Once I get my new shop built, you better believe she will see some use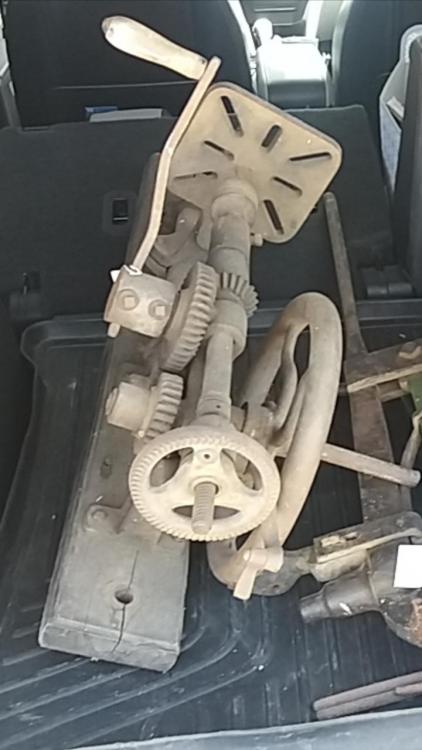

-
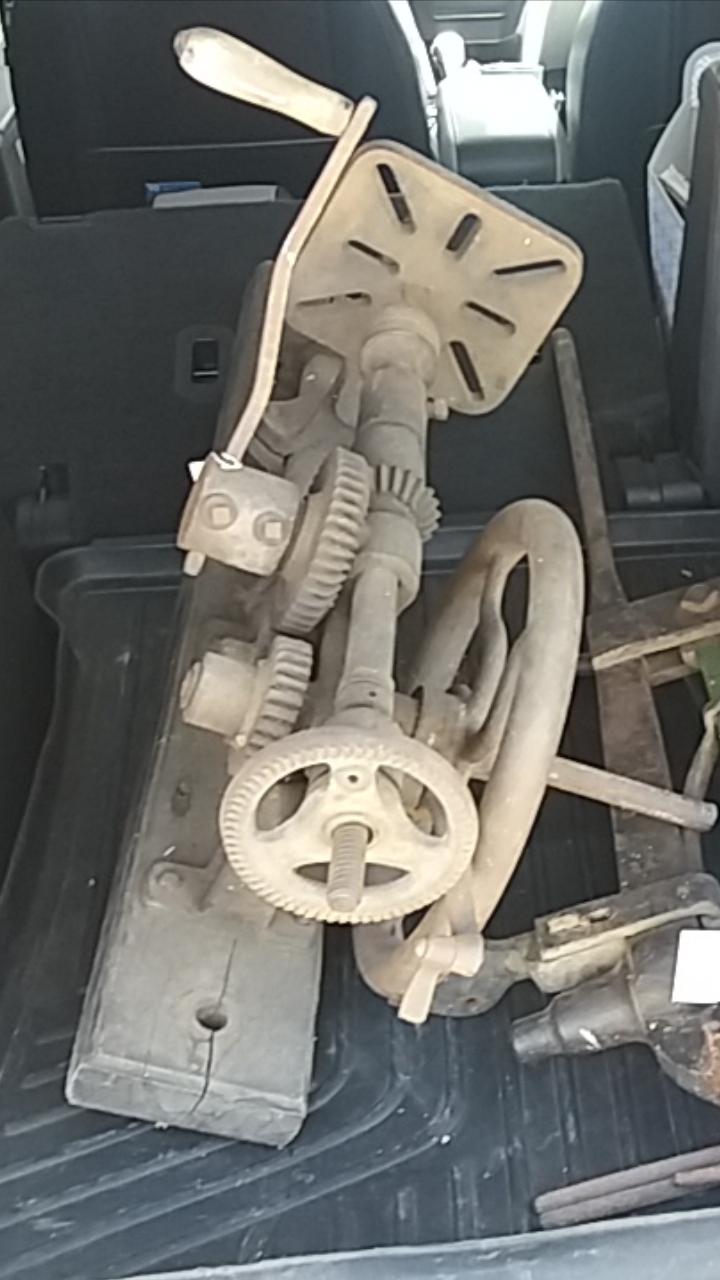
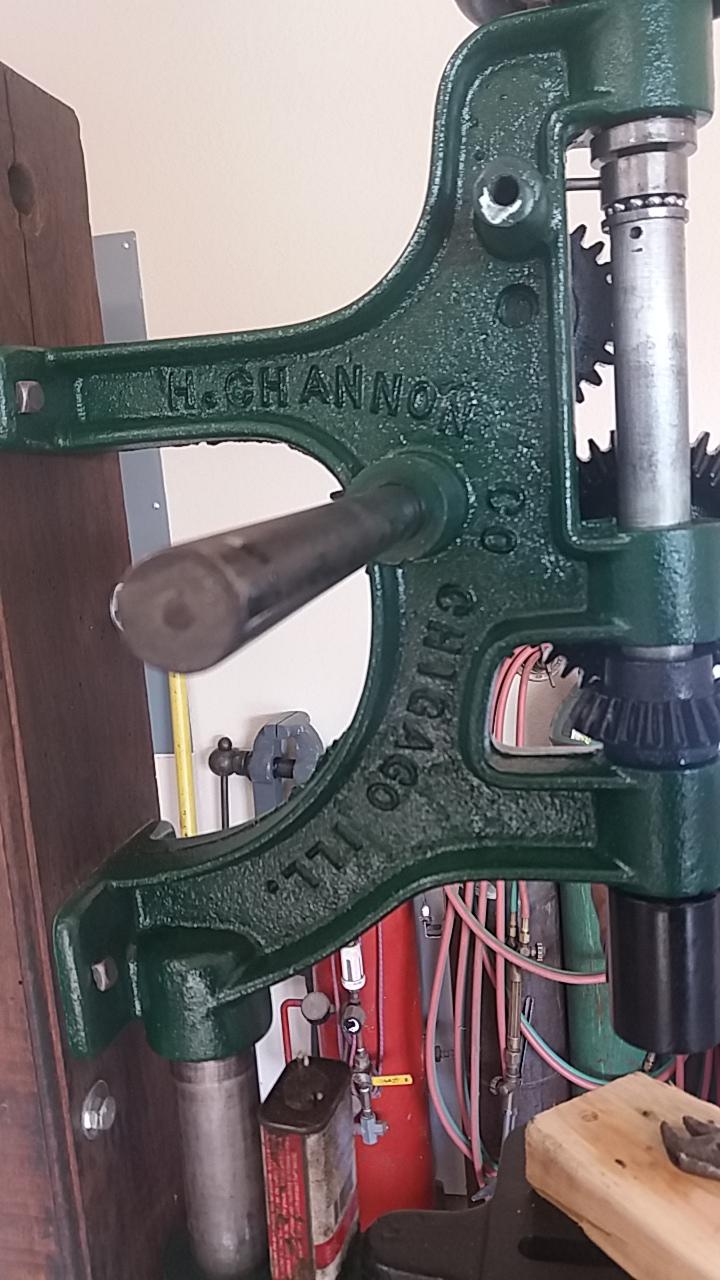
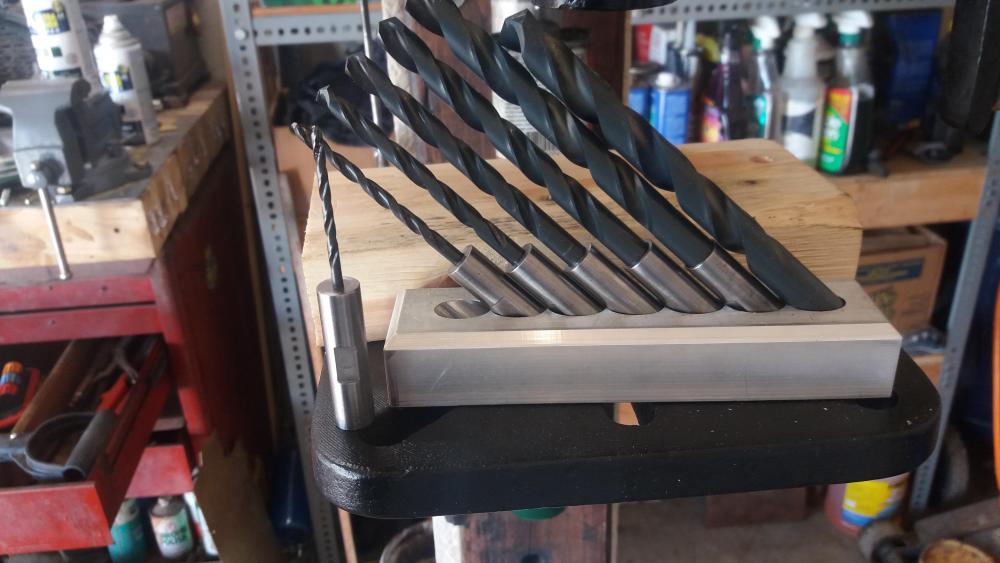
Hello everyone. So about a week and a half ago I acquired this post drill. All seized up and covered in dust like it had sat in a barn untouched for 75 years. With some penetrating oil, a little heat from a small torch, and a wooden mallet I was able to completely disassemble it. I sand blasted it and gave it a nice gloss coat of hunter green and black. I can't for the life of me figure out any info (history) on the brand though, except that for a while, H. CHANNON may have been partial owners of McMaster Carr. I also didn't notice until today when I was painting the lettering black that it says CHIGAGO instead of CHICAGO. Does anyone here know anything about this brand? I made a set of drill bits at work by drilling out some half inch stock and red loctiting drill bits into their new half inch shanks so I can use the original chuck. Drilling holes with these post drills is really satisfying. Thanks for looking and any help. God bless, Keith


-
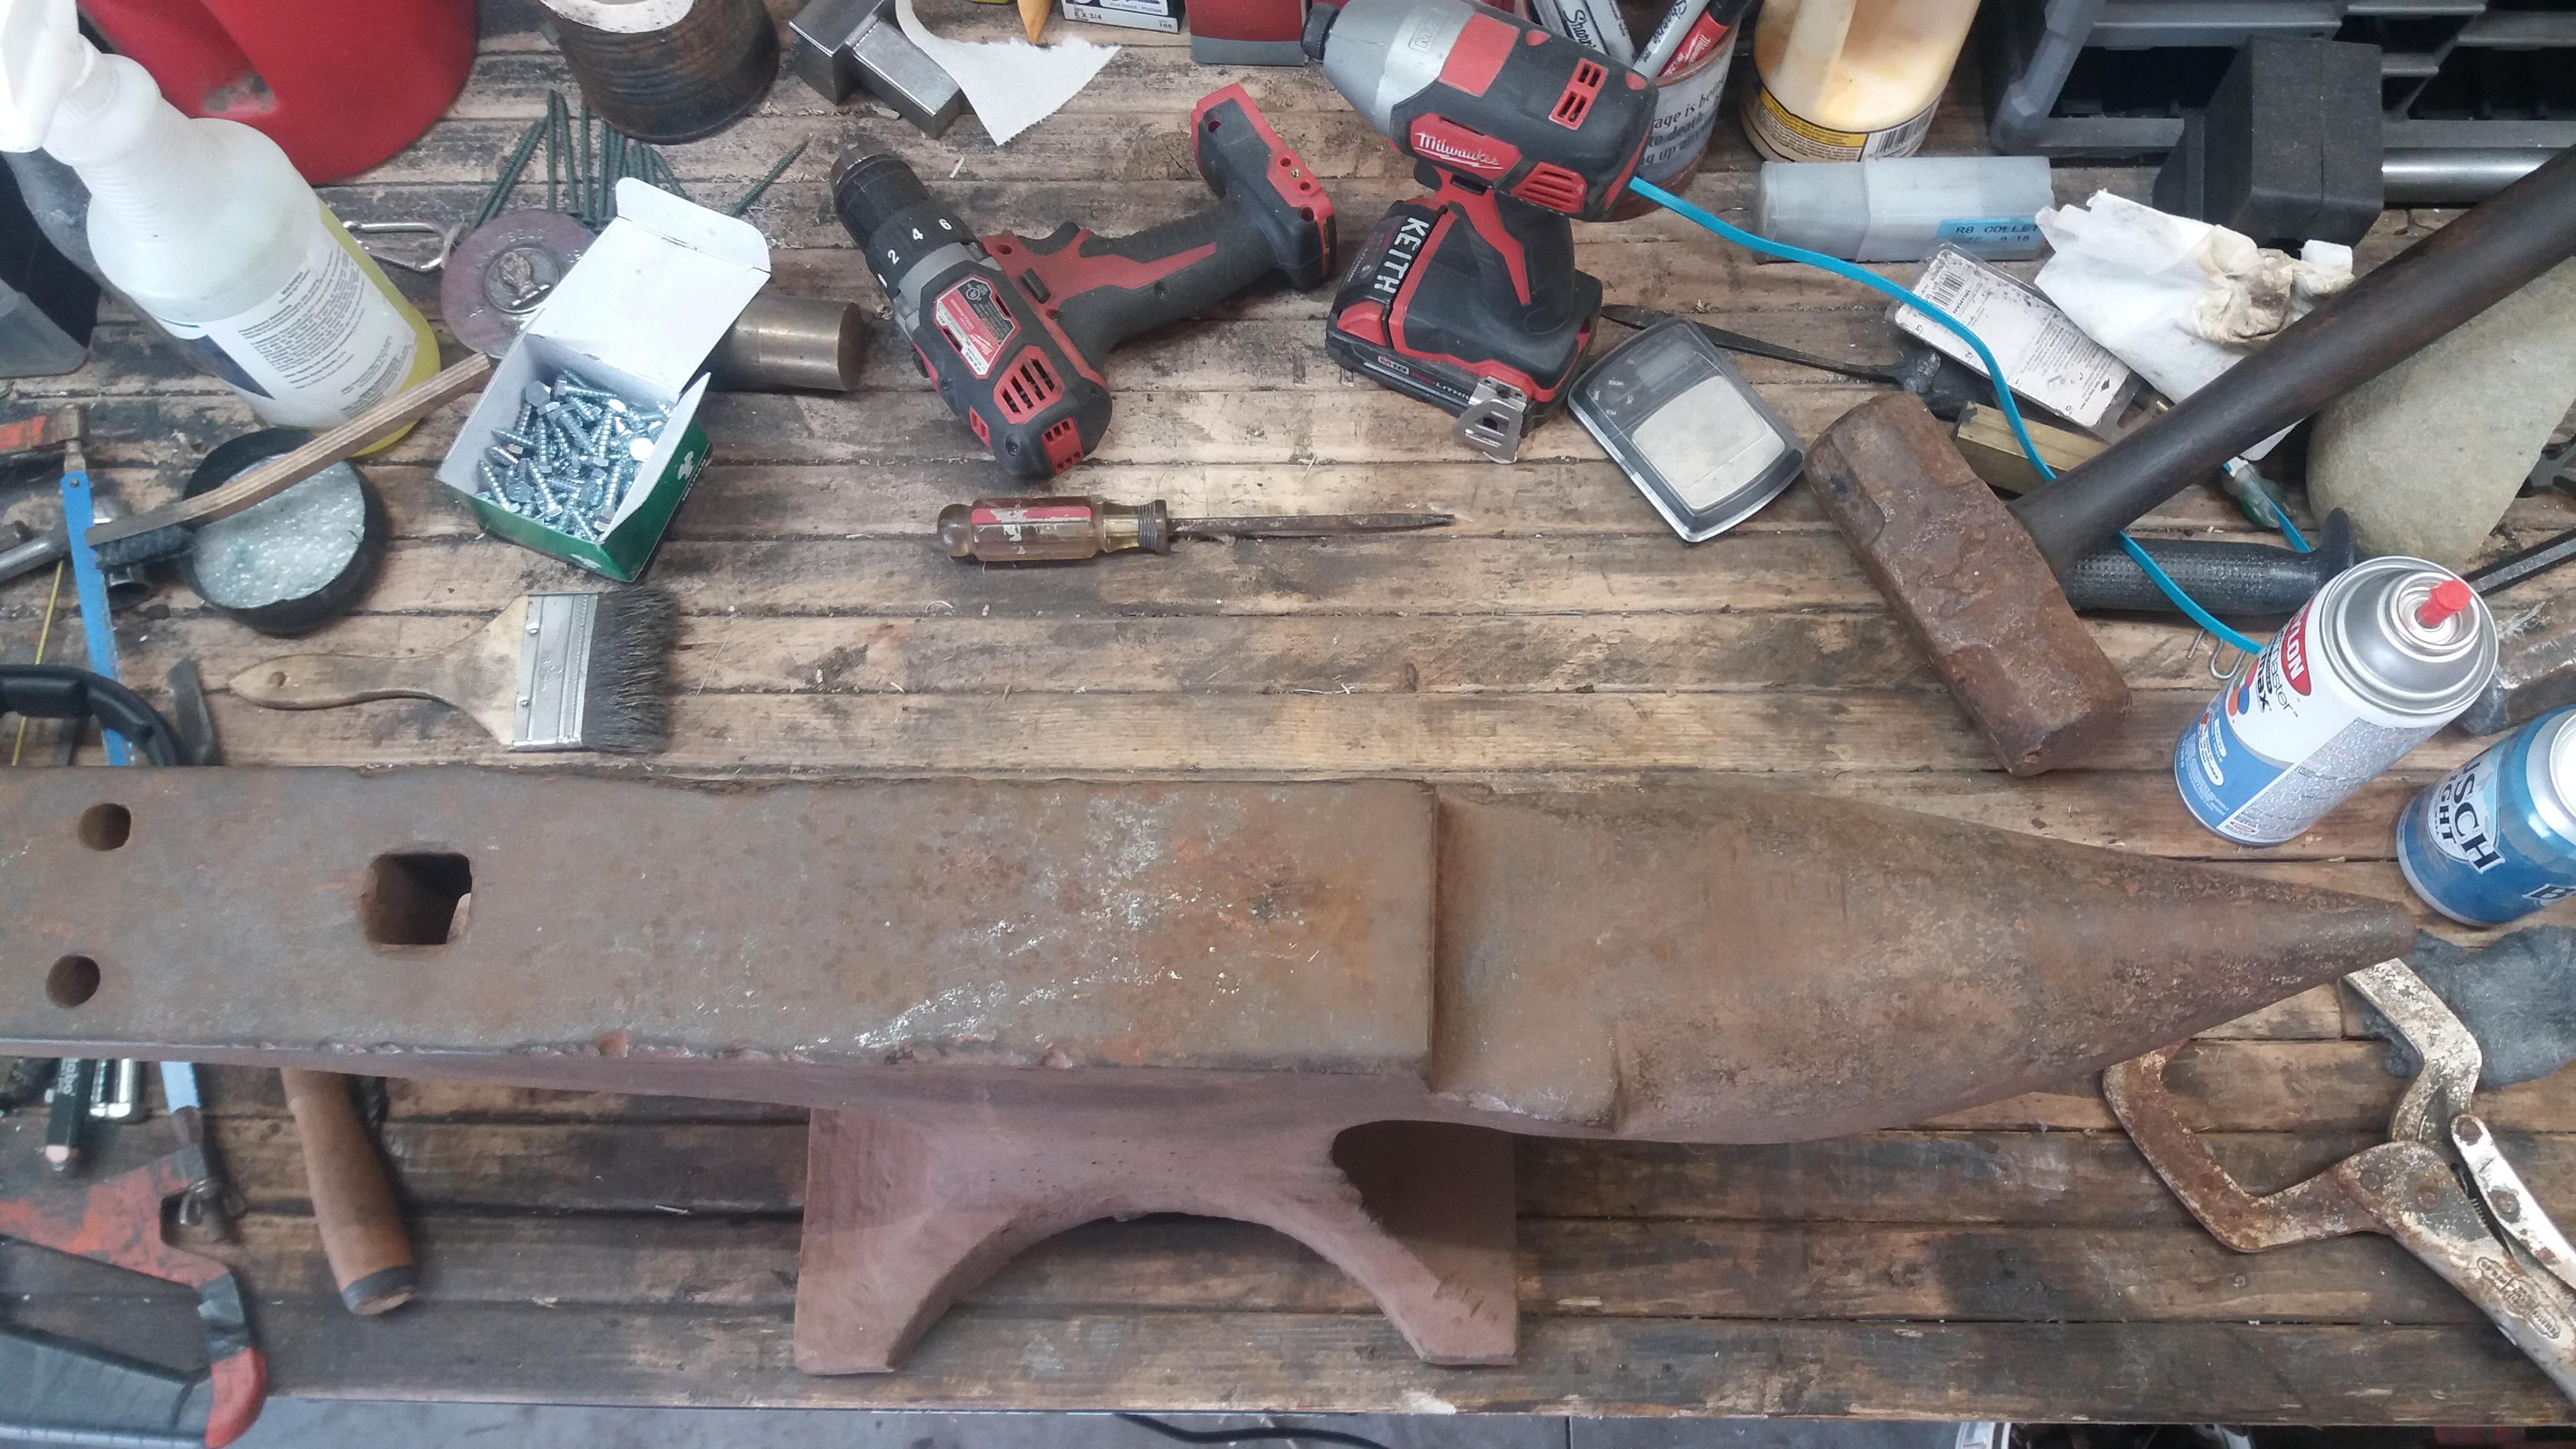
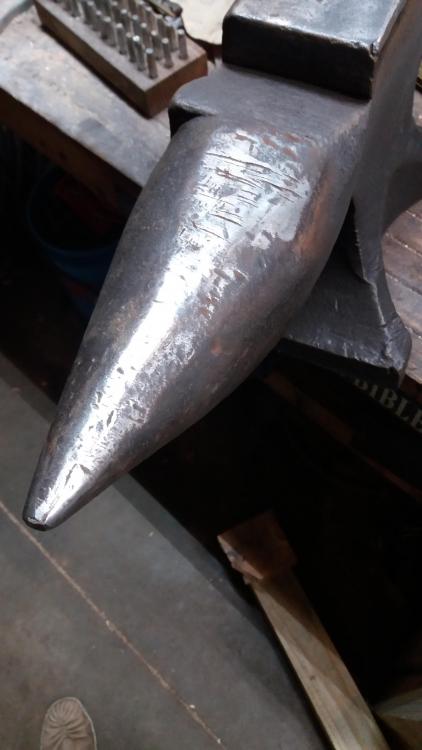
Just a little follow up and so every one knows I'm not looking to weld up corners and try to "fix" an anvil that way.... I ground the mushroom part off of the horn (which had been peened over by someone else) and there was some marks on the horn from what looks like someone using the horn as a chisel plate that I ground the high points off of. I then ground the mushroomed edges of the face of the anvil square vertically then blended/radiused what that left from doing that. That left me with a fairly square corner close to the chisel plate and various radii throughout the face edges back to the hardy hole and from there back over the heel, I didn't touch ove the heel with the grinder as everything back there looks good. The anvil now has no mushrooming and should last well past my lifetime. Now I need to build a smithy..... just wanted to post a follow up to let everyone know my intentions with thus post and that I know a but about what is good and what is bad for an anvil. I wanted to eliminate the mushrooms on the face to avoid future chipping, not "return to factory looks" which would be a step back lol. I hope this topic is seen by beginning smiths who want to "refinish" an anvil and realize that true refinishing doesn't involve making square corners, but rather eliminating square corners/fixing potential problems with a mushroomed edge. Thanks for your input guys, Keith
-
cool video for quieting an anvil
ChiefLittleBair replied to Awrksmokey's topic in Anvils, Swage Blocks, and Mandrels
My cast steel West did the same thing, but I couldnd get it as quiet with a magnet and the magnet kept moving around. When I made a new stand though and lagged the anvil to the stand with a sheet of rubber under the anvil, it's as quiet as your anvil with the magnet. So that's one thing you may try if you notice the magnet moving and having to reposition it frequently. Check out how Roy from Christ Centered Ironworks mounts his little 66 pounder -
No offense taken and I hope I'm not coming across like that. I just want everyone to know my intentions and why I'm looking for the answers to the questions I have. Thanks again for all the input that was given, and no hurt feelings!
-
Sounds good guys. I'm not trying to "restore" sharp corners. Not a fan of cold shuts on my work myself lol. I was mainly worried about the mushroomed edge spalling and how to fix that before another chip occurs. I will be grinding the face flush on the sides and just a quick once over with the grinder to smooth the sharp edge that will have been created.
-
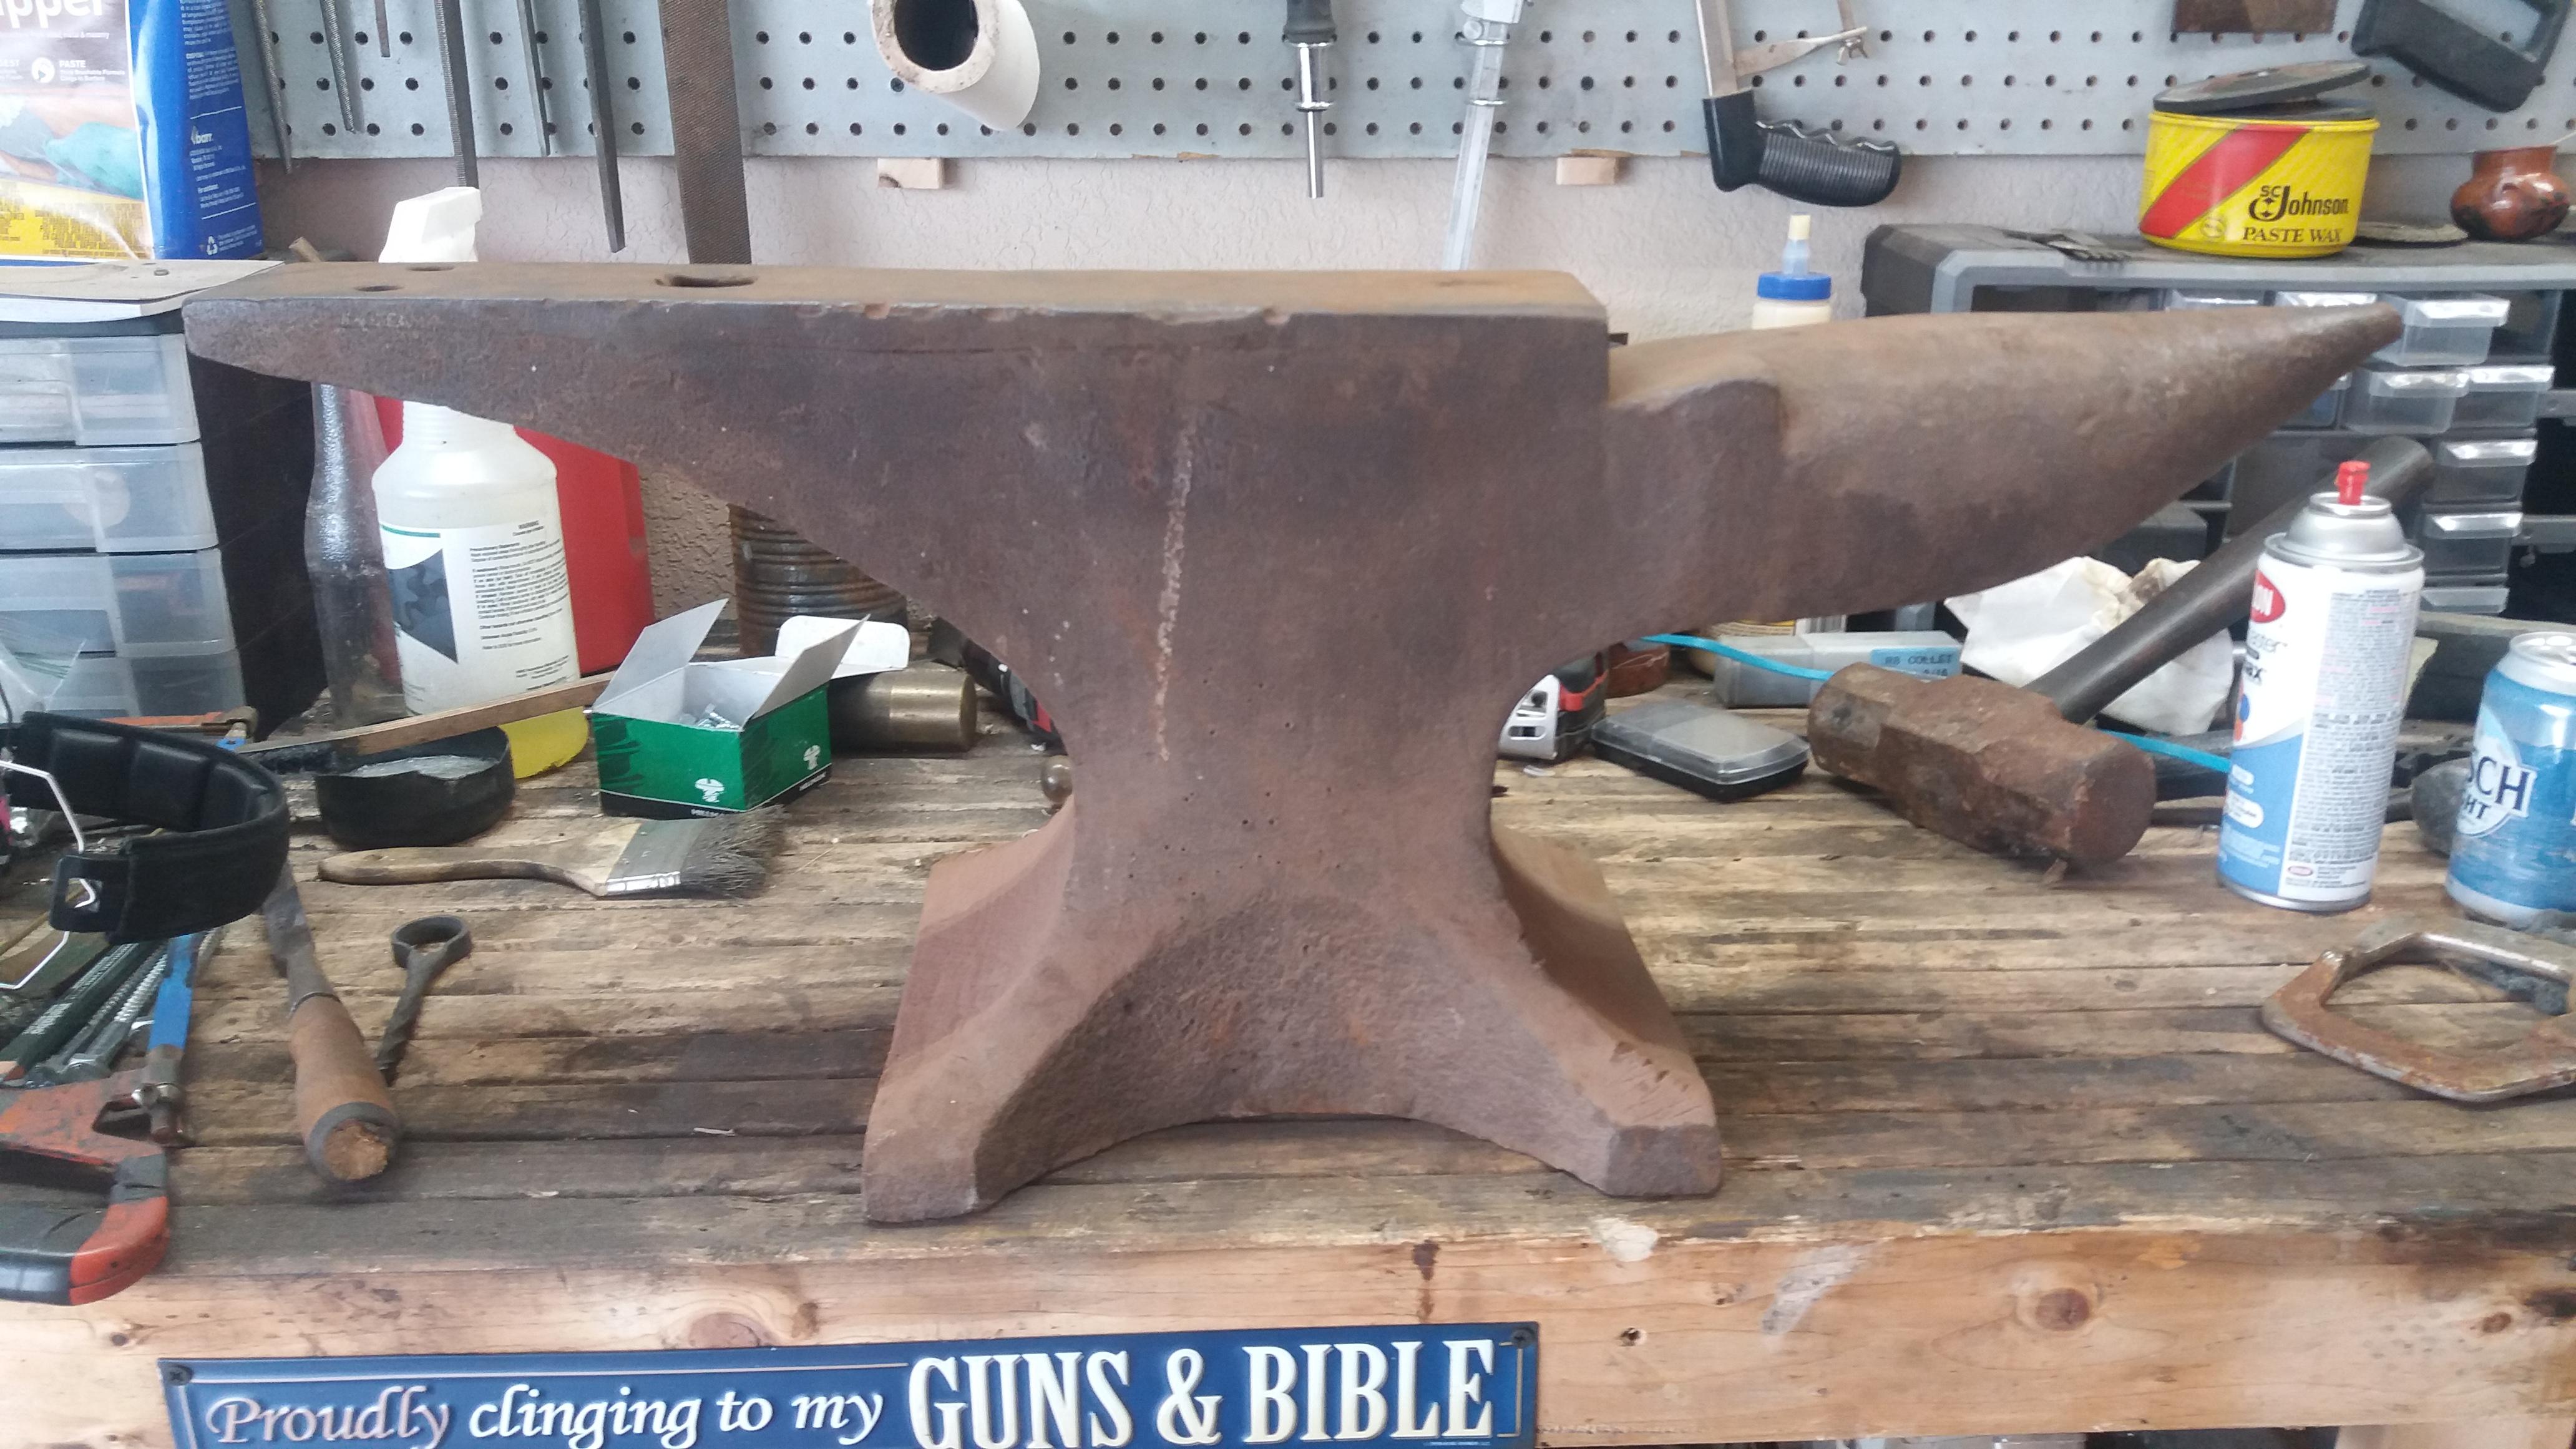
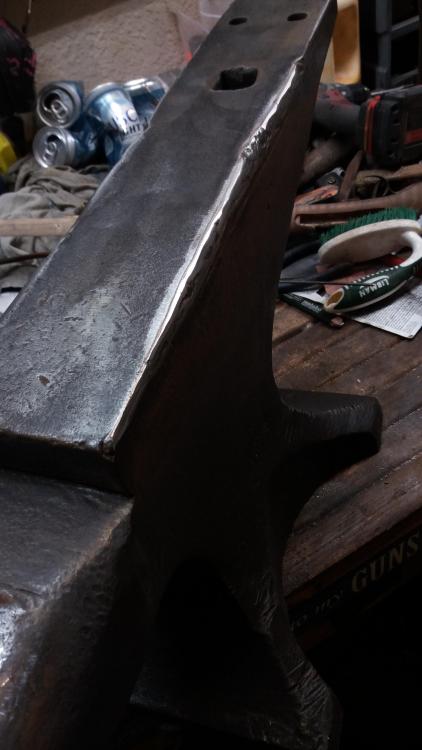
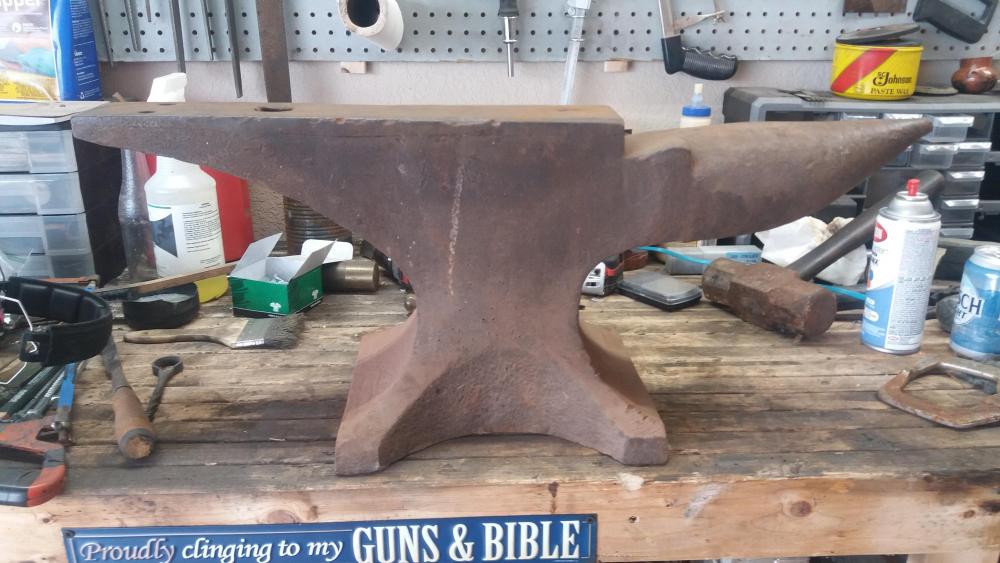
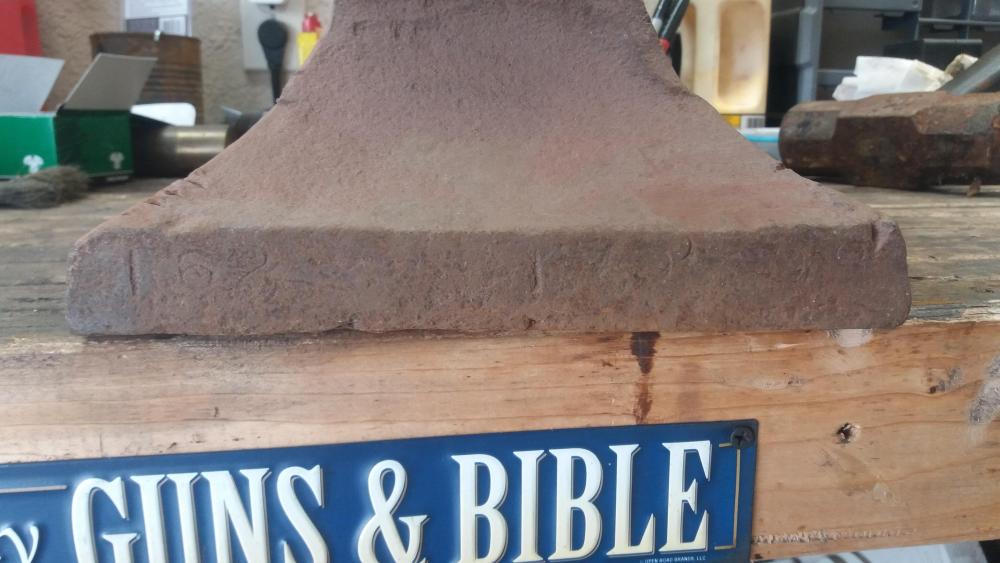
Hello, i just posted about a Trenton that was my great grandpas then my dads. I was cleaning it up via wire wheel and BLO when my dad told me to keep it. My concern is that there is an area of the face that is peened/mushroomed over instead of chipped like most of it. I plan on using thus anvil and don't want a missed strike in thus area to result in another chip fly in off at high speeds. Is there a possibility I could cold forge this part o the face back into its self, of should I grind it flush vertically? I'm not one to take abrasives to an anvil, but as far as safety goes I was taught to always grind to mushrooms off of the hammer and of a punch so it doesn't send shrapnel at an unexpected time. I don't really want to leave the anvil as it sets, but don't want to risk trying to cold forge it either and send a chip off the top of the face. It's a 162lb 1921 Trenton for anhone that didnt see my earlowr post. What is your guys thoughts? Most of the edges are peened like this even under the chipped edges and I feel if I grind them flush vertically, I could bring the anvil back to factory width and at the same time loose a lot of the radiused/chipped edges (about 1/16" width per side)
-
Also, does anyone know anything about the extreme angle of the chisel plate? Is thus a normal thing in Trenton farriers anvils? I've done some Google searching and found Trenton with sloped chisel plates but nothing as extreme as what this anvil has...
-
You better believe we detect he shot out of that place lol. Dad found some early aerial photos of the homestead and it looks like the front yard used to be all gravel with hitching posts, later unfilled with dirt. A project we want to do is rip the unfilled dirt back down to the gravel and see what we can find about a foot down. I've found shoes, axes, felling/splitting wedges, and all sorts of farm equipment. Most of which was wrought. My brother found an old worn out double bit ax that was wrought with welded hc bits
-
Thanks guys. Yeah it looks funny, but the more I look at it, the more I like it. Funny how this forging addiction gets to the heart with sentimental stuff like this. I've been bugging my dad about this anvil for the past 5 years or so, and I've been in tears for the past 30 minutes since he told me to keep it. The edges past the hardy are sharp, and various radii throughout the rest, so plenty of edges to work off of. My wife and I just built a house and the plan for this year is to build a timber frame off grid blacksmith shop maybe 10x15 foot or so. Enough room for a forge, anvil, bench with post vise, treadle hammer and not much more. Keeping it small and simple. My dad bought the old farm off my great grandpa in the 1990s, and we've found quite a few draft horse shoes in the garden with a metal detector. Must have been where great grandpa threw the old shoes out. A sheet of printer paper would probably cover the shoes but not with much to spare...
-
Well guys, a very happy moment in my life just happened. I texted my dad all the info on that anvil and he said with it being so heavy, he would hate for me to have to move it twice so I could keep it. I am beyond stoked to have great grandpa's anvil.... Thanks. I'm too late to edit my post now, but i will keep that in mind the next time I post something.
-
Thanks for the info and ya I assumed it was a farriers anvil with a worn clip. My great grandpa did farm with horses and I don't know of a blacksmith shop close by where he lived, so he might have shod his own horses. How do I resize my pics and what should they be resized to?
-
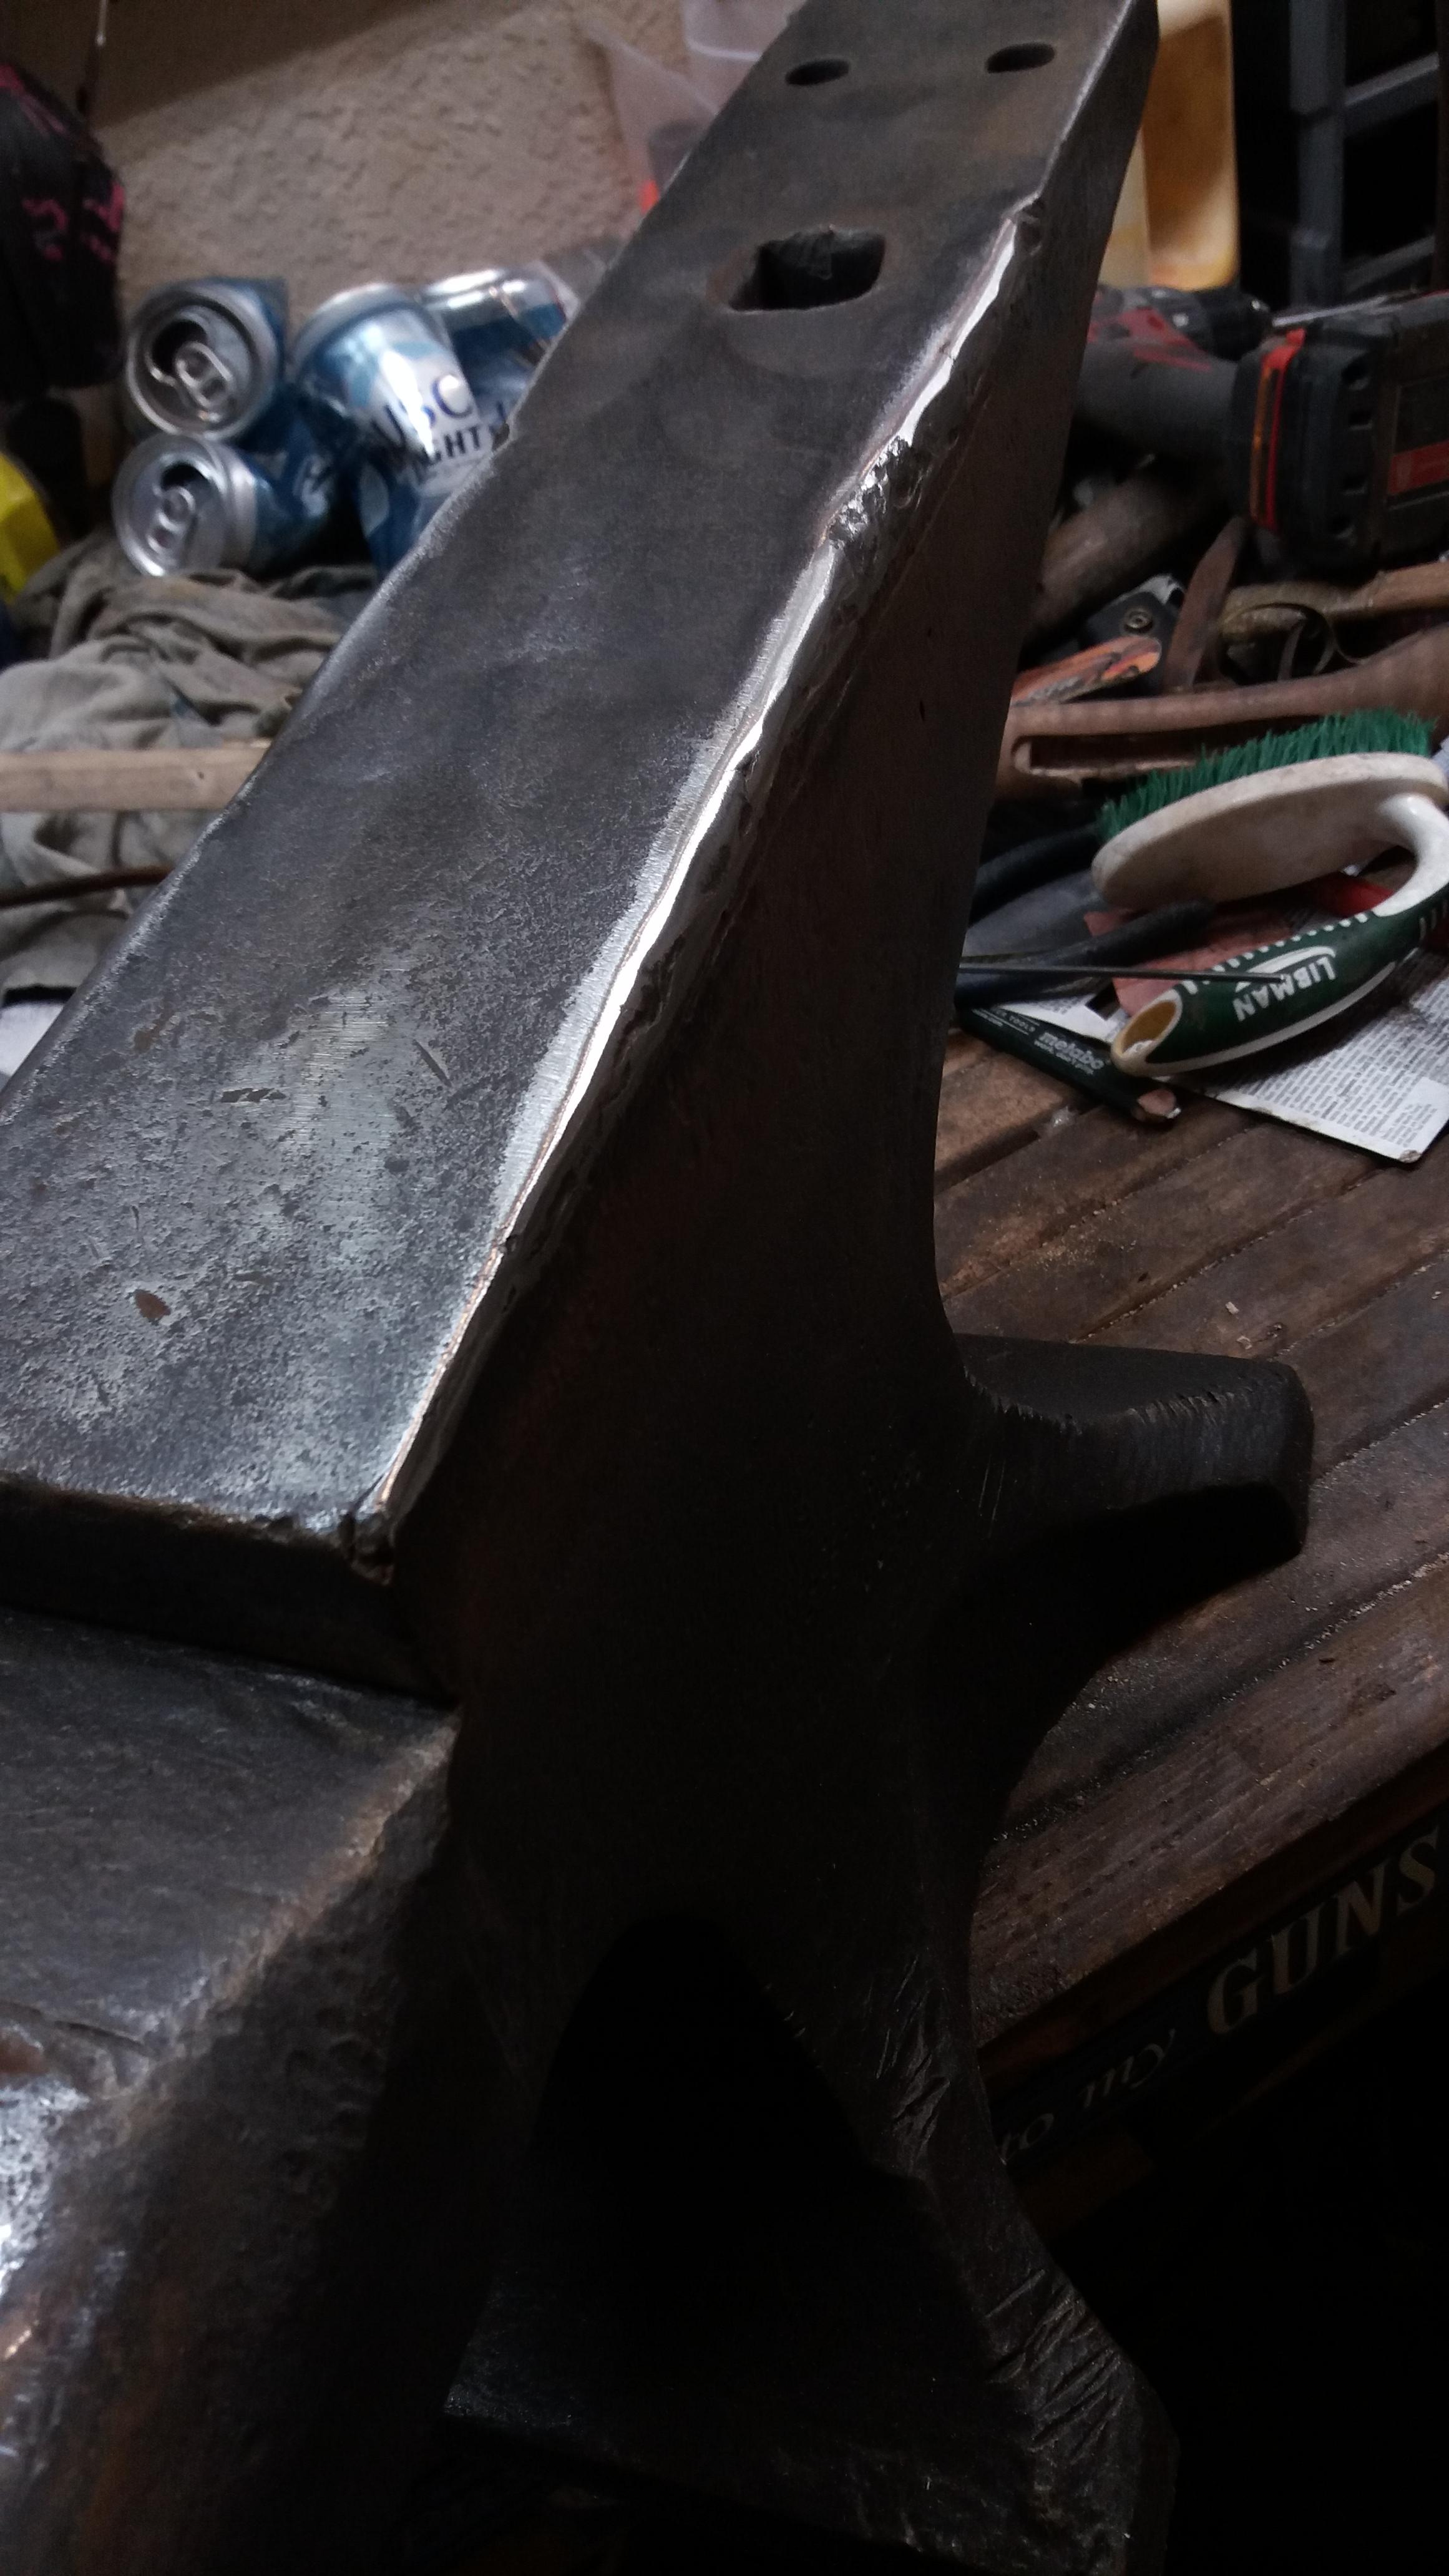
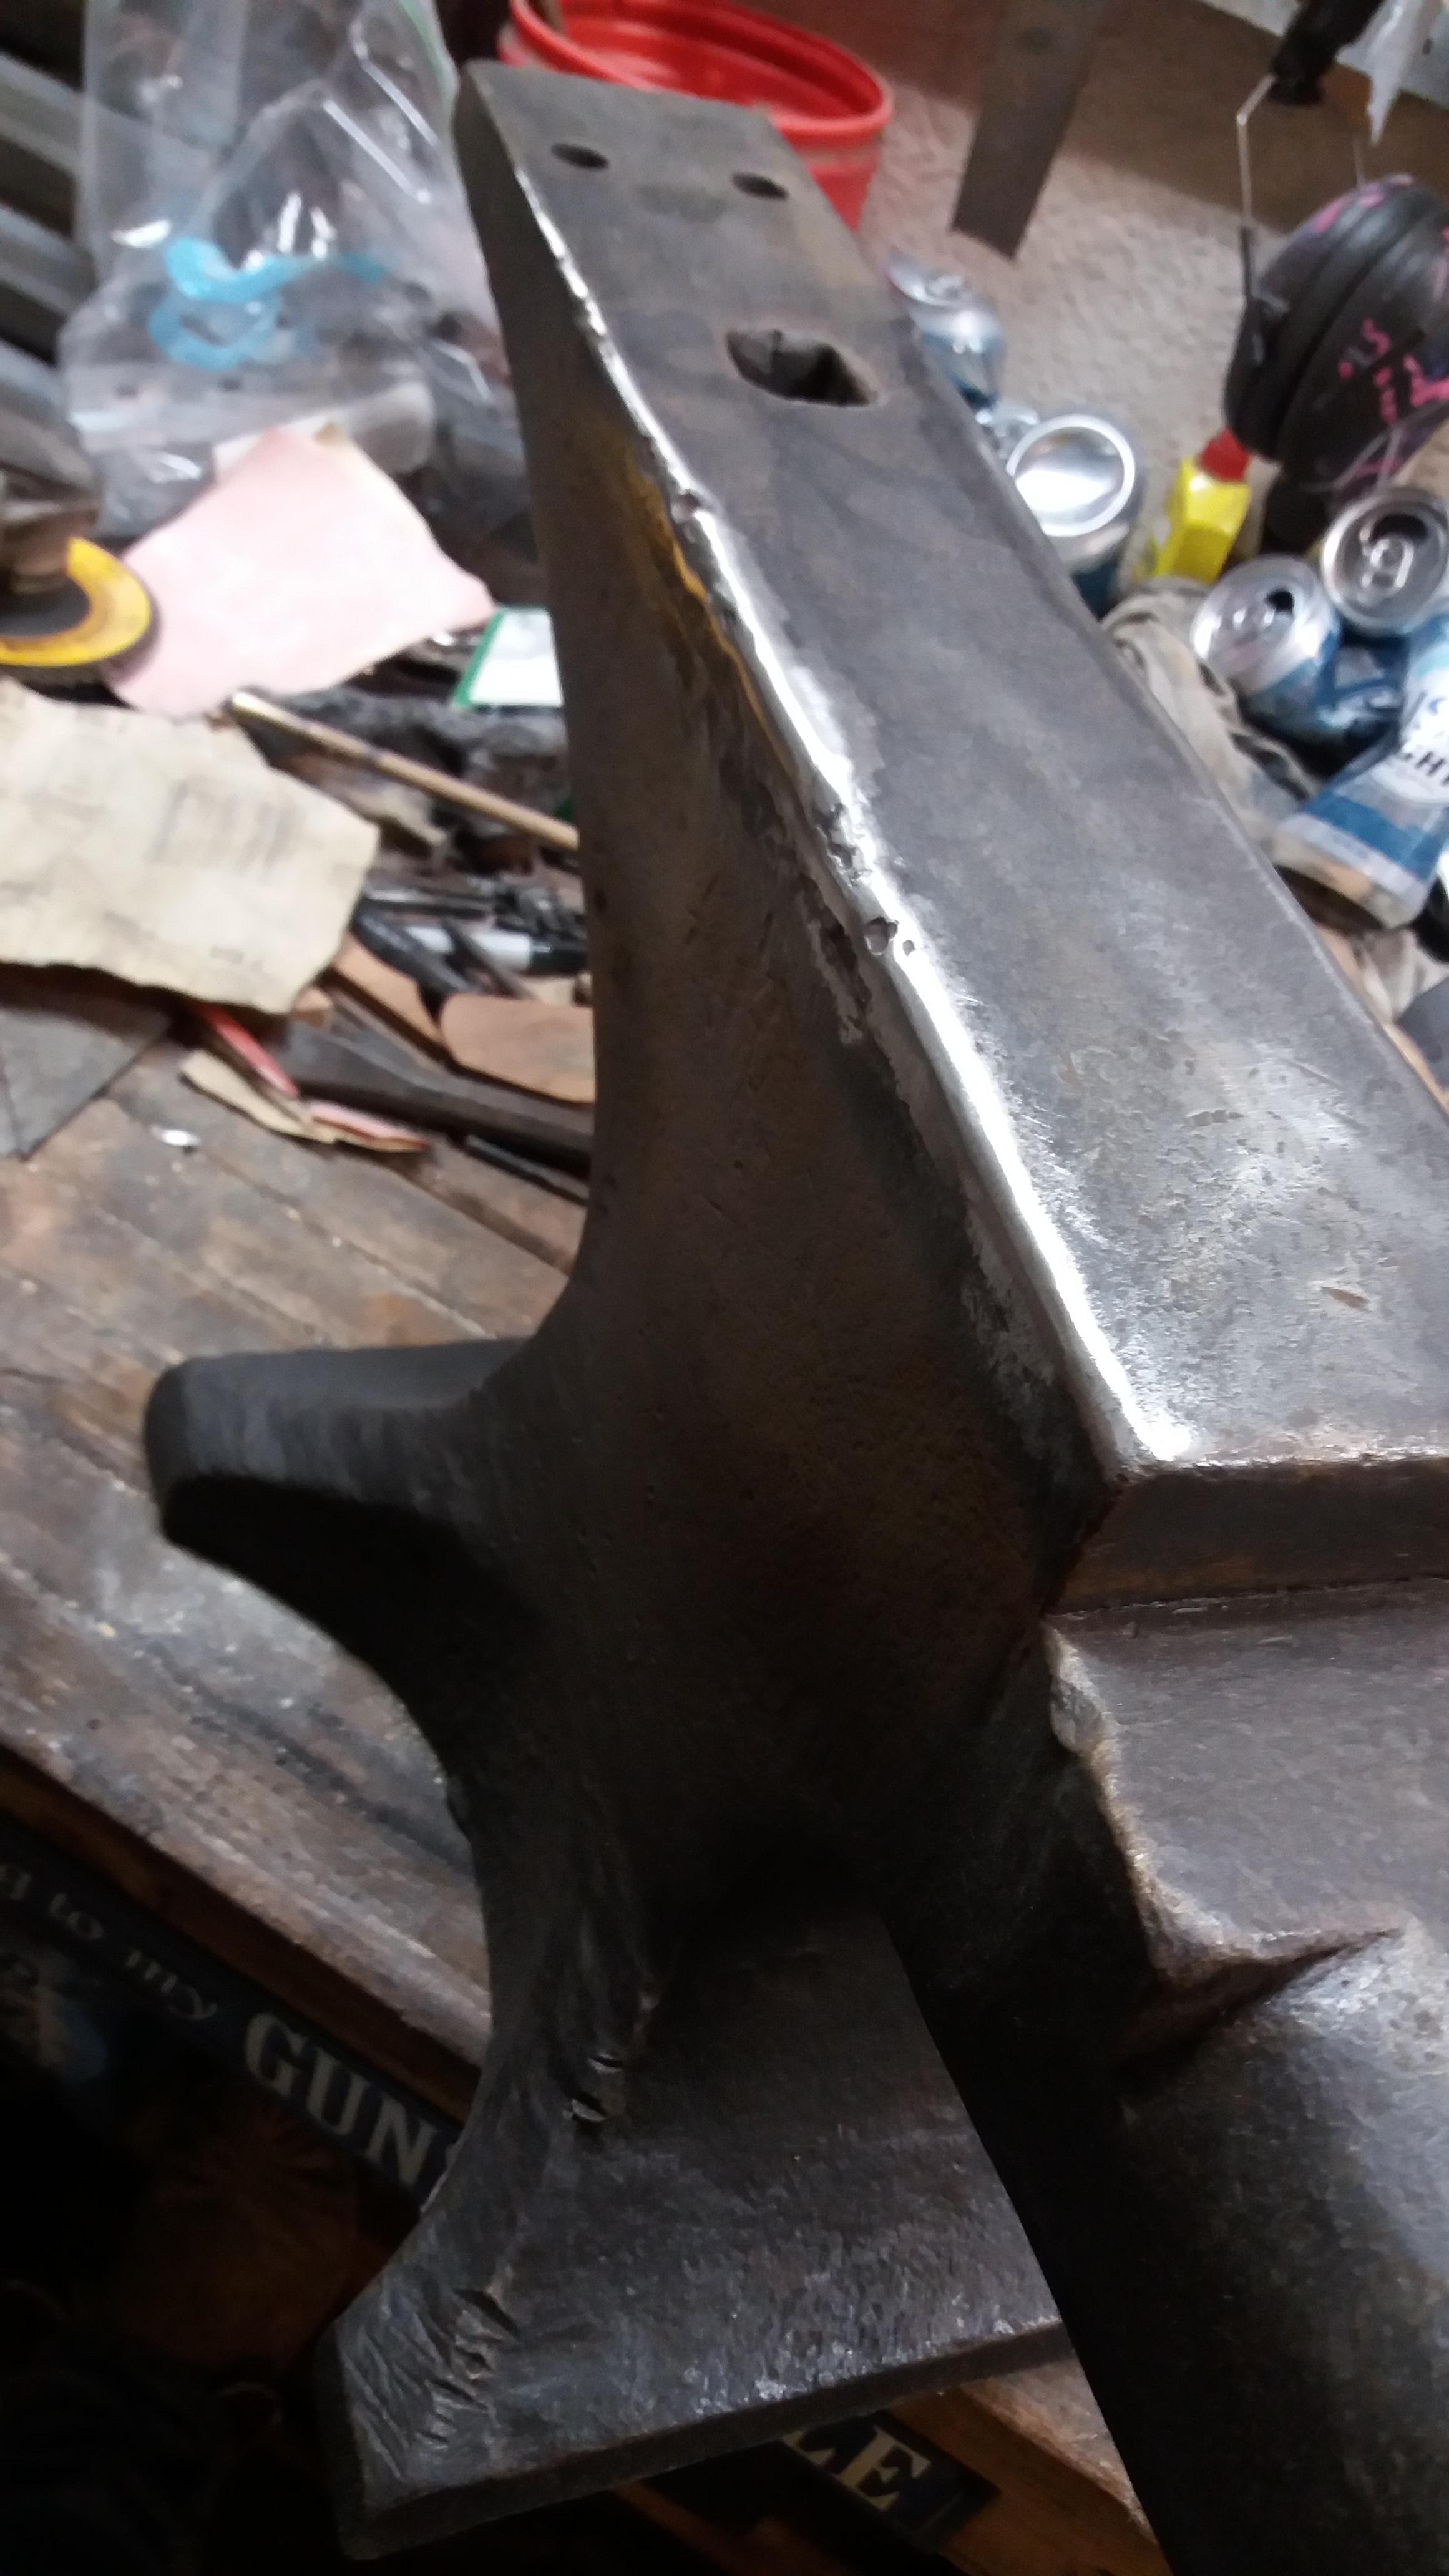
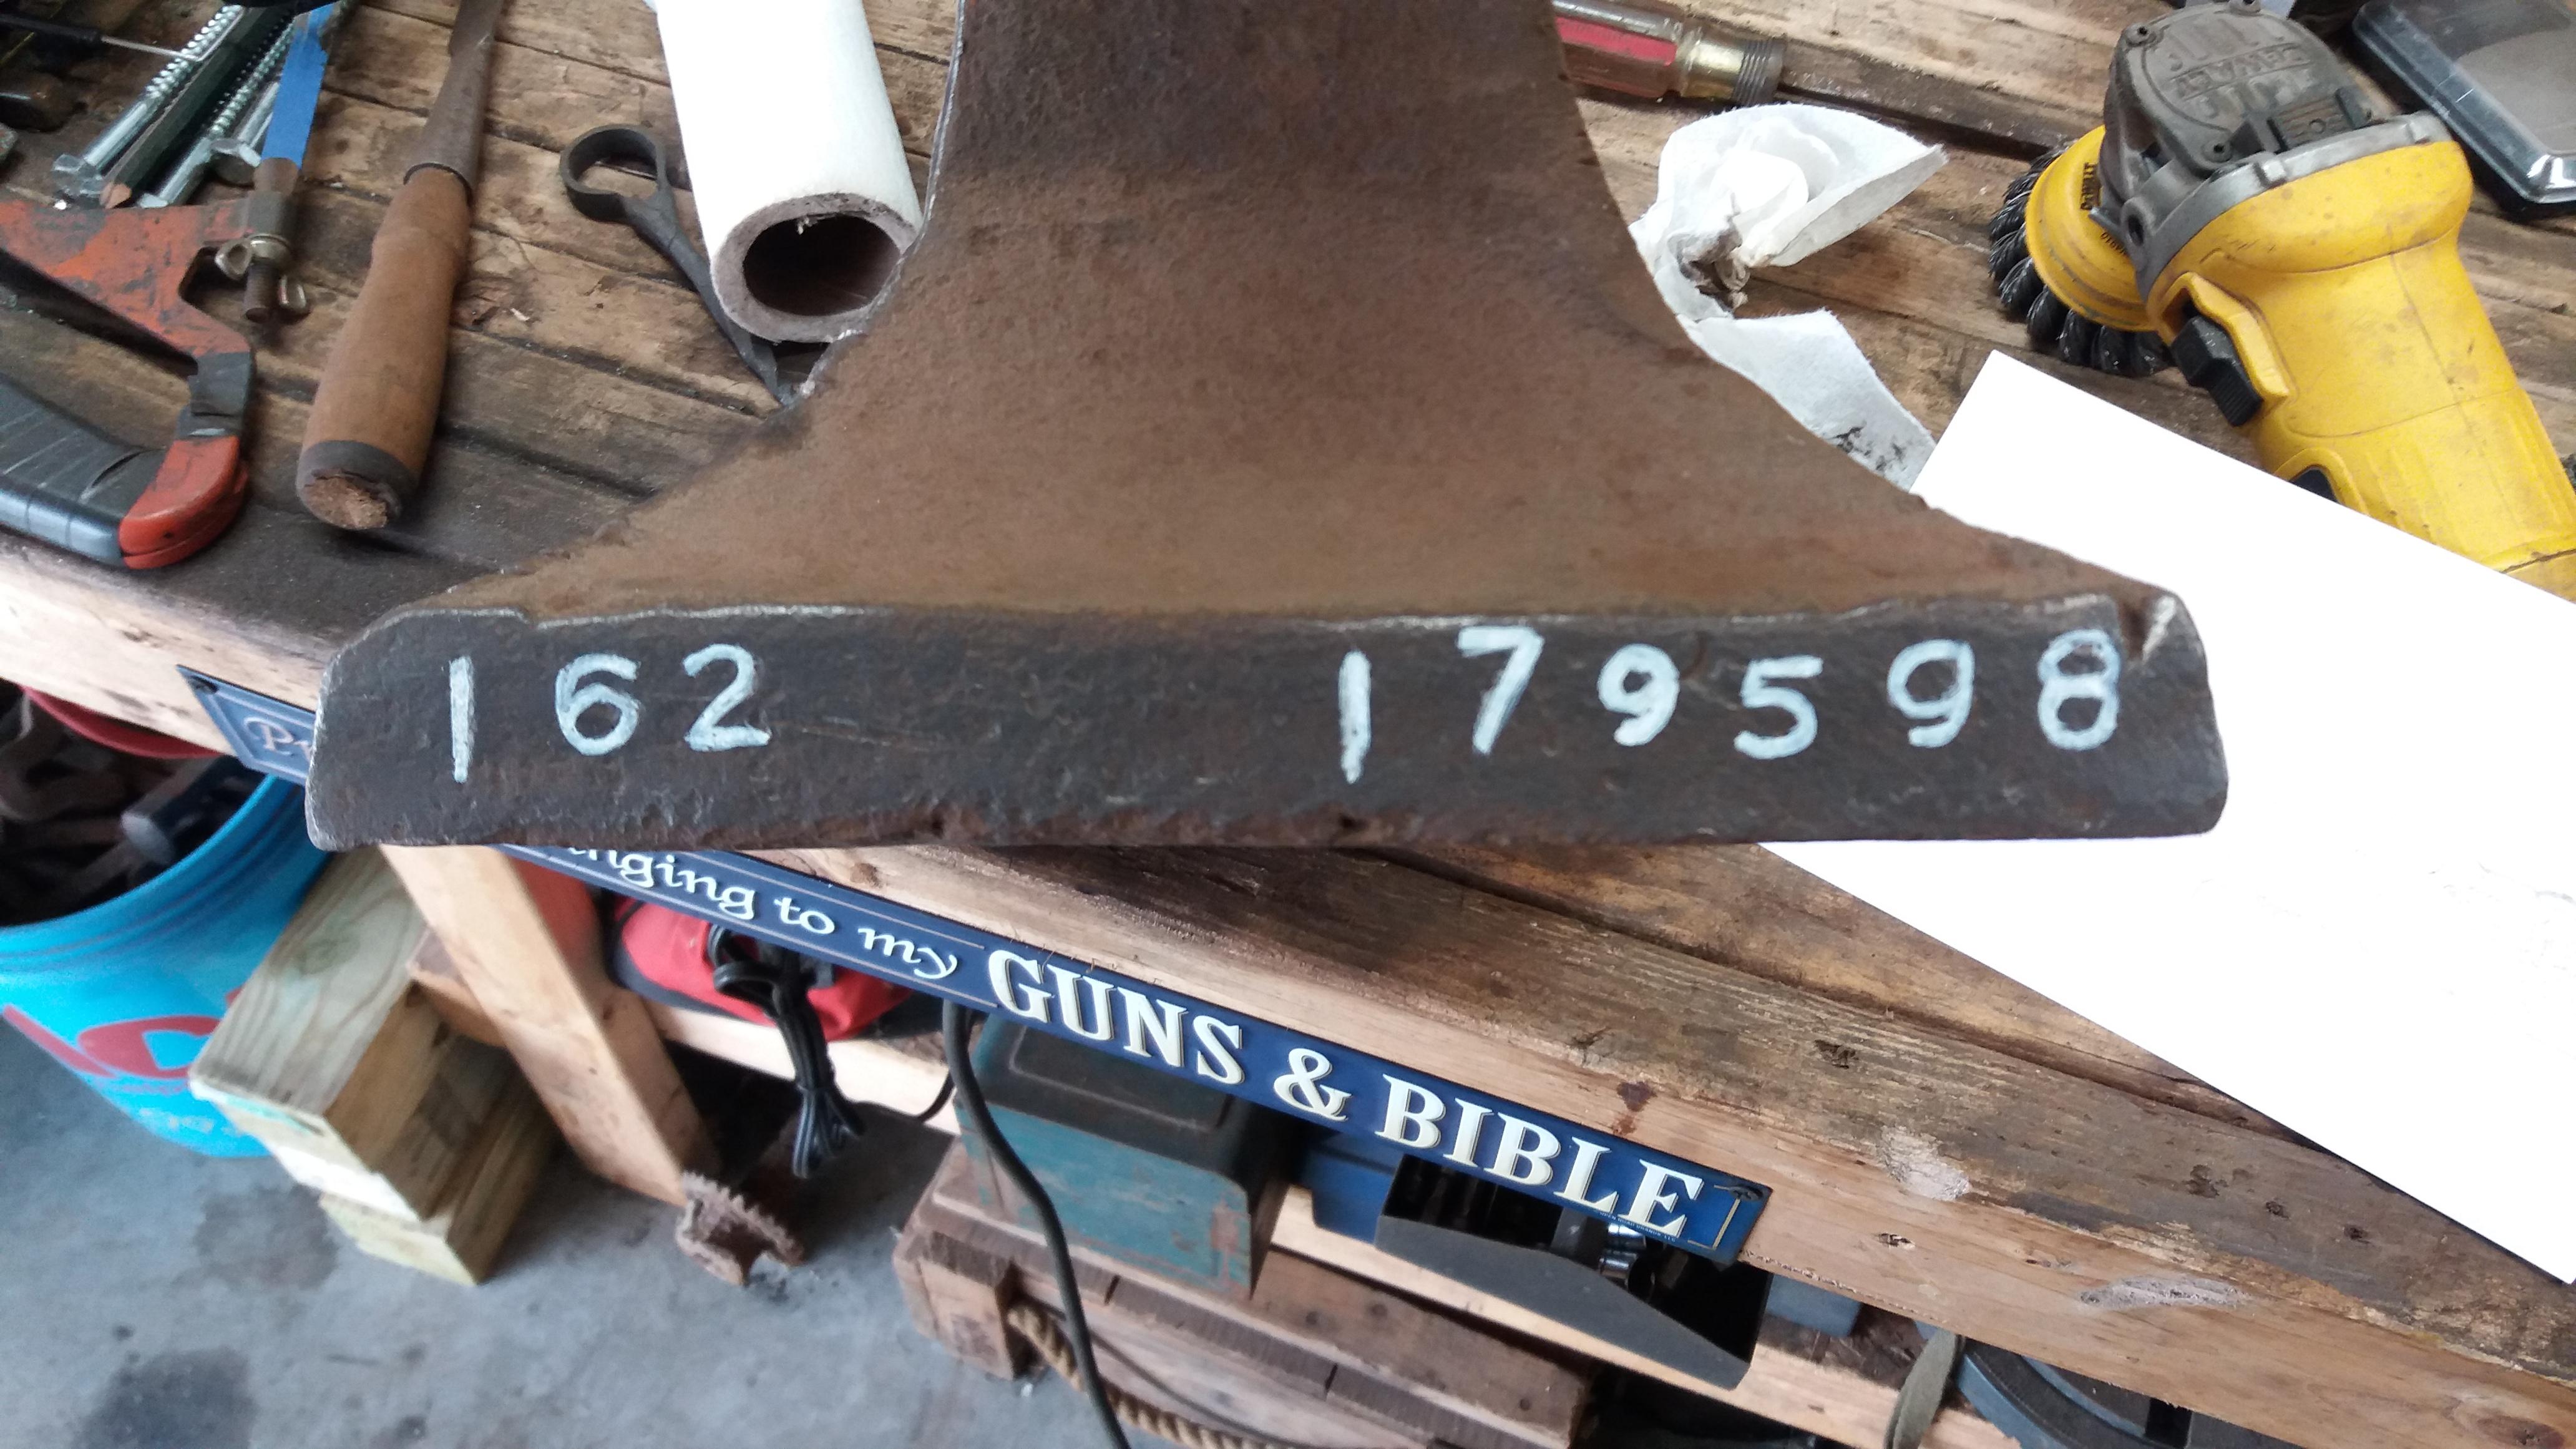
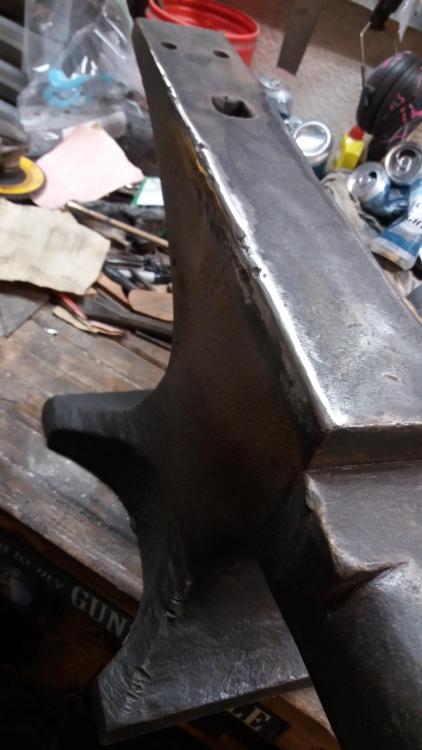
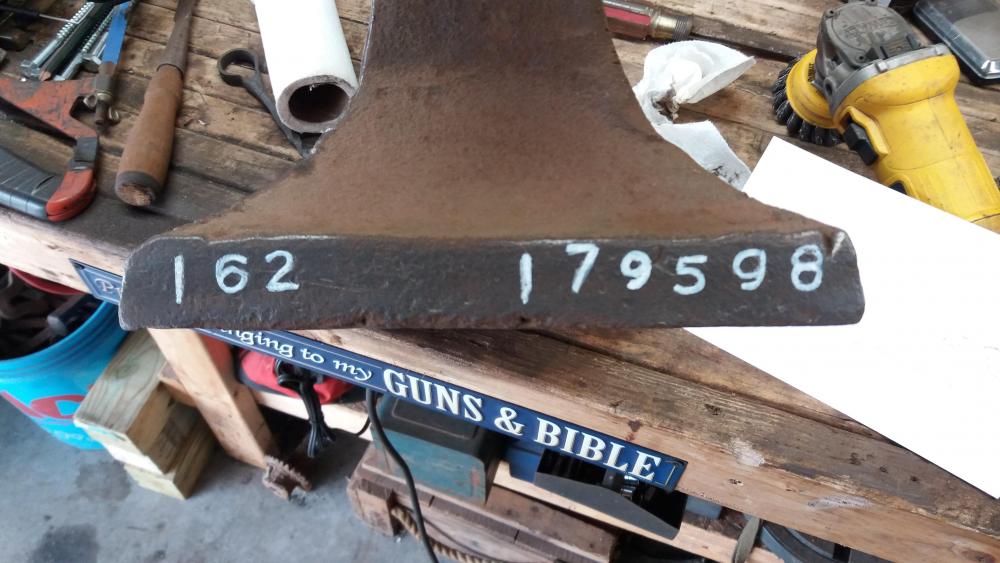
Hello all, another anvil question. This belonged to my great grandpa who was with us from 1919-2001. My dad currently owns it an I convinced him to let me clean it up and see what info I can get from you guys on it. I didn't realise until I took it from his shop and brought it into the daylight that it appears to be a Trenton. You can make out the diamond and the "ENTO" of TRENTON. On the side under the horn there is a very positive "162" followed with some space and what appears to be, but is very faint, a "179598". I assume the 162 is the weight in pounds as that feels right, and the 179598 is the serial number. I've cleaned it up some with a wire wheel and when that's done, I'm wiping it with degreaser and putting a coat of BLO on her. So as I'm sure many of you will be glad to hear, no abrasives are going to touch her lol. If I inherit this beauty, then I may blend the edges a touch I they cause me problems. Anyway, I was wondering if any of you gents could verify my assumptions that it is a Trenton, verify that the 162 stands for the weight in pounds, and that the 179598 is in fact the serial number. If that is the serial number, what would be the year of manufacture? And one more thing... it looks odd with the horn being wider than the face, and the chisel plate being slanted the way it is. Is this common and just a model of Trenton? Thanks in advance guys, Keith
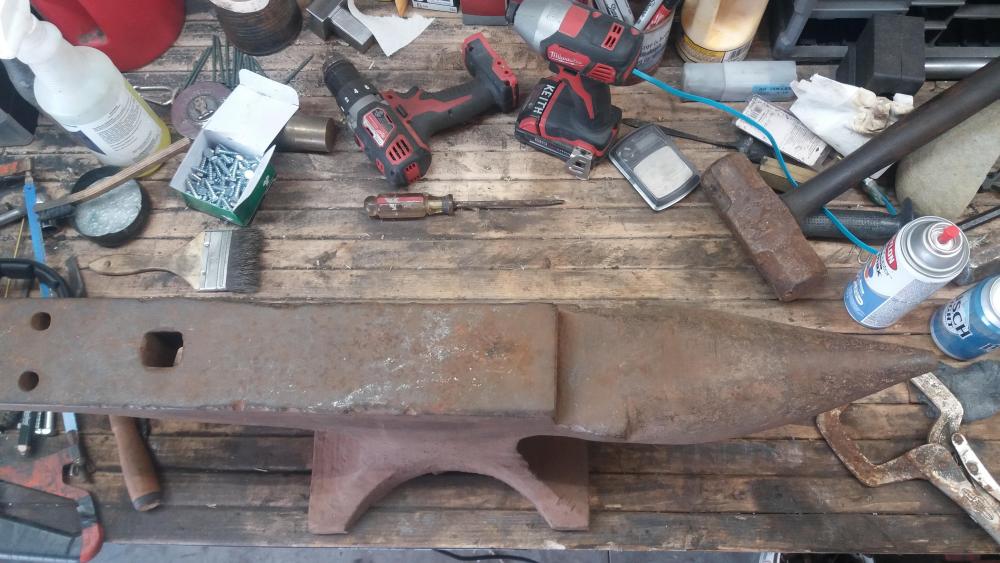
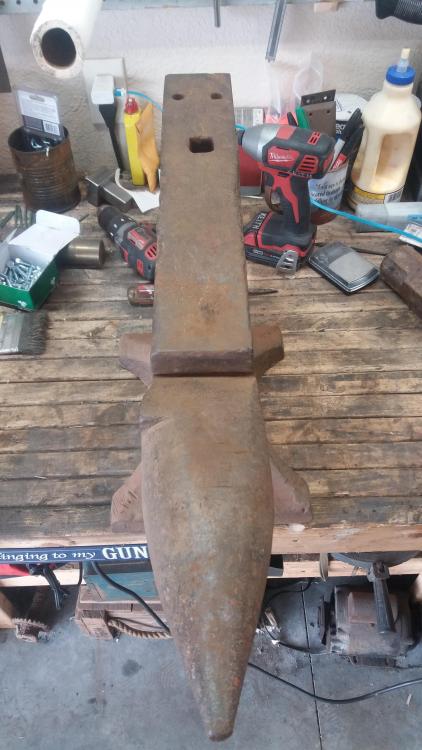

-
New member with another anvil ID
ChiefLittleBair replied to ChiefLittleBair's topic in Anvils, Swage Blocks, and Mandrels
What is AinA? I've seen you mention it in other posts too -
New member with another anvil ID
ChiefLittleBair replied to ChiefLittleBair's topic in Anvils, Swage Blocks, and Mandrels
Thanks for that info. When was West in production with smaller anvil like this? If never heard of West until I started digging into this one -
New member with another anvil ID
ChiefLittleBair replied to ChiefLittleBair's topic in Anvils, Swage Blocks, and Mandrels
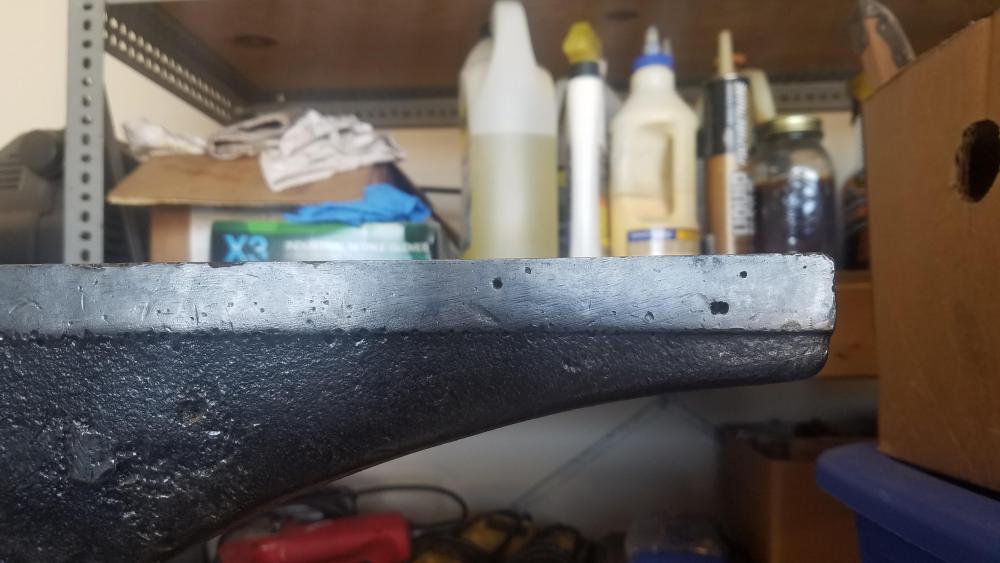
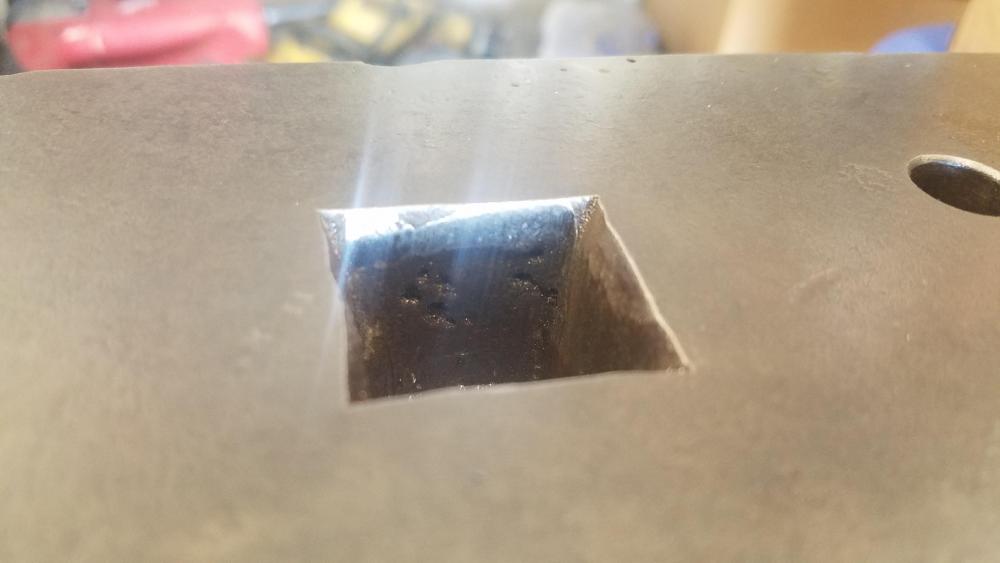
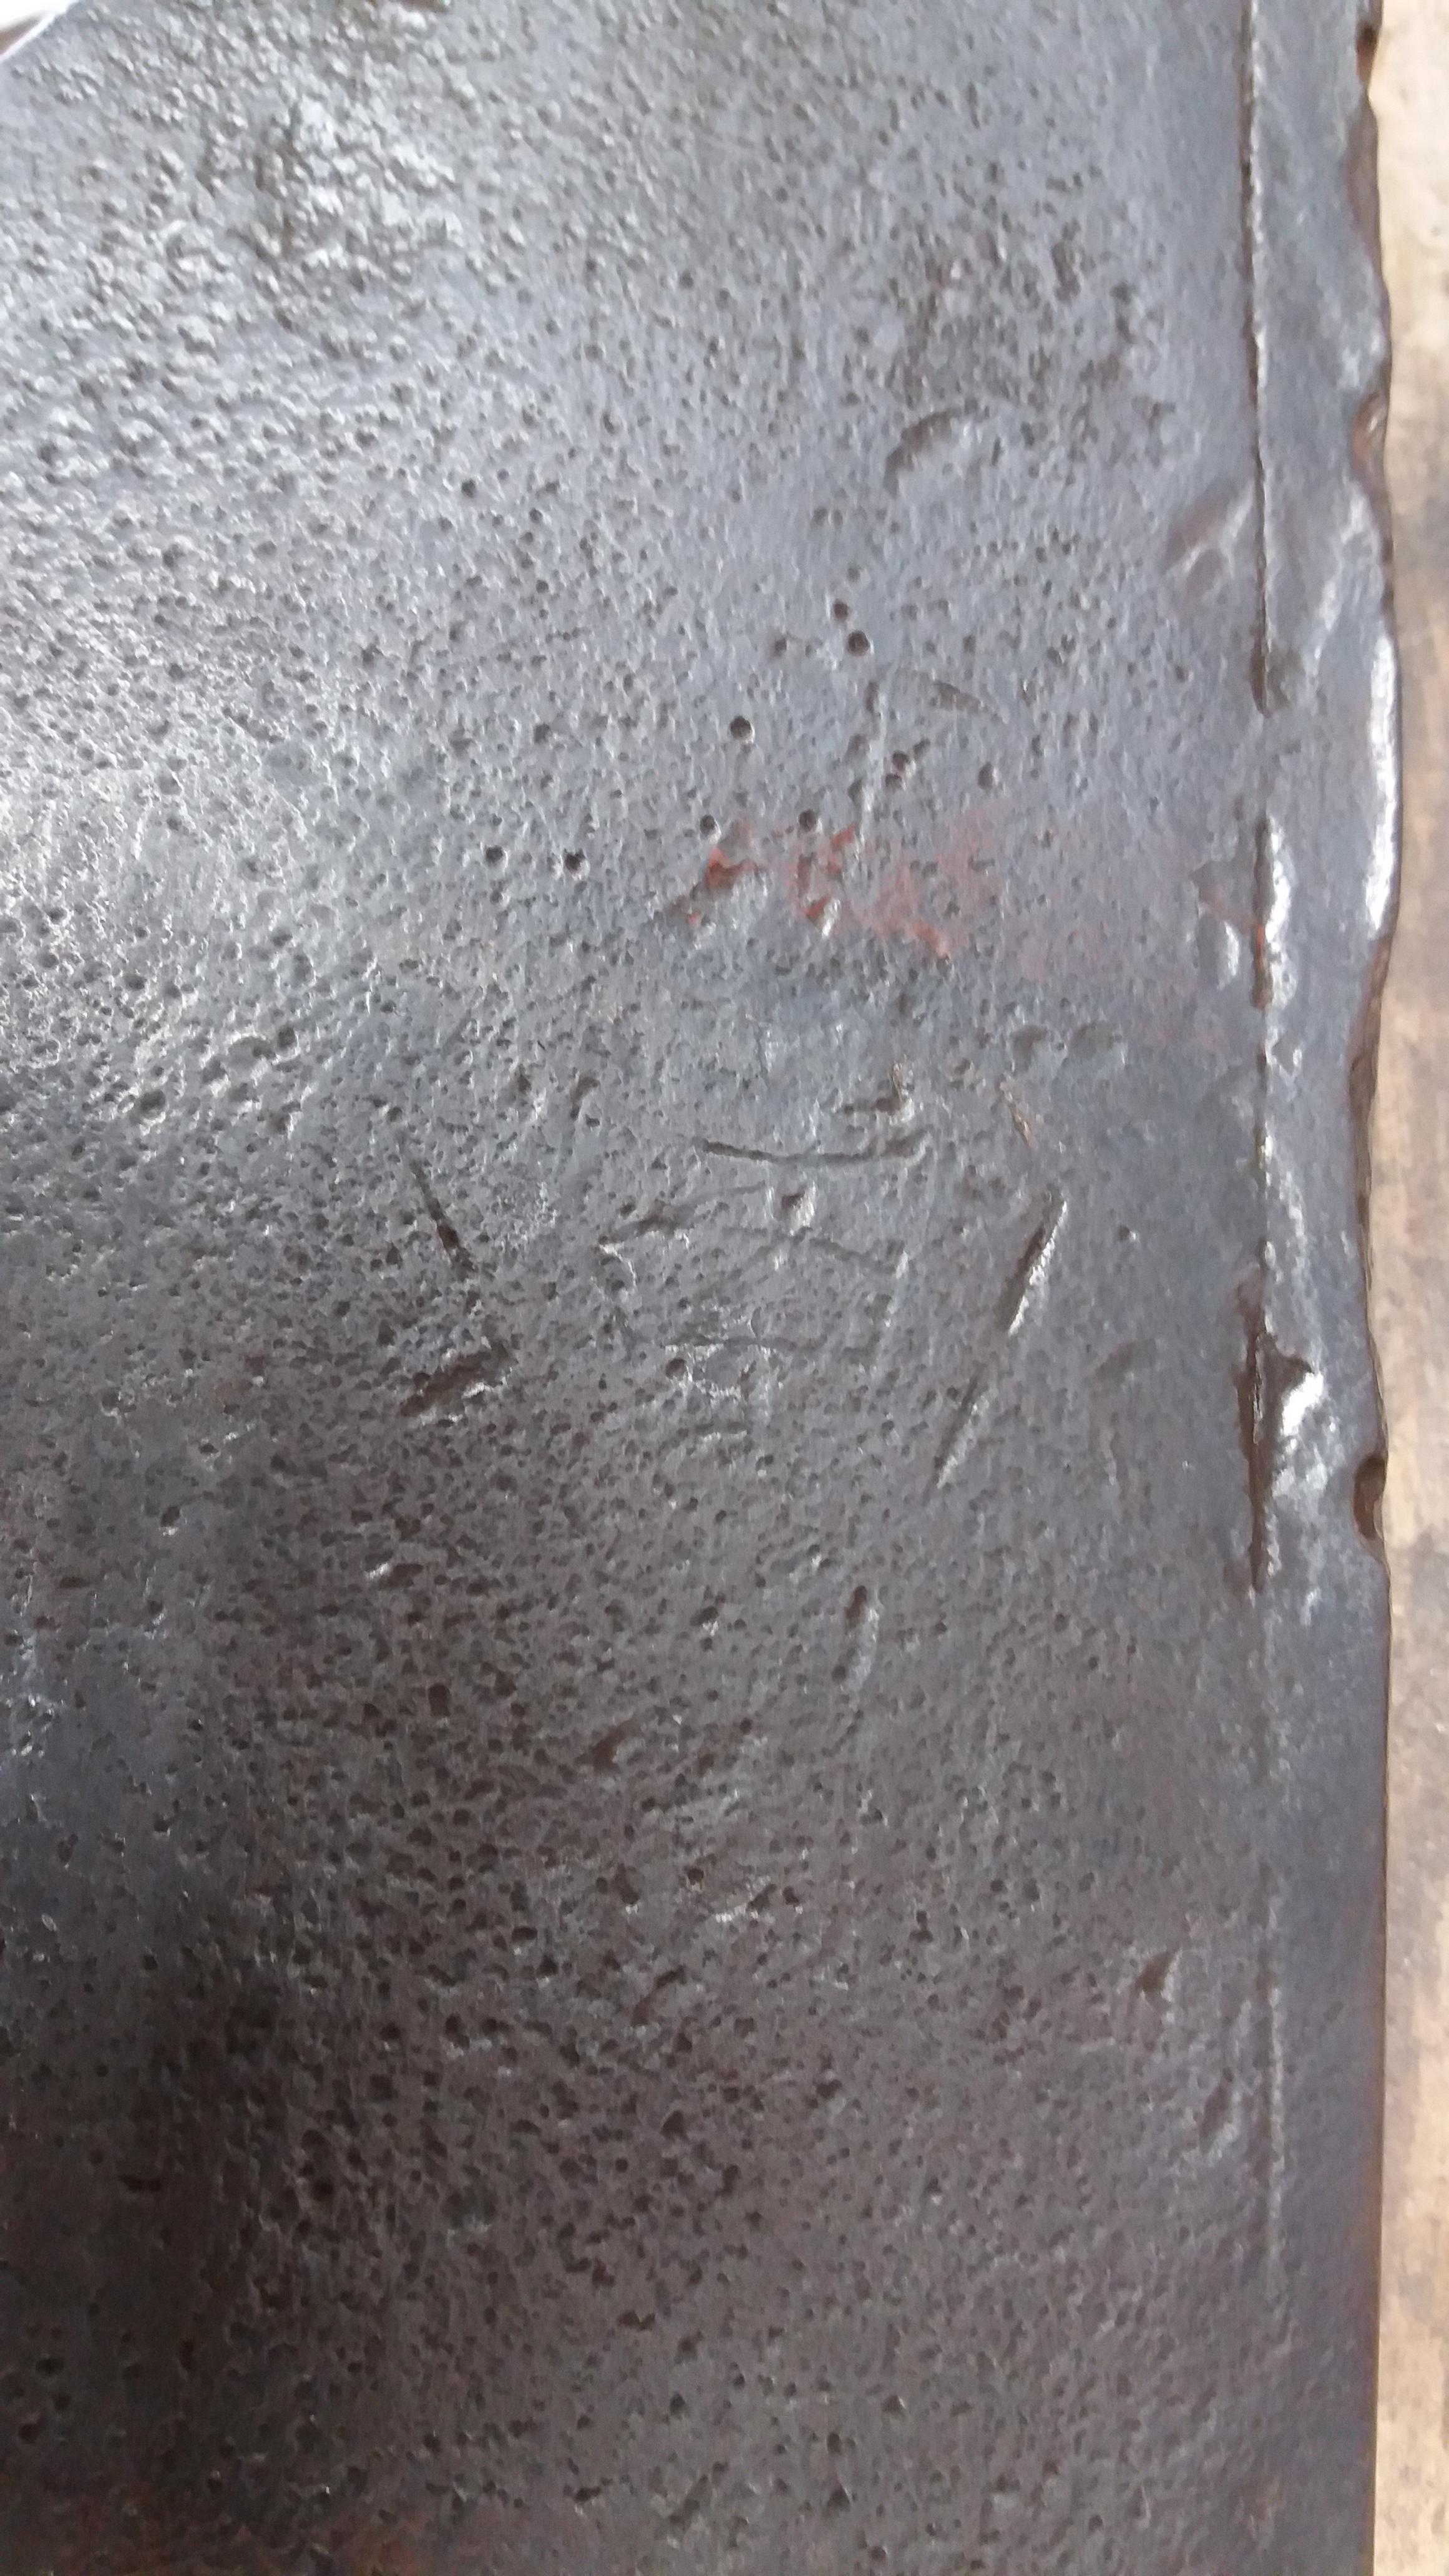
Thanks guys, I appreciate the welcome. I plan on taking a grinder to put the tiniest radius on the corners, like 1/16 inch max, but other than that it's about perfect for me. I already have a PW that had one edge pretty well all but wiped out. My brother is a welder so I had him grind out any cracks, preheat the anvil until water sizzled on it, and rebuild the edge. I just had him use 7018 rod as the rest of the face seemed fairly soft anyway. Between that and wiring paint off and applying BLO, that's the extent of "refinishing" I'll do to an anvil. As I had mentioned, the main thing I'm interested in is if anyone recognizes the markings and can tell me a manufacturer on this charm. I'd like to be able to tell my friend that gave it to me some history on it. I'm sure he would be interested just to know some about it. Thanks again And the marks are more like air pockets from casting than center punch marks as if someone were testing a punch. Some of them even open up a tad the deeper they go so I'm darn near certain they are air bubbles. The thing that I find interesting is how theres bubbles on the "steel" plate and inside the hardy at a depth that would still be the plate thickness. It's like the plate and body were all cast as one, but the plate was made in the mold to overhang the body. Then the "plate" was ground on the top and sides to make it look like a separate piece. But if the plate and body were cast as one, this thing for sure is cast steel and has a nice heat treat to it, not cast iron. -
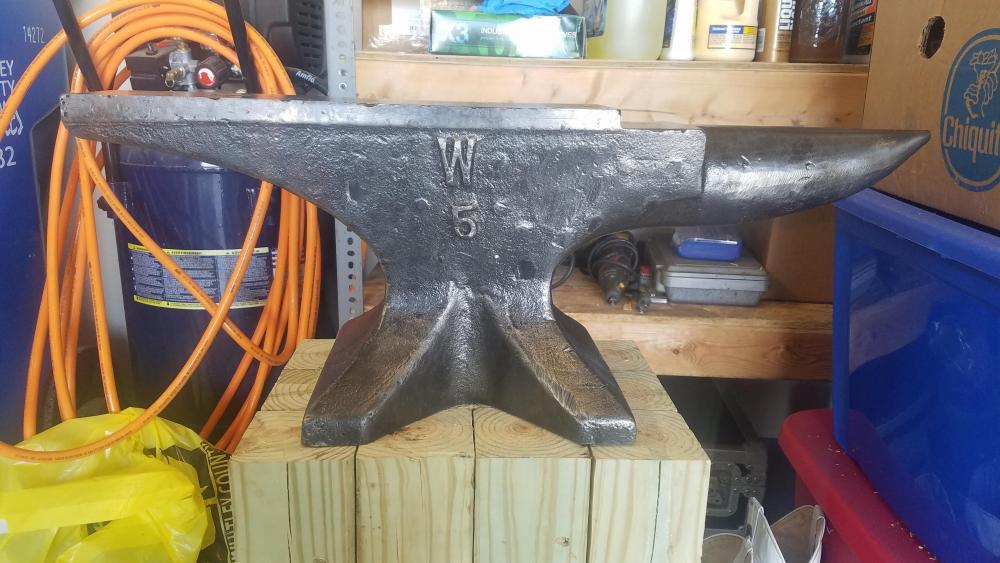
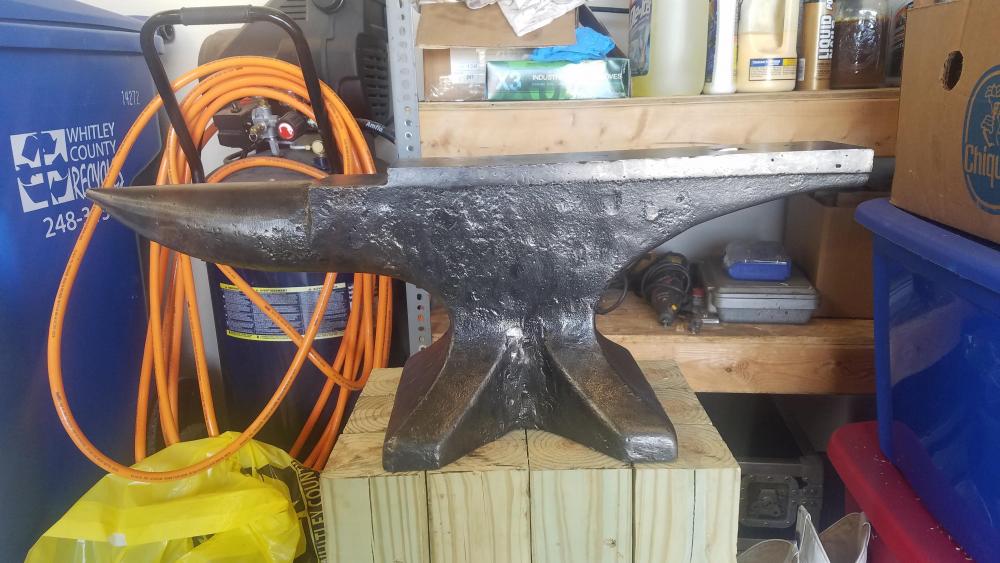
Hello everyone. I am new here and couldnt find a new members intro page so I'll introduce myself here. I'm a 24 year old (young lol) machinist. Been machining for 6 years now after going to a trade school. I'm also a hobby blacksmith, been blacksmithing for about 8 years now. I'm from NE Indiana. I also do leatherwork, buckskin tanning, flint knapping, and garage gunsmithing. Let's just say I enjoy working with my hands lol. I'd like your guys input on this anvil I have, mainly the maker. I love this anvil, and theres no way I'd sell it. I'm mainly just interested because I like to know these sort of things. First a little story on how I acquired it. The fab guy at the shop I work at came up to me one day and said he had something for me. He wouldnt tell me what it was, just told me to swing by his house after work. I stopped at his house and we went to the garage and he drug this beauty out from under some shelves. He said it was his grandpas, who died in the 1960's if memory serves, and it's just been collecting dust in his garage ever since. He said if I can use it, I can have it. I've been forging with it for the past 2 or 3 years since he gave it to me, and it was painted a hideous light green/yellow color. I was forging over at my buddy's last night where I keep the anvil and I decided to clean it up. I wire brushed all the paint and rust off of it and wiped it down with boiled linseed oil. The only markings on it is a W over a 5 and they are proud of the surface, not recessed. The anvil is cast, and I believe cast steel. It appears to have a steel plate face, but there are spots in the face that have air bubbles as if the face was cast. Rebound is amazing on this thing. As close to 100% rebound as I've ever seen over the heel and even on the chisel plate (which is why I believe it to be all cast steel), and probably in the range of 75% over the center part of the face. A file wont touch the face over the heel, but bites a little over the more central part of the face. Weight is around 140lbs. The best guess that I have is that it's a West? Thanks, cant wait to find out some history on this anvil. Keith