

yea3114u
-
Posts
39 -
Joined
-
Last visited
Content Type
Profiles
Forums
Articles
Gallery
Downloads
Events
Everything posted by yea3114u
-
From what I can tell 44w is the Canadian equiv. of A36. I have made several tongs from mild steel that work just fine. Because its is mild I would leave the tongs a little "stockier" than if I used tool steel . Hope you have a power hammer or some stamina if you plan to draw out 1.5" into tongs though.
-
Just a heads up. Peter Ross was on Roy Underhill's show recently. You can watch the episode here http://www.pbs.org/w.../3100/3111.html I really like that helper Peter built. And if you have never seen the Woodwright's Shop, Peter Ross has been on it before and I'm sure you could find a couple more episodes with blacksmithing if you look in past seasons.
-
Next time you have to mess with the stuff try keeping a spray bottle of water with you. Mist the area you are working, specifically the sides you cut. i found this to help alot. Nick.
-
If you do indeed cut the wood down below the height of the rail, you may find it useful to sharpen the top of the flat side the sits flush against the wood on one side of the web and round it over on the other side of the web. This way you will have a fuller (basically a small anvil horn) and a hot cut in reach at all times. I tried to upload a pic to better demonstrate what I mean but was unable to. :( If you do this please be careful, while not a hardie protruding from the face of an anvil the sharp edge could still cause damage if careless.
-
Wrought Iron anvils are some of the best. The wrought iron was used for the body which then had a high carbon face forge welded to it. Peter Wright, Mousehole, Arm & Hammer are all wrought iron bodied anvils. I'm sure there are more i'm missing. Of course most of these anvils are at least 100 years old, so whether or not it is a good anvil has much to do with its current condition, but in general they are very good anvils. They also ring very loud, something to keep in mind if you are in a suburban area.
-
Looking good. These look very similar to the hooks when I first started. My recommendations: Draw a full taper on the part you are curling on the ends rather than just making it flat, make them pointed and then do the curls. I was doing them very similar to you until someone showed me, and they started lookinig 10x better. For you drive hook, i can't really see the scale of it in the pic, but it looks to me that the nail part is perhaps a bit to big. I would try making this part smaller. Both length and dimensions. This should allow you to drive it into wood without causing splits. Hope this helps. Keep on forging.
-
One way to get an idea of what good vs bad grains look like is to make yourself some examples. Take 2 pieces of the same steel. Stick one in the fire, overheat and let it sit in there for too long ( just don't let it melt away) quench and break it. Now take your other piece and give it a proper heat treat. Anneal, 3x normalize, quench and then again break it. Don't temper them and a solid tap should be sufficient to break them. You should notice that the abused piece has a very grainy looking appearance along the fracture while the heat treated piece should look and feel almost velvety. You could probably get a good comparison without doing the full anneal on your heat treated piece and just doing a 3x normalization/quench to save some time. The normalization process is what refines the steel grain structure back to smaller size after heating to forge has caused it to grow. Hope this helps.
-
My anvil is uglier than yours!
yea3114u replied to stuartthesmith2's topic in Anvils, Swage Blocks, and Mandrels
and another E-bay I'd probably buy that for 33 dollars if it were local haha -
At the moment I break mine up in a sheet metal box with a tamper bar, outside with good vent. cause it can make a nasty dust cloud. However I like Mr. Powers advice of using some sort of grating to evenly size it.
-
ty for your opinions. Wish I had an xtra roll of that greenback toilet paper just to have an excuse to go look and feed my curiosity, but i suppose im not alone.
-
what do you all think of this anvil. craigslist fisher - post has been deleted by craigslist First off im not buying this but want to see if im way off base here or not. looks to me like its had alot of repair work. The face looks convex, has that suspicious black line on it...not to mention no straight on photo of face. Also the side of the table near horn looks weird to me. so what do you think... fishy fisher?
-
http://nashville.craigslist.org/tls/1846772103.html
-
Under the Memorial Weekend Conference it says for Saturday the 26th , should be the 29th. Just a heads up. And thanks for the link I always enjoy browsing these publications.
-
I'd leave it alone. Could be pretty nasty if you throw it in the forge and inhale some fumes. I try to stay away from anything of that nature. I suppose you could strip it but not worth it to me. Something from google Hex Chrome Someone more experienced have input some input?
-
Very well done. Is this at a park etc. or on private property? And yeah I would be the one to run towards it and jump on only to find it doesn't swing :unsure:
-
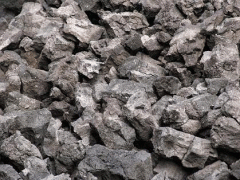
Does it look like this? Be sure you are breaking it up to a usable size, which can be a job in itself. The stuff I get come in fist sized chunks and is hard. I toss some in a metal box and use a digging bar to make quick work of it. Like others have said a good charcoal fire will get it going and take note of Ironwood's wood chunk tip to keep it going. Also as there is not nearly as much ash or clinker there is not much to insulate your fire pot, so if you are using a cast iron one it can burn it up over time depending on how much you forge.
-
-
-
Well I got a lining in and it worked to an extent, no more sparklers constantly rising from the fire. However it was an earthen clay mix with sand and the sand just made a mess more than anything, and it tends to break up pretty easily when messing with the fire. Going to try a few more mixes and see if anything works better. Wooldridge, you are right about the blower but I find I can let it go without blast for about 10 mins before it reaches a point of no return. I'm using an old buffalo forge blower and i think it helps keep me on task a bit as well as keeps me from burning up material. If i plan on stepping away for a bit longer I dig a pit, toss in some charcoal and cover, I've come back 2 hrs later and it cranked up in few mins back to operating temp. But, an electric blower I do foresee in the future. My arms getting tired ;)
-
Yeah I doubt I will be burning through 1 ton a month. My arm would turn to jelly Found this on anvilfire "Because the volitiles are already burned out it is difficult to maintain a carburizing fire. Unless you have a deep fire bed (or forge pot) coke fires tend to run oxidizing like gas. Coke also burns VERY hot and can easily damage a fire pot. I do not generaly reccomend lining firepots with clay but it is a good idea when using coke." Going to try and get a lining in this weekend if I find the time. Thanks for the input.
-
I'll check out coke pots for future. In the meantime I'ma try some linings until this one wears out. Thank you all.
-
So, I have come across a decent supply of free metallurgical coke. I believe that is what it is after a little research and picture comparisons. After a 4hr session I was left with about 1/2 cubic inch or a bit less of clinker. I had read in an older thread where Brian Brazeal had commented on his use of oil coke and how it ate through his firepots, but 250$ a year was a good trade off for free fuel. I agree with this and imagine I would not burn through pots like he had but was curious if there was anything I could do to help prolong the life of my firepot. Something alongs the lines of a clay lining to subdue the intense heat at the bottom of it. I am using an old champion 400 whirlwind firepot. TIA, Nick.
-
I would think that weight might be an issue as well. Every ounce counts when its something you will possibly be lugging through a field for hours and must be able to quickly put to your shoulder quickly. Just a speculation though.
-
Quote from Wood Stabilizing Specialists LLC "We use a unique, proprietary process combined with a special blend of monomers and acrylics to stabilize, process, and dye a wide variety of hardwoods and softwoods for a superior product for artisans and manufacturers requiring extra durable material. This process is the result of over 15 years of research, development, testing, and production. We do not laminate; we achieve complete penetration and stabilize materials in original form, with no change other than color/figure enhancement and a high degree of permanent durability. This results in material that is resistant to temperature changes, humidity extremes, UV rays and saltwater as well as many acids and solvents commonly encountered in day-in-day-out use." I think that this gives the wood a plastic like appearance and prefer and oil finish like linseed more. But i have also seen some gorgeous work with stabilized product. Edit: Also if you are thinking of possibly trying something like this at home I have researched it a bit and come to the conclusion that it is a very nasty process that usually ends up in lack-luster results. This is probably something best left to the pros. And no I'm not affiliated with that link, simply the first on google.
-
Aral, tongs were my first project too. Just don't get discouraged when your first jaw looks like a pile of poop. As long as you learned something from that first ugly jaw, your next jaw can only be better. Of course to finish the tongs I needed a punch and rivet so inherently i made a punch and a die for making rivets. i think once u get going you will find projects just start breeding themselves. good luck in your endeavors.