Klorinth
-
Posts
88 -
Joined
-
Last visited
Content Type
Profiles
Forums
Articles
Gallery
Downloads
Events
Everything posted by Klorinth
-
Thinking along the lines of safety... Heating it with the big torch in a stable and upright position with something wrapped around it to contain and focus the heat where I need it, then quenching with a running hose while standing back behind a barrier seems the smarter way to go. Especially seeing as I am likely to do it alone. I'm slowly reading people's descriptions of how they have done it with RRT and other large chunks of steel. There seems to be quite a range in the amount of time people have spent heating it, 20 minutes up to several hours. How would I know what to prepare for? I understand heating to colour but I don't want to have problems running out of propane. Running that big torch for more than an hour is going to burn a large amount of propane. I would only be heating the anvil portion which is a very small portion of the total size, less than 20lbs? I'll use a bit of gas doing the welding pre and post heating. Would tempering be required? I am assuming yes given the potential carbon content.
-
I honestly don't know. I've never tried something like this. A little piece yes, but a 100lbs hunk? No. I have access to large amounts of water in varrying size containers. A hose if I wish. I assume water is not necessarily the right thing to do... Salt? It would take a fair amount of oil... I think I have a couple gallons of used motor oil. That could make a very pretty fire. Very smoky. I would love some suggestions.
-
Temple stick... That sounds interesting. I haven't heard of that before but it makes sense. To do it myself I'll have to use the FEL on the tractor. I can suspend it in the fire and move it to quench and temper... It won't be easy though. Lots of planning will have to go into it. I'll have t use a pit forge to do the heat. My little forge is too fragile to risk dropping a hundred pounds of hot steel on it. If not that then it will be the big torch. How long would it likely take to heat it with propane?
-
Insulated Concret Foundations around here. Our house has that. Very expensive. Everything I build right now is temporary and movable.
-
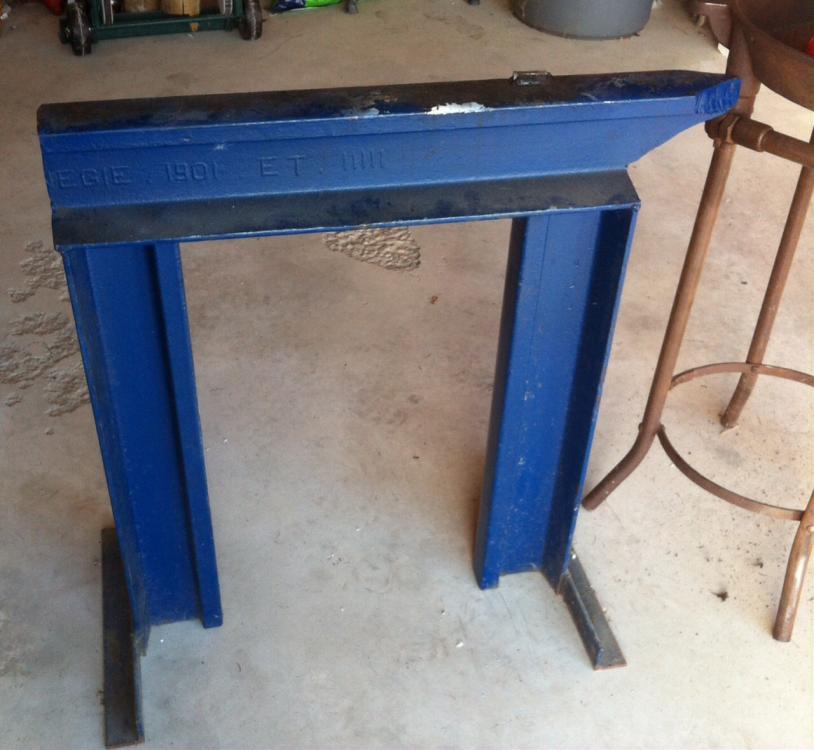
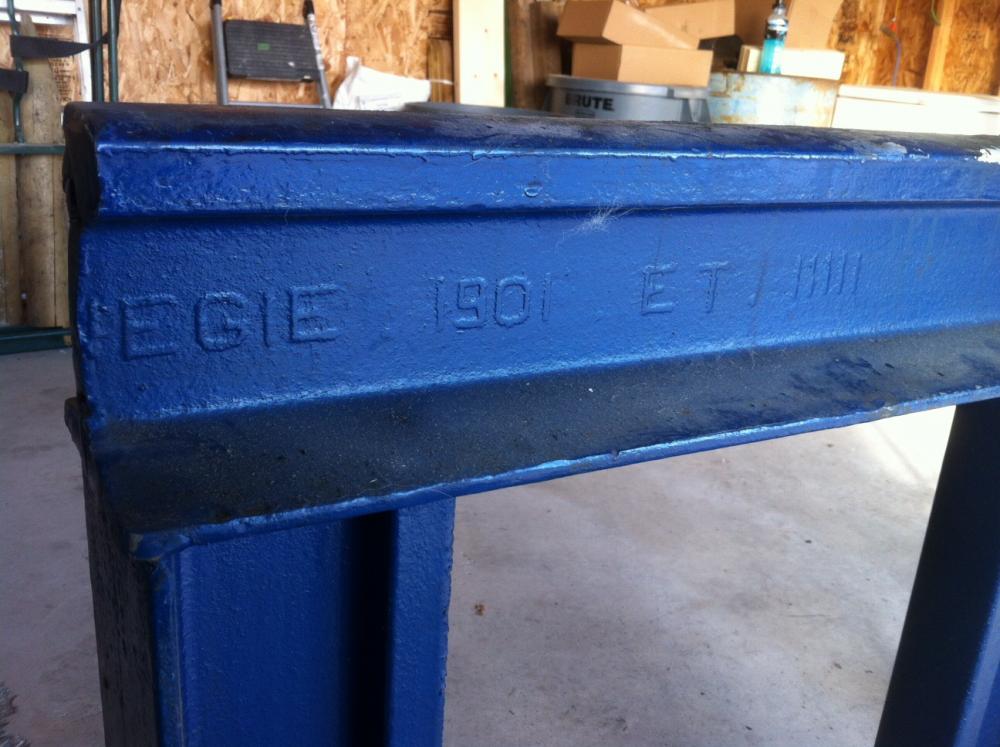
I have started the process of shaping that ugly point into something more usable. Once that is done I'm thinking about cutting it off with a few inches of untouched rail behind it. Cut the web off and weld the top to a vertical section. Mass and form. It will need a little reinforcing to stabilize it but that I can do. This can then be mounted to a wood base and stand to the appropriate height. The stand could be made large enough to include a separate plate for a hardy and pritchel hole. I could also attach my post vise to it... I love the bottom tool ideas using slices of rail. And the portable spike anvil. Way too easy to carry that around. Welding is going to have to happen on at least one of these projects. That means heating it... Small sections will be easy enough but are there any suggestions for a 24" length? If I'm attaching a top to one end should I just hang the long section up above the forge and settle it into the fire? How about a propane torch? I have a big one. 2" wide flame. I have no idea how long it will take to heat to 500 degrees. Same question applies to heat treating them. Is there a better way to heat them? Anachronist, thank you for the info on the rail. Any idea as the the meaning of the ET IIIII after the date?
-
Ahh. Gotcha. Point taken.
-
I was thinking I could attach a hardy hole to the rail base so it would be built into the wood mount I will need to make. That way it is close to the anvil but not in the way. I've seen a few pictures with this setup. If I cut the webbing and base shorter than the anvil face I could have the height of the hardy tools match the height of the anvil face. Is there anything wrong with that? Spring fullers wouldn't be as easy to do this way I guess...
-
What should I be using on the threads? Grease or an oil?
-
Thank you Charles. I understand your warning to not get focused on making a larger anvil out of rail. I can see a lot of work going into it. My time is very valuable to me. If it is going to take me a week to build I would prefer to just buy an anvil. I enjoy the challenge of design and build projects but I only do them for the enjoyment. If I find a decent anvil for sale I will buy it before spending $100 and a week of time building. I was just thinking that a single vertical piece with a well shaped head and horn would be good for me to get going and learn on, especially if I attach a piece of square tube as a hardy hole. I have found a couple of designs that look simple enough to make. I hadn't thought about what I could make of this rail. Very good point. One piece for an anvil and the rest to turn into tools and practice projects. I need to do lots of practice before starting on tools but this would make good tools. Thank you for the ideas.
-
Randy, Did you leave the webbing at that height or cut it down to be shorter than the face of your new anvil? I'm not sure what experience my neighbour has with track, but he is a professional welder that works on all the big agricultural equipment around us, tractors and combines, to cultivators and harrows. He fixes what the farmers break. Also fabrication work like 20' trailers.
-
That is basically what I was thinking. If the main part of two tracks were welded to the the webbing of the third and butted up against the main part it would creat a solid core that is greater in size and very stable. The remaining webbing could then be modified into different uses such as hot cuts. I would need to get the cutting and welding done by my neighbour. I am just starting to learn to weld and not up to that job. I like the idea though.
-
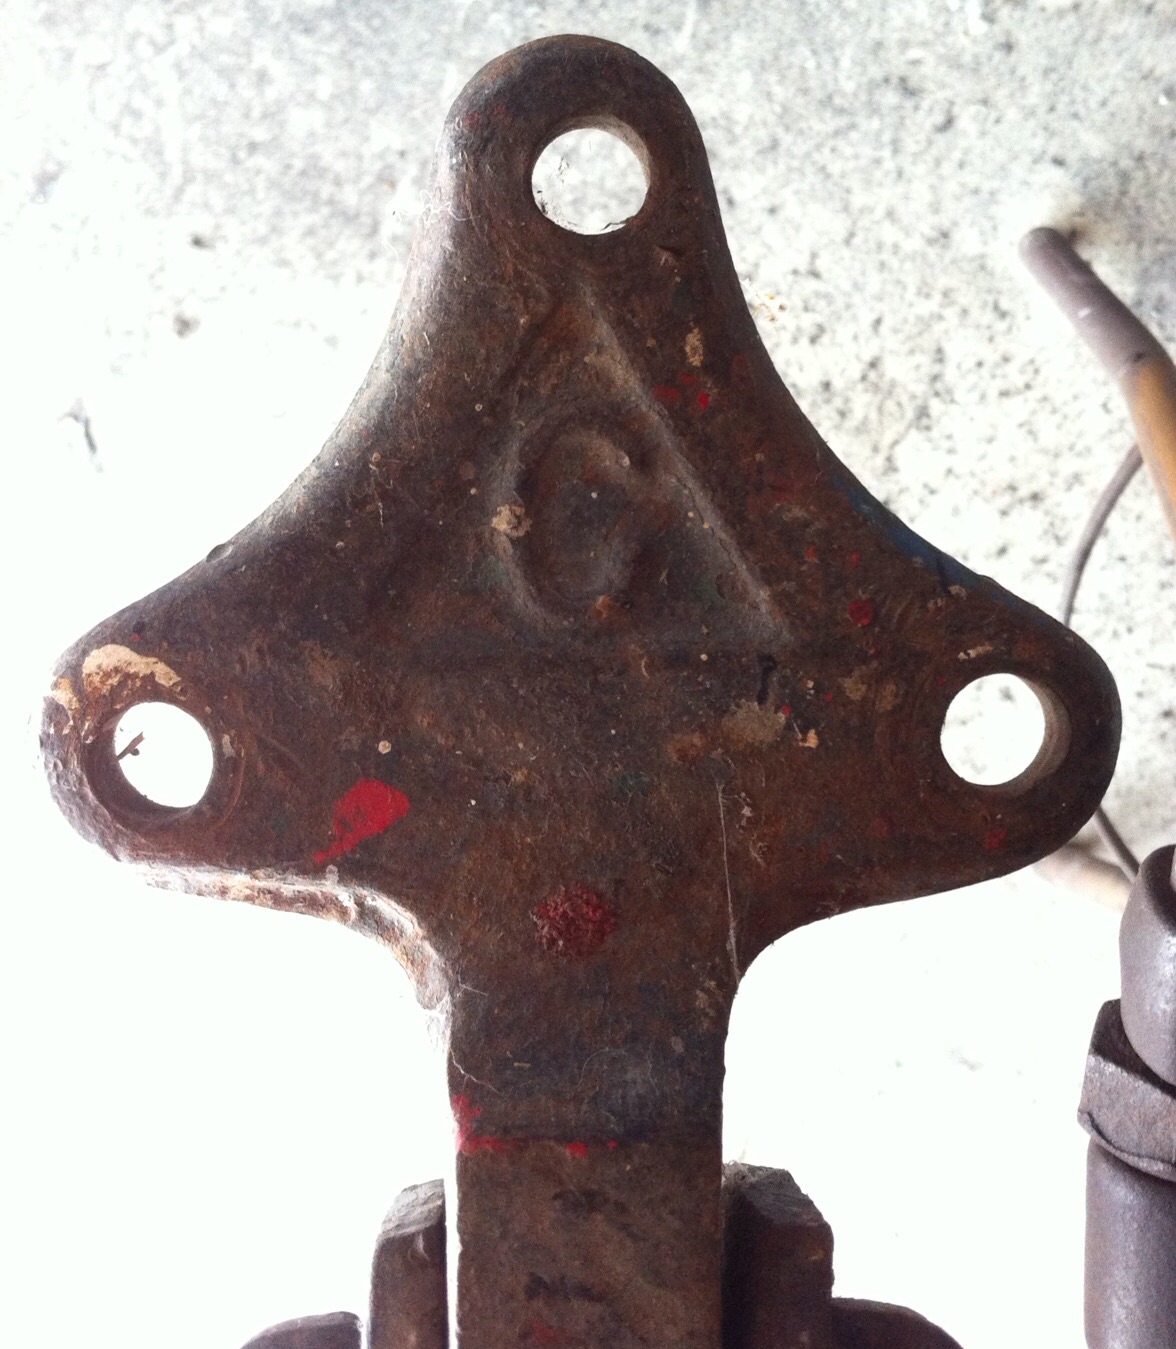
I think I see what you mean by a short back end. When I do some image searching I find quite a number of Colombians with a flat snub end, not the slightly longer ball end that this one has. I do also find quite a few others that have a longer tubular end that finishes with a ball. I can't see the emblem on all of them though so I can't be sure of the maker. i even found one that looks almost identical including the red paint.
-
Until I find a proper anvil here is what I have. I got it this way. Three pieces welded together with angle iron feet. Each piece is just over 26" not including the point on the top piece. Total weight is about 170lbs. I can pick it up and move it but it is heavy. Not stable though. It rocks a bit on the angle iron. It's probably meant to sit on soil not flat concrete. What should I do with it? I have started to reshape the point so it is more rounded and usable. I prefer the idea of the tie being vertical. Should I cut the pieces apart and mount them vertically? Weld them together into a single vertical piece? Most people seem to only use a single piece. I have seen a few interesting ones online just not as many as I expected. Or just leave as is and use it until I find a better option?
-
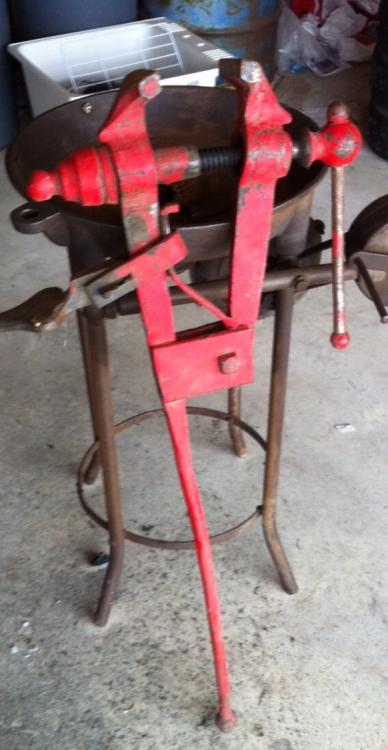
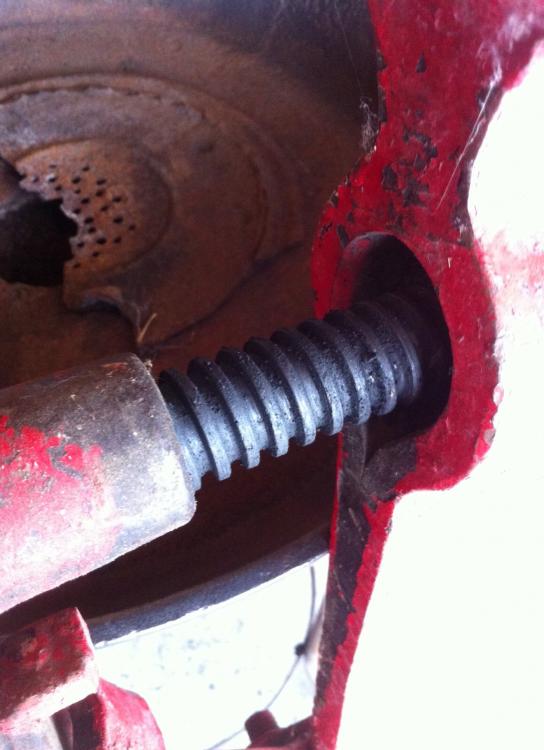
So here is my new to me post vise. I actually bought this last summer before I knew anything about blacksmithing. I was building a little propane forge and knew that I was going to need a vise at some point so I kept my eyes open. This is what I found. 4" jaws that close nicely. Small amount of horizontal play when closing the jaw, not enough to worry though. 41.5" tall. Threads seem good. Opinions? I don't actually know what to look for. What should I be using for protection and lubricant? Any other care for a post vise? Here is the only symbol or identification mark I have found so far. Any ideas? I'll probably take it apart and clean it up at some point. I need to work on my forge and anvil first though so this will have to wait a while. I would prefer the oiled metal look to the red paint. If nothing else I'll strip the paint off. Overall I am very happy. Well worth the $85 I paid.

-
I think I found a picture of what mine would have looked in its original state.

-
Xavier, are you using a real crook for a template? if you want it to be truly functional I would suggest adding a leg crook to the other end. That way you have a neck crook on one end and leg on the other.
-
Drums... Now that is a new one for me. I have done a fair amount of reading and discussing of alternative building materials and that is one I have never heard of. Interesting idea. I can see the potential in the right situation.
-
You are completely right, a hedge is probably going to be required. I just wish I could get them to grow faster here. It has taken several years to get them big enough to start working. I have a buffer zone around the entire property growing. Mixture of trees and shrubs. Eventually it will be an effective barrier. I guess i could could start one right around the future building site. A dense hedge of carragana would muffle and deflect the sound up. Only if it is 5' or more tall. Around here that will take almost 10 years to grow properly. I have no problems with long term planning but that is a little too slow seeing as I would like to start building in about 2 years. I will have to think about how I might improve the growth. Being close to the house would let me do a few extra things like watering. A manure mulch would be easy.
-
My bad, I did not clarify... I'm more interested in any new neighbours not complaining about noise. I'm rural but only a couple minutes outside of the city so more and more "city" people are becoming neighbours and they Do Not have the same ideas about what makes for a good neighbourhood. I am trying to anticipate problems I may have in the future and prevent them from ever happening. its makes total sense to just prevent the noise in the first place. So obvious I wasn't even thinking that way. Michael, I have no interest in using Sheetrock either. It's fine in the house but not in this type of building. Just not going to happen. I don't even like it in the garage. I am looking for something that is truly weather resistant. Something that can survive the extremes we experience. Cold, heat, rain, snow, wind, etc. That is why I bring up the idea of gambions. Being nothing but metal and stone makes me wonder. They have a great deal of mass to absorb sound. Although they are porous given that the stone is often loose poured gravel. I see that as a good thing for ventilation though. Their weight is also good thing when dealing with high wind speed.
-
Morning All, Being the newby, I am slowly collecting tools and equipment, reading books, and trying to learn what I can. I have now started to think about where I am going to be working and practicing. During last summer I set up my little propane forge and RR tie anvil in the garage and moved them around as needed. Since I have decided to start using a solid fuel forge I can't continue to use the garage. My wife will never allow it due to the vehicles and her wool milling equipment that live in the garage. No big deal I have a metal sided shelter out in the livestock area that I store tractor implements and hay in. I can use part of that. I'll build everything onto movable platforms/pallets that I can pick up with the tractor. I have lots of used metal roofing I can use to enclose and cover everything. I am thinking further down the road to the possibility of setting up a small shed on its own where I could set things up permanently. That new "shed" would be in the backyard about a hundred feet from the house. In a couple years what types of materials should I look at using for control of the noise of a working smithy? I have read a few of the older threads that talked about this a bit. I understand the information about isolation of the power hammers and such heavy equipment but I am unlikely to ever have those. I am just looking at small power tools and the hammer. I am experienced with the use of mineral wool insulation, foam insulation (spray and board), and the use of drywall. Our house has an ICF foundation ($$$). I have looked at double walls ($$). Landscaping is too destructive to the yard... From my reading it seems that to reduce sound you need to absorb it or redirect it. So to absorb it I would need a combination of very dense and light materials. To redirect it I need something that will deflect it straight up. I am wondering about the usefulness of gravel gambions for absorbing and deflecting??? What else should I look at? you may wish to check your use of terms. a Rail Road Tie is normally made from wood, occasionally concrete, Some peopl have used R track sections.
-
Just a box of dirt, or a simple side blast forge
Klorinth replied to Charles R. Stevens's topic in JABOD - Just A Box Of Dirt
Adobe is easy to do on the farm. I suppose that part of the fun is in the redesigning and building. -
Just a box of dirt, or a simple side blast forge
Klorinth replied to Charles R. Stevens's topic in JABOD - Just A Box Of Dirt
Thank you Charles. That is what I was hoping you would say. I have an endless supply of very good quality clay since we live in a massive and ancient flood plain. It is about 6" under our feet and goes forever seemingly. I can access seams that are pure clay and compressed into solid layers. Good enough for pottery. I was thinking that it is easy enough to create a clay forge that would probably harden quite well and last for many years. As long as you don't hit it with too much iron. Should it be designed to harden or not? Is that a bad idea? I should clarify by saying that anything I built would be on a pallet that can be lifted by our tractor and moved as needed. -
Spiked Hot Cut
Klorinth replied to AlexTN's topic in Hot Cuts, Anvil devils, metal cutting on the anvil.
Another good suggestion. That would be easy enough to do. Thank you. -
Home made charcoal retort
Klorinth replied to Marksnagel's topic in Solid Fuels: Coal, Coke, Charcoal, Wood, etc
I would also love to see your setup. It sounds really good. Better than others I have seen. -
I guess I need to make some plans for a heat shield... Or something else.