LawnJockey
-
Posts
306 -
Joined
-
Last visited
Content Type
Profiles
Forums
Articles
Gallery
Downloads
Events
Everything posted by LawnJockey
-
Gas bottle furnace
LawnJockey replied to Rainbows's topic in Smelting, Melting, Foundry, and Casting
I believe some of the newer propane tanks need to be connected to a BBQ or other appliance for opening the valve to actually relieve any pressure in the tank. -
DSW, could you name some places that carry pre made 230v extension cords? I had to make up a 10 footer but for $70 I would sure get a lot more freedom around the shop. Right now all my welding and plasma cutting is restricted to one corner.
-
The first one is a self help tool for bill collecting and the second one is a nicropress. Versions of nicropresses are used for electrical wire, marine rigging wire and for fence wire splicing. In regards to barbed wire be very careful putting too much of a load on the pressed splices, my learned that the hard way.
-
Brad, your photos bring back fond memories. My first job was working in an old WWII shipyard. I did layout work in the plate and angle shop. We had a platen table that was about 20' x 60'. I spent a lot of time on my knees snaping lines and setting up jigs on it. The power hammers and presses were so big you could climb inside the castings to hide. One press even had a table with a checker board and a couple of chairs in it.
-
New Stack - Thoughts on how to tie into?
LawnJockey replied to Borntoolate's topic in Chimneys, Hoods, and Stacks
First I would cut a disc to use as a template. The diameter would be the OD of the crimped end of the flue pipe coming from the forge. A foot or so below the roof structure I would mark the corrugated pipe using the template and a felt pen. Then I would cut the corrugated pipe opening erroring to the small side. Stick your flue together and try it. If it works screw it together using some 90 degree brackets where the flue enters the corrugated pipe. If your fit is fairly close there shouldn't be a problem. If it is a bit sloppy you can use some of that heat resistant tape sold for sealing gas fired appliance flues. Home Depot probably carries it. -
Cba Backsmith where you from ?
LawnJockey replied to ironwolfforgeca's topic in California Blacksmith Assoc
I will be in Hollister for sure. I had not heard about that before. I am also watching the CBA site for info on ther Oktoberfest, that sounds like a great weekend. -
Cba Backsmith where you from ?
LawnJockey replied to ironwolfforgeca's topic in California Blacksmith Assoc
Frosty, I am learning that lesson. I figure I will keep putting my desire to network out there and attend CBA events and instruction as it is available and in the long run it will all work out. -
Cba Backsmith where you from ?
LawnJockey replied to ironwolfforgeca's topic in California Blacksmith Assoc
What I have been finding is that some of the CBA classes shown are no longer active or they are not taking new students due to being full. Then there have been my own scheduling conflicts which I am working on removing to open more opportunities. My son will be taking a course at the Crucible next month and that may be something for me too. I am looking for networking opportunities as well as classes. -
Cba Backsmith where you from ?
LawnJockey replied to ironwolfforgeca's topic in California Blacksmith Assoc
Dave, thanks. I checked out Tim's web site, very impressive and open forge on Thursday nights. He is located near Half Moon Bay. I will have to cross the dreaded Silicon Valley to get there but it looks like it will be well worth the effort. I am going to be traveling for a couple of weeks but on my return I will check it out and report back. Thanks again. -
Cba Backsmith where you from ?
LawnJockey replied to ironwolfforgeca's topic in California Blacksmith Assoc
I am in the Bay Area and I am having to drive to Sacramento for CBA classes. I would sure like to hook up with others in my area too. -
I'm also a big fan of West Epoxy. They also have various fillers that you mix in with the epoxy that fill and give more strength. They used to mail out a printed manual but I am sure it is available on line. I think West epoxy and high density filler might do the trick. Check Jamestown Distributors and West Marine for the best pricing.
-
Any idea what to do with this
LawnJockey replied to GottMitUns's topic in Blacksmithing, General Discussion
Cook totrillas on it. -
I have seen some offset chisels similar to those used for old leaded cast iron pipe joints. First you pound oakum in like caulking a wood planked boat and then pour lead in the joint and pound that in. If the pipe is horizontal you used an asbestos rope to act as a dam so the lead doesn't just pour out. Because the pipe can be in all sorts of awkward positions lots of interesting offset chisels are needed.
-
"The older generation tended to retire minus digits, eyes, hearing, etc; too" In my misguided youth I worked in the plate and angle shop in an old WWII ship yard. That place was wild, 50 ton presses that were big enough to hide in, everything giant and ancient. After getting a chemical burn in my eyes I started noticing everyone working there was missing something or limping or otherwise no whole. These guys knew what they were doing but day after day, year after year stuff happened. And as they say their scars were proof that the past was real. I quit that job in a hurry but I always look back on it and my coworkers fondly.
-
I have a heavy lug crimper: http://www.iboats.com/Heavy-Duty-Lug-Crimper/dm/view_id.38723 I never thought of using it for blacksmithing purposes but your photos got me thinking, always dangerous.
-
Caulking down an anvil
LawnJockey replied to Crazy Ivan's topic in Anvils, Swage Blocks, and Mandrels
5200 came to mind as soon as I saw the heading. I used it a lot on boats. It is the meanest nastiest caulking made. If you want it to stay put with great adhesive qualities it is the one to use. I hate being the guy who has to take something apart after 5200 was used. West Marine carries it. -
question about punches
LawnJockey replied to markdamachinist's topic in Blacksmithing, General Discussion
"There's a reason we do this, but at some point sharing our reasons appears a waste of time." Now that was a nice response to a reasonable question. -
Items for tractor and steam lovers?!
LawnJockey replied to Curly's topic in Blacksmithing, General Discussion
Tractor steering wheel knobs and shifter knobs. Beer can holder is always good for the tractor. -
A Blacksmith by any other name.....
LawnJockey replied to SpankySmith's topic in Blacksmithing, General Discussion
I have a long way to go before anyone mistakes me for a blacksmith. -
When I lived in Los Alamos I was a regular at the Black Hole. I always liked being greeted, "Welcome to the Black Hole". Even with the Black Hole closing there are still the Lab surplus auctions.
-
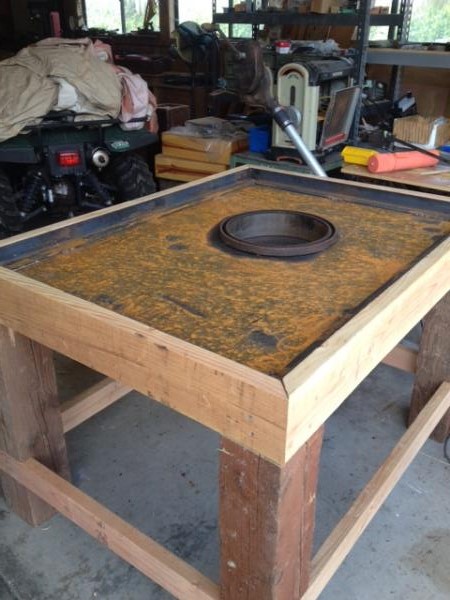
One of my first projects is going to make some retaining "clips" like what used to be used for undermount china sinks. The deck is not fastened to the frame so it can be lifted out and flipped over. The fire pot can then be centered on the cutout on the underside and held in place by the clips tack welded to the underside of the deck. I was paying attention when you suggested the undermount idea earlier. Thanks for the tip.
-
I finished my first attempt at a forge the other day and we will move it outside today. The stand is made of scrap wood that I had piled up behind the shop. I will see how this blower works but I strongly suspect it was made for one of those forge BBQs and it may be undersized. I have my eyes open for dead appliances with blowers. The forge is going to be outside for now but I plan to move it under a carport like structure we built next to a shipping container when I make a chimney for it. I have an anvil arriving in a couple of days. I will take the tractor down the road to my neighbor in the firewood business and bum a chunk of tree trunk for the stand. Things are falling into place.
-
Has anyone made a sheep wagon door latch?
LawnJockey replied to LawnJockey's topic in Blacksmithing, General Discussion
I don't know how to date one. There is a book, Sheep Wagons, Home on the Range by Nancy Weidel which is the best source of info in one place. If yours has the stove still in it you are a lucky man. They are highly sought after. I have seen them go for as much as $1,000 on ebay. I hunted for one for months. Then I found one on Craigslist 200 miles from where I live in a town I was planning on driving through the following weekend for a fishing trip. We didn't do much fishing on that trip as we were so excited about finding the stove we spent most of the time baking apple pies in camp. -
Has anyone made a sheep wagon door latch?
LawnJockey replied to LawnJockey's topic in Blacksmithing, General Discussion
Thanks Mat and Jack. The two wheeled versions towed behind freighters was called a cooster wagon. For some unknown reason cooster wagons also had the stove on the opposite side. I have an antique door knob on the upper door. The draw latch for a barn is mechanically what I am looking for, or should I say looking to make. -
Has anyone made a sheep wagon door latch?
LawnJockey replied to LawnJockey's topic in Blacksmithing, General Discussion
Thanks again for the nice comments. Chichi, I think you are thinking of the latch to the storage area in the rear, see photos below. Here is my guess as to how the latch works: There is a strap fastened to the door. Toward the left side the lever handle is riveted to the strap so that it can still rotate. A little ways (unknown distance) up from the rivet toward the lever handle the non-hook end of the hook is riveted to lever so that it too can swing. It would work as follows: With the lever handle in an upright position the hook is lined up with the catch on the door jamb. The lever handle is rotated clockwise and the hook is pulled tight in the catch. At this point the pressure felt in the lever is pulling the handle counter clockwise. When the handle rotates past the axis of the mechanism the counter force flips to a clockwise direction. After the reversal of the counter force there is a stop on the backing strap fastened to the door. This stop stops the lever from being pulled further clockwise. The stop would be constructed like a hook so that it would also stop the lever from being pulled away from the door. As usual I am probably not foreseeing many details.