

Latticino
-
Posts
2,169 -
Joined
-
Last visited
Content Type
Profiles
Forums
Articles
Gallery
Downloads
Events
Posts posted by Latticino
-
-
Strongly recommend you be specific on whether you want "hard" or "insulating" furnace brick when you make you inquiries. Also, Ceramic supply houses are good sources for insulating fire bricks, even online... Google search for "insulating fire brick for sale" should get you some good hits, but be sure to use at least 2600 or 2800 degree selections. Surprisingly even Walmart appears to carry them in boxes of (6) with refractory cement for joints.
-
I would expect a Vulcan in that condition, in Texas, should sell easily at 2 or 3 $/LB to a smith that wants to use it (as long as that is dirt, not Bondo or a weld on the top surface in the "sweet spot"). You could always list it for 4 $/LB, and hope for the best. Anything above that and you will likely have to wait or get lucky. Note that Vulcans are typically viewed as one of the lower tier manufacturers. Would sell for more (particularly in that excellent condition) if a Fisher, Peter Wright, Arm and Hammer, Trenton, Brooks, or Hay Budden (just to name a few of the more desirable common anvils here in the States).
-
All depends on your build. I'm a fan of a removable "face plate" that allows both initial forge insulation and inevitable relining.
My process is to put in full circumference of 2" thick 6 or 8 # density refractory blanket on the shell. If you want more insulation thickness for added efficiency you can pleat this and get even thicker insulation. Then I spray the surface of the insulation with a solution of fumed silica to stabilize it and keep it from crushing during the casting step. Set vertically with the front opening up and prepare removable forms for the inner cavity (sonotube or rolled vinyl) and burner opening (pool noodle, plastic cup...). Then I mix up the castable refractory insulation and cast the back wall. While that is starting to set I place the inner form and pack in the walls. I think 1/2" thickness is a little hard to achieve, but 3/4" works well enough. Use the rest of your mix to cast a face plate with a door opening, front and rear doors (you prepared frames for those, right?), and if any is left over cast some 1" thick tiles that can be placed in the forge as removable floors for when you forge weld with flux (cardboard forms are fine for this). Wrap castable sections in plastic so they dry slowly. Follow manufacturer's directions for drying and slowly heating the new liner.
-
Only downside I know of for CI firepots (aside from cost) is that you need to be careful not to heat shock them and crack them. As long as you don't pour a bunch of water directly on it while it has been heated up it should last a lifetime.
-
Make sure your casting is completely dry before firing. Cure time is pretty long. Can accelerate a little by putting an incandescent light inside forge body and letting run for a day or so (first with the door full open then mostly closed). Watch for moisture boil off during initial firing, and go slow at first.
-
Umm, now you are saying your spine is thicker than 3/4" and edge is over 1/4" thick?
-
That type of oven control is typically ON/OFF, not proportional. Not only will you need to be concerned about overshoot, that kind of controller typically relies on having an effective pilot light. If you are going to use an oven controller, you may need to use the entire gas train hookup, including pilot safety system.
-
On 12/10/2022 at 11:19 PM, M.J.Lampert said:
spine thickness: .07-.08 in
Sure that is the spine thickness before quench, not the edge? If so I'm surprised it didn't turn into a potato chip. A spine between 1/8" and 1/4" thick will help with the bends, provided that you normalize and stress relieve before quenching. My understanding of Parks 50 is that is operates best at ~room temperature (i.e. 60-80 deg. F), and not only shouldn't be preheated too high, but that it will approach it's flashpoint of misused. Fireballs with quenching are definitely to be avoided.
-
Hardness files can be unreliable if you potentially have a layer of decarb on the surface. To check a test coupon for hardness I typically do a break (snap) test. Pre-file a groove in your samples. Harden, but don't temper all but one sample. Place in vise with file mark just above jaws. Cover with thin cloth and wear eye protection. Snap with hammer (if it bends instead of snapping it didn't get hard). Once you have established that your heat treating procedure is effectively hardening, remove decarb layer abrasively, then use your testing files to check.
Note: IR thermal guns are not necessarily reliable at 1,500 deg. F either. Ideally you should be looking for decalescence to identify the phase change before quenching. Don't delay on quenching between taking out of the forge and dunking in quench media. You don't have that long to miss the "nose", particularly for thinner stock.
Also, no need to anneal before hardening. However normalizing, grain reduction, and a high temperature tempering pass are good for fixing grain and stress relief.
-
80 CRV2 should harden fine in 120 deg. F canola. However, you shouldn't drop it in the pan until at least 15 seconds go by, and ideally use a large enough piece so the tongs don't cover up the part you are going to test. How are you determining that the steel hasn't hardened? Are you doing a break test? How quickly did you get them in the oil? Also, how long did you leave them in the forge at elevated temperatures (possibly you have significant decarb)?
-
That's a very clever trick that I never thought of or heard of before. Me a former glassblower who should have known. I'll remember that one.
-
I misread your post and thought you got the H-13 as drops for the same price as mild steel, not at the same place
 . $3.40 a pound isn't outrageous for H-13 (certainly less than McMaster Carr), but it is more than I would be ready to jump on until I had a specific project in mind.
I agree with Fraser regarding use of the H-13. In fact that is exactly what I've used it for in the past. I have H-13 hammer and tomahawk drifts and a hammer eye punch that have held up extremely well.
-
I'd certainly start making hardy tools from 4140 before jumping to H-13 (or even A-2 or D-2). As others have stated, it is a bear to work with, particularly without a power hammer or press. Even 4140 in hardy tool size will benefit from having a friend onboard to strike. I have overheated H-13 in a coal forge and had it crumble under the hammer. Hard to tell for sure from the photo, but your grain looks massive. Did you soak the steel for a long time at high yellow?
Also, if you can get usable sizes of H-13 at mild steel prices, I suggest you buy a bunch and sell it at a modest markup to the smiths here. Great way to make friends. I'd sure be happy to take some off your hands at $1/# or thereabouts.
-
A 2" NPT mixing chamber with a port for your fuel and one for your forced air. Fuel source with 1/4 turn isolation valve and modulating regulator. Blower for forced air with some method of varying the flowrate (speed control, waste gate, inlet gate, outlet valve...)
-
My preference is a cast inner liner. It is a bit tough to paint it on in layers, the material really isn't made for that. Even troweling can be a challenge. I like 3/4" thickness, but each to their own. I find it pretty hard to cast anything any thinner.
-
31 minutes ago, Mikey98118 said:
its main function is to create swirl in the incoming air
Mike,
Respectfully disagree. I see it's main function to allow acceleration of the relatively static environmental air up to closer to the velocity of the gas exiting the orifice for efficient induction and mixed flow. Any swirl or turbulence after this mixing resulting from the shape of the air inlet is a benefit, but the induction function is the critical one IMHO.
-
-
Also:
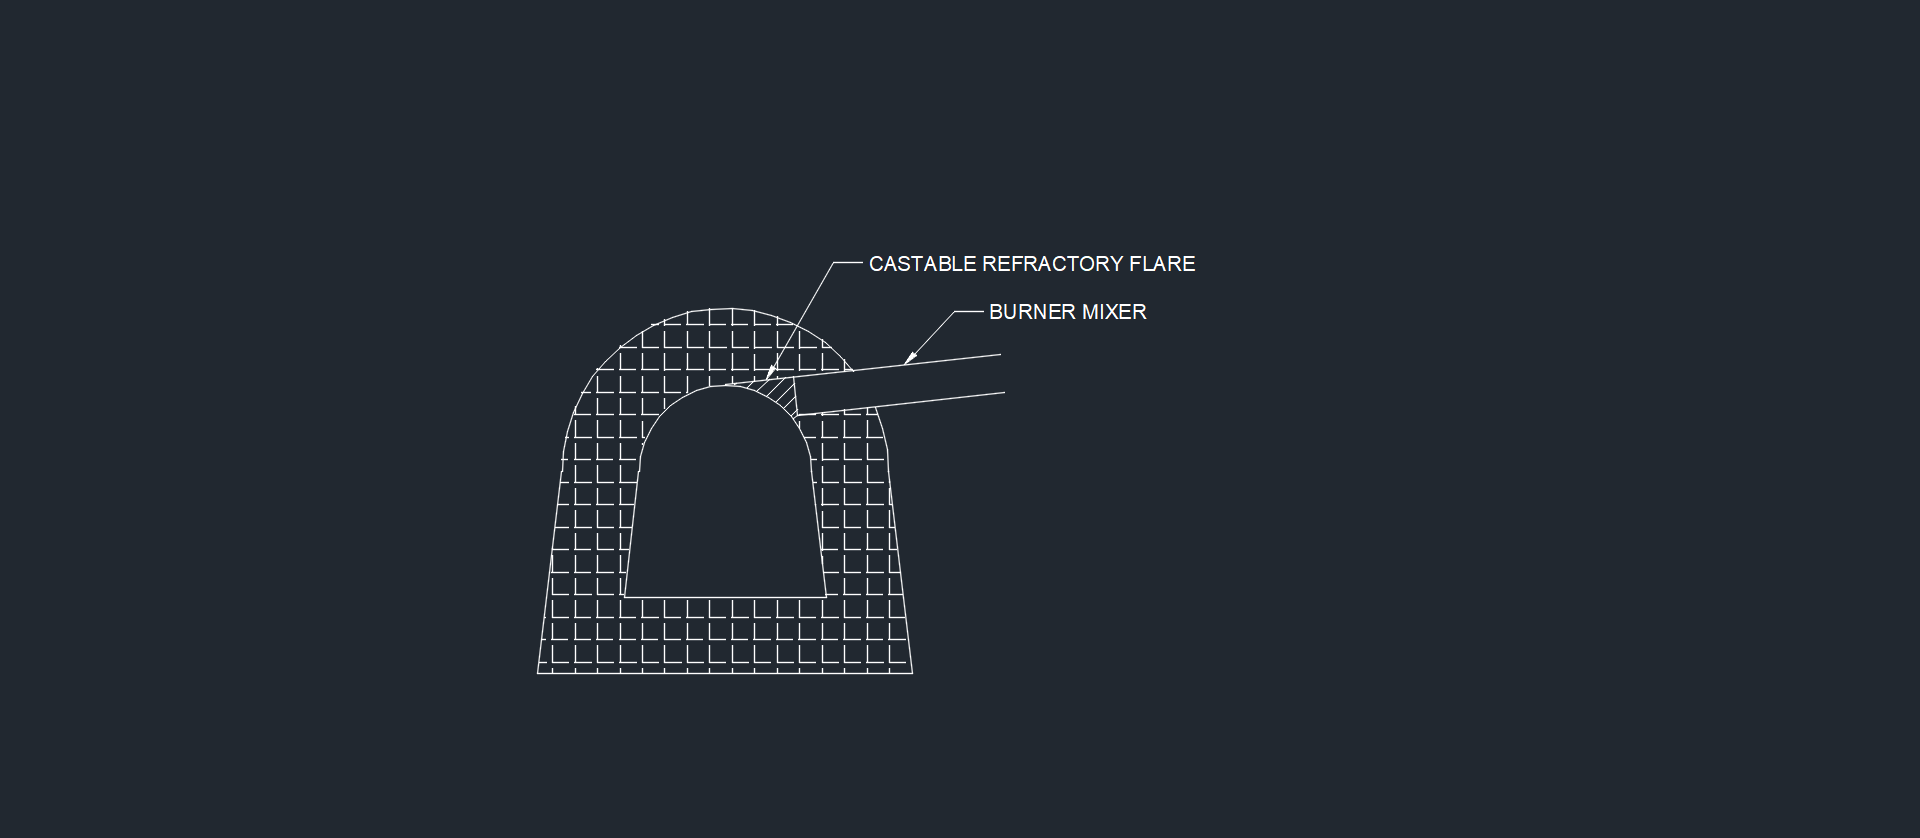
- Burner mixing tube is mounted too far into your forge. Edge of mixer should be in the insulation layer, not in the forge cavity. Dark circle on the floor of your forge indicates that too much of the flame is hitting the floor, and moving it back will help the flame develop more fully (and save you mixing tube from scaling away). Ideally the cast refractory inner shell protects the end of the burner and provides an integral flare.
- Burner orientation is not optimal. It is best to promote a swirl of flame along the wall by entering at a tangent to the inner wall rather than perpendicular.
- Make sure on your updated build that the gas supply tube doesn't obstruct the air inlet as much as currently (if you increase the reducer size that will likely help.
- Alignment of the gas orifice is critical. It should be centered and in parallel with the mixing tube for max effect.
- Appreciate your polite response to assistance. Goes a long way to getting additional help.
-
Not being a religious person, or that familiar with the inner workings of hospitals, I never know what to say in these situations. All I can add to the well wishes and recommendations in the above is that I have greatly enjoyed, and learned from, Tom's contributions over the years I have participated on this forum. I almost ran into him at SOFA the one time I got out to that Ohio Hammer in, but he was too occupied with tailgating and chatting with friends for me to interject. Now I wish I had made more of an effort, though it is possible I wasn't sure who it was at the time and only learned afterwards that it was Thomas based on his iconic hat.
-
Stuff in bucket looks like Satanite to me. Was formerly thought of as a good coating for refractory blanket, applied in multiple thin coats, but most users report that it is quite fragile, cracks and breaks down pretty quickly with use. I would substitute a 1/2-3/4" thickness of Kastolite 30 instead.
-
I'll have to check once I get home. I was advised by the US Anyang rep to use a hydraulic fluid, I think, but would have to check to be sure. My little hammer has a visual drip indicator so I can see that the oil is flowing at an acceptable rate.
-
+1 for the amp clamp style meter. Make sure you clamp around each hot leg individually.
Have you confirmed that your hammer is getting adequate oil circulation? I know that in my shop in upstate NY I have to use a magnetic oil pan heater to preheat my oil till the hammer gets going for a while.
-
I've successfully forged and finished two swords to date, both in week long classes at a local craft school, and prepared a handful of others for heat treatment. The latter haven't been finished due to the difficulties in setting up dedicated sword hardening and tempering equipment.
The advice to date regarding use of a smaller forge for the actual forging is good. However what we used to great effect for hardening was a large (55 gallon) drum lined with 1" of refractory blanket. One port near the bottom for a 1" propane burner and two in the lid (one for the sword blank and the other for a vent that used a brick cover to selectively vent the chamber and make small adjustments to temperature. The extremely large forge volume helps to provide a relatively stable temperature for austenizing the steel, but don't let the flame directly impinge on the blank. I believe this was originally a Don Fogg design, and you may be able to reference it as such.
Tempering was done in a heated bath of canola oil . This works well, but you need to be careful of the flashpoint of the oil and to ensure you take into account the volume of the steel you will be putting into the tank so you don't get an overflow.
I have seen a demo where a larger size blade was heated for hardening in a long trough filled with lump charcoal and fanned with a pizza box lid. It worked, but it is a bit of an art form rather than a science (and Phil Baldwin, the experienced maker who did the demo ended up burning himself badly with the hot oil).
-
If the flame is lifting off the burner face you have plenty of air and gas and shouldn't need more for that burner. If you can ever get the forge to heat up the flame speed will increase and you may be able to turn the burner up further (yes I am aware that is a kind of catch 22, but with doors you may be lucky). I am not familiar with the castable you used, but it looks like a high alumina refractory castable rather than a high alumina insulating castable. The former can be quite heavy and makes a great flame face, but the thermal mass will take some time to heat up and may cost you in fuel bills if you don't have an adequate overall thermal resistance in the walls. As I've stated many times, I like a 2" layer of 2600 degree ceramic blanket with a 3/4" castable insulating refractory for the forge walls, roof and floor. Check the listed k value for the refractory material you got and compare it to refractory blanket (lower numbers are better and the heat transfer quantity is directly related to the temperature difference between the inside and outside of your forge and that value).
That is a pretty large forge, what is the internal volume?
First projects
in Member Projects
Posted
If you are going to build a solid fuel brick forge you might as well build it out of conventional clay brick for the bulk of the structure and chimney. A top layer of high temperature furnace brick for the forge pan with a steel or cast iron fire pot should hold up quite well. I don't see any need for dirt or concrete, and the high temperature mortar only for it's intended purpose of marrying bricks together (though likely not necessary for the bulk of the construction, if at all, if you use conventional mortar for most of the brick). I'm sure there are numerous sets of plans out there for these in archived books as they were pretty common at one time. Sometimes it is better not to reinvent the wheel, particularly if you don't have a lot of experience with the craft. Seemingly minor design decisions like the size and depth of firepot, or the height of the sides of your forge can have a pretty significant effect on how useful your construction is in the end.