-
Posts
2,169 -
Joined
-
Last visited
Content Type
Profiles
Forums
Articles
Gallery
Downloads
Events
Posts posted by Latticino
-
-
Mike,
Pretty good aside from my knees starting to fail, my memory apparently going to the devil, and still having to work instead of retire and get to indulge in my hobbies full time. Why, do you know something I don't?
-
Frosty,
Only you could elevate curling to a contact sport
 . Hope you get better soon.
-
On 4/19/2023 at 2:11 AM, George N. M. said:
Also, if you may get wind or thunder storms having stakes and rope to secure your booth to the ground are good.
This is excellent advice. I have seen too many tents blow away at shows (at my first one I foolishly connected all my shelves to my custom designed tent structure. I was exhibiting hand blown glass and lost most of my stock when a big wind came through).
If you are on dirt, some longer tent spikes with a twist forged in will help (some folks go so far as to use the dog stake style, but as a smith I think you could make something pretty easily out of 1/2" stock that would serve. If you can bring some extras to loan, trade or sell to your neighbors.
If you are on asphalt, weights are your friends. I used to use 3' pieces of 3 x 3 x 3/8" angle iron, but some folks tie on barbell weights.
In that vein, one of the things that has saved my sanity at a show that wasn't going particularly well was commiserating with (and trading with) other vendors. Got my wife a lot of nice stuff that way over the years. Think she misses that aspect of my former avocation.
On 4/19/2023 at 2:11 AM, George N. M. said:have a chair or 2 to sit in
Again good advice, but be sure to pop out of it to speak eye to eye with potential customers when they come to see your work. Alternately use a director's chair at "bar height", which should keep you at a good elevation. As others have mentioned, enthusiasm is a big part of having a successful show, and lounging down in a chair while the attendees are getting tired walking around can be off-putting.
8 hours ago, George N. M. said:I suggest using piano wire
Piano wire is great stuff, and ideal for making springs. It can be a challenge to cut using "normal" wire cutting methods - and will quickly kill the jaws of most cutting pliers. Best method I've found is using some form of abrasive wheel. I used to use an old 6" bench grinder. The "corners" of the wheel cut it easily and you can quickly finish the ends with the wheel "face".
-
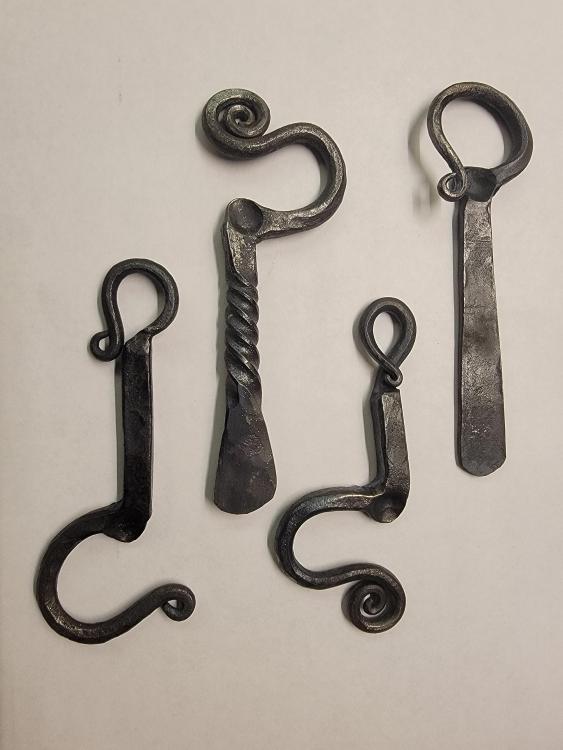
Thanks, I never thought of that. Guess I don't drink to much with tabs (not a soda drinker, but have to admit the newer Guinness cans with the marble inside work pretty darn well to give you a fairly authentic pour).
The wife thinks I should try selling these. I think I'm too slow (at least right now) to be able to make it worthwhile. Etsy has some for under $20. You have got to be pretty quick to make money at that price point.
-
Anvil is correct on all points.
Just to be clear, the typical two issues that come up are the height above the roof (well described above) and the penetration of the roof itself. It appears that you have wood construction for your roof, so you need to conform to the code requirements for penetration of a combustible horizontal plane. Most codes will require 18" of clearance from any combustible materials for a "low heat" solid fuel industrial appliance. If you are penetrating a wooden floor as well you have the same issue. As others have noted, there are some tricks that can be used to reduce this clearance requirement (like using special double wall insulated "zero-clearance" ducts, but they aren't inexpensive. Research roof thimbles.
I would never recommend a scavenged blower be used for powered flue exhaust unless it was specifically designed for that purpose. 6" is pretty small diameter. I typically like to see at least 10".
-
For what it is worth, I have finished the hammer in the photo above and used it successfully on many forgings. It is a great pattern and size. The only thing I will change for any future hammers of this design would be to move the "nostrils" a little further towards the peen. When I ground the slight radius into the face after forging the edges in those locations aren't as well supported as I would like.
-
Thanks all, lovely to get feedback. It is nice to stretch and forge something other than knives and axes.
-
That's my favorite as well. It is a fun challenge for me to work so small on my 250# Fisher anvil with a 5" wide face. The mini spirals without touching the "coils" are interesting as well. Thanks for the feedback.
-
That's a cutie Steve. I like the multibar pattern.
-
-
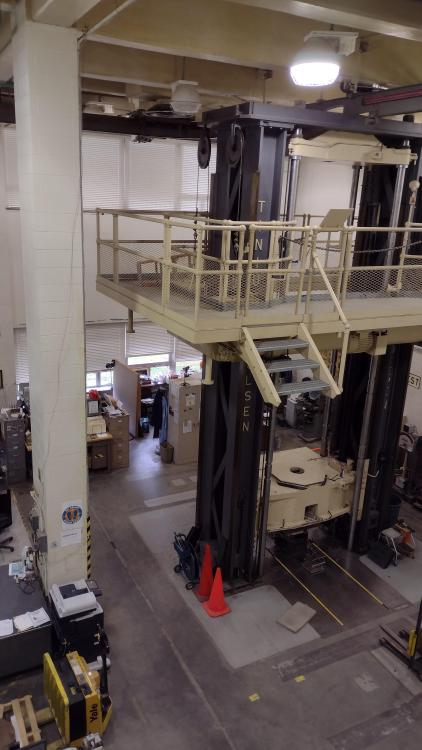
No, they had just finished a test when we were surveying the building. We had been instructed to not talk to the techs, so I didn't get to quiz them, but clearly it had some power under the hood. Looked like you could put whole truck frames inside and pull or crush test them.
-
He probably means a melting furnace. Crucible supports in those serve several purposes including the following:
- Provide a replaceable, level, flat bottom to properly support the crucible
- Elevate the crucible above the furnace floor to improve heat circulation and raise smaller crucibles to more easily accessible heights
- Provide a clean, flux and old spill free surface that the crucible won't stick to (see replaceable from #1)
I'm not sure what you mean by fire brick and ceramic brick. The crucible support needs to be able to tolerate the temperatures your furnace will experience and still support the weight of the loaded crucible. I suspect the best option would be a high alumina refractory fire brick rated up to 3,000 deg F, but those aren't cheap. A fire brick from your local big box hardware store won't cut it unless you are melting aluminum.
-
If metal is heated to the correct temperature, and held at that temperature while stretching, it is certainly possible to stretch it. After all, that is essentially what we do on one side of a piece of stock when we bend it. However it is no minor thing to maintain that even temperature or to safely provide the required force to do the stretching. If I had to do this I would more likely do the fabrication that others have mentioned, but if the only choice was to actually stretch it, and the client had VERY deep pockets, I would be looking at coordinating with someone who had a extremely large tensile test machine. I visited one recently owned by the Department of Transportation in Albany NY. It was around 25' tall and could exert many tons of force.
-
Most split crosses I've seen, or even the few I've done myself, are made from square bar stock. I think you may have some trouble with the quantity of steel in each twisted arm not being sufficient if you use round. Of course that might make selection of a jewelers saw a good choice, rather than the more standard hacksaw or portaband. Hopefully you are patient and have fairly aggressive jeweler's saw blades. Why not try it out and see for yourself? If you don't know this trick already, you might want to periodically put some paraffin wax on you blade to lubricate while sawing.
-
Light industrial furnaces like this one also have integral safety systems in the gas train. From the photo I see what appears to be a safety solenoid valve as well as a final internal regulator. Both will have to be functioning properly to use your forge. Note that he regulator may be setup like mine as a zero pressure regulator that varies the flow of gas in parallel to the air flow. If so you may have an adjustable orifice as well, which will set the relative proportion between the two. You still would likely have to change out the orifice if you switch from natural gas to propane. If you do have natural gas available it will be more convienient.
When lighting a forced air gas forge it is critical to turn the air on first. Then deal with your ignition source (wadded newspaper or hand held propane torch) and only turn the gas valve on after the forge door is open and the ignition source is lit near the burner. As George mentioned, you may get a bit of a blast when it first lights. You will need to learn what air and gas settings are best for the initial firing. Shutting down is the opposite sequence (gas off first, then air after a few minutes to keep the burner cool.
Note that these old furnaces were not really optimized for hobby work. They typically have a lot of thermal mass and due to that take a long time to get up to heat (but hold their heat well during operations that open and close the doors regularly). The other issue you may have is the operating range for the furnace. Unless you get a manual somewhere there is no easy way to tell what it will tolerate. The insulation may not be rated for forging temperatures.
-
Cracking is usually working too cold. Remember that the smaller the crossection, the faster it both heats up and cools down. You also may have forged in a cold shut when you forged down the taper. One good trick on these small diameter tapers is to leave a small "bulb" at the very end of your taper until the final steps of the taper. It is easier to demonstrate than describe
-
Likely getting preignition inside the burner. Typically happens as the flame front moves back towards the air/fuel source which happens when the forge/melter/furnace starts getting hotter. You have to keep the flowrate up at higher fire and not turn it down as the chamber approaches temperature and be careful to let the waste gasses flow freely (don't close the door too far). Sometimes can be addressed by allowing a small amount of secondary air to be induced by the burner outlet (gap between the forge shell and burner port).
-
Was this at Penland? I've blown glass down there in years past. Sorry you missed the final product viewing, but it has to get into the annealer before it cools too far or it will likely crack.
-
Look into substituting ductile cast iron (though reportedly it doesn't forge at all well). I don't know why anyone would want to forge a material that can be cast, but YMMV.
-
On 3/2/2023 at 4:11 PM, George N. M. said:
local HS offer a shop class that includes foundry work
You have foundries and such in high schools there? Even back in my day they didn't have those here. These days they are removing most of the real hands on stuff from the typical public high schools (metal shop, automotive shop...). Still have wood shops, but pretty de-emphasized. Everything is going over to "technology" with multiple computer stations and 3D printers. Not that there isn't a place for those, but it is a shame to lose the practical classes. I know HS graduates that barely know which end of a screwdriver to hold.
-
Mark,
We aren't all that organized. Join the club, it's cheap, and there are meetings (unfortunately also on the weekends) for the Buffalo based chapter as well (Niagara) on alternate weekends. Typically our meetings are a bit of a free for all, but there is usually a demo to start and plenty of smiths hanging around to chat and forge with. The website isn't great, but it does have some good information: https://nysdb.org/
I think it is in process of being upgraded.
-
3 hours ago, Buzzkill said:
The chuffing you're getting after 30 minutes or so is most likely due to the chilling/freezing of the propane tank
Chuffing can also be caused by preignition inside the burner mixing chamber. If the burner gets too hot from being inside the forge chamber or radiant heat from the forge during "turn-down" from high fire to low (less fuel air mixture in mixing tube = less localized cooling effect for the burner), that flame front can move right into the mixing tube.
-
Flashback arrestors are not typically needed for propane. Venturi meters are superior to orifice meters IMHO.
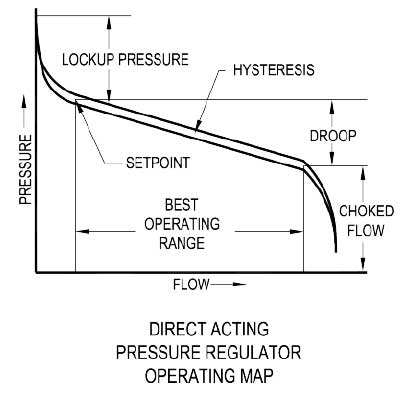
A characterized pressure regulator will give you some indication of flow vs propane pressure (see below), but simply knowing the pressure in the pipe at a single point in the fuel line will not necessarily give you the flow velocity unless you have done testing for that particular gas train with a calibrated flow meter.
Since you have ignored my request to elaborate on you eventual aims for this steel casting exercise, I'm done here.

-
33 minutes ago, Saltyrad said:
I was going to measure the air velocity and take the diameter of the pipe which would give me the 2 variables I need to get the air flow rate via this formula. Qair = uair * π. D2/4. then take 21% of that to get the amount of oxygen moving through the pipe. then convert the PSI measurement from my control valve on the propane tank, convert it to flow rate as well to get the the other variable. with 2 of the same units of measurement (cubic feet per minute) I can dial what I need from there. that would be my first approach
These are indeed the basic physics of what you would need to do, but the practicality is something else. First you must consider how to source an air flowmeter that is accurate in the ranges of CFM for the size blower outlet. There are a number of options, but you most likely will have to either cobble something together or purchase a fairly costly instrument (a multipoint pitot-static array with calibrated magnahelic would be nice, but I don't think it will work all that well in the turbulent air you will most likely get with a blower assembly not designed for same and the relatively small duct diameter. Perhaps an orifice meter with a fixed cavity calibrated for that level of flow and static pressure? I saw one CDI meter that seem to be close to that range for a 2" pipe, only around $1,000 and may not be all that accurate at the flows involved). Another option might be to source a characterized blower with a known blower curve, measure the discharge pressure and associated RPM directly and calculate the flowrate from that. Then you have the problem of getting the flowrate from the propane valve. Unless you are planning on using a rather expensive characterized pressure regulator style control valve I don't think you are going to find any kind of simple relationship that will directly apply to your gas train.
All of this can be done, with the right application of test equipment and the time and knowledge to utilize same. I think as a budding melter on an admittedly slim budget, you should start a little slower and just get the basics of melting and pouring relatively low temperature metals without causing accident before starting to worry about steel. You can play with your furnace atmosphere at the initial stage the same way most of the rest of us do (loosely metering the level of oxidation or reduction by judging the exhaust by eye and the sound of the burner) and learn the basics of casting before jumping into the deep end. Please consider there may be a reason you don't see a bunch of backyard tin can melters or at least give us some idea of what you plan on melting the steel for so we can offer better advice on how to achieve those aims.


Rasp Tomahawk Problem
in Axes, Hatchets, Hawks, Choppers, etc
Posted
Also recommend that you rethink the final shaping of the eye after the weld is complete. You are really using a mandrel to shape it (most hammer blows should be with the mandrel inserted and the "side" of the eye on the anvil face with hammer blows from above) and should not be doing any major drifting to increase the opening size. For the inevitable first shaping of the somewhat wonky forge weld I suggest you trap the welded section in your post vise securely when you first seat the mandrel.
Also, always weld from the front of the eye towards the bit. The front of the eye is the critical location and most difficult to get cleanly welded. Of course I always weld a HC bit into my hawks, so I do that side afterwards. Still, as John mentioned, keeping the stock fairly thick while welding (light hammer) seems to help as well. Even with your coal forge you can oxidize the surfaces, making for a difficult weld. Make sure you are in the reducing zone of the fireball.