

Latticino
-
Posts
2,161 -
Joined
-
Last visited
Content Type
Profiles
Forums
Articles
Gallery
Downloads
Events
Posts posted by Latticino
-
-
Wanted to finish up these Parkinson style tongs and since the forge was hot, nocked out a shoe horn for my new boots that are still a bit tight. Love making tools. Even played around with a little filework and chasing on the tongs. Obviously need a bit more practice on that, but I was rushinga nd we all have to start somewhere.
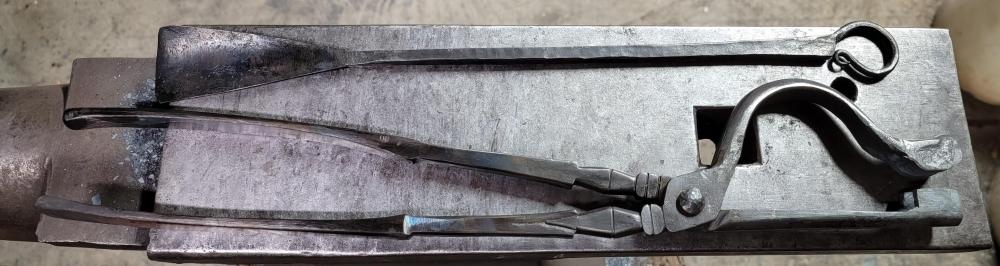
Here is the back side of the shoe horn. On reflection I should have made the transition a little more carefully with my set hammer to keep it centered, but the nice edges on my Fisher are pretty effective...

-
This is the way...
Well done.
-
As I understand it, tempering a second time is often recommended to address the martensite that can get transformed from retained austenite after the first tempering cycle. This is also one of the reasons you are supposed to let the quenched billet cool down to room temperature before tempering so you can improve the overall transition of austenite to martensite that mostly takes place during the quench.
Of course a lot depends on the specific steels you are using, and the heat treatment requirements and processes can vary pretty widely. The guideline for double tempering is for more typical blade/blacksmith steels like 4140, 5160, 1075, 1084, 1095, and 52100. Note that when you "run the colors" to temper a tool it is usually recommended that the oxide tempering colors are brought up more than once as well...
-
Thanks all for the prompt feedback. Very helpful. As I suspected, I am likely overthinking this.
-
Lovely sentiment, thanks for clarifying.
In your shoes, unless you wanted something very unique (i.e. costly), I would just google "Iron Viking Rune Pendants". I did that and got dozens of hits at some pretty fair prices. I think it is unlikely anyone not making these regularly could compete with those churning them out in a light production atmosphere.
-
2 hours ago, BHUMP89 said:
Was hoping for iron
For the anniversary I would recommend that you go with either mild steel, scaled sufficiently to look old (like the sample you showed) or wrought iron. While the latter will be harder to source, it does have a lovely surface once etched and is a little more rust resistant. Pure iron will be a lot harder to get a hold of. Any competent smith should be able to recreate the sample you shared, but why do you want a Viking "X" rune on a pendant for an anniversary?
I suspect if you surf something like Etsy you will find any number of steel pendant types. For an anniversary you might want something like a heart or leaf pendant. There are also folks making some nice ones out of pattern welded scraps that show well.
Good luck.
-
17 minutes ago, LeeJustice said:
pure Iron
You just had to re-open that can of worms...

-
Steve,
That is a great idea, and I can't believe that I didn't think of it. We will be using coal forges, so there should be plenty around. Of course at home I don't have my coal forge setup yet (struggling with getting a proper thimble for the roof penetration), so I will either need an alternative or get myself a can of coal dust next time I'm at our local group forge.
Thanks!
-
Strange question I know, but I will be taking a class shortly where we will be forge welding sockets made out of real wrought iron as one element in a larger project. I have been doing a little research and found that most folks who forge weld sockets or tubes use an inner mandrel during the welding process to keep the crossection stable and allow hammer blows to be concentrated on the welding plane. To avoid sucking the heat out of the stock, the mandrel appears to be heated up with the stock to something approaching welding temperature.
So the question is: How do you avoid welding the mandrel into the socket? I know that a layer of paint containing some titanium dioxide (White-out) is reputed to work well as a weld resist, or a significant layer of scale, but are there other alternatives that folks have used? Specifically I was wondering if spray-on dry graphite lubricant might be effective.
I do have a mandrel and matching bick that I forged out to use in the class, so I may try it this weekend. However I would appreciate some guidance from smiths more experienced than I am with forging sockets or tubes. I may be overthinking this...
-
Nathan makes nice hammers that are very attractively priced. The BLD hammer looks nice also.
How does one "pick-up" a Patina (rainbow or otherwise)?
-
If you haven't done it already, I recommend that you make or purchase a file guide (preferably with carbide inserts on the face. This will help a lot with getting both the plunge and step for the tang lined up well from side to side.
I like the shape of your blade quite a bit, and the grinds look pretty good also. One thing that stands out to me is the slight tapering of the handle at the front of the wood section right behind the antler and brass spacer. It is hard to tell if this is intentional or a product of grinding the relatively softer wood next to the harder spacers. If not intentional, you need to take extra care in this transition area to avoid the "dip" in the future. If intentional, I recommend you exaggerate the change a bit more so it is obvious you wanted it to be there.
-
You are essentially talking about a complete rebuild to get the cobbled together grinder parts reconfigured as a vertical grinder. If it were me I would essentially toss all elements other than the motor, contact wheel and tracking wheel and then repurpose same with a grinder build kit for a standard vertical 2 x 72 grinder. Of course you can make knives with a forging setup, a decent 12" file and some sand paper, but if you want to be efficient a 2 x 72 grinder is a life saver.
-
59 minutes ago, JHCC said:
That would make the radius of each half-circle just under 9-1/2".
Think we have a different interpretation of the OP design. I see this as a half-circle will be bent with a perimeter totaling 3'. Therefore the full circle would have a 6' perimeter. 6' is 72", divided by pi I get a diameter of 22.9". This should be a radius of approximately 11.5" at the centroid of the bend. Perhaps you calculated an allowance for the thickness of the rebar? How did you know what that would be?
-
Adjust the air intakes until you have 1" - 6" of flame showing out of the opening of the forge door when it is burning in a dark room and up to a decent orange interior temperature. This should be a slightly reducing internal atmosphere, which will help prevent scaling on your steel. A proper neutral atmosphere (full stochiometric burn) will be a little hotter, but most feel the tradeoff for increased scaling is not worth it.
Shame the manufacturer doesn't provide adequate instructions to run their forge. You certainly should not be smelling propane when it is burning. Make sure you soap test all your gas piping joints for leaks (brush a solution of dish soap and water over any joints and look for bubbles). You did use gas rated pipe dope or thread tape on the joints during assembly, right?
-
Are you 100% sure it is 1/2" x 24 thread? Only that MSC has a 3/8" x 24 - 1/2 inch chuck for around $40.
I'd post a hot link, but it against policy.
-
You could do worse than following the video from Mark Aspery:
I have done similar with good results. You can also start with thinner stock and forge weld on a poll before doing the wrap. Lots of different ways to achieve this.
I can't view the video at work, so am not sure if he gives the sizes. There is also a step by step in an issue of Hammer's Blow (the ABANA publication). If you still need sizes, I can go through my notes tonight.
Good luck.
-
Have heard that Star hammers are decent, but nothing special. Hard to tell the extent of the damage from the photos. I'm not a big fan of the leaf spring style linkage where the exposed spring is level with your chest if it fails in use. Pulleys are typically easy enough to replace (and might be a good idea in any case if you are switching from flat belts to v-belts), but it looks like the shaft may also be damaged. If the castings aren't cracked, it might be worth repair, particularly if you get it cheap and are willing to do all the renovation work, but it wouldn't make my list.
The drill press behind appears to be a camel-back style press. These are typically heavy duty and well suited for a metal shop, provided you have the space. I've seen them selling (in working condition with a useful motor) for anything from $350 to $500. Typical caveats on the quill and bearings.
-
You may find that with such a small forge volume you have a bit too much burner for the forge size. I'm not sure what the turndown ratio is on the hybrid burners, or how potential swapping of the nozzle or flare will affect same. I typically go with Tim's recommendation to provide a step in the refractory to protect the burner outlet and configure the forge liner to double as a nozzle. It does look like you are planning something like that. I would expect that a short, bushy flame might be better suited for that size forge. Note that in any case, the nozzle/flare should not be exposed inside the forge chamber.
I am not familiar with either the bricks you have specced or the coating you plan on using. However, every soft-brick forge I have used or come in contact with has had issues with the brick getting very friable after heating and cooling regularly, and the remainder is quite brittle. Hopefully yours will fare better, but I do recommend if you aren't going to include an enclosure, that you consider some kind of steel angle frame that can exert adjustable pressure on the bricks to hold them in place.
-
One thing to be a little wary of is that even though the official tailgating opens on Friday, there is a bit of a history of folks getting to the site days earlier and setting up sales. I have heard of the same anvils and the like being sold multiple times during the week, starting as early as Wednesday... with prices increasing at each sale.
-
Patrick,
Thanks for the exhaustive response to my initial question. You have confirmed my suspicions regarding DI anvils.
I think some confusion also comes up when some manufacturers list their anvils as being "cast steel" when they are actually ductile iron. I'm not saying that ductile iron anvils aren't a valid alternative when properly heat treated, just that they are different from steel.
However, don't you think that the anvil surface deforms a small amount (at the microscopic level) during normal use)? After a century or so of use with sufficient planishing blows, I suspect there is a bit of work hardening going on. Certainly there are some dislocations involved in the swayback or mushroomed tops we sometimes see on older anvils. I was just curious whether the different crystalline matrix microstructure of a DI anvil would behave similarly, but I certainly agree it is a minor factor next to proper heat treatment (and that with proper heat treatment less deformation and consequent work hardening will occur).
-
On 7/24/2023 at 12:17 AM, patrick said:
Ductile iron, you get a material that has good toughness, in some cases on par with steels, but it still has the casting advantages of a very high carbon material (lower melting temp that steel and good flow characteristics in molds).
patrick,
There was another question on the forum regarding ductile iron that I hope you might be able to address: Will ductile iron anvils work harden over time with regular use like a cast steel anvil does (or one with an added tool steel faceplate)?
-
5160 is a deep hardening steel that doesn't need a fast quench. Any 11 second quench oil will do, and in a pinch canola as well. Canola should be preheated to around 120 deg. F to keep the viscosity thin for more effective quenching. Kevin Cashen's website is a great resource for better understanding knife heat treatment: https://cashenblades.com/bladesmithing-information/
-
I would define the throat as the distance between the press dies and the press main support structure. If you imagine a C-frame style press this would be the distance between the main support channel and the dies. With an H-frame press it is the distance between the two main uprights. This sets the limit on the width/length of the piece that you can press (in the depth dimension).
I would define the daylight as being the maximum distance between the dies on the press. This sets the limit on how deep an item you can press (needless to say you need to allow for any tooling).
For hammer making it really depends on your tooling. I believe that Hofi (who could blank out an alarming number of hammer billets at an advanced age with one bad leg) used a tungsten punch, and stripper dies. You could do worse than copying his configuration. Once you know your tooling design, simple math will give you the desired travel distance. Remember that daylight is only one factor, you also need the correct travel for your cylinder.
As far as I know, presses don't need "anvils" in the same way a power hammer does. The end supports need to be robust and rigid, not necessarily massive.
-
If it were me I'd just use a piece of rebar to simulate the ridges and taper it only on two faces. Then I'd roll up those faces into the spiral. It might not taper in "depth" like a true one, but I think you would get the illusion pretty well.


Forge Welding resist
in Blacksmithing, General Discussion
Posted
Thanks Jen. Very helpful as usual.
Here is the bick I forged up to help with final shaping (and possibly the forge weld, depending) as well as the rough forging on the mild steel mandrel I forged out. The latter is now ground clean and polished up to match the bick. Both made from 1 1/2" stock. Bick was 4140 and has been heat treated.