RustyLaidlaw
Members
-
Joined
-
Last visited
Everything posted by RustyLaidlaw
-
I melt copper in my forge no problems. I use old electrical components and wire as well as salvaged MIG welding tips and oxy/fuel torch tips. I don't use charcoal but I do flux with borax. Going overkill with the borax tends to carry over the pour and cause inclusions in my castings, so I've had to find a happy medium by feel. I built my forge to burn propane (atmospheric), I just tuned the oxygen out as much as possible. Here's a pic of what it looks like, works fine for me. I use fused silica crucibles and often forge my ingots into copper bar stock for making copper nails and roves for boat builders. Never had a problem with spongy or porous castings, and I cast in sand. As usual your mileage may vary. It's always best to take advice and then run with it and figure things out in practice. Yours - Rusty
-
Thought I'd show a quick picture of the way I forge oak leaves. This one in progress started with a 1/4 x 1" flat bar which was forged to 1/8 or so thick and then cut with a hacksaw to separate the lobes (this could also be done with a chisel. The lobes are then drawn out with the peen of the hammer shown and finished with a little sort-of rounding hammer, then a file to clean things up some. When finished they look like the ones on the branch in the second photo. Hope this helps someone! Yours - Rusty
-
Hey Benton! I swedged it out with my straight peen. Started at the base of the socket working a taper in from 1/16 (or so) from the edge of the socket to the blade, thinner at the base and thicker near the blade. I formed it without a mandrel rolling freehand and forge welded it over a 3/4 inch bar with a rough taper forged in. If I had taken the time to make a mandrel it would have turned out way more even. It was supposed to fit a 1" shaft, so doing the circumference calculation C=2 x pi x r, you end up with 3.14. Spear sockets are wonderfully easy. So I flared the end with the allowance for the lap for welding, and off it goes.
-
Hey Gergely! I hardened it at non-magnetic and then tempered it back to a spring temper, in the blue color range (round about 490F). This works good for me with this batch of steel and gives great edge retention and awesome toughness to handle lots of abuse. The slightly softer edge makes it easy to sharpen in the field too, which is a big bonus. The socket is welded but not hardened, I only quenched to the base of the blade and then drew the temper on the whole piece. Thanks for the compliments! Yours - Rusty
-
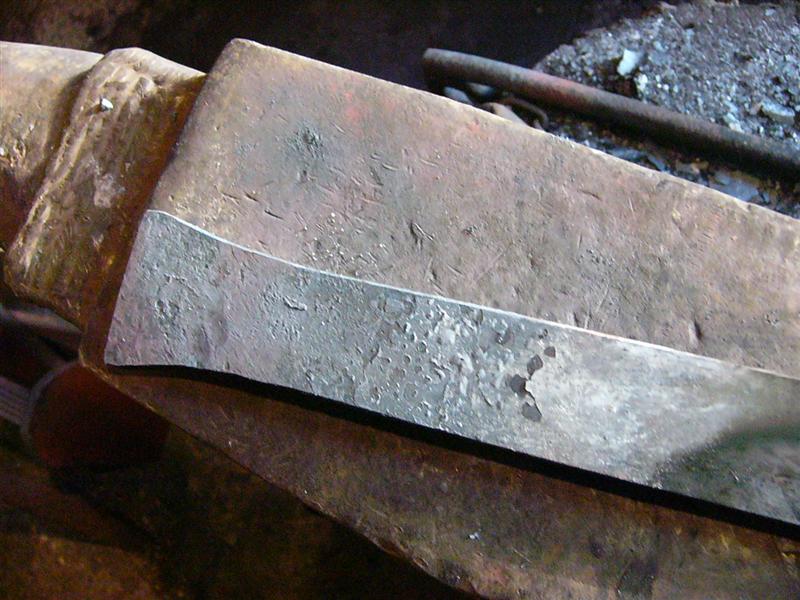
Forged a spear for my buddy's Viking wedding. He called me a week before the big day because he had ordered enough stuff for his groomsmen but forgot a spear. It only took a few hours to knock it out from 3/8 x 2 5160 flat bar. Pics show the flat bar in the forge, spear head tapered and socket swaged out, socket rolled, grinding done, getting to hardening heat in the forge, and the finished spear. And a shot of the forge and anvil etc in there too. Wedding was awesome, it was nice to have some of my work in the spotlight. Enjoy! - Rusty
-
I charge $125 for mine. Forge-welded hips, etc. I get orders for bouquets for 50th wedding anniversaries and such, as well as funeral arrangements. Here's a shot of some fresh forged ones. I make mine from old autobody steel and any scraps that are lying around. Make sure y'all don't charge too little! Roses are a lot of work. Yours - Rusty
-
I've acquired some ground clamps from old MIG welders. Melting them down is a treat, but I was wondering if someone knows what alloy of bronze they may be? In the forge the pieces melt beautifully and it's self-fluxing - all the junk floats away to the sides and the molten puddle looks like a mirror. I wanted to see what would happen if I threw some flux in there and it foamed up and oxidized like crazy. I know it's bronze and not some kind of red brass because there is no zinc boil at higher temps. Anyone know any specifics about this stuff?
-
Looking for a gauge for my regulator now, Tom. Sharpshooter - I opened the choke on my second burner and I guess the extra O2 coming through helped burn off the extra fuel in there. Works like a charm (for now). Frosty, I've turned the pressure down and by fidgeting with the regulator then fine-tuning with the ball-valve at the burner I can pretty much get it perfect. Once I have the gauge so I can tell what the heck I'm doing I'll be able to come up with a system to actually regulate it and not have to guess. Thanks again for the help guys!
-
I just lined my forge with some 3100F castable refractory, and the dragon's breath is excessive. I have no pressure gauge on my regulator, so I have to adjust by sound and feel. I'm feeling this issue is because there is too much fuel, but maybe the experts have a better idea? I have the back blocked off for now. Will adjusting the accelerating tip up or down help? My nozzle is in the flare at a height to make a great flame, but I'm worried that I am losing too much heat out the front. Advice??
-
Update! Needs one more firebrick in the bottom (local supply didn't have enough) and a back door made, but here she is on two burners! And a video! (If it works) http://s1238.photobucket.com/user/RustyLaidlaw/media/Picture098_zps5d6d8011.mp4.html
-
Thanks Frosty! You always have awesome advice! I tried it today with just one burner and got some 1" square to forging temp in no time. I'm not convinced it'll get to welding heat, or am I missing something?
-
Howdy! Just started building a gas forge cause it was about time I switched over. I currently reside in Lower Mainland British Columbia, in Canada, and coal is proving very difficult to locate. I called up a local coal company and they basically said (very paraphrased) "We hate small local business passionately, and we'll only give you coal if you make a minimum order of literally 50,000 tons". The lady I talked to cited safety concerns as the reason why I couldn't just drive on up to the mine and load a pickup truck. All in all it's been a pretty crappy reception to the coal industry here, and I was stuck purchasing 50lb bags for $65 each from the local farrier supply! I've done some research and decided to go with a propane forge for now. I liked the idea of the sidearm style, but my local plumbing supply didn't have the gear for a 3/4 inch burner so I figured "Hey! Why not step this thing up to a 1 inch"? I like how it works! I welded up my forge body this week, and I'm gonna make it a two-burner. Outside Dimensions: 12" wide x10" high x18" long Inside Dimensions: 8x6x16 roughly. I've lined it with a local refractory blanked called "Fiberfax" which is used in pottery kilns and should be good up to around 3000F or so. No word on what flux will do to it, but I'm gunna put a firebrick bottom in that bad boy anyway. I've attached a shot of the burner in action! Hopefully this works, I'm not 100% on posting videos. I have it on my photobucket too, hopefully one of these things works! My two 1" sidearm burners will be evenly spaced at around 6" center to center, and 6" from each end (18" divided by three, right?) Oh! Edited because I forgot to mention the burner flares! I pressed them from stainless steel tubing on my hydraulic press over a mandrel machined from an old spline shaft. The taper is 1-in-12 and it kicks butt! Does this all sound good? I fired it up with one burner and it looked hot enough to flash fire an elk in probably around 15 seconds. Lots of dragon's breath, I think maybe I need to choke that baby down a bit, but I won't know till I pipe in the the other burner. Thanks guys! - Rusty IMG_3229.MOV
-
Very nice stuff oldtimer! Are those turnscrews for muzzleloading?
-
I get my boric acid for $5 a quart at the local pharmacy. It comes in a powder as a burn remedy. Suits me just fine, as I wash my hands with it at the end of the day. If it's good for burns then it's good for me!
-
-
"I generally warn them 3 times and then let them mess up their project as they are not learning from being told. " Good policy. I have an annoyingly short attention span, so if I can keep from burning it, they can too. Sometimes it's best to learn the hard way though. After a couple hours of careful work, if one of my students burns the project they tend to make sure it doesn't happen again...
-
I'm with Phil, I'm more of a few times a week kinda guy.
-
Thomas - You're right. I think the misconception comes from the difference in volume needed to get the same heat. And people believe things people who "know more" tell them I suppose. I had a gas forge for 2 years and hated it. Coal has it all, smoke, clinkers, less chance of catching one's hair alight. I feel like a cowboy wrangling the fire where with gas I was just adjusting the regulator and letting it do it's thing. I'm also curious to see what your gas forge looks like!
-
I prefer coal. It's cheaper than gas and as long as you have a clean fire you'll be alright. I have good Pennsylvania coal, but lately I've been using cheap dirty local coal (about $1.40 a bag) and as long as I pull the clinkers out (feels like every 5 minutes, haha) it's fine for welding with. Quite a contrast compared with local wisdom - most blacksmiths won't touch it and moved to gas or buy imported coal at $30-75 a bag. My rule is if I can burn it then I can weld it Most of my billets are roughly 12 inches long by 1.5 inch wide and 1.5 inch thick depending on how many layers I start with.
-
I think the people of the 15th century knew whole lot. At least more than I know, anyway. I have a book of Italian medieval ironwork and it blows me away. A whole different level. Yes, the golden spiral does look a bit mechanical, but tweaking around with the proportions can make it look very pretty and natural. I've tried a lot of different methods, and I think it's a very solid scroll to begin with, and build other jigs off of.
-
Yes, Eric, I mean square root of five. What it all relates to is that if you look at my drawing the largest square is 40x40. Units being squares on graph paper. Using the equation Fn=Fn-1+Fn-2 with seed values F0=0 and F1=1, we get a sequence of 0,1,1,2,3,5,8,13,21,34,55,etc. If we plot this out on paper, it forms a natural spiral. Like nautilus shell, or a pinecone, or the spiral sunflower seeds grow in. So. I have a 40x40 (8) square. From there, I make a rectangle that's 25 (5) x40. From there make a square that's 15 (3) x25. Then make a square that's 10 (2), and two squares that are 5x5 or (1). It's all in the sequence, as long as you use factors of that sequence. By changing the size/ magnification of the squares, you can control the size of the scrolls. Clear as mud?
-
Sorry Mark, and anyone else who might be insulted. Sometimes I get a little carried away. No offense meant Apologetically Yours - Rusty
-
As many of you may know, I'm in the process of making a sign bracket for an art gallery in Lunenburg. A big part of that sign bracket is a number of scrolls. The real question, at least to me, is "How do you make a scroll?". I've tried many, many scrolls free-hand and out of maybe a million (at least it seemed like that many) maybe one turned out just right. How did the old timers get their scrolls just right? I mean people in the 15th century were basically uneducated idiots compared to us, right? So how did they make those fancy scrolls and complicated iron work? Simple. They used mathematics. The Greeks were the first recorded people to catch on to this insanely simple concept - that nature creates pleasing shapes, so why shouldn't we? From the nautilus shell to the distance from your armpit to your crotch, nature plays the same pattern over and over again. Today we call it the "Fibonacci Ratio" or as the ancients coined the term "The Golden Mean". I hear you asking "Okay...so some old Greek dude came up with some *stuff*, and that relates to metalworking how?". I'll tell you how, and it's as creepy as alien abductions. Cause steel at forging temperature actually forms with even hammer blows into the golden mean spiral. I know, intense right? The only thing a blacksmith has to do is take the shape of a nautilus shell and make a replica in iron. Everything else follows like clockwork. But how? First, you have to understand the Fibonacci sequence. In the "golden ratio" the simplest way to envision it is a line divided in two, but instead of a ratio of 1:2, it's more like 1:craziness. So 1/2 is 1 divided equally into two parts, where as the Fibonacci sequence is exactly 1+root 5 divided by 2 which equals 1.6180339887. But, you might ask, how does that make a scroll? Simply. The mathematics of the golden ratio and of the Fibonacci sequence are intimately interconnected. The sequence after all the maths is as follows: 1,1,2,3,5,8,13,21,34...etc. So to find the golden spiral we do the simplest maths possible, use the first 6 numbers to draw a rectangle, and from that rectangle work down the sequence to form all squares to fill up the rectangle, and from there, draw arcs from the corners of each square till they touch and make a spiral. Easy right? It'll look something like this: Now, to make my steel look as immaculate as that. First, I need a hardy bending fork (the thing stuck in my anvil) a scroll bender (the same thing but with a handle) and a piece of steel (Ta-daa!) First I take my steel, in this case a piece of 1/4x1x36 inches long and forge a pretty (I'd even say gorgeous) fishtail at the end, with a beautiful (I'd say immaculate) taper to the end. Such as this: Next we take that beautiful taper and offset the #$%@ing thing we worked so hard to make pretty, like so: Offset Now we take a pause to see if the fire is hot enough to heat a good section to start our scroll. To check this we use a complicated pyrometer known as "Little Iron Man". By the looks of things based on his facial expression, it's #$%@ing hot in there: Looks perfect to me, let's proceed Next step is to start the scroll over the edge of the anvil. It has to match the diagram. Like so As evidenced by this tell-tale burn mark... So basically we just tweak and twist with the bending forks till we end up with the final shape. Weld that to a hardie shank, and set it into the anvil, ready to shape new scrolls to the golden mean! As per: And... From here, I can forge a good long taper and bend a scroll to fit the golden mean! Which by the way, is the most pleasing shape known to nature And by nature I mean everyone By the way, here's my fork when it's not in the hardy hole:

-
I second the reply that the more expensive discs are the best ones to use. I use Walter or DeWalt discs, they are made for industrial use. The thinner they are, the better they cut. Mine last me at least 3 weeks of serious cutting. I can't remember, but I think the discs are only around $25-35 or so.
-
I have a small hammer that I polished the face and ball on to a mirror finish for fine work like this ring! It's a size 6, I made it for my fiance when we first started dating. Gotta show off for the girls at least a couple times ;)