NateDJ
Members
-
Joined
-
Last visited
Everything posted by NateDJ
-
The hatchet pictured is a roofing hatchet used for nailing shingles to a roof. The v-notch is for pulling bent nails. It may also have other purposes but I think you can even still buy them form the builders supply stores here in the US.
-
Try a wire supplier, they usually carry wire in these sizes and it would be much cheaper than special ordering I would think.
-
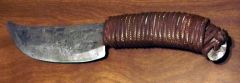
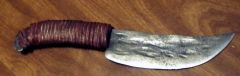
Thanks for the comments! I do hunt, but the knife will be a Christmas present for my lil brother should make a good hunting knife though. I was going for a ''barbaric'' / old Indian knife look and those who have seen it suggest that it looks like one of those two so I guess I have gotten my 'point' across ;)
-
LOL no but that should defiantly turn some heads! Very nice work! You have the rest of the costume to go with it?
-
I am using an old hot water heater that I cut the top and bottom off of. Cut a hole in the side and welded it to the forge table and it does the job.
-
According to the guy in the video it was brass, I have no idea how well it works but it seemed to do ok in the video.
-
LOL I would lay awake trying to envision exactly what the smith was making just by the sounds... Now that sounds like he is drawing it out... now maybe bending it over?... that sounds kinda like he is hitting it from the end!!!`~!!@~111 HE is making a hook! ... no wait a sec what is he doing now? ... etc all night! Sounds like a great exercise though!
-
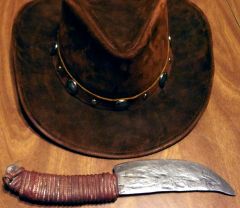
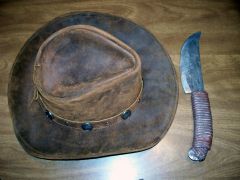
No way I'm going to use the hat, I am looking for some leather like it though.
-
-
 First knife
-
 First knife
-
 First knife
-
 First knife
-
 First knife
-
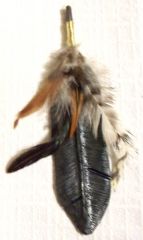 Feather
-
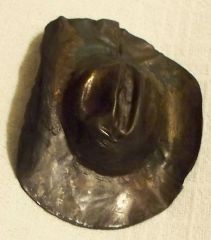 Cowboy Hat
-
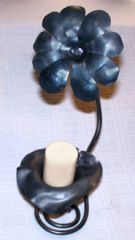 Candle holder
-
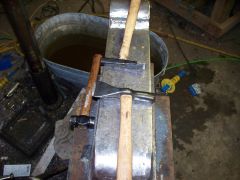
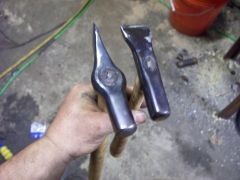 Shaping Hammers made from grade 8 bolts.
-
 Shaping Hammers made from grade 8 bolts.
-
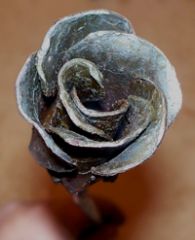 Rose made from sheet metal.
-
 Tiny salt spoons and larger spoon/candel snuffer.
-
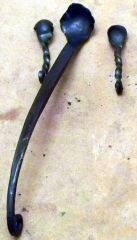
 'Russian' rose and leaf bent to sit on a table/shelf.
-
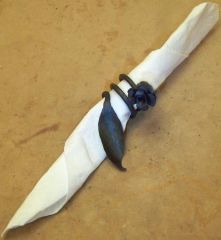 Napkin holder with 'Russian' Rose and small leaf.
-
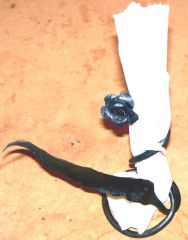 Standing napkin holder.
-
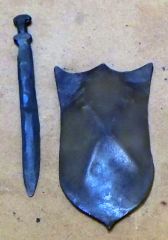 Sword and Shield
-
-
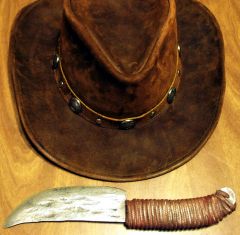
Well everyone else is doing it so here goes... The boys were wanting to make a knife for my brother for Christmas so this is what we came up with. ~8'' long 5160 and roughed up a bit for that forged / old iron / antique look. Handel made from nylon wrapped 2x and then polished using a buffing wheel and julers rouge until the nylon started to harden real well, kinda has a plastic handle feel but the rope doesn't move any. Anyone have any idea what you would call this type of knife, except homemade, I have that part already? The pictures are with my hat because the colors came out the same and I thought it fit the style. :rolleyes:
-
the 2.5 in flare is WAY too big! The one I use is a 1'' pipe hammered over the 3/4'' pipe and then drifted out flare shape on the horn of my anvil. It is about 2-3'' long from the tip of the 3/4'' burner pipe.
-
Cube twist: Take a square bar, for this example we will use a 1/2'' X 4'' square A36 steel bar. Place it is a vice so that it is laying flat and the top edge is about flat with the jaws of the vice. Take a die grinder ($9.00 at harbor freight this weak only ) and a cutoff wheel and cut a 3 1/2'' groove centered in the bar face. This should be centered both directions and about 1/16'' deep. Rotate the bar 1/4 turn and repeat the cut on all 4 sides. This cut can obviously be made with any device (chisel if you want) your imagination can conjure however this is what I use Once all 4 sides are cut make sure the cut is in as close to the same start and end point on all 4 sides use a hacksaw / band saw / very thin bladed cutting device and pick a side corner of the bar. Make some cuts perpendicular to the bar so that the first one is starting at the beginning of the groove and is cut on the edge so that it will end by the blade resting in the groove on 2 sides of the corner. Space the cuts so that the length of steel between the cuts is about = to the sides between the groove and the corner of the bar and continue cutting until you reach the opposite end of the groove. Now rotate the bar until the same cuts can be made in the corner exactly opposite the first one, leaving an untouched edge between the 2 cut edges. Once your cuts are made on heat the piece and twist it till you are happy with the looks of the bar. As you twist the bar, the squares will seem to pop out a bit and different twist will create different results.
-
Yep welcome to IFI. What is this about reading the instructions BEFORE you start? Hmmm.... What an interesting concept! I'll have to give it a try next time (if I remember) ;)
-
Ah, I see, and I agree. I would love to be able to travel to other sates for the meetings but being centrally located makes that a 2 day trip to anywhere.
-
A galvanized shed should be just fine, as long as you are not heating the walls up enough to get them smoking. You also do not want to be grinding / sanding on the walls as that will cause the metals to become airborne as well.
-
JAFO does the side of the ammo can say ICE on it? or anything about breaking the glass? ... I think I should put together an emergency forging kit! could even carry a gal of coal in the quench bucket!
-
I find it helps to just have your hammer with you... usually has to be in close proximity but even if you can't hit anything with it at the time you all ways know you could if the need arose. ;)
-
Saltfork Craftsmen is the Oklahoma guild and is an excellent group of smiths. check out the newsletter and it will list all the meeting dates with the next one being on the 8th of November and in your area of the state.
-
Thanks for the comments, the kids are great fun! Thomas, I do have some on order, the older ones already wear them (most of the time) and the younger ones will be soon. Good note on the hammer to the forehead though! I will be watching out!
-
I believe you will find that militaries had them traveling with them. I have no documentation on that but I have heard it was so, perhaps the lil bird was misinformed but it may be a good place to start researching.
-
You do have a burner flare at the end don't you? it is required for the burner to work. also make sure there is no outside wind blowing around it when you try it or it will keep it from burning right. }===<~ should do it This flare will create a low presser area just outside of the burner tube and keep the flame at the far end. a pipe 8-12 inches long should be about right and a flare with about a 15* angle about 2 inches long should be about right. The gas nozzle should be placed where it will cause the most air to be sucked into the pipe as it blows down the tube. If it is burning inside the tube then the tube is either too long, too big around (+1'') the gas nozzle is in the wrong position or your flare on the end of the nozzle isn't right. You should even be able to get it to burn right with out the bell end but you would have to hold the nozzle with pliers and that would defeat the purpose.
-
LOL around here they would likely be too drunk to hit the center but that would sure not stop them from trying!
-
Think I'm already replacing my blood stream with coal dust, soon there will too much blood in my coal stream. I do have a problem though... too much work to do getting in the way of my addiction!
-
Now hold on a bit, I think if you look around you will find several girls on here. No reason in the world you have to/need to be a guy to be a blacksmith. I recently had the opportunity to watch a 2 day demo given by Allison Finn of Freedom Metals. She did an EXCELLENT job and was an excellent teacher! You are most welcome to this site please jump right on in. Remember blacksmithing is as much about creativity and imagination as it is anything else. If you don't think you can hit as hard as some men, get a power hammer (they likely use one themselves) ;)
-
Size your forge to only heat what you can forge in the time it takes the metal to cool enough to need to go back in the fire, unless you are setting up for a special type of forging. A 7'' square firepot for me is large enough, I used a much larger one this weekend and found I couldn't hardly stand near enough to it to place / retrieve my work piece, I had to go get some much longer tongs. A fire that is too large will cause you to use WAY more fuel and accomplish very little more unless you are heating a very large piece. The pot on my forge is about 3'' deep and is just great for keeping enough fire for small things and I can heap up 2-3'' more on top if I need a large fire. Charcoal works great for forging fuel and has been discussed to death hear and elsewhere, the main draw back for me is the sparks it puts off and the rate of fuel consumption. If you was to use a firepot even 1/4 the size of that tub you would need a truckload of fuel per day and It would likely require a leaf blower to get enough air to it. Once you got it burning it would put off enough sparks to light the neighborhoods houses and be hot enough you would need 6-8' tongs to place your work. Once placed your work must be retrieved before it begins to melt, if the fire pot is too large it becomes very hard to find your work epically if it falls below the top layer of coal which is usually where you actually want it. The lower in the fire the hotter it gets and the faster your steel will melt, at a certain point you have trouble getting your metal out between the hot enough stage and the too hot stage. I do understand the concept of wanting to use what you have on hand however, the side draft hood of my coal forge is a hot water tank with the bottom and the inside tube cut out and made into a hammer stand. Perhaps you could take the tub to a scrap iron place and sell/buy or exchange it for the right parts. Do you have a welder? If not try the wash tub forge which is shown on here and is very easy to build and configure for a large or small fire and should cost only a few $ for parts. Please don't think I am talking down to you or any thing like that, when I ask questions I like to get straight answers, and so I try to return the same.