

peacock
-
Posts
706 -
Joined
-
Last visited
Content Type
Profiles
Forums
Articles
Gallery
Downloads
Events
Everything posted by peacock
-
Hey Grant the first I knew about inverters was this little box I use to install under a car hood to change the alternater out put to AC so we could run a drill motor. We are pretty lucky to have access to all this info at the end of our fingers. I hope to own one of your induction heaters soon. I think it would be perfect at demos, no noise, no more burned up iron while answering a long question, much cheaper to operate. Phil
-
Grant thanks for the info. I really appreciate everyones help. I was still wondering about pointed tungsten on AC. What I found out is something like this AC out put from an inverter based machine is not really AC at all but 2 inverter generated DC circuits 1 with a positive polarity the other with a negative polarity turned on and off to mimick an AC out put. thus the need for a point, it is really DC. I hope I have understood and relayed all of this correctly. If I have messed this up I'm sorry and still may need help. This thread has strayed along way from the original post but I for one have learned alot thanks. Phil
-
original post said stick welder. Miller inverter welders listed as stick welder in 2009 cat. DC out put only. however Miller welders listed as Tig/ stick have both AC/DC. Grant I respect your knowledge but all my inverter welders have ac input dc out put. am I confused? please help me out. Phil
-
use a ball for ac current a point for dc. never seen a inverter with AC output. Phil
-
Looking for blacksmith for hire
peacock replied to sketch06's topic in Blacksmithing, General Discussion
I live in Hamilton Mo. about 55 miles north of you. Sounds pretty simple. PM me with your phone # if you want to talk about it Phil -
A good rule of thumb for stick out is one diameter of the electrode. You will need a point with a taper about 1 1/2 to 2 times the diameter of the electrode with the grinder marks running lenghtwise of the electrode. A number 5 cup would be a good place to start about 20 cf on the flow meter. I hope your torch has a valve on it, it is much easier than turning the bottle on and off. Tungsten life will be much longer if you use a copper scratch plate and pull off onto your work. You can do this but I would sure miss my foot control. Phil
-
I think you have the start of a real nice hammer. It's simple, has alot of room for die opening if you want to use tooling, and very few moveing parts. All are a big plus. I would like to suggest a few things to try. If you watch the video the crank arm and the light colored spot on the jack shaft pulley you can see the hammer is slowing down as the dies close. You might try adjusting the die opening to about 1.5 or 2 inches open at the bottom of the stroke to allow the ram to throw it,s self on to the work. Also I can't see real well but it may help to shorten the leaves on the spring so they are progresivly shorter. This will add some flexibility to help your hammer smooth out. When I look at the video the bottom run of the belt from motor to jackshat flops as the dies strike the worrk suggest the belt is slipping on the motor pulley. The mods above may help this also. Don't stop tinkering with it till you get the way you want it. Looks like your on your way to alot of fun. Phil
-
The reason the nut end came off, in my opinion, is when you forged the threaded end down the threads acted just like a crack or cold shut. As you thinned the metal the minor diameter of the thread met in the middle. This is a great lesson shared with others. It is IMPOSSIBLE to forge a crack or cold shut or lap out. It must be cut, filed or ground out as soon as you know you have a problem. It is also possible to be fixed by welding the crack, but you must be sure to get to the bottom of the crack. If you get to it before It starts to close you can fuller it out. I have had similar result with the head end. I wonder if it has somrthing do do with the way the bolt was headed, most likley cold upset. Maybe nakedanvil or Mark A. would have a better explanation. Phil
-
Frosty I just saw that there was a earth quake up there. Does that mean you got your 50# Little Giant going? I am glad to see you are on IFI now guess that means you are OK. Phil :)
-
I find it very helpful to take several pictures with my digital camera as I take things apart. Makes for a handy reference if you need it as it goes back to gather. Phil
-
Side draft or Super Sucker?
peacock replied to Steve McCarthy's topic in Chimneys, Hoods, and Stacks
I am on 36 hiway 45 miles east of St Joe Mo. -
Hammer pad between hammer and foundation
peacock replied to Ed Thomas's topic in Power Hammers, Treadle Hammers, Olivers
I use rubber belting under all the hammers I mount. I think the most important reason for cushion is most all or the old mechanicals are cast frame and the parting line ridge runs right down the middle of the frame. If you dont put something under the hammer the base cannot set flat then the hammer will rock and work the bolts loose. Phil -
Side draft or Super Sucker?
peacock replied to Steve McCarthy's topic in Chimneys, Hoods, and Stacks
I have never use a super sucker but have alot of experience with the side drafts. as long as the flue pipe is at least 10 or 12 inch in diameter they work great. Be sure the tunnel from the forge to the flue slopes a little to the outside so that rain doesn't run inside. I burn a couple of sheets of news print in the tunnel to start the draw. Phil -
before I went to alot of work I would forge a small piece down heat it quench it to see how hard or tough it is. I have several of these around the farm and depending who made them and what for some are fairly low carbon. Most are easy to drill or file. Others are very tough something like 4140 I hope you have a good piece. Phil
-
Interesting powerhammer
peacock replied to imagedude's topic in Power Hammers, Treadle Hammers, Olivers
Frosty Didn't mean to spoil your fun. I would be glad to retract but I don't know how to strike the image from your mind. Phil -
 rubber cushion & leather strap
 -
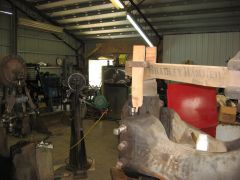 rubber cushion & leather strap
 -
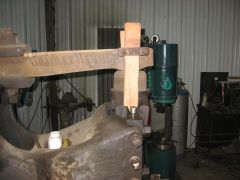 rubber cushion & leather strap
 -
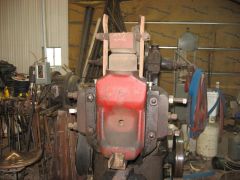
Interesting powerhammer
peacock replied to imagedude's topic in Power Hammers, Treadle Hammers, Olivers
Hi All . The problem you speak of was solved years ago by the Bradley company. The helve is attached to the ram(tup) with a leather strap and a rubber cushion. It allows for horiziontal movement with zero slack or noise. This makes the hammer smoother, quieter, and more relieable. Phil http://www.iforgeiron.com/gallery/showgallery.php/cat/500/ppuser/3634 -
I did not mention this earlier as Frank ask about utility hammers however this thread has been everywhere so when Glenn ask if ther are others to be added to the list I will add this. Say-Mak 50 & 60 kg are still for sale if you can run your 7.5 horse compressor you will not have any problem with either of these. I have had my 50 for 6 years with not one problem. Tom sold over 250 of these hammers and I have not heard of anyone who did not like them. Plug it in and go to work. If you would have a problem I will be glad to help you figure it out. Since Tom has passed I have had a few calls from people having questions all were handled over the phone. If you would like to run one of these hammers or any of the several mechanical hammer s i have here for comparison you are more than welcome to come and visit. For more info PM me or e-mail at Peacock@dishmail.net Phil
-
I know you said you had plenty of air, but I would make sure you have enough to run what ever hammer you buy. I have been ask to demo on a few utility hammers and they eat air. I would talk to owners of each kind you are looking at and see how much air they use. It was very frusting to have to stop and wait on the air to build up. I have friends who got hammers only to find out they don't have a heavy enough electical service to run the compressor they need.
-
25 lb LG lower drawing die wanted
peacock replied to westerwald's topic in Power Hammers, Treadle Hammers, Olivers
Frosty it's a nice compact design but from the pics I think it will interfer with the ram at the top of the stroke. If you look at the top of the ram it is relieved to clear the spring as the spring loads up at the top of the stroke. I would turn the crankplate to the top then put a block on the bottom die and pry the ram up and see if you have plenty of clearence between the ram and guard. Phil -
25 lb LG lower drawing die wanted
peacock replied to westerwald's topic in Power Hammers, Treadle Hammers, Olivers
HI GUYS I have been using LGs for close to 20 years. I have rebuilt about 20 some hammers and have seen hammers with serious failures. I have had 2 springs break while running hammers with no bad results. I totaly agree with Frosty and others that I would much rather be able to see the works and mantain it than hide it. I have used hammers with guards and some of the guardes scare me, If they are built close enough to not restrict access to the dies they create shear points. My best advise is if the hammer SOUNDS or ACTS different stop and find out why. Get your hammer in good shap and keep it up. I do think covering the spring with heavy leather is OK. I personally don't think it as likely to hurt you as the things we put between the dies, the dies themselves, tooling etc. I have been hurt by chips of metel from dies and tooling . I prefere to put the guards on myself. Safety glasses, good gloves, long sleeves, leather boots, and hard hats. One last thing do not try to save money on cheap dies and springs. The price of good quality componets wiil not even get you in the door of the ER. Phil -
LG 50# spring
peacock replied to territorialmillworks's topic in Power Hammers, Treadle Hammers, Olivers
50# old style od 3 in. id 1.75 in. length 5.5 in. wire dia. .625 no. of coils 6.75 new style od 3 in. id 1.75 in. length 6.375 wire dia. .625 no. of coils 7.25 I hope this helps Phil -
new belt for 100# little giant
peacock replied to Fe-Wood's topic in Power Hammers, Treadle Hammers, Olivers
I use flat belt that I get at a hay baler dealer. 4 inch is the narrowest I can get but it is easy to cut down. They will lace it for you where I get it but I dont like metal lace I prefer to lace it with leather. If you have trouble finding this let me know and I could make you one up. I have two to do for myself anyway. Phil