

viking-sword
-
Posts
129 -
Joined
-
Last visited
Content Type
Profiles
Forums
Articles
Gallery
Downloads
Events
Everything posted by viking-sword
-
Repairing metal files / rasps
viking-sword replied to alvispace's topic in Tools, general discussion
I use alot of the cheap chinese files and rasps as hard as I am on them, and I can take them when they are completly out of biting capabilities and put them in a large plastic pitcher and fill it up with a gallon of white vinegar from the local market, leave them for four days and pull them and wash them with hot soapy water and baking soda to neutralize the acidity from the vinegar, and they have much more life in them. Your files are probably not near as bad as mine when I do this but you do need to clean them good before doing this otherwise the vinegar will not be able to do it's job. I would also put some form of cover atop the pitcher to cut down on odor and to keep the evaporating vinegar from settling on other metal objects in the work area and starting corrosion. Wes -
5160 is a great steel for using knives that your not trying to get a hamon on, but it does not lend itself to water quenching at all, I'm not saying it's not possible, but it was not made to be water quenched, and the results of quality will be unpredictable. I used to use it regularly and never had one fail using an oil quench with the quechant heated to around 125 degrees.It always gets glass hard and needs to be tempered quickly. Tempering temps will determine final working hardness and three tempering cycle will sufice once the proper hardness is found( you should test the edge with a sharp file to determine this) but don't think the testing right out of the oven will give you an acurate reading as you need to remove the decarb layer to get the true hardness by lightly skimming off this decarb layer with the grinder. I know how you feel about your daughter, my mom booked on me when I was three, and 35 years later we finally met, ironed a few things out , and are doing alot of catching up anyway we can. I'm on Kodiak Island, so I know about remoteness. Wes
-
I have a collection of Lamp brand carving tools, about 30 of them in all ranges of radii,flats,skewers, and a few miniatures made for carving stick faces. All "very" sharp as I do alot of scraping on my carvings as well.It's been awhile since I've posted pics of this knife, but it too shows some of my carving and inlays. Wes
-
Actually, wood is made up of fibers, made up of wood cells, and when they absorb the water and it is heated the heat causes steam, which swells the cells and at the same time drying the water out so the cells stay bloated. Now, when you soak the handle in sealer and then finish, and this finish dries in each cell it locks everything up. If the handle is not properly finished, the environmental conditions will over time shrink and swell over and over again eventually pushing the wire out. The wood should be pretty dry when you inlay, and when you make a slot for the wire, you are actually parting the wood rather than removing any, so you are actually wedging wire in and the wood will try to go back to size when wetted and if your wire has roughness to it the wood locks it up. I've actually destroyed handles trying to remove a piece already swelled in. I have seen some guys use thinned down wood glue to get the wire to stay, but I've never found it neccessary myself.Wes
-
I believe your thinking about inlaying into metal, when you inlay this wire( which is actually a flat ribbon) into wood, a straight down groove is impressed into the wood following the pencil line drawing of your design, and the wire, which has been abraided on the flats with either a file or sand paper, is set into the groove edgewise and tapped down. The wood is then swelled with a drop of water and dried with heat( I use a small hobby heat gun), and the wood swells up tight locking the wire in place, which is then filed flush with the surface of the wood. there are a few more detail steps in getting it to look right, but this is just the basic desciption of the process. Wes
-
Thanks everyone! This knife gets packaged up and shippedut tommorow to it's new owner. Wes
-
This is my latest completion after having been in a hospital bed for 32 days, and 3 months following in recovery. I fortunately have a very patient customer that was very understanding. Damascus is 1084 and 52100, guard is n/s, and the handle is fancy walnut ith carving and silver wire inlay. Didn't turn out as well as I'd hoped, especially the wire inlaying as I was a bit rusty after the layup.Wes
-
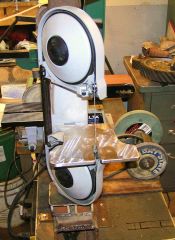
Looks like a Peter Wright. I have and use both of mine and yours has all the exact same characteristics. The face will need some work looks like.
-
strange surface pattern after heat treating
viking-sword replied to overmodulated's topic in Heat Treating Knives, Blades etc
Also too add to all this info, O1 specifically needs to soak at critical temp for 30 min to get all the steel into solution for a complete hardening. Wes -
Stainless steel forge welding,
viking-sword replied to Tom Lumpkins's topic in Blacksmithing, General Discussion
Though I've never tried it myself, I have seen it done and know there a good many bladesmiths that do. Your temps must be very precise and in the upper ranges of the forgewelding temp, and you must remember that due to the chrome content in the steel, it air hardens below a certain temp, so all forgewelding, and all subsequent forging must be at much higher temps. Most makers of stainless damascus have programable heattreating ovens for the items they produce. Wes -
Another idea, for items that will fit in your oven, is a bake on black finish sold by Brownells. Lots of knifemakers use it. Wes
-
How to Heat treat 52100?
viking-sword replied to Charlotte's topic in Heat Treating, general discussion
I make most of my knifes with blades less than five inches out of 52100. I've found it critical in getting the heat treating precise in order to get the most out of it( I suspect folks expect more out it due to all the hype it's gotten). If it's normalized and hardened well, I've found that you must temper at at least 430 t0 450 before the edge will no longer chip out, but that needs to be tested on each blade to make sure that the knife doesn't come back to you for edge repairs. Wes -
I myself wondered the same thing though I don't usually forge weld it with any really dissimlar steels. One thing that I have not seen ever( though I'm sure it's been done) is the making of a knife strictly from 15n20 It would be interesting to see how it test out. The only obstical I forsee is getting a thick enough bar of the stuff to start with as most of the time it's sold in the thin stock for the sole purpose of making damascus. Wes
-
Frosty you need to have a hammerin with the entry fee being a signup to the sight! I have a once a year open house to the general public, but on an Island this far out nobodys gonna spend that kind of money to get here. I usually have a pretty good turn out of locals if the weather gets good, and a whole lota folks learn that a blacksmith and knifemakers in town. Most have only seen forges, anvils, and powerhammers in a museum, it's quite entertaining.Wes
-
I have always favored silicon carbide/wet/dry paper for my hand sanding. It holds up much better than A/O does and I use a lubricant while sanding, such as water, or odorless lamp kerosine oil. This floats away the particles and does not allow the paper to load up near as fast. This type of paper can be found at the automotive stores and most any of the knifemaking cataloges. Wes
-
Cross your fingers for me.
viking-sword replied to Frosty's topic in Power Hammers, Treadle Hammers, Olivers
Proud papa of a new powerhammer! Congrats Frosty! now do yourself a favor and take a piece of cardboard or plywood and get a good tracing of the footprint of the machine including bolt holes, for when you go to prep your new base. Of course you know all this, I'm just so excited for you it takes me back to when I got each of mine, it gets my mind rolling on all the steps for preparing it to stand, and I start thinking out loud. SLOW IT DOWN WES! Guess you'll go to sleep with a smile on yer face tonight:D -
Cross your fingers for me.
viking-sword replied to Frosty's topic in Power Hammers, Treadle Hammers, Olivers
The name of the book is "The Little Giant Powerhammer"--rebuilding, history, and use, by Richard R. Kern. Most any book store should be able to order it for you, we even have one on the shelf in our local library. Figure that one out! I don't honestly think half a handfull of people on this Island have ever heard of one much less seen one, but as usual life is always surprising me. Wes If your not able to locate one let me know and I'll send mine to you, and I believe Centaur Forge carries it as well. -
Cross your fingers for me.
viking-sword replied to Frosty's topic in Power Hammers, Treadle Hammers, Olivers
I can strongly recommend purchasing that book thats out there on the Little Giant Powerhammer. It has just about everything you will ever need to know about the hammer, including repair and rebuild. Sid is a major component in the book and you can even give him the serial # on the side of the hammer body and he will have a record of when it was made and who it was shipped to when It was new. If you ever pour a foundation the only thing I could mention is to pour the corners curved if possible rather than square to avoid the cracks that will tend to appear as they did in mine. Wes -
Cross your fingers for me.
viking-sword replied to Frosty's topic in Power Hammers, Treadle Hammers, Olivers
Sorry Frosty, thought it might be Virgil Eglund you were dealing with. Wes -
Cross your fingers for me.
viking-sword replied to Frosty's topic in Power Hammers, Treadle Hammers, Olivers
Congrats Frosty,I know what a special treat ANY powerhammer up here is and believe me it is not cheap bringing them up to Alaska. I moved up here 8 years ago, no less to an Island off the coast of Alaska, and I shipped up my two #50 LG's. Wish I could get over to help you out as I've moved mine more than once. Digging out the 3ft deep foundations for them both on this rock was no fun, I know others will tell you It's not neccessary, but Ive found it extremly nice not having to worry about a hard working hammer walking around on you while forging. Rebuilding can be fun, but is time consuming. I only know one Virgil over there and if it's him I can imagine the hammer was taken good care of. Can't wait to see pic's. By the way, sorry to hear about your mom. Wes -
Though I now live in Alaska, I grew up in northern Illinois, and when my folks had their house built they had to knock down countless dozens of black locust tree's for development, and my point in mentioning this is to seek out areas of land development for houses or what not and try to find your sources there. When you find them they should be in abundance and cheap. Well I now take that back as with the raising cost of fuels it may be more of a race with the firewood mongers these days. Just a thought. Wes
-
In point of fact she was, and I was standind right next to her when he did. She was a ranch hand of his, of sorts, any time anyone went to visit ED more often than not we ended up bailing hay or herding cows. I never minded at all as that's what I grew up doing. The reason I never adopted the super glue technique is that the stuff always bothered the hell out of my eyes, no matter how far away from it I was. It still needs clean up afterwards anyway, and Ed, nor Audra for that matter, usually did not solder on a completly finished guard, theirs were most always just rough blocks of brass that were shaped, sanded and polished, after it was soldered to the tang. Not saying thats backwards, just not the way alot of makers are doing it nowadays. WES
-
I have developed a way of cleaning up my blades and guards that works quite well, with very little disturbance to the finish of either the blade or guard. I've always been a little sloppy with my solder jobs but I use the cappillary draw method of soldering and when the solder starts, or even before it starts to show up at the face of the guard, I take a large very clean needle with only a soft point and dip it in the flux a little and start running that point along the guard/blade seam right after putting the heat to it and I can get the solder flowing after the needle point and I follow the point all the way around the seam working out any bubbles and flux inclusions, and once it's a solid solder line stop immedietly and let cool on its own. Once it's set up good but still hot, I'm impatient, cause I just gotta know if it's a good job or not, I take a tounge deppresor( I get them by the box from the local dentist)thats been sanded square and beveled to an edge on one end, and a small bit of fine bronze wool and I push the bronze wool into the seam with the edged stick and I can remove all but the finest hairline on solder at the seam leaving a nice appearance. Any runoff of solder can also be removed with this same method, and it will disturb even a high polish very little so that it's pretty easy to reestablish. Now on damascus this will work well too if the etch is not really really deep, and since I don't blue my damascus I cannot say what it will do but I know proffesional gun refinishers will use bronze wool to remove light corrosion on barrels and action without removing much of the bluing. hope this helps! Wes
-
-
