
Black Frog
-
Posts
1,623 -
Joined
-
Last visited
Content Type
Profiles
Forums
Articles
Gallery
Downloads
Events
Posts posted by Black Frog
-
-
This is the anvil I'll be using this on, I could make a wedge-shaped washer piece so that a large lock-down hand knob will tighten flat on the underside.

-
I thought about that sqaure orientation relative to the hardy as well. That will have to be implemented (and remembered!) when the square holes are drifted on the anvil.
As far as a handle, I didn't want anything sticking up above the surface of the plate.
Having a flat bolster plate gives more flexibility (to me) for holding/placing odd shaped objects for drifting, also positional stance at the anvil depending on the shape of the item to be drifted.
I'll be using a countersunk bolt for the middle center pin that will provide for a flat surface.
Maybe add three or four 1" "finger holes" in the middle area for easier lifting and removal of the plate?
A lot of the plate will be hanging off the end of the anvil, so removal shouldn't be too tough.
If a position lock down is needed, a quick/dirty method would be to clamp in place on the heel with:

-
Had another thought just after posting this: For these small holes you likely will not need all the support of the thick plate. You could back drill a larger diameter hold and leave however much base metal to fit your needs,,then just drift the top part of the hole to size.
Fantastic idea (as I slap my forehead)!
Thanks!
-
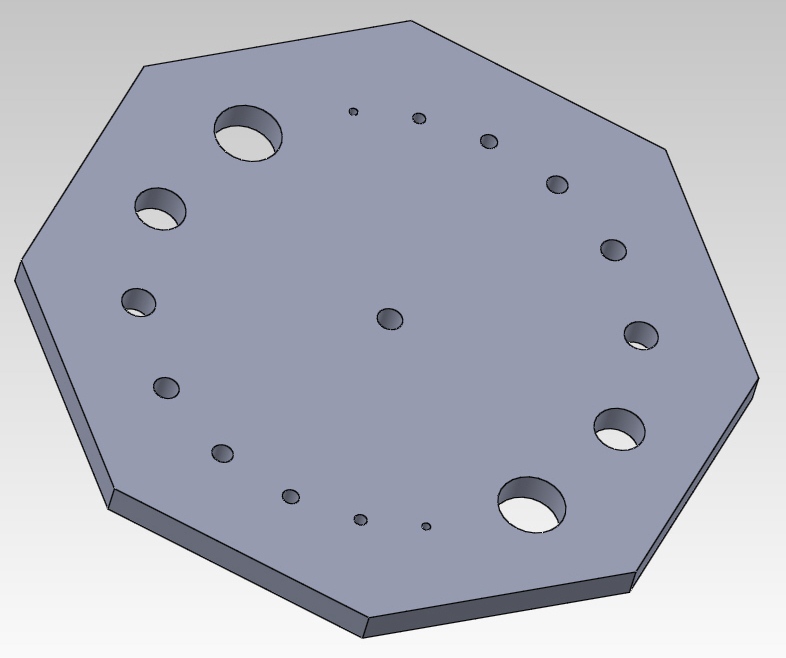
Center of my pritchel to center of hardy is 3-11/16", so that makes for a fairly large rotating bolster plate.
I have a 10"x10" sqaure 1/2" steel plate I could use for this. I would cut the corners to make an octogon.
I thought this might be a chance to incorporate round and square holes all on the same plate.
One half of the plate's holes would be drilled slightly undersized, and then drifted square to shape/size.
What I wanted to do is leave enought "meat" between the holes so that when drifting the squares it doesn't effect the hole next to it.
I slightly increased the meat between the holes as the hole diameters increase. The largest hole is 1", and there is roughly 1" of material all around that hole.
I went in 1/16" increments for the diameters of smaller holes, and then bigger increments as the diameters get larger. I figured the smaller holes might be used for finer work and proper support would be more useful than some of the bigger diameters I left off (like 5/8", 7/8").
Does this look like a good idea before I go any further? Recommend any changes?
-
I'm laying out a "dial-a-hole" bolster plate (thanks Brian Brazeal) for my anvil.
I'd like to have one of these for sqare holes as well. I'm planning on drilling the holes for the squares, and then drifting them to final shape/size.
My material is 1/2" thick, how small of a square hole can I drift through that? Can I drift a 1/8" square through there?
I plan on drilling a hole slightly undersized to 1/8" diameter so that I might get a nice square shape when drifting, but wondering if I would be able to do it?
I've never tried drifting a square hole that small through that thick of material- thought I'd better ask first!
-
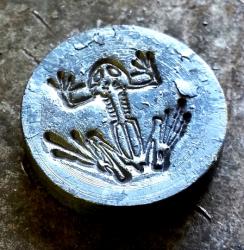
With the C/triangle, looks to me like a Columbian.
Does that look like a weld line at the waist to you?
I haven't seen it in person, this is just a CL photo.
Columbians were cast steel- no reason for there to be a weld line there unless it was once broken off at the waist?

-
Is the M 'sticking out' from the surface? That means it is a cast anvil- didn't some Columbians have a M on the side?
-
Forged leaves are interesting for people to touch/feel and look at up close.
-
For some 5160 stock of 3/8" diameter, call a few of your local garage door installers/businesses. Just this week I called a few to ask about finding some old or broken springs. No luck with one, but when I told the second business what I wanted the springs for, he was intrigued. He said I could stop by and we could take a look through their recycling dumpster.
I took along a forged bottle opener in my pocket, and when I met the owner I explained this is some of the work I do. I showed him the opener and he thought that was really neat- I told him to keep it and that it was for him. I got all the scrap I want now of that thinner dia spring steel. ;) he said to call him in a month or two and he may have some bigger dia scrap for me.
A little forged item goes a long way.... -
My 25# LG is the transitional style- not many of them made.
Made in 1939 and sold to Henry Guelig in New Holstein, Wisconsin according to Sid.
I bought in near Green Bay, WI last summer so this old girl may have never left the Cheesehead state.
When I got it, it had never been converted over to electric motor use and it doesn't look like it had much use in its life.
I was thrilled to find it! And for once, be the first guy there to jump on a deal like this.
I haven't used it yet, I'm debating rebuilding it this summer with new bearings and such... Could be a fun project.
-
Jonn- love the last pic, care to elaborate on the method?
Or I could guess at it? Bundle up 8 small dia rods, forge weld one end of the bundle. Then twist pairs of rods, then forge weld the far end.
Then twist the entire bundle (2nd example), then slightly untwist (3rd example)? Am I close?

-
I haven't inspected in person, but found an Armitage without readable numbers for weight.
Dimensions are 31" long, 5"wide, 13" high.
I know Armitage's seem to have heavier waists, any guesses for weight? -
Nice thought, and I've seen clocks like that too. That would cut down on the work needed.
Maybe make the four position numbers even larger, thicker, and heavier.... hmmmm.
I'll have to draw out a few more sketches with that option as well..... Thanks! -
For the serif, you could form a tenon on the numeral and peen it in place.
Interesting idea- that way you could also gang numerals together with a one piece serif that spans all numerals within the bunch.....
-
Oooh, I like spacer idea- thanks!
-
SERIF!
Learned something new today.... ;)
-
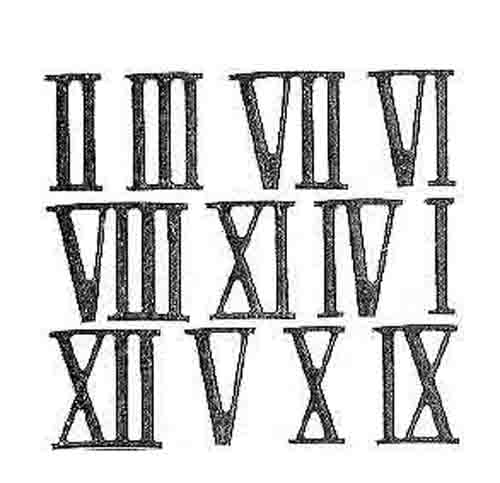
I thinking of making a large wall clock with many forged elements (numbers/hands/face), still tinkering with drawings and designs but I did like the idea of having forged roman numerals around the clock face.
Not sure of the thickness of the numerals yet (1/4"-5/8"?), but ballpark hieght guess for numerals on a 32"-36" clock face would be 5"-ish?
The thicker numerals laying on a dark metal clock face would provide more of a contrast for light/shadows so that hasn't been decided yet, open clock face with lighter background, or solid clock face left textured/rusty appearance.
I don't want just standard "X" or "I", but rather the more detailed numerals that have the bottom/top base and cap to the numeral.
For an example here's a picture I found with a rough layout idea of what I'm considering, but the forging design for the minute and hour hand is another discussion...
And another thing- seems that the #4 on clock faces is open to debate using roman numerals, sometimes IIII and sometimes IV.
I'd like to have the numbers made individually instead of them ganged in one piece.
Never considered how many elements you have to make for this! 17 I's, 5 V's, and 4 X's for standard numeral markings.
Anyone ever forge roman numerals like this? I'd love to see some pics.
Many of the nicer looking (to me) roman numerals have the V and X with different thicknesses of their legs.

-
I like the ideas of the rotating table! I'll have to see what I can scrounge up for other tidbits for making the rest.....
-
Well I laid it on the floor with some 4x4's across the top and had myself and a bigger guy stand on it while it easily spun, so that's good for at least 450# or so.....
I do have a 900# machine not installed at the moment, I suppose I could put that on there too for the heck of it just to see. ;)
But I wouldn't doubt that it may be perfectly fine, you should see some of the stuff they pitch in the dumpster. -
Came across this nice slewing bearing ring in the dumpster- it is in beautiful shape and nothing wrong with it.
Turns smoothly, grease looks perfect in there. I looked up the manufacturer, and this model is rated to 1700 lbs of axial force.
Not sure of the radial force rating yet. There is also a center plate that was botled to it.
I know this could be a very useful item for something. But what is the best application for it in the blacksmith shop?
Maybe a rotating rack for hammers/tongs/tooling was what popped in my mind first.
I have very limited space in my area, so that might be nice to get access to a lot of tooling in a little space.
But I'm thinking there may be some sort of scrolling or bending tool to make from this too....
What would you use it for?


-
I love my Ohio made anvils---Trenton and Arm and Hammer and my Ohio made Post vises---Columbians Just wish I had a Columbian anvil to round out the OH collection.
I know a guy with a very nice 200# Columbian for sale, not cheap though.... -
Should be a drummer, fairly easy to switch hammering hands after years of drumming. ;-)
No love for A&H?!? -
SR, what a nice Trenton you have there!
What's the weight on that one? -
Yes, pell lake.


Suspicious Columbian?
in Anvils, Swage Blocks, and Mandrels
Posted
5x20 face, 32" long. Owner is guessing 300#.