
Black Frog
-
Posts
1,623 -
Joined
-
Last visited
Content Type
Profiles
Forums
Articles
Gallery
Downloads
Events
Posts posted by Black Frog
-
-
I guess I should also check with the little lady that is getting this planter stand to see what she wants!
....novel idea, eh?
Thanks for the input! I'll report back with
her,my, our final decision.... ;) -
I tacked the legs in place, the camera makes the legs look a bit unequal but they are right on. :)
The bottom of the foot is located vertically in line with the upper hoop, so the feet are also in a matching 16" diameter circle same as the top.
I'll be putting some circular pads on the bottom of the feet to finish them off.
I was thinking of making some scrolls that go from leg to leg around the circumference of the table, but now I'm thinking that is overdoing it a bit.
Instead I'm thinking of putting some gentle arches going from leg to leg as sketched in the 2nd pic.
Or putting some arches that run from opposing legs, like two intersecting rainbows under the table to stiffen the legs up a bit in case someone puts a real heavy pot on here.
Any thoughts?


-
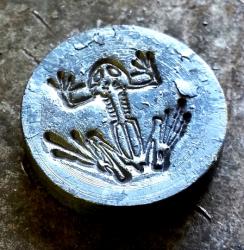
Yup, after searching a few more pics, I believe you have a Trenton there.
You can make out the bottom half of the Trenton diamond logo, and Trenton did indeed put a USA stamp under the circular Solid Wrought.
If you look on the front of the foot under the horn, you will most likely find the weight stamping on the left and the serial number on the right.
Once you have that info- we could get the approximate year it was made.
Here's one with a clearer stamping of the same:

-
Some better pictures would help, your second pic is very blurry.
And the first pic has too much contrast from a flashlight I'm guessing?
More equal lighting or a daylight picture would be better, and of course non-blurry helps too.
I know Peter Wright had the circular "Solid Wrought" stamping, but from what I can make out in the picture, does it say "USA" under that?
Or is that the bottom portion of the Trenton diamond above the Solid Wrought?
-
Looks like a fantastic piece, on my list of things to make for sure!
Saved your pic for something to emulate.... -
Well I saved my nice sharp 4140 blocks for now, and welded a hardy post on my 3x3x5 block of unknown steel. A hefty hardy tool for sure.... I've used it several times now and haven't noticed any rounding of the edges yet.
-
Thanks!
And that was the point for me in this, to learn lots even though there may be faster and more efficient methods, like a jig.
Haven't decided on joining the legs yet, I'm sorta making this up as I go along...
I've had people offer to buy it from me already (which surprised me), so if I make another one or two a jig for the scrolls is definitely happening. -
I saw a planter table at a garden center that I liked the general design of. It was cheaply made, but I liked the overall idea so I thought that would be a great learning project for me to do. Plus, my girlfriend would love this for her numerous flower pots everywhere.... I went with 3/8" rod for this project.
I'm not using any jig for the scrolls, doing them all freehand. Of course this is taking me a LOT longer than if done by a jig, but is proving to be a good experience for me to do it the hard way. I started with the S-scrolls that go into the legs. Getting them all about the same was very finicky. I learned real fast how a little tap here and there can make a big difference in how a scroll looks.
I put two different radii on the legs, and then the table hoop is about 16" in diameter. I intentially left some space around the small end of the scroll when mounted in the legs- I wanted to give the legs some "air" to them rather than being too heavy looking. I thought the space around the end of the scroll would maybe do that. We'll see when I get it all together.
I didn't care for the original design of the garden center's table top. So I did something completely different from scratch. I sketched up several ideas and finally decided up on a tangential scrollwork arrangement from an inner circle to the outer diameter. 12 scrolls around the circle. I had no idea how time consuming this design was going to be....
First thing I did was taper my 12 rods for a guesstimate amount of taper. Then I roughly formed 12 scrolls to see if I liked the idea. It was at that point I realized I did not like my taper amount- it was too long of a taper for the scroll shape. So I undid the scrolls and started over from the other end with a shorter taper amount which I liked much better. Ugh, what a pain. That's why you'll see tapered ends on the straight ends of the scrolls.
The next ordeal was getting all 12 scrolls to look the same (hopefully), and to equally fit and fill the circumference of my table top hoop. Then I had the bright idea to put a gentle reverse arc on each scroll to sort of give a gentle flow into the center circle. Of course this change how everything fit in the main hoop. Ugh, what a pain. I spent many, many hours fiddling with these 12 scrolls.
Hopefully this week I can get the legs installed, and then start working on the scrolls that will be on the bottom of the hoop filling in the spaces between the legs around the circumference.
I vastly underestimated how much time would be involved in doing all of this freehand, but it has been fun and challenging at the same time.


-
I'm thinking about doing the same this summer.
I snagged a good deal last summer on a 25# LG that had never had an electric motor on it.
I just haven't had time (or much space) to get it up and running with a motor.
This was the thread when I picked it up: '?do=embed' frameborder='0' data-embedContent>>
I was going to photo-document tearing it all down and repouring the bearings.
They are not horribly bad as is, but think it would be a good idea to start fresh with my ownership with a thorough going through.
Please post pics as you go!
-
I think you'd better send that anvil to my garage for further and more detailed inpsection... ;)
Nice piece! Doesn't look like it's ever been used much, if at all.
-
I live just south of Milw, and love to look at this exhibit. Not only the exhibit itself, but you can find lots of fantastic ironwork around the East side, much of which is Colnik's work...
-
Take a class with him, first thing you'll do is make one of your own before noon..... :)
-
Thanks!
I think he'll be quite surprised- He lives about 6hrs away and I sent it so that he should be getting it delivered tomorrow.
Of course I had to put a little somethin' on the back before it was boxed up... ;)

-
Jim, this is fantastic! I could find scraps to fabricate something similar, this definitely has my interest. Now I have lots of ququestions about it-
Now that you've had this for years, do wish you had done some things differently in its design?
What diameter are the horizontal bending bars?
What height did you make it?
Could you take some more closeup pics?
Very cool. :) -
I love that video of the making of the files!
-
Wow. ... Thanks for the post.
-
I really like the lines of the glass table!
May I ask the diameter of the top and middle hoops and height of the table?
What stock size did you start with for the legs?
-
I had been contacting the seller about this anvil.... It's been for sale for a year now, unless it just recently sold.
The seller "didn't think it was broken off" and did not have any further close up pictures.
I wasn't willing to drive that far without better information, at least not for the asking price.
-
Not knowing what to do for Father's Day for my dad who is now 83, still in great shape and still looks forward to hunting every fall, I made this. What great times we have had hunting together over the years.... I saw this design as a car window sticker, and instead of doing it all as a silhouette I wanted to make it a bit more three dimensional.
I made the frame from and old wrought iron wagon wheel that I recovered from my dad's old hunting area. :) I think he'll get a kick out of that.


-
Looking through AIA tonight when I got back, it mentions Fishers added the bolt holes to the castings in 1877. It also says the weight number was cast on top of the foot after about 1880. Looking back at my hi-resolution pics on my computer, like the one I added a few posts ago, I cannot see evidence of any weight numbers on that foot.
-
at least your hands will be clean....Ahem.... I already have this...
Dale -
Those edges are well within tolerance to use. Why do folks get so hung up about having sharp edges nowadays?
I agree the PW is still entirely useable. For some forging details a sharp edge is required, my current anvil with great rebound doesn't have the greatest edges, and I made a hardy block with sharp edges for that requirement. Problem solved. -
It seems the harder I search, the luckier I get... ;)
-
Here's another pic of the Fisher, and of the two blowers I found, and the 288# Peter Wright he has there too.
I had to use good ol' spit to get enough moisture for cleaning to make out the make and weight numbers. Edges are pretty beat up on the PW, but for the right price I might snag it....


My first table project, planter table with all free-hand scrolls.
in Member Projects
Posted
FIB?!? Why you must mean "Friendly Illinois Brethren". ;)
So I spent a few hours last night trying out my arch idea between the legs. And to make it look like the arches belong there, they have to be 3-dimensional arches in that they have the arch size to fill between the legs but also needed to follow the outward radius of the leg form. After a lot of messing around to get two of them the same and to fit nicely in the legs- I realized I didn't like it.
So now onto the next idea...