
EricS
-
Posts
142 -
Joined
-
Last visited
Content Type
Profiles
Forums
Articles
Gallery
Downloads
Events
Everything posted by EricS
-
told my 16 year old son that is not really into blacksmithing I wanted him to strike for me as a Fathers Day gift so he agreed with a sigh. Started wit an 1 1/2" x 3 1/2 piece of 4140. It aint pretty but its one more piece to add to my hammer making kit. 1 1/2 radius Let me know what you think good or bad Thanks, Eric
-
Moving clinker breaker or stationry grate?
EricS replied to Everything Mac's topic in Solid Fuel Forges
Emac, I built a clinkerbreaker for my pot and its triangular it can be seen here http://www.iforgeiron.com/topic/26575-first-day-on-new-forge-build/ I think i get different results from the different position, point up i think I get a smaller more concentrated fire ball versus the flat side up the fire ball is spread out more. Think of the way the air would flow around the shape. I hope this helps. -
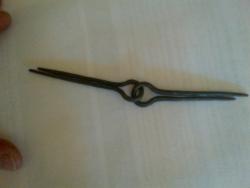
Just wonering if anyone has an idea of the maker? Says warrenteed on one side and ha cwt onthe other 0-3-17 which is 100# no othe ledgable letter on the warrenteed side definately wrought bodu Thanks for the help in advance, EricS
-
Alec, thangs for the video not only does it show the hammer blows most importantly let's us listen to Brian explain the reasoning behind each hammer blow and tool positioning. Thanks for the video, Eric
-
Need help getting rough ID from spark test.
EricS replied to DanielC's topic in Blacksmithing, General Discussion
Try this in a google search: spark test site:iforgeiron.com -
Hotcut hardy
EricS replied to brianbrazealblacksmith's topic in Hot Cuts, Anvil devils, metal cutting on the anvil.
Brian, first of all thanks for all the info you have posted here and on youtube. For the past year since I started blacksmithing I have relied on your posts and LDW's pictures to try new things a beginer would probably not even try. As for the hot cut it was one of the first tools I made. I used it with sucess but it wasn't untill you mentioned" cut to center" did I realize the true ability os this tool and how easy it makes other steps imn the forging process. I recently switched from a 176# anvil with a 1" hardy hole to a 100# anvil with a 7/8" hardy hole and the hot cut made the transition quite well. Now I just have to make mine with a finish as smooth as yours. Great tool. Eric -
Dave, thank you for the videos. Looks like you have a great shop. You pretty much cleared up any questions I had. Soon to be starting my super C build Eric
-
Tubbe the riegns from center of rivet to the end are 11" and 5" from center of rivet to tip of bits. @retty much the same size as the pair in Brians post. I picked up a 2" round x 4" great gripping. But I do see a glove being used when being used with a yellow hot hammer blank.
-
I've been focusing on making tools lately with a goal of making my own hammer. - decided to give the hammer tongs a go. Following Brian's tutorial on making hammer tongs. This is my first set of tongs. I've always been intimidated by tongs but the tutorial made it quite doable. I had a slight problem with making the tong halves exact and the hammer finish is not that great. I really like the lightnes and spring in the riegns. Here's a few pics.
-
forging guide for rams head wallhook
EricS replied to Daniel Lea (AKA 99pppo)'s topic in Blacksmithing, General Discussion
Daniel thanks for the video. I gave it a go. This is my first animal head. Thanks Eric -
I got mimne from an heating and air supply. 10"x10' spiral duct for $40.00 comes in 10' or 20' lengths
-
have you seen this maker before?
EricS replied to EricS's topic in Anvils, Swage Blocks, and Mandrels
Thomas being fairly new to smithing and not having the years of expierience in anvil ID that you do, I have seen a picture or two of ASO with the top plate looking similar to this anvil so I figured I'd ask. Due to my ignorance the c could have meant China. But now I'm one step cloer to being as smart as you.thanks -
have you seen this maker before?
EricS replied to EricS's topic in Anvils, Swage Blocks, and Mandrels
$175 ill have it in my truck in the am -
Going to check out this anvil never seen this mker before. Is it a ASO? The only thing I know is its 100# Thanks, Eric Here is the picture
-
Alright John you talked me into it! You can never have enough and I ejoyed making them plus its good practice and as bonus I end up with more tools. Win win
-
Thanks for the compliments. I've been working on the no hammer marks thing. I will heat treat as I need practice on heat treating and I probably will be using some of the punches on cold for lay out.
-
I ran across a post titled spring tools and figured I'd give it a go. I really enjoyed making these punches as they showed the progress I've made in the past few months. I still want to make a few more. So let me know what you think. Bob punch, Eye punch, Square punch, Round punch, Hot cut chisel, Small fuller, I still need to heat treat the business end
-
i got to get in about 3 hrs in at the forge today. being the rookie i am i decided to try some forge welding and practice being consistent and improving as i made the same object over and over. first i spent about an hour making the same drive hook. the first one took about 15 min and the last one about 8 min with considerable improvement in relative quality. next i took on some forge welding in the form of a fire poker. welded a loop on the working end cut it formed the points. next i welded 5- 1/4"rounds together at both ends(should have used 4) then welded attempted basket handle to poker. the poker need to be straightend and cleaned up. the info you guys have put on here about forge welding technique has made it pretty easy to weld if you follow the steps every time, thanks.
-
I am headed to buffalo next week (9th-14th) to visit some family and will have a down day or 2. I would like to visit a real blacksmith and maybe pick up a few bits of knowledge as I am still quite green. Let me know if you would'nt mind someone asking questions and watching you work. Thanks, Eric Smith
-
Striking Anvil
EricS replied to brianbrazealblacksmith's topic in Anvils, Swage Blocks, and Mandrels
Well I finally drifted my round hole square. About a week before brian started this post I gave him a call and he gave me a few pointers on the drift geometry. Well I finally got to it this am. After bein aprehensive I decided I had nothing to lose. So the anvil is 2"x6"x12" I drilled a 3/4" hole an drifted it with 1" mild steel drift. It took me three heats because it was not hot enough on the first try and the second was not hot enough either the third heat I finally figured out that if I piled the fire over the the piece it would get past orange and get to yellow. (Stupid rookie)this time the drift went through like butter. I still have to weld it to the stand. I also made a brazeal style hotcut it came out ok fo a first try the blade is not parallel to the edges of the hardie shaft but it seems to bee a little benificial while standing in front of the anvil.here are some pics and any comments will be appreciated good or bad. Thanks Eric -
Frosty, yes that is a snipe hinge. The are an old form of hinge used on chests and other lidded boxes. One side is driven through the lid and and bent over like a cotter pin and the same goes for the chest. Kinda like two eye hooks. Hope this helped.
-
spent some time in the forge this weekend. Forged an eye punch from 3/4 spring so i can make a handled eye punch. also used a little pice of a tire i got to make a set of snipe hinges. this is my first go at WI. WOW this stuff is like butter when its yellow hot. the dia. are a little off on the higes but im sure they will work. i need a lot more practice.
-
I really like the lines of your design.I'm going to be bookmarking these and adding them to my list of things to make. Great looking tongs.
-
I stopped by after work today and ended up getting 2 tires for a railroad spike bottle opener
-
I stopped by the scrapyard on my lunch hour and came out with a beat up bucket w/ no holes a slightly bent c clamp and a 12# cone shaped piece about 8" tall 3" at the base it has some thread type lines on it I will make quick worK of those with aflap sander all for $4.00