

Toreus
-
Posts
106 -
Joined
-
Last visited
Content Type
Profiles
Forums
Articles
Gallery
Downloads
Events
Everything posted by Toreus
-
 Love it! :P
 -
When the propane pressure drops on my setup, it's usually because it's frozen rather than empty. Although it does get worse when you have little propane left. Putting the LP tank in a water-filled container that goes about 1/2 to 2/3 of the way up the tank usually warms up the LP enough so that it starts evaporating again. Hope this helped! EDIT: As to how long a propane tank lasts, it really depends on the forge: big/small, insulated/not ... I run a blown forge and I managed to tune in to run at <1psi for a 1/16 fuel port.
-
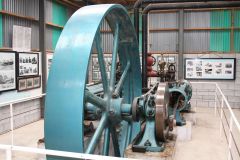 Stirling engine, right? the Tokomaru steam Engine Museum in New Zealand. http://www.tokomarusteam.com/
 -
Thanks for the comments, guys. Phil, thanks for looking at your links evfreak, I'm not sure I really understand your hybrid method- it sounds like a hybrid of twisting stock and upsetting the bit, and that it's aimed at getting a good boss... Am I wayy out in the left field? I think I'm leaving enough material but I was using a small round piece of Stainless rod to get do the indentations. Using a *narrow* fuller to get "notches" sounds like it would work a lot better than trying to get half-round impressions right off the bat. I haven't tried making gooseneck tongs since that's what I have right now, but from what I can see, you just make the shoulder about 4 inches further back than you would otherwise, correct? For the V- bit, do you just flatten it out then bend it lengthwise on a smoothly radiused right angle? Thanks again for the help everyone!
-
Hello everyone, Quick question: Is there a repository (book or website) that explains in detail how to make tong bits of different shape? I've been trying to get wolfjaw/universal tongs and box tongs from some flat bit tong blanks I made, with no luck. For stuff other than flat tongs, the only method I've seen is Brian's Universal Tongs, which seem quite a ways beyond what I can do atm. Thanks for the help!
-

Hi from Saskatchewan, that's the middle of Canada Guy's
Toreus replied to Lee Waite's topic in Introduce Yourself
Hello Mr. Goatee, Lemme echo all of what Dennis said- both the question and the welcome! Lots of great, helpful people here! Cheers from a 'pegger -
Oooh, can we get a name? :lol:
-
Hello danhayes! You've definitely picked the right forum! Lots of great info already there, and the people are super helpful when you find a question that hasn't been covered. Welcome, and have fun!
-
Another thread, ciladog made a ribbon burner outa drilled firebrick:
-
For something similar attached to a steel plate, I drilled the holes in the plate at the far side of the bracket holes- the bolts needed a few taps with the hand, but it seemed snug enough. The vise leg was hanging in air (plate was on a metal post), so I drilled a hole in a 2x4 so the leg would fit snugly, haven't had a problem since. Alternately, I guess you could put a shim between the vise leg and the post- when my vise stand got loose I macguyver'd one and it worked fine- but that doesn't seem like an ideal solution. Hm.. now that you've got me reflecting, the more think about it, the more I realize that it's really situational- can't use on a wooden table with a weak edge, etc. The more you know... Thanks!
-
If you don't NEED to stick with the original bracket, wedges and attach plate, you can simply bend a piece of flat stock into a "U" shape to fit around the main post of the vise, and then twist the tips of the "U" 90 degrees and punch/drill holes to attach to a flat surface. The length of the piece of flat stock should be about 6 times the width of the main post of your vise.
-
Please see next post: file attachment got corrupted on this one somehow.
-
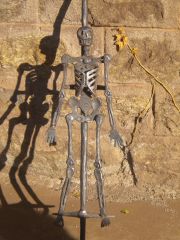
A few things I whipped up recently: 2 hooks and a chisel. For the hooks, I wirebrushed using an angle grinder and then applied some wax/linseed oil/turpentine paste after heating with a hairdryer. I didn't wirebrush between heats and I kinda like the "textured" result. I made the nail on the one hook too long, and I still need to practice my elftoe curls to get them smoother. Maybe a longer taper? For the chisel, I have a few railroad "clips"- basically 1in round turned into a pretzel. It's roughly 1030-1040 (I think) so I quenched the tip in water and then tempered it by putting the other end in the forge and watching the colours. The divots in the middle are where it was bent. It's a quick'n'dirty chisel, more to see if the steel would take an edge than anything else- I'll be making a nicer one , as well as a slot punch and maybe a slitter next time I fire up the forge. Suggestions/critiques? Cheers, Toreus
-
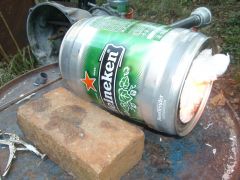
The things people try to get away with! Heck, if I was close enough to pick it up, I would definitely snag it, if only to have another beater.
-
Sparks?
-
I use a really similar mix (turpentine instead of varsol, and slightly different ratios). I end up applying it in the basement sink after heating the piece with a hairdrier. Not really a direct answer, but hope it helped!
-
If it's not bad manners, can I ask what you were getting for them?
-
Definitive Test for a Forge Weld?
Toreus replied to kraythe's topic in Blacksmithing, General Discussion
Hey Kraythe! I tried the exact same thing for my first weld! Did you put it back in the forge for a second heat? One way to tell if the weld is complete is that both pieces of metal are the same colour. If the two parts are different colours as they cool, they're not fused (or at least, not completely). This doesn't tell you as much about the quality of the weld as a destructive test, but it's definitely a good start. Does anyone know if this method can be used to figure out the *quality* of the weld, and not just if it's complete? Another way to tell would be to use an ultrasound tester, but those are a bit thin on the ground. If you do end up wanting to do destructive testing I'd suggest putting it in a vise and bending it back and forth until it breaks. The way stuff breaks tells you a lot about it! I broke my first weld apart and then cut it into 0.5in wide slices. That piece broke just behind the weld- the grains were gigantic. Then, cutting it up told me 2 things: 1) like you, I hadn't gotten the first little bit welded, so I would have needed to brush, reflux and do a second pass and 2) I needed to clean the metal better before welding! If you really want to get into the details, you can polish the cutoffs and then etch them in acid (like vinegar) to see lots more detail- the acid etches the grain boundaries much faster than it does the inside. Doing this and then looking under a microscope tells a lot about the grain structure. Hope this helped! -
I second what Phil said! I made a blown burner with 2in black pipe without flamestop/flameholder/firebreak/whatever-it's-called leading to the chamber, and the only time I need to worry about burnback is when the tank freezes up. (No idea why that would happen, but there it is.) I'll also pitch in my ¢2 on #9. I think I got this from the same thread you linked, but I'm not sure- got no personal experience with ribbon burners either. What "they" said is that with castable you can have a refractory lip on the inside of the plenum chamber that seals it up, whereas with a drilled-out brick, there's a much higher chance of leaks.. I've tried to think up a way to use brick safely, but I haven't found one I'd feel comfortable with yet. The best I could think of was to cut the plenum opening 1in smaller than the brick in all dimensions, and then have a 0.5in groove running around the brick. Then cut out a "tab" to one end of the plenum, slide the brick in and somehow stick that tab and the endcap back on there to close it off. I'd say go with castable if it's not ludicrously expensive near you: plenty of other uses for it.
-
 Wow! I've been daydreaming about making one of these. Kudos to you!
 -
That's how they line the interior of the huge rotary limstone kilns (to make quicklime). Because of the small diameter of these forges, I'm thinking you'll have to shave a lot off the bricks to make them wedge-shaped, or stick in a lot of castable/high-temp cement between the bricks. Hope I understood it right!
-
Update: Got the mask, used disposable gloves, did the repairs and slapped some high-temp cement on everything. Forge works like a charm! LINK! Cheers!
-
Update: Got the mask, used disposable gloves, did the repairs and slapped some high-temp cement on everything. Forge works like a charm! LINK! Thanks!