
LDW
-
Posts
873 -
Joined
-
Last visited
Content Type
Profiles
Forums
Articles
Gallery
Downloads
Events
Everything posted by LDW
-
I found this pic,
-
-
This is indeed called a friction folder if you do a search you will find a lot of different styles of them. This one was made from cable. The original "pocket knife". I have only made three or four of these. Thanks for the kind words.
-
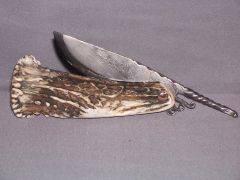
This is one I made after MS Terry Vandeventer did a demo. I think the hardest part of this is cutting the slot in the antler and getting it straight. This one has a brass pin and some little copper washers under the pin where it is peened.
-
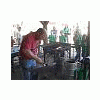
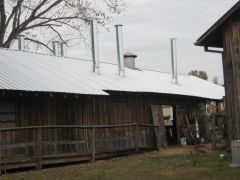 Had a workday and got the forges ready
 -
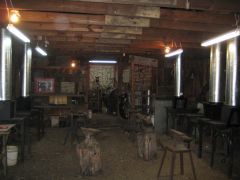 Had a workday and got the forges ready
 -
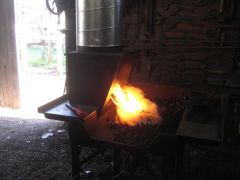 Had a workday and got the forges ready
 -
Here is a link to the poison control center give them a call. Find Local Poison Centers
-
We got a lot accomplished today. Installed 6 super suckers with 12" stacks. Here are some pics. Picasa Web Albums - Lyle - Work day at t...
-
This is who we used to buy silver from when I worked in the plating business. Silver anodes for electroplating - Technic Inc
-
In my experiences with cable it requires a much deeper etch than damascus because all the steel is the same. The pattern you end up with is due to the individual forge welds that take place between each of the many strands. I have heard this referred to as de-carb lines. I have used ferric chloride in many different dilutions with water, the strongest being 50/50, as well as using vinegar and ferric mixed 50/50 I have done it for hours taking it out every ten minutes or so to remove the oxidation, I was told the black looking oxidation hampers the etching process. I have found that muriatic acid is much quicker and if you heat it first to about 140 degrees F it gives you a totally different look, as well as makes it work even quicker. This is some nasty stuff though, due to getting it on your skin as well as breathing the fumes so I would not recommend it unless you are familiar with working around such harmful materials. I usually set a glass container inside another container that contains heated water. To me a deep etch on cable looks better than a shallow etch. I am sure what you were using would do just as well it just takes time. Make sure there is not any oil on it before you start etching. LDW
-
Avadon, those were all good questions and like Ian said it strictly depends on what you need them for. The video I attached worked well for me. The first pair I made after watching this video was made with 3/16" x 3/4" I clamped the ends together with vice grips and worked both pieces at the same time to the back side of where the rivet was going to be. This way both pieces would be the same. You need to get to be very efficient in making tongs since they are going to have to be made pretty often till you get enough for most of your requirements. I have been hammering on hot steel for about 9 years and the tongs I made from watching this video were the first ones I was actually proud of. YouTube - Forging Blacksmith Tongs
-
It looks great and has a clean line. You mentioned heat treat, what will you heat treat it in? I messed up and told a fellow I would make a machete for him that is 37" long. I guess I will heat treat it using a propane forge and a torch at the same time. The holes for the handle have been drilled and the next step I need to do is heat treat. This thing is massive and I am lost on getting the whole thing hot. LDW
-
Here is a post similar to yours. We just bought 6 of the super suckers to put on the forges in our shop at the Agriculture Museum for the MS Forge Council, and are about to install them. http://www.iforgeiron.com/forum/f7/coal-forge-hood-3229/
-
There will be a December meeting. It will be Dec. 13th this is our Christmas Party and would be a great one to come to. It will not be far from you. It is at a members house off of Ratliff Ferry Rd. I think it is on Lone Pine. Send me your address and I will get you the info. ldwynn@gmail.com I will be demonstrating how to make a knife from cable with a cable handle.
-
Saturdays meeting will not be held at the Agriculture Museum, instead it will be held in Jackson at Steves, shop on Mill St.. He is going to be demonstrating the uses of the fly-press. His shop is Magnolia Ironworks. LDW
-
Welcome aboard Anthony, good to see a fellow Mississippian. Whether you are getting started or been hammering for a lifetime your at the right place. We have a thread for the MS Forge Council on here, if you want to check it out. Lyle
-
Flat Belt and Belt Lacing
LDW replied to the_sandy_creek_forge's topic in Machinery General Discussions
If you go to McMaster-Carr website and look at the Hammer-In Alligator Conveyor Belt Lacing, It is made in small enough sizes that you can cut it to length. I only used it on conveyors years ago but it seems like it would work. -
You can make a v-block to fit in the hardie hole, but without one you can use the step of the anvil. You have to get the cable hot enough to tighten first to remove all the air space.( I tighten by continuously turning and hitting on the step using light blows) this is done so you can get a nice even heat when welding. Remember to only put the part you want tightened or welded on the anvils step. The first objective is simply to get the tip welded together. There is no telling how much cable I ruined before I got it welded (the first time). Good Luck.
-
 After welding and grinding on a belt sander prior to heat treating and etching.
 -
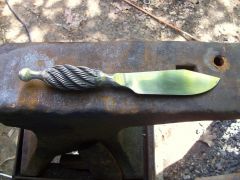 After welding and grinding on a belt sander prior to heat treating and etching.
 -
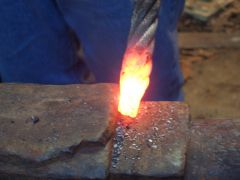
 This fullering is forming a transition between the handle and the blade.
 -
 This fullering is forming a transition between the handle and the blade.
 -
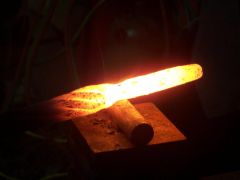
 Get it to a red heat and stick the tip into borax, then bring to an orange heat and tighten on the step. Now bring it to a welding heat and weld the tip.
 -
 Get it to a red heat and stick the tip into borax, then bring to an orange heat and tighten on the step. Now bring it to a welding heat and weld the tip.