

Paragon
-
Posts
166 -
Joined
-
Last visited
-
Simplest is to just cut a slot in your pipe (I am using PVC from blower to gas inlet) and drop in a piece of sheet metal. basically a simple gate valve. You can also try a motor controller. If it is a basic brushed AC motor, should be able to try that. Harbor freight has a cheap one sold as a Router motor speed control. I have a leaf blower I'm trying to use but even with the 2" pipe blocked down around 90% it was still too much air for my burner. Could not get the forge lit and that was on lowest setting.
-
I necked down the crayons on my burner block. Narrow side is at the plenum. Still full crayon diameter at the flame face of the block. This is one of the test crayons. In theory it should help keep a higher velocity by the plenum so no back burn. Downside is that there is more restriction so need better blower pressure. Gas pressure is all relative to what size orifice there is. I can run mine 1PSI (probably lower) through a 1/16" orifice but I only have a 9-hole burner block. .. Again, no other blocks to compare it to. It was my first and I was curious how it would be. If I can get a better blower and get the forge to weld temp then there won't be a need to modify. Thought was that I could just drill it out straight through with a carbide bit if it was an issue. Mizzou seems to be extremely hard so I'm not sure how clean the inside of the hole would be.
-
Some places charge a nominal fee (ran into this today.. was something like $12-$15) and is just an inspection they do and then re-date the tank. Was told 10 years after the creation date then the re-cert is good for 5 years before it needs to be redone. They actually told me to just go swap the tank at a store (Amerigas or Blue Rhino) as it will be cheaper and then they can refill it after that. Tank swaps will only have 15lbs in a 20lb tank. Places that refill should fill it up all the way. I just swapped a tank and it has a few recert stamps. Last one was 2017. There will be a sticker on the tank like a price tag sticker and that will be a date code when the tank was last filled (the tanks get trucked off to a large facility that fills them then redistributed. My other tank says 12 years until re-cert is needed so I don't know if it changed.
-
In my garage. Came with the house. You can typically find it at your local hardware or builder center in the metal stock area. Can get it online from McMaster-Carr and metal supply places as well. Regarding the detached flame, I can get mine to detach and seems to be too little gas or too much air.
-
I don't know for sure. Far from an expert as I am still tweaking my first. I have read that propane does not mix with air as readily or something of that sort so I went overboard with stuff I had on hand. I would think it would work OK as I'm sure many have similar setup to what you have but I do know some have put a regular solid spiral inside and it has helped mixing. I used perf sheet to help induce turbulence to mix it The spiral is per sheet metal. I heated it with an OA torch to get it to twist easily (otherwise it just wants to fold on the diagonals with the holes) The yellow baffle is still just a test to help divert the air to all holes evenly. I have added more holes than what is in the photo to even it out. Eventually the plan was to use a can with holes as an insert.. eventually (the simple yellow sheet is working very well. You may just have too much air velocity or not enough gas (basically need to find that balance - Previous post from above link is when I figured it out and previous to that was the lifted flame).. I don't remember what the key thing was to get mine to settle on the burner face but I think it was a combination of the air and gas tweaking.
-
Mine had lifted flames at first testing but after working through the fuel and air, it now stays at the face from start to finish. Flames at the holes will be more stable. You can see your flames fluttering about in the video.. It could be too much air velocity or not enough mixing before it gets to the plenum. I don't recall off hand what the main issue of mine was that fixed it. I tweaked a few things at the same time and ended up with a stable flame. The face of the block is going to get far more heat from the radiation of the rest of the forge than it will from the flame base touching it. The backside of my burner is only warm to the touch after an hour at an orange heat. The air mo ving through it will help cool it. I leave the blower one for a while after shutdown so the heat doesn't work into the plenum.. just trying to get longevity out of the burner.
-
Cool forge. Were you able to tweak your air and fuel to get the flame to contact the burner head? I think I need to find one of those blowers for mine.
-
Figured I'd post an update. Have had the forge on & off a few times now. The PA23 brick seems to crack easily. Both roof bricks have a crack showing but are holding together with the metal frame. No issues that need to be taken care of yet. The PA26 brick seems ok, even the carved one where the burner is. I put a baffle in to shrink the interior to the size of the Mizzou base. Burner seems to be holding up so far. Flame coming out of it is great. Can run it on 1-2 psi out of a temporary 1/16" orifice. Only issue now is the lack of air to get to higher temps. The blower fan I'm using is not made pressure (squirrel cage) so it is having an issue keeping up with higher gas pressure around 3-4psi. I don't think it has gotten to a yellow heat yet. I'm hoping a better blower will solve the temp problems. Orange heat seems to drop off quickly but the tongs I was making reheated in approx 15 seconds so not the end of the world (made from 1x1/4") The thicker 1.25x3/8" was feeling like it could use more heat.. .. I may try without the screen but I think a different blower would be the best option (at least easier to change than having to disassemble everything.
-
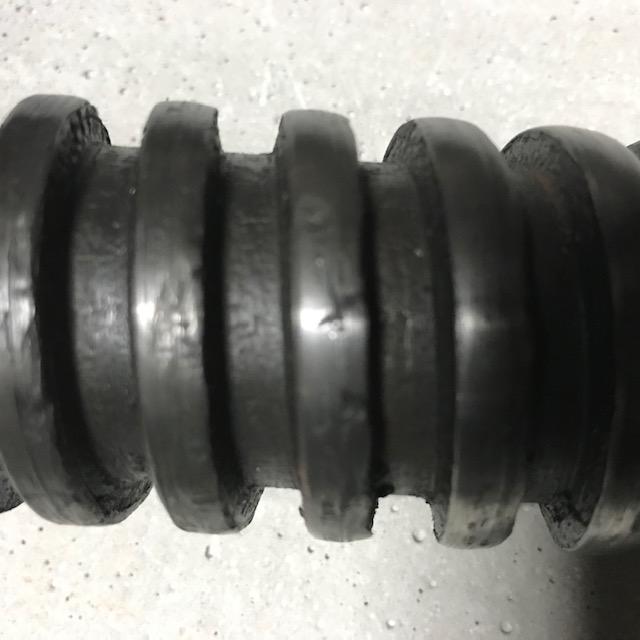
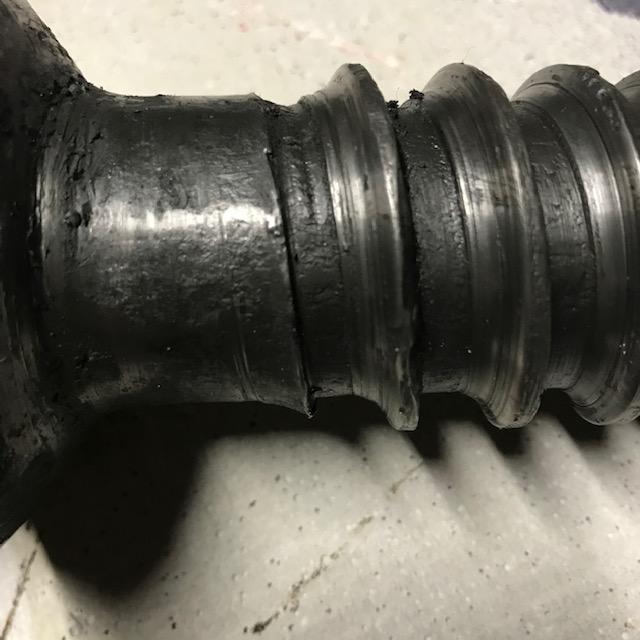
Hi Moose. I have seen some of the fab jobs people have posted. It's pretty much like putting a new nut inside an old box. Here is what it looks like cleaned up. Square thread. Last photo you can see the surface texture on the backside of the threads. Looks similar to what I have seen on tapped threads but I guess it could be from the process if they were wrapped.

-
To elaborate, the foot looks like the 11lb cast iron anvils found if you search google for '11lb anvil' but the casting, or at least the paint, on yours looks smoother. There are some photos of a 24lb anvil with the smooth finish. the current photo of the 24lb on the grizzly site has a rough finish so yours could just be either from an earlier production.
-
For a jewelers anvil it will be fine for what you need. Looks like a new china anvil.
-
I will get a photo of the screw and box tomorrow. doesn't look like anything in the area with a machinist program. I should be able to do the fitment by hand.. would just take a lot more time. Might be able to do some stuff at work on the mill like roughing a tenon on a screw rod or roughing down a nut (limited tools.. no rotary table so would be sketchy holding anything round in the vise)
-
Read about the babbitt method. The alloy seems interesting. I'll have to test to see what materials are as that may dictate what can be done. I didn't get to that point before the storms rolled in. The screw is only trashed for the first portion of thread and could be cut, flipped, and reattached. I have seen the blueprint about forging a bar around the screw to take the thread form and brazing it inside the box. Might be a possibility. certainly the cheapest Thread appears acme instead of square, and I think they were cut (will have to inspect further) Acme nuts in 1 3/4 - 4 tpi are available. Could grind it to obtain the helix thread and braze that inside. Would still have to flip the screw (if lucky and same as the nut thread) or replace the screw with new or go to 1 1/2 in 4 or 5 tpi and have a bit more for the possibility of welding around the outer edge of the box. The one vid I saw where someone use new acme rod just mig welded both the box nut and screw which from what I have read is not ideal for cast iron but did also read on one site that welding on edge was not as critical as repairing a crack at the center of a casting. Will report what I find out
-
I may try to repair it. There isn't much thread left in the box so that should be easy enough to clear out by hand. Is the box and screw typically cast iron or steel on these? There are 2 seams across each other on the box so it looks to be sand cast. The screw threads look to have been cut by looking at the surface finish.
-
If anyone is interested in this vise, shoot me a message. I don't have a need for such a large vise or the means to repair it at this time and would love it if someone could put it to use. I prefer local but can meet someone a reasonable area around or stick it on a pallet for pickup. Can send additional photos if needed.