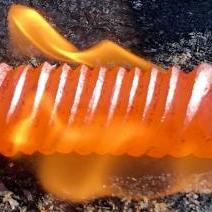
February 16, 20206 yr Others certainly have posted on this approach but I thought it would be fun to remind newer smiths that not all PW work requires tack welding the stack and tack welding on a rebar handle. The process for making San Mai (3 layer - 1018/1084/1018) and Go Mai (5 layer - 1018/15n20/1084/15n20/1018)) PW blades without a welding machine begins with tying the stack together by wrapping it with steel wire. Tightening the wires is done by twisting with a pair of needle nose plier (middle picture) I keep one outer layer of the 1018 at a 3ft length (top picture) to serve as a carrying bar for the initial heating, fluxing, tacking, and forge welding. Works great. When the stack is welded together nicely it is then possible to cut off the bar, leaving a 6” handle (bottom picture) that I can pick up with my box tongs. By this time the wire is gone. It simply holds the stack long enough to do the first tack weld, at which time it pretty much gets blown off by the hand hammering (I also later move to a foot treadle hammer with a 60lb head for flattening and drawing out the billet).
February 17, 20206 yr You can always make the billet a bit longer and rivet the ends using a 16 penny nail for the rivet.
February 18, 20206 yr IIRC a 130 year old book on smithing mentions using rivets to hold pieces together for forge welding. This is just an extension of that. Once you get past the "I need to arc weld the ends of a billet." to the "How do I hold the billet together for welding?" Other possibilities come to mind. Of course you should trim the rivet ends off the final piece; but trimming ends is a common thing to improve quality.
February 18, 20206 yr Author Thanks. For small billets, the wire method is kind of fun....it does the crucial initial binding and then just disappears with the first high-heat hammering.
February 18, 20206 yr I generally use either rebar tie wire or baling wire---living in the country does have it's perks! Folks doing their welding in propane forges tend to have fewer issues as it's "gentler" on the wires. I do my welding in bituminous coal and try to do the first welding pass using a cave fire. Some people have issues as the wire will start burning before their billet is all the way hot. Letting a cold billet warm up before turning up the air flow helps. I've used the "handle" extension a lot but like to just make it a tab that's easy to grab with my tongs. For me this is easier to position in the fire.
March 1, 20206 yr I weld up billets, use collers for wrap around swords where I want the edge material to be able to slide along the core as it stretches instaed of bunching up and somtimes use wire wrapping or shaped tongs. use whatever you have that works for you.
March 1, 20206 yr Author On 2/17/2020 at 10:27 AM, ThomasPowers said: You can always make the billet a bit longer and rivet the ends using a 16 penny nail for the rivet. Thomas, I tried this the other day on a small 5 layer billet. Works great. Thanks for the intro to this method. I’m really interested in doing a lot more work with the simple 5 layer technique without additional folding. Much fun learning to control the designs with hammering and planned indentations, and then revealing the layers with carefully thought out bevels/edge shaping.
March 2, 20206 yr What Basher said: "Use whatever you have that works for you." Some methods will require some different steps---like peeling/grinding a canister off or cutting a riveted end off---or an arc welded handle for instance. Getting a good solid weld is the important bit! I generally start with a wired billet and trim ends; but they are good solid billets after welding! I took one once and flattened it into a disk starting with the billet VERTICAL---(making a pattern welded pizza cutter and needed a sizable disk.) It held together under that much weld abuse.
March 2, 20206 yr Author Thomas, do you have a picture of that pattern (how many layers and what kind of steel)?
March 2, 20206 yr It was bandsaw blade and pallet strapping; I think my pictures died in a disk crash; but I can try to see if the fellow who took them has backups. It was around 10 years ago. I was at a SWABA meeting, (now New Mexico Artist Blacksmith Association), and they were asking for suggestions for a trade item for the next meeting, crickets, so I piped up with Pattern Welded Pizza Cutters---yes I am obnoxious in person too---anyway they dropped the pattern welded part; but as I had suggested it, I had to follow through. Someone got a very nice working one---we took it to a local pizza place and asked for an uncut pizza to try it out on...
March 3, 20206 yr Thanks, Thomas, I've been meaning to ask you what happened to SWABA. You answered my unasked question.
March 18, 20206 yr Author On 2/17/2020 at 10:27 AM, ThomasPowers said: You can always make the billet a bit longer and rivet the ends using a 16 penny nail for the rivet. One question to follow up on this: drilling 15n20 is a beast! Even when I drill slowly (using a post drill) and even when being careful not to overheat and work harden the steel I still am struggling to get through the 1/8" pieces. Broken a few bits in this process. Any suggestions? By the way, what gauge wire do you use?
March 19, 20206 yr For wire ties: anything handy; usually baling wire or rebar tie wire. For putting holes in strips. I have a large bench mount hole punch that works nicely. (A friend once borrowed it to punch holes in Ti sheet for a brigandine armour.)
March 19, 20206 yr Why I buy used, cost me US$20 IIRC. I tend to design for the tools I have or have access to rather than design for stuff I have to go out and buy!
March 20, 20206 yr Author While it is hard to drill an 1/8” hole in the thin 15n20 pieces, my good old Silver Mfg. 1 1/2 post drill ripped a 3/8” hole through a 15 layer forge welded axe billet:
March 20, 20206 yr My bench mount is a Roper Whitney punch #16 rated to put a 3/8" hole through 1/4" steel. I also have a couple of Jr's and a #8 Like beverly shears, the RW punch is on my "buy whenever found cheap" list if you do any work with sheet metal. The expensive part is usually buying replacement punches and dies as finding a complete set is quite rare. Luckily you can buy them individually in the size needed for a project.
Join the conversation
You can post now and register later. If you have an account, sign in now to post with your account.