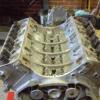
March 12, 201313 yr Well after a weekends reading here, watching videos on utube, and a rummage around my scrap piles I have started to build myself a forge Here is the makings of the Hearth, with thanks to Glenn for his informative posts, anybody else's posts I have read ( too many to name ) John B for some questions and ideas answered, and to a few guys I was speaking to in chat ( I forgot your names ). It stands 14ft tall from ground to chimney top. Clinker breaker and fire pot made from 3/8 plate Hinged and weighted ash dump, clinker breaker handle and air control handle The air control Gate, the box is 3" section I have today got a bouncy castle blower as my air supply (thanks John) I need now to get some ducting, some coal and some tools and a anvil, but it's a start :) Oh and don't tell the wife I have told her it's a fan assisted BBQ ;) It will get a clean up and a coat of paint as to look nice and pretty Any Glaring mistakes please show me my errors Nick
March 12, 201313 yr That's a good looking rig. The only problem I see is that without a cut-out in the back of the barrel, you will be limited to short stock lengths. If you cut a pass-thru in the back it will solve this problem. Good job.
March 12, 201313 yr Author I did think that but saved cutting it until I need to I shall be starting small and working up in size i'm sure :)
March 12, 201313 yr Only problem with your build is its in your shop and not mine.... Looks pretty good to me..... Forge on.... Dale
March 12, 201313 yr Author This will have to live outside the flue for my workshop will cost $1100, as it's high and has a second floor :(
March 13, 201313 yr Don't wait to cut that pass-through in the back of the hood. A lot of simple beginner projects require a bend or texturing in the middle of a long piece. Making a simple bracket, for example, to support a shelf uses 12" of stock with a bend in the middle... and that's only for a small bracket.
March 14, 201313 yr When I restored this little forge I had to make a new windscreen as the old one was nearly rusted out. I took the opportunity to add a mouse hole door in the back for long pieces. I'm really glad I did, as I use it all the time. Do it now while you are building it, you won't regret it.
March 14, 201313 yr Author Ok ok I shall make a cut out :) before I paint it. So does this mean I can make swords now :lol:
April 4, 201313 yr Author Well it's finally finished, mouse hole cut out for longer jobs. and painted in stove paint just to look nicer. Even had time to polish the stainless chimney. My selection of coal has arrived today, Got three different types to play with and different sizes. But I start work tomorrow for my 5 day shift :( so first fire will have to wait for a while.
April 5, 201313 yr Author Seems as if my post hasn't been recoginised by the forum it's not updated last poster or moved it up to the threads?
April 23, 201313 yr EnglishWraith, Do you happen to have any photos of the top section, where the pipe connects to the 55 drum? I had this exact idea minus the stand, then stumpled across your thread. Thanks, Mud
April 25, 201313 yr Author Not ATM but I will get some for you. All I did was roll a section of 1" wide x 2/8th steel into a ring and weld that onto the top around the opening and used some Acme screws to then hold the chimney to the welded ring.
April 25, 201313 yr The update lapse was most likely part of the general proble the forum was having with an upgrade in their software, everybody was screwed up to some extent or another. Nice job. You might like to put a tong rack on the front of it so they're at hand. It's not too uncommon to need a different pir of tongs and having them right there is good. Frosty the Lucky.
Join the conversation
You can post now and register later. If you have an account, sign in now to post with your account.