Keith Rider Posted January 3, 2013 Share Posted January 3, 2013 I'm working on repairing a worn out garden plow and need some help. This is a small garden plow from Sears. It was pretty badly worn then it was in a structure fire, so it was in bad shape. It also only cut a 7" wide furrow and I need a 9" furrow to fit the right rear tire on my tractor. I took a bunch of measurements of the share and did my best to sketch out what it looked like when it was new. What you see in the picture is my best effort to put on a new point shaped like the original and I also added an extra bit at the heel to widen the furrow. Both pieces were forged from a piece of Jeep leaf-spring from the junkyard. The share started out very hard - a file could scratch it but you couldn't really remove much metal. I annealed the whole thing and welded on the repairs with 6010 and 6013 rod. (I read all of the online books about old school plow repair and forge welding on new points, but that is way above my skill level.) The welds must be good because they stood up to some post-weld forging that would have strained them a lot. Since the original share was hard, I annealed again then hardened at a red heat in oil. The old books cover case hardening shares, but there is nothing about tempering. This thing is now glass-hard and I think that it needs tempering. At what temperature should I temper this thing? I forgot to mention that I will be doing the tempering in an electric pottery kiln with good temperature control and an accurate thermocouple. My plan is to put the share in cold then ramp up slowly to about 550F, hold for an hour, then let it cool for a few more hours. The temperature and time are what I need your help with. This plow is going to be used in fairly mellow soil without big rocks. Light duty for a real plow. I don't want to risk having the share too brittle and breaking off the point, though. The thing leaning up against the beam in the picture is the partially rebuilt moldboard. It needs to be a bit taller and wider, so I forged mild steel bar to match the curves and welded them on. It still needs trimming and some finish work. The moldboard was every bit as hard as the share, but I don't have any way to reharden it, so it will just have to stay soft. Quote Link to comment Share on other sites More sharing options...
HWooldridge Posted January 3, 2013 Share Posted January 3, 2013 I used to "steel" shares for the few remaining mule teams around here - this was about 25 years ago. For the most part, I would do all the welding then let them air cool because I learned that quenching usually left a spot somewhere that would eventually spall or crack. One old farmer wanted his to be really hard because he was working in sandy soil and a couple of his broke because there really were a few rocks in his field... Your tempering plan sounds fine and is probably a bit overkill but no harm doing it for several hours. I might add you can also make all of the hard pieces and rivet them to the moldboard. The rivets will wear down about as fast as the point. Quote Link to comment Share on other sites More sharing options...
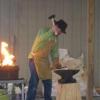
njfarmer Posted January 3, 2013 Share Posted January 3, 2013 I may be missing something in the picture but theybway it looks you welded your new point on the wrong side of the moldboard. The point should be pointing towards the coulter near the hitch. What shape is the landeside in? Quote Link to comment Share on other sites More sharing options...
Keith Rider Posted January 3, 2013 Author Share Posted January 3, 2013 The pieces that I added to the moldboard are along the top edge and the right side. The bottom-landside corner of the moldboard is on the right in the picture. It wasn't modified because it still needs to mate with the top of the share. The new point is on the share in the foreground. You can't tell that it is new in the picture because there is an even shine on everything, but it is about 1" longer and is sharp. The landside is fine other than some rust. It is at least four times thicker than the other parts. I'd expect it to outlast several points. Quote Link to comment Share on other sites More sharing options...
Jeff B Posted January 3, 2013 Share Posted January 3, 2013 theres no need for the share to be hard, the smith that I worked with would let them air cool, But he would say they had to be on there backs on a dirt floor running north and south! YA right. there is away to make a share that runs in sand last longer with out harding, But I can't tell, Its a trade secret. Quote Link to comment Share on other sites More sharing options...
njfarmer Posted January 3, 2013 Share Posted January 3, 2013 Well its a little late to tell you this but you could have just adjusted the 3 pt hitch arms on your tractor to get it to successfully cut the 9 inches. It would have taken some adjustment in the field but it can be done. That being said you did a fine job on the point. I had thought that was the one you replaced! Just remember to make sure the point sticks down a bit and is not flush with the bottom of the landside. This will help with the "suction" that keeps the plow into the ground. My only other suggestion would be to make sure u scour the moldboard with a wire wheel prior to use. It doesnt have to be shiny but you want the rust off it. Also clean up the welds on your additions so they dont catch soil and prevent a nice turning of the soil. Good luck with the hardening. It is said the best plow parts for sandy soils were the old chilled plow parts. Quote Link to comment Share on other sites More sharing options...
SoCal Dave Posted January 3, 2013 Share Posted January 3, 2013 If you can arc weld than you can hardface the plow. You need hardfacing rod, Stoody 35 for example, and just do it. Any hardfacing surface on the plow will help preserve it and your welding so far is good enough. Talk to other farmers who have hardfaced their equipment and the guy at your welding supply. Good luck. Quote Link to comment Share on other sites More sharing options...
Keith Rider Posted January 3, 2013 Author Share Posted January 3, 2013 njfarmer -- It is never too late to learn; school me! This is not on a standard 3pt hitch, though. It is a sub-zero size hitch made by sears for garden tractors. It really only has two adjustments; there is a turnbuckle on the left lift arm so that you can level the plow left/right and the top link length can be changed to level the plow fore/aft. I did set the point down a little for some suction, maybe a little too much, about 1/4". We have red clay here, not Garden State sand, but my garden soil is dark and light from all the compost that the chickens worked in for me over the course of five years. They can work 6" of chopped leaves into 2" of nice soil in about 6 months. I only need the plow to turn under sod and weeds otherwise I would just use a cultivator. Dave -- I've never tried hardfacing. The catalog descriptions of the rod make it sound difficult. Thanks for the compliments on my welding. Truth be told, I'm a poor welder but a patient grinder. :) Quote Link to comment Share on other sites More sharing options...
njfarmer Posted January 4, 2013 Share Posted January 4, 2013 Well in your situation I supposed you wont be able to adjust cutting width without altering the bar the 3 pt bottom arms go on. But since we are talking about it. On a horse drawn plow you would change this but moving where the plow is being drawn from on the hitch plate. On a tractor larger then a lawn tractor you would be able to adjust the bottom arms in or out via the sway arm links. You have a right turn plow. Simply meaning it turns the ground to the right. To adjust the cutting width you would simply adjust the plow further to the left (when looking at the rear of the tractor). As a rule of thumb you can cut 2-3 inches wider then the plow point and still do a nice job plowing. As far as the down turn of the point. I can really on speak of horse drawn plows. 1/8-3/16 is the acceptable difference from flush. Never really paid much attention on our tractor plows. Being that you are in heavier soil it is vital to scour the point and moldboard well. You would be surprised how easily dirt will stick to it. As a side note. When you get to plowing the idea is to plow half as deep as your plow is wide. As far as hardening im not to sure. The old points were soft in the middle with harder steel on top and bottom for wear. When they were sharpened on the anvil not much was heated at once to preserve the points toughness and hardness. Old school of thought was to keep hammering from a red heat all the way to a black heat to preserve these characteristics. According to Lynn Miller's Horsedrawn Plows and Plowing solid steel shares of the time were not tempered. Hope this helps! Quote Link to comment Share on other sites More sharing options...
Keith Rider Posted January 4, 2013 Author Share Posted January 4, 2013 I noticed a little oil weaping out of a crack when I tempered it, so I had to do some more grinding and welding. After heat treating a second time I used Jeff's method of floor annealing upside down, aligned with magnetic north. Shoot, Jeff, was it supposed to be magnetic north or true north? I need that good mojo. Quote Link to comment Share on other sites More sharing options...
Recommended Posts
Join the conversation
You can post now and register later. If you have an account, sign in now to post with your account.