GregDP Posted April 28, 2012 Share Posted April 28, 2012 I've been working on my first gasser and I would appreciate any advice before I wrap and cast the refractory. What I'm working with: Ceramic Fiber Spun Blanket, Temperature Rating 2300°F - 1" thickVesuvius Hot Top Moldit Plistix 900f IR 1 inch forge/foundry burner (An 1" wide, 16 1/2" long atmospheric burner 0.45 mig welding tip and sliding choke) An old propane tank Uses: Light foundry work Pattern welding General purpose forging I've got an idea of what I'm doing, and have had a chance to talk to a few local folks to get their opinions before starting the project. I bought the burner some time last year so I was kinda locked in and almost everyone I know uses 3/4" inch or less burners. In my mind I'm planning to have a narrower entrance (~4") with a blooming internal forge area (~8") a flat level floor. with a hinged door on the rear end. It's clam shell and I don't know if I should let the two haves meet flush or try and have them line up like this... / \ .. In my mind it seems to allow for less heat loss... The burner is mounted just over 65 degrees in the middle but off to one side. Rex Price mentions 600 cu inches but with no firm suggestion. I've been advised it's best to go for less than advertised volume so I figured out a 12" by 8" cylinder is just over 600"cu inches. My forge body is just over 10 inches long. Depending on how the wool fits I'm guessing right now I'll end up with between 450" and 500" cu inches.. I'm kinda worried this may not be big enough or I may have a hard time regulating down far enough to keep from burning small stuff.. I'm sure I'll be happy with what ever I manage to build but I've learned a lot from many folks here and I figure you'll never know what you don't know unless you ask. Thanks! (Edited - Forgot to resize my photo.) Quote Link to comment Share on other sites More sharing options...
pkrankow Posted April 28, 2012 Share Posted April 28, 2012 2 inches of insulation would be good, significantly better than 1 inch (3 inches seems to make little difference over 2 inches though.) 600 cubic inches is probably the upper recommendation. The lower recommendation is probably about half that volume. I base this statement on the 3/4 inch burners I have built, and my current rather small forge. Having a small back door that can be closed off is a good idea too, instead of opening the whole back of the forge. Phil Quote Link to comment Share on other sites More sharing options...
GregDP Posted April 30, 2012 Author Share Posted April 30, 2012 Thanks Phil. If I had planned out things better-- I probably would have put the 3 inches of wool on the top instead of the floor or just two inches all around. I'm very happy with how things are going so far though and if I have to replace the floor it should be easier to replace this way.. I'll keep that in mind about the back door. I sorta regretted the large door idea after I made the cut. Mostly because I would have like to at least see how this burner handles a forge with more length. I'm not sure if such a large back door will be helpful. At least the door is large enough for two inches of wool at its center.. Too bad it doesn't close air tight.. though I may find that to be a good thing.. I feel like I could have cast the two halves to line up better and I may take a masonry wheel to it and rework it some. It certainly is getting hot though I'm not really pushing it too much till the refractory cures completely. I'm not really seeing the sort of swirl I imagined. Although I'm still really restricting the amount of gas and pressure. The chamber is about 9" long, 5.5" high and 7" wide. I did some rough calculations and if I can apply the rule for finding the volume of a elliptical cylinder pi*(2/width)*(2hight)*length I find I've got about 272 cu. in.-- Which just doesn't look right. It's not a perfect eclipse so I'm not really sure how to get an exact number (I wish I focused a bit more in school, now I've got to remind myself all these things!)-- But ~300 cu. in. doesn't sound bad. I'm sure it'll work, but probably not as efficient as I'd like. I really want to build my next burner like Frosty, so I'll be taking some tips from you Phil. I've only got a little refractory cement left and if I wanted to retool things a bit. Would mixing in some wood ash and kitty litter be a bad idea to stretch it? Quote Link to comment Share on other sites More sharing options...
pkrankow Posted April 30, 2012 Share Posted April 30, 2012 That looks awesome! The small back door can happen when you need it. I like the clam shell configuration. I think this forge will carry you for quite a lot of work. Phil Quote Link to comment Share on other sites More sharing options...
Frosty Posted April 30, 2012 Share Posted April 30, 2012 That'll work nicely Greg, good job of putting it together. The rule of thumb for burner tube diameter vs. volume is based on area of the burner tube's cross section and is 300-350 cu/in per 3/4" burner dia. A 1" dia burner will heat 600-700 cu/in. OR 150-170 cu/in per 1/2" burner. It's a pretty straight line ratio, the leeway is to account on differences in burner efficiency usually as a result of individual construction. I agree, 2" of Kaowool or equivalent is plenty good for a liner, more isn't going to do enough to justify the expense and hassle. Kitty litter is bentonite clay and is pretty darned fire proof, it's used to plug the tap in iron foundries (cupolas that is) I don't know if it's a vitrifying clay though so I don't know if it'd be very durable to scraping and poking. Wood ash might introduce some voids and increase insulating properties a bit but it's had to say if it'd be worth the hassle. Wood sawdust on the other hand is a traditional additive to fire clay to make light insulating fire brick so that's the way I'd go. I'd just buy a bag of fire clay it's not that expensive, last I bought was $25/50lb bag. The mix I used If I recall correctly, was 1pt fire clay to 1pt or more silica sand to 1/2pt portland cement to 3pts sawdust. By volume. Mix the dry ingredients before adding the sawdust and wet the sawdust, let it soak a few hours to a day. Once the dry ingredients are thoroughly mixed add the sawdust, mix thoroughly and ram into the forms. Ram it hard and let it set then dry a couple days, put a light bulb in it if it's cool or humid. Fire a little at a time once you're SURE it's dry. Start with a few charcoal briquettes, just enough to support a burn and let them burn, go out and cool. Then double the amount and repeat. Last cure is the burner, bring it to high orange and soak a while, let it cool and it's ready to work. The portland cement will set like concrete, holding the liner together temporarily but there's so little it won't spall at heat. You need to fire cure it so the clay can fire hard, first firing drives off hygroscopic moisture, second is a bisque firing and last is the vitrifying firing. It sounds more complicated than it is, just be patient and it's all good. Frosty The Lucky. Quote Link to comment Share on other sites More sharing options...
JamesBBrauer Posted May 1, 2012 Share Posted May 1, 2012 I suspect you might find yourself using the small back door more than the clamshell side. I say that because I built a two burner forge/oven that flipped open like that. After it gets all glowing orange hot inside, when that door opens all the hot refractory is facing outward, and is like a heat ray to the face. But mine didn't have a second opening like yours, which should give you the flexibility to avoid some of that unless you need to fit a long or wide piece in there. Hope things are going well in Clayton. I lived in Johnson County for a couple of years, over near Benson. Quote Link to comment Share on other sites More sharing options...
Frosty Posted May 2, 2012 Share Posted May 2, 2012 James has a valid point. Pointing anything glowing orange or yellow at yourself is NOT NICE. A lifting lid forge is a lot more comfortable, Johnson Gas Appliance for instance has trench forges with lifting lids that are sprung to lift and are guided on a piece of tubing, they lift and swing aside. A device similar to a hinged clamshell uses up to four swing arms one above the other to allow the lid to lift and remain level. I'm sure you've seen this arangement on doors or other things, basically two arms on each end of the swinging component, one above the other but in the same plane. Sll the hinge pins need to be parallel and the same distance apart. This will let you l lift the lid without pointing the hot part at yourself. For myself I just made a variable volume gas forge. The lid is on a jack and the sidewalls are firebrick I can arrange as needed. It has four burners in the lid's quarters individually controllable on/off so I can heat one or all areas of the table. It's a more complicated build and is kind of fragile but I'm still developing the thing. If you come up with something that works please share it with us. Frosty The Lucky. Quote Link to comment Share on other sites More sharing options...
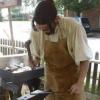
GregDP Posted May 2, 2012 Author Share Posted May 2, 2012 (edited) Wow what a night I had a chance to coat the inside of the forge with Plistix and try it out. When the forge was fired I was getting a huge dragons breath and isolated heat.. very little swirl. I was at a friends house and we considered the problem and narrowed down the causes: A - to large of a internal volume B - the angle of the burner C - Both I'm really glad it was 'B'. It was an easy fix with a cutting wheel and a little muscle. A little back story When planing the forge I wanted to weld the burner mount at a slightly more acute angle to the forge bottom. And well when trying to figure out how to keep it in place I figure out I could just thread the galvanized (**not suggested for those who don't know the risk**) pipe into the hole, only increasing the angle slightly. Doh! I hope ya'll like pictures.. 'cause I'm kinda proud and just wanted share! About 2.5-3 psi with a needle valve mostly open: Thanks for the advice on the homemade refractory and door designs Frosty. I may toss them into my next forge (I got an old refrigerant tank for just a few cents today!) Clayton has grown a lot in my lifetime but it's still got that small town charm in a lot of ways. Did you ever make it out to muledays in Benson James? Thanks for the tip on the back door. I considered that it may get a little too hot to open without tongs, but hadn't thought about how to approach opening it without a face full of UV. I did give it a nice little tong hook though which doubles to lock the forge closed. I'm really happy with how things have turned out. All that is left is to burn of the zink, strip the old paint and give it a new look. But everything except the zink is on the back burner. Edited May 3, 2012 by Moderator54 Removed external link as per administrator's request Quote Link to comment Share on other sites More sharing options...
Recommended Posts
Join the conversation
You can post now and register later. If you have an account, sign in now to post with your account.