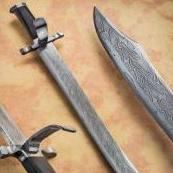
kevin (the professor) Posted May 20, 2009 Share Posted May 20, 2009 (edited) Hello Everyone, I have posted this knife on other forum for design and critique assistance about a week ago. I want to thank Michael, NDunham, and GEzell (GHEzell?) for their input in helping me decide where to go with this knife. They helped me decide to try something totally new. I am generally happy with it, I am going to try other simillar knives to refine the techniques. But, I would not have come up with this initially without some input (at least not for a long time). 1095 Blade 9" long 1.15 " wide 1/8" @ ricasso, with distal taper last 4" false edge (not sharp, but could be) Stainless bolster and cap Leather spacers Ebony handle (4.5" - wow, I hated working the ebony, but once it is polished, it is beautiful!) edge quenched in heated canola, tempered 3x at 400F. So, here it is. Thanks for looking. I am open to ideas, encouragement, or any other comments. As I always say, I am trying to learn without a local teacher, so the input I receive from you folks is very valuable to me. Thanks, Kevin Edited May 20, 2009 by kevin (the professor) left someone out who helped design Quote Link to comment Share on other sites More sharing options...
rokshasa Posted May 21, 2009 Share Posted May 21, 2009 that looks really good, im not an expert but i know what i like, the blade is fairly well ground from what i can tell, i like the simple shape you gave it, very fine job much better then i've managed to do as of yet. Quote Link to comment Share on other sites More sharing options...
kevin (the professor) Posted May 21, 2009 Author Share Posted May 21, 2009 Thanks for comment. There is one dip in the blade. It happened because I ground the blade and false edge too thin prior to heat treat. There was a slight warp during the normalizations before hardening (I placed blade directly under burner not thinking, so one area heated much faster than the rest). In fixing this warp, I accidentally hit the blade too hard with a hammer. I was just really pushing on the blade, but the steel was so soft that the push left too much of a depression to grind out at this late point in the making. This was a test blade, with a new style. It came out better than I expected. Next time, I am going to center the tang and put the spine even with top of handle. I will still have a heel that extends down, just try to keep the "flow" better. The reason I did the tang on top of blade and blade offset was to study the look. It is sort of an imitation of Scagel. thanks for looking, Kevin Quote Link to comment Share on other sites More sharing options...
Frosty Posted May 21, 2009 Share Posted May 21, 2009 Kevin: This is why I use a wooden mallet on a wood block for all my finish straightening. It doesn't damage details, change cross section, etc. Wooden baseball bats make outstanding mallets. I usually get two from a full sized bat and one from a softball bat. I use the handle for the . . . handle. They're also easily shaped for forming mallets and can be had from garage sales, 2nd. hand shops, etc. for about a buck each. Needless to say (I hope) al and ceramic clinker bats are no good for mallets. If it don't go CRACK it ain't a real bat! Well, okay lots go squeak but that's a whole different thread. Frosty Quote Link to comment Share on other sites More sharing options...
Recommended Posts
Join the conversation
You can post now and register later. If you have an account, sign in now to post with your account.