
Rantalin
Members
-
Joined
-
Last visited
Everything posted by Rantalin
-
This is going to be a blast from the past...BUT! are there perhaps any legacy members who recall this discussion, and recall a member offering to ship me chuck of steel to use as an anvil? After about 11+ years out of the game, with only a little tinkering here and there, I've set all of my equipment back up and refreshed my Lively Style forge. I do indeed have a paying job, but the aforementioned chunk of steel has been working well enough for me that I've not sourced a 'real' anvil (yet). However, I would like to find the contact information for the person who provided me with this steel, and send them a few somethings. If this was you, please reach out. I've scoured my messages and posts and can't find anything related to the exchange.
-
I used to play around with my balisong until it broke. The screws at the hinge keep loosening and one of the scales on the handle fell off. I don't care enough to fix it so I dulled the blade and use it for practicing opening and closing. I know some basic moves, as well as a couple of neat throws (the dull blade helps). I only bother with it once in a long while because it is hidden under some stuff at the bottom of my display case.
-
I've got the answer, but its not something you're going to like :-D The earliest swords were designed for thrusting, so all that was needed was a sharp point on a long dull blade. The blade was flat at the handle end and rivet holes were punched. A separate (possibly wooden) handle was then riveted or pegged on to allow for thrusting, but not chopping strength. An improvement upon this was to forge a handle out and again punch holes for rivets. However, this means fully forging the basic shape of the handle and then filling in the grip with additional materials. I will post a picture of what I mean and link to it from this post. I have also attached a picture of a sword made in its entirety from bronze. Both pictures taken at the Higgin's Armory Museum, Worcester, MA. A wonderful place, I recommend it to all who can make the trip. Website at Higgins.org
-
Hi everybody, Its been years since I've posted anything, so I decided to show what I've been working on. School has kept me busy and now winter is keeping me from the forge, but I hope to be back at it soon. The pictures below were taken before the knives were finished. Apparently I forgot to take pictures after finishing and before giving them away. The first knife is a railroad spike forged with an up-swept blade, then mostly filed to shape. It was made for my girlfriend's uncle. I left the handle and parts of the blade rough for aesthetic reasons. The second knife was also made from a railroad spike and was based off of a parang machete. The parang has three distinct edges as you go further up the blade. I tried to mimic this as best as possible with the shorter blade. The edge closest to the handle is very fine, the middle is more coarse, for chopping, and the tip is super sharp. The handle was poorly done and may need to be replaced, but functions well for the time being. I do not have a lot of experience with handles, especially on knives with a curved tang. Any comments and suggestions are welcome.
-
Hi everyone! It's been a good year or so since I've visited the site or the forum, so I figured I stop by, say hello, and see what was new. I've got a couple of things to post as time goes on, so you can see the very small amount of work that I have been doing. An update as to my life, I have officially graduated from UMass Amherst and I am in the application process for the NH State Police. Things are going well, but with the economy the way it is, I am not guaranteed a position even if I meet all of their requirements. I'm waiting for the spring thaw so that I can set up my forges again and get back to work. I've got a couple of projects that I would like to try, and can't wait to get at them. I've got a lot to catch up on, and a lot of time on my hands, so I'm hoping to spend a lot of time back at the forge.
-
looks great badger. very impressed.
-
That's a really neat pattern, I like the form of the blade. Nice Job!
-
AMAZING. I've been away from the forum for what seems to be a year now, but I'm glad I decided to look again just so I could see this work of art.
-
and comb it with the TINE (s) of a fork
-
Rink (this makes it long enough to be posted)
-
The guy had a piece on the scrap pallet that was a good 7 or 8 inches in diameter and about a foot long. I asked about it but he said it was still a good piece and was going to be used. Needless to say I was disappointed.
-
I just got a new job to earn some extra money for the summer, and in the same building is a shop which machines 52100 steel into various imprinting dies. The guy said I could just take any of the scrap they have lying around. Most of it is cylinders about 3-4 inches in diameter and a couple inches high. How easily could I take these chunks and turn them into a bar for making knives and other tools from? I don't have access to any sort of power hammer, so it'd all be done by hand.
-
Instead of piggybacking on top of the existing thread about coin rings, I dicided to start one of my own. Over the past four days I have made four coin rings. Each from a standard US quarter, and each a BIG learning experience on making coin rings. It took a while to figure out the best way to do each step, and I'm still learning. The first three ended up being practice rings, each with their own flaws. The final result however is quite nice looking, although the pictures aren't of the best quality to see it. They are in order by production date. I used my mother as a hand model for the last two, which are a bit skinnier and can't stant on their own. A bit more information is available on each in the gallery. Thanks for looking!
-
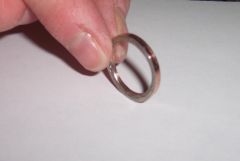
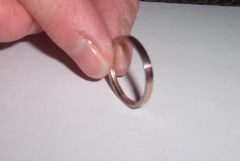 Here is the fourth and latest coin ring I've made. It is just too big for either of my ring fingers, but isn't too bad. The inside has been rounded and shined, as well as the top and sides. There are a few hilly areas where I didn't sand the inside flat, but that could be fixed with some sanding by hand.
 -
 This is the third quarter ring I made. The words are visible around the edge, but somewhat deformed and obscured by moved metal. It has a decent shine, except for a scratch caused by a rough sandpaper that I didn't get out. Used this ring to practice sizing and shine.
 -
 This is the second ring I made from a quarter. Th edge is very rough and full of scratches and gouges from the vise and vise grips. I used this one to find better ways to hold the ring without marring the edges.
 -
 First coin ring. Top isn't bad, inside isrough and not sized.
 -
I've only been smithing for two years off and on, with college getting in the way/being a priority. As a result I haven't have much practice time, or even time to make anything worth selling. When I do, I usually take the cost of materials and fuel, and add about 20% of the total price. Then I look at how many hours it took me, and multiply by about 7 dollars. I then adjust the price based on its quality, usually down. If I feel as though my formula has produced a severely overpriced estimate, I forget it all and make something up, never going below the cost of materials and fuel. Once I get some real practice time in, and can put all the theory I've accumulated to work, I'll have to develop a new method of pricing.
-
Iron Puppet, I bought a Machete at Walmart a couple years ago, and after a few months the handle began to break off. I tore it off the tang and made my own out of wood. I was going to rivit it on, but then my dad told me about those bolts. They work really well, and I can just unscrew them if I need to remove the handle for whatever reason. I get home from school on Monday, I'll post a couple of pics of what it looks like. I bought the bolts at my local hardware store, I'm sure they shouldn't be too hard to find.
-
Very nice! I really like the work on the spine.
-
I think I might end up dropping by the auto recylcing center and picking up a cast iron brake drum. That way I wouldn't have to deal with welding and it'll last a lot longer.
-
If one was to make a welded firepot such as that, what would the minimum thickness of the steel be to have a firepot which would last a decent amount of time (a couple years or so) and? I'm building a new coal forge and I've got some 1/8" thick plate that I could use.
-
Although slightly off topice, I once read a book in which a group of dwarves were the main characters. Tyler's post reminded me of something I read in that book. The basic premise was that if you give a dwarf something to hit metal with, just a block of wood, or a stone, he can make a hammer. Using that hammer, he will make a better hammer, and then a better one. This continues until he has a very fancy, very efficient hammer. This is sort of what Tyler is doing. You don't need something fancy to make something that looks good. A fire in a hole, and a hunk of metal for a hammer and you can make just about anything you want.
-
wow, I really like the shape of the knife. I especially like the way the handle is shaped, and the tranistions into the blade. Very nice job!
-
That'd be nice Daryl. Always great to have some images to go along with the words.