Vinito
-
Posts
79 -
Joined
-
Last visited
Content Type
Profiles
Forums
Articles
Gallery
Downloads
Events
Everything posted by Vinito
-
Banana blade.... Sure sounds like our third "Forge Friday" member. Every week he starts out trying to make a blade. But he always jams the metal to the bottom of the fire and gets squirreled with his phone so when he gets back to it, half is gone and what remains looks like fireworks. Last time he was doing OK for a while, but won't do any homework so starts off making a sword and ends up with a ratty banana pairing knife. Every week so far. I'm glad he's there though because when I start feeling bad about my two-hour S-hook skill, his example cheers me up. Does that make me a bad person?
-
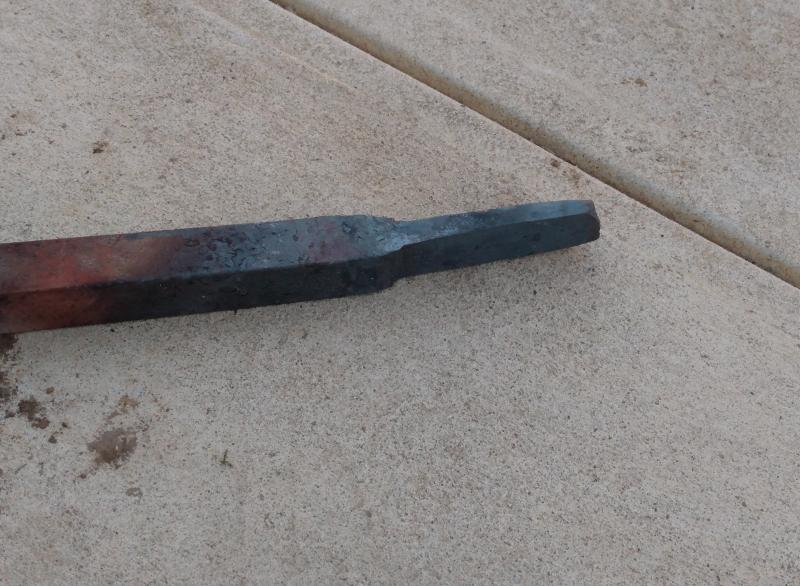
Thanks. Yeah, I'm pretty stoked! The little 33 lb. hammer hits way harder than I expected it would. I've never even tried any kind of power hammer before so I have no frame of reference except my "Armstrong" hammer, which would have taken waaaay longer to do this to a 1" square rod than the little hammer did today. This was a single heat. I know the hammer is small, but I am impressed.
-
Thoughts on small air hammers? (Anyang 15kg/33lb)
Vinito replied to Vinito's topic in Power Hammers, Treadle Hammers, Olivers
Well it arrived today, along with a little forge of my own the guy sold me. I think both are awesome! I know I'm new and a large hammer definitely hits harder, but I am thoroughly impressed at how hard it hits! The pic shows after a single heat on a 1" mild steel bar I was just playing with to experiment. Holy cow, it would have taken sooo much longer by Armstrong hammer.

-
It's here. Works great.


-
Today is the big day. Also, since it's being delivered instead of me hauling it myself, it's literally "following me home". Taking delivery of a couple items I bought used - an Anyang 33 lb. hammer and a nice small coal forge today. Should arrive safe and sound by lunchtime. I'll snap a couple photos and post them once it gets here. I'm all excited... almost like a kid at Christmas.
-
From what I could find, both Anyang USA and the overseas website do not have much information on maintenance or operation. In fairness, normal operation and maintenance are pretty light so they shouldn't need but a one page list of typical things to do. So what they provide is fine for the typical needs. The TLDR then is that I am asking whether there is anything special I should do before starting a hammer that has been sitting for years other than a full inspection as I can muster. Any tips? 2nd, is there any information anywhere regarding a valve timing setting procedure?
-
Thoughts on small air hammers? (Anyang 15kg/33lb)
Vinito replied to Vinito's topic in Power Hammers, Treadle Hammers, Olivers
I would not be surprised to see an older 33 sell for more than $3750. But I personally thought that James' suggested range was not far off after I considered a few things. 1) he qualified that the range was dependent on condition. That can be anything from scored bores & backyard hack repairs to low hours and running good. 2) I couldn't find much actual documentation, but from what I could infer, the new price a couple decades ago was probably closer to $4K?, even including the necessary dealer markup. Sure some things do buck the typical and actually appreciate after you buy them, but I dunno whether that would apply here or not. 3) the new models have several upgrades over the old models, including more stroke, deeper throat, oiler design, die mount, slightly more hammer and overall mass, included base (I think), yada yada. Overall, I would guess that if the current model were sitting next to a newly made old design package on the same dealer's showroom floor, the new one might have a price tag around 20-25% higher than the lesser model. So it's not quite as easy as to just take the current model price tag and apply that to an older hammer since it's not apples to apples. The current market is a factor in selling anything, but a more appropriate comparison might be the current offerings from aliexpress which are clones of the old models, etc. Anyways, you can always ask for a higher price. If you get no nibbles, then you can always lower it until the market responds. These days that's essentially free to try. Sometimes a seller can get a higher price than the market would normally deliver depending on the buyer's knowledge and motivation, so it's worth a shot. If it's been sitting for years, I would think that taking a month or more to sell it is probably not a big deal. Getting the best price may not even be your high priority. I find in my old age that who the buyer is makes a huge difference in my selling price for things when I sell stuff. i.e. someone who is obviously buying something so they can just flip it for a profit is one thing and the other extreme would be an interested nephew who could benefit from a little help, to which I would just gift it. Everything in between is TBD I was just relaying what James said because it seemed reasonable to me. -
I will be a new owner of my first power hammer this Saturday. I'm sure even for a brand new hammer, there will be some sort of checklist and first-run, maybe even a break-in procedure. But since this hammer is not new, I wonder if there are additional other things I should maybe do as a matter of course for prepping for a first run of the machine. I am counting on checking out the lube system and cleaning things up. But for instance, since it's been sitting for years, is there a tip for making sure there is lube inside the cylinders so the initial startup isn't a shock to its system? I would like to make sure nothing is dry and know it isn't dry before I power it up. I couldn't find much of anything online. Power hammers are evidently esoteric enough that even the Omniscient Internet doesn't have a ton of info for them, in my experience so far anyway. One more question is, the two control valve shafts are set to some kind of timing. Yeah, they are set at the factory and a guy shouldn't have to disturb that ever probably. But what if the timing has been disturbed? What's a guy supposed to do then? And how does one determine if the timing is correct or not in the first place? A little writeup on that would be a nice resource I would think. I would like to be able to do some sort of systematic go-through for making sure the timing of the valves is set to optimum. Lets face it, you can't always trust (at best) the worker on the floor at the manufacturer to always be having a good day and set things just right all the time. I would think that even a long-time owner might even not have considered that maybe their timing isn't set to optimum simply because the thing does seem to be smashing metal. Maybe a good working hammer could be brought up to awesome with just a couple minor tweaks? Anyway, I for one would like to know how to verify that the setup is optimum for what I've got. Anyways, any tips on these two issues will be appreciated by me, and undoubtedly others in the future. Also, of course any other tips on getting started with a new power hammer are welcome, because a new guy doesn't even know what he doesn't know. Thanks for any input.
-
Thoughts on small air hammers? (Anyang 15kg/33lb)
Vinito replied to Vinito's topic in Power Hammers, Treadle Hammers, Olivers
A good asking price is kind of a moving target, but I can tell you that when I chatted with James (the owner of Anyang USA) he suggested, for the older design, a reasonable range would be $2,000 to $3,750 - depending on condition and in his opinion. I dunno, but I would expect James to have a pretty solid take on market values since working that market on that machine is what puts food on his table. Probably pretty accurate. For posterity, this post written Fall 2021. -
Forge Friday! (weekly blacksmith fun)
Vinito replied to Vinito's topic in Blacksmithing, General Discussion
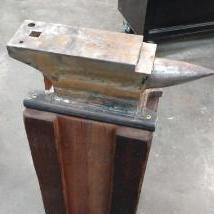
Yeah, that might be call a "legacy" setup. That stump & anvil combo has been sitting outside that garage door for over a decade and not exactly installed as per industry standards. However, the anvil itself has recently benefitted from helpful updates, i.e. much more added mass and a small shelf, plus a couple other new features. The stump will undoubtedly be adjusted at some point soon. You'll notice that the other anvil to the left is situated more righterer because it's entirely a product of more current attention. -
I got to thinking others might like and maybe even do what a couple other guys and I have started to do. I'm new to blacksmithing but older, so you know how life tends to interfere with hobbies often. I was somewhat concerned that over time my blacksmith endeavor could be set aside with increasing frequency as other things encroach, so a couple other beginners and I started meeting up on Friday evenings to practice banging on hot metal. We just had our 6th one in a row and it's already an event I look forward to each week. It's just fun anyway and I think making it a weekly meetup kind of thing will help a ton toward sticking with it so as to gain skill over time. Baby steps and consistent habits seem to be pretty much THE thing to do if you want to get good at something eventually. So we call it "Forge Friday". It's working out really well. Here's a clip I took yesterday. It pretty much captures the mood. Feel free to critique the setup - I'm sure some of you might have some interesting observations. So far it's been at my brother's house, but in a couple weeks I'll probably have a working setup at my own shop too so we can alternate where we meet. Mine may be more suited to being indoors (thinking on a gas forge to suit inclement weather) plus I amazingly just made a deal on a little power hammer so that should also be set up soon. Anyways, Forge Friday is a resounding success. Maybe something similar would be fun for some of you too.
-
Thoughts on small air hammers? (Anyang 15kg/33lb)
Vinito replied to Vinito's topic in Power Hammers, Treadle Hammers, Olivers
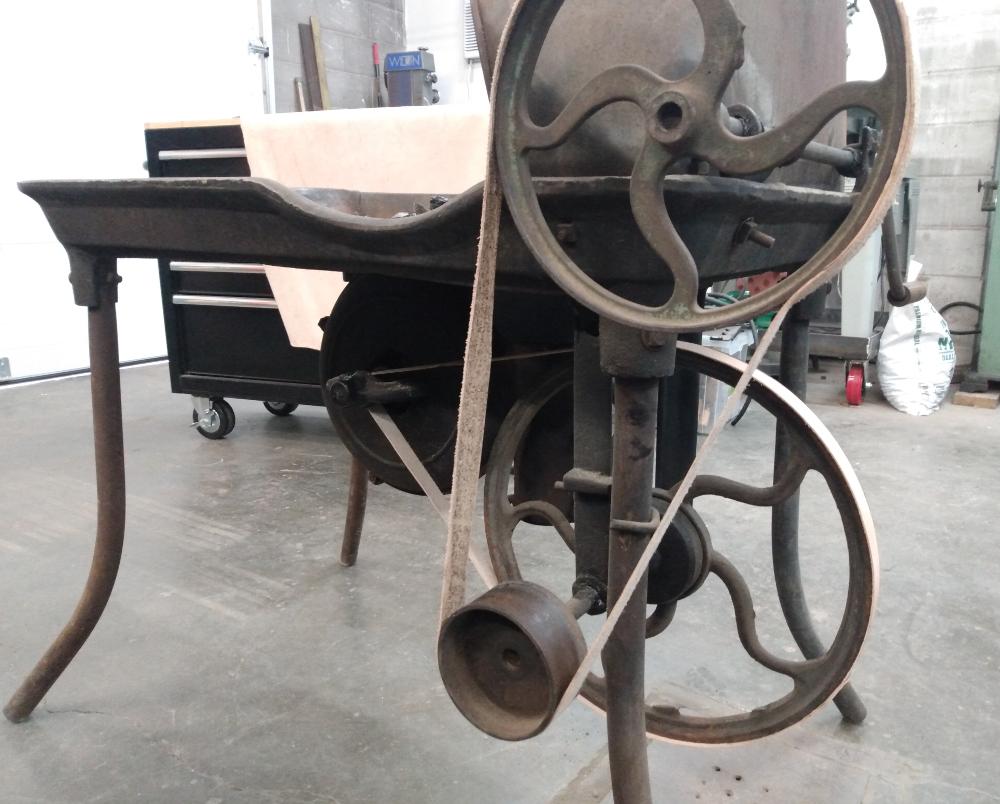
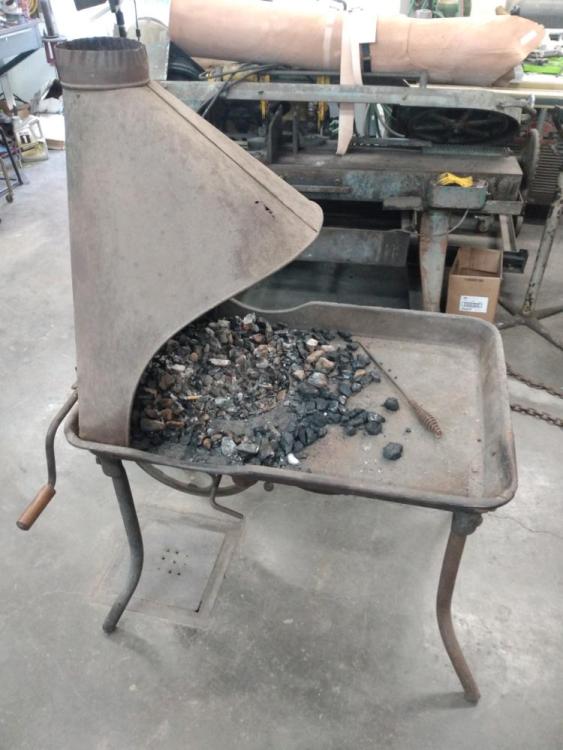
Well we negotiated what I think is a decent deal with the seller, so I guess I'm going to have a power hammer later this week. I tend not to count my chickens and it's not actually in my shop yet, but I did give him a deposit and we're going to coordinate a move on probably Thursday so I feel pretty confident that it will go fine. The seller seems like a solid upstanding feller. He had some spare parts which he handed me to take home today so I suppose that's probably a good sign. One cool thing is included in the deal is a cool little coal forge as well. But the forge is the real deal, i.e. blower, ash dump, clinker breaker, hood. It's better than I was going to build, so I think that's very cool. I'll post pictures once it's here. Also... just wow! I never thought I'd run across a power hammer near me at all and didn't think I'd be worthy of one for quite a while anyway, but now I am kinda pinching myself at the prospect of having one so early on into my blacksmithing endeavor. Since my joints are all so old now, I'm thinking it's maybe not a bad idea to have this to use at this point in my life. So I'm almost doing a little happy dance... almost. Dancing is a little risky for me as well, but you get the idea anyway. -
What did you do in the shop today?
Vinito replied to Mark Ling's topic in Blacksmithing, General Discussion
I took a break from the vacation today, so I worked on getting all prepped for my 6th consecutive "Forge Friday". I'm really new to this so anything I do that comes out functional is goodness. I am old and have done tons of various handwork for decades and I'm a machinist by trade, but inexplicably I never got into blacksmithing until now. Anyway, I got a rounding hammer the other day to try out and found that the flat side bounced off at angles extremely easily. Investigation showed that the face was actually slightly concave, which was weird. So I re-dressed it to be slightly convex, so hopefully that helps. We'll see tomorrow. Also, the other day I picked up a hammer off a yard sale which was rusted and loose on the handle, so dressed that head up, wiped on some cold bluing for cosmetics, dressed the back end to be a bit of a chisel, and re-fitted the handle nice & tight. I dunno if either will end up working well, but I'm hoping my three hammers complement each other somewhat. The square one from the yard sale I figger can be a kind of small finishing thing and maybe the square-ish corners will be useful now & then? The chisel I forged last week so I did some finish work on that today and will try it out tomorrow too. So... short on forge work other than the janky chisel, but it was fun finishing these up. I stumbled on the burned handle finish look kinda by accident and liked it, so that's what they all have now.
-
Thoughts on small air hammers? (Anyang 15kg/33lb)
Vinito replied to Vinito's topic in Power Hammers, Treadle Hammers, Olivers
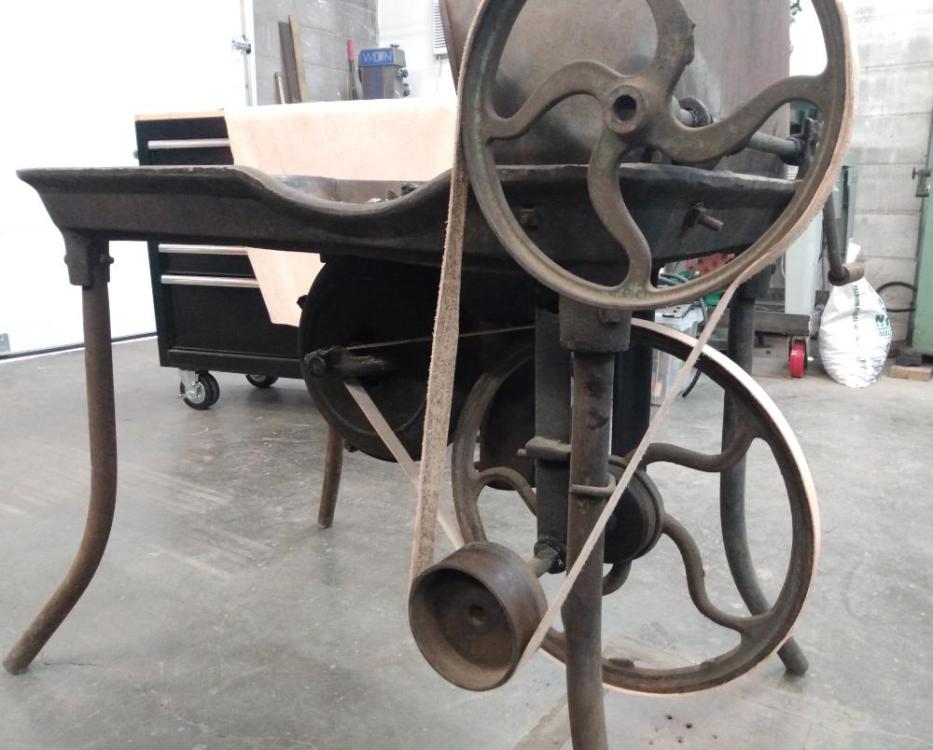
edit to add: I searched a little and found that on these older Anyangs, the ram actually pulls up into the head a fair bit so it has more stroke than just what's sticking out like in the picture. So yeah, it's not the newest whizzbang, but not a choked stroke either. Sooo... it is what okiedokie is I guess. -
Thoughts on small air hammers? (Anyang 15kg/33lb)
Vinito replied to Vinito's topic in Power Hammers, Treadle Hammers, Olivers
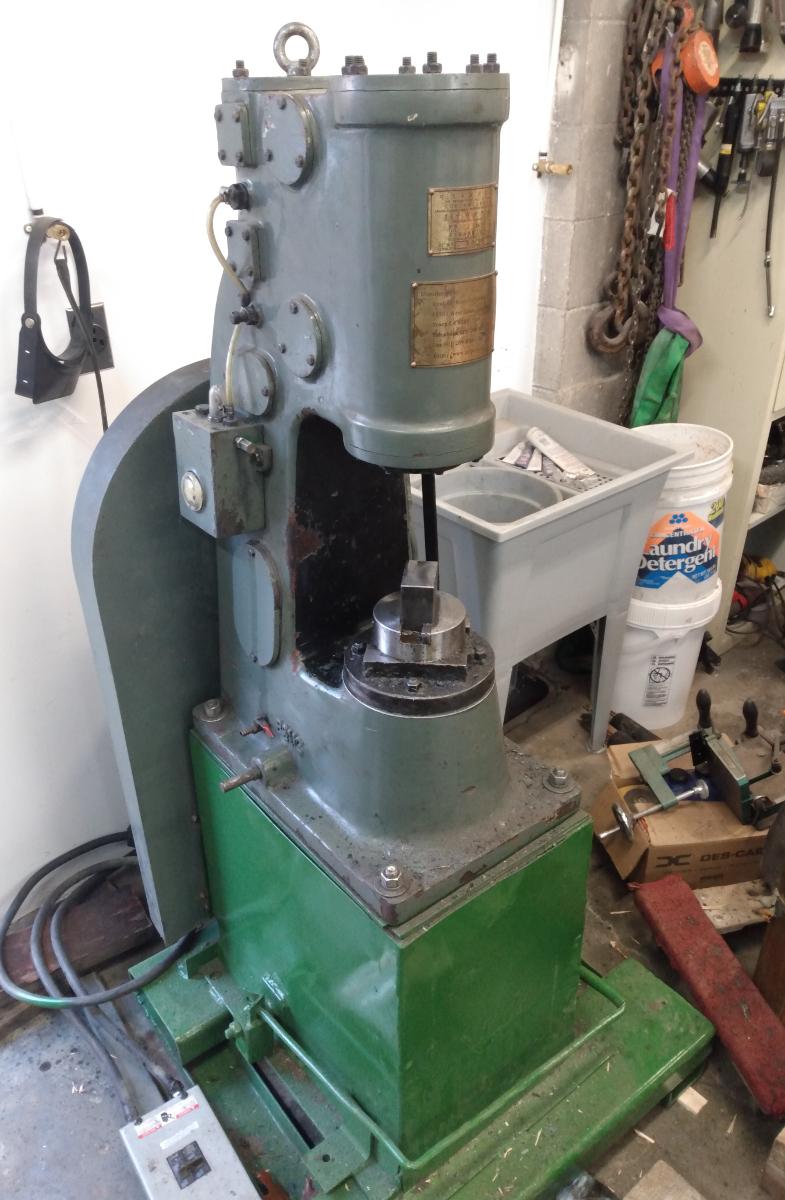
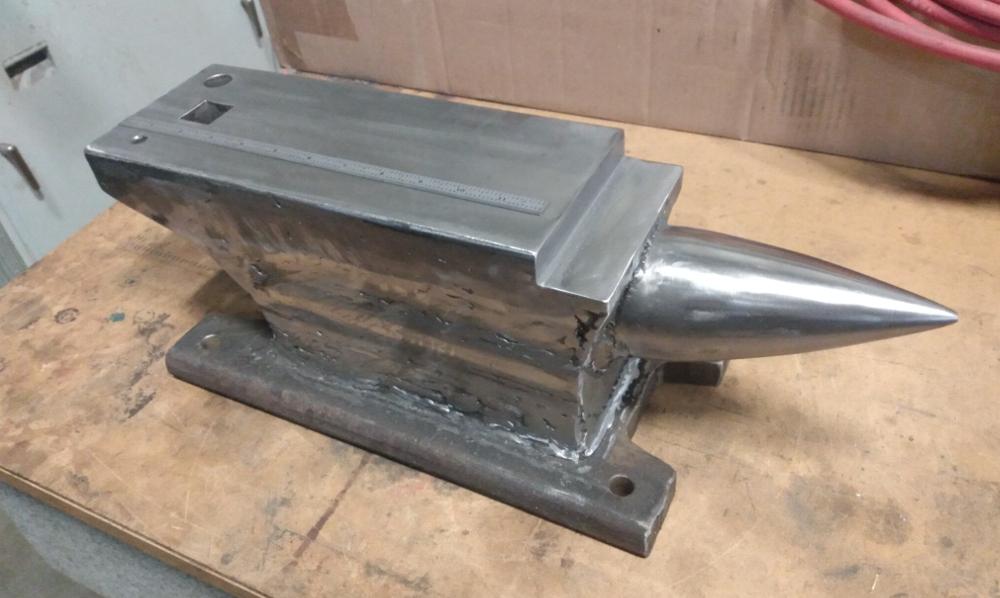
I reached out to James at AFP and he said what's on the nameplate means it was made before 2008, so I'm guessing the date code probably means 2005. I'm going to talk again to him briefly tomorrow for a couple details and make a decision to either get it or not this weekend. At the moment, I'm squarely on the middle of the fence whether I want to get it to play with and give it a good home now or just stick with my Armstrong hammer for a year or so. Just for the tool porn angle, here's a non-flattering full length pic. Is it just me missing something or does the ram appear to only have about 5" of travel with those tall dies taking up all the space in between? Seems odd. I'm suddenly suspect of my original enthusiasm. I guess I could whip up some shorter dies, but it's a head-scratcher.
-
Thoughts on small air hammers? (Anyang 15kg/33lb)
Vinito replied to Vinito's topic in Power Hammers, Treadle Hammers, Olivers
Here's the nameplate, in case that helps. Looks like maybe 2014 vintage? If so, it's not as old as I suspected. If nothing else, maybe this nameplate can help determine if it's a clone or the real deal.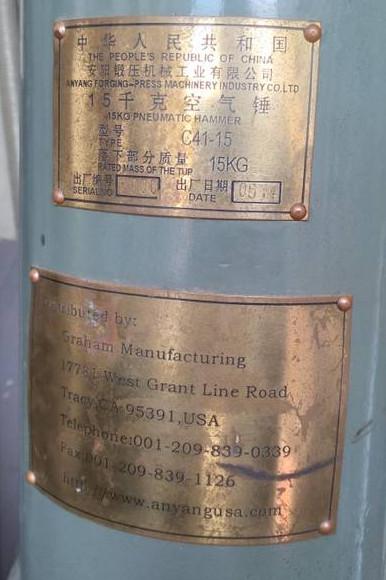
-
Thoughts on small air hammers? (Anyang 15kg/33lb)
Vinito replied to Vinito's topic in Power Hammers, Treadle Hammers, Olivers
By the way... One thing I was wondering if anybody knows, is if the new 33lb hammers whip the old ones on power or control or anything like that. I can probably afford a new one if that's the case, though I probably wouldn't bother with that for a year or two maybe. This thing popping up for me now is what prompted me to consider one at all. Just trying to weigh out getting a jump on learning some power hammering as opposed to kicking the can down the road. I'm kinda OK either way, but since I'm so green, I am either unaware of what I'd be missing or unaware of what I'm getting into and too ignorant to know either way. I guess this is a way of asking if you wish you had got something like this early on your path or are power hammers not that big a deal? -
Hi folks. I am old but almost absolutely new to blacksmithing. Of course I've been internetting tons of info the past couple months or so, thus exposed to a bunch of the tech. That includes lots of time looking into various power hammers, whether they be Davinci, treadle, Clay Spencer, Ken's KZ / MZ hammers or self-contained air hammers. I can build stuff so was thinking I might go that way when the time comes and after I decide which one to go with (ie. start with). Since I'm just starting, I'm already maxing my brain out at the forge just figuring out the basics, so I don't really need a power hammer of any kind at this point. My arm easily keeps up with the baby-step pace I can work at during a heat. But I am liking this stuff so I'll assume that one day I will certainly reach the point of wanting a power hammer. Here's the wrinkle: I have a chance to get a halfway decent deal on a somewhat older (guessing 10-15 years old) Anyang C41-15 (33lb hammer). Wasn't looking, it just came up. It's not a steal, but this little hammer isn't exactly a budget-buster to begin with. Basically the one I'm looking at just a little more than half the cost of a current new one (so probably not much less than it cost when it was new honestly). The dickering hasn't begun yet, so there's that. But no matter, I'm wondering if there are some thoughts on this hammer you folks might have. My own thoughts: #1: I figure at this price I could probably sell it off and not lose a bunch if that was the ultimate fate. If I outgrow it and need/want to sell it off, it shouldn't be much of a loss, if any. That might be a big if, but you never know. I have no idea what size of things I'll want to forge in a couple years... of course. #2: Since it's relatively small, it wouldn't require major infrastructure to run the thing. I'm guessing bolting to a 4" concrete pad probably would do halfway OK. #3: since I'm new, it's something that could be useful enough to be worth having and helpful for cutting my teeth in this hobby. The size makes it a little less to bite off maybe? I can think of cons, but I'd kinda rather not poison the well and see what you guys think about these "little" things first. I do like wielding the hammer, and for decades I've been a fan of various handwork in general, so I promise not to jump that ship and skip learning the fundamentals. This would just be considered yet another tooling option and not a hobble to my learning. After all, having a power hammer is one more skill inside this hobby that might be fun to learn in itself. Anyways, any thoughts you feel like offering are appreciated. Thanks in advance
-
Fabricated anvil build (I'm new)
Vinito replied to Vinito's topic in Anvils, Swage Blocks, and Mandrels
Thomas, those eyelets are a good idea. Funny enough, I am sitting on 6 of those at this moment (the nut variety) because I just this past Wednesday picked up some salvage utility poles for a project and the hardware was left on. I would not have thought of using those on the anvil stand, but I just checked and hammer handles do indeed fit just right in them. Cool! If I don't get fancy and fabricate something from straps & angle, then I'ma go do dat. -
Fabricated anvil build (I'm new)
Vinito replied to Vinito's topic in Anvils, Swage Blocks, and Mandrels
Hadn't updated in a whlie 'cuz... busy beaver. We have stuck to diligently having Forge Friday and this week will be no different. Besides several other things, last week's S hook turned out a ton better than the first one. Each try is better than the last and I expect that to continue moving mostly in a positive direction. I decided to do at least one S hook every time for practicing analysis, greasing the gears and repetition, yada yada. But anyway, here's a pic from earlier tonight. Finally have a halfway decent stand under the anvil. Nothing special, but it's functional and at a proper height for me and I'm very much looking forward to testing it out tomorrow (Forge Friday). It's built up from various 4" thick boards I scrounged. I'll probably add some straps & tool racks eventually. I like to use first & let the upgrades reveal themselves by need.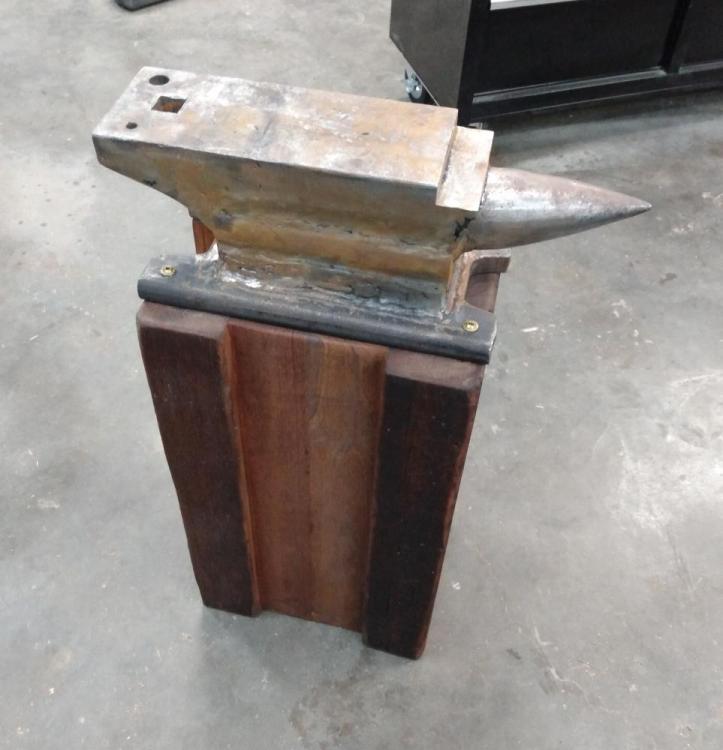
-
That's cool Charles! Do you have any more information, review, opinion, etc. on that firepot? I'd like to know more about it, especially comparison to the standard bottom blast types. I'd love to hear some stories, i.e. "my first forge was a brake drum, then found an antique bottom blast, but my current side blast does this & that..." etc. Maybe you've posted at length on it already? Seems like it might not be a big deal to just orient the air hole like that. I've searched a little on side blast forges and everything that has come up for me so far is pretty large and complicated endeavors. I also love that you've mounted your vise right to the table. I've been wondering why people don't do that more often. I mean I can guess advantage & disadvantage possibilities, but sure would be close & handy. Maybe folks just have more space at their disposal so separate vise location is easy. I dunno. edit to add: I think I should make clear... I am guessing I will likely stick to building a standard bottom blast firebox in my forge since it seems to be a simple tried-and-true design. I am a beginner and don't need to get in over my head about something I know nothing about. I am just curious about your firebox and wouldn't mind reading up a bit about it. Seems like every side blast design has water cooling and a bunch of other complexities. In my case there is too much freezing risk of that so I won't even consider that for a long, long while if ever. But yours looks like just yer basic pyramidal firebox except the air comes in the side a little off the bottom. If that's the case, then it's actually simpler than a traditional bottom blast type and I'm into simple if it works... and also if a no-experience beginner like me could operate the thing without it melting a hole to china. Anyways, just wanted to clarify that I'm curious but not going off the deep end.
-
Fabricated anvil build (I'm new)
Vinito replied to Vinito's topic in Anvils, Swage Blocks, and Mandrels
At the third "Forge Friday" in a row at my brother's forge, the anvil performed great. I did some S hook practice which was frustratingly more challenging than I expected, but just kept thinking it through and pushing to an acceptable final hook. Just one, but my first one ever so... My brother finished a split 3-hook coat hanger thing he started last week. He faced similar confusions thinking through the steps but seemed satisfied with the result. Then he drew out some rough-cut copper bar out to be a little over 2x original length and round. That was interesting. It's going to be parts for some cooking utensils. Then I beat some 1-1/8" hex jackhammer shaft into a hardie cutoff chisel. This was my first try with hard material and it took a couple heats to realize it works a lot easier once you get it hot enough. I first got one end to fit my 1" hardie hole and that went better than I expected (encouraging) so then it was just a matter of shaping a chisel to the other end. I am not sure why - maybe because I half expected it to not work at all. But this was extremely off-the-scales gratifying. Once done, I just kept having to drop it into the hardie hole over & over to witness how well it fit. I'm not sure if the chisel shape is exactly what I want, but it's pretty close and of course I can heat it up again and tweak it. The piece of resistance for me was we cooperated for more hands on deck and on the third attempt, we forge welded some bar stock together. Also don't know why, but this was very gratifying. After reading (and learning from) several queries from people attempting this with no success for years, and both of us having xxxxxxxx tried it a couple times in the past with a torch, it was pretty cool to persevere and have success on the first night of trying it in earnest. Two things I wasn't previously aware rose to obvious priorities, which is kinda what this learning stuff is all about. 1) I now have got to shift my attention to building a proper base for the anvil. I set it on an existing log stand thing and it's at least 10" too high. This often made things somewhat awkward to deal with and you could really feel how tired your arms get having to lift everything up so high. 2) I am sadly uninformed about metallurgy for a layman, but especially for a dang machinist. Honestly (possibly surprisingly to you) it just doesn't come up all that often in my job so whatever little I ever knew has been replaced in my brain by other data long ago. So I just need to focus on that bit. Also might have to look around for a budget heat treat oven for tempering, though a kitchen stove might work for some things for a while. Anyway, the hardie chisel has been half-hardened but I need to look into things (like what the metal probably actually is) and what it takes for a proper heat treat. Important but lower on the priority list is ... proper fitting tongs are important! we have about 10 tongs to choose from, but most of them need attention and none of them fit great. Good enough to play, but that's it. Good tongs are gonna be a thing soon. Forge Friday #3 was a resounding success! OK this has rambled long enough. But the anvil performed great and helped to illuminate my next priorities to address. -
Fabricated anvil build (I'm new)
Vinito replied to Vinito's topic in Anvils, Swage Blocks, and Mandrels
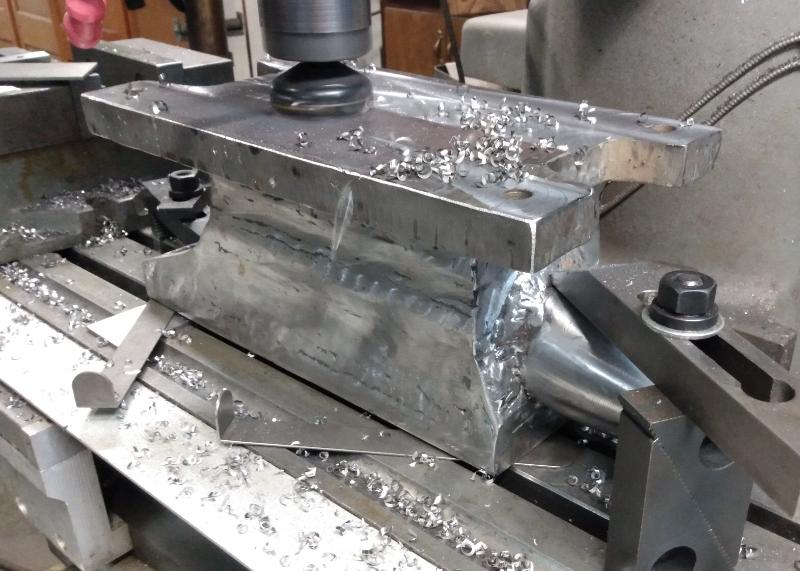
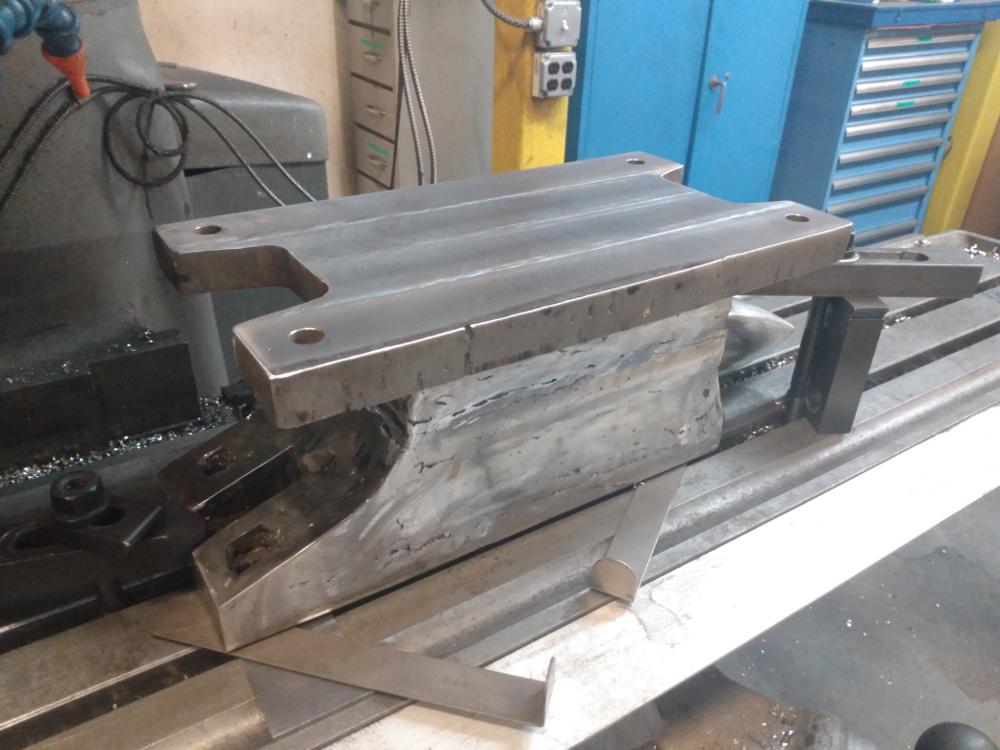
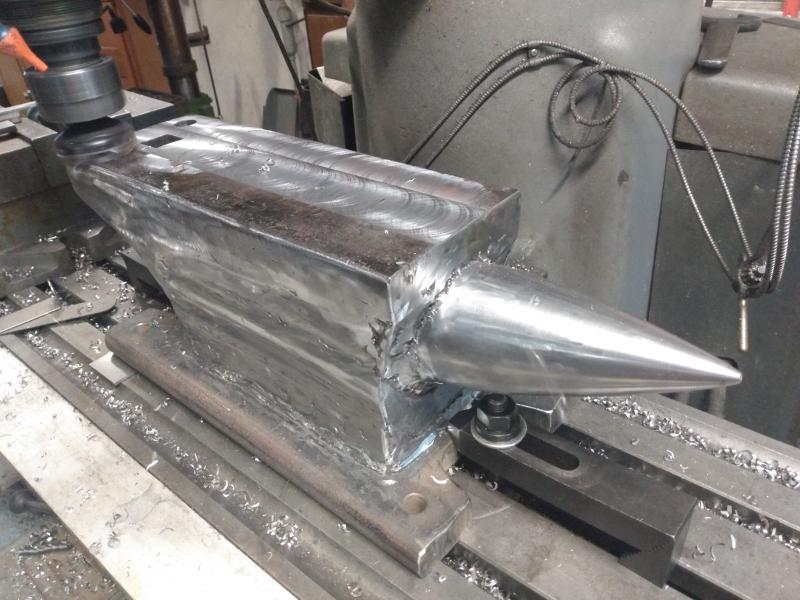
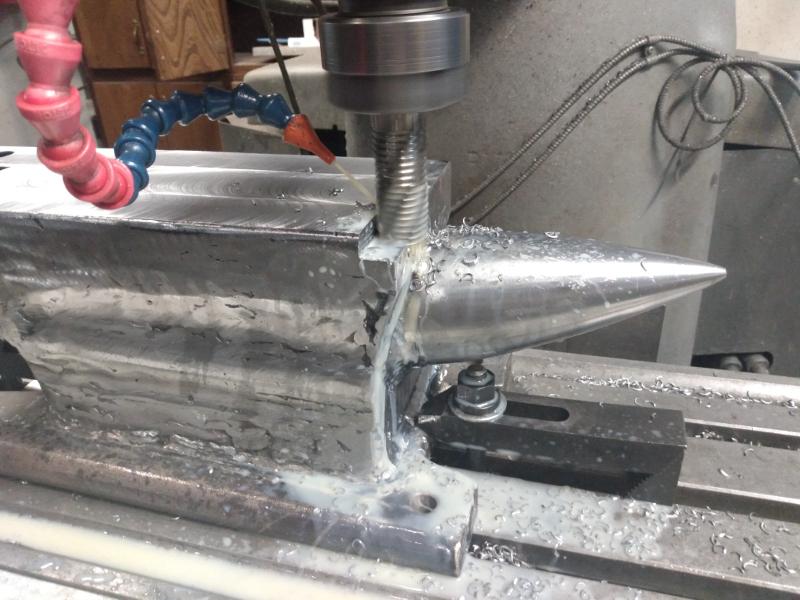
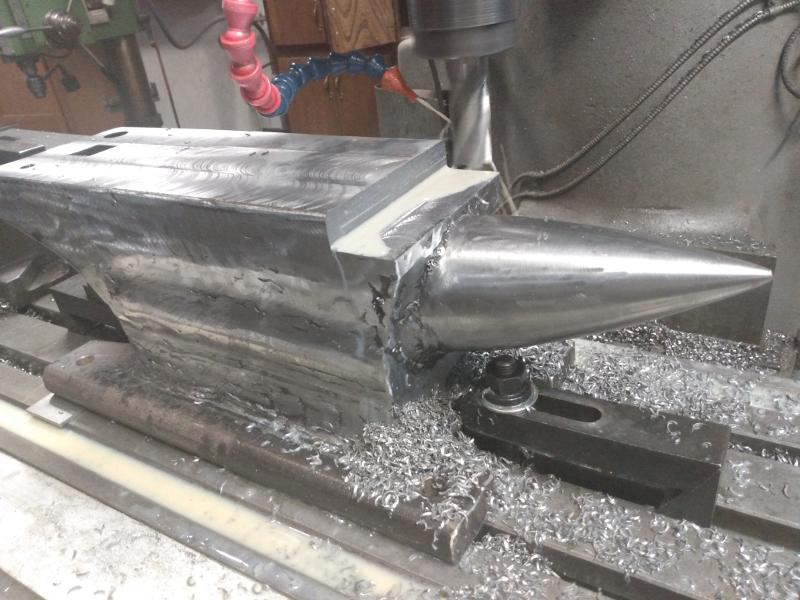
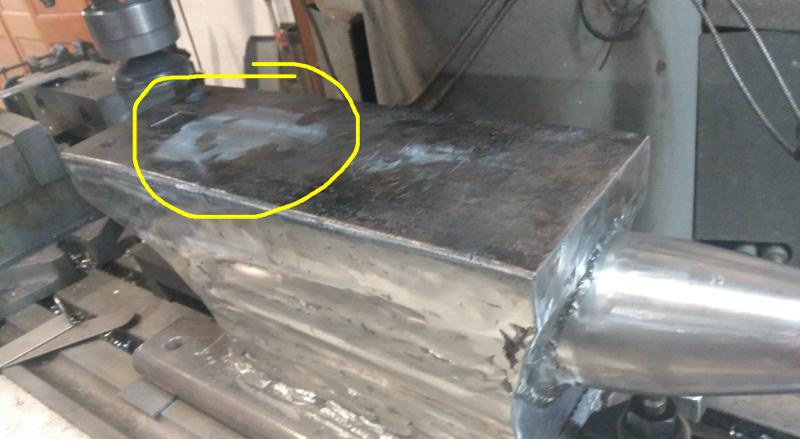
OK here's the pics. First I clamped it upside-down to establish a flat base. Then flipped it to mill the top. The yellow-circled area shows the high spot from a light pass. It was humped about .050" total. If you're metric, then DO THE MATH! I mean that's what I have to do. Then I decided a shelf step might be handy and the material was there, so did that. Once all that was done, it was just a matter of deburring edges and a light minimal flap-wheel polishing just to get rid of the machining marks. Oh yeah... and I whipped up a little bending jig for the Hardie I'm happy with it! Hope it's not too many pictures.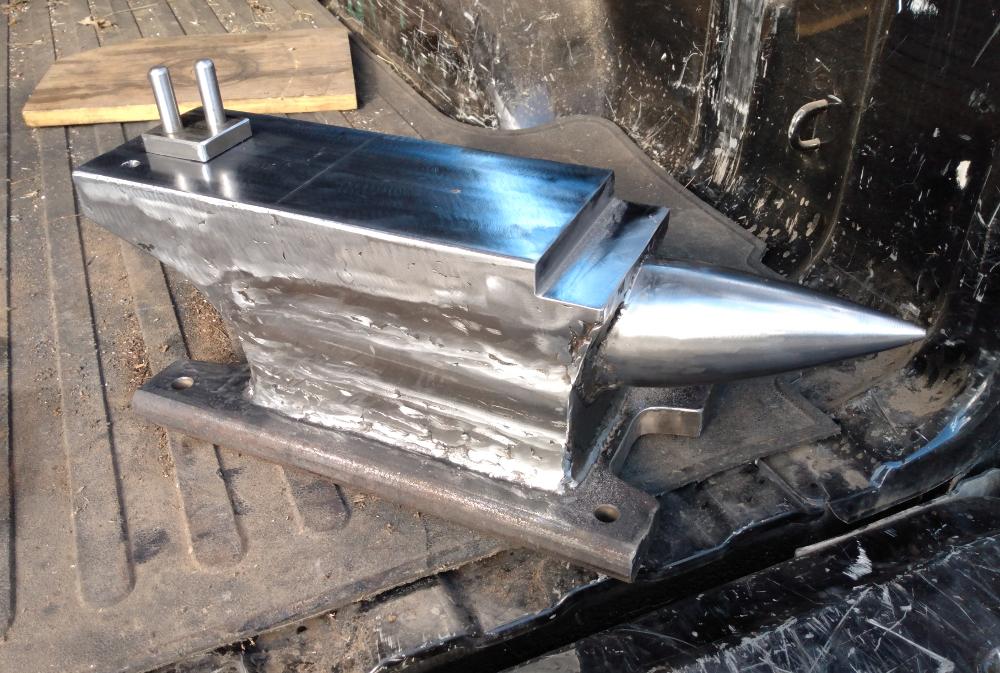
-
Fabricated anvil build (I'm new)
Vinito replied to Vinito's topic in Anvils, Swage Blocks, and Mandrels
Thanks Frosty. Yup I have a pretty good selection of copper that I use for welding helpers pretty often so was already planning to do that on the edges. Brass works OK and that's what I have for the holes so I'll be using those pieces shown before for that. But it's always good to add the suggestion because a) anyone who hasn't heard of that will benefit from learning the tip and b) I am constantly forgetting crap like that so you may have helped keep me from forgetting... I'll report back once I do it and we'll all find out together which way that went. -
Fabricated anvil build (I'm new)
Vinito replied to Vinito's topic in Anvils, Swage Blocks, and Mandrels
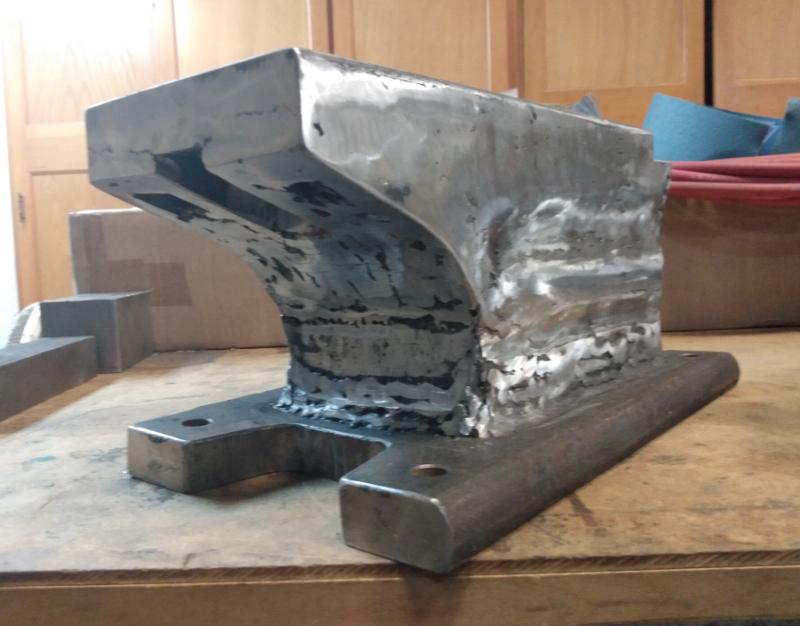
I'm calling the anvil "done". I'll hardsurface it someday but it should work well for a while. The top & bottom are flat and there's a ledge now. It's reached the point of diminishing returns. I could fill & polish the thing for a week but that honestly seems kinda stupid considering its function. It looks shop-made and I don't mind that. If my welding was better it would look less rough, but it is what it is. I'm going to try forging on it a bit again tonight and see how I like it, but I liked it before and I'm pretty sure it's improved now. I tried to include some pictures but my phone won't upload to this site for some reason. I'll upload some photos of it acting done and also a couple of the machining once I get to my PC. Could have waited to post this too, but just consider this a teaser I guess.