Vinito
Members
-
Joined
-
Last visited
Everything posted by Vinito
-
First, much apologies for this verbose post. Sincerely! anyways... Had our first "Forge Friday" with the new functioning hammer. It was a success that I'm very pleased with, but not 100%. There are three problems that I'm aware of so far. Fortunately I am a machinist and can address them. If a guy had a different profession, these problems would be much more disappointing. Not that I'm not disappointed, but much less than if my options were fewer. 1) the lower anvil (called the "anvil cushion" in the manual) is acting... strange. Not with the hammering, but rather with die alignment. It was missing the retaining pin (centered underneath inside the slot in the die), so I machined one. Once inserted, the lower die was misaligned (offset) lengthwise from the upper die by about 3/8". At least now I know why the alignment pin was lost in the first place. Measuring things, I verified that the spacing of features appeared to be centered on themselves as they should be, i.e. both on the dies and the anvil. Yesterday after using the hammer for a while, the offset had reduced to more like 1/8" which is just odd and I haven't yet looked into it enough to know how this has shifted. It seems obvious that somehow the anvil must be moving, but I don't know enough to know how that is even possible. I'm halfway hoping that the bore the anvil (cushion) is fitted to has a fair amount of gap which I can address. Also, I'm assuming (hoping) that in the original manufacture of the hammer, the ram and anvil bores were kind of "line bored" to be located on the same line axis. I did verify that the casting is not cracked or anything (fortunately). 2) Stacked upon this, the dovetail for the dies is dorked up significantly. The bottom face seems decent, but the fixed side is pretty beat and also doesn't match the side of the dies well at all (7° spec in the drawings). This of course leads to the die working itself loose fairly quickly in operation as the fit of the dovetail/key is just not good. Way less than even 50% contact bearing. Seems my solution to this will be removing the anvil, building up material and machining it back to where it fits well again. Not a trivial job, but it's in my wheelhouse so I can do it. 3) related to this but somewhat separate, the dies themselves vary in spec. or in fit I guess. The flat die is almost 1mm (.040") narrower than the other 4 sets of dies that came with the machine, which is enough that the key doesn't even begin to fit the gap of the other dies. The crate of 4 other dies all seem to match each other fairly well, so it's the flat die that's out of spec. The flat die is also bungled up on both the dovetail sides and bottom and top faces, so it could use a complete tidying up. The other dies have seen little to no use and all seem to be in good shape as well as matching in dimensions. So my plan of attack is: 1) inspect further and take careful measurements 2) remove the lower anvil and inspect deeper both the die slot and the fit into the casting bore, possibly machine soft spacer ring to help alignment 3) close inspection and measurement of all dies 4) document all measured dimensions for analysis 5) repair what's necessary for as close as possible to 100% contact bearing of dies to dovetail fit 6) maybe manufacture new taper key to allow for use of other dies if necessary So it's a fair amount of work, eh? This tells me another thing, i.e. the rumors I've heard of this hammer having 100hrs of use are boldface wrong. This kind of damage/wear is almost impossible with 100hrs of operation. Not a huge deal in some ways, but at least another data point for my own records. Sooo, the good news - Upper die fit is pretty dang good. No problems there at all in both appearance and function of fit. The 7.5Kw VFD seems to drive the machine just fine. Big "Yaaay" in my opinion which saved my close to $3K compared to the remaining other solution. The hammer does indeed have (to me) amazing power to smash. Also it's painted green, so I may get out some paint and name-tag "Hulk" on it somewhere. Control is very good - basically exactly what you would want & expect out of a self-contained like this. So all told, I remain pleased to have acquired the hammer. Let me know what you think.
-
Thanks Neil. I'll open it up and check that out. I'm fairly sure but not positive that this machine hasn't had the covers off since it was purchased, so it's probably in dire need of a greasing anyway. I've was told that the machine possibly has less than 100 hours on it. I have been near humans before though so I'm sure that's at least an exaggeration, however it's probably not got a lot of wear due to lack of lube (sure sounds decent at least). But I'll feel a lot better after it gets a proper greasing. So I'll see what else I can glean from an interior inspection. Having said that, the crank and con rod are not greased by oil but rather just grease zerks, so a splash paddle is probably not on the menu. Sure won't hurt to see what I can learn by studying the insides a bit.
-
Ran out of time to edit in a couple more thoughts, so FWIW... All I can imagine regarding wear due to direction is maybe a "spun bearing" situation is more likely in one direction vs. the other due to bearing design? Of course this would really only apply to a plain (i.e. babbit) bearing and not a roller bearing as far as I can guess. I dunno. Such a simple thing and without the dang label I'm a quivering, ignorant meat bag. Just to be clear, I'm not skeptical about the correct flywheel direction being important and I would like to spin it in the recommended direction. I mention this since my thoughts on this so far seem to paint me as doubting that the direction matters, which isn't really the case. I simply can't visualize why the direction should matter because of some undoubtedly erroneous mental block that my brain has erected. I can't seem to work it out. What would be neat to find out is that Striker hammers all had the same flywheel direction no matter the size or vintage. If that were true, I'd be golden. But I have no idea if that is true or not. Thanks again, and in advance for additional advice.
-
I have the manual for the machine (miracle!) but it does not mention flywheel rotation direction unfortunately. The grease lube (crank & con rod) is via zerks so that should be pretty straightforward. The oil lube is via vacuum oiler which functions fine in either direction (yes, I tried both). Since the piston draws the vacuum by simply oscillating up & down, the flywheel direction essentially has no difference on the function of the oiler, I mean it moves it up & down the same way no matter which direction the crank rotates. That's why I'm confused. The only possibility I can think of is that pulling to, say, the left on the downward stroke and the right on upward stroke, might mean something if reversed. In other words, the only difference I can think of is the direction vectors of force on the bearings/crank might mean something, but I'm not sure what that would be. Maybe the bearings are more likely to spin in one direction vs. the other due to bearing design? I dunno what that difference might be. It's too bad the darned thing came to me in pretty good shape other than the direction placard being torn off. Typical Piffle for me I say. Just my luck. Anyway Frosty, thanks for the suggestion to contact Striker. I've read that local (USA) sources are now all defunct so IF there is any hope of contacting anyone, it would be direct to China I guess. I'll give it a stab in the next few days though and see if anything good comes from it.
-
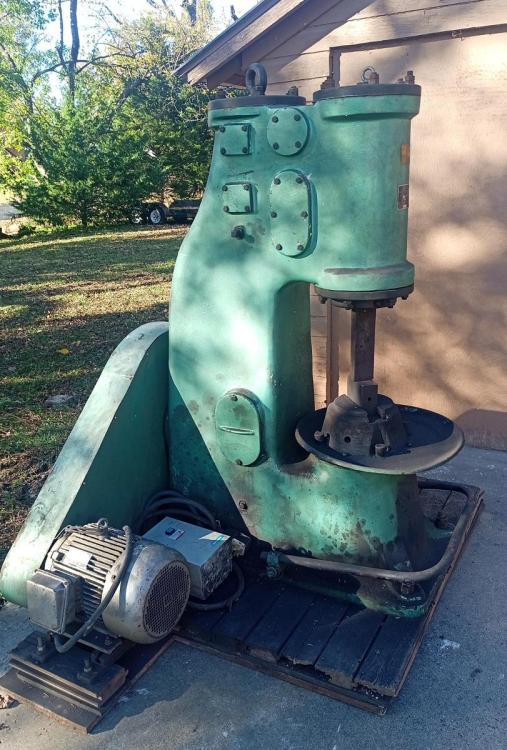
Hoping for someone with one of these hammers to be around here. Could be even a different vintage of same machine could be different, or maybe it doesn't matter either way? I just picked up and got running a 75KG (165lb.) Striker C41-75 hammer the other day. Pretty sure it's 2000 vintage (11/2000). Pretty happy with it. There are a couple details that I'm disappointed about, but easy workaround and shouldn't affect proper operation. First up though, the belt guard sheet metal on the back just happens to be missing the little plate showing correct flywheel rotation direction. The old rivets are there and witness mark of where the plate used to be, but plate is long gone. The more I think about it, it seems like the rotation direction really shouldn't matter and even if it spun backward from what the plate used to say. I mean the crank just raises the air piston up&down in a linear fashion at whatever rpm the motor spins, so functionally it should operate identically either way. Am I mistaken here? The only reference to similar is is a page showing lots of info on a Striker STC-88 hammer (88lb. not 88Kg I presume). This hammer has a different model number and appears different vintage, so not sure if his plate is what mine was or backward, but photo below is what his had: His motor is mounted underneath and on the left (looking at it from the back) and mine is mounted low and on the right looking from same perspective. This motor mounting location alone might change motor direction maybe. I don't know. It's close, but not an exact match to my hammer for sure. Here's the quote from this website: And later mentions this Is it even true that excess wear of compressor cylinder may occur" I can't understand why that would be the case, but I could certainly be mistaken. Sorry so verbose, but details might be important for proper assessment. In short, if somebody has a 75KG Striker like this one, if you could tell me what your label says for direction, I'd appreciate a reply. Could be that Anyang and other similar makes & clones all rotate the same direction by design, so if you know this is the case that would be helpful as well. Maybe there's a general rule of thumb that simple analysis just makes the proper direction of rotation evident? For reference, here's a photo of my machine in case that matters: Thanks a lot for any advice.


-
Thanks for the good news. Yeah, it seems to function very well as far as I can tell. I just don't know what I don't know, thus the question. I was indeed tapping very lightly when it was doing the "tap, miss, tap" thing. I wanted to try some bigger stock, but wasn't easy at-hand. I really want to try smashing & upsetting some large stuff soon. I have a fair amount of spare 2" square stock. That might be the perfect victim for a good thwacking if I can get it hot enough in my little forge. A forge upgrade is also in the works, but it's early stages so far. Side tangent: my forge upgrade design has evolved a lot over the past week or so. Out of the gate is was going to be 24" long, but practicality and better sense has slowly been creeping in and it's down to 14" max length and ribbon burner (originally 12" long) might be 6" long and 8" at most. I'm glad I didn't just dive in. Letting a design evolve in my head seems to always end up much improved before I touch fabrication of the first piece of anything. I guess it pays to not be in a big hurry.
-
Made a start-up video. Check near the end and hear that the machine is doing a "tap-miss-tap-miss" kind of thing. I've seen that this is a "thing" on some hammers and I hope you can tell me if a) this is just standard operation and run with it or b) this is a possibly annoying control issue that can be adjusted out. Just generally, I'm new to this thing, it is a fine line to make it occur (thus far) and I would think that I can just get used to it if that's what people do through this phenomenon. Anyway, hope this video is at least somewhat interesting to some of you guys. YouTube video link:
-
I got to thinking about the weirdness of the bogging down with the VFD and my stupidity was revealed yet again. I thought "maybe it could be due to slipping belts?" I checked them and they were indeed significantly loose. So I snugged them up and tried it again. I'll be danged, darned and a monkey's uncle. That actually worked!! Holy Carp. The hammer still starts up slow and easy, and now there's zero bogging when the ram is engaged, and a quick, hard step on the pedal bar and WHAM! I do believe this is more what was intended. I guess the motor shifted a little in transit or something and loosened the belts. I do need to so some shimming as the thing rocks pretty bad. My current floor is known to be very non-planar. I think once I get that done, and several fiddly odds & ends I've been working on, i.e. missing screws, die fit-up issues, etc. - Oh yeah, did I mention that the hammer came with four additional die sets? Anyway, I tried one and it's way different width in the dovetail, so I need to either shave them all to match or make some matching taper gibs or something. Anyways, just fiddly stuff now.
-
I gave the hammer a go from a 10hp VFD. It almost works, but I think the VFD just doesn't have enough poop to do it quite right. I gave it a 10 second ramp up time and that seems to have worked. No signs of any kind of amperage spike problem, and it gets up to speed, while in idle of course. However, once I engage the ram, it slows the thing down significantly, which I really don't even understand as it seems like the VFD sending out 60Hz is what it's doing for sure, yet the hammer's motor gradually slows down between 10% and 40%. Maybe the motor is just getting out of sync and just doing the best that it can with the phases that are being sent to it. I will say that slathering a little oil to the ram while it was down and also letting it warm up for a while does lessen the bogging problem, but not completely. And the biggest problem is that when I fully engage the ram (pedal down quick and hard), it struggles and doesn't hit very well, i.e. not nearly as hard as it did on the seller's RPC. It's a little like having half the hammer it could be, so that just won't do. So I guess I am at the point where I probably could kind of use the thing somewhat, but it's probably not doing the motor any good if I did. Thus I'm probably looking at investing in a RPC. The folks at American Rotary recommended either an ADX25 or ADX30. There's a pretty large price jump between the two, and I saw the machine running on a basic 15HP rpc at the seller's shop which ran it just fine. So for the moment, I'm pretty sure I'll be ordering an ADX25 RPC from American Rotary this week. So add around $3K to the price of the hammer, but the RPC is an upgrade in both power and quality from my existing one. Honestly, my existing one is a bit of a hack job to begin with, so it might be nice to remove it from my list of substandard stuff anyway. Point is, the new RPC will be spread amongst 7 other machines besides this hammer, so can't quite focus all the blame on it. Having said all that, it was pretty cool spinning up the hammer and testing it out today in my own home shop regardless. All in all, it's a step forward. Anybody need a video? I'm a little beat for the day, but could throw something together if you really want to see it.
-
Because it will take some time for me to make the siding I need to match the old shed, I tucked it inside my other shop so it will a) be out of the weather and b) I can work on the phase conversion options until I achieve success running the thing reliably. I'll pull it back out to place it in the previous location once I am set up to build the extension quickly. The extension will also function as a dedicated blacksmithing area too, which I'm looking forward to setting up. I like looking at progress pics, so I'll assume some of you feel similar. Behold the pics. One is before and the other two are after a wet-gas-rag bath. Just a once-over, but I can see more what I've got here and I think I like what I see. By the way and a little more specific, this is a Striker brand hammer 75Kg.


-
Well it has arrived. Hauled it home today and lifted it off the trailer with my telehandler, and was surprised the machine would lift such a heavy load. The base was different than I thought. It's a 1" plate with 1" rubber atop that then capped with 2" wood planks. I figure the hammer plus the base (that plate adds 1K or so) is around 7200 lbs. if the specs from the manual are correct. So new plan as well. I set it on a concrete pad in front of a shed, so next weekend I plan to build an extension around it. This solves a couple problems, but mainly keeps me from being so cramped. But it will be nice to have one area segregated for the blacksmithing. I have a move in my future in about a year (with a much larger shop), so the certain mission creep I'm in the middle of will have more space to fit into once that happens It's really great to know that my telehandler is powerful enough so moving the machinery won't be a big deal. This hammer is double the weight of my heaviest other machines. Anyways, today is one of the good ones.

-
Yeah, this is basically an Anyang self-contained with a different name, and it does indeed have very nice progressive control. I was lucky enough to get a 33lb Anyang a couple years ago and have become fairly decent at controlling it since then. While I haven't seen a manufactured hammer with speed control designed into it, I have seen a couple guys attach a VFD to a self-contained hammer and used the variable speed, but personally I don't see much of a point to it other than some guys might have a druther regarding maybe the frequency of the whacks. Like you pointed out, you get such nice control with these already. I guess a bit of a variable speed range wouldn't hurt (within reeason), but all the ones I've seen in videos or whatever, even the cheapest clones, appear to have dang good control designed into them. Admittedly, I am extremely inexperienced and mostly hoping to raise that to "kinda inexperienced" one of these days so FWIW.
-
Yeah I feel ya Frosty. I currently have eight 3-phase machines here total and would LOVE to have 3-ph run right to my house, but it's a prohibitive fortune even if you could convince them to do it, which is a whole 'nuther matter. Fortunately, years ago I set up a small rotary in a separate building for the stuff in there and have 3 or 4 VFD's on other individual things. The small rotary is plenty for those machines but they need much less than this hammer does, thus my consideration of buying another one. The other VFD's I've installed are more for wanting variable speed than just conversion (other than that one mill I spoke of earlier). But I am not quite a sparky. I am a machinist at the plant so more aligned with the mechanical stuff. But I do have several electricians "on retainer" so I could possibly relay questions & replies. BTW, I am now leaning more toward the VFD route on this hammer IF I can verify that it can handle the current it will draw. The seller sent me a photo of the motor info plate so I'm gonna pick the brains of a couple sparkies at the plant and do some research of my own. Of course if I find one with suitable specs, I'll need to fab up a decent enclosure arrangement to keep out the dirt and vibrations while still allowing adequate cooling of the unit. I wouldn't run a typical VFD without some beefing up of the enclosure - just asking for premature failure if a guy did that.
-
Thanks guys. Good points. I agree that Frosty's safety concern is valid and worth expressing in the thread, both to me and posterity. I mean he doesn't know me and should assume that I may be blindly driving a safety train off a cliff. I would do the same. I work at a power plant and I'm so used to having a couple dozen skilled electricians at arm's reach that I forget to consider my situation is certainly not normal. These guys would be great for making sure my wiring is safe and up to the task, but they aren't necessarily doing home shop stuff and thinking through the compromises we lowly normies face. But I will be asking around at work too. Larry, this hammer does have a "run" and "idle" setting lever. I guess that means the weight of the compressor cylinder, linkage and pulley is still added to the starting load but still helps significantly. Good point on the motor nameplate and I'll see what I can do about that before calling around. And I'll look at the Phase Perfect stuff and see what I can learn about it. I agree with you Mike on the VFD possibility, and I may yet go that route in the end. The reason I'm leaning toward an RPC is that I also have a lathe and mill in the same room, the mill already having a mechanical variable speed arrangement and the lathe having three motors on it (spindle motor + coolant motor and feed motor). The lathe is an almost finished restoration project (not been powered up yet) which is why it hasn't been a problem thus far, and the mill just has a small VFD running it up to now (just have it set to fixed 60Hz since variable speed unneeded). So I was thinking an RPC might be a good solution to what's evolving in my shop. Having said that, I can solve my lathe power issue by other means and maybe a suitable VFD would suit the hammer for less money, especially since it's probably just a temporary setup for a while. Hmmm. I have some thinking & researching to do. Thanks a ton for the input guys.
-
Yeah, I can hardly wait until the day I get to TAKE some pics. I'll try & make them good. The seller had the hammer on a kind of sandwich of one layer of thick rubber between two layers of planks. This comes with the hammer and the base of the hammer is anchored to this base sandwich thing but not to the concrete floor. It's about 5' or so square by about 4" thick total, and looks like it would significantly spread out the load. I didn't ask him about his concrete floor, but it looked like yer standard 4" slab though I could be mistaken. I suppose a standard 40' x 60' building like his might have 6" concrete too. Maybe you guys know which is more typical for that kind of structure? At any rate, during the running of it today, there was certainly no sign of the thing moving or rocking at all, so that sammich must be doing some good stuff. In my case it will temporarily be in my garage on a concrete floor (about 5" thick), but will be moved next summer to a barn I'm building, so I'll be able to pour a nice thick isolated pad for it there. BTW, regarding the RPC question... the seller is feeding his with a 15hp RPC and it handled it fine for what little time we were there. And when I mentioned 10hp above, what I meant is whatever size RPC would suit the 10hp motor. I guess it just my non-trusting nature, but though I will be discussing this with the RPC vendor, I feel I can only give them some less-than-100% belief that they will give me an honest recommendation rather than try to upsell me on something that's larger than I need. You know the drill. That's why I like to ask here too because even if you're not an expert, I'm just in the "soaking up data points" phase of this decision today so I'll be weighing out whatever I can take in at this point. Any input is welcome. Thanks
-
To be clear, I'm not looking for answers to code compliance questions. There are lots of guys with experience running machinery with a rotary phase converter and just want to pick their experienced brains for even anecdotal info regarding what they may have run into in their histories. I guess all I'm wondering at the moment is whether anyone has made a similar decision in the past (matching an RPC to suit their largest load) and either found that to suit their needs well or regretted that decision because expectation clashed with reality. Sorry for the confusion but thanks for the reply & input anyway Frosty.
-
Well I'm pretty stoked. Just got back from looking at and making a deal for a power hammer. I was keeping my ear to the ground for a larger hammer. I have a 30lb Anyang, which has been fantastic. But of course, as one does, a growing jones took root and the desire for a little larger one got real for me. I figured for my shop and electrical arrangement, an 80lb or possibly 110lb hammer would be nice. Of course these things just don't drop in your lap though... except that this one kinda did! I figured if I got one, it would almost certainly involve a road trip and motel stays and such. But lo and behold, one came up within a half-hour drive. The wrinkle is that it's significantly larger than I though worth considering, but looked into it and figured out that I can indeed alter things enough to suit the 165lb hammer on which I decided to pull the trigger. It's essentially an otherwise labeled Anyang. Certainly that same style and casting. It will be a week or two before I move it here and place it, but maybe that means in the meantime I can work out the electrical upgrades I need to do to suit the thing. So.... apologies in advance to my neighbors. But hey, the bigger hammer means their knick-knacks & silverware get disturbed for a shorter portion of their day, right? So I'm still a relative newbie to this whole thing so I feel quite fortunate this has come my way. I'm certainly still on the very low end of the skill scale. But I'm also old enough that minimizing the shock to my joints & bones of striking sledges is definitely worth significant concern too, so I feel absolutely zero guilt in my luck. I'll post back with more entertaining content once things start happening. Should be getting it in place in a couple weeks. If I do some electrical stuff beforehand, I'll post about that too. Honestly, I may (likely) have some questions and hope you all can help me through that part. The hammer is 10hp 3-phase and I have a lathe and mill which also use 3-phase. So I am leaning strongly toward investing in a rotary phase converter to run all that. The reality around here is that I will never be running more than one of these machines simultaneously, so probably just a 10hp rated rotary converter will probably do, but give me input if you think I'm off track. I plan to phone America Rotary for advice on this too since I plan to buy the RPC from them. Anyways, it's been a good day today.
-
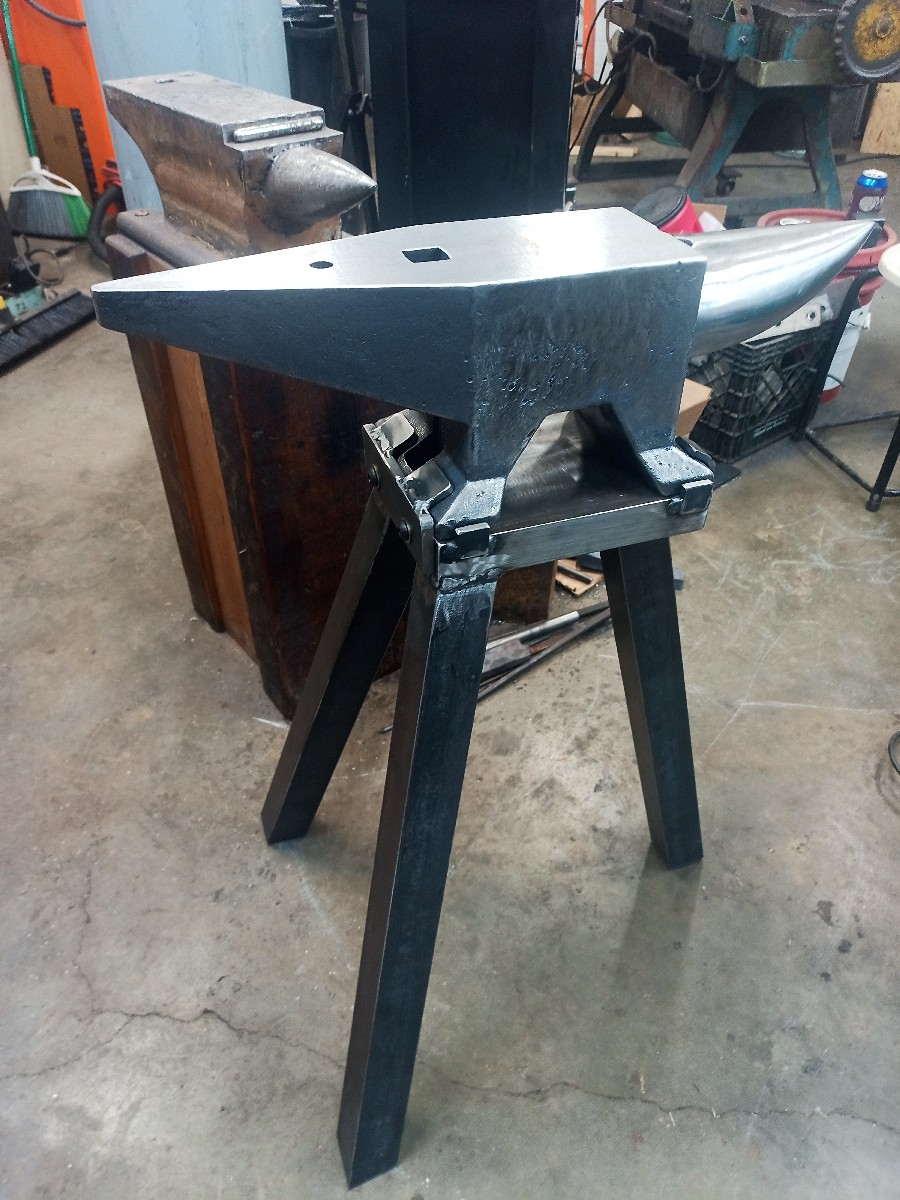
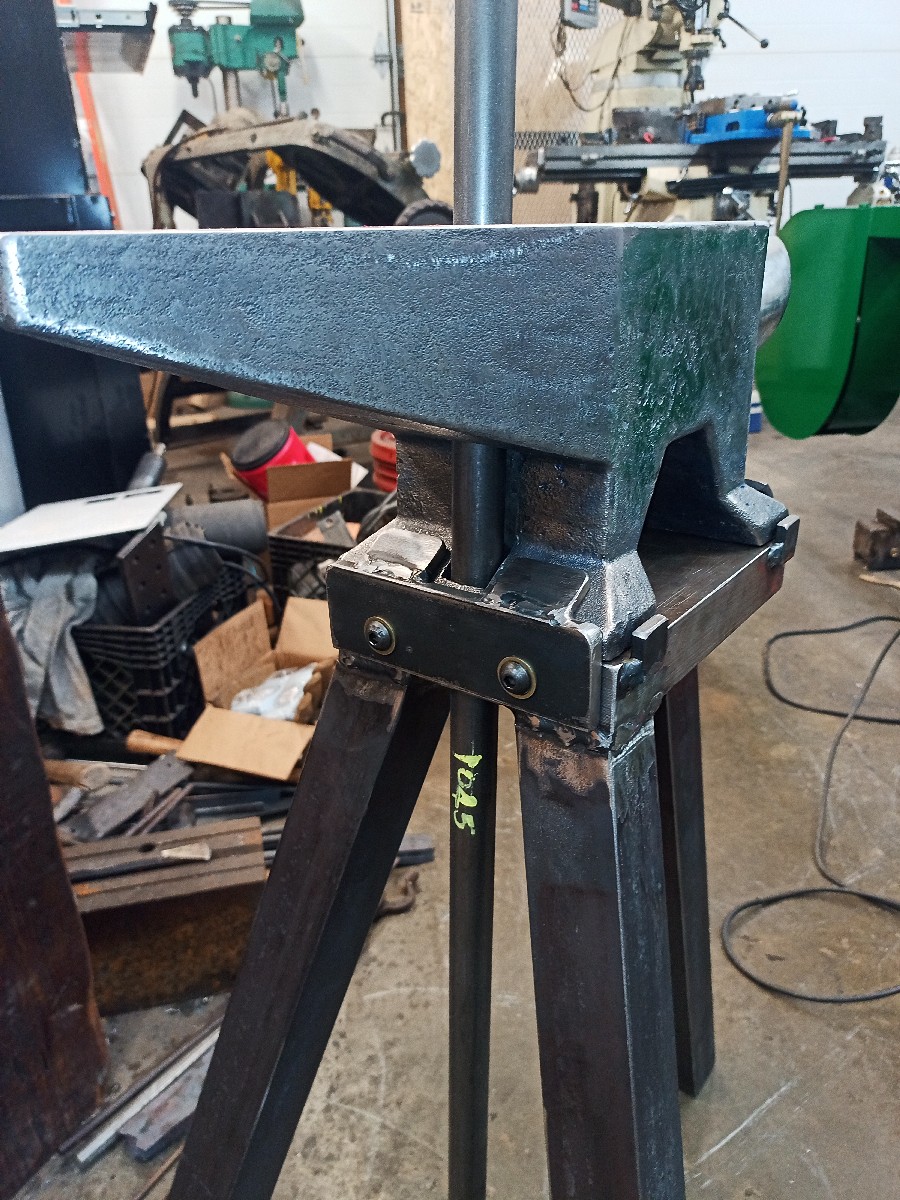
Thanks. I was thinking the same thing regarding the welds. With that in mind, I did do a three-pass fillet on the legs which I'm hoping will help keep it beefy so it won't crack, but thanks for the tip - I will check those welds from time to time. The ring was loud and prominent just sitting on a table, but clamping it down to the base mitigated it quite a bit. I do agree that some caulk or RTV or the like at least won't hurt and it might help the ring a little. I did find that a magnet on either horn pretty much eliminates the ring. I guess that means it's the horns that are vibrating now. I will find a dedicated magnet the right size and type eventually (just haven't yet) which will stay with the anvil, but even if it falls off or something, what ring occurs without the magnet isn't too bad. It's certainly not the loud, painful ring it had before mounting it to the base. Oh yeah, I did kiss the feet just a little with a face mill to flatten it out a bit. The manufacturer milled it, but it was extremely rough and it had a bit of rock to it which my face pass flattened out. That wouldn't matter if mounting to a stump or the like, but since mine is a flat steel plate, a flat plane on the feet I figure will just help it seat solid as possible. It seems to have worked I guess. By the way, I considered (along with a bunch of other bad ideas) filling the gap between the legs with big hunks of steel. There are several reasons that isn't a good move. But now that I've seen it assembled, it occurred to me that I can make some lemonade here. I kinda like the idea that the gap makes a little shelf I can lay punches or hot steel or whatever. Anyway, turns out I think I'll like having that gap there after all.
-
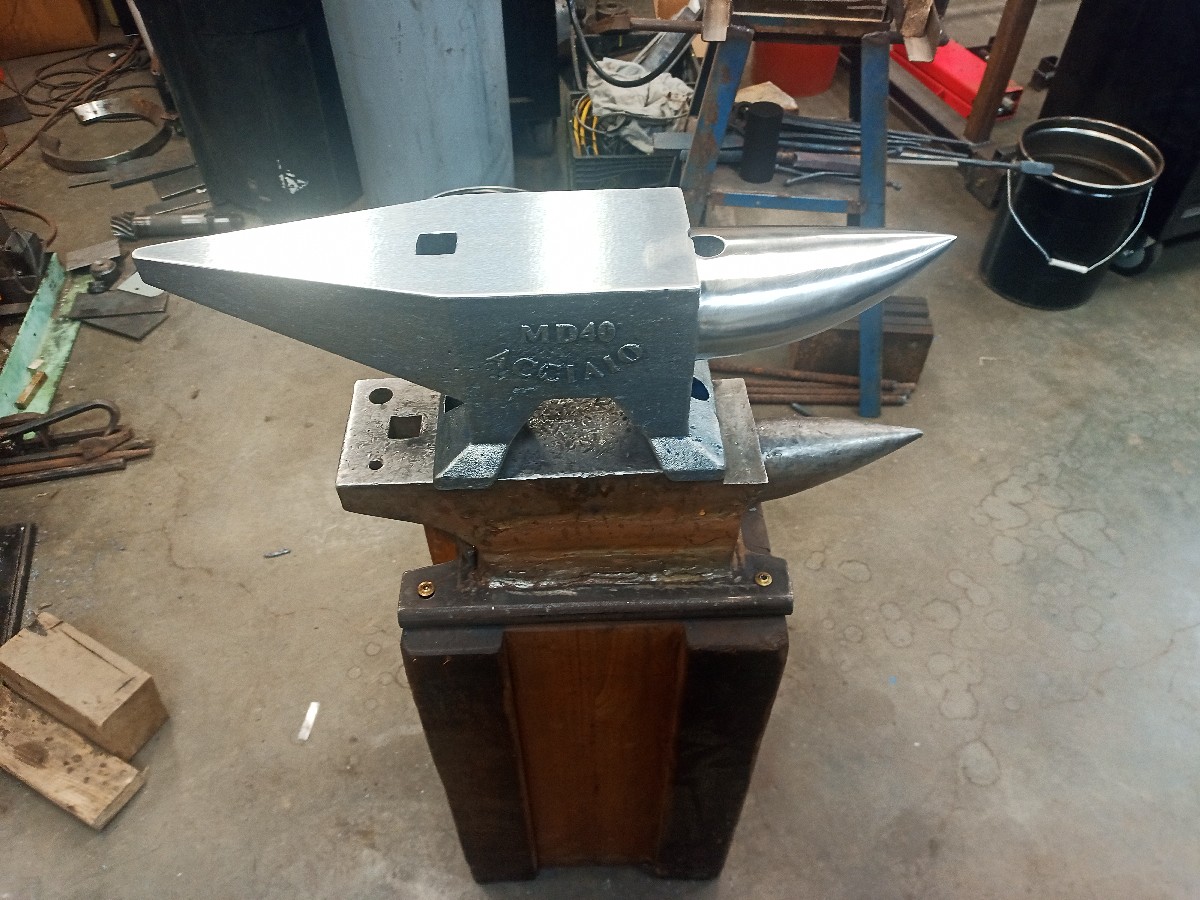
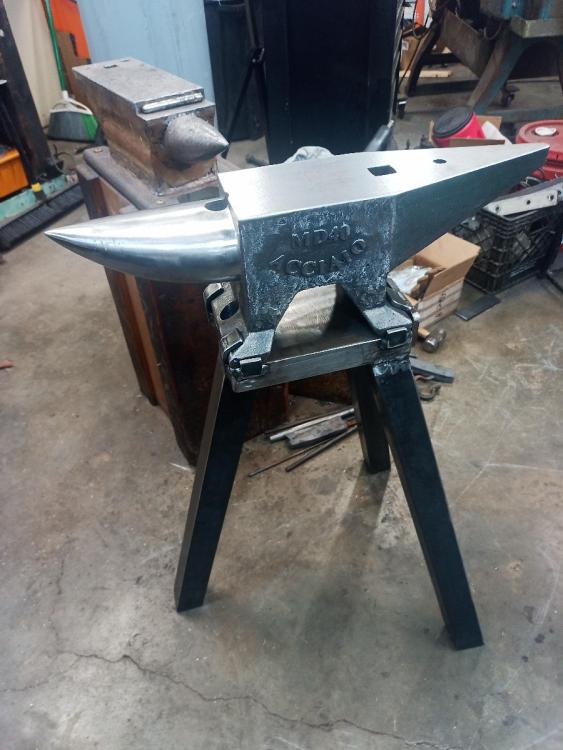
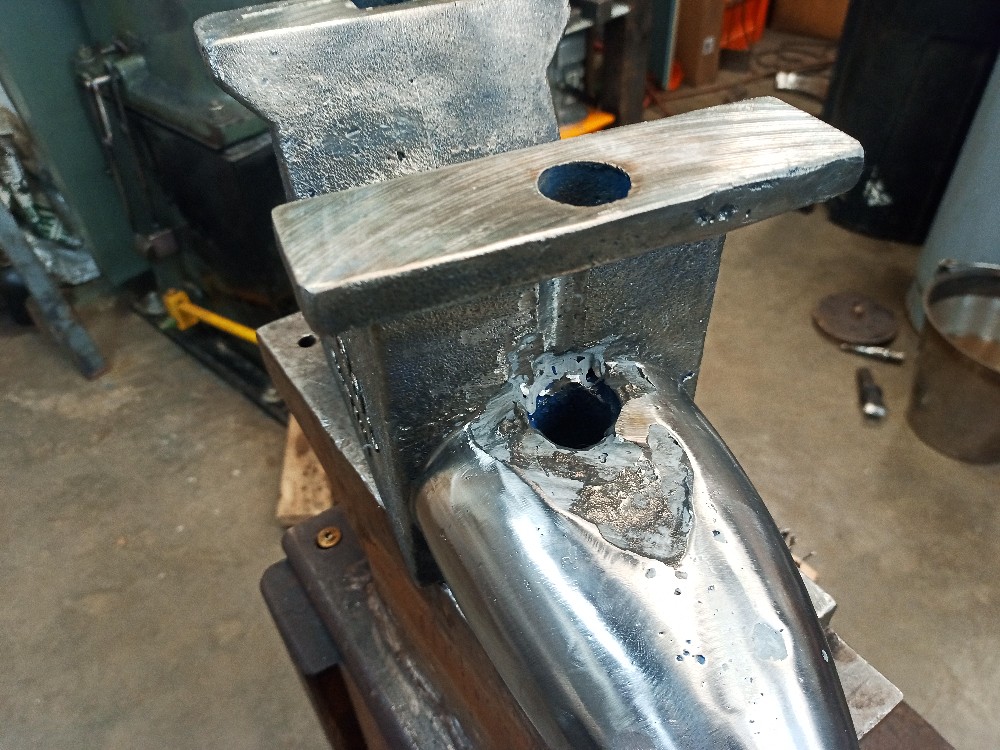
I picked this anvil up a while back but then got busy with other stuff so the smithy took a back burner. But last evening I finally got the base I made for it functional and got a chance to try it out first time. Now I know what the most of you already do in that a hardened top makes all the difference. Compared to the mild steel anvil I made a couple years (behind the Acciaio in photos below) ago and have been using ever since, this little cheap import just bows it away. The rebound thing is a drastically different and improved feel to the hammer hand. You can really tell you're doing work when the anvil surface is higher quality. Yeah I know - duh. Anyways, I'm really happy how this turned out so far. I'll paint the base and at some point I'll add a few hanger type things underneath. But I think I'm not going to go too wild on that because the thing is kinda mobile now and that's appealing. The clamp holding the anvil to the base is extremely simple so segregating the two is quick & easy in case I want to load it into the truck. Otherwise the two combined are just to heavy, at least for one guy. The base is made from 1-1/2" thick plate on the top and the legs are 2" square solid bar, so it's a fair bit of mass underneath the anvil. I drilled a clearance hole under the hardie hole in the base so it's a pass-through, which I've found to be quite useful in the past. My scale measures the anvil to be 86# (39Kg) and the base (so far) is 113# (51Kg). It will be slightly but not significantly heavier after I add a small hammer/tong rack of some kind. Just a couple hammers/tongs. I want to use it for a while and let it tell me what I want to add to it rather than rely on my inexperienced guesses to stick something on it now. I figure for a kind of mobile anvil like this, a separate utility table build for a larger collection of that stuff will be more practical and useful, can move it wherever is most convenient, and leaves more clearance all around the anvil. So my take on the design of the anvil is that the solutions for "fixing" the goofy round hole are too sketchy or risky to bother. I'll just leave it there and maybe use it for some odd task now & then. But I wanted a pritchel hole so I dug out a high-quality carbide drill (around 9/16") and drilled one. That went well, but if you're so inclined, don't try this with anything but carbide. This will indeed be useful in contrast to Acciaio foolishment. I cleaned up the hardie to fit 1" which was pretty much just cleaning up the casting bumps. Dressed the edges some and also put a few minutes into dressing the sides of the anvil as well which I kind of like the look of (appears odd in the photos, but much better in-person) and makes for a little smoother finish in the event I'm kind of working off the sides, i.e. bending a 90° or something. In the process, I went ahead and ground off the lettering from one side since it didn't need to be there twice, removes possible interference, and it's not like anybody is "proud" of these anvils and considers the lettering to be valuable or anything. Anyways, let me know what you think. I really like this thing so far - quite a bit more than I expected to. Pleasant surprise.


-
After sitting for forever, I finally started making the base for my 40Kg Acciaio anvil. It's solid 2" square legs and a 1-1/2" solid plate pulling it together at the top - because I wanted some serious mass in the base too. Turns out the base is heavier than the anvil and I'm not even done with it yet obviously. I also drilled a pritchel hole into it. I had a carbide drill (roughly 9/16") so I figured that might do just fine. Just spin it slow and keep it lubed and it got through the hardened top layer, which incidentally was somewhere around 1/8". Once through that, it was just a bunch of peck drills and blowing the chips away. Anyway, I think I'll like that hack! I've seen some pretty good ideas for dealing with the other round hole, but none of them seemed all that appealing to me, mostly because of the processes during and not because of the result. This seemed easy, and it was since I already had the suitable drill bit. Just a little more work and the anvil will finally be ready for its first real run. Behind it is the anvil I built a year or so ago which has served me well for this beginner. It's heavier but about the same size as you see, but mild steel. Looking forward to comparing!

-
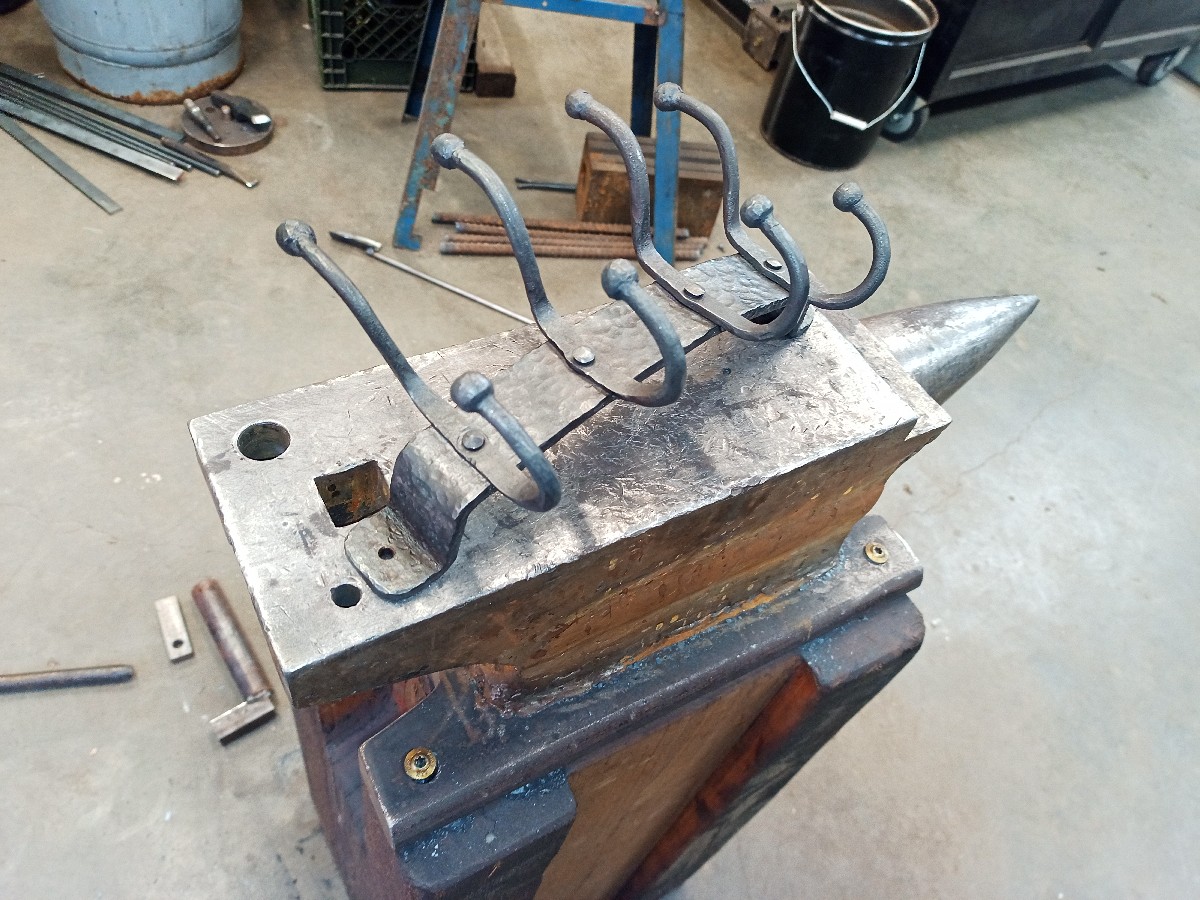
After not being able to forge for several months due to elbow surgery, I've finally got to the point where I can start learning how to hammer some steel a little lately. I'm a beginner so take it easy on me. I thought I'd whip up an accessory hanger thing as a little gift for my brother. He lives in a house that has a long history with horses and such, so anything blacksmith he's kind of a fan, so even though this is a little rough, he'll like it a lot. (well OK, some of the "rough" is because I textured the strap some, but that's not what I'm talking about) I did cheat just a little by adding a tiny tack on a hidden corner of the hooks because I'm certain that a single rivet is a recipe for coming loose and spinning eventually, at least the way I do it.

-
I waited too long so couldn't edit, but what I meant above when I said "mine weighs in at 130lbs." I meant the one I made, i.e. the one Acciaio is setting on. The MD40 Acciaio obviously doesn't weigh that much. Maybe obvious, but didn't seem clear when I re-read it.
-
This will be my last hijacking of Arkans's thread, but thought adding some feedback on these Acciaio anvils from Vevor might help posterity? By the way, we all assume these are made "in the same factory in China", but I read the other day someone claiming these are cast somewhere in the Czech republic. Anyone else ever hear that? anyway... Stripping the paint for a close look at the casting reveals that it's not quite as good as I thought, but still pretty good. The area under the arch has the typical filler but of course that doesn't matter at all. Plus on the bottom of the horn under the round hole has a substantial void, but also somewhere between little and zero practical consequence. Otherwise my vote is a positive. I slid a curved file over the top and it didn't want to scratch it (pretty much just skated) and on the horn it only wanted to grip it a little, so I wouldn't say the horn is "soft" exactly, just not as hard as the top. Nothing new here, just reiteration. Me being a machinist, I wouldn't say the top has a great finish. It's flat and has been ground, but it wasn't done well and has a subtle texture that might transfer to your steel depending. But most of the time you wouldn't notice. I have access to a nice surface grinder and I might just clean that up. But honestly I'm just nitpicking and doubt I'll bother messing with it even though I could do it pretty easily, if that tells you anything. It's pretty good even if I wouldn't say it's "great". couple of quick pics in case the data is useful for others. Probably a half-hour with wire brush & abrasives.

-
Last year I built an anvil from chunks of steel. It has served this beginner pretty well but the top surface is only mild steel and the deep gouges & dents are beginning to be a problem, at least in how I feel about it. I saw these 88lb Vevor/Acciaio on eBay the other day for cheaper than I've ever seen them, so decided to pull the trigger. I'm still a beginner and these are still aimed at my demographic, so probably a pretty good fit. It arrived this morning. Some time with wire brush & abrasives converted into something I don't mind looking at. Also, I was quite surprised that less than 5 minutes with a narrow belt air grinder is all it took to fit the hardy hole for my 1" tools (the Vevor site specs the hardy hole at .9 inches (22mm) so I expected that to be more work) Here it is sitting on the one I made last year. FYI mine weighs in at 130lbs. I think the "missing" mass between the arch on the Vevor could make a significant difference, but I'm gonna try it out for a while before I start getting goofy with it.

-
I was prepared with apparati for catching the toss, but pleasantly surprised to discover that when I woke up, they had already delivered it to my porch. I reviewed the recorded video and it showed a little bitty feller just carrying it across the yard and fairly gently setting it down. Also, note that today is Sunday. For my address anyway, Fedex has a history with most deliveries of the tracking saying that it's "out for delivery" only to update the tracking late evening to say that it's been delayed, so color me amazed. Also, a cursory look tells me that the quality of the casting isn't bad at all. I'll check it out closer in the coming days. So far, so good