-
Posts
79 -
Joined
-
Last visited
Content Type
Profiles
Forums
Articles
Gallery
Downloads
Events
Everything posted by Vinito
-
No, but there's a wrinkle with that. I don't do well around groups of people and usually have to recover for a day or two. I'm autistic or something. Since I'm old I've learned to just cope with it. I could do it, but it's not my first choice. Maybe someday I can hang out with a nearby smith or trade steak & beer for one to drop by my shop for a while. I'm in no hurry.
-
Thanks for the thoughtful replies. Lots of good opinions. I maybe should have mentioned my background again so you all had an idea what things I will and won't struggle with, i.e. what am able to do and what I'm ignorant about. So to that end - the design link I posted I estimate would take me about 4-6 hours to build since I do that kind of stuff all day for a living (machinist by trade and can do some welding). Honestly, I think it would take longer to patch up a brake drum to work than to just cut plate and weld up a pyramid-shaped box. As happens over decades, I have a bunch of material just piled up, so for only my time I could match or be pretty close to what was shown, or similar if changes are made. What I don't have experience with is blacksmithing/forging. When it comes to visiting other smiths, in some ways in-person is hard to beat, but in others it's hard to beat a resource like the experience in this forum. Thus this thread. Though unlikely, I can grok that I might dump this whole effort within a year. Of course the benefit of having something with a fairly decent basic design is that if that should happen, I can pass the thing off to the next guy rather than dump it in a landfill. Besides this option, I figure that I wouldn't do any worse building a moderate, generic, decent forge than if a guy purchased one from a commercial supplier. And since I could have one in a day or two for only my time, this seems more convenient than paying significant cash and then having to wait for shipping (which can be ridiculous lead times currently) Anyway, I think I'll probably build something like this, meaning essentially a pyramidal firebox with a T arrangement air supply, counterweighted dump plate and slotted air grate. If nothing else, it seems to be time-tested and still being sold to this day. I'm leaning away from including the clinker breaker because a majority of smiths seems to not fuss with them to no bother, and as a beginner I expect that I will create a lot less clinker than even an avid hobbyist, thus less of a need in the first place (plus could easily add one later if it becomes a thing). In other words, yeah I'll build one, but try to keep it simple. Thanks for the feedback.
-
Hi folks. I'm going to build me a forge in the next couple weeks and in a goggle search this firebox design came up: https://www.calsmith.org/resources/Documents/CBA Coal Forge Drawings.pdf It looks to be about what I've seen recommended other places. I was kinda wondering what you experienced folks think about it. Is there anything you'd change for some reason? Should be pretty easy to fabricate one. I do that kind of stuff all the time, but I have done almost zero blacksmith stuff. So I don't mind making a firebox & forge but prefer to get something pretty workable the first time instead of having to remake something had I just known better beforehand. The basic dimensions of the firepot are thus in case ya aren't into opening the link. But there are more pages in the document showing tubing, gate, clinker buster, etc. Thanks for any input
-
Fabricated anvil build (I'm new)
Vinito replied to Vinito's topic in Anvils, Swage Blocks, and Mandrels
Ooh, I just had a thought... which hurts a little to do but sometimes a guy can't help it. I bought the little cabin across the street at a tax sale long ago and it has a small entry porch - about 8' x 9' maybe. It has a wonky but intact concrete floor so that's not bad. I am just storing a few things in there and it's not much at that, so would be fairly easy to set that up as a nice covered blacksmith area. Has a low ceiling/roof so somewhat trivial to install a ventilation chimney even. For my level (beginner student), that seems like a nearly perfect area to set up and be adequate for quite a long time. I know it's goofy to just forget you have something like that, but forgetting is one of my most prominent traits. -

Fabricated anvil build (I'm new)
Vinito replied to Vinito's topic in Anvils, Swage Blocks, and Mandrels
Thanks for the lesson Frosty. I'll do just that... but I don't know what you mean by "fish mouthing". Other than that I think I follow ya. I'm a fan of systematic approaches to learning, so your tips for my next steps is more helpful than you know maybe. I need to look at my hook again for analysis. One thing I do know is that I tapered the whole thing at once rather than what I've seen since then, which is to get the tip to size first and working my way back, so I did it backwards I guess. I'll keep at it and learn. I took a minute and weighed the anvil. It's up to 127 lbs. That seems like a great middle of the road useful weight and I'm pretty stoked about that. I think this anvil will serve me well. I'll look into building a coal forge. Safe, adequate (if not preferred) and not difficult to build - at least not for someone with my background I guess. The only thing remotely tricky is the blower. I'm sure I'll run across something for next to nuthin' that will fill that void. I can sure see the benefit of having one right here at my own house, i.e. my learning would happen tons faster with a blacksmith setup here at my own place. While using my brother's forge, I've noticed that it seems larger than necessary for the stuff we've been messing with so far. It's about 3' x 4' with the coal firepot in the center, but the bulk of the table seems to just be storing coal off to the side. I'm kinda thinking the forge table could easily be a 3' square and maybe even 2' square and still be quite useful for a long time. I'm leaning toward 3' square but at the same time my shop is already cramped. i suppose I could make sure it's covered well and keep it outside buildings since I have plenty of yard. I'll think on it for a few days. But fabricating something halfway decent and mostly complete should be a one-day project I think. Maybe another part of the next day to attach the blower and fan control or whatever. This is just all wild guesses, but based on experience nonetheless. I have a bunch of 11ga steel from which I could make the table, and if necessary some 1/4" from which I could make the firebox, etc. -

Fabricated anvil build (I'm new)
Vinito replied to Vinito's topic in Anvils, Swage Blocks, and Mandrels
I used it once so far and it worked great. I'm short a forge so far so I'm stuck hauling it over to my brother's (we've been calling it "Forge Friday") so I have nuthin' but time to work on the anvil until I scare up a forge of my ownie. So what if I had absotively nothing "whipped" earlier because I'm brand new? Keep on hammerin'? Taking lots of breaks while working on this anvil, if that means anything. I guess I'm practicing for the real fun. -

Fabricated anvil build (I'm new)
Vinito replied to Vinito's topic in Anvils, Swage Blocks, and Mandrels
-

Fabricated anvil build (I'm new)
Vinito replied to Vinito's topic in Anvils, Swage Blocks, and Mandrels
Great. Thanks guys. Probably a good approach at this time for me is to just keep things simple and not making this too frilly. Even on the bending pegs, I commonly see a hardie attachment for that which makes sense too. I'll just call this design "done" then and concentrate on finishing it up. -

Fabricated anvil build (I'm new)
Vinito replied to Vinito's topic in Anvils, Swage Blocks, and Mandrels
I have a couple design questions for you experienced guys. I have the options of adding a shelf extension on the top face and an upsetting block on the base. Can anyone chime in as to whether those shelf things are desirable? I don't want to assume I want it and discover that in reality it gets in the way, or something like that. I could also put a couple bending pegs out the side or maybe all of the above? What do you think? Maybe since this anvil is relatively short (7" or so overall), the upsetting block won't be as useful as otherwise? I mean I haven't hardsufaced it yet so I could just add the stuff and try it out, then cut it back off if I don't like it before I do add the hardsurface layer maybe. I'm rambling, but any feedback is welcome. -

Fabricated anvil build (I'm new)
Vinito replied to Vinito's topic in Anvils, Swage Blocks, and Mandrels
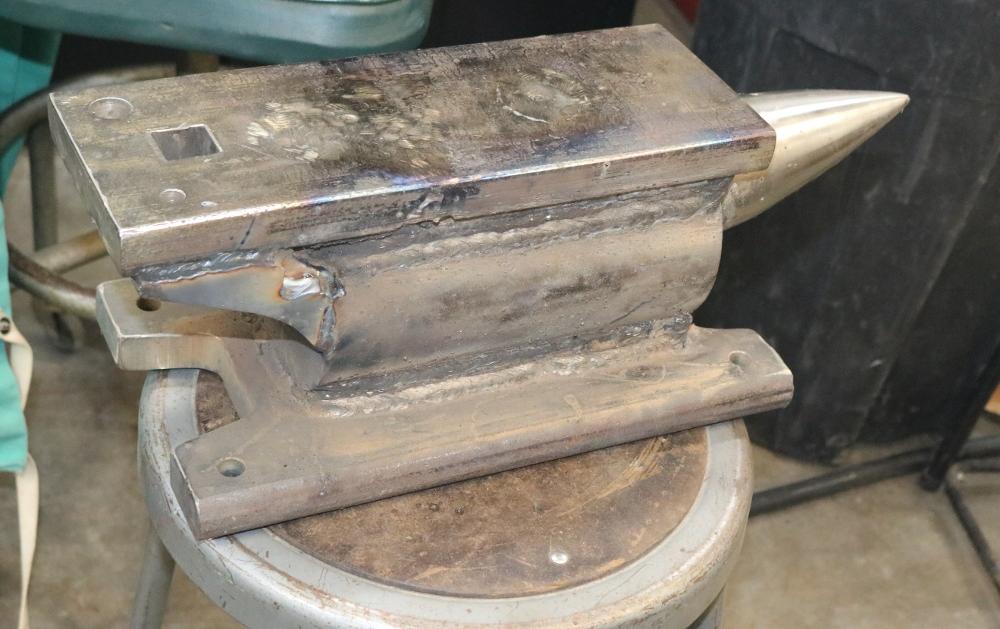
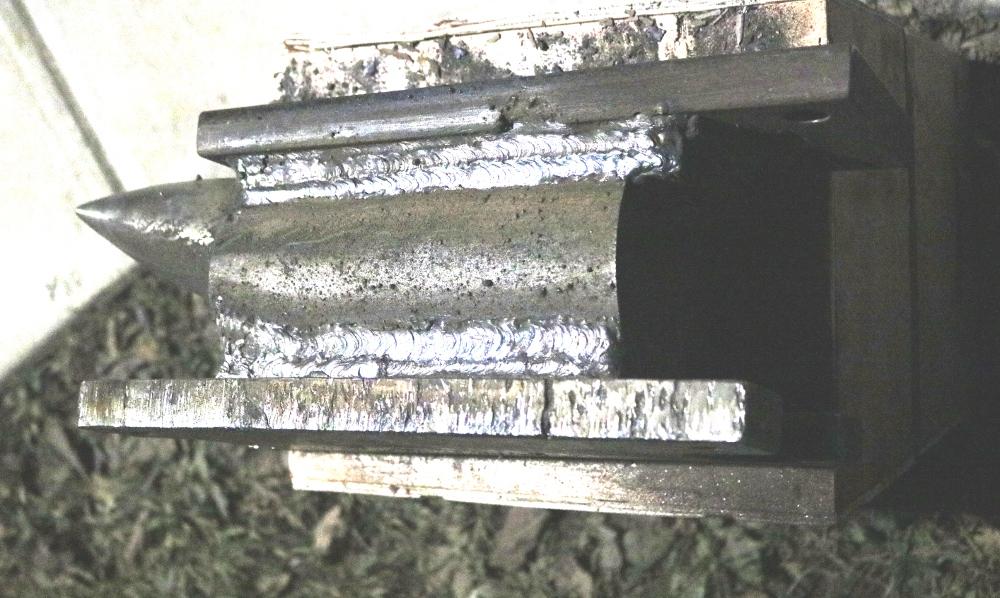
Did another fill session. One side is almost full and I started a little on the tail. Included a shot of my little work area, which is comfortable and keeps the dirt & smoke out of the shop. Also a shot of my cute little welder It's a sweet old machine for stick welding. The TIG attachment doesn't hold a candle to the new technology so I don't use it anymore, but the main unit is just fine. Must weigh 600 lbs., which might be an over-estimate but it sure is a beast. The duty cycle spec. in the manual should just say "much longer than the operator's duty cycle". Supposed to rain tomorrow so not sure if I'll finish this before the weekend is over, but I'll try to figure it out. Progress continues. Ain't exactly pretty, but it's full of weld... Hard to brush this out so you can't see much... -

Fabricated anvil build (I'm new)
Vinito replied to Vinito's topic in Anvils, Swage Blocks, and Mandrels
True. I could probably use a ton of these in the shop come to think of it. -

Fabricated anvil build (I'm new)
Vinito replied to Vinito's topic in Anvils, Swage Blocks, and Mandrels
I realized similar things about my hook Frosty. Thanks for the tips. Cool thing is, I can reheat it and get a little practice with tongs next time and save it. The edge above the hole is rougher than I like so I can smooth that out a bit too. I was trying to keep it simple and not get above my raisin, so I figured that hook was actually kind of a good basic thing to try for a first outing. The simple act of adding some tongs to it will be a new thing for me as well so that's actually cooler than it probably seems to you veterans. I just got done with another filling session on the anvil. I don't stretch them out too long because I get a little punchy after a while. I figure after about another 5 or 6 sessions that part will be done I think. -

Fabricated anvil build (I'm new)
Vinito replied to Vinito's topic in Anvils, Swage Blocks, and Mandrels
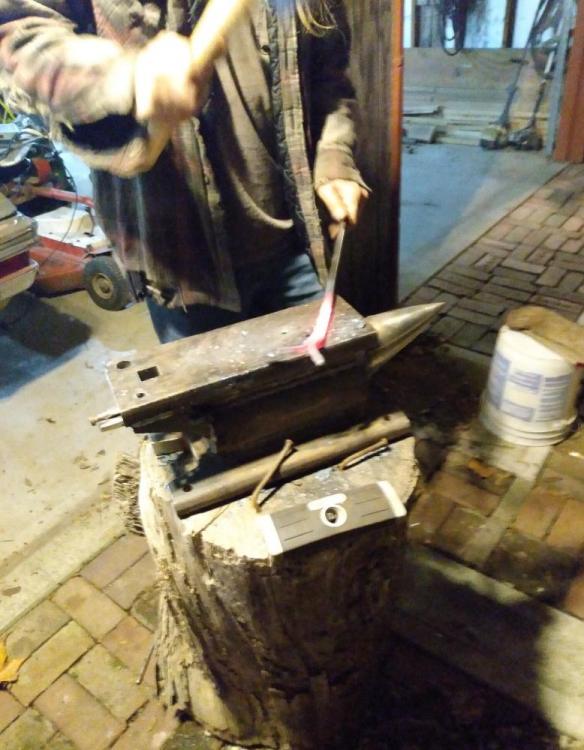
It's apparently an anvil. It's not fully baked yet, but it's adequate for some light cooking. Took it over to my brother's forge and tried it out. I'm blown away by how much better it functions than the makeshift rail track thing we used before. I'm giddy. Below is a pic of THE FIRST thing I've ever actually forged. I started by just trying a bit of drawing out some 1/2" round bar to a small taper so I could curl it. I was just goofing so didn't intend to make anything, but figured heck, it could be a coat hanger somewhere, so straightened it back out a bit so I could make a flat and poke a hole, then curved it back and chisel-cut it off hot. No big whoop and not a fantastic piece, but I'll be darned if I didn't make a little something. Did I mention I'm giddy? This is getting fun. First pic shows my brother roughing something out on my anvil. It works!!! It just gets better from here, right? My first ever thing! -

Fabricated anvil build (I'm new)
Vinito replied to Vinito's topic in Anvils, Swage Blocks, and Mandrels
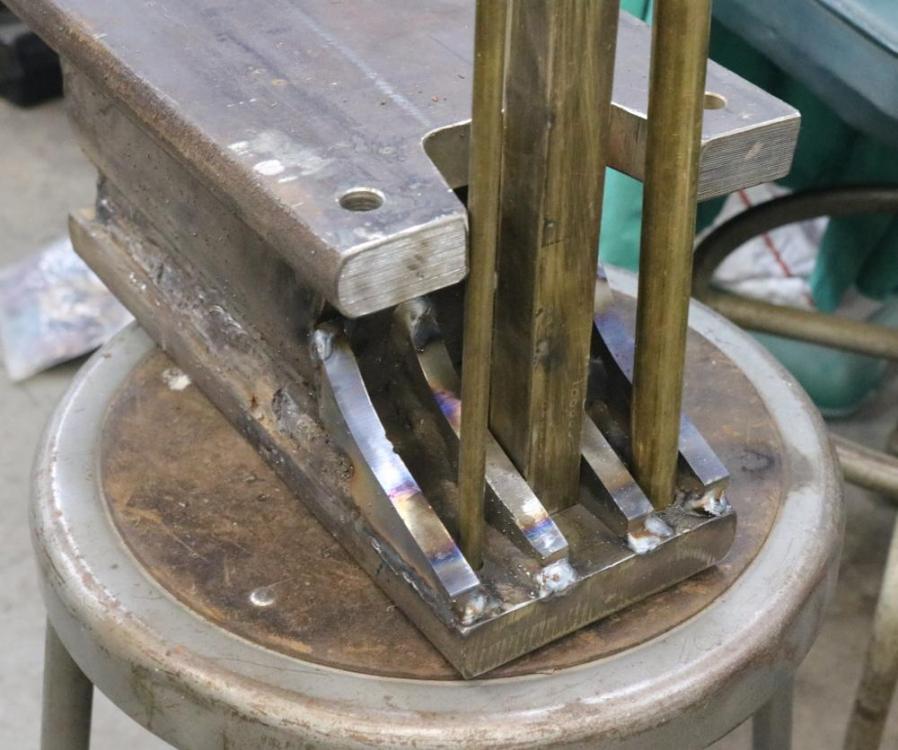
I cut out some steel filler pieces for the back and welded them to it tonight. There are 4 of them across the back which are spaced out to help leave the thru holes thru while also making for a guide for filling weld in between. Also aiding that is 5 brass bars fitting the holes to help keep me from getting weld into them mostly. I may have to occasionally drive them out maybe and then file or ream the holes to smooth them up when I'm done, but no big deal. These brass guards should help when I'm hardsurfacing the top one day too. I'll be filling more, but probably not until tomorrow. I'm just kinda beat for tonight. Might be obvious, but the brass is just the stock I have. They'll be shortened to useful lengths once I start needing them. -

Fabricated anvil build (I'm new)
Vinito replied to Vinito's topic in Anvils, Swage Blocks, and Mandrels
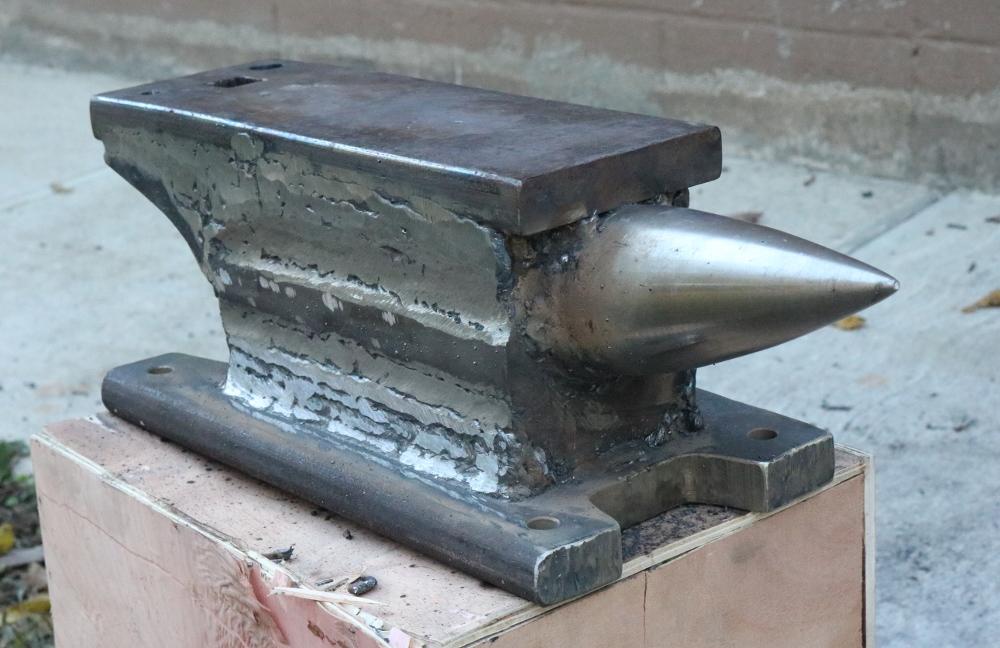
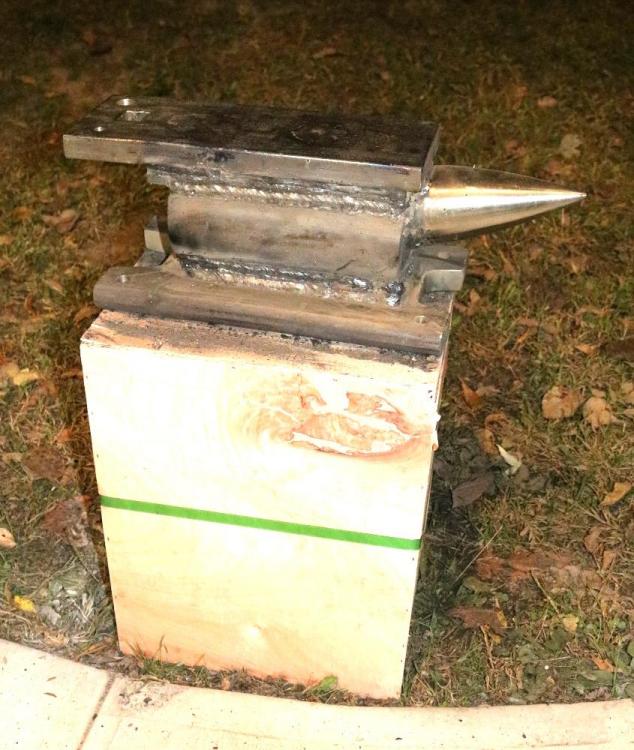
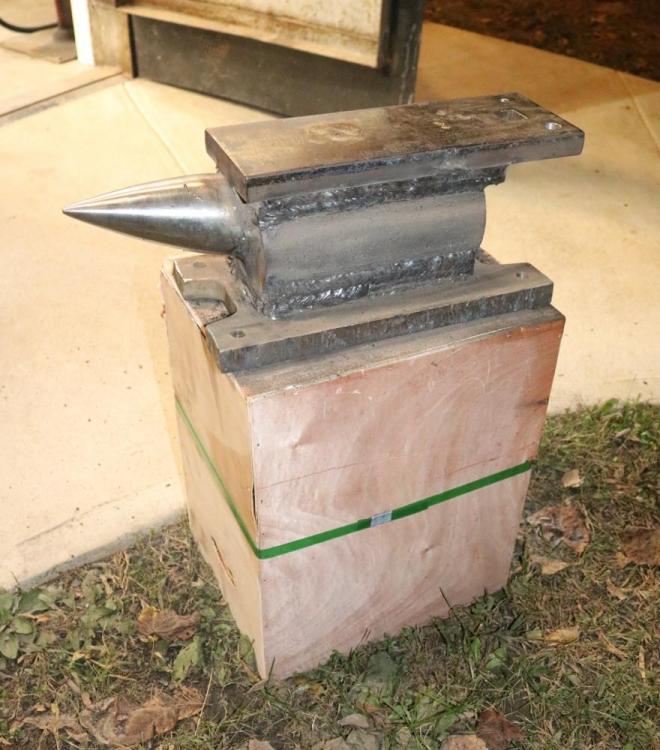
I realized I didn't specify which rod after I clicked "save" but figured nobody was interested. Since I was wrong, it's an old case of Lincoln jetweld LH-70 which is equivalent to 7018. Verified it is indeed 5/32" and not 1/8" It's just setting on a little wooden crate for a table to work on. Here's a couple more snappers I think I missed a spot! -

Fabricated anvil build (I'm new)
Vinito replied to Vinito's topic in Anvils, Swage Blocks, and Mandrels
Well I just completed another filling session. I'm guessing I've put maybe 100 rods on the sides so far. I dunno, that might be an overestimate, but the pile of stubs I swept up looked like about 50 both times. 1/8" rod... I think. Could be 5/32 but I'm halfway sure it's 1/8" rod. You'd think a guy would know these things laying it down for a while, but I just dove in and didn't care. Best I can figure I've added a little under 5 lbs. of metal so far based on cubic inches of 1/8" rod. Less than I thought it might be but not nuthin' I guess. I'll try to figure out the top surface thing eventually, but there's other things to beef up in the meantime. Making some progress. -

Fabricated anvil build (I'm new)
Vinito replied to Vinito's topic in Anvils, Swage Blocks, and Mandrels
I could try, but it appears there are about 20 or so varieties of Stoody rod and the Gunther-Schuler writeup is pretty specific so I'm not sure how optimistic I feel about success going that route. What I might find though in talking to that kind of shop is they might know (and have) some rod they use for high impact stuff maybe. Seems like exploring that wouldn't hurt anything. Also just talking to a welding supplier might yield similar ideas. I'll try that a bit today and see if there is any knowledge left out there - because I'm sure I'm not the only one who has found that lately most employees seem to be hired on whether they can answer a phone and not much beyond that most of the time. -

Fabricated anvil build (I'm new)
Vinito replied to Vinito's topic in Anvils, Swage Blocks, and Mandrels
Well I was all inspired to "just follow the directions", but already ran into the first hurdle out of the gate. Stoody rod is hard to get at minimum. I'll call around a little locally tomorrow, but it certainly feels like you need the super-secret password to get in the door to find it online so far. Not a good sign. I think it's slightly easier to find an electron microscope for sale than Stoody rod. With all the supply problems today, I wouldn't be surprised if it was just impossible to actually get the stuff. So I'm open to suggestions for substitution. (Thanks in advance) Dang man, sure seems like most everything lately for me follows a similar path. I think pretty much all my interests are obsolete I guess. Kind of unfortunate that the respected Gunther-Schuler method might appear to be becoming outdated due to materials going extinct maybe. I did find one web page that seems a little broken, but it let me put things into the cart "pending availability" (uuhh, let me guess...) and the price tag after hazard pay (I mean, really?) and shipping for 10lbs. each of the rod is close to $250, just so's ya know. Seems steep, but could be the going rate? By the way, the actual ESAB website is completely broken and there is zero love there from any angle. So yeah, if there is a good substitute, I'm into it. -

Fabricated anvil build (I'm new)
Vinito replied to Vinito's topic in Anvils, Swage Blocks, and Mandrels
Well this is great news to hear from you folks! I like the fact that hard-surfacing rod is 100% fused with the substrate rather than possible (likely?) void between plate layers. The source that inspired my original caution is much less experienced than you folks so it's obvious where my bias should lean. I'll source some rod based on the Gunther-Schuler recipe directly and follow it. Honestly, with that bit of process added, I feel like this one step (not that's it's a cakewalk, but still...) can definitely raise my project from the level of "experiment" up to a completely useful anvil. Thanks a ton for the advice. Well, maybe not a ton, but somewhere around 130 lbs. anyway Tonight was a bust, but it looks like I'll have some chunks of time the next three consecutive evenings, so without pushing too awful hard I think I'll probably have the sides filled in fully pretty soon. I will be adding a few bits of support under the hardie end and also filling in around the back of the horn so I can have a short bit of flat shelf which will also add more weld to sturdy up the horn itself a bit more. Some fair bit more to do, but I sure am significantly more excited about what I think the end result can be with this anvil build now. -

Fabricated anvil build (I'm new)
Vinito replied to Vinito's topic in Anvils, Swage Blocks, and Mandrels
My understanding on hard-surfacing rod is that it poses a risk of chipping off which can cause injury. I haven't looked into different kinds of it though so maybe Frosty is onto something with a different type of it? It would make sense to me that, with the hundreds of different kinds of rod a guy can buy, that there wouldn't be a huge gap between soft welding rod and something that's so brittle it chips easily. Surely there is rod or wire which will be hard but durable against shock. I need to research that a bit. But as another option, aside from having to transfer and match the holes I've already got in the top plate, seems like if I could add 1/2" or 3/4" of a good plate to the top and just weld it on the edges (making sure it's as tight to the substrate as possible) might be doable too. Yeah caotropheus, I am indeed planning to add some gussets and filler as thick as I can under the protruding top plate. I laid down several beads on the thing this evening. It's starting to look better. I have family coming in from out of town tomorrow so my expectation of getting it kind of done this week might be pushed back a bit. But as soon as I get it beefed up I'll snap another photo & post it. Meantime I'll research welding rod & wire this week and see if I can find anything interesting. -

Fabricated anvil build (I'm new)
Vinito replied to Vinito's topic in Anvils, Swage Blocks, and Mandrels
Thanks a lot Glenn !! Well Thomas you might get to see some vertical round too. Not to be outdone, my brother liked what I did so far but he has to have one too, and of course it will be twice as big... just because. And his plan is to set the round vertically and taller, though still a bunch of fill because he's planning three of them side-by-side for the main body. It will be his project but I'm sure I'll be involved to some degree, and I'll take pictures and post 'em. PB, I think the horn will actually still not be exactly "hard" since it's not heat treated, but just a higher carbon content than mild steel in its current state. I'm guessing some 41xx series maybe. But not being heat treated should give it a little more resistance to dinging than 1018 but not full-tilt. I think someday I'll add a harder layer on the flat, but I'm just gonna try it out for a while once I get the sides filled in. Adding more stuff is almost always fairly easy. Heck, I might hate the thing and want to build V 2.0 right away for all I know. I don't think so, but I have pretty much zero experience so it's all theoretical for me so far. Plus, I'm often wrong so I'm kinda ready for any possible outcome at this point. -

Fabricated anvil build (I'm new)
Vinito replied to Vinito's topic in Anvils, Swage Blocks, and Mandrels
Yeah, just stepped it out and eyeballed a blend, then filed & polished it smooth. All on the lathe. I didn't think of it before starting, but what I should have done is cut the angle on the back face first before turning a curved cone out of the rest of it. It was already to length so the shape made it "interesting" to clamp it for the final angle cut on the band saw. I guess that would have made the lathe work tricky though. Best idea would have been to start with a longer piece so there was always plenty to grab onto. Make do. I know using power tools is cheating, but following that logic I do almost nothing but cheat all day long. I like the forklift tines idea. -
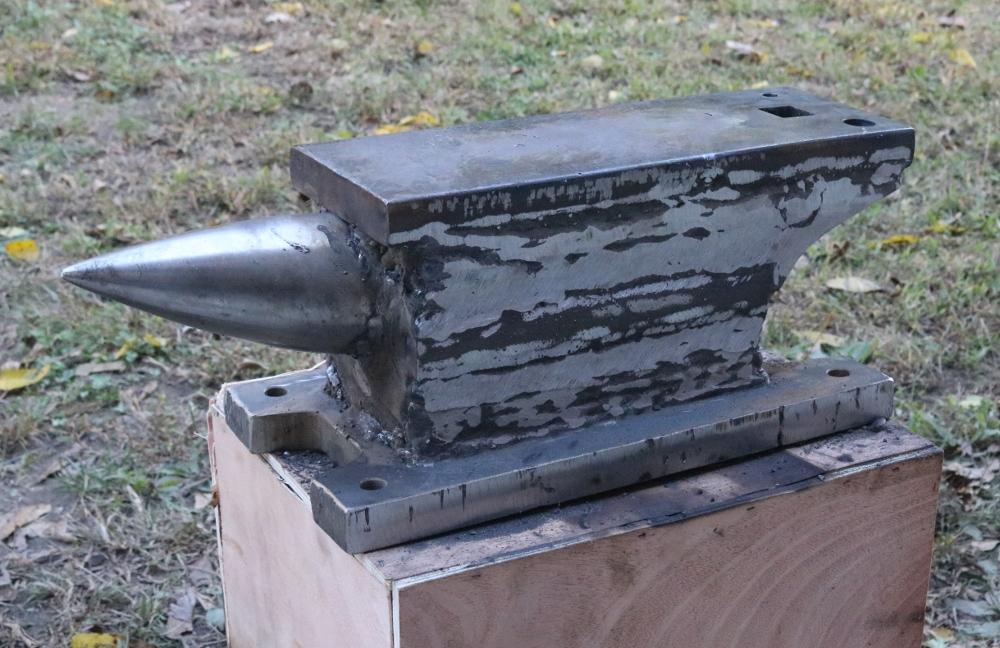
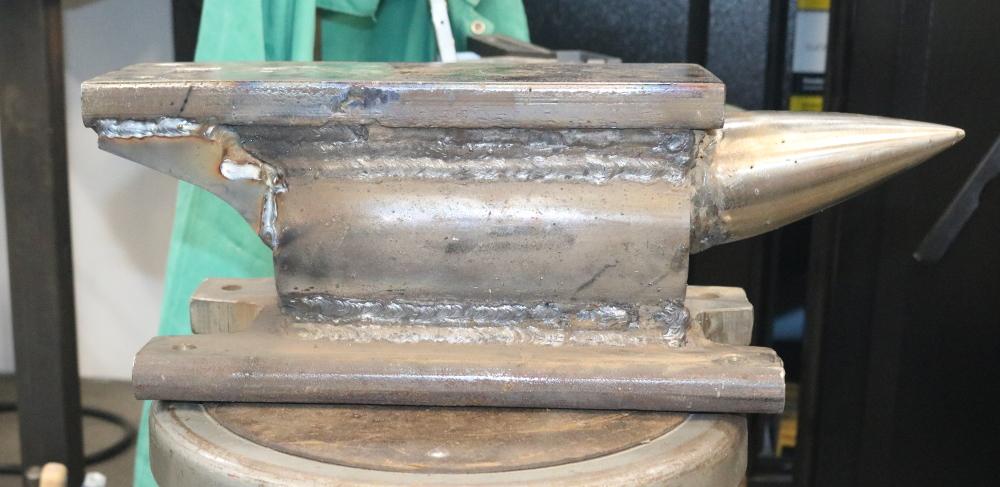
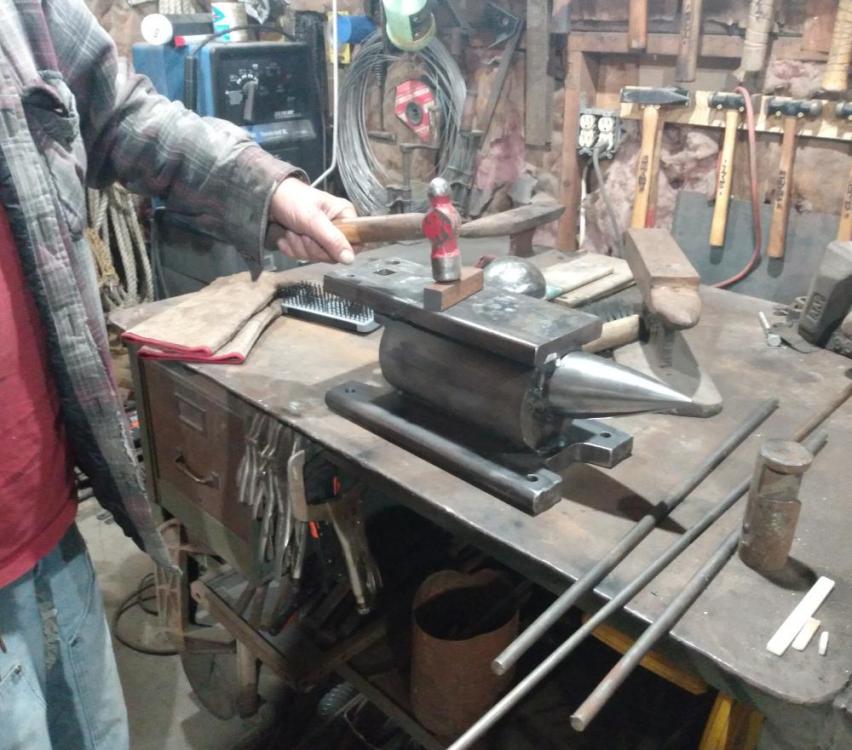
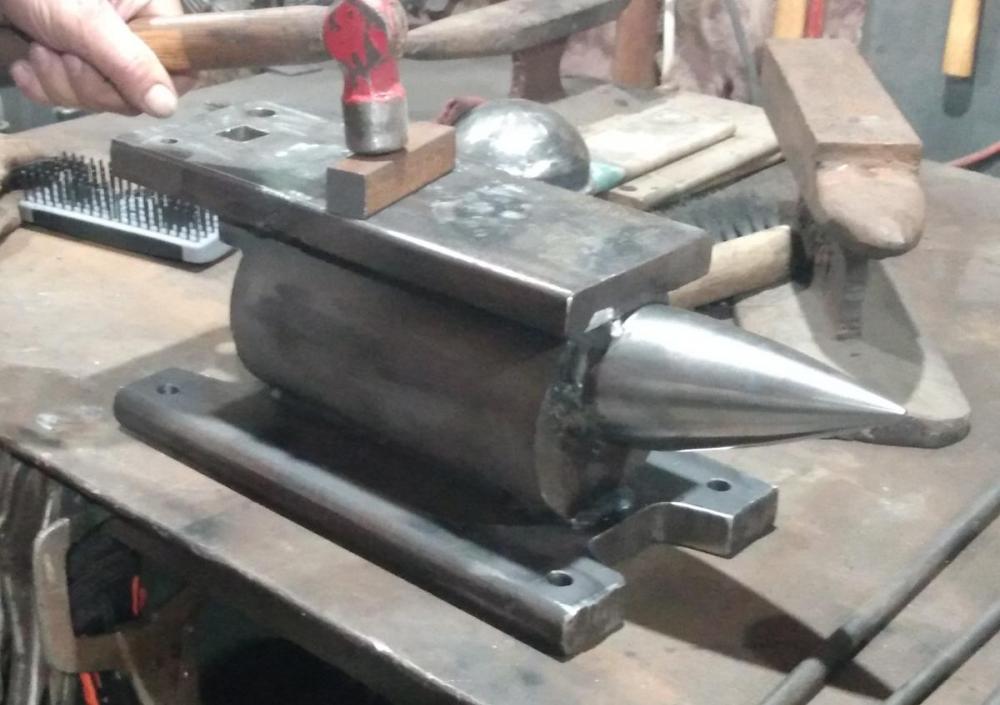
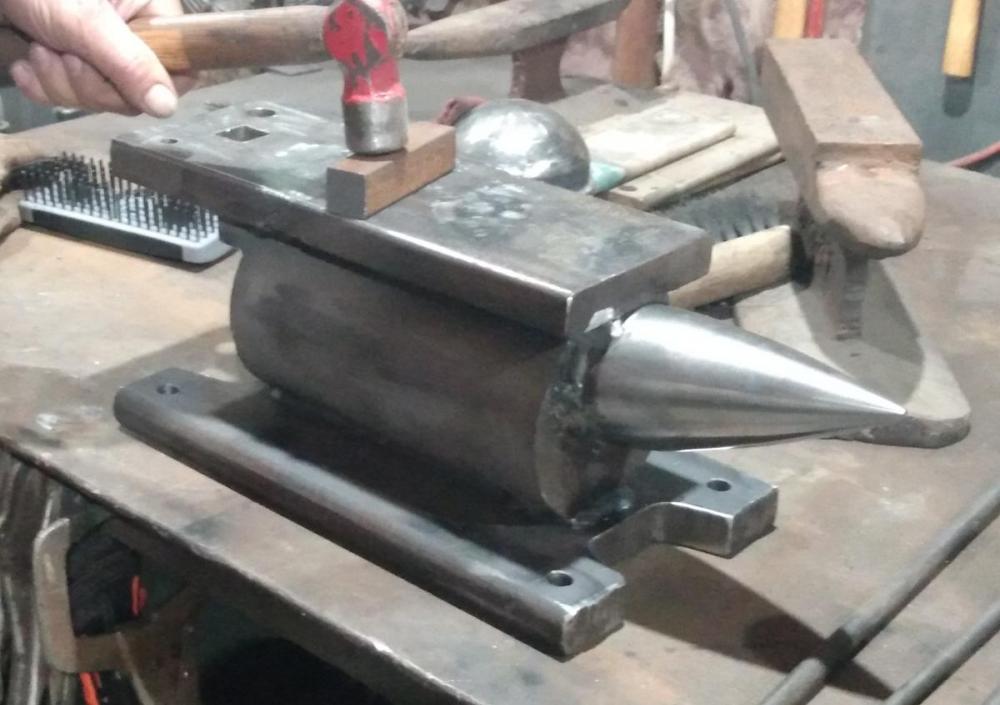
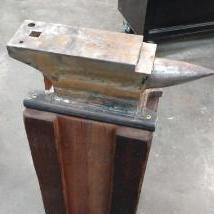
I posted in the "Show Me Your Anvil" thread, but figured I'd start a new one so as not to hijack anything. I put this together yesterday. A bit beat (me, not the anvil) getting to this point so I stopped here, but I planned to add a bunch of fill to the sides later this week, then I'll refine it a little for looks & pride. I figured filling the sides would help a bit and look better, but replies from some illuminated that doing so will be way more important than I previously realized. This was just stuff I had in the pile. Being totally new and ignorant of the finer points, I just set out to get something together and tried to keep from going down the rabbit hole of endless details. 5" x 1" x 14" top plate, 9" or so being the center work surface. It's just mild steel which I can address later if I find I want to. Bottom plate also 1" thick by about 15" x 7-1/2" width. Center body is 5" round solid x about 9" length. Horn is some 3" round x about 7" length, turned to a cone at the lathe and back face cut at a slight angle so it points up a little. The horn is the one piece that's not mild steel. I dunno what it is exactly, but turning made it evident to me that it's a bit of an upgrade. I will use it for a while first, but I may add a plate of harder steel to the top someday. I'm a machinist by trade, so I machined the hardie hole on a mill leaving just a bit of filing at the corners. It's 1" square (seemed proportional for the thing) with about .020" of clearance, which I hope is not too little (making things too tight is always a machinist temptation). I drilled two pritchell holes near the hardie hole, 3/4" and 3/8" (actual holes a bit oversize of course). I figured the additional small one might come in handy, and in fact discovered last night that a 5/16" carriage bolt slipped through it fits about perfectly for working on shaping the head. I've got a little under 5 relaxing hours into it so far and the material is 100% from the scrap pile. So far she weighs in at 106 lbs. but that will go up another 10 or 20 lbs. maybe once I fill the sides in. Well that's about it I think. I'll post progress in a few days. I'm brand new to this subject so I think this anvil will serve me well for a bit. Been learning a lot from the armchair the past few weeks so I'm looking forward to getting some iron in the fire. Let me know what ya think! (note that I'm well aware that the sides should be filled and that will be done soon)
-
Thanks for the excellent suggestions folks. Taking another glance I can see that the picture isn't obvious that the round middle is the same width as the top, so adding plates to the side would probably not work very well. But I am planning to fill there both along the top and base plates. I have a couple hundred pounds of old stick welding rod that has been sitting for 20 years so was going to use up some of that, but for efficiency I'll probably weld in some appropriately sized bar stock that will help fill it in as I go too. It should end up either just slightly scalloped or approaching flush with the top when I'm done. I was planning to do this anyway, but from your comments & explanations, I understand now how that is more a "have to do" than just a somewhat helpful and aesthetic improvement. I understand better now why I felt the RR track piece I was beating on felt inadequate. It wasn't all due to the mass I guess. Though it doesn't look like much in the photo, there are about 6 passes on each side between the top and middle already, so I will opt not to cut the top off but will instead add a layer of a better material someday. Other than the filling, I'm going to simply use it for a while first though. One thing about it being mild steel is if I dork the dickens out of the top (which should take me a fair bit of time to do anyway) I can just easily mill it flat again for another round of abuse. BTW, I'm in Kansas City
-
Thanks for the quick feedback! And thanks for the encouragement about my little project. I guess being new I'll make errors like that until I get more experienced. I have been reading and stuff of course, and along the way somebody gave me the idea that make-do stuff like this all gets classified ASO. I was encouraged when I realized at the lathe that the horn wasn't mild steel, but I didn't have anything in my pile to make the top face other than mild steel. when you say I can replace the top with better material, do you mean that I add a layer or to actually replace the top, i.e. remove this one and replace it? It would be nice to not be removing the top (especially after I've added a buncha more filler). I suppose since some commercial anvils had a hard top layer laminated, then I could try to simulate something like that someday. Also, even more mass if I do that too I guess. Several times today I thought of things I could do to soup this thing up, but it became almost a mantra to "just get it done stupid". I kept reminding that I'm a greenhorn with nearly zero knowledge doing this first attempt and thus there WILL be things that aren't correct about it no matter how hard I try. So just keep it simple, get it done and use it for a while. Leave that strive for perfection thing to some future attempt after I know better what I want anyway. It occurred to me that picture showed more shop than anvil, so here's a closeup of it in case somebody wants to see better detail.

