
John B
-
Posts
3,598 -
Joined
-
Last visited
Content Type
Profiles
Forums
Articles
Gallery
Downloads
Events
Posts posted by John B
-
-
This year’s Blacksmiths Feature adjacent to the Farriers section has been the last one, and the organisation responsible have withdrawn funding for the blacksmiths side, and expanding the farriers presence.
For many years, the competitions have been a qualifying round of the prestigious National Blacksmiths Competition in the UK, and contributed to raising awareness of the blacksmiths craft, promoting local blacksmiths, and bringing top class competitors so other 'smiths can study and learn from their methods of working, the Worshipul Company of Blacksmiths, and the NBCC would like to see this hard earned privilege continue
I know there are people on this site who have stands at the Show, and I would like to hear from them if they have any thoughts upon the matter, and would like to put some input into what the future holds for the feature at the show.
Initially funds will have to be raised to cover costs incurred. The Royal Bath and West Society have agreed to supply an indoor area in the Dulverton Pavilion, and an outdoor area in the Woodlands and Conservation area where the other blacksmith’s stands are located.
The Blacksmiths and Metalworkers Association of the South West have agreed to initially try to keep the feature functioning, and we already have members in the area, we have also agreed with the RB&W Society that we can use the forging facility to enable us to raise the funds necessary by whatever means we have to, ideal for courses, forge-ins and masterclasses.
This new situation will involve complete consideration and improvements to make the feature more attractive to the public, the participants and the local blacksmiths with stands there, and that is why we need you, and your input it is your local show, and we are there to support you.
The new group to be responsible for the event could be totally independent, or as a sub group of the BMASW, our aims are the same as at Westpoint, that is to ensure that there is a Metalwork Feature for the public to enjoy, and to promote blacksmithing in general, and more specifically locally.
I feel the time has also come to consider that the old traditional idea of blacksmithing is looking somewhat jaded, and the public whilst liking to see the "old stuff" are looking for more contemporary and modern metalwork items to suit the current times and the fashions we are going through, and possibly participate in the forging experience either at the show or elsewhere.
We need to get this moving quite quickly so if you can register your interest, then we can arrange for a meeting at the Forge at the showground to hear what your opinions are and how we can put them into effective use, all ideas will be considered, and volunteers will be needed with paperwork and stewarding.
The only items we will be keeping will be required to be a qualifying round for the National Blacksmiths Competition, and that is as simple as a Live Forging Class, and a Static Class.
Regard it as a marketing opportunity, any methods go, the public pick out what they like, and that is drastically different from an entry judges on technical standards, so work with us and help raise awareness all round..
Contact me as soon as possible please, it will be going ahead, and as it's for the local smith's benefit mainly, it would be best for the local smiths to run it for themselves, with the benefit of back up if needed,
-
11 hours ago, RhysKawka said:
Hi everyone, was just wondering if anyone knows any smiths in or around the Sheffield area? Would be nice to be able to go somewhere that practices the profession and see what goes on but as far as I'm aware there isn't any around like there used to be
Rhys
"Like they used to be", most of the industrial smiths disappeared when they turned Sheffield into a theme park and the steel industry collapsed, I served my time in the Archer Road, Little London Road, areas and there were many working forges in that area, sadly most have gone, and been replaced by housing and supermarkets,
Smithing as seen on this site was never that prolific in Sheffield, most were specialised Industrial smiths serving collieries, railways, agriculture, engineering, and the rest of the world,and do you class bladesmiths as cutlers or smiths?
Forgemasters are still around, https://www.sheffieldforgemasters.com/sfm/home
Try looking in yellow pages, sadly most are fabricators but there are a few practitioners in the Sheffield, Rotherham, Chesterfield, Conisboro, Doncaster, areas, try going to local fairs, and Country Shows, Bakewell show and the Hope Vally show used to have blacksmiths trade stands, also Christmas markets, art galleries etc,
http://www.simt.co.uk/abbeydale-industrial-hamlet or http://www.simt.co.uk/kelham-island-museum may be worth a visit, and help you to find some contacts.
Good luck with your search, I am now down in Devon trying to keep some of the Skills I learnt way back when I lived local to you, if you are ever on holiday in the area, feel free to drop in if we are having a members day or other event,
-
48 minutes ago, Donniev said:
.The length of the boss has varied so far, I'm not measuring when I do the set down from the boss to the reins because I'm sure that the more pairs I make, the more it will become muscle memory.
I filed down the extra metal on the edge of the boss, so it should be flat now. Just for the heck of it I forged these just like a right handed person would, it really only changed how I was standing in relation to the anvil, and I'm sure that may have lended some help to the ugliness of em.
Muscle memory is fine, but it will come easier if you measure and mark at the start,
I think you will also find that as you forge items, you get a "natural flow" to what you are doing it becomes difficult when you try to consciously make two items identical, try making a few scroll ends and you will see what I am getting at,
No prizes for making it difficult for yourself, do what comes naturally. What you have there looks to be on the right track, take care with the 'ears' and forge them when hot, or they will crack and become a weak point.
Enjoy
-
Frosty nailed the explanation spot on. It is a natural movement as you forge them,
Mark out, same on two bars, lengths of jaw part to suit application of use.
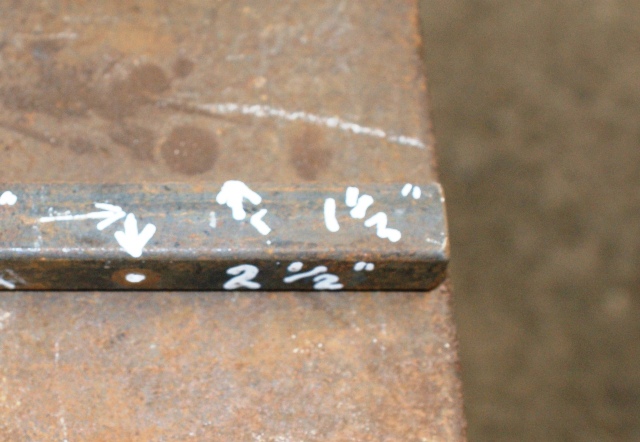
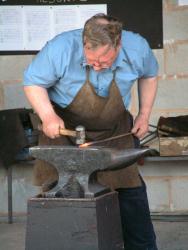
The key steps for the right handed tongs are as in the pictures, (these were to have drawn down reins, but same proceedure applies, after forging jaw end, just cut off from parent stock at the point of scarf)
Holding the stock in your left hand.
At the Near side of anvil forge down the jaw section to approx half stock width and in line with outer edge of jaw.
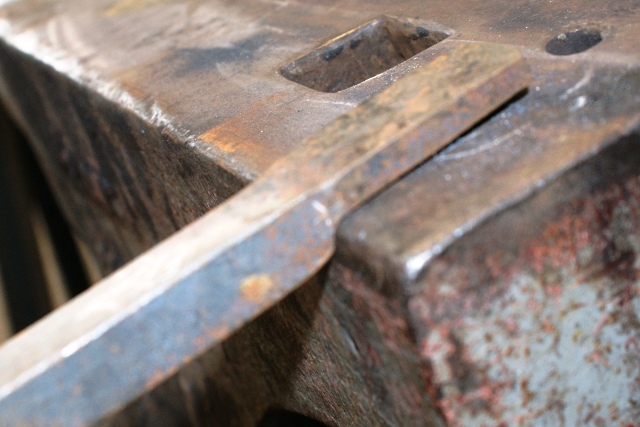
Go to the far side of the anvil and turn 1/4 to the left and push out away from the body at an angle of approx 45 degrees at your mark at the end of the jaw and forge down to just above half the width of the jaw.
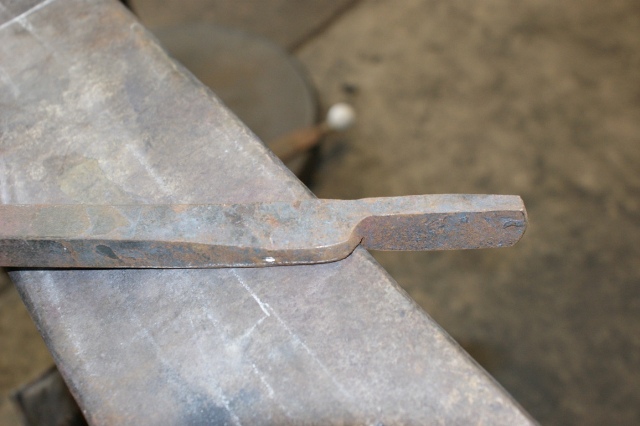
Still at the far side of the anvil, Take another quarter turn to the left and at 90 degrees (square) to the anvil and at your mark, forge down to just over half the size of stock to give you the portion to attach your reins to.
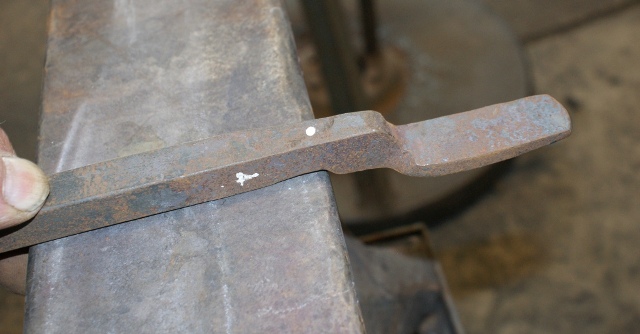
Round up the corners to form the boss,
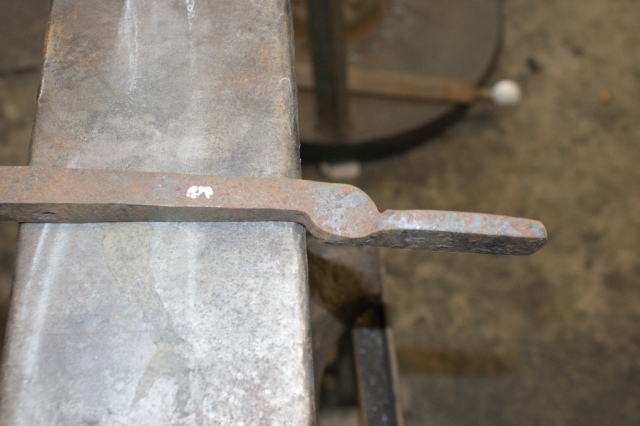
and punch through centre for your rivet.
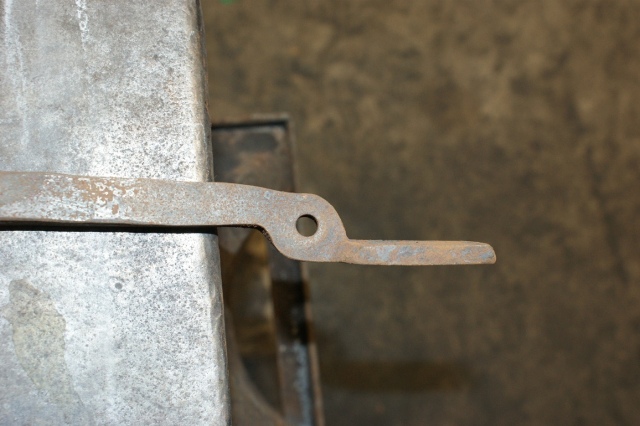
Cut off at your required length , form scarf and weld on your reins
Dress up and finish ready for rivetting,
And from your pictures you will have no problems with the rest of the process.
As you are left handed, the same proceedure applies except you turn the stock to the Right each time
Sorry I do not have pictures for the Lefties, of a left handed corkscrew, but that's not really appropriate here, but it is part of the blacksmiths magic to solve the problems of others.
You probably did not need this, but it may help others to understand the process,
Have fun and enjoy!
-
On 10/6/2016 at 4:39 AM, Donniev said:
Hey guys I want your opinion on these.
I forge the jaw and boss out of 1/2" and weld 3/8" square on for the reins.
Any suggestions to help me get rid of the 'loose' feel (even tho it's not much) would be appreciated, as well as any other constructive criticism
I don't think there is much wrong with your technique/method that you are using, and using a flatter/set hammer would be beneficial.
My suggestion would be to use a different choice of material sizes, go to 5/8" square to form the jaw, and use 3/8" square or round for the reins. The 5/8" would better make 3/4" wide when you forge the first stepdown.
Then as you forge the next stage, you can bring it down to allow for a scarf to blend to the 3/8" bar after welding, upset and scarf the 3/8" bar to suit for welding.
The reason I advise this is that it is preferable to have the jaws at least as twice as wide as the reins, and the thickness of the boss to be 1/2 of the width of the jaw, (in this instance)
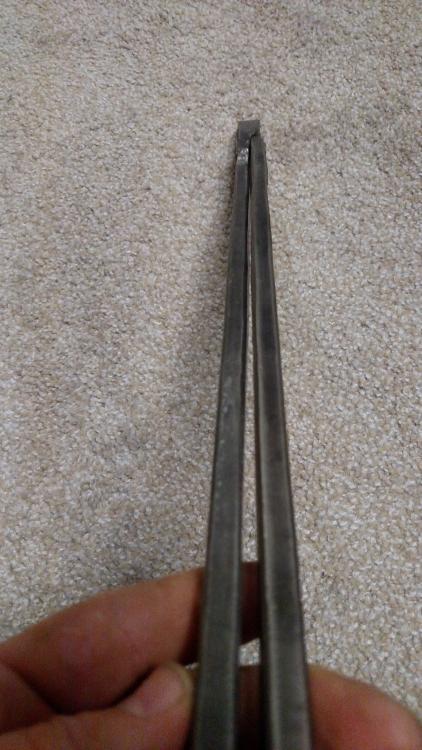
this puts the edge of the rein onto the centreline, which then allows the reins to be in line with each other when in the working position,
In the picture, as you look down the reins you can see the tapering gap, which also throws the tongs out of line when in use, and tends to prise the pivoting area apart if you use a bar rack to support them when not in use.
Another minor coment, the boss does not need to be as long as it is in the pics, it would be advisable to put the rivet in the centre not to one end as shown, again this gives more equal bearing area around the rivet, and reduces 'slop'.
As an aside, do you hammer with your left hand and use the tongs in your right hand? As the ones in the picture appear to be for use in the right hand.
I hope these comments are useful, have fun and enjoy.
-
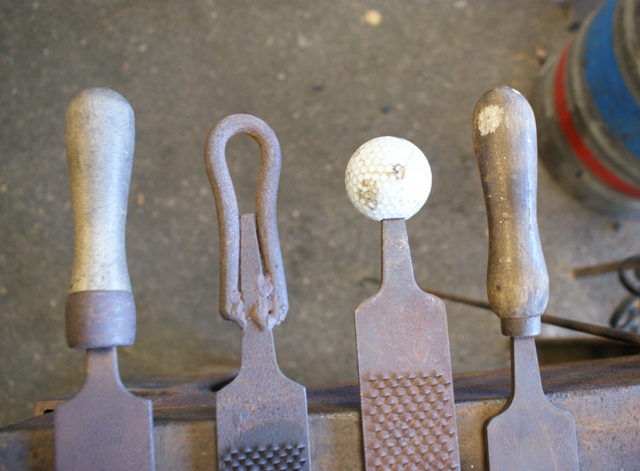
Part of my apprenticeship was in an inspection department, and I was privileged to work alongside a totally blind gentleman called Tom who used one of these amongst other unique tools in his toolbox,
A lot of his time was spent on inspecting and sometimes grading items within a certain range of sizes, the micrometer being initially set to a slip gauge or Jo block, and thus he could measure items of each size within the tolerances allowed, sort them into grades, or reject them for further work or scrapping.
His other speciality was in surface finishes
He was pretty good at telling you what sizes small things were without the aid of calibrated measuring tools too, he would select the appropriate size of calibration block which was then checked by a visually sited person against the drawing/blueprint and route card as normal proceedure, Invariably Tom was correct in his choices.
-
Slit punch and drift is the way to go,
Drifting a drilled hole is going to stretch material, rather than displace it to the shape you want.
If you drill, then forge it over the horn to stretch the material and enlarge the size,
Drifting is used to give an accurate sized hole, which may be square, round, or other some other desired profile.
-
Well done young man, an excellent job all round, and an example to all of us.
-
5 hours ago, IronWolf said:
Another Fix all rod I see for anvil repair is hard facing rod NOT the right rod to use but folks still do !
Can you explain why not please?
We have had high content managanese steel hard facing rods used, and they have worked fine, we work harden them with a hammer after welding, and the welded areas are still able to be filed to blend with the adjacent surfaces, probably come in around 50 -55Rockwell, so not too hard, and easy for a non professional welder to apply.
-
What diameter is the orifice in the PVC ball valve, and what diameter air pipes you are using? The vacuum is powerful enough as it is melting steel, air restriction may contribute to noise levels.
The pressures required are not that high, it is the volume of air that needs to be controlled, and a gate valve as you say will be a more controllable arrangement if the orifice is the same as the air pipes.
I would suggest going for this option, as it can easily be transferred to a new blower, and see how effective it is, and if it does make a difference to the noise level.
Hope you don't have to wait too long for a new blower, and i hope it is quieter than you existing arrangement..
-
17 hours ago, Lou L said:
Seriously, I'm desperately seeking my just right blower that has the static pressure to push through the pile of coal in my side blast. I hate the noise of my current blower but, because I'm cheap and willing to wait for something free or cheap, I grin and bear it. I won't be happy with some Mickey Mouse setup, I want complete control of my fire.
Hi Lou,
If it is only the noise you have a problem with, consider how to reduce it.
It would help to show us a picture of your setup, and how you control the air flow. If it is electricity powered there are options, if it is hand cranked, surgery may be needed
Our blower is located in a seperate area externally and piped into the building and serves 12 hearths,
Others I have used have been in a contained (boxed in) area that has soundproofing, at the rear/side of the hearth , but also vented to allow air intake to the blower,
Both these methods significantly reduce the noise levels.
Hope this is of consideration and helps.
-
On 9/21/2016 at 8:05 PM, SReynolds said:
all these posts and not one.

Useless not these are
-
Do you use a coolant flow onto the blade whan in use? Heat generated can allow the blade to flex and wander, also blades have to be 'run in' gradually when new or that can cause problems,
Minimum clearance between supports is necessary, and an appropriate toothed blade for the material size and type being cut.
All roller supports and bearings should be incorrect situ and good working order,
The one I have to use is a PIA, blade keeps jumping off even when everything is set up as per manual, and when new ones fitted,
Good luck with sorting it, I even checked the play in the main pivot point, it still jumps off and wanders.
-
All steels react differently, and if you are buying new stock, advice is available on heat treatment possible and advis available, This may help (or confuse) the issue further. http://www.msm.cam.ac.uk/phase-trans/2012/Manna/Part3.pdf
I would suggest trying a sample in various ways to see what works best for you.
-
I don;'t know if this helps, but it is a section from the handout and general notes I work to when taking a toolmaking course
HARDENING To harden steel, the metal must be brought from hot to cold quickly , and this rapid rate of cooling is done by quenching
The more rapid the rate of cooling, the harder the steel will become, but care must be taken in choosing the appropriate quenching medium, because certain steels will crack if quenched too quickly, or if the item being quenched is of an intricate shape
The quenching medium is chosen according to the rate at which it is desired to cool the steel
For most steels we use oil or water,
Water should be clean and fresh from a tap, warm water will give a much slower rate of cooling but will be somewhat more rapid than oil,
Warm oil is more rapid than cold oil, Mineral oils are more rapid than Animal oils, and Animal oils are quicker than Vegetable oils.
Air is also used and results in a very slow rate of cooling and is referred to as Air Hardening.
If extreme hardness is required, 5% caustic soda solution, or 5—20% brine solution can be used.
-
4 hours ago, Bmallen77 said:
I am an idiot and definitely made a mistake John b please feel free to kick me in the xxxxxx if you ever meet me . Just realized what he is saying and you are saying about the chuck.
No offence taken, not knowing your experience and also trying to help others at the same time, it was not my intention to upset anyone, I try to start at basics and then work onwards.
Knowing how to use one, and knowing how they function and make tooling for them are two entirely seperate experiences,
I often find it is so easy to overlook what becomes the obvious at a later date, and a fresh set of eyes is of enormous help,
Looking at your own pictures will no doubt also give you a new view of what we have been trying to point out. Like they say a picture is worth a thousand words (Unless it's a picture of me, and then there is usually a good single word or two for it, just those that can't be mentioned in polite conversation)
Having got past this, good luck and you do have a great little tool there, especially as you come to terms with it and it's capabilities.
Have fun and enjoy
-
I am not sure what your problem is here except that you, along with quite a few others, are not aware of what a flypress should do, and how they are used/tooled up, I will try to explain a few basics which may help.
- Primarily they were not a blacksmiths tool/machine, we use them because we can.
- They were used on a short stroke on thin materials to produce many mass produced items, the stop facility was there mainly for a couple of reasons, firstlly for the task in hand, usually that was for either blanking out items or bending and forming items with a guaranteed repeatability. and secondly operating reasons, reduce fatigue and establish a rhythm when in use, maximising effort in a minimum time.
- They were used on cold, relatively thin materials
- Bending and forming was usually done with top and bottom tooling as individual or paired items depending on the task being done
- Blanking out shapes and punching holes were done using a top and bottom die set with pillars for accurate location when in use, without this degree of accuracy the dies (on the bottom tool), because of the clearances needed for cutting a clean profile, would not align with the punches, (top tool) and chip or break when in use. The clearances when in use were approximately 5% per side of the thickness of the material being used so on a 16 swg (1.6mm) workpiece which would mean less than 0.004" (four thousandths)or 0.08mm, which is not a lot as you can appreciate, hence the guide pillars. Stripper plates were also an essential part of the punching tools.
Tooling was specific to the job being done, and this is applicable to what you are trying to do, you make the tooling to fit the gap and task in hand. I would suggest a google search on fly press tooling would be enlightening.
It would also appear from your pictures that you have a toolholder already inserted into the press's toolholder mounting which may or may not help.
Usually the standard size for the top tool location was 1" diameter, and a screwed spigot of this diameter was fitted to the top tool of the die set,
It is good practice to mount the top tool to bear on the base of the top slide rather than rely on it bottoming out or just being held with the locking screw on the front.
Basically you have the space that your screw travel allows, and the rotating stop allows for the stroke to be stopped at a specific place.
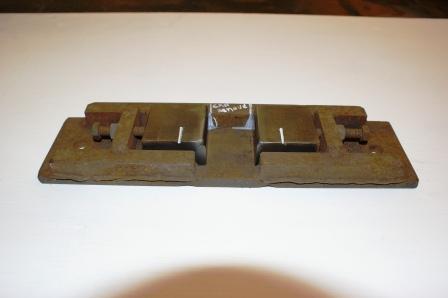
The base plate you have there is a mounting plate to secure the tooling you make for whatever task you have to do, hence the T slot
When you design your tooling, do so around what you have there, If you need to close the gap, either raise the base or increase the top tools length.
This is a simple fixture I used to form collars,and other U shapes, or bend curves, or form angles, depending on what combination or top tool I used with it. I like to make the tool as versatile as possible so I can use them on other applications (and don't have so many to take up space in the workshop).
If I needed to higher it, I just placed 1", or 2" thick bars beneath the strategic areas and then clamped it down to the T slot
readyfordrivingdowntoformU.JPG.70ec5abf0ed16d19fab31e328d42a482.JPG)
I hope this has helped somewhat in trying to understand how it works, and to best utilise your flypress.
Good luck with it and enjoy,
-
Nice one Joel, always good to see final item in the place it belongs and was made for. Good job.
-
On 9/11/2016 at 9:46 AM, Smitse said:
I recently started making hammers myself, i've made a rounding hammer but struggled grinding the round dye ( in don't have a belt sander only an angle grinder)
Any tips? thanks!!
Hi Smitse and welcome to the site, if you didn't have a cupping tool to form your dome, you should have forged the rounding end and then finish with a hot file/farriers rasp, allow it to cool slowly to anneal/ stress relieve it and keep the metal relatively soft, so that you can then finish file, and polish to give your required smooth finish, When satisfied, heat treat and then a final finishing polish and buff.
If you are going to use your angle grinder you will ned a bit of patience and various grit wheels rough out first with a coarse grit to your desired profile, then a finer grit and finish with emery cloth in increasing grades until your reach your goal.
Have fun plenty of tips here on finishing and polishing.
-
Here in the UK, "Men in Sheds" use molasses to clean up old tools sent to them for refurbishment before they distribute them to relevant places
-
3 hours ago, Hawgdirt said:
And can anyone recommend a good book for beginners to learn about blacksmithing?
Welcome to the site,
The Blacksmiths Craft, free download from here http://www.hlcollege.ac.uk/Downloads/cp_blacksmith.html
Wrought Ironwork A manual of instruction for Craftsmen, free download from here http://www.hlcollege.ac.uk/Downloads/cp_wrought.html
Others on that site also of interest, but they are the basic blacksmiths reference books, Others will also make recommendations of what their choice is.
Have fun and enjoy
-
If it works, don't worry, there is always an alternative "blacksmithy" way to sort a problem, just not a proper way, depends on your skills, and the time and money you want to spend on the project, sometimes Less is more, and keep it simple also works.
Have fun and enjoy.
-
I know of a few that have had the top link "adjusted" to bring the head to vertical over the anvil face, some bent, others upset.
Can only speculate on why it was needed, favourite idea being that a replacement part was not exactly the same as the original.
-
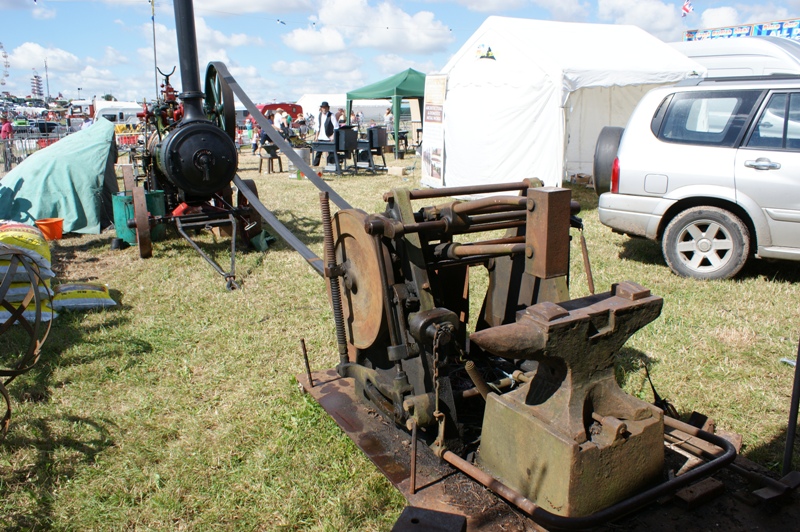
Had a couple of days at the Great Dorset Steam Festival over the weekend, thought this may be of some interest.

Gates steels choices
in Blacksmithing, General Discussion
Posted
No,
Location, function / purpose and surroundings all need to be considered, as well as a budget figure from the client.
Preconceive your steel or its sizes, and you limit your creativity.
The only criteria I have is it that the material, and its size/section is suitable for the task being undertaken.