
John B
-
Posts
3,598 -
Joined
-
Last visited
Content Type
Profiles
Forums
Articles
Gallery
Downloads
Events
Posts posted by John B
-
-
18 hours ago, Frank B said:
I have been forging railroad spikes into garden trowels for years. I think this is my best version to date and with the curved handle it sits nicely in your hand.
Nice looking job, may I make a suggestion, I think an extra quarter twist on the handle before drawing out the blade would make it more comfortable a fit for fingers to grip, what do you think?
-
IMHO
Is it a creche or a class you are in charge of?
How many in the class, and what ages?
Are responsible adults on hand for each student under a specified age?
Each student is responsible for their own and others safety and comfort within the group with the tutors ulimately responsible for all.
Do you have rules about behaviour in your work area, students need to know limits
The other factor you have not mentioned is your standing/position relative to the OHC and their policy regarding students. It is better to have one student upset than to have the rest of the group upset/disrupted by one person.
In this situation you have given this brief insight, which should have set off alarm bells .
3 hours ago, SReynolds said:His Grandmother said no other class/program would allow him to attend due to his age (13) ,,,,,,,,,,,,,,,and know I know why. Not my first poor student, but the worst.
If this was mentioned prior to class, I would have insisted on a one to one session, then if it does not work out you can abort the class, and refund (or not) the fees.
In any case, one disruptive person can ruin it for the rest, my policy is to give one response to the situation in no uncertain terms, and if it continues, show them the door. (Even prepared to refund any fees if necessary)
If they want to return I will need some guarantees of better behaviour, or the same will happen again.
I have occasionally sent students home if they did not conform to what was required.
I firmly believe there is no such thing as a bad student, only a bad/poor tutor,
Getting through to engage and understand their needs is the problem. In that situation I call off their involvment with that particular class, and go for the one on one, and then deal with the problems.
It is also a matter of reputation long term, if people are involved in this situation, or see this taking place, are they likely to give out good messages or alarming ones, was it a good experience or one they would not want to repeat. ?
-
Hi Joel, stick a pic up and lets see what you are describing please, Side mounting screw hole would suggest a length stop of some sort, plain hole is probably a dowel location hole for positioning, or could possibly be used for pivoting tooling, or a specific quickly needed tooling to be added,
Ask the person you bought it from what they used them for, I don't think they are a standard item.
-
Happens to us all, it's called "gaining experience" Darn frustrating though all the same.
Not quite back to square one, call it a practice run.
Good luck with the next one,
-
Exactly like those Glenn Thank you.
I understand it was also used as a slang term referring to the gaolers in medieval times when they used the rack, thumbscrews and other types of torture equipment.
-
3 hours ago, SmoothBore said:
In America, we call it a "Screwdriver".
.
My understanding of turn screws in the UK are what are also turned wing nuts or butterfly nuts, basicall they have some method of turning them withoput resorting to tools like screwdrivers or hexagon/allen/torq tools.
-
So far, so good !
-
I like that Pancho, a neat solution,
If you do define the star edge it would be as you have already realised beuncomfortable to use, and if put in a pocket or bag it could damage lining.
I like this thread, proof of considered input, understanding of requirements, and a practical feasable solution Well done all concerned,
Now you just have to make it and post pictures.
Have fun
-
5 hours ago, ThomasPowers said:
It's only cheating if you arc or torch welded them as you often make a basket by forge welding them.
Cheating ?, so long as it works and is safe and by current definition it's blacksmithing, I would also add well finished with welds ground smooth (unless a feature) and welding spatter removed.
My concern with the practical side of this item is the necking in above the lower level of the bag supports as it is a weak spot on 1/2" square bar and is easily bent when in use or being transported.
Other than that, Good job
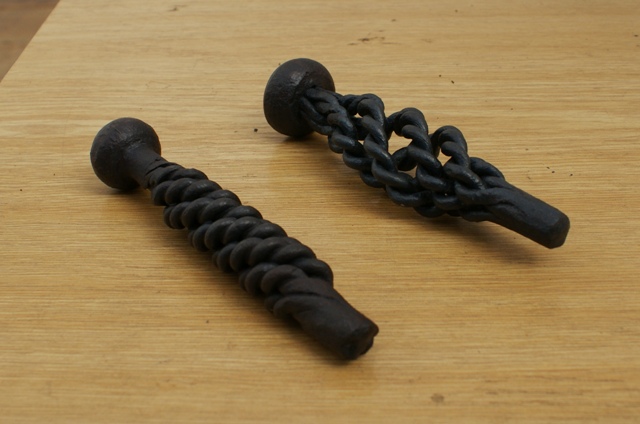
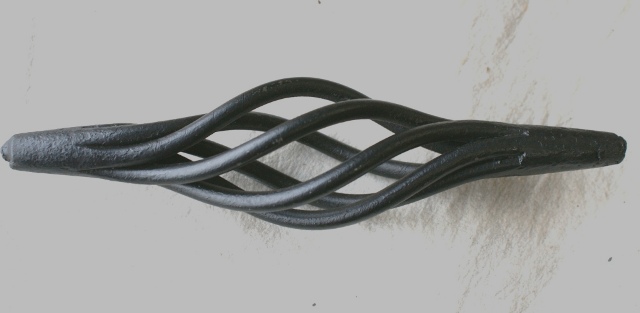
Here are a few twists for Dustin or anyone else interested.
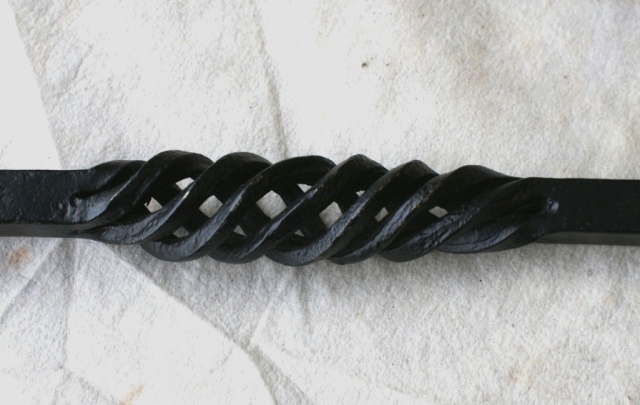
on 1/2" square bar split through from two sides, twist it , and then untwist whilst compressing to open out into a cage until required profile is reached, slight adjustments with tongs or wedge type tools may be required.
Playtime with a Claydon knot type twist,
six round bars
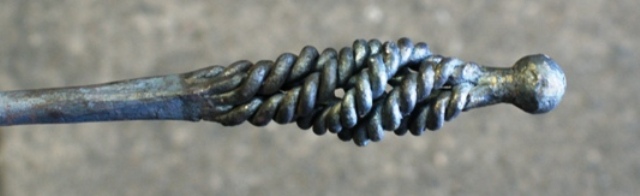
Four round bars, doubled back onto themself and twisted, then the four bars placed together, ends firewelded together, one having a ball end, the other scarfed and attached to a solid bar to be used as a part of a companion set tool, then the twisted sections revers twisted and compressed at the same time to give the cage .
These show ends welded, one is for a clockwise twist (Right hand) the other is anticlockwise (Left hand) why right and left hand ?, its a comfort thing when in use.
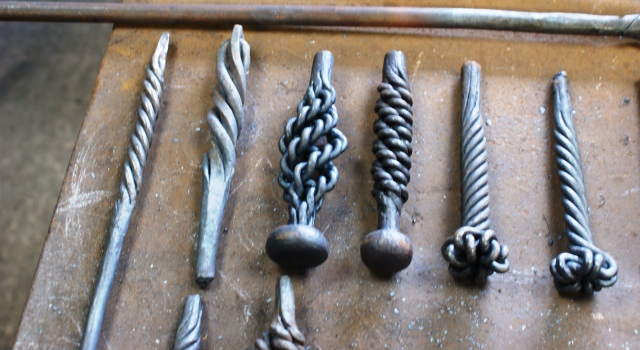
Just a selection of multi bar twists made by the students on a course we held
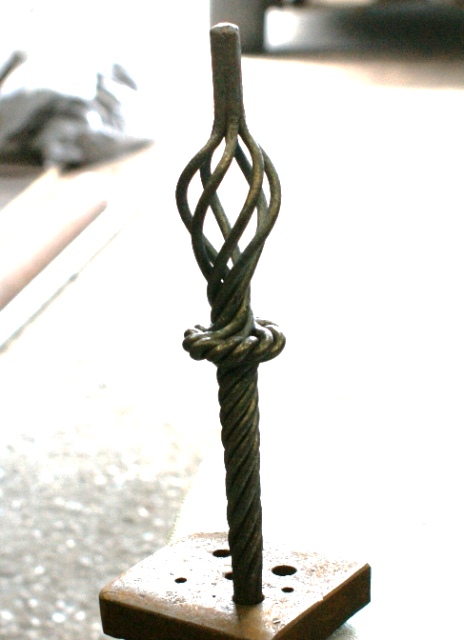
This one is based on an unfished Claydon knot
Hope you find them of interest.
-
This coming SaturdaY July 9th is our monthly Members Day, and one of the members is hoping to bring along an old small trip hammer for perusal and trial, if anyone would care to drop in, you are welcome. Kettle will be on.
-
The quantity you have to produce has some bearing on the method to be used, so how many are you being asked to make?
Laser cut and (tig) weld on is one way to go
Another would be to alter the sketch a tad, (there is a potential weakness as the star points contact the main body end) make a star shaped punch, forge the end down to a disc, punch through and then trim to give the external profile (hot cut or cutting disc on angle grinder)
Twist the handle and it will appear to look a little like a shooting star.
Good luck with the project, and have fun
-
6 hours ago, Frosty said:
Annealing the glass is important but it's not as tricky as most folk think. Two points to consider when mixing glass and steel, they both have similar COE, not the same but close enough. The real buggaboo is thermal conductivity, the steel will cool much faster than glass. You keep them in an environment that cools everything at the same pace.
Another little trick is using the right kind of glass. Lamp work glass is a lot less sensitive to stresses and requires less annealing.
All I do to anneal the things I was messing with was leave it in a section of the forge out of the main chamber but with enough leakage to be over 1,000f Yeah I even adjusted the partition bricks a little to make it so.
Here's something I was surprised to learn about molten glass, it's very viscous but the darned stuff is an astounding penetrant. Capillarity sucks it into virtually any void if it ISN'T completely open. The points on the negative space in the spread cross for example. I've tried a number of things to try containing it on the under side but it flows through ANY gap and spreads over the bottom side of the cross where it's laying on something. Getting the little points filled in the negative space of the cross on the other hand are so far not happening.
I purchased Red frit, same color as in this cross thinking if the corners are full to start I have it made in the . . . .forge. Get it hot enough to flow and it's all over the place EXCEPT the corners. Getting it to slumping temp on the other hand has some really nice aspects it looks sort of like itty bitty bright red caviar just not in the corners.
Frosty The Lucky.
The special paper mentioned by bigb is probably mica as it acts as a non stick surface for the molten glass, but if used on forged items there is the possibility of leakage on the underside due to the capillary action into any indentations, I have not used frit or powdered glass, mainly bits of broken coloured glass or glass marbles, and I have not used a gas forge to meld them in, (what is meld ?: to (cause something to) combine with something else)
The first I made was in a microwave, details are on this site somewhere, and results would have been better if I had used a mica sheet backing for it, as it turned out, I had to grind/polish off some of the sharp bits left on the lower side when the items fused together,
Other attempts have been succesfully done on a side blast forge, I say on rather than in, as I placed the cross onto a flat steel plate (3/8"), with the bit of glass or marble in the opening of the cross, The plate heats up, then the cross and then you can see the glass slump and flow, (slump is beter than melt as it leaves a jewel like finish at the front which acts as a lens if illuminated from the rear.) lift the plate off to one side of the hearth and allow all the lot to cool as you would when annealing/normalising steel.
Now comes the interesting bit, in practice, the glass slumps through and rests on the heating plate where it melts and flows, attaching itself to it and forming a bond between all 3 parts, glass, cross and support plate. This forms a potential shear line for the glass, keep your eye on this stage and remove from fire as soon as this occurs. It may take a couple of attempts to get it spot on, but the process is quite forgiving and you an always melt out the glass and repeat the process.
When they are at room temperature (or leave overnight) if you use a spannering motion between the cross and the plate, (sharp tap with a hammer on the cross, plate in vise) then the glass usually shears off with a nice clean face on the rear of the cross, you can polish up if needed to remove any shards that may remain.
Have fun
-
6 hours ago, SReynolds said:
But my point is the source of information . An individual must get it somewhere. What would be a reputable source? If not books then youtube? Or this site?
That alone is a challenge for a beginner. I worked under a talented smith (per the work he does) but insists that water quench cools slowest and heavy oil the quickest.
I have met a smith who informed me you harden low carbon steel at black heat and quench in engine oil. So yeah. I'm trying to point out there is alot of bad information.
I am glad we finally got to the point you intended, that was not clear in your previous posts,
As I mentioned previously there is no right or wrong way, and practitioners have many theories as to what works for them and usually why, so ask them and form your own opinion on the rationality of the response and act on that. The proof of the information is if it is succesful for you when you try.
Reputable sources ? Hands on with an experienced 'smith in the field you wish to study is my first choice, some books are better than others, my recommendation is the CoSIRA books now known as Rural Craft Publications, frequently mentioned on this site and although out of print, they can be downloaded for free from http://www.hlcollege.ac.uk/Downloads/craftpublications.html especially the Wrought Ironwork: A Manual of Instruction for Craftsmen and The Blacksmith's Craft
You tube, some good, some bad, pot luck really most miss out useful if not vital points, some are downright dangerous, some well intentioned, others just an ego trip, with advise and experience you will come to recognise which are useful for you.
This site is the best I have encountered on the internet for constructive (sometimes controversial) advise, and usually as in this post, people will step in to try to help and inform.
'Smithing is a hands on lifetime learning experience, Aristotle has been quoted as saying "For the things we have to learn before we can do them, we learn by doing them.” a perfect mantra for the craft. Simply put , we learn by our mistakes, on this sit you get the benefit from also learning from others mistakes.
Whichever way you choose to work, always remeber there is no proper way
Have fun and enjoy, it's a great hobby, but a heck of a hard way to make a living.!
-
You say "I don't know, I don't write books, this is his second book so he must know how to do it"
He may know how to write books, and how to market them, so you assume he knows how to do it.
Many years ago I obtained his "Edge of the anvil a resource book for the blacksmith" and by and large for beginners thats fine and I found it interesting, mainly for the portfolio of Samuel Yellins work, some of the other contents I found personally found questionable
As for his hands on smithing , I do not know his experience or capabilities and have no wish to cast aspersions but his book(s) techniques are only his (and his advisors) guide lines.
When you start out you tend to soak up any information from any source you can, and trust that source to be reliable and experienced mainly due to your own lack of knowledge. Do not be afraid to question its provider, many are short on practical experience and can talk the talk but do not understand what they are saying, or doing. You will be able to judge them on their response.
There is no right, proper or wrong way when you blacksmith, just do it safely.
He may clearly state "If don't scarf a faggot weld, the weld is weak" and that is in itself unqualified, What is the purpose of the weld? In this case adding volume to a bar, it is either a good weld or a bad weld, and so weak is an inappropriate term. If its going to fail under load, then it is weak, but in this case you are consolidating metal onto itself so it becomes one.
He also always uses flux, again nonsense, you do not need flux to forge weld mild steel, it may help, but it is not essential. Fluxes have been used from the Bronze age to help join metals, it does not mean you always have to use them, they are part of blacksmithing mythology along with clean fires and no copper contaminents or the weld won't stick.
You then go on to recommend this weld for a beginner, with thin flat stock, but don't scarf it as it's too thin. Thin is not good to practice to start trying to forge weld on,
I think it may help here to define what a scarf is in blacksmithing welding terms, Andrews mentions scarfed collars, these are cut on an angle and become in his terms overlap collars, It may be an American thing, but my understanding of a scarf is your piece of metal to be welded is jumped up or upset to give excess material so that when two or more pieces are welded together the pieces consolidate and the original bar size or intended section at the joint is maintained, The scarfs are made to rest on each other in a number of different ways, to help locate them and stop them slipping during the initial tacking of the weld.
Good luck with your trying horse shoe stock, and show us the results
Here are some pictures to illustrate scarfs and how they fit, these were done by Richard Bent

Apologies for the picture quality, they were resurrected from very old archives
-
3 hours ago, SReynolds said:
That is the point I brought up. The Andrews books says otherwise. You must scarf the joint otherwise cold shuts are formed. I have performed the task each way and both can form cold shuts.
The book is wrong, the technique used is what determines what you term cold shuts occuring or not.
If you are going to perform the foldback/faggot/lapweld or whatever you want to call it, then cut halfway or more on your hardie and then fold it back onto itself, this will reduce the eye shaped gap you see in the picture, then weld back from the end and it will consolidate from the welded end end towards the "handle" end
If you are going to scarf something you are usually putting metal back into where you are about to weld so as to maintain section as you weld, and then forming a mating area with your other piece.
Why would you scarf on an outside edge as in the picture?
-
This may be of interest, board is made of sections with different textures/markings. Made by James Deane
-
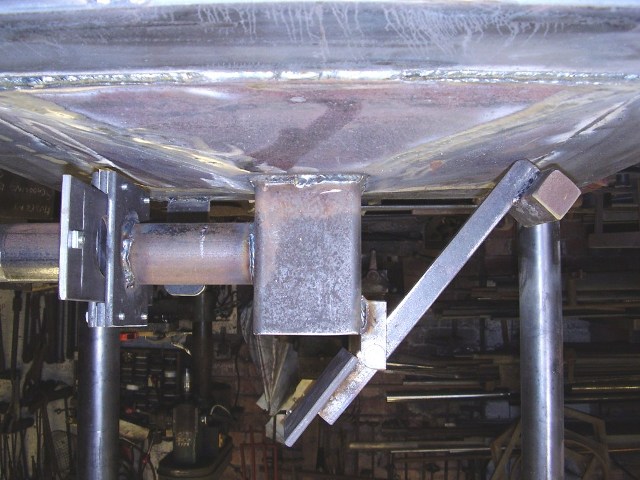
8 hours ago, Bowland said:
Thanks JohnB and pictures as well! Yeah I was thinking a dump on the bottom. I left enough so I wasn't needing to dump until the end of the session.
The ratchet I get - good idea for sure. Is the danger running with too little air then breaking into the coal or what?
The two square flanges with the pull out plate for the air choke look good to me.
My plan was always to put in that raised internal floor - what kind of min / max on that as regards the plate thickness?
Also saw some cast iron heavy grid covers recent and wondered if I might source one the right size or one I might alter?
Does the airflow still work if it's not centrally focused in the burn pile though? That's what I fear with a grid cover
In practice, you should not get a lot of ash/clinker in the ash dump,(to qualify that it will depend also on the size of the air vents in the hearth base suporting the fire) so you don't need a great volume beneath the air intake,
The ratchet gives a repeatable and secure reference point when the forge is working, if you have a simple pivot on a lever then there is a tendency for it to move when working on the forge, if the lever is horizontally mounted then not it is a tad better, I just like the directness of the ratchet type, I also have it inside the periphery of the hearth so it is easier to transport and stack if it is going to be portable.
I am not quite sure what you mean by "Is the danger running with too little air then breaking into the coal or what?"
So long as you have air being fed in it will percolate through the fire by the easiest route, if you have a load of clinker in then it will either have a hole through the clinker's centre, or the air will go around the outside edge of the clinker giving the appearance of a good fire, but it will have no 'heart' and you will heat around each side rather than towards the centre where you would expect the hot spot to be. You can usually tell if this is happening as the centre bit of the length of heated bar will be duller in colour thtn the ends of the heat.
Air control is vital, you need sufficient for the job being worked on. You are better off using less air + patience and let the workpiece soak up to the required temperature.The amount of air dictates the size of the fire/heat generated, too much air results in all sorts of problems, eg excessive fuel being used, ash and clinkers attaching to the workpiece giving a poor finish, and needing excessive use of the wire brush or hot file, burning of the exterior surface resulting in 'scabbing', excessive scaling, the metal being hot on the outside but not all the way through, particularly on the larger stock.
The above also partially answers your question re grid covers and centrally focussed. It is also dependant on the size of the grid you are using as this is what holds the clinker, too big and ash and small particles of fuel can fall through also.
"My plan was always to put in that raised internal floor - what kind of min / max on that as regards the plate thickness?"
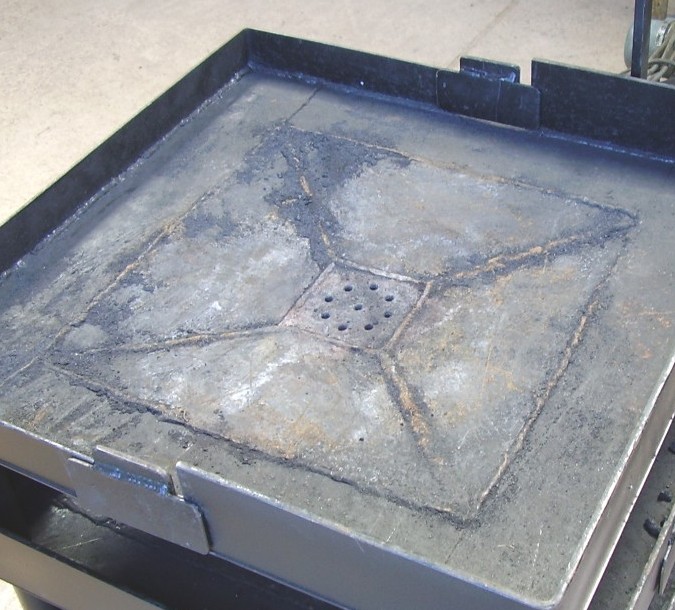
If you put in a raised floor ensure the air will not escape around its edges as it can cause fire management problems, as to min/max size of plate to use. There are no guide lines but longevity in use is the problem, personally I would recommend at least 3/8"/10mm thickness preferably 1/2"/12mm as a minimum for the grid base,
I would also use 6 or 8 holes on a pitch circle diameter of holes 3/8" diameter with a central hole of a similar or slightly larger size. This is a proven design.
I would abandon the thought of using a cast iron grid as it can cause more problems than it solves and depending on configuration may be totally unsuitable.
The forge in the picture has a shallow angle base of 6mm (1/4") plate with the tue area made of 10mm (3/8") (or could be 1/2" = 12mm ) The shallow angle allows for easy clinker removal, you just allow the fire to cool and let the clinker coagulate, then slide a slice or shovel along a side and remove the majority of the clinker in one go. Steep sides can be awkward.
What you don't mention is the fuel you are going to use. The abve design can be used for coal or coke.
Hope this helps you a little further on your journey. Have fun
-
2 hours ago, Bowland said:
This is were I am up to trying to decide on were to divert excess air ( thinking in the horizontal directly in- line with flow? Via a sliding trap that I could pull or push from front end?
You need to be able to control the air, so a slide valve is easy to do, and you will need to be able to seal off the bottom of your tube or you will have difficultu cotrolling air flow.
I would suggest making a hinged ash dump as they are easier to use especially when forge is portable
No need to water cool, total waste of time on a bottom blast set up. maybe make a removable plate to fit over the central tube and drill a series of holes or put slots in for the grate.
To control air I prefer to feed from rear with adjusting handle at the side on a ratchet arrangement as this gives repeatability and is less likely to get accidentaly knocked or disturbed when in use, which can be potentially dangerous.
What fuel will you be using? The existing depth should be ok, but for future reference the steeper the sides, the more difficult to remove clinker.
Here are some pictures that may help to illustrate what i mean square tube was used because weld prepping is easier than on round to round.
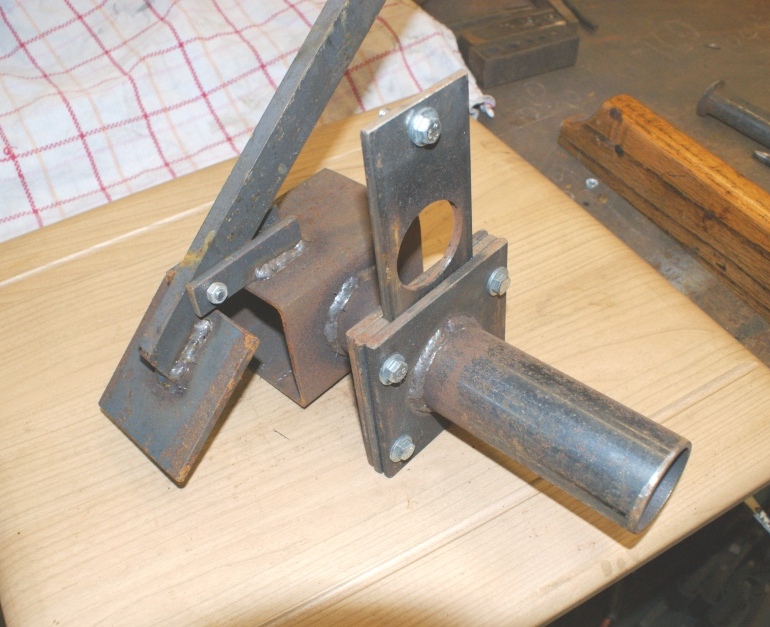
Look forward to seeing pictures of it working and what you are making in it. Have fun.
-
2 hours ago, SLAG said:
It looks a lot like a tailor's ham that is used in darning socks. Mr. John B. you are most likely correct. (which is not surprising).
Cheers. SLAG.
Surprised me !
-
Darning dolly ?
-
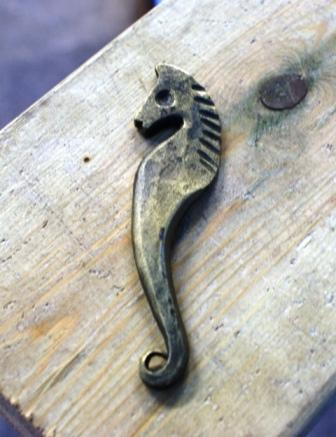
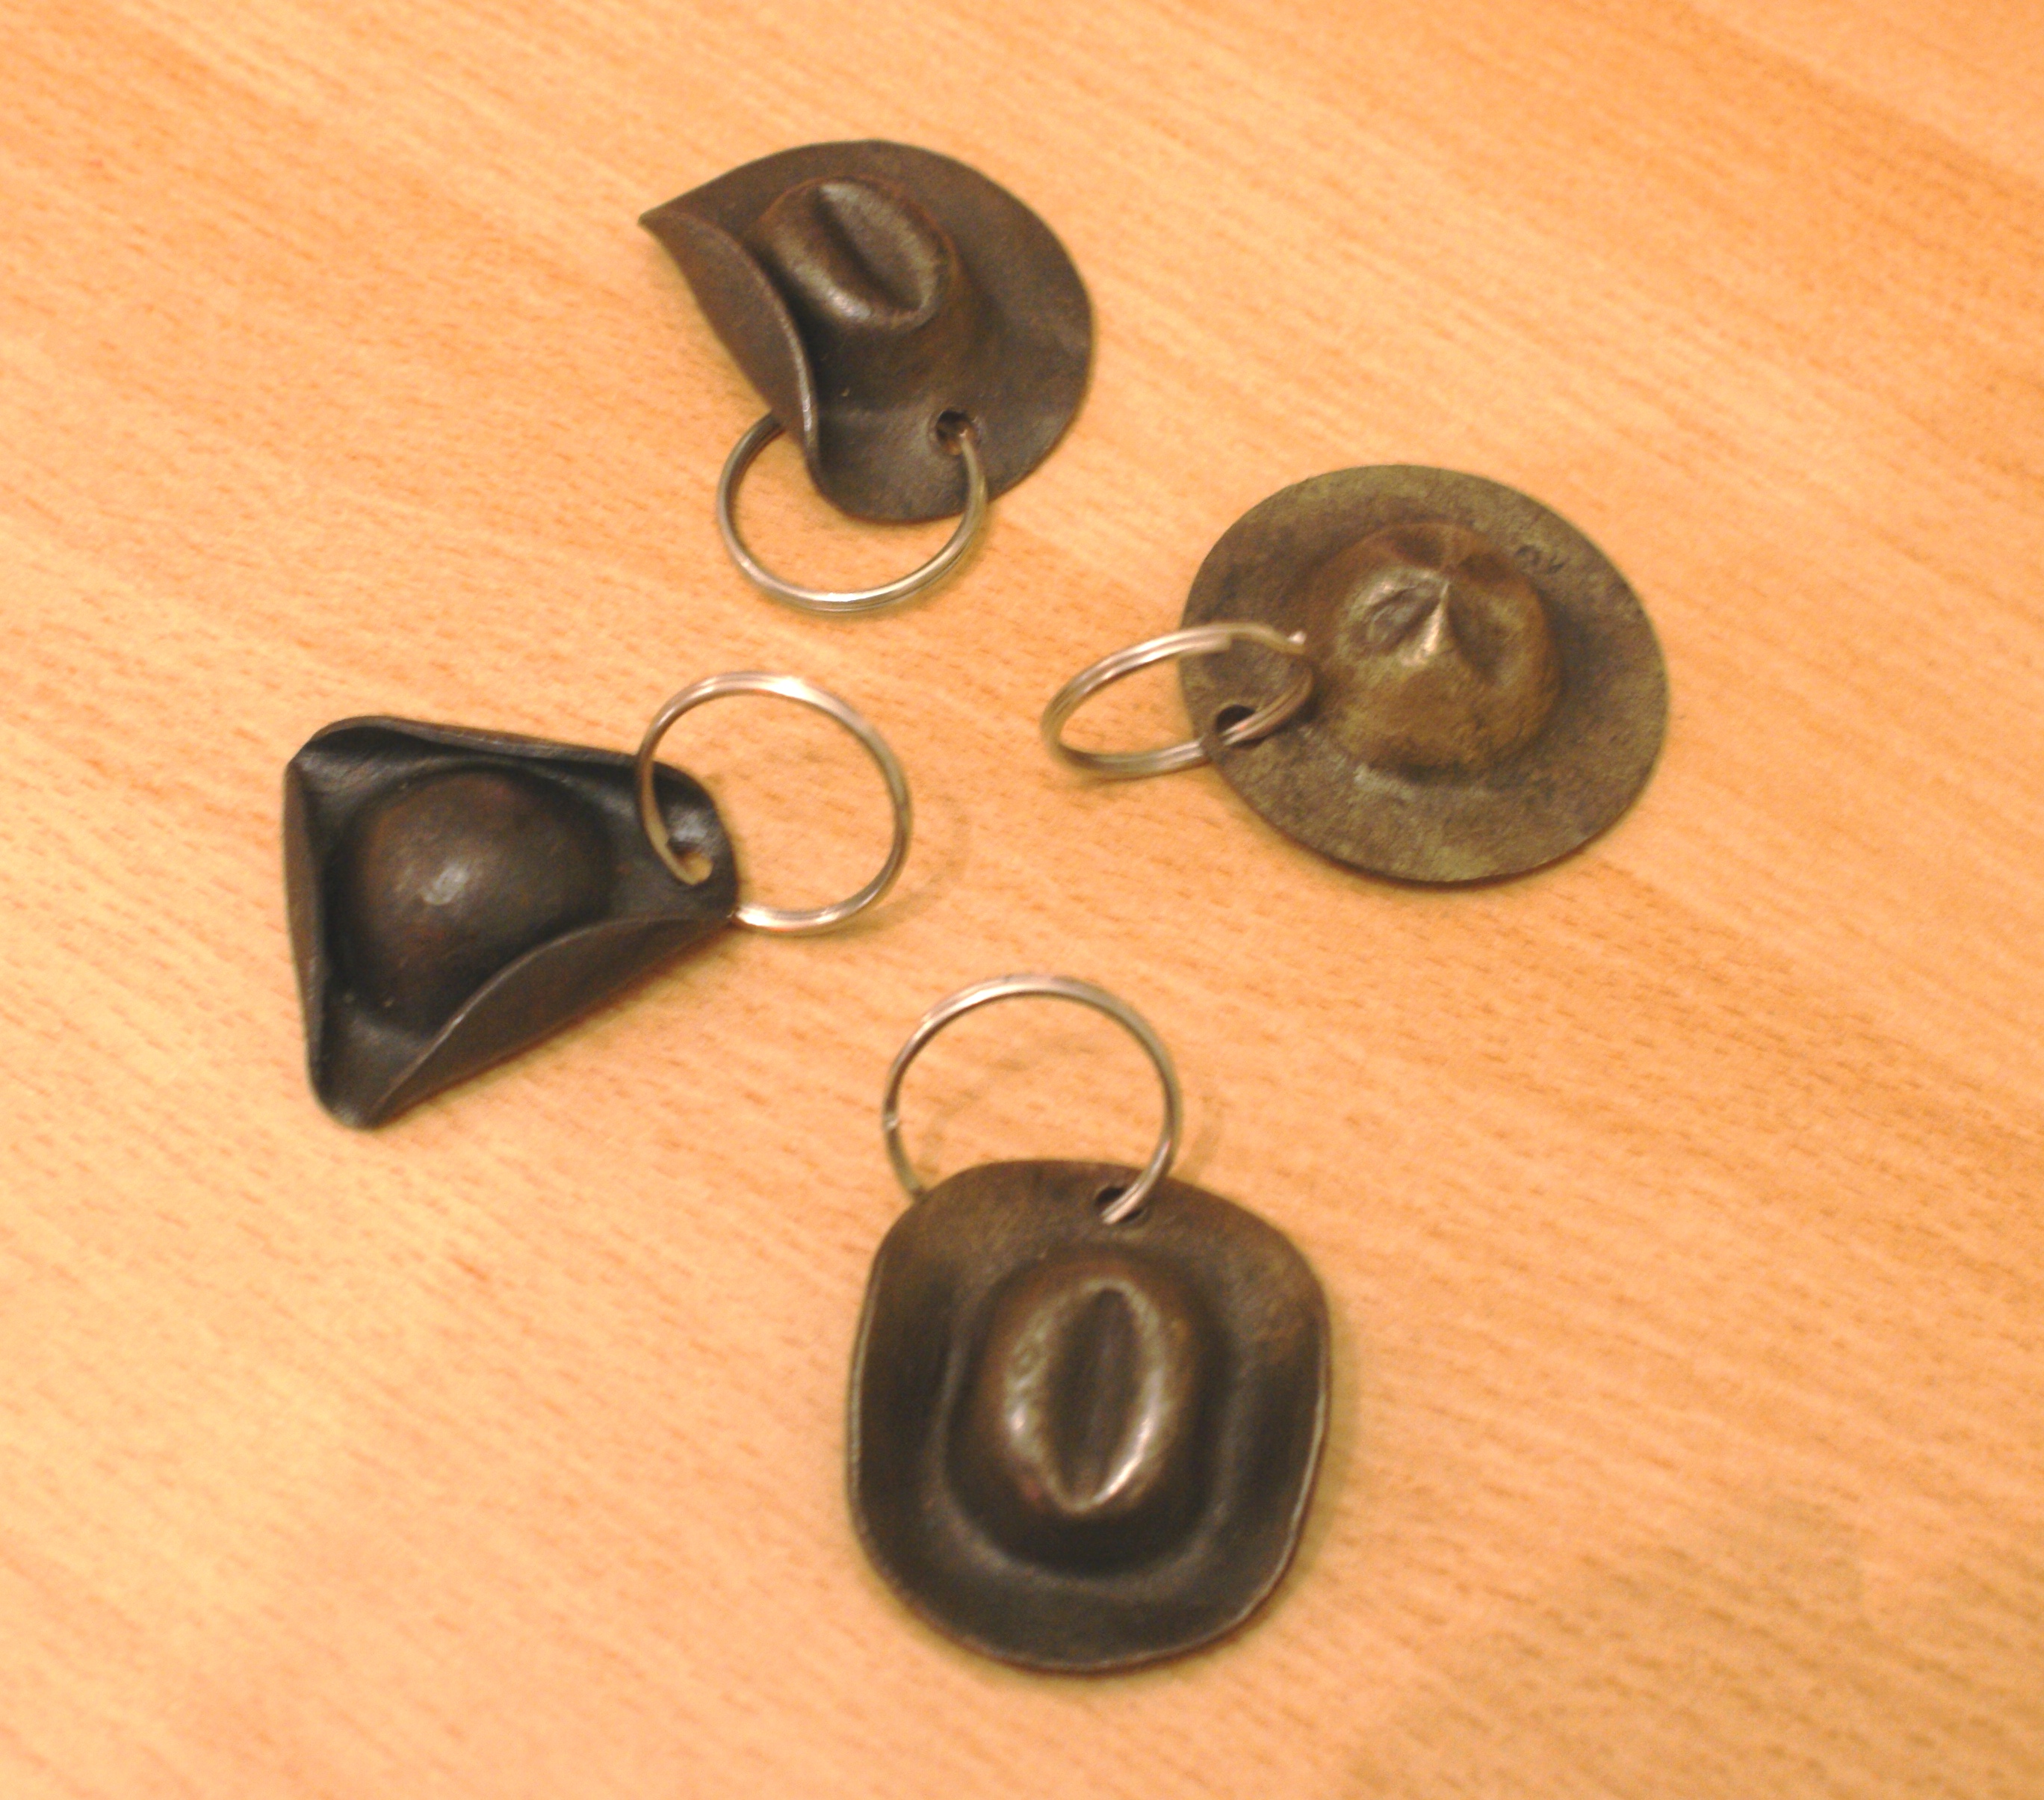
A few pics of past bits, Coil needs picklingbefore attaching ring, and sea horse needs a ring fitted

.JPG.18c1011c97e06107ae4667611a9a1708.JPG)
-
I would suggest investing in a blacksmithing course first of all before going into machinery, tool, etc,
With a soundly based course behind you, you will have more experience to make educated choices into what is going to be useful for you, and the skills to make most of what you will be needing.
Too often I see people rushing in to acquire tools they think they need, only to be disappointed in their choice, or wasting money on tools that are not suitable for what they are doing, but "may come in someday" (someday can be a long waited non occurring event). they can also take up workshop space that could be better utilised, Many of us don't have the luxury of large workshop areas, but that may not be your problem.
Welcome to the site, Enjoy the future, and let's see your progress
-
Air supply >>> ebay>>>>>> bouncy castle blowers>>>>>> 0.99p up + p&p they are industrial, will work all day, relatively quiet,
If you are going to be forging big tools and jewellery, for jewellery go for a small gas forge rather than solid fuel, similar techniques, but different scale.
I think you would benefit from going to some shows to see what the forges look like and have a chat with the people using them, may help to make a more informed decision. We would be happy to show you and explain diferent style, but it seems you are not able to travel easily, if you are in devon near Exeter anytime, let me know and i would be more than pleased to discuss and show what we have from cheapie home made forges 16" Square to large double hearths, small gas forges and burners. Some of our members are making forges as we converse.
Have fun, it is easier to change designs in your head prior to starting rather than make something you are not comfortable or happy with.
-
Hi Andy, There should be no problem with the seal if you fitted it to instructions, they are the correct one for that roofing panel profile.
We have had them in service for over 16 years at Westpoint, and no leaks at all, Only difference in ours and yours is the chimney itself, the helical joint may allow a minute amount of leakage, and if the cowl is set too high rain water can blow under and run down the inside of the chimney onto the register plate and into the hearth or down the canopy, yours looks to be OK so shouldn't have a problem.
Another problem you may have, if your hearth has wheels, and it starts to move, is that you will put stress on the seal, it looks as if you rely on the chimney seating on top of the register plate on the canopy, with no other support apart from the seal to keep it in place.
Take the wheels off and lower the hearth a tad to give maximum height if you are worried about the low roof.
I trust you secured the chinamans hat in place, they tend to go walkabouts if not.
Looking good, and it won't be long before you need more space.
Have fun
July Members day
in Blacksmiths and Metalworkers Association of the South West UK
Posted
Had a good weekend with the members, one brought along a small power hammer to see and for anyone who fancied having a go to play on
I found this hammer particularly interesting as although there was no makers ID on the machine, there was the name Hardypick and a machine ID number on the stand, I served some time as an apprentice at the Hardypick works, but never came across one of these. It seemed to be tooled up for producing points on chisels and this would point to it being useful to say the least as Hardypick produced pneumatic drilling equipment for mining, and points were made at the works. So if anyone else can shed any light upon the maker, it would be appreciated.
Another tool in the process of being made was a leaf veing tool based on the CoSIRA drawing which turned out well.
Others did their own thing including making the firepot, ash dump and slide valve assembly ready to fit into a table, and another played with some wrought iron with varying results, but learning a lot about forging the material and how it behaves.
On the Sunday a youngster came along to just "Have a go", he had never picked up a hammer before so we took things nice and steady and made a log roller, with some twists, forging and a little fireweld, He has already booked for a three day intensive basic skills course, so that should give him a little confidence to start with next time.
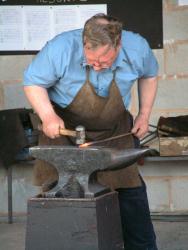
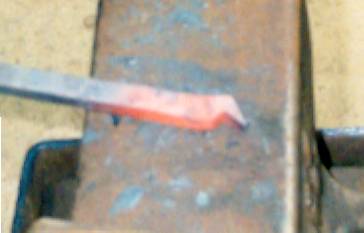
Although the end appears to be red hot, it is actually the reflection from the fire in the waxed finish
Looking forward to the next members day, August 13th at Westpoint.