Dasher
-
Posts
70 -
Joined
-
Last visited
Content Type
Profiles
Forums
Articles
Gallery
Downloads
Events
Everything posted by Dasher
-
the damage is relatively minor, just if I try to hold anything for long periods, and my concentration fades, my grip can weaken, not normally much of an issue, if I'm carrying something fragile, I just adjust my angle of lift to support it more, hot stuff, with the added cantilever of tongs can be a small problem though, if something is heavier, I have an old , large pair of vice grips that Noah used building the ark, they are near bullet proof and just shrug off punishment, they save me having to grip as well as lift. The nasty 1st set of tongs I made are not super ergonomic, which I will rectify in coming days
-
Yes, got that, but almost always working solo, the main reason for the guillotine really, just trying to free 1 hand as much as I can, my left hand has a bit of nerve damage from an old work accident, and a lack of attention, or concentration can mean hot stuff falling to the floor or worse.
-
I'm not sure if you are taking the Mickey out of me with that last line or not Thomas, but as I'm new to this I'm not quite set up for that at this stage, even the guillotine, when done, will only be used for practise at this stage as I learn new methods of shaping steel.
-
Thanks guys, I'm thinking that at this stage , my tooling can be mostly mild steel, with harder dies as needed, as I have no bandsaw, or cold saw, most of my cutting is done , by either friction saw, which works pretty hard on thicker and harder stock, grinder, or gas, which, to me at least suggests I keep the tooling down around 12mm thick, my friction cut off saw handles that easy enough, but it doesn't like the 25mm dozer cutting edge I have. I'll re think it and see what I come up with
-
yep, thanks pnut, I'm sort of looking at it like what point is an aid, if you have to work more to make the aid?
-
Hi all, hoping for some advice/ feedback. I'm in the process of making a hardy guillotine and have come across a couple of issues that more knowedgeable people might help with, my original intent was to make it to suit tooling made from old spring leaf, but the steel is an odd size, ie 80 mm wide and 14.5 mm thick, or most likely 17/ 32", which means when I run out of spring leaf, any new tooling will involve making blanks to fit, and generally discouraging making a quick die for a job, 2 questions come from that, 1 , is harder steel necessary for general guillotine tasks? Especially if the actual tool face is an add on of higher grade particularly for cutting type tools. And 2, is it just simpler to make the guides suitable for readily available stock, and, if need be add a hard face at the working edge? I hope my intent is clear in the questions, and appreciate any advice, thx.
-
If you watched the Beverly Hillbillys, you'd know what a Gozinta is, it's a mathematical term, as in 3 Gozinta 12, 4 times , in engineering, it is indicated by a 50mm tube Gazinta into a 50mm pipe, but can be tight.
-
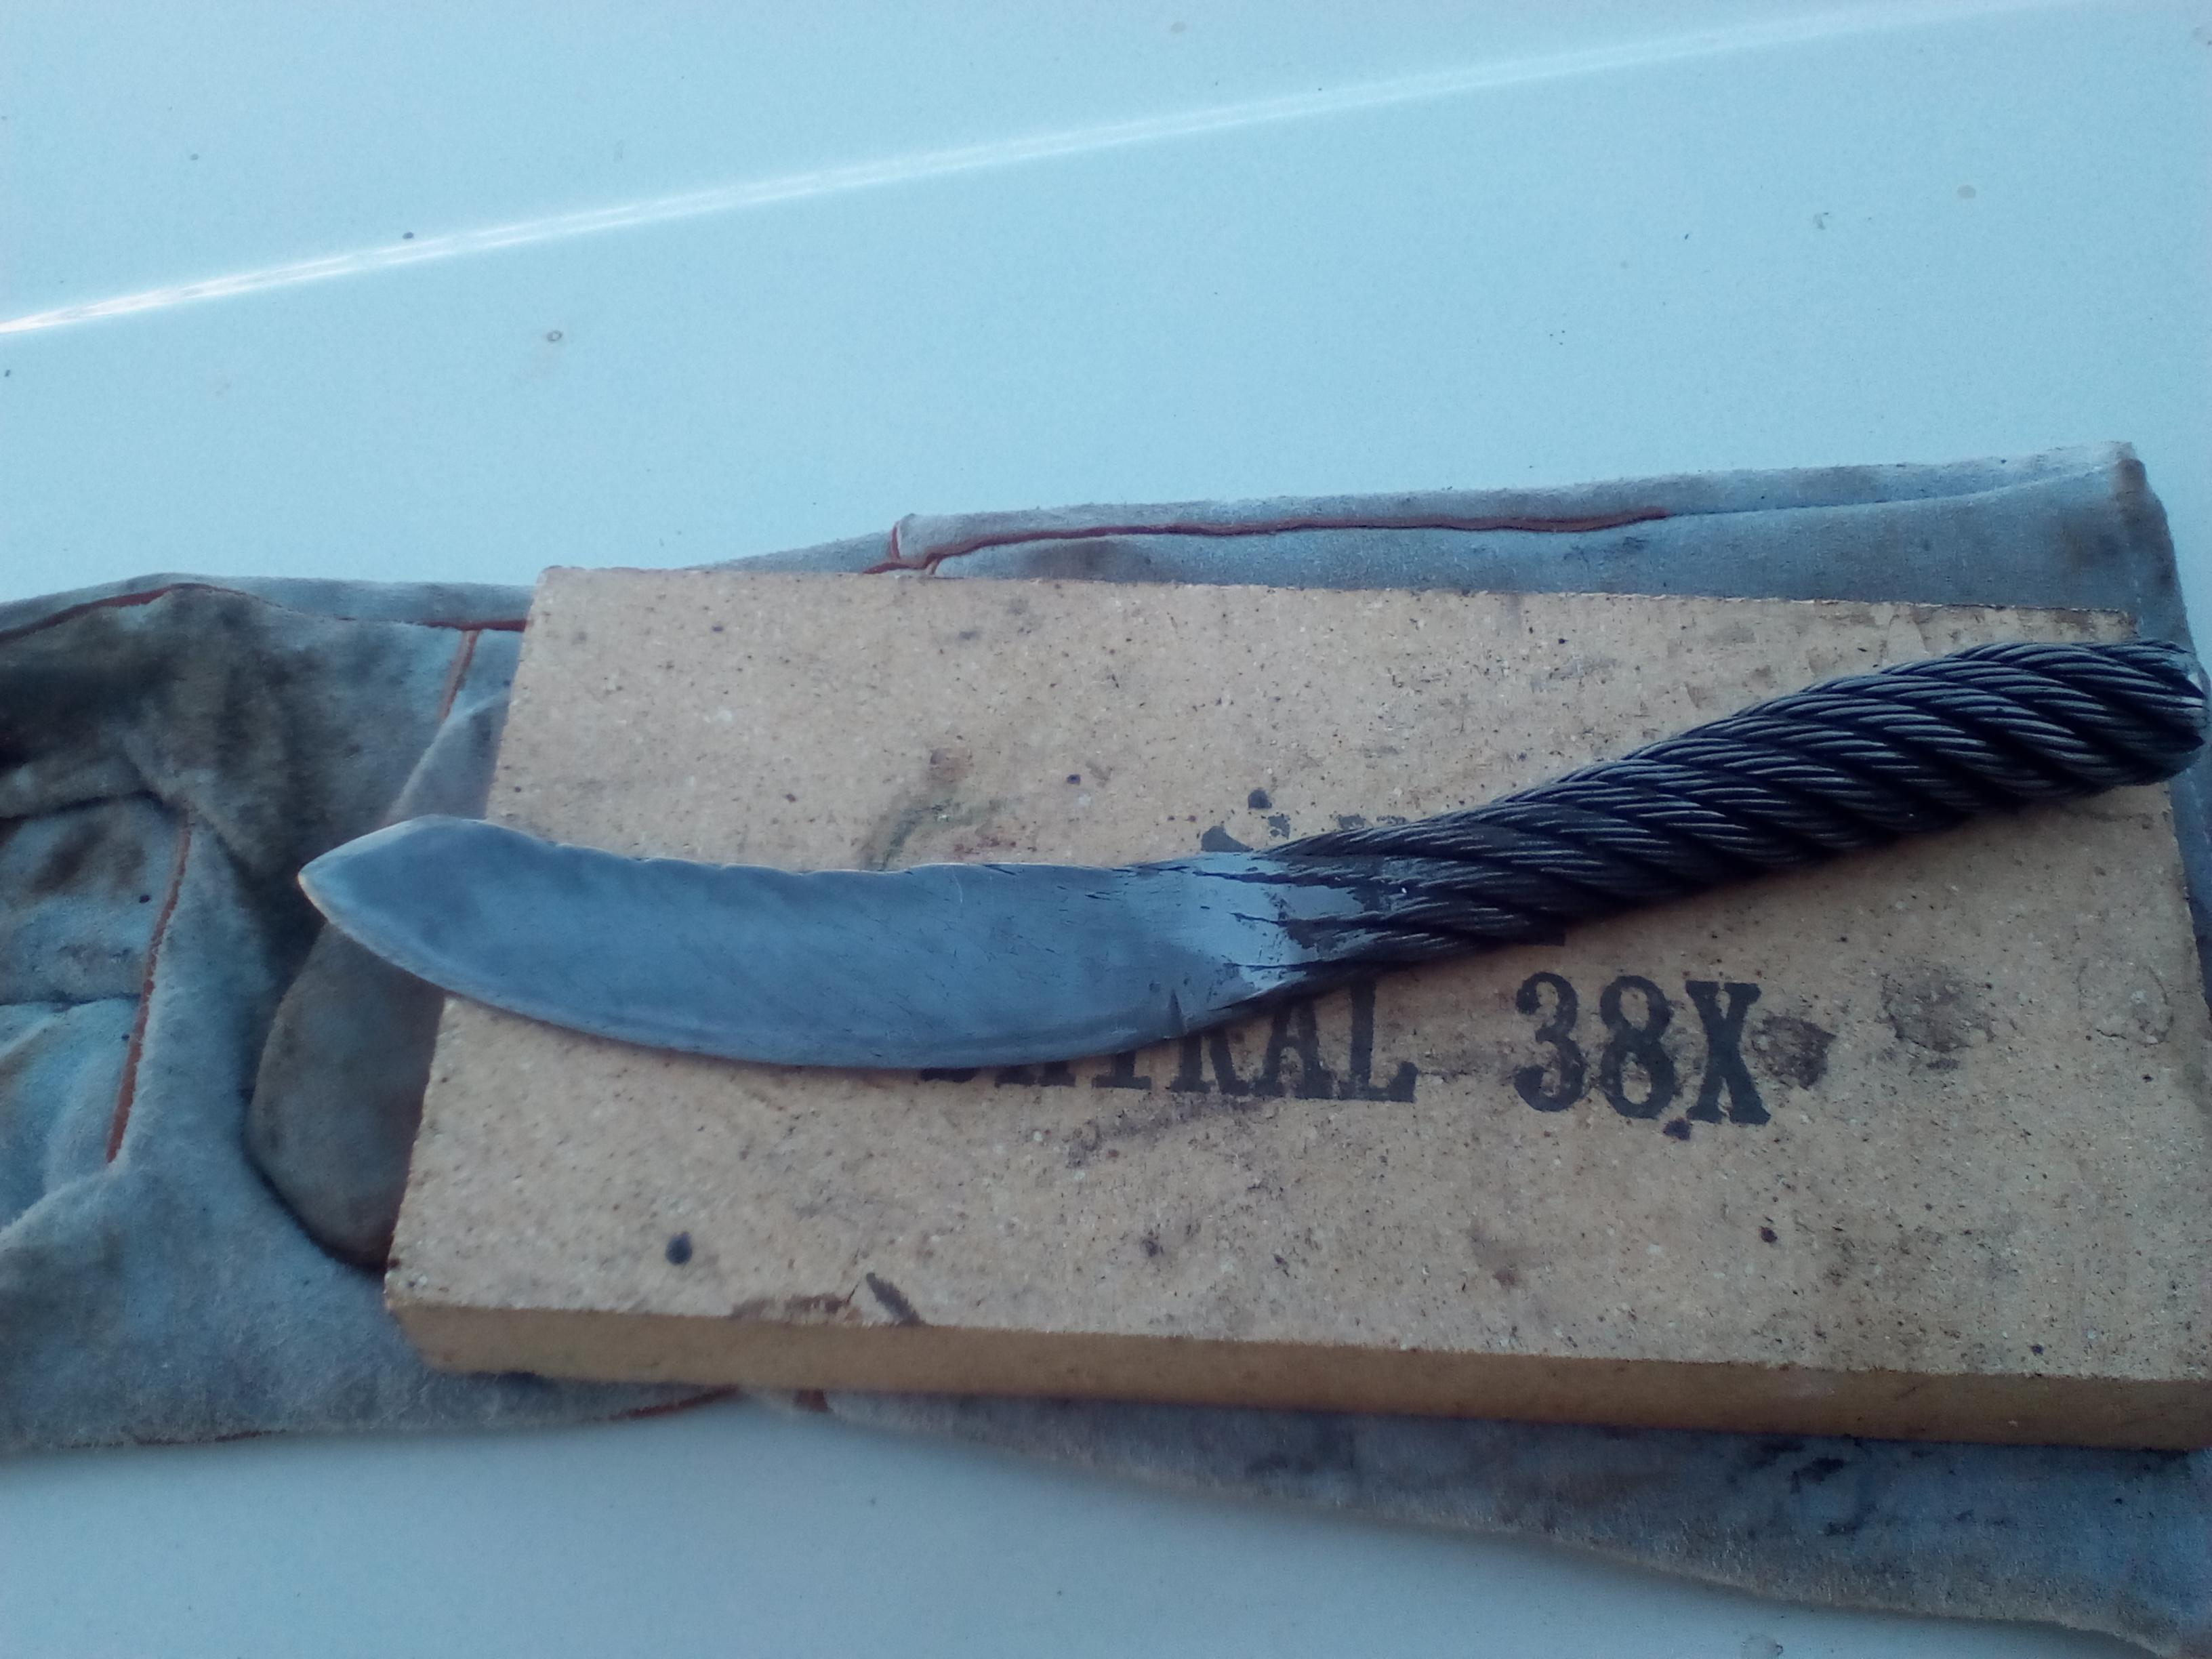
Daswulf, I went back and tried the vinegar, worked well, but took a couple of hours as the carbon build up seemed to slow it down a bit, once I started to pull it out and lightly clean it a bit, then re dipped it, it went quicker,I've got a reasonable contrast now with only a light buff, leaving a few smudgy grey areas, which I think I'll leave because heavier buffing will reduce the etch effect I think. Thanks for the heads up.
-
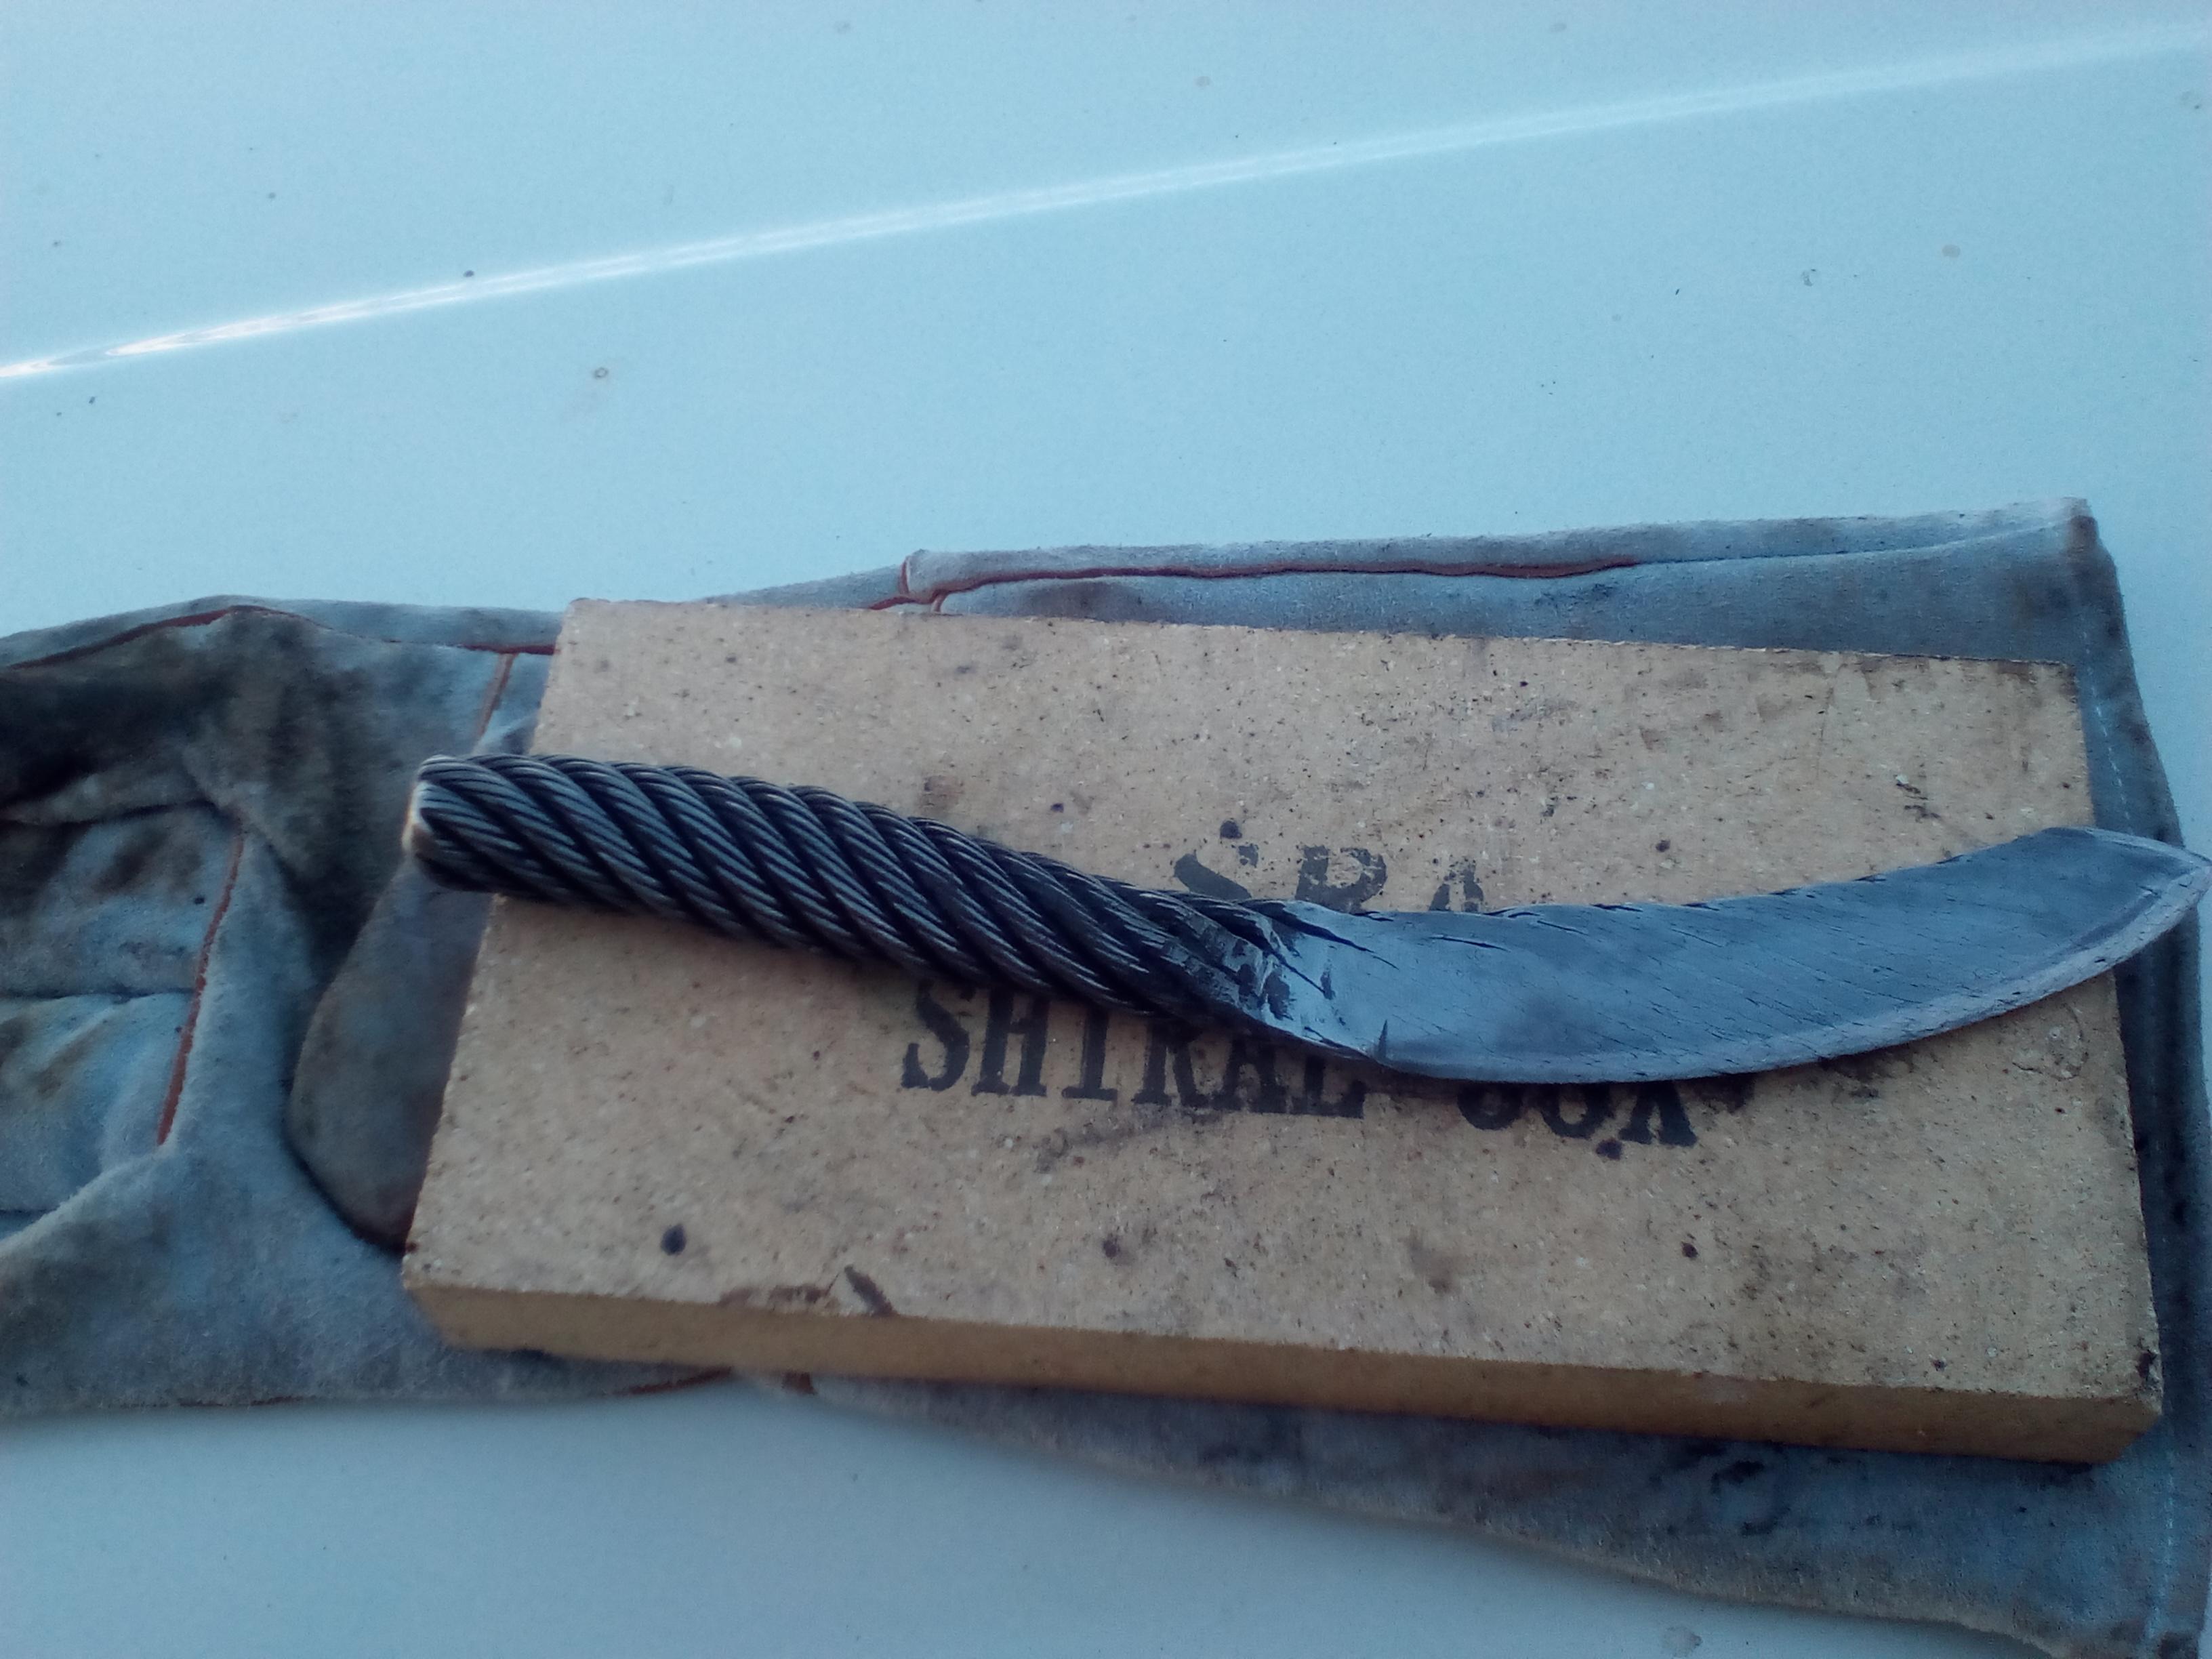
Thanks IDF and Daswulf, yeah the priority was to get a sound weld, I didn't want to rock the boat too much by overworking the steel, so , took the easy route and followed the steel instead of it following me, a thicker cable would give me a bit more shape options I suppose, but I've got a fair bit of this stuff so I'll experiment a bit and learn a bit hopefully.
-
Hi all, just finishing my 1st cable knife, in fact the 1st thing i've forged period, I thought I would put it up, not so much to show it, but for any obvious faults more experienced makers can point out, I'm aware of some glaring mistakes, my bevels are not very good, but I'm working on a better grinding set up where I can actually see the contact point, whereas I'm working blind at the moment. My method was 19mm fswr [used, and full of grease], soaked in kerosene overnight, welded ends with a re bar handle on one end as I only made my 1st tongs AFTER the knife, heat to bright red, coat with borax, reheat a touch hotter and twist up tight in a vice. I tried to only twist extra tight the blade portion, hoping for a sort of slightly expanded grip, I then set the weld with multi heats and gentle tapping until I felt it was becoming solid, then started hitting a bit harder. My hammer control is still pretty green and I struggled to control the shaping of the blade well, it sort of found it's own shape, I'm pretty sure that will come better with practice. The weld seems to be pretty sound as best as I can make out, so I'm happy with that. Treatment was 2 times to critical and air cool, then critical to ATF quench, followed by 1hr at 200 deg cel. Etching was initially 10 to 1 hydrochloric acid, but barely made a mark after an hour, so I rightly or wrongly upped the ratio to about 60/40, and still didn't get much after 3 or 4 hrs, I then tried caustic soda at around 20% which worked better but is still very feint, so any advice on how to make it pop a bit more would be great. Feel free to tell me if I've done anything really dumb, it's a great way to learn, and I'll still sleep ok, thanks.


-
Yep, got that,, that is in my plans, but, 1/8"" pipe seems hard to get near me, I will have to go to the far side of town, a couple of hrs drive, so I''ll try to fit it in with another trip.
-
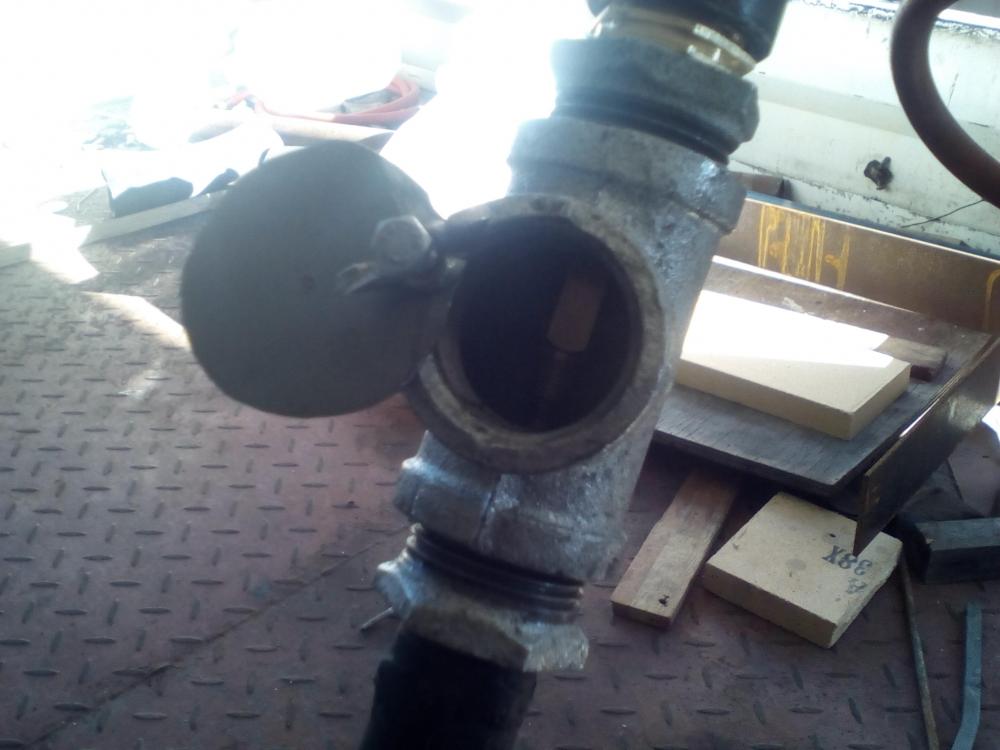
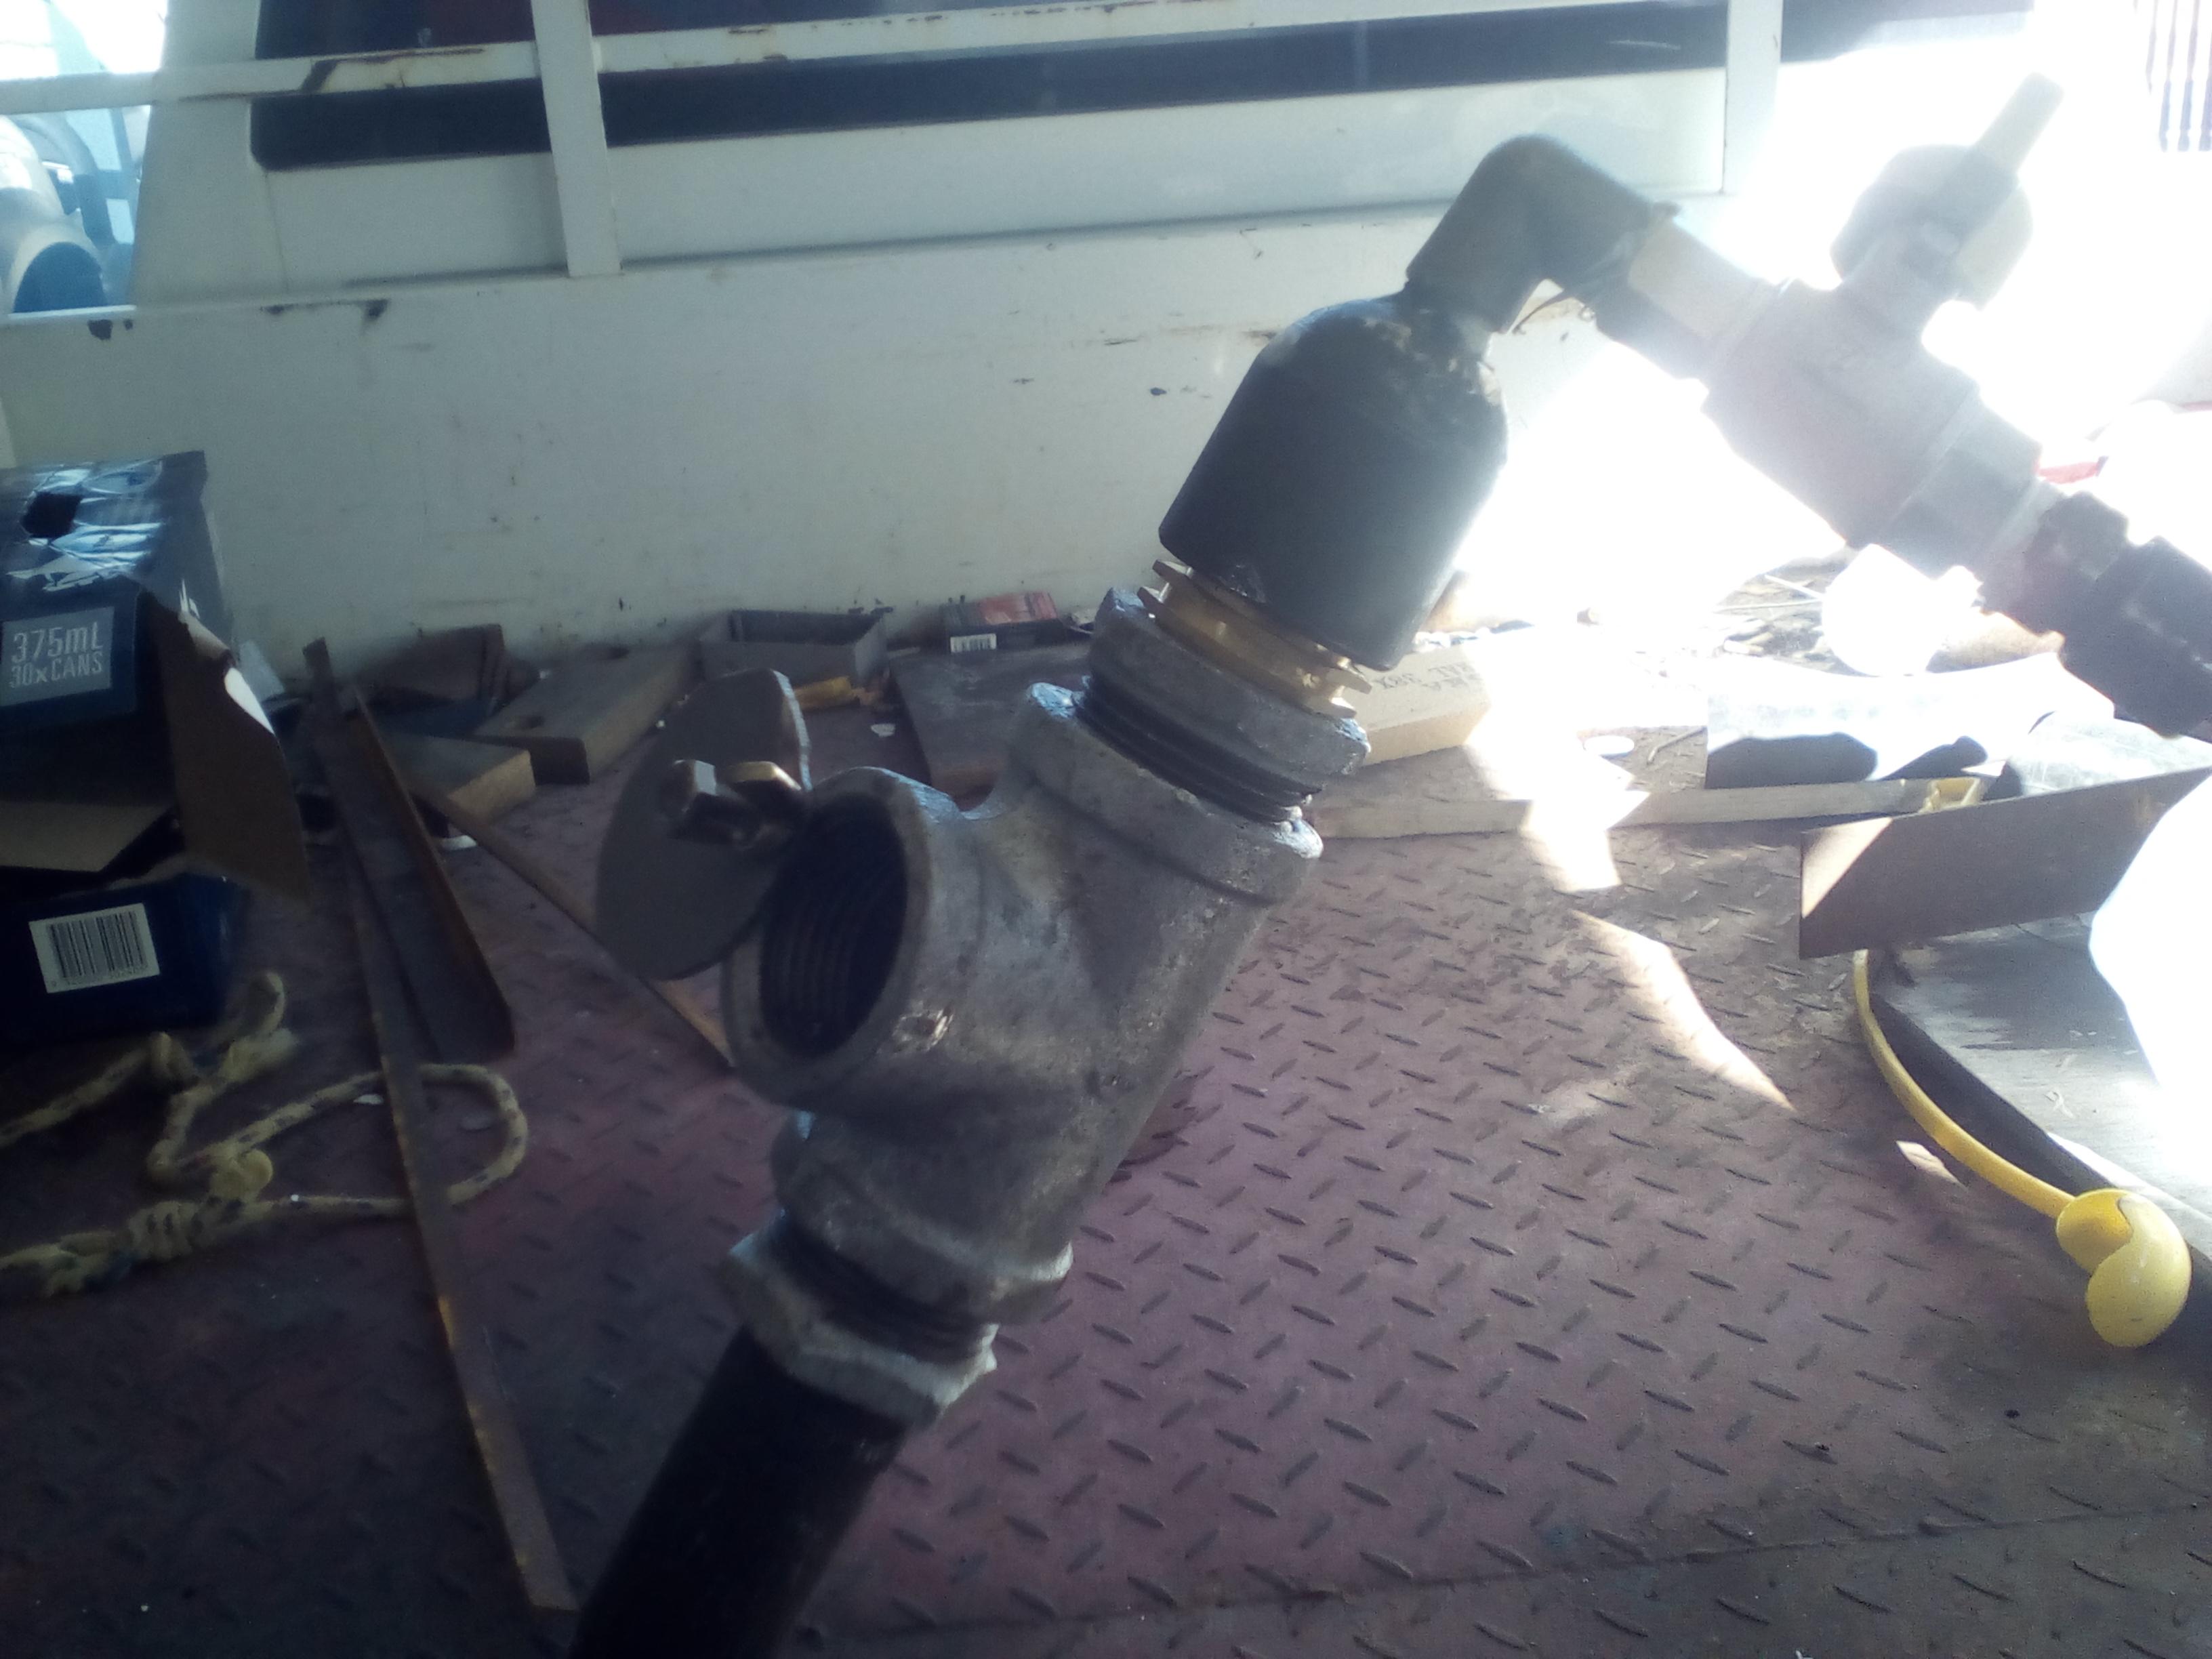
There is a 1/4 tube holding the gas burner inside that 1/2" nipple Mikey, but I intend to make it with 1/8", straight into the 1"" cross, not least to make it less clunky, less likely to be damaged, plus it will lower the COG
-
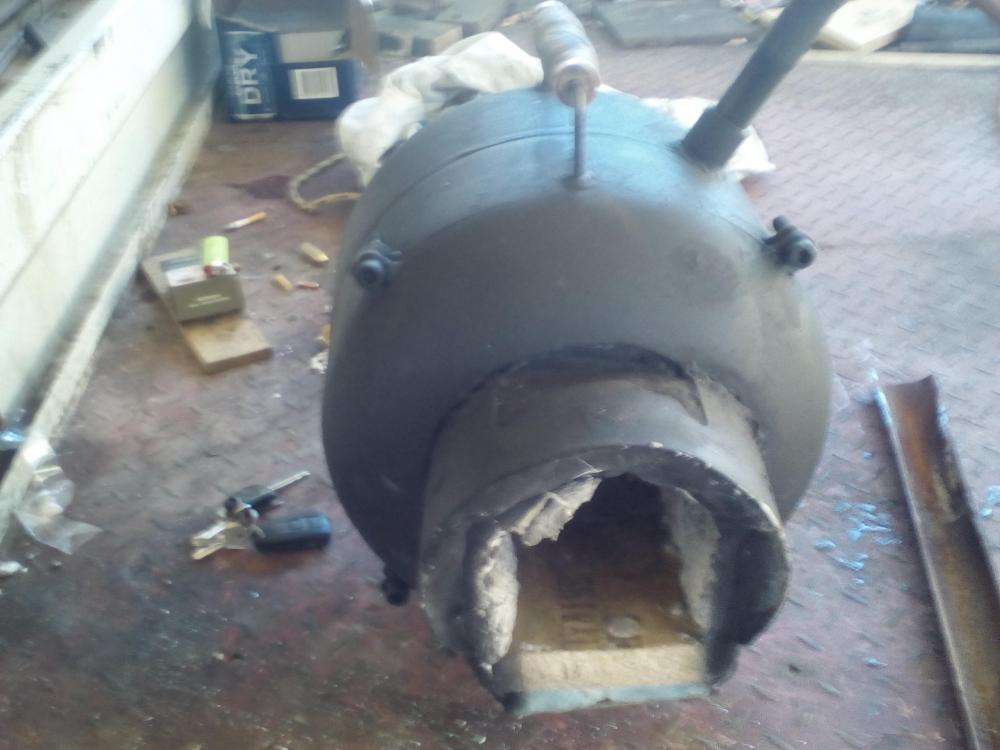
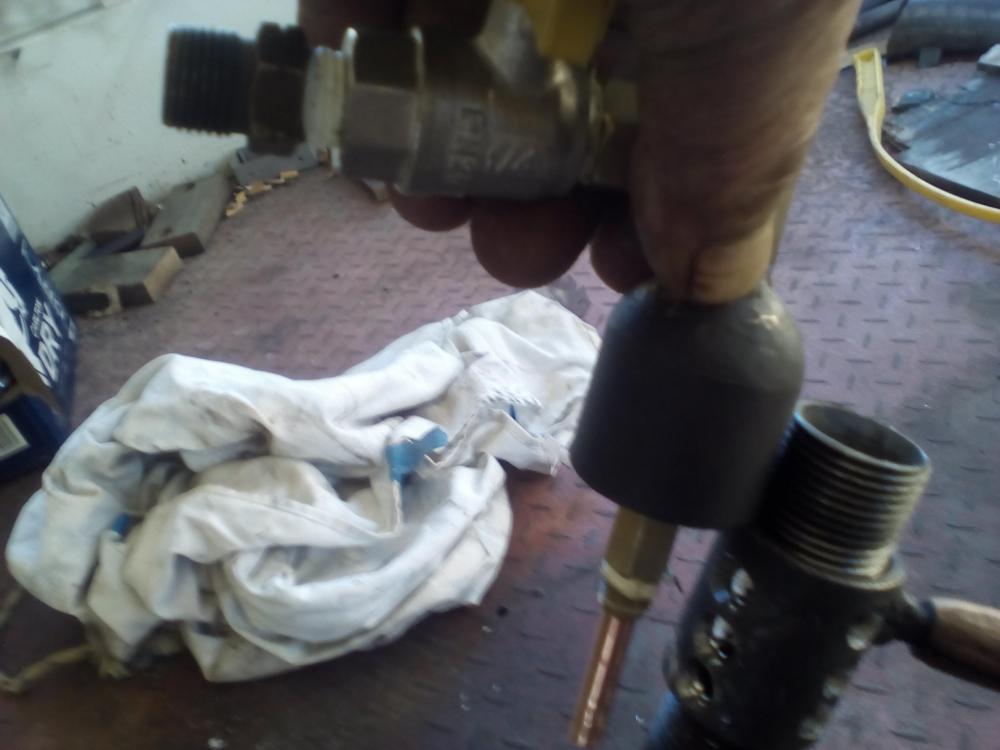
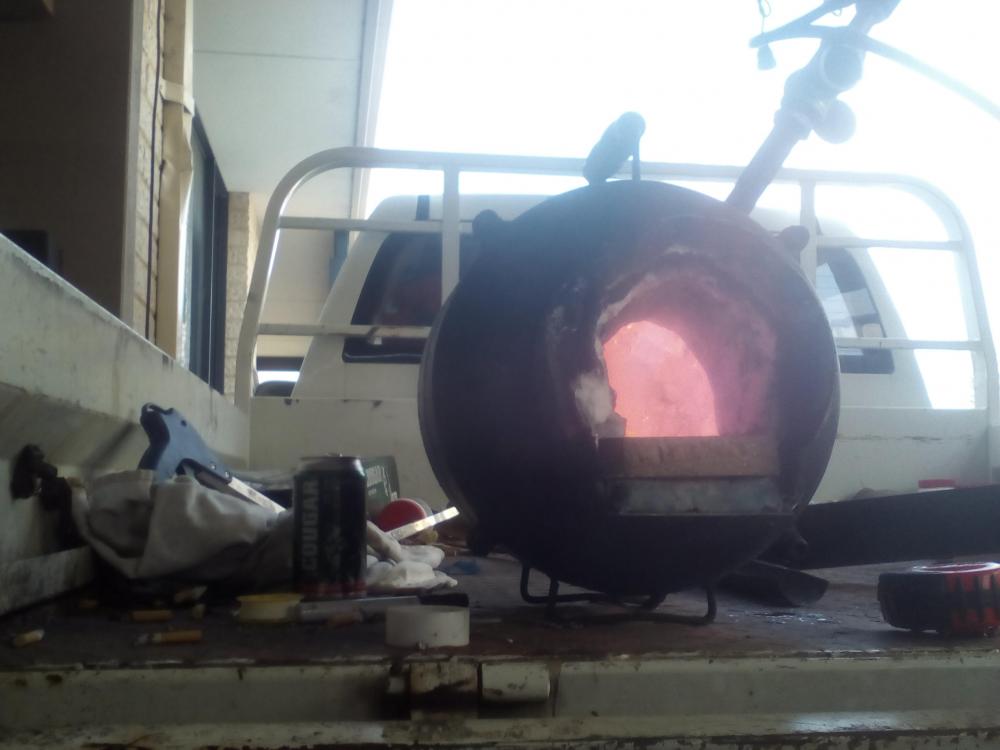
Update on burner, thanks to advice from Mikey 98118, I've modified my burner closer to a Frosty T burner spec, some difference in fittings mainly due to what is easily obtainable near me, as it is atm, I have nearly 2" movement for the jet up and down adjustment, once I get some 1/8"" pipe, I can make the gas inlet side less clunky, and still keep 1/2" - 3/4" tuning adjustment, I've added a couple of pics showing the new set up, and also the lit burner, the lit picture doesn't really show the flame colour well, but it has a small 1-1 1/2" blue cone , and is throwing a lick of yellow from the door, I hope someone might be able to tell if the flame looks ok or not, but I think I'm in the ball park now and will play around with it a bit, at least the thing roars loudly now.

-
Dasher from West Aus., hobbyist, new to smithing , but many years of steel fab experiance, which may, or may not help, looking forward to learning a bit.
-
Hi everyone , I'm a newbie from Western Australia, totally new to smithing, but many years fabricating and erection of structural steel, I'm now retired from work and like doing stuff that keeps me busy and interested, which sort of explains how I got here. I've just finished my 1st mini forge, made from a 9gk lpg tank, the forge itself seems ok, but I'm having a few burner issues, which , after getting advice on the burner 101 thread, should see me right , I tried to get some fittings this morning [Sunday], but only the big box stores were open, so I'll go again tomorrow. Anyway, thanks for having me, and look forward to learning a bit. BTW, I am having trouble navigating the page smoothly atm, but it is becoming clearer as I go, so don't be surprised if my hello or similar pops up elsewhere.
-
OK, Thanks, I'll get a couple of fittings tomorrow and see how I go Thanks Iron dragon, I'll work on my profile now
-
Thanks Mike, I looked through the burner 101 thread, and I think with what I have already, a slightly modified Frosty Tee burner is the simplest modification, if I use a cross piece instead of a Tee, my existing gas plumbing should be ok, saving me the issue of finding 1/4", or 1/8"" pipe and tapping and threading to suit, by the way, would the lack of a rear door possibly induce excess back pressure? The burner modifications might take care of the fluffing of the flame, so I will wait and see, I do intend to open the rear anyway for longer stuff eventually.
-
I have looked through that thread, but I struggled to find detailed info, I will look again, hopefully I'll be able to recognise more detail now I have a bit of hit and miss practise, I have no issue re doing the whole burner, the only problem is screwed pipe and fittings are far and wide here . I would kill for my old bsp tap and die set that my step dad threw out 30 or 40 years ago without asking me
-
Hi all from Australia, I'm new to smithing generally, but have years of steel fabrication experience, I have just completed my 1st mini forge, made from a 20lb propane cylinder, it seems to be ok so far, but depending on the advice I get for my main query, it might need some changes. My problem is I can't get a flame of sufficient strength, I can get a good neutral flame only by lowering gas pressure to very, very low, or near closing the gas cock, which suggests to me I am short of air. My burner is a combination of a few different designs I've seen, trying to make use of what I had laying around, I stated with a 3/4"pipe mixer with a 3/4"" to 1"" coupler as a flare, mixer tube is around 8"long, with a slotted socket acting as a choke/ venturi inlet, then a 3/4"" cap with a 1/4" nipple brazed into it projecting the burner tip [mig tip] down the mixer past the venturi. This system was not all that great, I got heat ok, but not fierce heat, and minimal air intake noise, so I changed the venturi system to a 1" Tee, going for more air volume, it improved, but only just, on anything over 5 or 10 psi the flame is full yellow and fluffing or puffing as I call it, the choke is not being used at all, the full 1"" opening of the tee is needed just to get a decent flame at low gas pressure My thoughts now are that I may need to make the 1"tee a 1 1/2" tee, the other thing that I realised too late is I made no allowance for simple tip position adjustments, it is doable but not incremental, and requires different length mig tips or nipple extensions. At the moment the mig tip orifice is almost 1" below the tee, which might be hindering venturi suction, the noise of intake is minimal, and does not effect conversation at all. Thanks for taking the time to read all this, and I appreciate any advise. One other thing that may be relevent is the forge is lined with 3" of ceramic fibre every where except the porch which is 2", and NO rear door, which possibly is pushing pressure back against the venturi and hindering it from drawing.