
Matt Watson
Members
-
Joined
-
Last visited
Everything posted by Matt Watson
-
Another FrankenBurner what about printing a fan blade like a 3 blade boat propeller that is a couple millimeters less of a diameter of the pipe so it can rotate. Would that help with what your trying to do? Just trying to figure out a way to insert it into the mixing tube and where at within the length would be the problem I see with doing this. I have a friend who had a 3d printer for a while and he printed a box with gears in it that turned and there wasn't any assembling any pieces of it it wort just as it was printed. If there was a way you could do some type of cylinder insert where the propeller was in the center and spun like the gear box my friend did and the top and bottom of it were just hollow allowing the air to flow through it turning the prop it might work. But please tell me if the theory of my concept is wrong and maybe why if you dont mind. I am new to this and trying to learn as much as I can.
-
Thank you Mikey for simplifying that I understood it a little better. I like it when yall add specific scientific terms in these post so I can look them up and learn some more. I'm starting to enjoy the science behind the burners and forges / and also building them just as much as I enjoy actually forging. If I could just get my son to sit down and learn it with me that would be an amazing accomplishment for him. He stays with me for a few minutes then gets bored with it and would rather just burn something. Guess I cant blame him since he's ten and has ADD just like me.
-
Ok, I do not have the intelligence yall have. Frosty you stated the paddles aren't flat and while my initial comment was to simply twist the air opening on the Mikey burner to achieve this I believe a little tweaking with scrolling pliers would be needed to get the right pitch of the blades. Also in order to get the blades to create the desired effect they would have to be on the inside diameter of the pipe I think is what you were saying Mikey. I read your comment several times and still couldn't fully understand it. could you have a smaller diameter pipe section (use a spring fuller to radius the section that you want the blades in prior to cutting) then cut the equal blade section out and twist / bend into the desired blade pitch. I state pitch since that is the term used for boat propellers. Also you could use 4 instead of three if thinking along the idea of a propeller. Although I am probably again just making things too complicated and in the end may not work. I looked at an older propane burner that just screws onto a 1lb bottle last night. It had a larger diameter flame retention nozzle than the new ones that are the same diameter as the mixing tube and you could unscrew it and separate the mixing tube and flame retention nozzle at the orifice which seemed to be a solid brass pipe. I did this while it was lit and started to see how far away from the orifice I could get it before it extinguished. I was able to get about an extra inch away from it before the flame went out. But while I got to looking at it and a new one that I have I noticed they are both the same except for the diameter of the flame retention nozzle. Both were roughly 3/8'' pipe from orifice to end and the orifice was I'm guessing but probably .010''. The older one had a 1/2'' flare retention nozzle over the mixing tube but instead of fitting flush against the other pipe it had tack welded spots or little cut outs around basically a washer with a 1/8'' center hole. The newer one has a recessed smaller washer with about a 1/8'' center hole and instead of the cutouts like the other one it looked like a crimped piece of sheet metal all the way around it in like a star pattern. Can either of yall explain to me how these work compared to the designs such as yours?
-
After looking at this design and since I've been looking at yours as well and have a little experience with blacksmithing now I am wondering if you were to heat your air opening up and twisted it wouldn't it create this same effect and cut the need to cast it? I'm just guessing here but that what I'm seeing when I look as this is the slotted material left would turn and it should create a twist in them essentially making them into blades. The only issue I can think of with doing that would be keeping it perfectly aligned centered with the opposite end.
-
Hello Frosty, I understand completely about your thoughts on the car handles, seatbelt latches and knives. Being a police officer the past 12 years I've seen a few that couldn't make it out of a burning car and burned myself in the process of getting a guy out once. But back to the topic. So the best insulating material for forges is Kaowool but you need a hardener for longevity, and the ITC 100 isn't useful except for its radiant abilities so only a thin layer would be useful. I want to be able to keep the heat in the forge as much as possible just as everyone else. That's why I was thinking 4" of thickness. I was thinking doing that it would also keep the body of the forge cool to the touch. Doing a little more digging talking with you and others. I'm now thinking I will use the wool with rigidizer and then about 1/2" - 1" of castable and coat the lining with 1/16"- 1/8" of the ITC. But also go away from square to oval shaped. Should be interesting trying to get an oval inside a square but I may just start all over an turn that body into a wood stove to heat the shop.
-
I am now starting to get a little confused with the refractory choices. I thought the ITC 100 HT was supposed to be the best stuff out there due to its insulating capabilities reflecting the heat back in and reducing the overall cost of fuel. This is the main reason I was wanting to overkill this forge I figured spend the money up front to build it right then it will save in the long run. From what I'm reading on both the Metrikote and the Plastix they are used as an insulator final coating like most have done with the ITC 100 HT. According to ITC website the 100HT can be used as a coating or a castable refractory. My interpretation of that is that you can mold a thick base etc. if you choose to do so. I did email them for clarification to be sure, but I haven't heard back as of yet. It also stated on their sight that a pint will cover 6.5-12.5 sguare feet but as Frosty pointed out a Pint wont cover but 28.88ci. So I don't have enough for what I had originally planned on doing. The 2'' Kaowool with the rigidizer will help insulate it but the castable material whatever I end up choosing will need to have an insulating property as well, and I will add a final layer 1/8'' thick of the ITC 100 HT for maximum insulation capabilities. The Kastolite 30 that Frosty recommended seems to be what I'm thinking I will go with since I have 1,008 ci to fill and according to Zoeller's site 1lb of it will cover 18 ci so I would need 56lbs to cover the area I'm wanting to do without the ITC or 55lbs with the 1/8'' coating. Or I could do 3'' of the Wool and just 1'' of the refractory. My main goal is fuel saving, then durability second. I have several of the K 26 soft bricks lying around and that's what I currently use but I was tired of replacing them. The Rigidizer I bought for the Kaowool doesn't have a name as far as brand but I got it from Clay Planet $11.95 a quart. I copied the properties of it from their site if you or anyone else is interested. Physical Properties: Color clear Solid content, % silica (approx) 28 - 29 Weight per gallon, lb (kg) (approx) 10 (4.5) Nominal density, (wet), pcf (kg/m3) (approx) 75 (1202) Maximum temperature rating, °F (°C) 2300 (1260) Freezing temperature, °F (°C) 28 (-2) Viscosity, centipoises @ 25°C 4 Specific gravity @ 25°C 1.203 pH 9.7
-
Frosty thanks for the reply. I looked back on their website and it says a pint covers 6.5-12.5 sugar feet. It doesn't specify a thickness on there. I'm not sure where I got that 1" from but i thought it was on their website. They have the 100 listed as a coating material and a castable and the 296 as a top coat but it doesnt really specify the difference between the 2. I sent them an email to inquire a little more details on the differences and as to weather the 100 is actually a bulk castable or just meaning it can be shaped. But now that you have pointed these things out and suggested the kastolite 30 as an alternative. I think I may just go that route and then use the 100 as a coating like you stated. Then I'll have plenty left over to coat a ribbon burn keg build that I'm thinking about. I'm curious though since you have experimented with alot of burners along with Mikey and yalls along with Ron's seem to be the top designs. Have you ever tried a single orafic with a y split at the burner end? The reason I ask is I put a t reducer 1"×3/4" at the end of my burner the other day just to see if it would work and it did. The flames weren't as stable as a single flame but they worked, I'm assuming because when the air and fuel mixture hit the end it created an eddy current like in the ribbon burner. Do you think it would be possible to do the y split with two steps or tapered flares roughly 3 inches apart? I thought maybe a design like this could reduce the case of cold spots in some forges or maybe even step the orifice diameter up and run it like a fuel burner? I may be completely off base though.
-
No typo. From what I've seen most use just a thin coating due to the high cost of the material and high shipping cost. I purchased a pint which according to the label will cover a 5ft square area 1' thick. Which would give me enough to do what I'm wanting to do with a little left over. I figured instead of a thin layer that would be more susceptible to cracking, a thicker more solid foundation of the material would possibly last longer and be much stronger. I had thought of using a cheaper castible for the entire forge then using the ITC as a coating but most that I read about crack and break apart a lot quicker than those that had used a thicker amount of the ITC.
-
Hey Mikey thanks for the idea. I use a 1.5" with a 1/4 end plug drilled and tapped with a .25 MIG tip. That is centered with 4 1/4 ×20 bolts. The mixing tube is 8" and the flare cone when outside my current forge is a 3/4×1" reducer but the way I have it in my current forge it goes into the soft fire brick halfway and the last inch of it is ground to a taper creating the cone. That's what gave me the idea for casting the new one. I'll have to look back and see the step design your referring to and see what to use and try it on my burner before I start this new one. A step would be alot easier to do and hotter is always better well maybe not anyways!
-
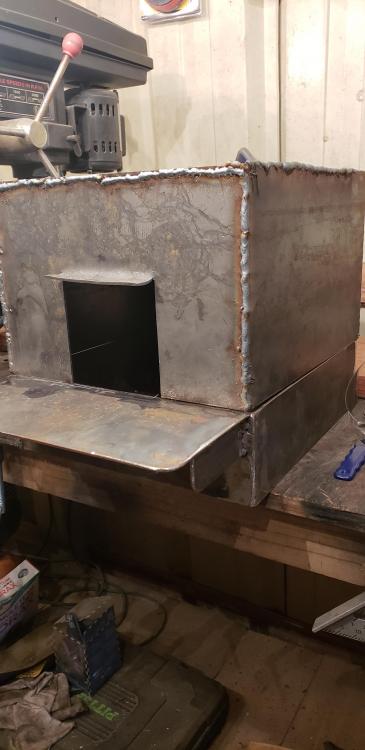
I need some opinions. I have finished the shell of my new forge and will soon be starting to fill it with the insulation. I know its over kill but I'm using 2''Kao Wool with hardener to help support the 2'' ITC 100 HT. The outside dimensions are 14L x 13W x 13H. The final inside dimensions will be 14x5x5 350ci total for a 3/4'' single burner Ron Reil design (might change to a ''Mikey burner'' if I can get the time to go ta a buddy's machine shop to build it). I have been thinking of casting the flare cone into the refractory instead of a standard hole for it to fit down in. I'm thinking the mixing tube will be inserted through the top and 2'' of hardened Kao Wool then the end of the tube would come in contact with the start of the refractory and sit flush against it. The first 1/2'' - 1'' of the refractory would be cast at the 3/4 diameter of the tube then the last 1'' -1.5'' of refractory would be flared as the cone shape ( I thought I would just use a piece of plastic from a milk jug glued or tapped together as the mold to form the refractory around) . I'm thinking doing it this way would allow for me not to have to change flare cone periodically due to heat exposure and cycling. I've included a picture of the shell, material thickness is 1/8''. For those of Y'all that have more experience than me (probably everyone on here) would this work? Would you change anything? What length would you cast the flare cone 1'' or 1.5'' or would it matter? I would just like to have some other people opinions / expert advice before I proceed any further. I can change the interior design if needed or something would work better. I also wondered if maybe an oval shaped interior would work better than rectangular? Or maybe even Bowl shaped? The base is separate from the top so I can shape it any way that I want and for ease of maintenance. Thanks in advance!!
-
Dan I took my classes at Lynchburg forge. There really isn't a name for it but the gentleman that runs the shop and teaches the classes is Bruce Gillies. Quite an amazing guy with a lot of experience. He doesn't charge anything to come there you can give a donation to help with the purchase of coal which he just recently started but you don't have to give anything. The man loves the craft and just genuinely like to teach it seems like. I was lucky to have stumbled across it and it's actually not far from my house. I'm sure you will have a great time at Ken's. I haven't been but I recently purchased his rapid tong bundle to save time and money as far as making more of my own (I spent 6 hours making my first pair). His customer service is exceptional and really has a great product at a really fair price. If you have bought any I would highly recommend them. You basically get to do all the finish work on them that requires the same steps in making them from scratch but saving yourself hours of the work and cost of fuel at the same time.
-
ThomasPowers I'm not familiar with 4340 I'll have to look that one up I pretty much know nothing when it comes to metallurgy. As far as my anvil I bought it online and had it shipped to me. I did look at pictures but at the time I knew nothing about anvils except the old ones that were forged were supposed to be the best of the best along with hand crank blowers and post vices. That was my general understanding at the time. I still think my anvil is superior in alot of ways compared to others that I have seen in person now that I have located people in my area with the same interest. But either way I have decided I'm definitely not going to do anything to it except maybe make a plate for the top to straighten longer stock. Or I may just save up and get a flat one that is around a hundred pounds or three RR track if I can find a piece I haven't had any luck with that in my area.
-
Swedefiddle by swail your referring to the low dished spot? If so I do use this section for straightening to within probably 1/8 of an inch but anything closer than that I have to resort to other methods. Maybe I just need more experience and practice with my anvil. I just know that I dont have to work as hard on an anvil that has a flat face. The one at my local group forge is flat and I dont have a problem with it. The instructor said he welded it then flattened it with a grinder and he has probably 50 years of experience and told me to do that with mine. I didnt want to argue with him or anything of the sort since he is nice enough to instruct us for free at his home and he definitely knows alot, but I was shocked when he suggested to me after what I had read about it welding ruins anvils rebound and hardness. But I also tend to look at alot of different things before I jump into something.
-
Frosty this is the only one I have on my phone at the moment I can post another one tomorrow. I know what you mean about wanting the best of things I'm bad about that that's why I wanted this anvil I thought it was going to be the best and it is amazing I think and the only reason I want a flat surface is for straightening things that are longer than the with in the front part that is pretty flat. The corners aren't much of a concern I wish they were in better shape but I have a few spots that I wouldn't want to change due to the fact that they actually help in some things. Kozzy I actually thought about that and took a flat piece of stock and have been laying it on top to straighten things but I cant really hit hit because of the bounce so I had thought about essentially making a lid to sit over the entire face but I didn't know if it would bounce as well. Making a top plate hardy tool sounds like it may make it work. Has anyone had any success with this that you know of and if so what hardness and steel would be best for this purpose? Something between 56 and 60 maybe so maybe a plate of 1075, 1085, or o1 I guess maybe the steel type itself wouldn't matter as much as the hardness level too hard it breaks or too soft and it dishes. Also if a hardy hole plate was used would there need to be something between the plate and the face like a rubber mat or a lead sheet? And Glenn thats originally what I wanted to do but it just frustrates me not being able to straighten pieces having to use a vice or some other way to straighten something longer than 5". Thanks guys for the advice!
-
I have been scrolling through these trying to figure out what to do to mine if someone who knows more than me wants to offer their insight it would be appreciated. My anvil is a 1830-1850 Hill anvil 201# that was forged with the hardy and prichet hole. I bought it a couple years ago and paid $1200 for it ( my first anvil) also my only anvil. I have maybe 100 hrs of use on it but I just got my forge going a few weeks ago. It is in good shape for the most part but there is not a sharp edge on it anywhere because of chips not major problem but a little sharper on the corners would be good. and there is a sag in the main hammer section you would use as well as towards the hardy and pritchet hole. basically I have about a 2''x4'' section that is flat. Im not worried about being level but flat would be nice. Is fly milling the face an option for me without ruining the hardness. I don't want to weld at all on it. I was just thinking of milling down .025-.075'' to flatten it enough for more useability. anyone know some more information that they care to share about the forged Hill anvils?
-
Mikey98118 I understand that part I should have specified a little better. I am not talking about a thin layer. I was planning on doing a steel frame bottom 12'' square x 4'' high then filling it with 2'' kaowool and then 2'' of ITC 100 ht. I know I could just do the refractory by itself but was thinking with the wool lining under it would be even better insulation. My plan is to to a botton like that then the walls and top would be a separate piece that can just sit on top of the bottom an it would be line the same way.
-
I am about to build my next forge and was wondering this same question if someone can enlighten me as to what I have read. If I understand right your definitely need rigidizer for the wool but if you line the frame of the forge with kaowool and then put 100 HT on top of it would this be the same as rigidizer since it hardens and would keep the flame off of the koawool? I definitely don't want the fumed silica but I was thinking this would work because I did a work around on my first forge where I used the hard bricks (non insulating) I took Kaowool and lined the outside of the bricks with it and haven't had an issue that Ive noticed with the kaowool fuming since the flame doesn't come into direct contact with the wool.
-
Sorry about the videos Frosty next time I'll do pictures instead. Mikey is choking it a bad thing? And as far as good enough does that mean as far as air and fuel mixtures go I'm where I need to be but if I wanted a better flame it would have to be adjustment with the orifice placement and / or containment flame cone?
-
20181229_093557.mp4 20181229_093659.mp4 I had my initial gas pressure too high and now I have a needle valve at the front of the line to reduce the pressure and its probably opened 1/3 -1/2 of the way open. My pressure guage should be here Monday. Then I have a second one at the burner to control the flame at the lowest burn without back burn its barely opened and then a full on burn its probably halfway open. I know I saw somewhere that when your forge gets to temperature the flame disappears which is what mine is doing but I also noticed a greenish flame coming out of the front when I turn it down to work on a hot piece ( I only see the green if the forge is hot not when I first light it on idle like in the bottom video). The burner is a Reil design with a .025 mig tip orifice. Flare is a k26 soft brick filed in a cone shape so the mixing pipe sits snug in the top about an inch. I'm going to be making a new burner and forge soon but my main question and reason for posting this is to find out if this is the right color of blue. I know really hot burn its supposed to be light blue with a kinda white center but that's almost too hot of a burn. And just the dark blue is a little too cold. I am trying to adjust to make this as fuel efficient as possible. Hence why I'm building a new forge that will have 2" kaowool with 2" HTC 100 on top of it hopefully that way it has more than enough insulation. 20181229_093659.mp4 20181229_093659.mp4 20181229_093515.mp4 20181229_093515.mp4 20181229_093622.mp4
-
-
Thank you for your response I played with it some more and got a better burn but still do not know if it's right. It roars if there is nothing choking the air off. I can fully choke the air off and it's still burns good but doesn't roar like it does without it. I am going to change the 3/4" pipe nipple from 5" to 6" I think maybe or 7" I'm not sure I didn't realize the one I originally bought was a 5". As far as I can tell th orifice is centered in the pipe I have 4 offset bolts that I adjusted to get it centered. I'm using a .25 mig tip from lowes as my orifice. and I think I'm running around 10psi on pressure waiting on a guage to come in to know for sure.
-
-
-
Frosty, I dont take anything personally and I assure you I appreciate every little bit of information that someone throws my way. I'm the type of person who will try things that are known to work and then try to modify it for me. It doesn't always work and I dont know alot but I do like to learn and try to know a little about alot of different things. I'm ADHD so I am always doing different things. I was a machinist and welder for a couple years and then changed career paths when my company went with cnc machines it took the joy out of making things. I also do woodworking and jump back and forth between old ways and new. I will probably do the same with this. Though I never even considered that the insulation between the different bricks would make a difference. I simply assumed the harder ones would hold heat better. I also was thinking of this as the flame heating the piece and the interior just helping to contain the flame and somewhat controlling the heat in a centralized location. I may get some kwool and put it ou the outside between the all thread and brick walls and over the top to maybe help insulate it better. But they may not work at all. Again I appreciate all the insight I can get and dont be afraid to be blunt I'm a big boy and my feelings aren't fragile! Thank you I plan on building a coal forge later on but I did this one for what I thought would be easier. The design I went with was originally one I saw that didnt require welding and was used with the soft bricks. I then found out that my friend would let me use his welder so I modified the design to a sturdier frame which can simply replace bricks when they break or wear out. I also decided that in this configuration I could add/subtract bricks to allow for larger and smaller stock and in Hope's that with the smaller inside would require less fuel to operate. Another reason i designed it this was was i can simply add another burner to it at any point that I feel I need one such as the case with the larger forge and not having to build another separate forge. This is my first but I am seeing that I need to make another one with the same design but slightly larger frame so I can add kwool insulation before I add the brick may also design a sidewall that can be put into place for the wool as well that will help to retain the heat. I am very pro one off producer of many different things not all work and some even fail big time but every now and then I hit one out of the park and I believe it's worth the effort.
-
I really just went with what was easily found at my local stores so I can replace things when needed. But I also assumed since the cubic inch of the forge is under 350 that it would get hot rather quickly I didnt consider loosing heat. However I could always use all of the thinner bricks and add a couple layers of that kwool as a thermal insulator.. it's my first forge and I really just wanted to throw something together that would work so I could smash some hot metal at home rather that waiting every two weeks to go to my local club.

