MikeTausig
-
Posts
24 -
Joined
-
Last visited
Recent Profile Visitors


-
Advice on differential HT with 1095
MikeTausig replied to MikeTausig's topic in Heat Treating Knives, Blades etc
Ok, well thank you. I’ll take this to the ABS member forum, where terminology won’t be an issue and the process is better understood. As an FYI, the process is done via oxy/acet torch only along the edge, in order to raise only that portion above critical. Not the entire blade, as you claim, in my lack of understanding of “how to do it.” It was taught to me by a master smith, and has been an invaluable tool in my arsenal of hardening techniques, along with countless other smiths Thank you all the same, and much respect. Mike -
Advice on differential HT with 1095
MikeTausig replied to MikeTausig's topic in Heat Treating Knives, Blades etc
My apologies. You are correct. I took for granted that in a knife section, folks would interpret the phrase “heat treating” as what we do in any series of heats above critical leading to a quench (in whatever medium the Smith is using) in order to harden and make a blade. If my terminology was unclear, I apologize. As I said, I took for granted that in a knife section, folks would know the reference, as is the norm in the ABS or ABANA. As for your final comment, I hope I’m not misreading it, but it sounded snarky. Differential heat treats are commonplace in knife making, where only the edge is hardened, leaving the spine “soft.” This is of particular use for choppers, or any knife that might need “flex” or will revive blows to the spine etc. I certainly don’t want to offend anyone, as i am here for the purpose of learning and offering advice when possible. I merely wish to find advice on a differential heat treat (ie hardening of only the edge) for 1095. I have successfully differentially hardened countless blades, but none were with 1095 due to the more extensive austentizing and quench process Thank you, and much respect. Mike Thank you buzzkill. And yes...I totally get the “generic” use of the term. Having surfed the online knife groups for so long, when someone references HT, it is about hardening, whereas if they are annealing, they use that specific term. I would prefer not to do a differential temper, as it is not needed and for this specific piece don’t want the undo stress. This question might be better served for the ABS member site, so I’ll ask over there. But I greatly appreciate yours and Steve’s responses. Cheers, Mike -
Advice on differential HT with 1095
MikeTausig replied to MikeTausig's topic in Heat Treating Knives, Blades etc
Hmm...I thought I was pretty specific. I figured the term “heat treat” was pretty specific in the knife world, as it refers to austentizing and conversion to martensite- ie heating and quenching. Let me try again. I want to do a differential heat treat on 1095, opposed to a full heat treat of the metal. So...that is heating only the edge of the blade to the appropriate temp, versus placing the entire piece in my forge. 1095 must “soak” at above critical temps (multiple times) in order to allow grain conversion and stress redux before quenching, so I’m trying to identify the best process for achieving this by only heating the edge, opposed to fully heating the entire piece I read the pinned post you made while searching, and it is a very good intro to what occurs metalurgically when heat treating steel. It does not, however, address heat treats for specific steels. The heat treating process for 1084 (as an example) is much different than the one for 1095, as I’m sure you’re aware. 1095-specific discussions only address full HT, not differential If I missed the thread or responses that are specific to 1095, could you link the correct place? I did multiple searches for this specific question, read about 40 threads, and none of them referred to differentially treating 1095. Thanks man. Mike -
Hi folks. I wondered if anyone on here has tried a differential heat treat with 1095, and if so, what was your process? I forged a small skinner (8.5” OAL, 3” blade, 1/8” thick) from 1095. I’ve worked with 1095 many times and the HT can be tricky. Well, tricky when compared to 1084. Suffice it to say that I understand the (correct) standard HT process for 1095. With this current blade, I have file work along the spine, and while I could use whiteout and do a standard HT, the thought of doing it differentially came to mind, thus eliminating any scale on the spine. I also wouldn’t mind having only the edge hardened for this particular blade. The advice I’m looking for pertains to soaking temps. 1095 typically needs a soak above critical. This is not a problem when I use my forge, as I set the temp for where I want it, then let the metal soak. When doing it differentially, I’m afraid I won’t have an accurate temp for the “soak,” if that makes sense. I would be using a gas torch for the heat source. Judging temps by color is fine for me in very general terms, but I don’t know that I can dial in a specific temp by sight. I’ve done differentials with 1084 many times, as the HT process is amongst the simplest for that steel. I have not tried it with 1095, and am hoping for some advice before trying it. I’m fine with the advice being “1095 does not do well with diff HT,” and if that’s the case I’ll do it the standard way. Thanks in advance. I think my info is specific enough, but I’d be happy to provide further info if needed. Cheers, mike
-
Show me your anvil stands
MikeTausig replied to pkrankow's topic in Stands for Anvils, Swage Blocks, etc
I’m going to try it both ways. I’ll start by using it without calk. If I feel there is a need, then yes...I’ll calk it. Maybe I’ll shoot a couple 30 sec videos of the comparison, if I go that route. Anybody know if IFI can handle short vid clips, or is it a bad idea in general, since not everybody has high speed interwebs? Thanks for all the ideas and responses. -
Show me your anvil stands
MikeTausig replied to pkrankow's topic in Stands for Anvils, Swage Blocks, etc
Interesting. I might need to consider this, especially since caulk can be removed with relative ease. Thanks man. -
Show me your anvil stands
MikeTausig replied to pkrankow's topic in Stands for Anvils, Swage Blocks, etc
That’s why I ask. Using caulk is much different than using a straight adhesive. Do you smear it on the entire under-surface, or just a bead? I would think it would need the entire under-surface in order to prevent gapping, which would render the technique moot to me. Cheers. -
Show me your anvil stands
MikeTausig replied to pkrankow's topic in Stands for Anvils, Swage Blocks, etc
I saw that shortly after I posted. I like that solution a lot better. I’ll try it both ways and see if there is a noticeable difference in rebound. Thanks for the heads up. -
Show me your anvil stands
MikeTausig replied to pkrankow's topic in Stands for Anvils, Swage Blocks, etc
Indeed. I don’t want any gack on the anvil. It will have a chain for the ring as well as forged flat-bar over the feet. Thanks man. Do you find that the rubber mat changes the rebound at all? It would be slight, if any, but curious. -
Show me your anvil stands
MikeTausig replied to pkrankow's topic in Stands for Anvils, Swage Blocks, etc
My new anvil stand. It’s a simple design. Cut 4x4’s, glued and clamped five rows of four, routed, filed, and 1/4” flat stock forged braces (which are not affixed to the stand, but laid in 1/8” routed grooves). No more tree stumps for either anvil!!! This is for my 155lb Peter Wright. Opinions from folks with similar builds, or in the know: - should I use calking compound between the anvil and stand, or leave it as-is? I would much prefer to have nothing there, but I’ve read differing opinions on this and would appreciate thoughts. The routed anvil groove is very flat, and there is no “jiggle” on the anvil legs. Cheers. And I am actually considering tie-dying the whole thing Frosty. Or letting my son do a “graffiti theme” on it. The blocks it’s on will (obviously) be removed. They’re there from the linseed oil treatment.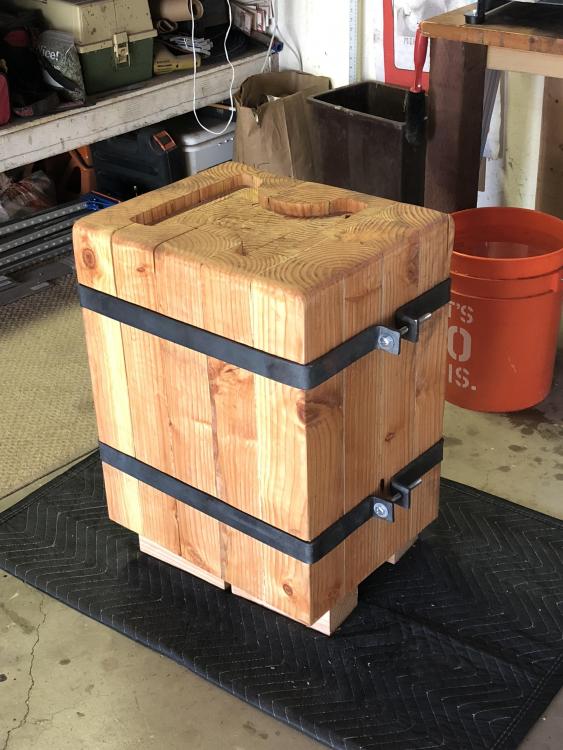
-
A very steam-punk remeniscient creation. Man...I really dig this. Well done.
-
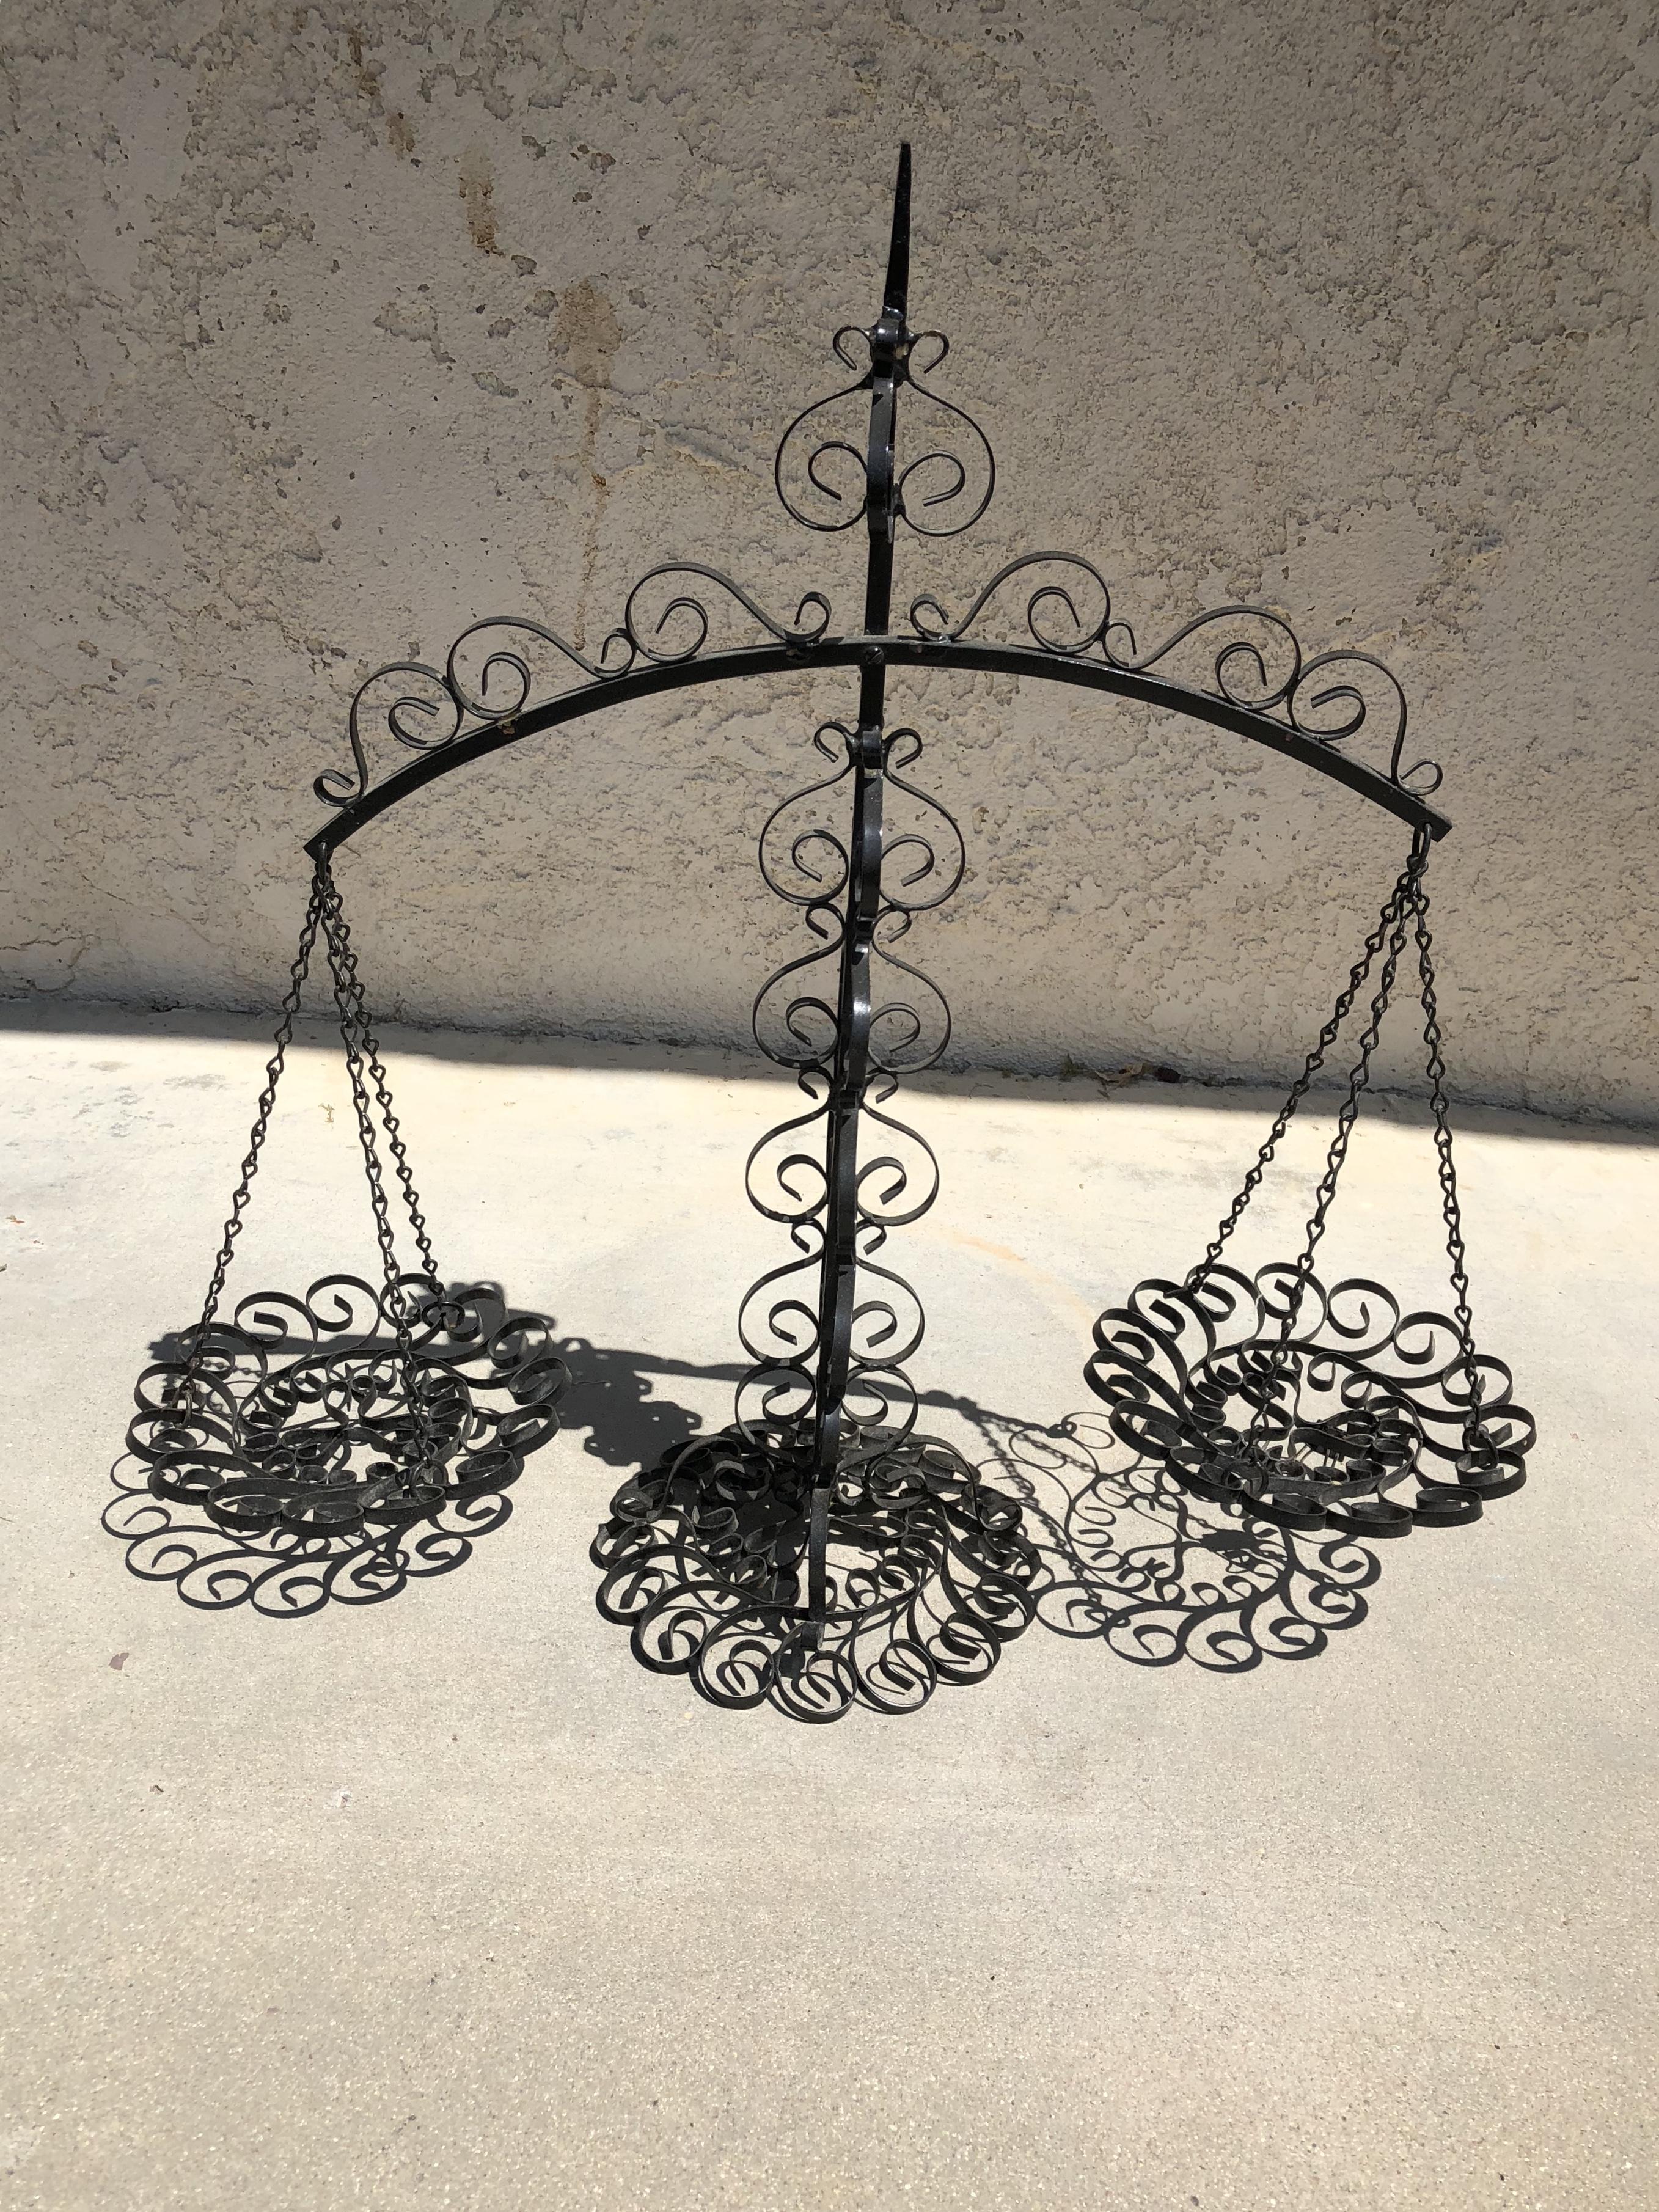
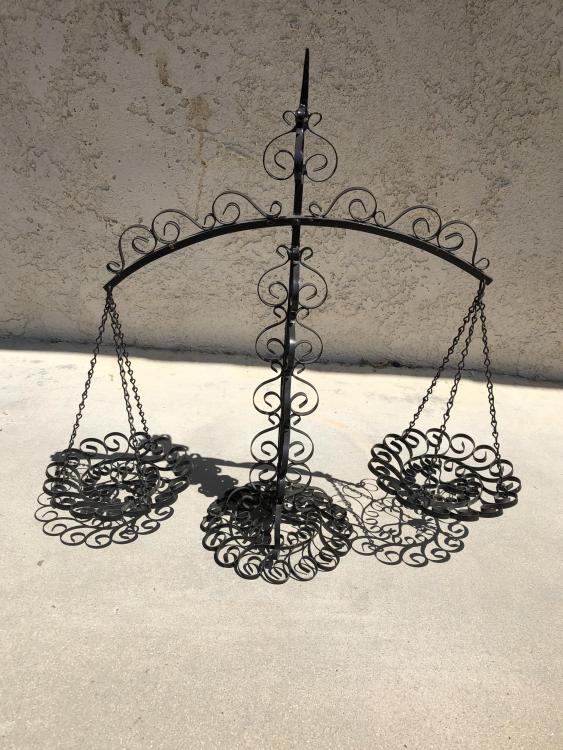
Hey folks. As a newbie to this forum, I mentioned in my intro that my son has decided to take up bladesmithing, and since I used to do wood and metal work as a pretty obsessive hobby, I decided to get my chops warmed up again and start with an easy project. Please forgive what appears to be imbalanced sides...I took the picture, forgetting I had a clamp stuck underneath. The main (four-sided) pillar of the scale has the metal curls on each of the four sides. The picture doesn’t do a good job illustrating that. Those were simple, once I made a jig. The tip is forged and shaped, then brazed to the pillar. Really enjoying this forum. I’ve interacted with some truly good folk. Cheers.
-
Steel size when beginning a knife
MikeTausig replied to MikeTausig's topic in Knife making Class General Class Discussion
But seriously...I was able to extract good ideas from every single one of your responses. For a six sigma guy, those are great numbers! I’m appreciative to each of you for taking the time to respond, and offer your thoughts freely. I’m nearly 50, so starting something new (bladesmithing, not metal work) is daunting, but in a positive way. Be well. Mike “Little Mountain” Tausig -
Steel size when beginning a knife
MikeTausig replied to MikeTausig's topic in Knife making Class General Class Discussion
Thank you all for the responses. As noted, I recognize the variables on this are largely contingent on ME, but figured I would at least ask about a “rule of thumb.” As mother always used to say, “if you don’t ask, you won’t know.” mike -
Hello all. I have read through every word of all the knife making classes, searched the forum using the actual search function, and gone through every page & thread in the knifemaking topic only to come up empty handed. The only discussions I found regarding steel type and choice do not involve SIZE of the initial bar in relationship to the end product, only using weight - which doesn’t make sense to me until after the project is finished. The question I am trying to answer is one I’m hoping their might be a rule of thumb for, or some other derivative means in order to “know” what size steel to start with. Before I go on, yes...I absolutely realize that design and desired size will help determine what size (and/or size & shape) to use...just to be clear. Also, I don’t want projects to be done only on abrasives...I want to actually forge a blade out of larger steal, I’m just not sure how to pick the right SIZE stock. For the purposes of this conversation, I’d like to offer two specific scenarios, as having read this forum long enough I know that very little insight can be offered without details. For both scenarios, let’s say the steel is 108X, and each blade will have approximately the same function, diverging really only in size, and simple imperfections in design reproduction. Scenario A] The finished product will be a clip point Bowie w/ full tang, likely 3/16 thick at its thickest, with a blade between 4-6” long x 2-2.75” wide (or thereabouts). All proportions of the clip point design are “normal,” with no major prounounced recurve. Guard will be assembled of secondary metal. Scenario B] Basically the same knife in the earlier scenario but with the following dimensions: thickness will be a full 1/4” - 5/16”, blade length will be between 8-10”. These are just examples that I’m hoping to get a better idea how to “know” what i need without running volumetric calculations to determine need, and learning how to recall that knowledge and apply it to different sizes and designs. Another issue I’m curious about when thinking about what steel to start with, is there a consensus among bladesmiths about initial thickness ratio to finished result thickness, as it pertains to what the initial steal thickness is? And by that I mean, if I want a blade that is 3/16” thick upon completion, do some folks recommend buying a 3/16” bar and forging only the edge, tip, point, ricasso, choil, tang, etc, then just heating to temp, and quenching? To me this doesn’t “feel” like fully forging a blade, but that’s an opinion NOT for this thread. I hope this long-winded missive is clear and concise as to what I’m asking & hoping to learn, and again, please know that I do recognize the numerous variables...just asking if there is a “bladesmith trick” to knowing size. Thank you, Mike