

Steamboat
-
Posts
261 -
Joined
-
Last visited
Content Type
Profiles
Forums
Articles
Gallery
Downloads
Events
Posts posted by Steamboat
-
-
8 hours ago, Stew1803 said:
there is certainly a lot of character locally. some fantastic metal work or some of the old churches here, big old doors and gates etc
Id love the chance to visit the states for a long visit, I think some of the scenery you have is amazing. plus im an avid shooter and you certainly have better laws regarding the use of firearms, plus your allowed to carry knives etc so I believe.
but there certainly is plenty history in America in regards to blacksmithing, and you lot have access to perhaps better steel works than over here, especially since a lot of steel is American made, we have no steel industry left here anymore.
and I would certainly be willing to give a bed (and use of my workshop) to any smith who wishes to visit here.
As Charles mentioned, the firearm/weapon laws in the US do vary. I won't go into detail, but a bit of online searching will give you an idea. You'll find that they can vary considerably from state to state. As to scenery, we definitely have a great deal to offer, although I must say that there are many beautiful areas in Scotland/England/Wales, and my favorite UK region is probably the Western Highlands of Scotland. My wife and I hope to make it over to your side of the Big Water again sometime in the next year or so. She'd like to have a look at the places her ancestors came from.
As to the term "smiddy," the closest equivalent here that I can think of would be "smithy" for a blacksmith's shop, such as used in Longfellow's poem, The Village Blacksmith.
Steamboat
-
I spent some time in England and Scotland some years ago. I rented a car in London and pretty much wore the tires (tyres to you) off of it...just going wherever I felt like going at the time. I loved visiting the historic sites and towns that still retained much of their Old World charm and character. You have a great heritage.
The average/median age of homes in the USA varies a good deal from state to state, and the percentage of extant historic homes varies considerably more. Our house in Maine is well over 200 years old, which is moderately old by Maine standards, but there are a lot of homes here that are even older. I'm very much into historical archaeology and I appreciate older/traditional architecture, which is one of several reasons I enjoy living in Maine.
Regarding blacksmithing, I plan to forge some reproduction hardware for our home, which we are gradually restoring.
Steamboat
-
Also, you may want to check with the Maryland Historical Society. It appears that they may have some records relating to the Naudain Manufacturing Company (Box 103, Folder 5). Check the list on their website for their Maryland WWII Records,1945-1965, MS. 2010. Unless it's just a coincidence, I'm just assuming that it's probably the same company as the one stamped on the forge.
http://www.mdhs.org/findingaid/maryland-world-war-ii-records-1945-1965-ms-2010
Steamboat
-
33 minutes ago, hikeordie said:
Here are a couple od pictures of the Naudain Forge.
It does look different from the one in the manual referenced above. Probably/possibly a manufacture date of 1946.
Also check out this older topic, which might have some useful information or contacts:
http://www.iforgeiron.com/topic/28685-portable-blacksmith-forge-military-circa-ww-i/
Steamboat
-
19 minutes ago, hikeordie said:
Thanks for the information. I will try to post a photo soon and will also check out the army field manual and post results of my search. I also acquired a 120 lb Fulton cast steel anvil in near pristine condition which were made by the Columbia Hardware Co. for Sears in the early 1920's. Great find. I also saw a Peter Wright anvil at approx. 250 lb here in S. Colorado that is up for sale. Edges were rough but it appeared intact ( no broken or cracked horn or heel). It will soon be up for sale at auction for a ranch dispersal.
You're welcome. I hope that it helps you determine the forge's history. And the Fulton anvil sounds like an excellent find.
Steamboat
-
6 minutes ago, Frosty said:
Have a brand name for the colloidal alumina rigidizer? It will go with products like ITC-100 like hotcakes and syrup. ITC is zirconium of various screen sizes a Kaolin clay matrix. Kaolin is a high alumina ceramic Heck, I'd be tempted to try adding a little of the rigidizer to ITC or see if it will mix with Zircopax as a kiln wash.
Frosty The Lucky.
Frosty, here are a couple of different brands you could look into:
Wesol D30. Links: http://www.wesbond.com/ http://www.wesbond.com/wesol_d30.htm
Zircar Alumina Coat. I think you can get this product in a one-quart size. Links: http://www.zrci.com/ http://www.zrci.com/zrci500.pdf
Both websites have links to MSDS sheets for the products.
I suggest contacting both of these companies to see if they have more complete or updated information available.
Steamboat
-
13 hours ago, Mikey98118 said:
It should bond just fine to the board, if you first coat it with silica rigidizer. If you have trouble bonding to the other, mix it together with just a little of the colloidal silica, as silica is the most common form of binder for ceramic formulas.
Sounds like a very good suggestion Mike, although when I installed the sleeve castings in the end-bells several days ago, I didn't have any colloidal silica rigidizer on hand, but I did have a bottle of colloidal alumina rigidizer, so I forged ahead and applied that to some insulating board. I figured it might at least add another item to my overall experiment. So far, it looks encouraging, but time will tell as the forge moves in fits and starts toward operational status.
I'll add more details and photos soon.
Steamboat
-
Posting a photo would help, but I'm just guessing it might be the forge that was part of the kit in the M3 and M12 welding trucks. There are a few photos in the War Department Technical Manual, TM 9-2852, Instruction Guide, Welding, Theory and Application, 3 June 1943 that show a rectangular portable forge. One of the photos (Figure 158a) shows the forge in its open and closed configurations, and the other illustrations (Figures 155b and 156b) show what appears to be the forge inside a truck. There might be a glimpse of the forge in Figure 156a as well.
By the way, there is also a chapter on forging and forge welding in this manual, but the above photos are in a subsequent chapter.
Just search online for "TM 9-2852" and you will probably get a bunch of hits.
Steamboat
-
2 hours ago, Thursday said:
I could leave a small gap between the top plate and the cement. The cements purpose is just to add mass. The anvil will be welded to the top plate which will be welded to the 2" pipe.
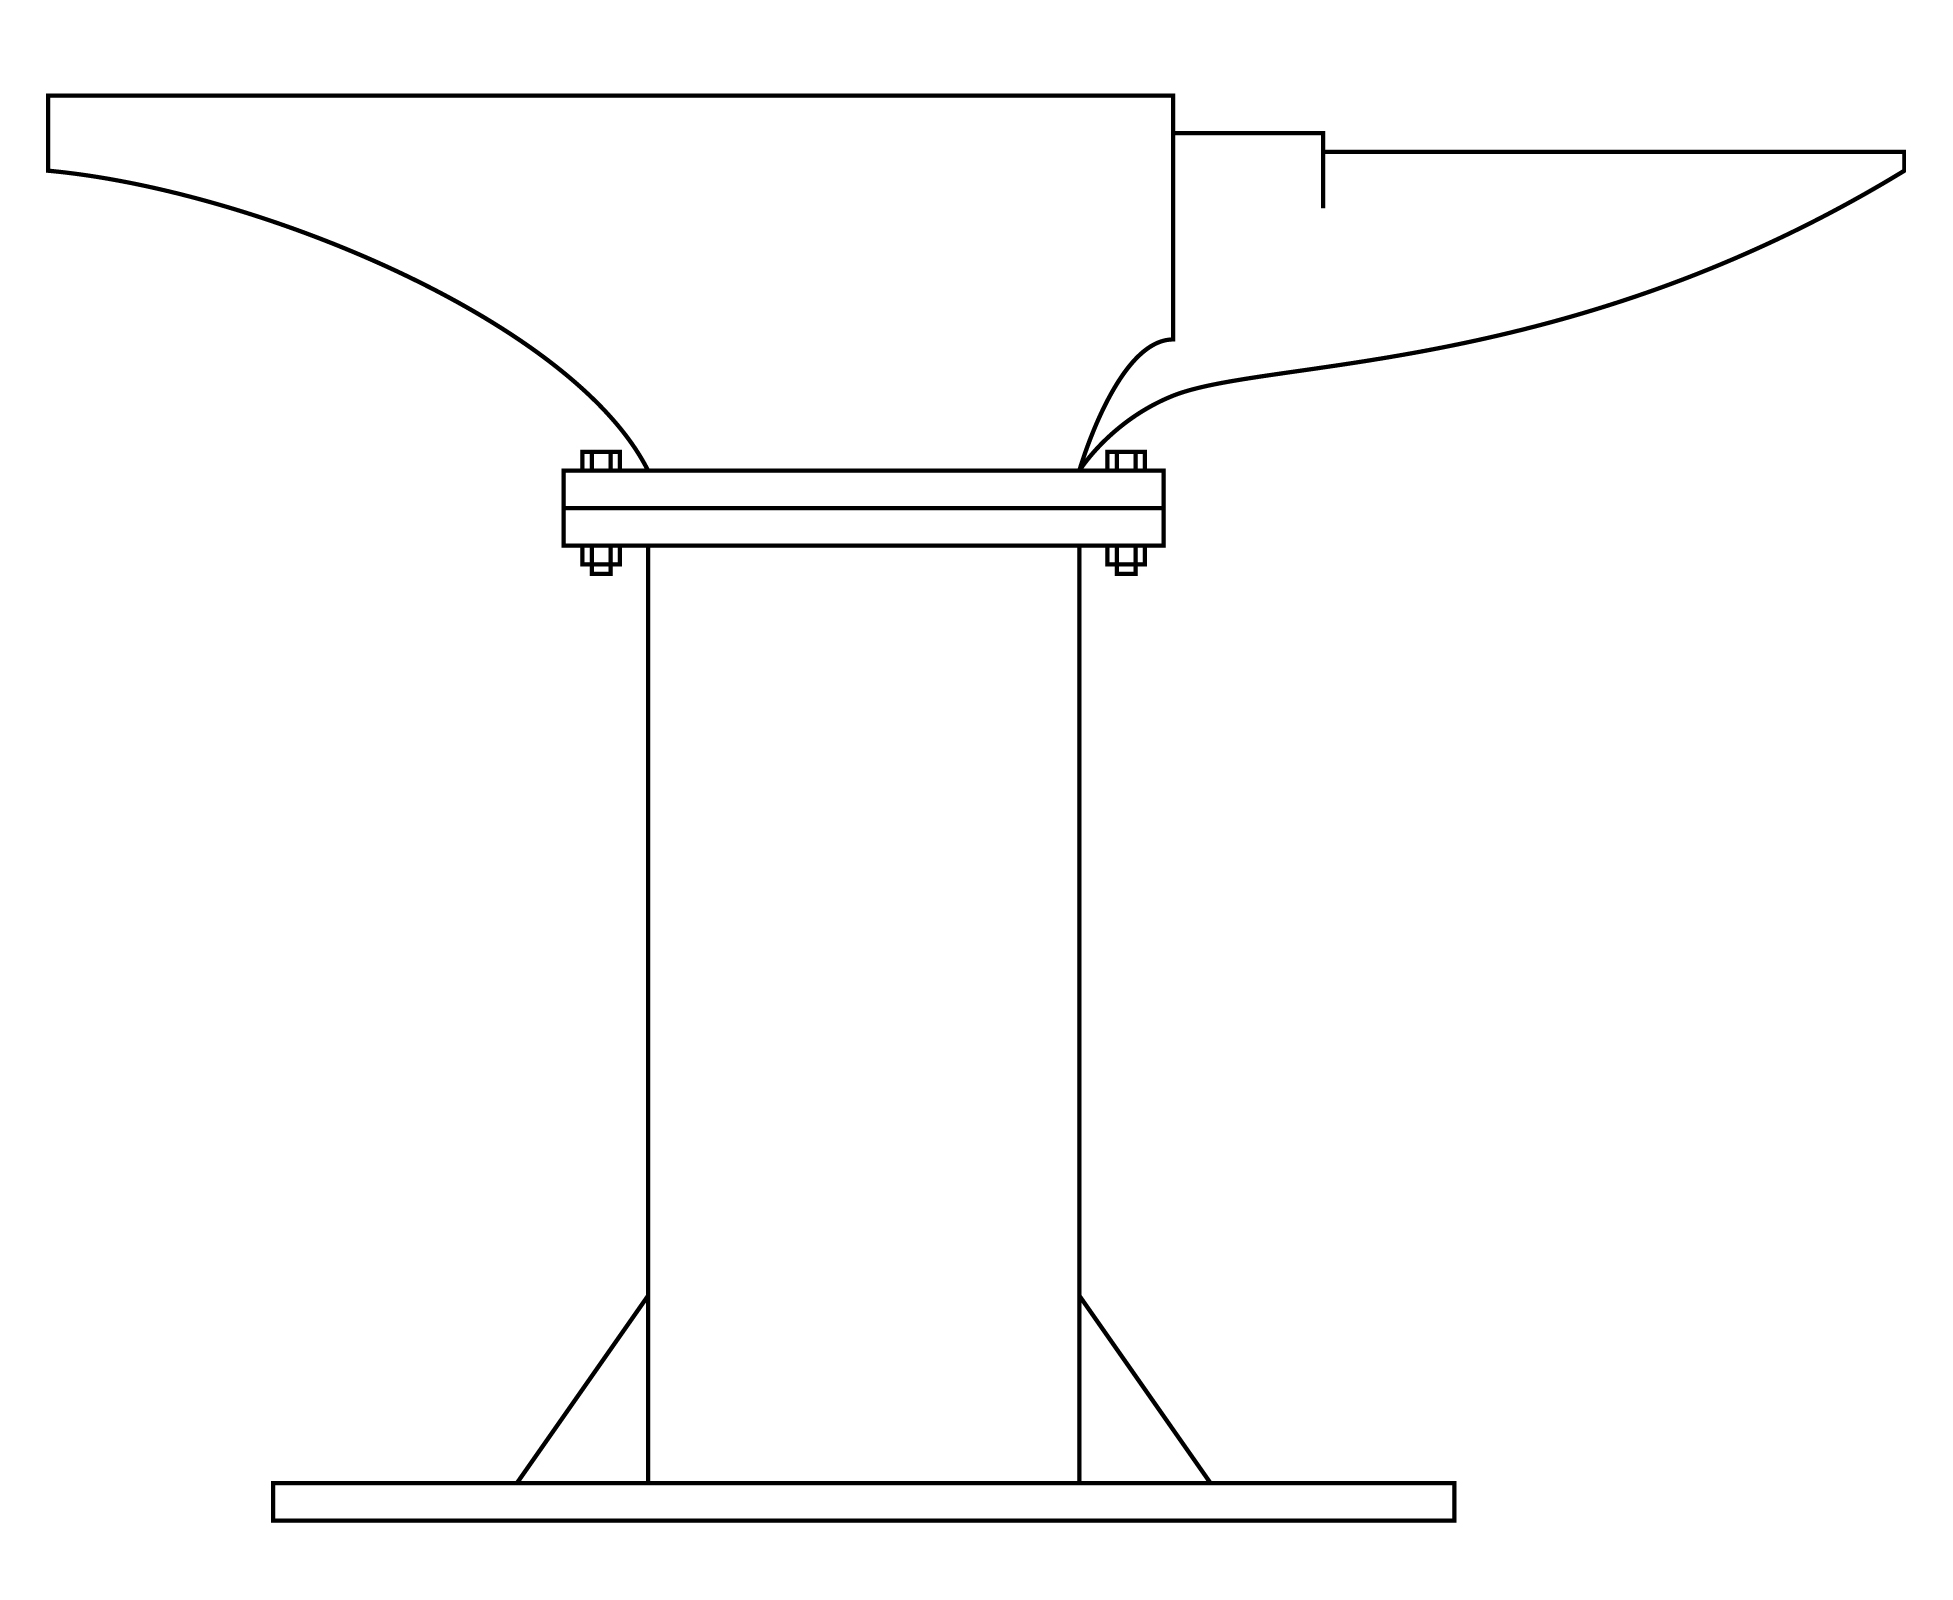
If the only structural support for the anvil is a single 2" (2.375") pipe placed under the center of the waist, I believe there would be a very high likelihood of structural failure due to the inability to tolerate the high leverage forces and other stresses/forces that would be applied to the pipe and its welds while using the anvil. Instead of a single narrow pipe support under the center of the waist, you should solidly support the entire perimeter of the waist all the way down to the floor.
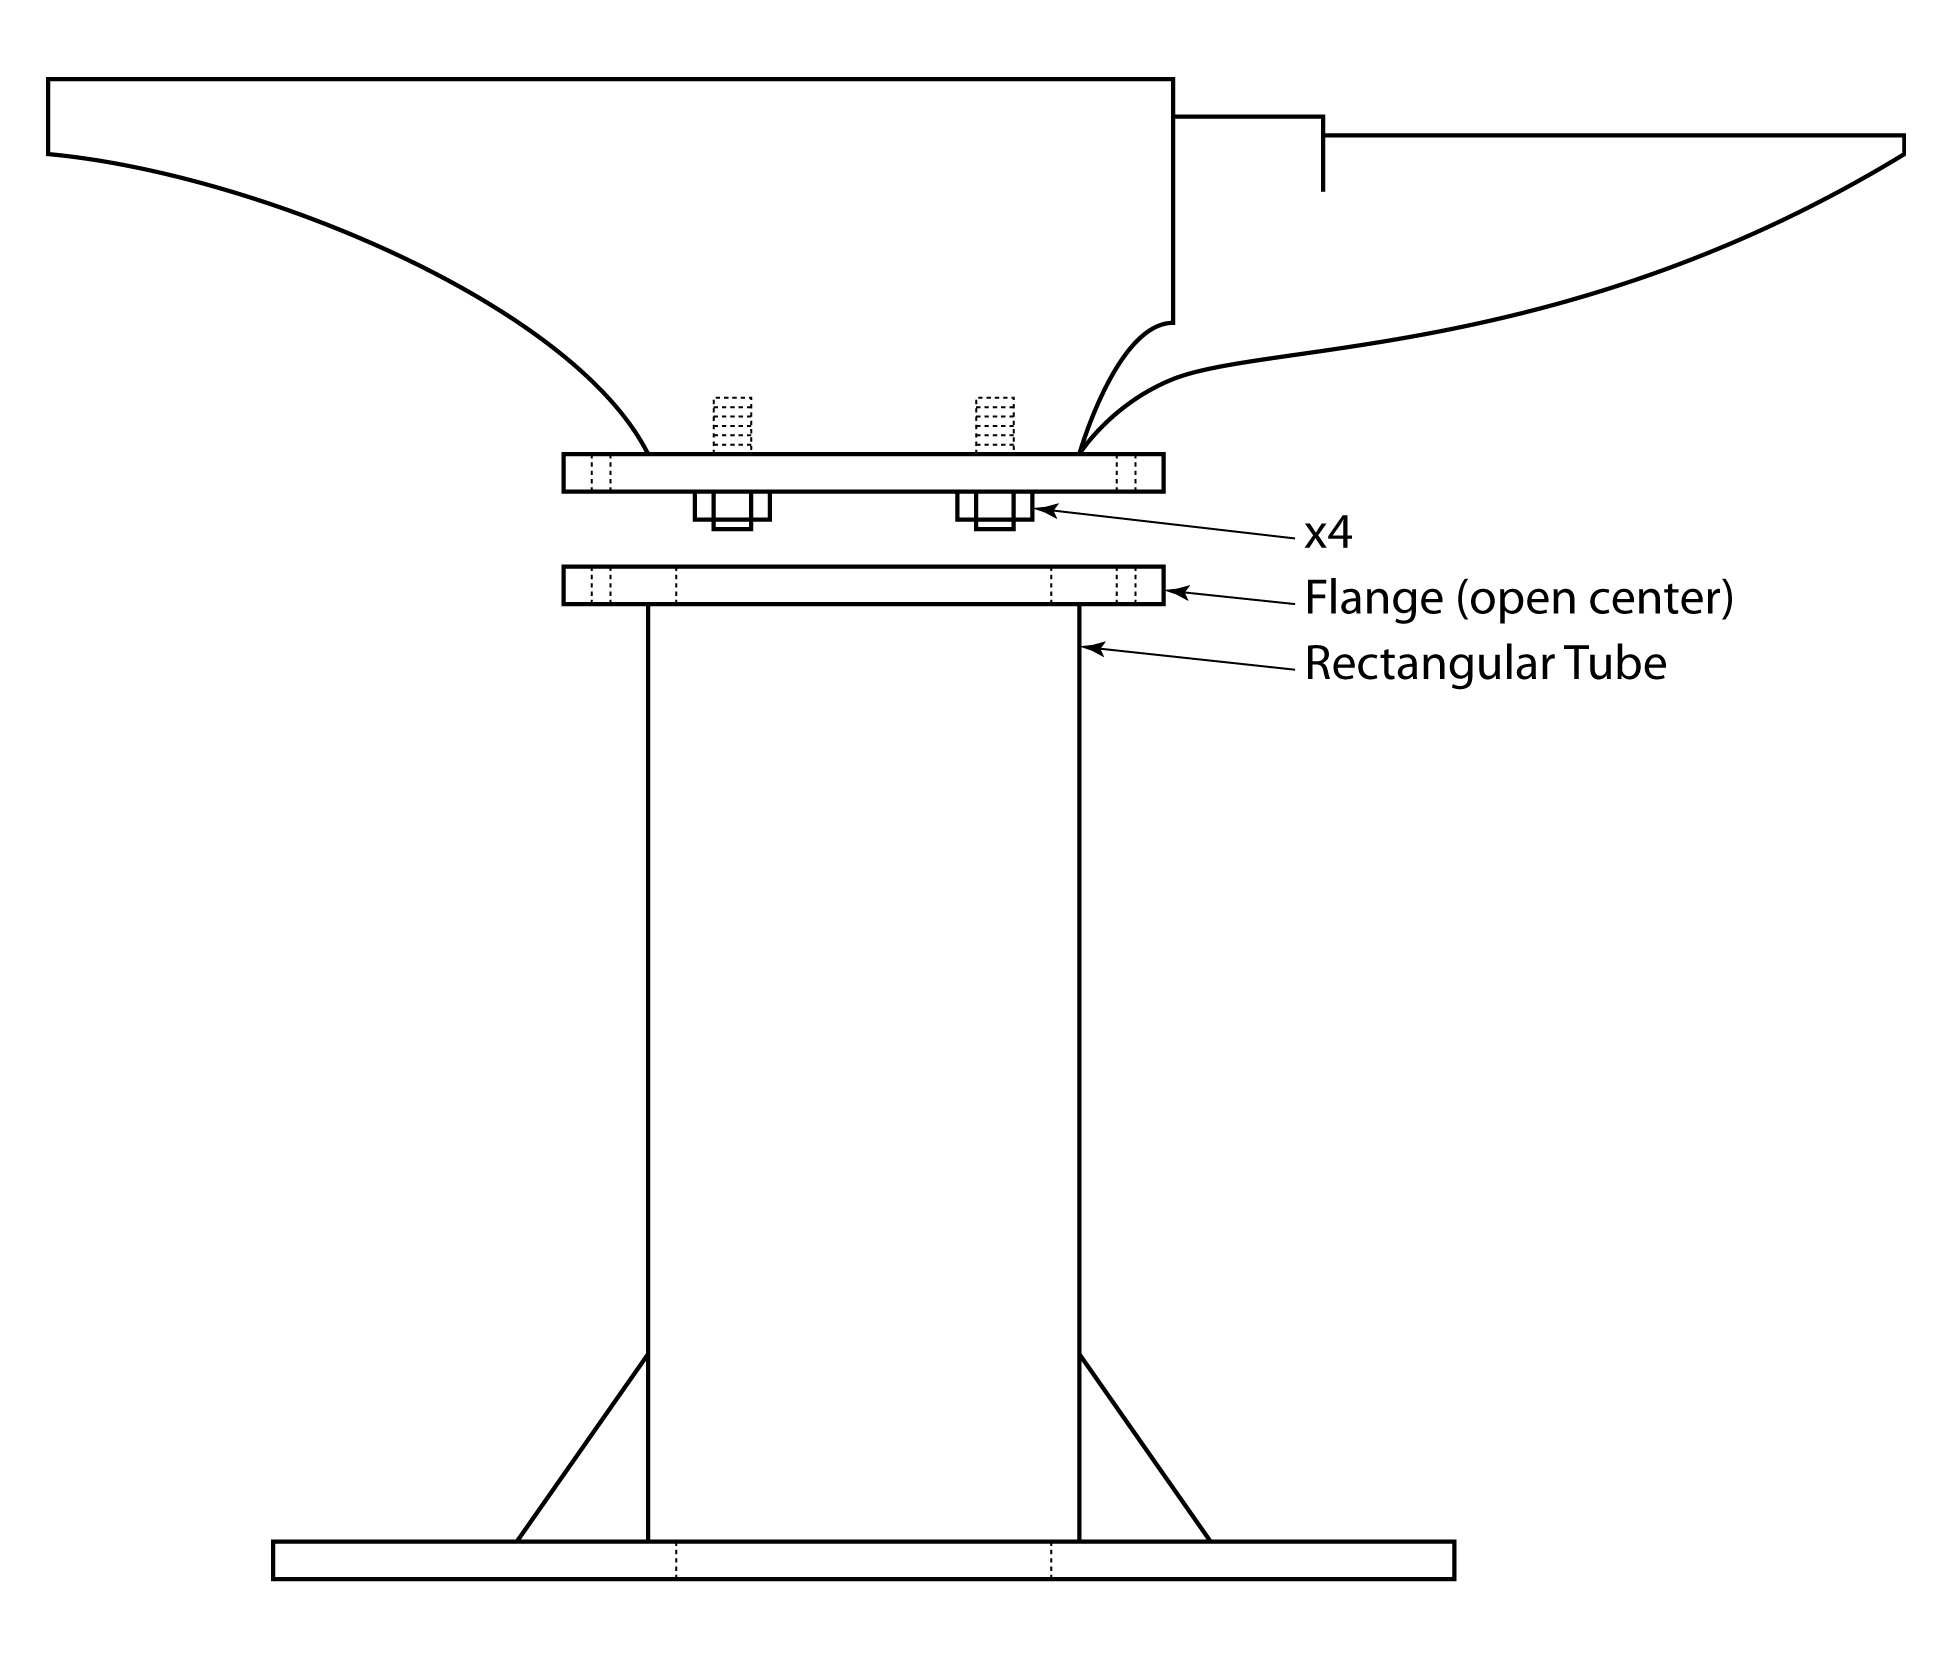
By the way, I think you should attach one plate to the anvil and an additional plate to the top of the stand, which you can then bolt together. This will make the anvil detachable. You might want to use it as a bench anvil later after you get a better anvil or make some other change.
I looked at your engineering drawing and mock-up, but I was unable to tell how thick the metal sides of the stand would be. You should use heavy plate steel for the four sides of the stand...let's say 1/4" thick...which could be welded on (or near) the perimeter of the plate at the top of the stand. That would provide solid support all the way to the floor, and the problematic 2" pipe would not be used.
You could just fill the stand with sand...much easier than concrete. Sand should help deaden the ringing sounds.
I would think twice about welding the plate onto the anvil. Assuming that the anvil body is wrought iron, and that you take into consideration the factors that can affect welding wrought iron, you should consider that once welded on, it's hard to change to a new configuration later. You could just drill and tap four holes for four large bolts or studs, which could draw the plate tightly against the anvil body.
Here's a modified version of your idea that is stronger, eliminates the narrow 2" pipe, and allows the anvil to be removed from the stand. The four side plates should be easy to construct and weld, since all edges are straight lines.
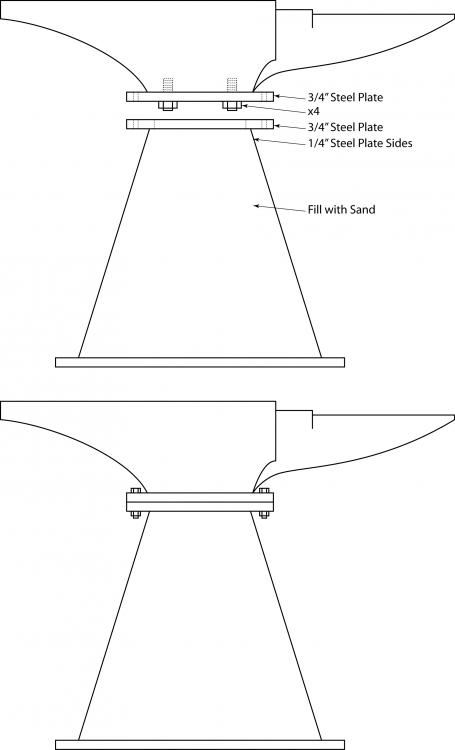
I hope that was helpful to you.
Disclaimer: The above recommendations are my personal opinions. I am not an engineer, and any use of the information or opinions I have provided is entirely at your own risk.
Steamboat
-
37 minutes ago, Frosty said:
I'm looking forward to running it in a proper forge it'll destroy the soft fire bricks in that brick pile and they're too expensive to destroy just because. I hope I can get something put together in time for the meeting. I really want to show this baby off, I am SOOOOO pleased.
")
Frosty The Lucky.
Once again, I'm impressed. Not only because it works, but also because it appears to work at a wide range of gas flow rates, which I would think should give you excellent temperature control. Would you say that the 2 psi rate would be akin to an "idle" setting? It was inspiring enough that I went out and got back to work on my current gas forge project, which has been on the 'back burner' for the past few days.
Steamboat
-
Just now, Charles R. Stevens said:
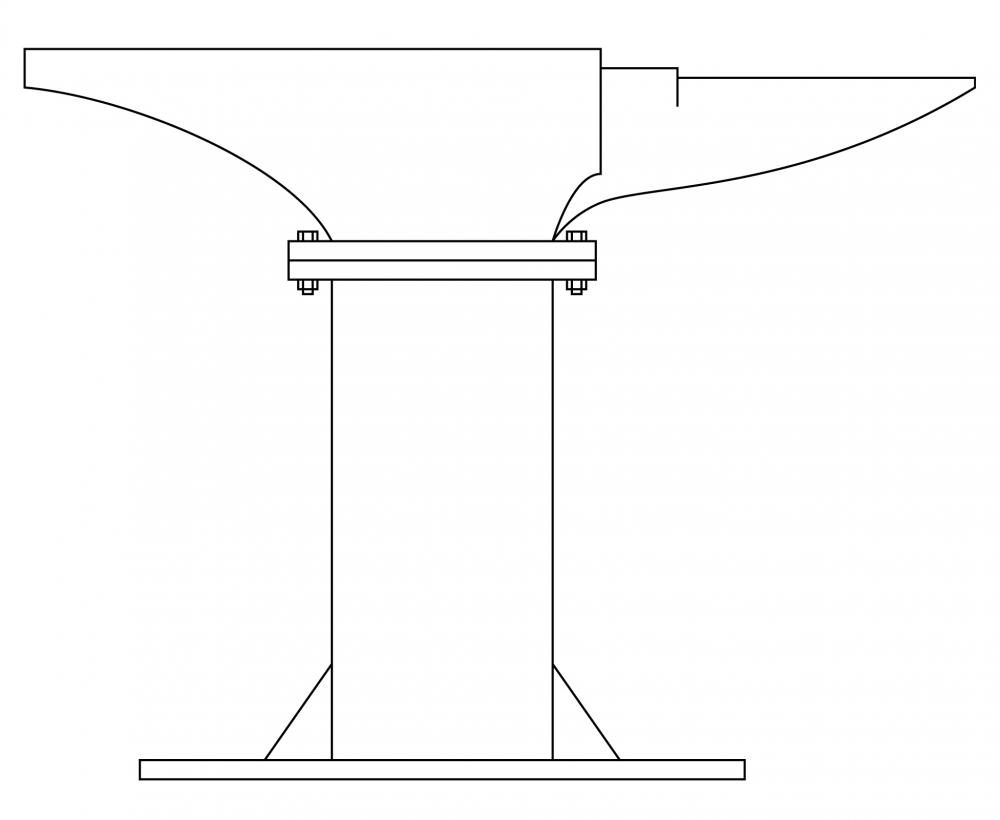
Fill that with sand ad wet it with oil, lest it ring like a bell
Yes, that's a good point you make about the ringing. I just now edited the text to indicate that the tube could be filled with something heavy.
Material like sand should certainly help deaden resonant frequencies.
Steamboat
-
2 hours ago, Fatfudd said:
I would be concerned that the contact area between the anvil and the cement would be too small causing the cement to break down in a short period.That would be particularly true if you used the horn or tail very much.
I think I agree with Fatfudd about the possibility of eventually breaking down the concrete, probably under the outer periphery of the plate on top of the concrete.
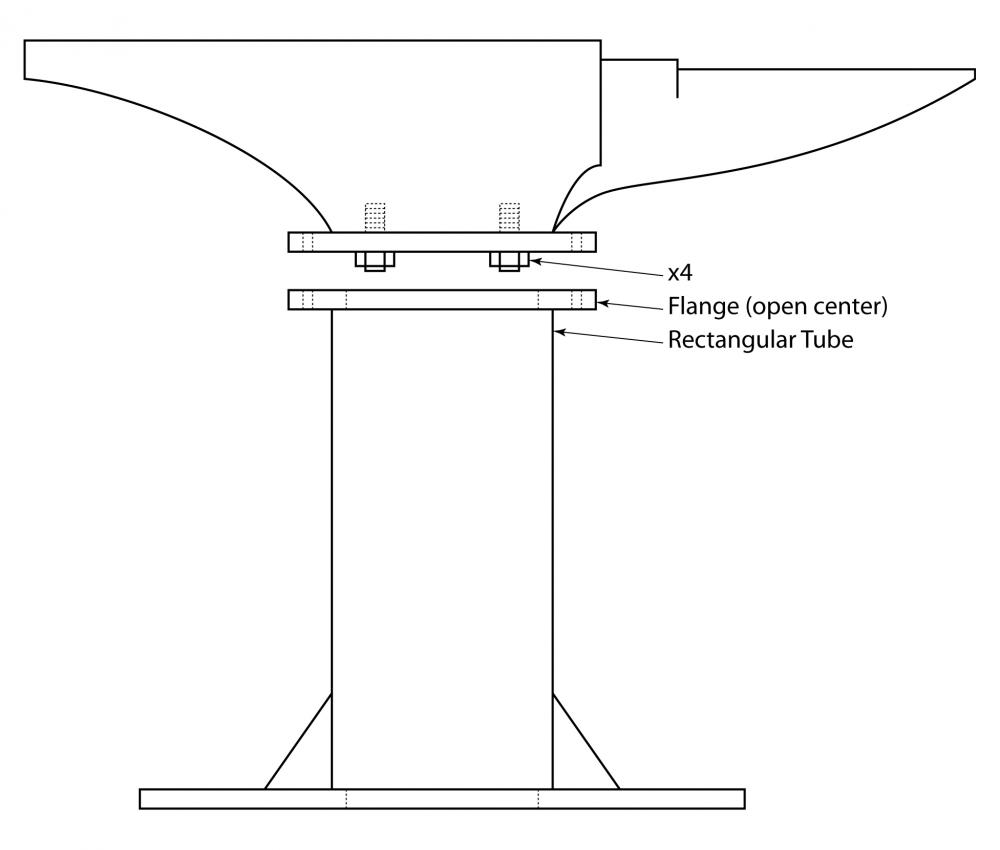
Coincidentally, I happened to see a broken anvil a while ago at what I would call an 'itinerant flea market' that people run out of semi-truck trailers as they travel around from place to place. It was cheap, so maybe I should have bought it, but I didn't. Anyway, that got me thinking about what I might do with one, and I came up with an idea or two. If you can source some heavy plate and some rectangular tube roughly the same cross-section as the waist of the anvil, you could make a 'convertible' anvil, which could use the tube as a floor stand, or could be removed from the floor stand and bolted to a steel table top for use as a bench anvil, as Frosty has suggested. You could countersink the attachment fasteners in the plate (or just use spacers) so that you don't have to make large holes in the tabletop.
I was originally thinking that the stand would be bolted to the floor. If you wanted more mass in the stand, it could be added easily in various ways. You could leave the tube open inside for direct access to the anvil attachment fasteners to re-tighten them over time (if necessary), but as an alternative you could fill the tube with something heavy and just remove the bolts holding the plate and flange together to access the anvil attachment fasteners. You could also add adjustable feet, etc.
Just an idea...
Steamboat
-
Excellent experiment, Frosty! I find this all very interesting.
Do you feel that having the T-inducer enter the plenum at 90 degrees to the 'nozzlettes' (instead of directly in line with them) helped reduce the need for a diffuser?
As to the Kast-O-Lite, I noticed the same phenomenon: At some point in mixing, adding just a tiny amount of water induced a significant change in the fluidity of the mixture. I've noticed similar effects with some masonry mortars that I've used in the past.
Steamboat
-
8 hours ago, njanvilman said:
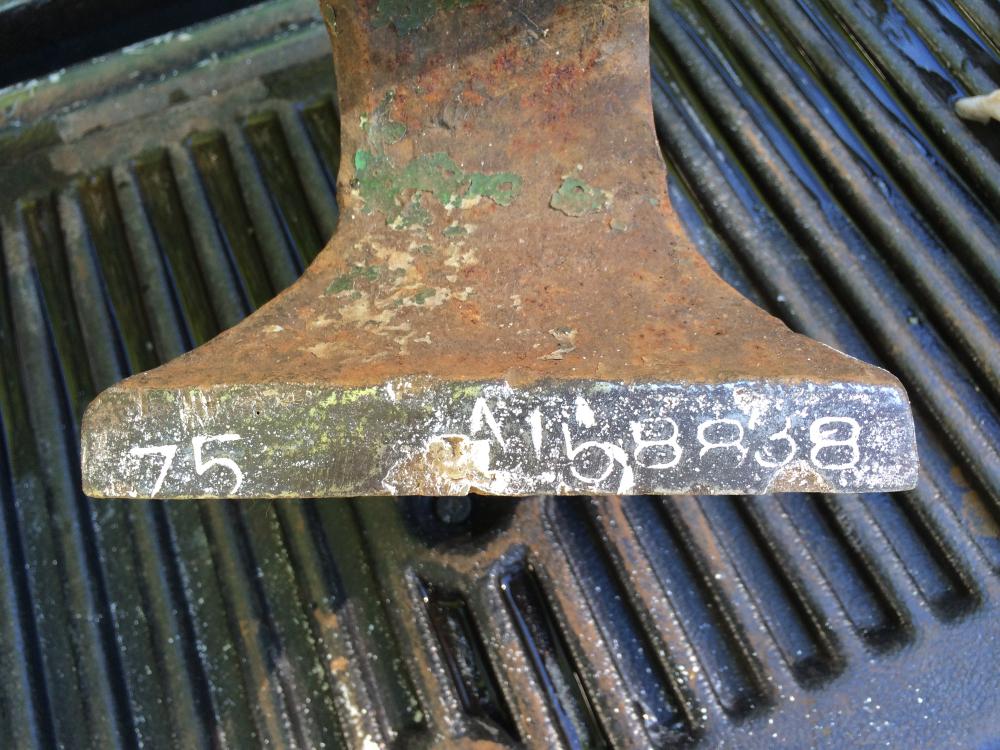
The way the weight and serial # are marked suggest a Trenton.
Thanks. That info does seem to be marked in the same way that it is on some Trenton anvils that I've seen.
Steamboat
-
41 minutes ago, Thief_Of_Navarre said:
All that Trenton I have seen have had the noticeable step on the feet. Rebound test will tell you all you need to know
")
Ahh, yes. I'm the detail-oriented type who likes to know more than I really "need" to know...gets me in trouble sometimes.
 I suppose it's my historical archaeology background showing through.
I've heard (maybe I can find the reference again) that there were two different lines/brands(?) of Trenton anvils: One line consisted of anvils imported to the US from Europe, and another line of Trenton anvils was produced by the Columbus Forge and Iron Company (Ohio), and it was the imported line that had flat areas or ledges (possibly the "steps" you're referring to) on the front and back feet. Maybe someone can chime in with more on that.
Steamboat
23 minutes ago, Fatfudd said:The serial number is straight Trenton. A&H usually have the weights under the logo on the side. A rebound test between an Arm and Hammer and a Trenton would probably be indistinguishable. Both are excellent anvils. To get answers to your questions I would suggest you purchase Postman's Anvils in America. It may seem expensive but you'll be amazed at what you can learn.
I've heard of the book. It would be a really nice addition to my library. I'll keep my eye out for a used copy. In the meantime, I may look into an inter-library loan of the book.
Steamboat
-
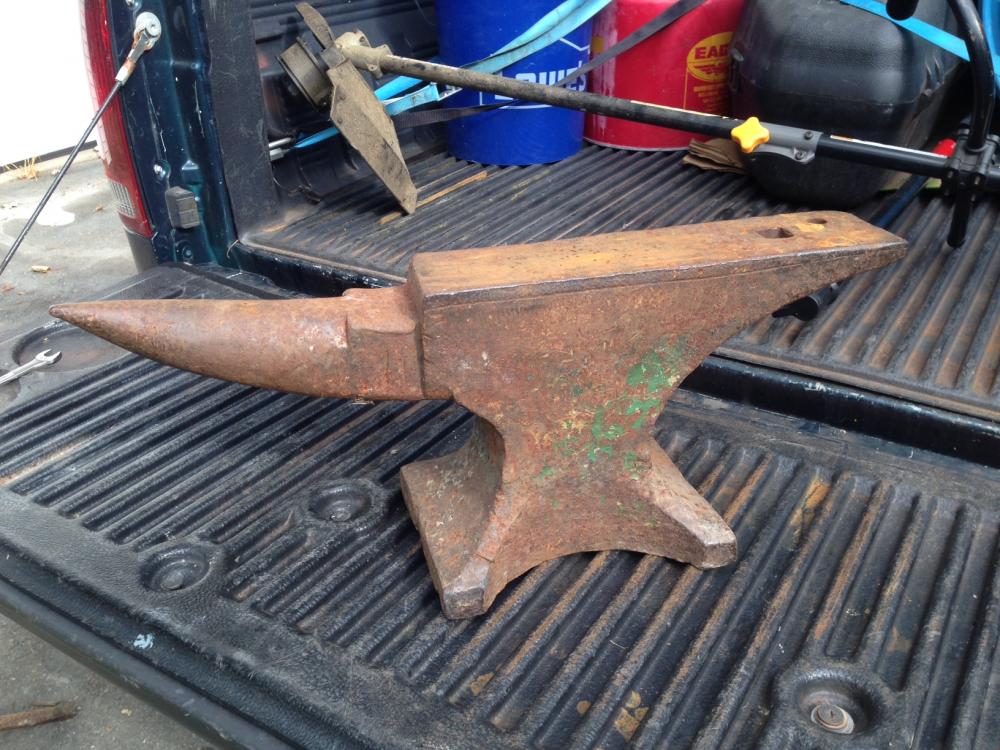
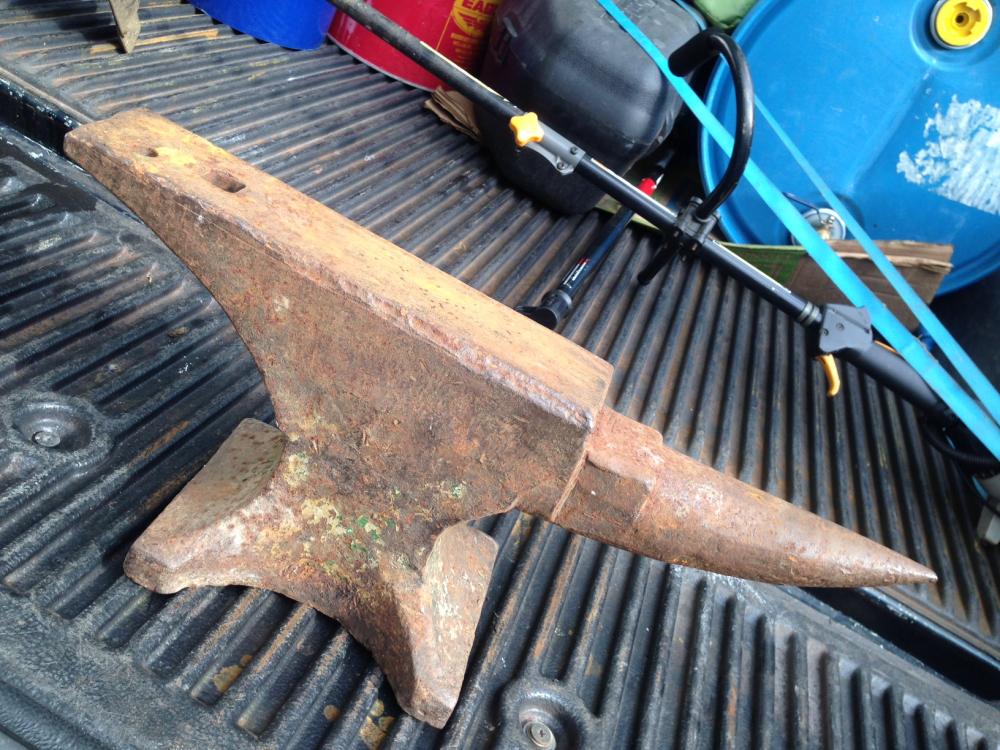
I just purchased a small 75-pound anvil at a flea market a couple of days ago. I didn't spend a great deal, so I figured it was low risk. The overall condition seemed pretty decent. One edge of the steel face plate is in excellent condition, although the other edge of the plate is chipped. The face is very flat overall, within about 1/32" (+/- 1/64 inch) both width- and length-wise, as checked with a small surface plate and shims. A tapping test over the face seemed nice and consistent, with no sound characteristics that would indicate a detached plate to my basically untrained ears. A ball-bearing rebound test yielded about an 85% rebound, and I suspect that the rebound might be even better than that if I were to clean off the surface rust. The hardie and pritchel holes are in good shape with good edges.
I looked closely, but could not find a logo or maker's mark on it. The features of the anvil suggest (to my anvil-challenged mind) a Trenton, but the Trenton anvils seem to have a number of similarities to some Arm and Hammer anvils.
The steel face plate is roughly 3/8" thick and is visually distinguishable from the body of the anvil. There is a 'caplet' depression under the base. Stamped on the front edge of the foot is "75" and what appears to be "A158838" if I'm reading it correctly (see photo).
Any more information on this little guy would be appreciated, including any details about manufacturing methods and materials. For example, is it a forged wrought iron body with a steel plate face forge welded to the body? Is the anvil's upper body forge welded to the base at the waist? I have not done a spark test yet on the body or base.
Steamboat
-
1 hour ago, RandyScott said:
I have used 1" Insboard for the end enclosures on my freon tank forge. I painted the entire surface with Rigidizer, cured same with my Mikey burner, then several thin wash coats of Satanite (with extra coatings around the openings for protection from tong/work piece abrasion) also heat cured between coats and the hot face coat of ITC-100. Pretty near bullet proof.
Thanks, Randy. That is more or less what I was considering for the surface treatment of the Insboard HD. It sounds like your coatings are holding up well.
I happen to have some colloidal alumina rigidizer (rather than colloidal silica rigidizer), and I'm wondering how well it will bond, not just to the Insboard, but also to subsequent coatings of either Satanite or ITC-100. I'd rather not have to buy more rigidizer if I don't need to, and I like the high temperature rating of the colloidal alumina. So far, I haven't found much in the way of user reports on how well it would work for what I have in mind.
Steamboat
-
I've given some additional thought to how I might support the sleeves in the end-bells. As far as the X- and Y-axis support goes, it will probably be from a combination of the end-bells themselves and a circular slab of one-inch Insboard HD fitted into each end-bell, with cutouts for the sleeves. I'd probably pack the area behind the Insboard with ceramic blanket. I'm not sure yet as to the coatings I might apply to the Insboard (colloidal alumina? Satanite? ITC-100?). I want to make sure that they would all be compatible with the Insboard and with each other, and also applied in the correct manner and sequence. Any opinions or recommendations?
As to the Z-axis support, that should take care of itself, since the sleeves should be secured between the end-bells and the insulation system inside the main forge body. At least that's how it appears to my little gray cell (cells on a good day) at the moment. This is all tentative. I guess we'll see how it actually transpires.
Steamboat
-
Thanks for the extra info. It seems to correlate quite well with what I've found out so far about the house and hardware. I might be going up to the house tomorrow or the next day. I'll try to remember to take a photo or two of some hardware. Also, thanks for the offer for help. When I get to that point I may take you up on it.
One of the big blacksmithing projects for the house should be the hardware and accessories for the kitchen fireplace with its beehive oven, which needs to be totally reconstructed, since it had fallen down before we got the house, and the previous owner had apparently sold off the bricks, so I'm keeping my eye out for a pretty good size pile of matching old-pattern bricks. We've repaired the other four fireplaces using authentic (well, slightly modified perhaps) lime-putty mortar and matching bricks, with some help from a couple of the top fireplace restoration people in New England. I learned a lot by working alongside them as time permitted and picking their brains with tons of questions. There's still a huge amount of interior work left to be done, although most of the foundation, exterior, and structural work is behind us.
Steamboat
-
2 hours ago, Mikey98118 said:
Sounds great; we all love photos, and we all love experimenters. We only get crabby when we see guys run off in all directions sans any planning at all. My personal favorite thing is to hear a report on something, either new or old, that is full of his personal views on what he experienced, good or bad; I think that a thoughtful even handed report does more to encourage beginners than anything else they can read about.
That's good to hear! You've seen a bit of a preview, and the main "feature" should be "coming soon to a forum near you." I hope it gets reasonably good reviews, but at least it should be a learning experience for me, and maybe for others.
Steamboat
-
Thanks for the photos and suggestions.
I'm not sure how many Norfolk latches I need to make...maybe about six or seven. The escutcheon plates on mine are simpler than the ones in your photos...basically rectangles with semi-circles punched out of each corner. They have shallow countersinks for the screws and staked-in hinge plates for the swivel lift. The hand grasps look very much like the ones in your photos, although proportionally not quite as bulbous in the center. Most of the lifts have a saucered thumb press and curved ends, but a few have straight ends. Mot of the mounting screws have blunt ends, no taper, and have thin, hand-cut slots, and the heads and threads vary just slightly in diameter and pitch between screws. All of the bars are plain except a few that have a button grasp, and all have escutcheon plates. The staples vary, some with and some without escutcheons. The catches also vary, some braced and some not. There are also a few latches with a somewhat different escutcheon design, but otherwise similar. One door had a Norfolk latch with a cast-iron escutcheon, but that could have been added later, and of course, a few of the abovementioned parts may be later replacements. I'd send a photo or two, but I'm not at that location at present.
The house needs a number of other hardware items as well. For example, it will need a fair amount of fireplace hardware. There are currently four working fireplaces, and the kitchen fireplace and associated beehive oven remain to be reconstructed. I have a few original pieces of hardware, such as a crane, a couple of andirons, and pieces of a trammel, but there's a lot left to reproduce. The list goes on...
What kind of finish treatment are you giving the latches? Beeswax, perhaps?
Steamboat
-
10 hours ago, Mikey98118 said:
Nice work! Also, I'd like to give you special thanks, as I was beginning to fear that I was the only compulsive personality on the Gas Burners forum
")
I never mixed stainless needles into refractory, because I stumbled unto Kast-O-Lite 30 LI (previously called Kast-O-Lite 3000) right off the bat; it is such a tough refractory that I've never seen a single crack in anything built from it. Combining the two products should see your sleeves through anything.
Thanks, Mikey! And yes, my wife says that I do tend to be a bit, uh, "detail oriented," shall we say?
 And I'm gratified to hear your positive opinion about the Kast-O-Lite 30 LI.
On the subject of things like sleeves and liners: Regarding the lining of the forge itself, I mentioned that I designed the forge for quick access to the liner from both ends for easy replacement or maintenance. This is part of my plan to experiment over time with several different approaches to insulating liners, some of which are considered "recommended" and others that might fall into the "questionable" category, since the latter should provide a good opportunity for learning more specifically about what makes them fail or perform poorly, and perhaps with luck, to devise some modification/improvement for better results. So, if you see me employ some odd combination of insulating materials in the forge, just remember that I'm merely experimenting, and not ignoring what I consider to be very sound advice from experienced and knowledgeable people like yourself and others. And I do plan to share information about failures or poor results...not just the good results.
I plan to post more pictures of the forge project soon in the Gas Forges section. It will probably be after I return from a little vacation that we're planning for next week.
Steamboat
-
Very nice work on the Suffolk latch! I eventually hope to make some Norfolk latches and other hardware items to replace some missing pieces in our Federal Period cape.
Steamboat
-
2 hours ago, timgunn1962 said:
I'm also very impressed indeed.
I've not tried ITC100 myself as it's very hard to find over here and the price in the UK is way over the US price.
If you do try it, could you be persuaded to tune and run the forge without it first, then apply it and try to get some quantitative data relating to any improvement?
Could you also let us know the dimensions and what burners you are intending to try?
Thanks Tim! By the way, I read your post about the Amal injectors...very interesting and informative.
I'd eventually like to try several different burners on this forge over time, and I'd be happy to post any results (no specific list of burners yet...that will depend on budget and available time). I'll probably experiment later on by building a couple of burners myself. I'd like to learn as much as possible about gas forges. Of course, the forge isn't just for experimenting with burners and insulation, etc., since I plan to put it to use for some practical reasons, such as making reproduction hardware for our Federal Period house that we're gradually restoring.
As to the ITC-100, I plan to fire the forge a few times to season it and fully cure any substrate materials before applying the ITC-100, so I should be able to get at least some rudimentary before-and-after data, although I can't guarantee how 'scientific' the testing will be.

I think I might have a type K thermocouple probe for my Fluke IR thermometer, and if not, I should be able to get one. It will probably be a couple of weeks before the first firing, but I plan to post more information about the forge on IFI pretty soon.
Steamboat


Hi from Scotland
in Introduce Yourself
Posted
I think she's traced some of her ancestors on her mother's side to places in and around Birmingham and Canterbury...possibly a couple of other locations as well.
Steamboat