

Steamboat
-
Posts
261 -
Joined
-
Last visited
Content Type
Profiles
Forums
Articles
Gallery
Downloads
Events
Posts posted by Steamboat
-
-
51 minutes ago, Daswulf said:
Not sure about the hardned face tho.
I can't speak for all post vises, but I believe that my Peter Wright post vise has cast-steel jaws. I haven't tested the jaw hardness yet, but just from cleaning it up, I can tell that the jaws are harder than the rest of the vise (wrought iron), and if you look under the jaws you can see that they are separate pieces of metal. I saw an old advertisement that looks like it was for a Peter Wright vise, and they were advertised as "Wrought iron blacksmiths' vises. Solid boxes, cast steel jaws." And Das, I agree with you about the wide range of uses for a post vise.
Al (Steamboat)
-
Ditto on looking for a metal supplier other than the big-box stores. I get most of my new metal from a local combination tool store/fabrication shop for far less than I would pay at the local big boxes, and the first cut on many standard sizes is free, so I can get any length that I want.
Al (Steamboat)
-
19 minutes ago, JHCC said:
The ID of the “sleeve” is about 1-3/8”, and the OD is about 2-1/8”.
So the "sleeve" or cylindrical part is roughly 3/8" thick. That's a little thinner than I thought it might be, but still fairly hefty. At 3/8" it could either be an integral part of the object or a replaceable sleeve. I think that the way to tell for sure would be to clean it to bare metal so that you can see if it's a separate piece of metal. The fact that you found it next to the road suggests to me that it broke off in use or during transport, since in most cases if someone intentionally burned it off with a torch, they probably would not have done so while on the road somewhere. Of course, it could also have fallen off of a load of scrap metal. The marks and grease that I think I saw in the photo suggest to me that something had been latched onto the exterior of the cylindrical area, whether that area is integral with the object or a removable sleeve. It would be interesting to see it after it's cleaned up.
That's a lot of mental speculation for a rather prosaic found object, but minor mysteries are fun to try to solve.
Al (Steamboat)
-
2 hours ago, MotoMike said:
...and some testing files. I've heard various opinions on them but the seller too an off so I gave them a try. I used them on a few tools and knives that have a stated hardness. I see that once you get the feel of them they could be quite useful.
MotoMike, the testing files should be very useful. With gentle handling they should last you quite a long time and get you pretty close on the HRC number.
Al (Steamboat)
35 minutes ago, Frosty said:I don't know what I'd do with it were I so blessed but I'm sure it's good for something.
Frosty, I can relate to that. My wife says that she doesn't know what to do with me, but I must be good for something.
Al (Steamboat)
-
Well, I'll have to modify my terminology a bit. The thickness of the "sleeve" suggests that it's not really a sleeve but an integral, cylindrically-shaped part of the object that was designed to bear a heavy load. It looks like something was designed to latch onto that part of the object it in order to move/lift/secure whatever this object was once welded onto, or perhaps the other way around (I'm assuming that this object was 'welded' on to something, since it sort of looks like a weld at its base). I'm guessing that the weld or substrate failed, and it broke off from whatever it was welded to. Someone is probably unhappy about that.
As to what it was once welded to, don't know...could be a lot of things. It also looks like there are some black marks on that cylindrical portion of the object from whatever latched onto it, and maybe the remnants of some grease. I can only speculate what it was once welded to. Snowplow? Truck dump bed? Road grading equipment? Large dumpster/skip? or who knows? Maybe it could temporarily be called a "coupler" until some better idea comes along.
That's about all I can think of at the moment...
Al (Steamboat)
-
Always good to get a canine's opinion. That narrows down the possibilities quite a bit if it's inedible (but could it be a good source of iron?).

You might also try to estimate how thick the sleeve is.
Al (Steamboat)
-
7 hours ago, JHCC said:
Spotted this interesting-looking hunk of steel next to the road a few weeks back and finally stopped to pick it up.
I just looked more closely at the photo of your mystery object, and I noticed that it appears to have a sleeve in it. The object is rusty and dirty enough that I can't tell if the sleeve is slid, pressed, or welded in place. Pressed-in sleeves are common in many equipment types, since the sleeves can be replaced when worn, and I've replaced a few over the years. If it were cleaned up a bit, there could be a few more clues. In any case, there are a lot of similar-looking constructions on heavy equipment...it's definitely not from a Volkswagen. Hinges/pivots, bucket linkage parts, machinery mounts, etc., are a few possibilities.
I have a backhoe with some similarly-shaped features that have a few different functions, so I think BigGunDoctor's mention of a backhoe is in the ballpark.
Arkie, as far as a heavy-duty clevis-type tow hitch goes, that idea crossed my mind too, until I noticed the sleeve, which sort of dampened my enthusiasm for that idea.
JHCC, did you ask Lola's opinion?
Al (Steamboat)
-
The shifty lizards are great, and yes, we'd probably call them adjustable wrenches, although I grew up calling them Crescent wrenches (popular brand name).
Al (Steamboat)
-
Mudman, nice openers. The equine model should be an especially popular item.
Das and Ausfire, since you've both been delving into the herpetological branch of blacksmithing, have either of you considered creating some visual metaphors or visual puns in steel of well-known things or idioms like "snake oil," "snake in the grass," "snake eyes," "lounge lizard," "toad in the hole," etc.? Might be kind of fun.
Al (Steamboat)
-
3 hours ago, duckcreekforge said:
Today’s haul from the scrap yard, I think I hit the jackpot. 700# total.
That's quite a pile o' stuff. Good range of raw materials and a lot of ready-made basic shapes that you could modify or re-purpose. Looks like it includes a stack of cultivator sweeps, which could be high-carbon steel. It might be worth tracking down the manufacturer of the sweeps to see what specific kind of steel they're made of.
Al (Steamboat)
-
Good idea to take advantage of what was already there. That's a good-looking anvil on a solid-looking stand.
I just now noticed that the plates are welded on both sides of the anvil, so you have hold-downs on both sides. Should hold well.
Al (Steamboat)
-
I have the luxury of being an avocational builder, restorer, mechanic, fabricator, jack-of-all-trades, and 'budding' blacksmith, which means that in most cases I don't have to cater to the tastes of other individuals. In my own work I strive for aesthetics and functionality that are in line with my personal preferences, so Jennifer's question is probably easier for me to address than it is for a professional blacksmith who needs to be cognizant of his/her clients' needs, tastes, and interests. Actually, I find my own preferences quite similar to Jennifer's regarding the level of fit and finish of the things that I make. I take pride in my ability to produce a finished-looking item, whatever the project happens to be.
As to where I picked up that trait or inspiration, besides the fact that I had my own tool kit with real tools before I was old enough to read, and besides the fact that I somehow managed to disassemble a hotel toilet at age three when my parents weren't looking (which was embarrassing for them to explain to the disbelieving hotel manager), I think part of it is heredity. My parents had perfectionist tendencies that I think must have been passed on to me. Another factor is that I was always encouraged to build things. My folks always wanted me to be a scientist, so I guess that they saw building things as a lead-in to a career in science or engineering (sorry dad and mom for straying a bit from that career path). My stepfather was a cartographer, which required extreme perfection and almost infinite attention to detail, so getting praise from him about something that I built was a true and satisfying compliment. I was also sort of a semi-loner in my teenage years and quite into cars, having had my first car at age 12 and having owned and rebuilt four or five vehicles by the time I was old enough to drive and selling most of them at a profit. We were not a wealthy family and my car hobby had to be pretty much self-supporting, so I learned to "make do" and fix or modify things rather than just replace them. I had an oxy-acetylene outfit at age 13 or 14 and sold numerous pieces of metal sculpture by the time I was in college, where I thought I wanted to be an art major, then changed my mind, but I won't go into that right now, other than to say that I changed my mind several times in six years at the U
My early interest in automotive mechanics evolved in other directions. I'm interested in early steam technology, Industrial Revolution technology, ships, etc. My interest in history and architecture may have evolved at least partially from my interest in the Industrial Revolution. In any case, I eventually went back to school later in life and completed my doctorate in anthropology (in the archaeology program). I suppose that my interests in history and archaeology were among the keys to my interests in restoring antique houses. I've restored four houses to date and am working on a fifth as we speak. Note that my work on antique houses is much more "restoration" than "renovation," and I think that the former requires a higher degree of attention to detail, as the parameters are more demanding. I can't just do any old thing when accurately restoring a house; I need to use the proper materials while duplicating historically-correct stylistic elements at the same time. While house restoration may limit my aesthetic creativity to some degree (in a way, it's sort of like having a "client," even though it's my own house), fortunately, old houses fall within the range of my personal stylistic tastes (by choice), and at the same time restoration work presents challenges that can be solved in my own creative ways, so it's kind of a creativity trade-off. For example, to create original-type scarf joints in clapboard siding, I invented a machine to make the scarf joints that saved me many hours of tedious labor and produced joints that looked just like they were done by an expert 18th-century carpenter.
All in all, I think that there is a kind of complex and collective synergy in the totality of one's life experience that creates vectors that are, if not irresistible, at least rather compelling to follow. Blacksmithing, to me, is one of those vectors that has formed and seems quite natural to explore.
Now, if you'll afford me a brief digression, I wanted to add an example illustrating something that I said in my earlier post about how contextual factors can broaden my appreciation of exceptions to my usual preferences. For instance, from my long-time interest in marine transport history, I know that the work done by shipboard blacksmiths on, let's say, an 18th-century British ship of the line, was often carried out under less-than-favorable and often horrendous conditions. Things tend to break a lot during storms and battles and need to be repaired quickly and adequately. There were not spares for every metal item on the ship, and a blacksmith had to turn out items that were strong and functional as quickly as possible, in which case I can appreciate the story and circumstances behind some of their less finished-looking items when working under duress. Another exception might be the farmer-blacksmith, who, often by necessity, had to create workable metal tools and hardware without having the formal skills and lifelong training of a professional smith, in which case I tend to be more accepting of the less-than-finished-looking work that they produced. It all goes back to the idea of a "story" behind the piece when it comes to how I interpret an object.
I hope that wasn't too boring.
Al (Steamboat)
-
Thanks, SpankySmith. Glad you liked the stand. I did actually give it quite a bit of thought as I was building it, even though I had not planned it in advance. Whenever I build something without a plan in mind, it usually takes me longer, since I have to consider all of the new possibilities after each step of the process. In this case, I happened to have some scrap metal that practically begged to be made into a stand. For instance, the scrap channels were obvious candidates for the uprights, and the leftover triangles came in very handy as gussets.
Al (Steamboat)
-
9 hours ago, JHCC said:
Did some drilling and tapping for the custom-project-to-be-revealed-later.
JHCC, you've whetted my curiosity about the "custom-project-to-be-revealed-later." Maybe you could give us a hint. Is it something that will require the use of the SCUBA-tank dishing form? Do you do any diving? I still have my PADI card in my wallet, but it's been many years since I've played under water. Just some occasional snorkeling these days when vacationing in warmer climes.
Really pretty hammers, RanchManBen. It's the first time I've seen someone take a selfie using a hammer.
JustAnotherViking, I like your miniature axe. It makes a cool pendant, key fob, etc. I think it would be a popular item.
Thanks to SFC Snuffy, Horse, Hans, & JustAnotherViking for your positive feedback.
Al (Steamboat)
-
34 minutes ago, Daswulf said:
Making a few ouroboros (snake eating its tail)...
Das, have you considered expanding on that and doing a whole series of other Egyptian or alchemical symbols?
Al (Steamboat)
-
From my own perspective, my current preferences tend to gravitate toward a more finished, detailed appearance, but still possessing enough hand-crafted "character" to differentiate an object from a machine-made, mass-produced item. Another way of putting it is that I appreciate a piece that demonstrates a high level of skill and dedication while still celebrating the maker as an "individual."
By the way, I love the larger Suffolk latch in the first photo. I have a strong historical bias from my history, archaeology, and antique home restoration background, and I've always admired the fine work that smiths have been capable of producing from the dawn of metalworking onward to the present.
That said, there are situational/contextual factors that intervene, and I sometimes find myself admiring simpler, more crudely finished, less-sophisticated objects that tell different, but still compelling stories about the makers and how the objects were made and used, and under what circumstances.
I think that the idea of a "story" behind an object can be important. What can an object tell you about its maker? What can you learn from it? How do you relate to it? What kind of role did/does the object have in someone's life? I think that an object that was turned out quickly and crudely can sometimes be very interesting if I know something about its maker, the maker's intent, and the context of its manufacture.
There are many dimensions to "taste" and those dimensions and their relative priorities are not necessarily static in an individual. When it comes to appreciating the work of others, I find my tastes and interests evolving over time and becoming more complex, less narrow, and, for lack of a better term at this time, less judgmental.
On the other hand, regarding my own personal construction and fabrication projects, I've always had a tendency to "polish" the results and pay a lot of attention to detail, and I fully expect that tendency to carry over into my blacksmithing work as I gradually become more adept at it. That's in keeping with some aspects of my own character, and I like to see my own character reflected in my work. I can look at something I made and say, "Yes, that's a bit of my "self" that I see there."
Thanks for posting this topic, Jennifer. It should get a lot of interesting responses.
Al (Steamboat)
-
Thanks Das.
By the way, I just thought of another minor improvement I might make. I'm thinking about grinding a bevel on the top edges of the tool racks so that when I hang tongs over the edge they'll hang in a more closed position. I'll experiment with that idea on a piece of scrap to see if it's worth bothering with or not.
Al (Steamboat)
-
Thanks, MotoMike and Dax. Sometimes I work from my plans and other times I just kind of design as I go. In this case I had a few basic concepts in mind, but no drawings, and some of the design features were determined by (or inspired by) what I happened to find in the scrap metal bin. As mentioned, I have a few small improvements in mind, which I might implement in the next couple of weeks, as time permits.
Al (Steamboat)
-
Glenn, that's a very good idea and elegantly simple! Thanks!
As a possible alternative, I'm thinking that when I make the planned tray/work surface, I might be able to build a couple of handles into that.
Al (Steamboat)
-
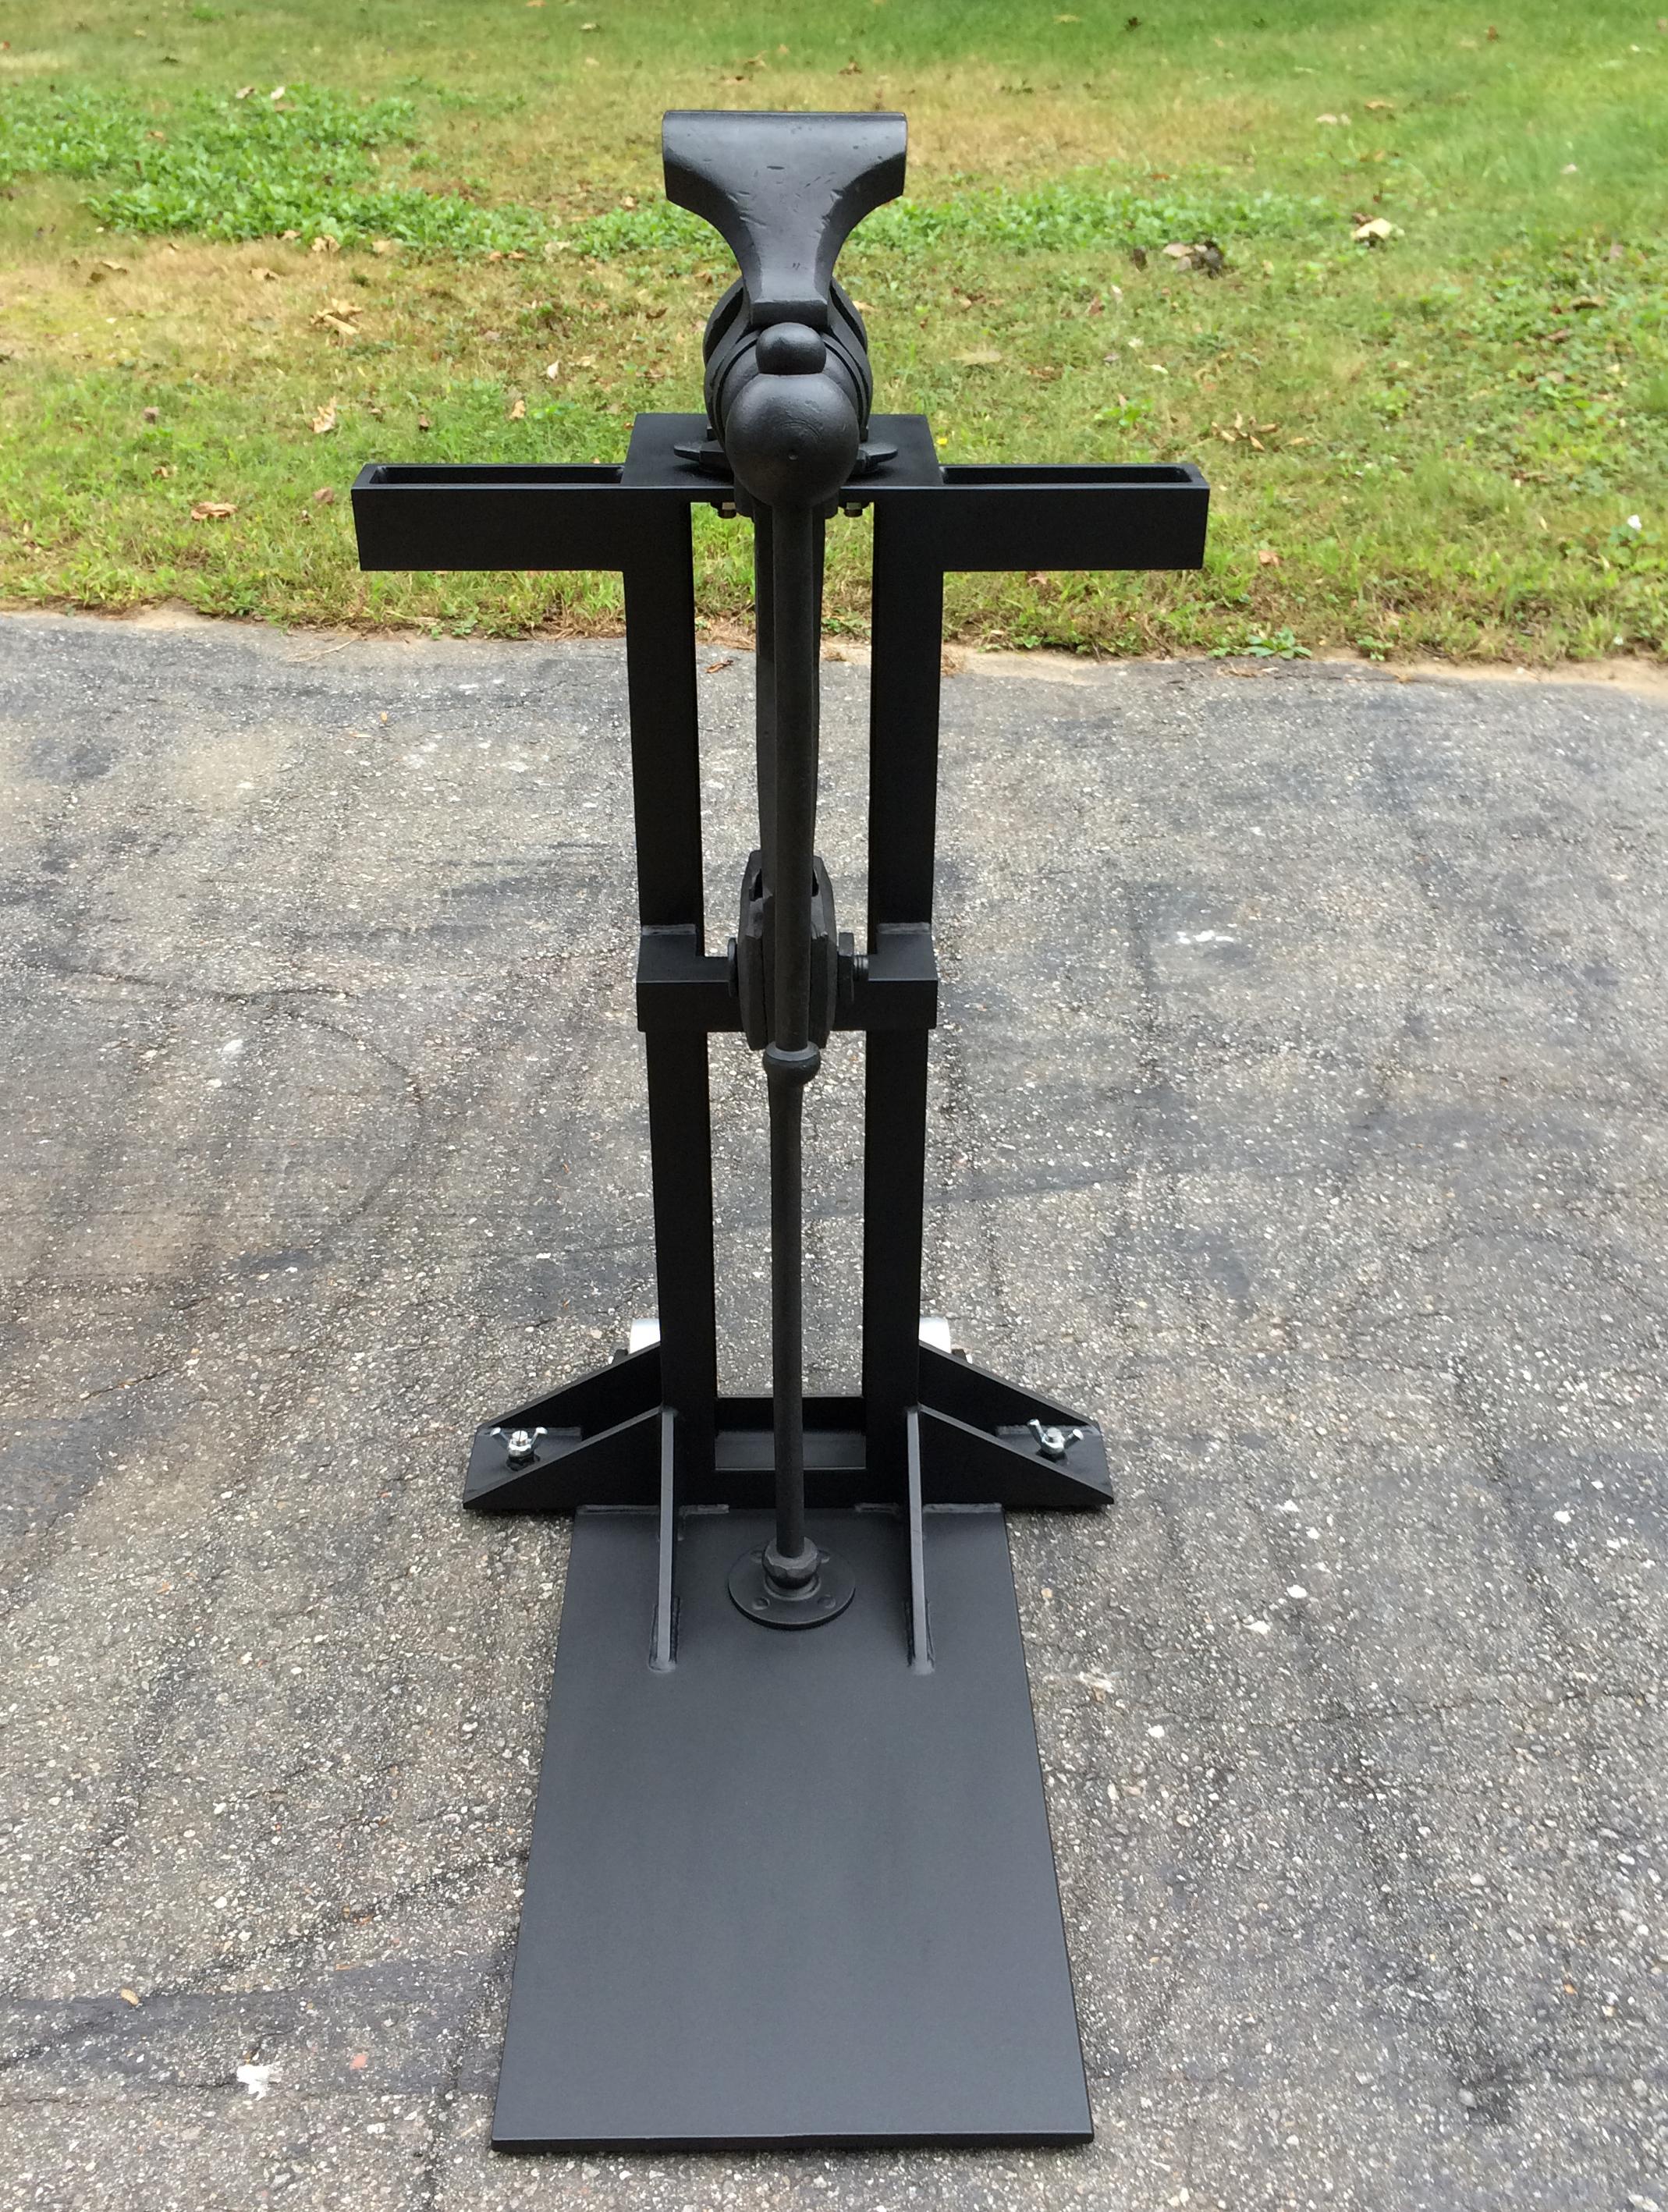
I fabricated a stand for a nice Peter Wright post vise that followed me home a little while ago. Here are the design requirements that I set for myself:
-
I wanted the stand to be portable.
Solution: Add wheels that are mounted just above floor level so that the vise can be tipped back onto them and wheeled around easily. -
I wanted to be able to stand on the base of the stand to contain any forces within the blacksmith-vise-stand triad instead of twisting or tipping the vise/stand.
Solution: Extend the base plate of the vise stand far enough to stand on it. -
I wanted to be able to adjust the stand's base to be stable on an uneven floor.
Solution: Add adjustable-height pads/feet at one end of the stand's base. -
I wanted to support the vise about halfway up to eliminate any "tendency," albeit slight, to bend the vise leg when hammering down on an object in the vise.
Solution: Add a mid-point support bracket to the vise stand. -
I wanted to be able to hang a few tools on the stand.
Solution: Add a couple of tool holder brackets. -
I wanted to have a small work surface/tray next to the vise.
Solution: Add a small two-section tray/work surface to the top of the vise stand (I haven't done this yet, but it's planned).
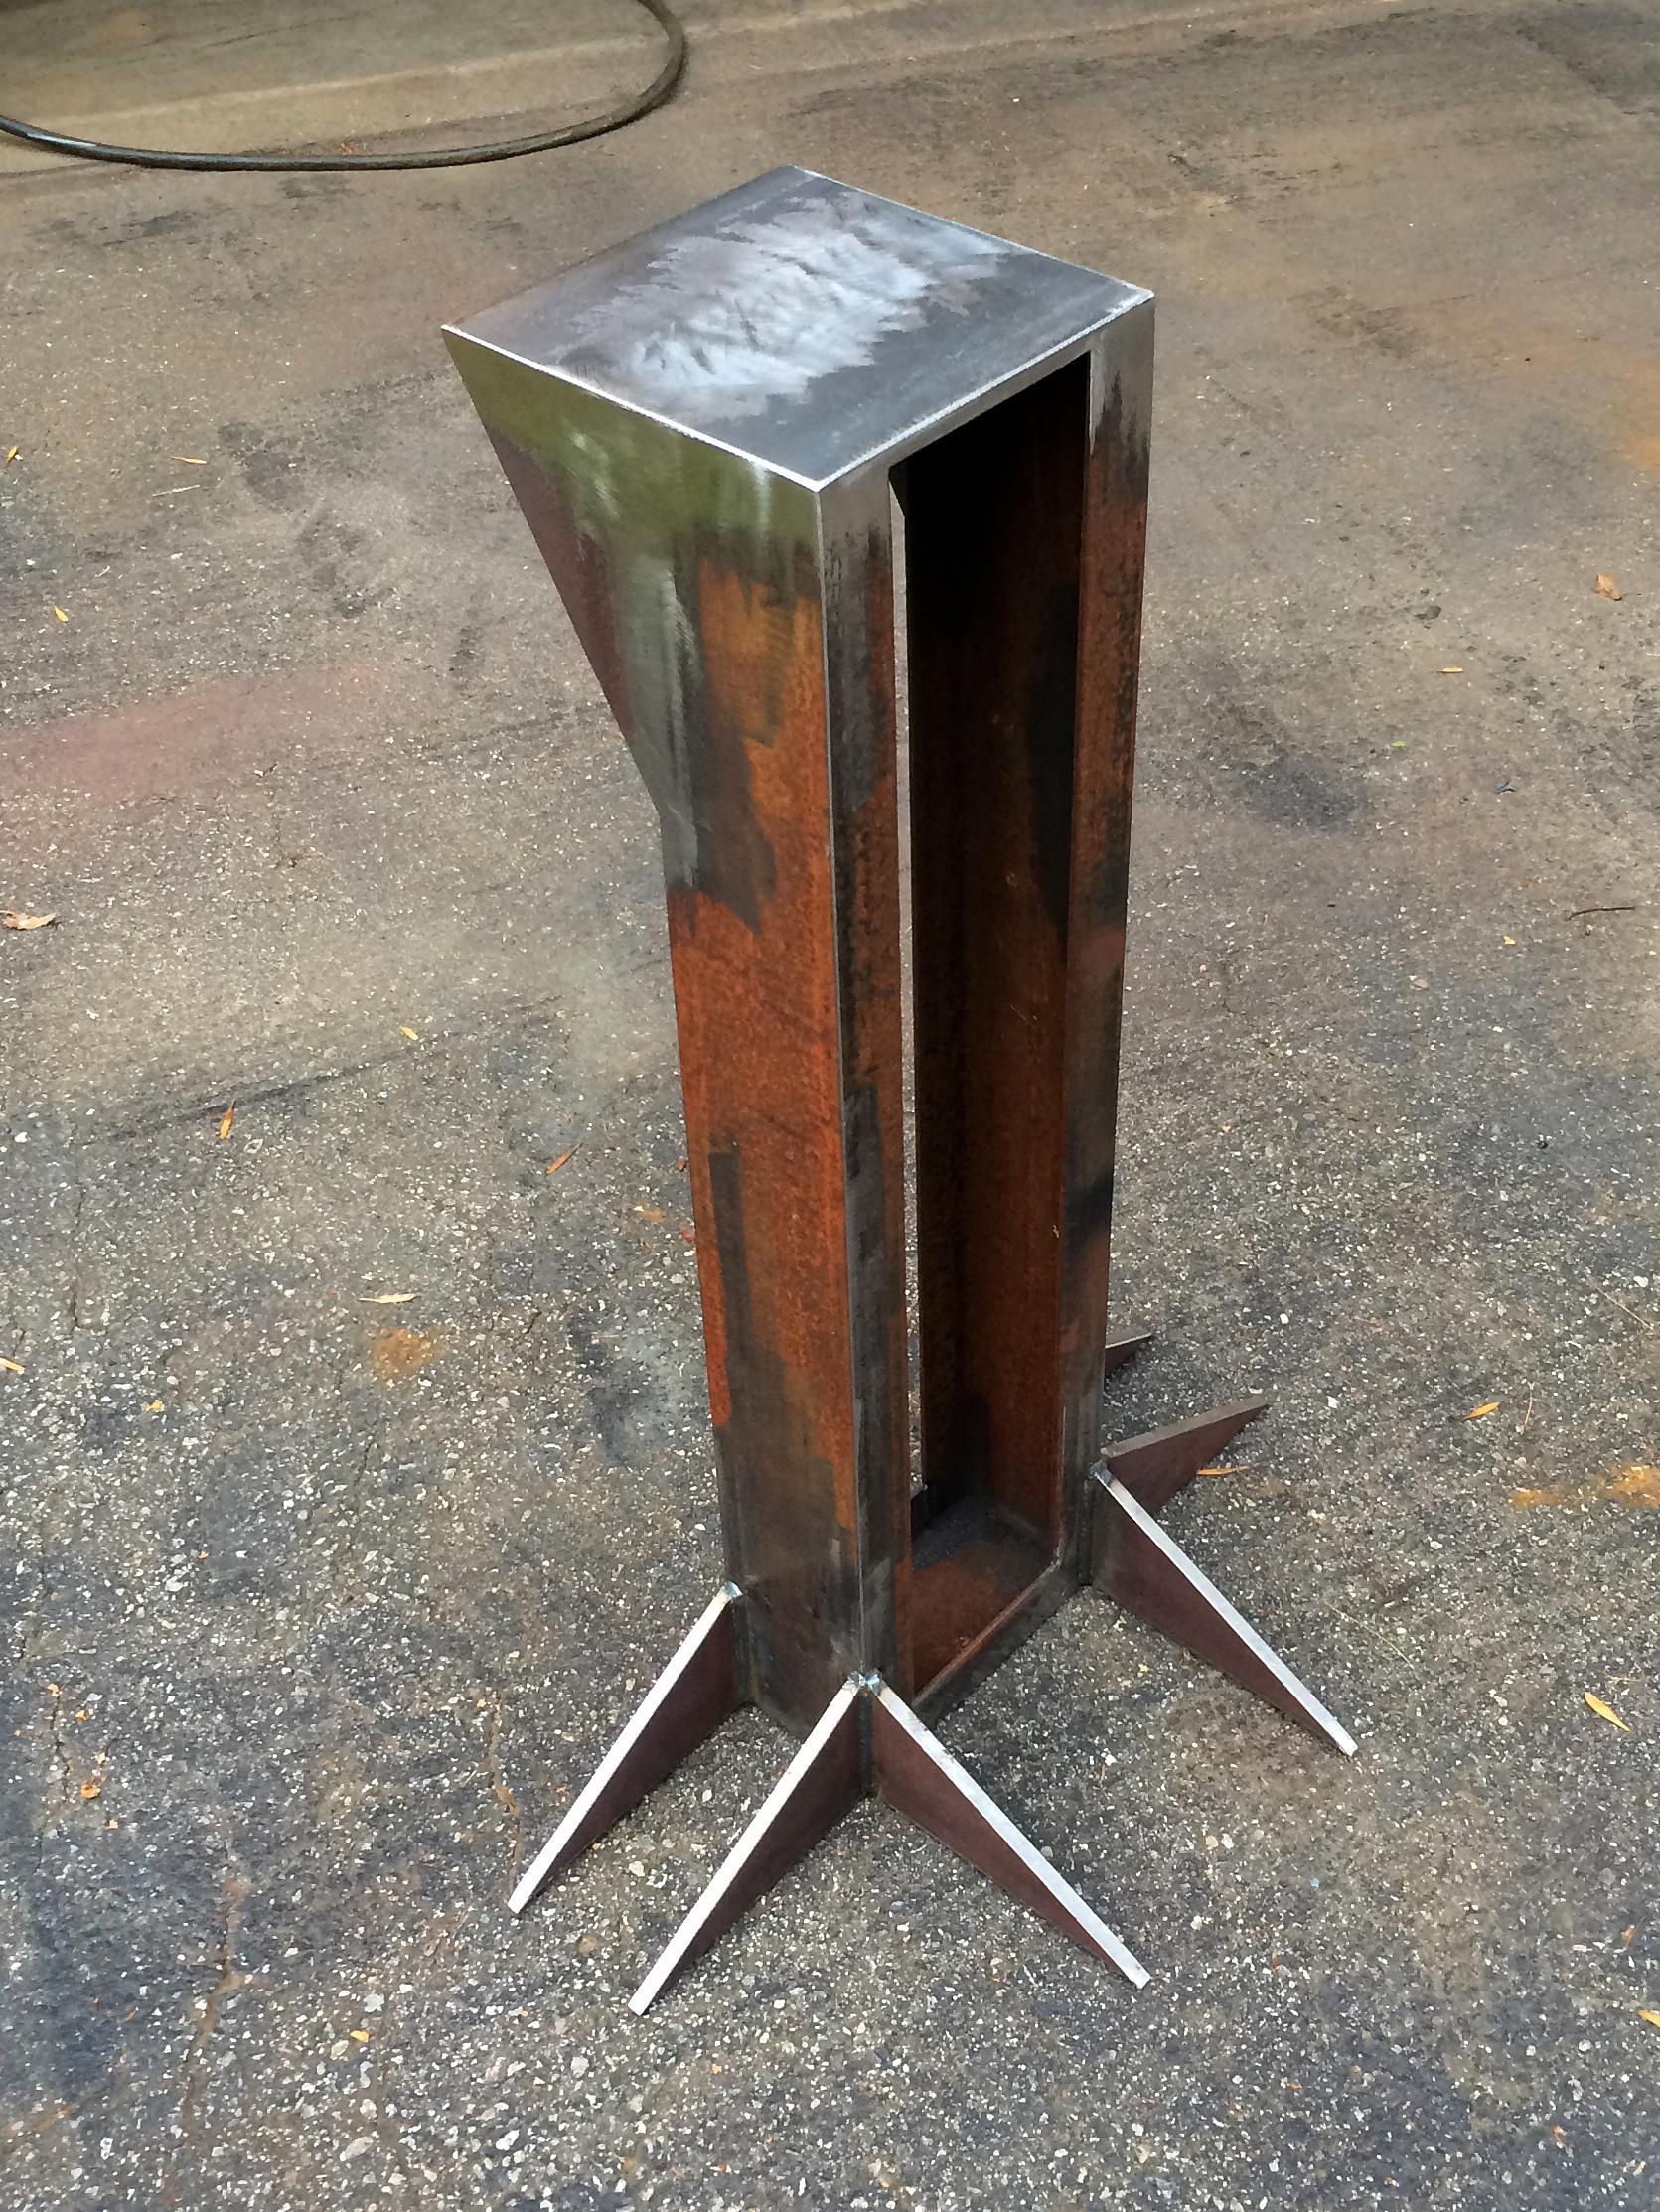
With those requirements in mind, I built this stand on the fly without any blueprint, based largely on what metal I already had on hand. I only had to buy a couple of odd bits of steel and a couple of wheels, so I didn't spend much on it. Here are a couple of photos of the stand as I was fabbing it up.

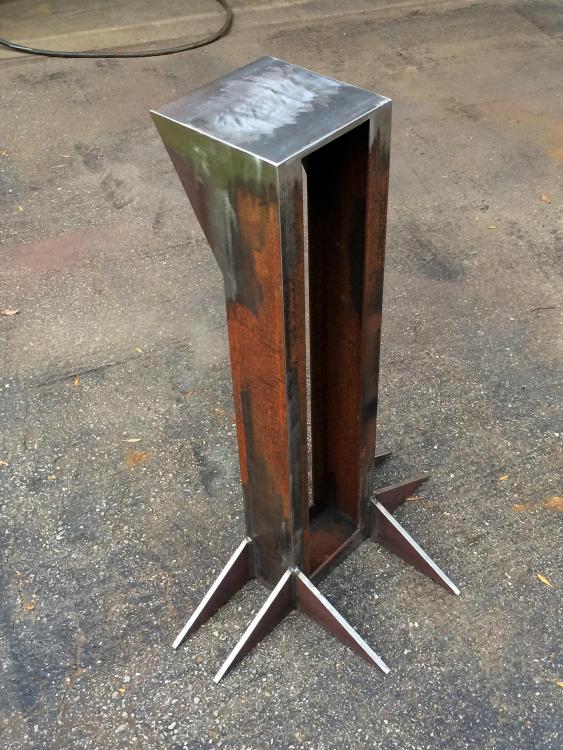
Following is a photo of the stand before I mounted the post vise. The base plate is 3/8" steel plate. The socket to receive the bottom end of the post vise leg is a 1/4"-thick steel disc with a piece of steel tube welded onto it (it is NOT a floor flange). I figured that the steel disc would distribute the impact forces from the bottom of the post vise leg over a larger area and make it a bit more solid.
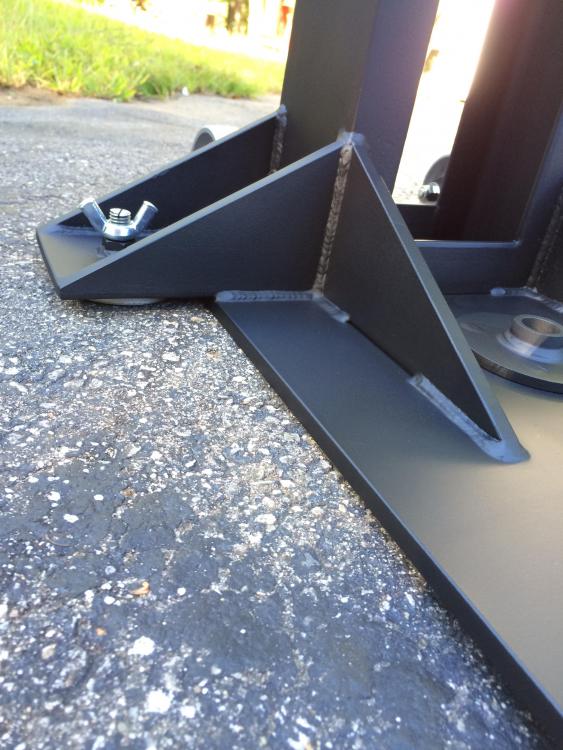
The next photo shows one of the adjustable-height pads. I use a screwdriver (note the slot at the top of the stud) to adjust the height of the pad, then lock the setting with the wing nut. I might eventually add a knurled knob at the top of each stud, since it would be more convenient than using a screwdriver to adjust the height.
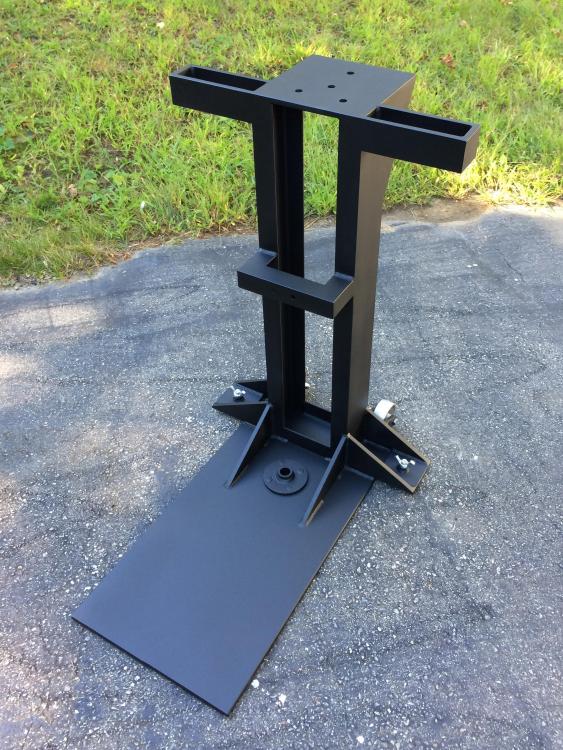
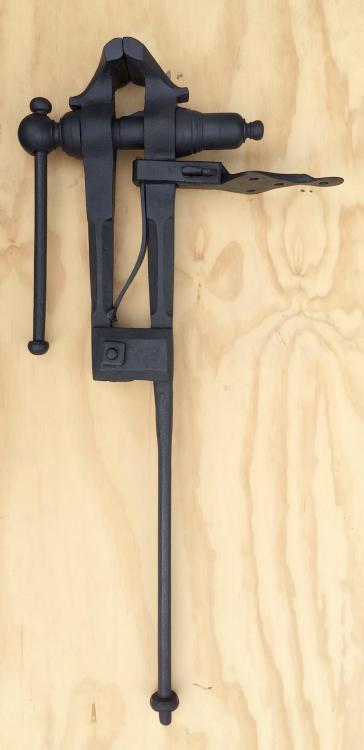
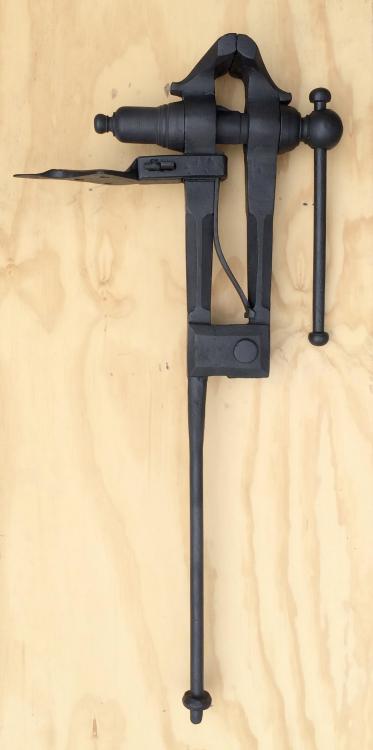
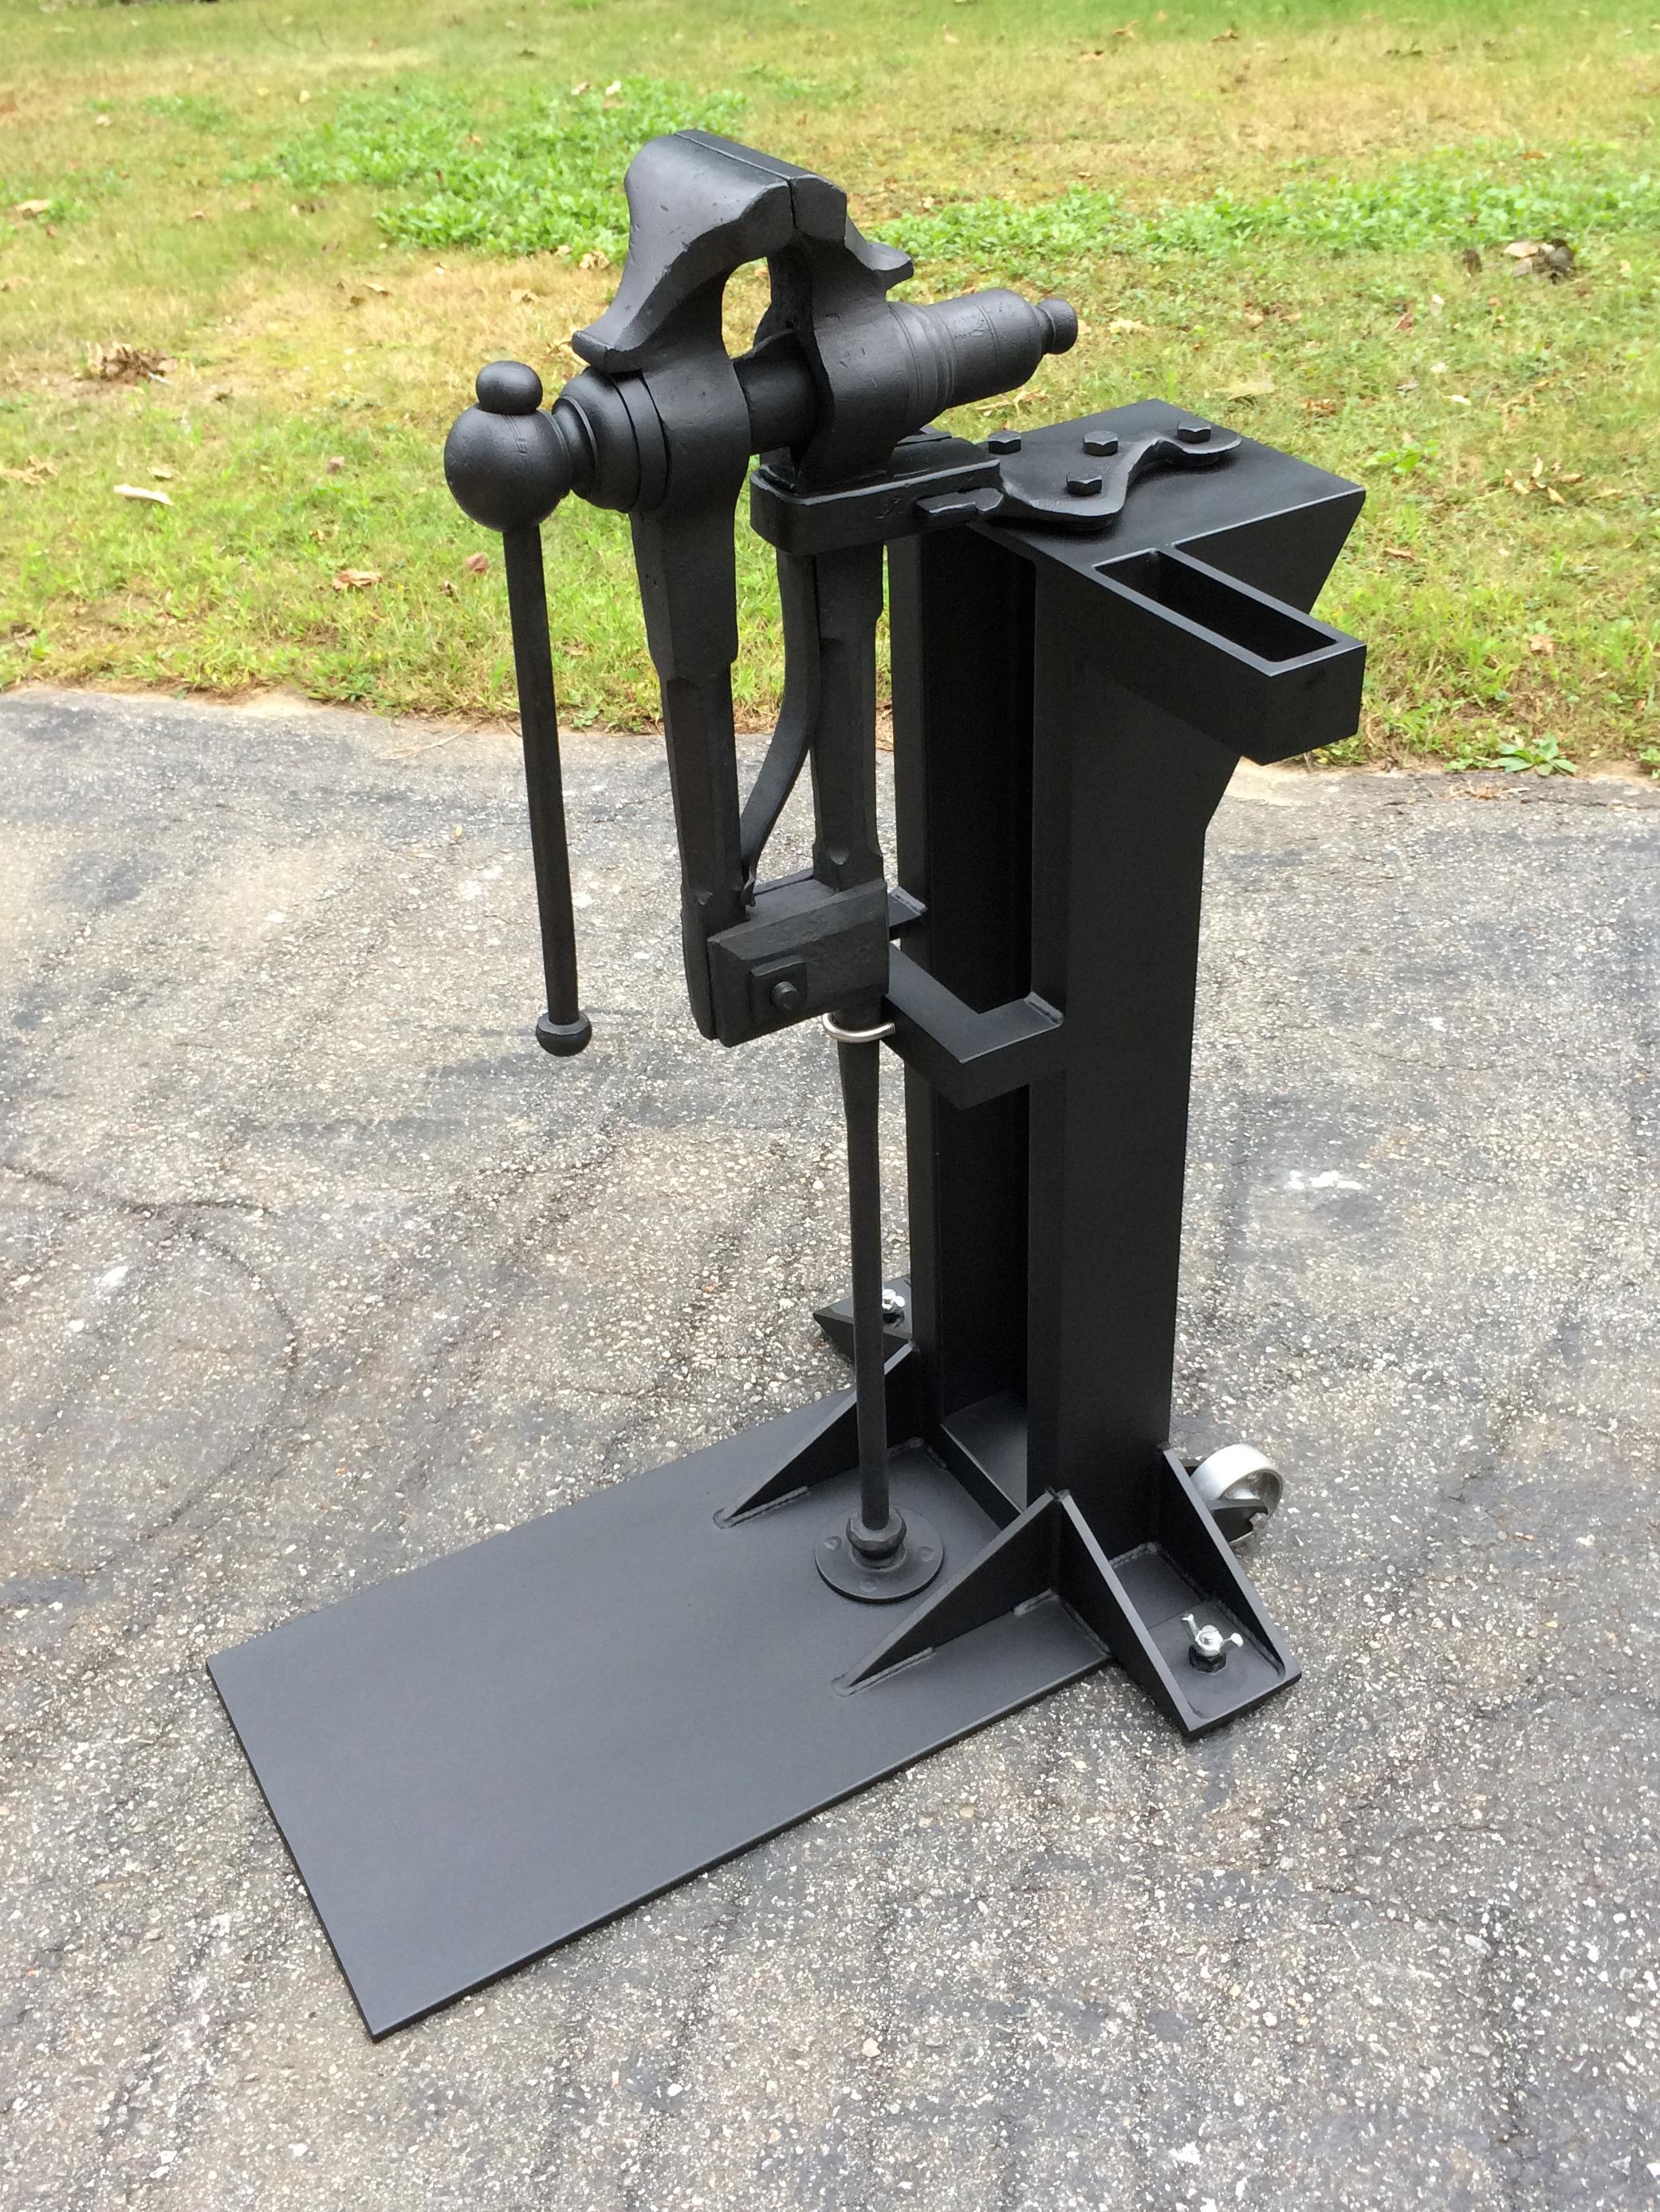
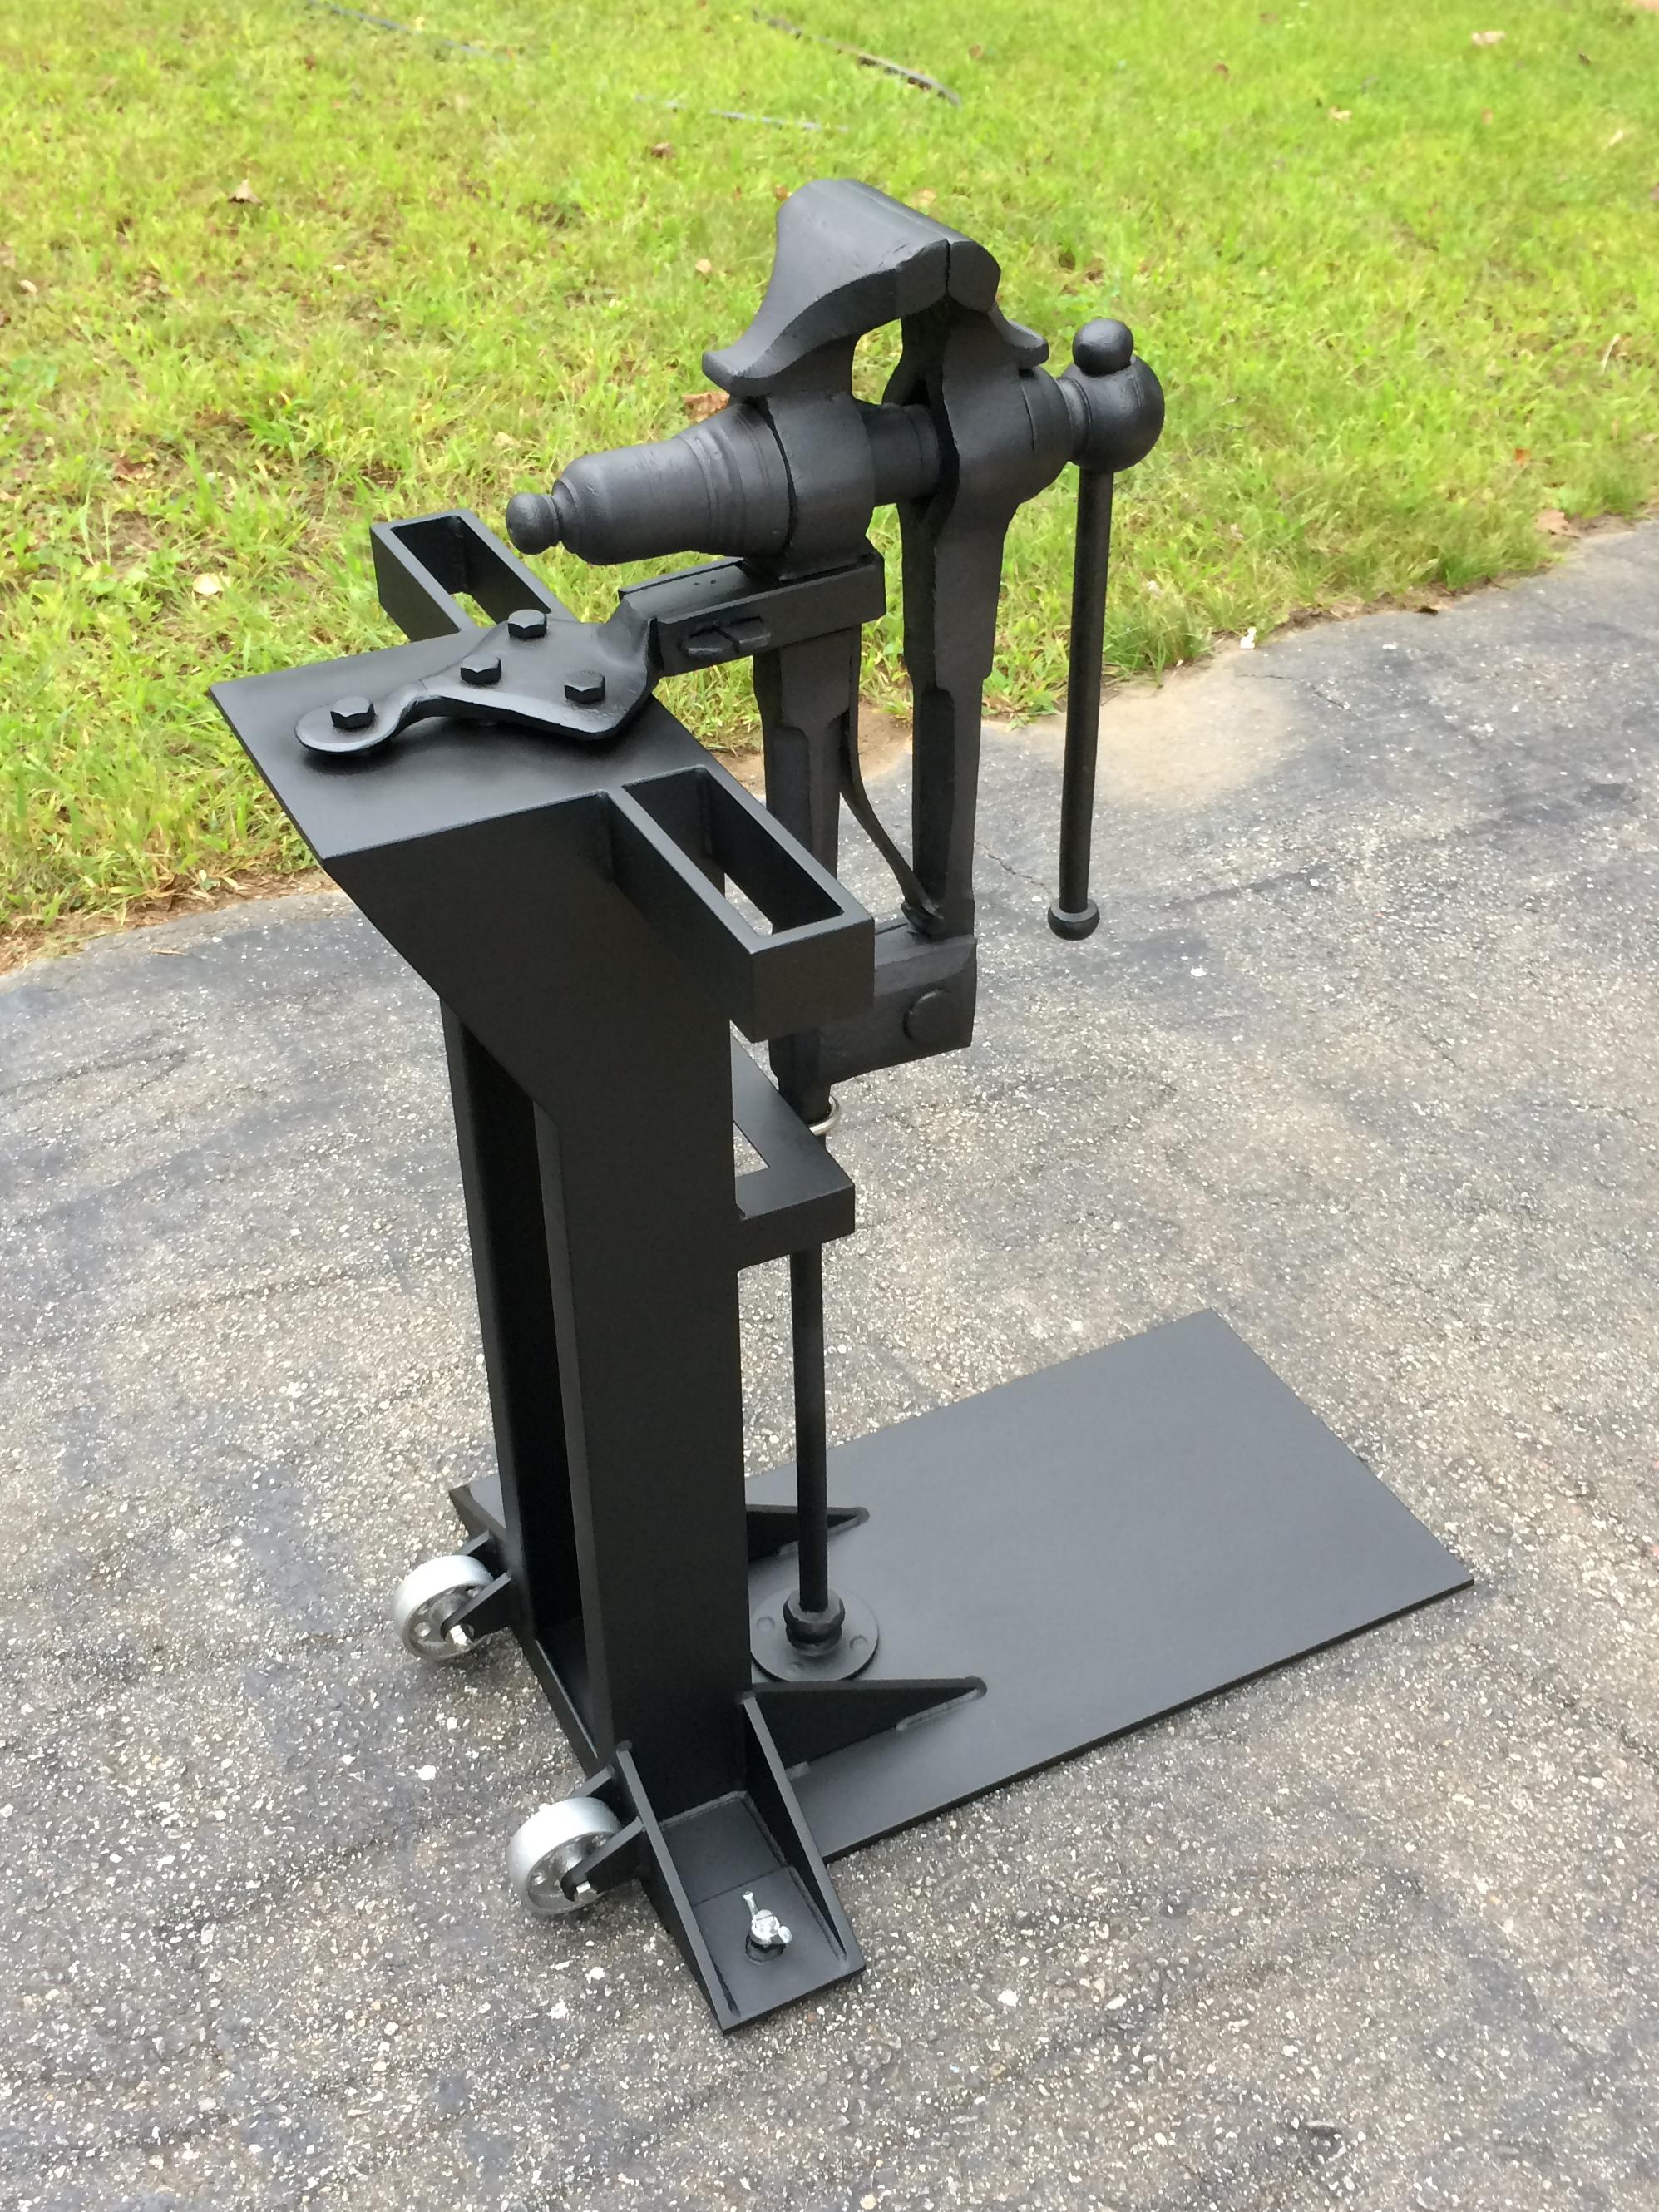
The following three photos show different views of the stand with the vise mounted on it.
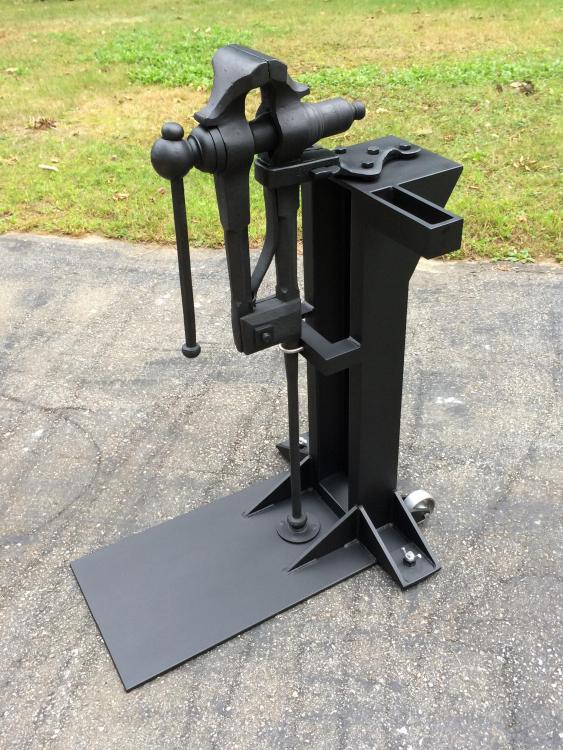

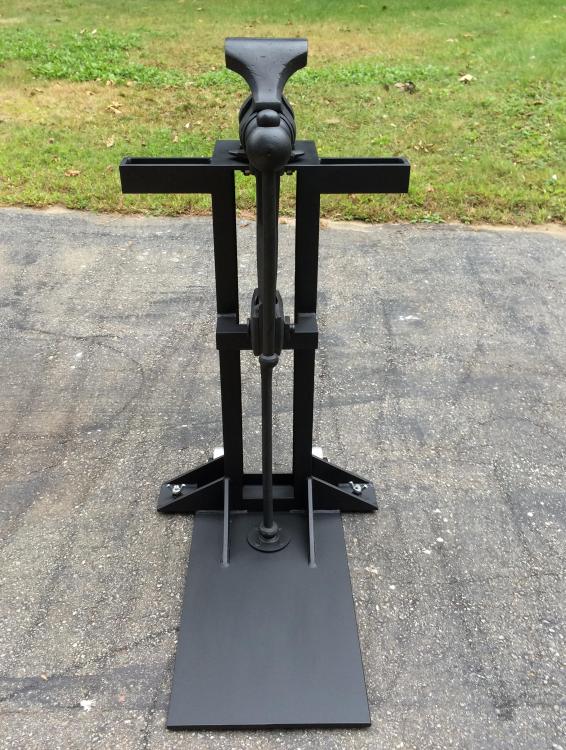
So far, so good. It's easy to move around and very stable, especially when I'm standing on the base.
Planned improvements: As mentioned above, I want to add a small, two-section, 3/8"-thick work surface/tray at the top, which would eliminate the 3/8" spacers between the vise mounting bracket and the top of the stand. I might also weld an extension onto the base to give me a little more area to stand on while using the vise.
Any thoughts?
Al (Steamboat)
-
I wanted the stand to be portable.
-
9 hours ago, Daswulf said:
Certainly is a nice one Al. Thats a good price for it and a great price for a tool that will last past your lifetime.
Thanks, Das. I suspect that I won't be the one to wear it out, even though I plan to put some mileage on it.
9 hours ago, JHCC said:I think I saw that vise when I was at Liberty Tool myself, but I knew it wouldn’t fit in my luggage. Glad it made its way to a good home.
I try to get over to Liberty Tool two or three times a year. You never know what kinds of goodies came in with the latest shipment, and their prices are generally reasonable. There are a few other places that I like to include in that road trip, some of which usually have old tools. The Treasures and Trash Barn in Searsport is definitely worth a look.
Al (Steamboat)
-
Irondragon, your point is well taken, interesting, and definitely worthy of consideration and further research! Here's my own spin on it (so far): Over the decades that I've spent working with tools and machines (I'm in my sixties now), I haven't arrived at any clear-cut answer. As far as the screws on most of my own machinist or woodworking vises go, I've always used a brush to apply a moderately thin film of grease containing EP additives, and for the past 30 years or so, I've been using synthetic EP greases. I've had excellent results and haven't (yet) seen any reason to change my approach, as it appears that the vise screws should continue to look great after many more decades of use. That doesn't mean that I'm not open to new information. If I see some compelling data that would favor using oil over grease for vise screws, I'd make the switch. I'm always learning new things.
The amount of debris collected by a lubricant on open vise threads could depend on so many factors that I don't even pretend to know or understand a fraction of them. The relative volume of lubricant, the relative adhesiveness of the lubricant, the depth of the lubricant, debris contact angles, surface tension, capillary action, how wettable the debris is by the lubricant, etc., etc.
As a rather non-scientific observation, I've seen some insects land on a greased surface and then fly away, whereas I've seen some land on oil and get trapped immediately. There are lots of variables and physical processes involved, so I don't think that thicker lubricant necessarily equates to stickier lubricant when it comes to trapping debris.
For sliding surfaces like the threads of a vise screw, I think that either oil or grease should work well. My current non-expert opinion is that it's important to have good EP and boundary lubricity additives in the lubricant that will remain in place and continue to provide protection as long as possible. After all, dirt isn't the only thing that wears out sliding surfaces. In many cases, such as threads that slide past each other under high pressure, galling can potentially be the prime enemy of longevity, with some metals being more prone to it than others, and I believe that EP/lubricity additives are a good defense against galling.
Just my non-expert two-cents' worth.
Al (Steamboat)
-
Thanks, MotoMike. The faces of the jaws are still nice and flat and meet square with each other. I gave this a pretty good going over before I bought it, since I didn't want any surprises after I got it home.
Al (Steamboat)
-
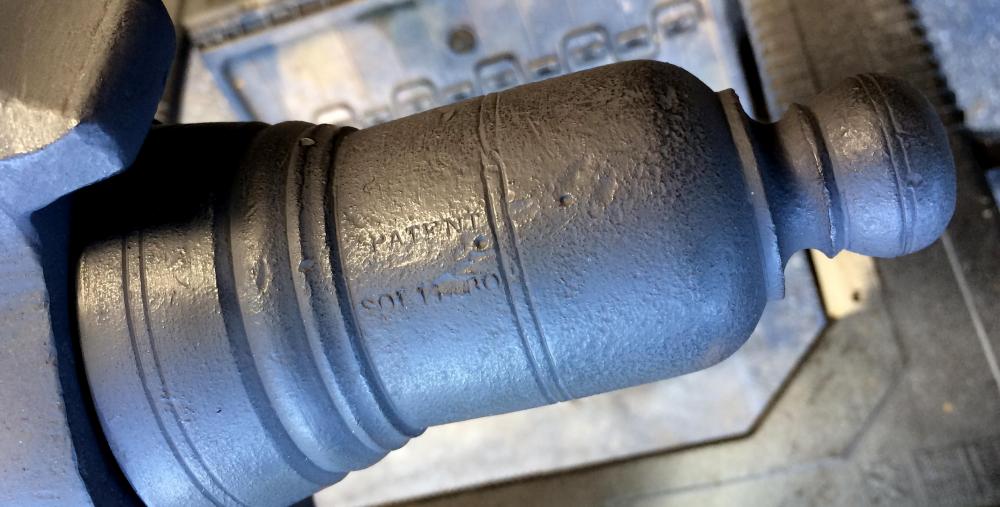
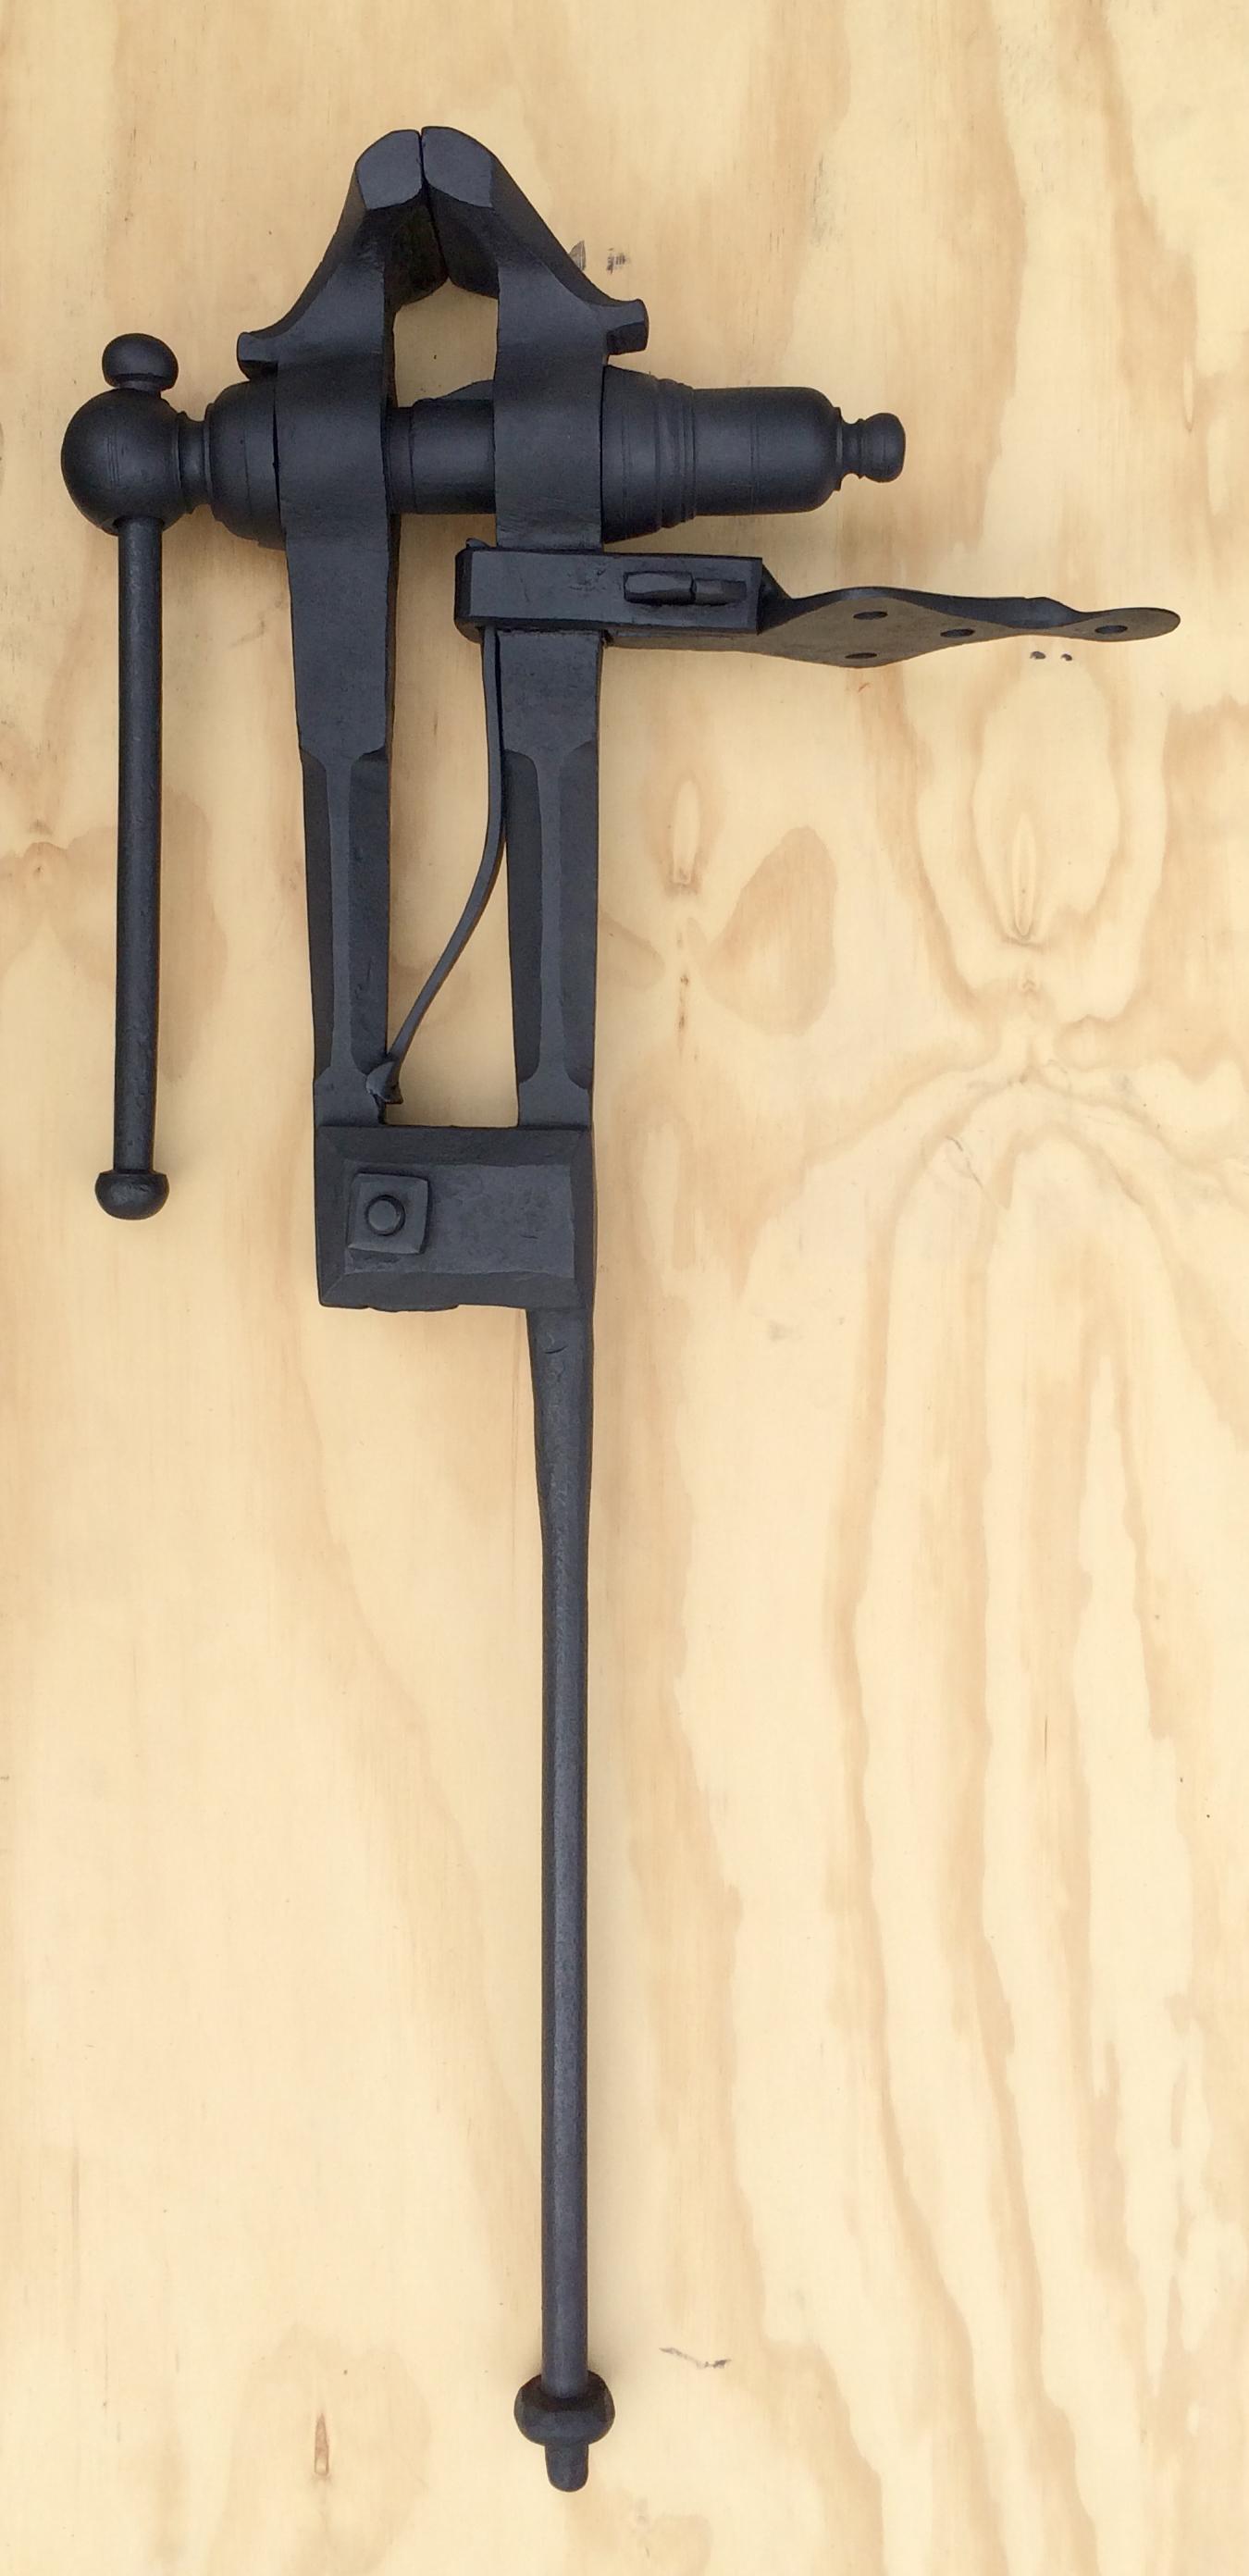
This Peter Wright post vise followed me home earlier in the Maine "tool season," but I'm just now getting around to doing something with it.
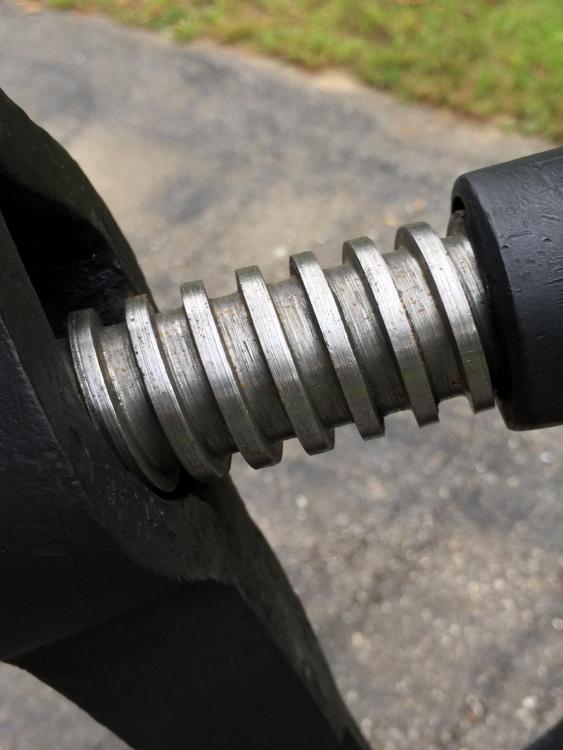
The jaws are 4-3/4" wide and it weighs 55 lbs. There are no signs of damage or repair work, all of the parts are there, the jaws align well, the jaw mating surfaces still have visible cross-hatching, there was no deep rust on the vise, and the screw and box threads are in excellent condition. I took it apart, cleaned it, and correctly aligned the original hand-forged pivot bolt, which is keyed to go in a specific position. The operation is smooth, and the wedges for the mounting bracket fit well. The photo of the threads below shows them without lubricant for clarity. I'm planning to use an extreme-pressure grease on the threads.
You can still read parts of the words "PATENT" and "SOLID BOX" and there is still just a trace of "PETER WRIGHT" visible on one of the jaws.
I'm just about done fabricating a stand for the vise, which I plan to post on IFI in the next day or two.
I paid $165 USD for this vise at Liberty Tool Company, in Liberty, ME, which I thought was a very reasonable price.
Al (Steamboat)


Newbie post leg vise question
in Vises
Posted
I just thought I'd clarify what I said. The jaws on my Peter Wright vise, which I think are cast steel, do appear to be separate pieces of metal but they are permanent parts of the vise, either forge welded on or possibly cast in place. I'll have to take a closer look.
I also think that a portable vise is a very nice thing to have, especially for someone like me with very limited shop space, since I need to move my equipment around a lot. I opted for casters for moving my vise stand around, but a round base would also work. The casters that I installed don't contact the floor until you tip the stand back, so they don't interfere with stability. I also made the base large enough to stand on. Here's my post about it: https://www.iforgeiron.com/topic/49549-what-did-you-do-in-the-shop-today/?page=206&tab=comments#comment-616374
Al (Steamboat)