

jlpservicesinc
-
Posts
5,761 -
Joined
-
Last visited
Content Type
Profiles
Forums
Articles
Gallery
Downloads
Events
Posts posted by jlpservicesinc
-
-
Found the product sheet.
![20240204_140855[1].jpg](https://www.iforgeiron.com/uploads/monthly_2024_02/20240204_1408551.thumb.jpg.2dd4e4f7aa6e6b9591712196d499f479.jpg)
-
Coming along nicely. Last we spoke it was still conceptual so it's great seeing it come to life.
Photos of the failed hinge you originally mentioned would be great too.
I'm a visual creature. I think most Blacksmiths are so seeing things is soo much better than reading a description.
-
gewoon IK, Hows about some photos.. I know your have been working on some projects.. Be great to see them and how your doing..
")
Shaina nice twists. Your pig tail scrolls are getting better too..
-
Pretty nice.. but aren't you missing a piece? The part that acts to keep the bar against the door.. Also known as a staple or bar keeper..
-
Thanks George.. Very kind of you and much appreciated.. First day forging again after nearly lopping off the right hand.. Felt really good swinging the hammer mentally.. But had to really pay attention to how each swing felt and the level of power and angle.
Latticino It will be a custom stainless steel double-layer affair.. Will have the inner flue and then the outer collar.. I'm going with 12" sq single wall for the flue/stack.
I've measured the temperatures of the stack and I can't find anything over 210F on the forge in the trailer even with really heavy wrought iron hammer forging/welding. There is enough air volume going up the stack..
I have started collecting 12" double wall stainless steel commercial (metalbesto) but don't see the need other than what the rule book reads as for "Coal heating appliance".. in the code book..
A forge is "not" a heating appliance.. Meaning or pertaining to the "heating of the building"..
So I'll make the thimble, get everything hooked up and then call in the fire chief to talk about it..
The thimble I'm making will accept the metalbesto pipe soooooooooo.....
If you have information pertaining to open coal forges and code I'm all ears.. I looked for 5hrs trying to chase down anything I could and even reached out to an old guy who was around in the 80s doing code.. He said there are "no regs" on coal fired open forges.. And since they are not used for heating a space the current codes do not apply as a "heating appliance".. LOL.. We know what that means.. LOL.. NOTHING...
The thimble will be fitted on the diagonal vs square to square (chimney/building) this will allow it to divert the water and snow on a sharp uphill leading edge.. I'll also make some Sharks fins (aka crickets) to also split the snow when it starts to slide..
The thimble will have a rather large thick wide flange on top that will rest on the roof and be sealed with calk being screwed thru the roof and into the subframe.. Over this will be a Dektite silicone conformal seal .
The inside portion will just have a sleeve that fits inside the secondary down tube..
What is not being said, is the opening will have to be framed in with the same metal Z and C channel that the building is made from..
The only 2 places that are structurally easy, are the very peak and then about 4" in from the bottom of the eves.
This will have to be completely framed in with the Z and C of the original building so all of it will be steel.
Frosty 4/12 pitch The original design was 2/12.. But told them 4/12 minimum.
-
Great suggestions.
George, everyone should evaluate what and where they are comfortable. And take the needed precautions.
My experience with outside help/professionals is lack luster.
As a male you don't get the same "positive reinforcement" from other male trades professionals. This is a sarcastic statement just in case it was missed.
No one will do as good as job as I will and exactly as I want it. Most people especially professionals work a certain way and won't do anything outside their narrow window.
I have the manlift so this is a huge game changer.
Owning your own manlift and having some common sense as to capabilities gives a freedom few can or will ever experience.
All the roof penetrations will be custom fabricated thimbles with the snow and corrugated roof panels in mind.
-
Thanks George, If I can pull it off I'm hoping late spring.. Of course between here and there is some time.. Nearly lopped my hand off the last big snow storm.. So that put me out of commission for a while.
The siding is next, then smoke stacks.. Then finish the wiring for the blacksmith side of the school..
I'll have to take a weekend to organize the equipment on the blacksmithing side to arrange the workstations.. I have a pretty good idea of where things are going, but it's always better to finalize layout.. Once the holes go thru the roof, it's a huge problem if there is a problem.
Not going thru side wall for stacks because of the snow loads.
-
Big day today.. All the light switches work the way they are supposed to..
Wow, is all I can say.. It's been a long road getting here..
I can now move on to the inside siding to finish the electrical installation. -
Carl is a great smith.. He's even more pedagogical than I am, if that's possible..
-
Frosty, The school is between 60-65F everyday in the winter.. Just warm enough to be jacketless when working but not so cold you want to go into the warm..
Especially when it's below 30F.. It feels extravagant.For working in the trailer, which is still my main forging shop, I use a diesel fired indirect heater.. So no smoke, just heat..
This warms the little trailer up in about 15mins to be in a Tshirt. -
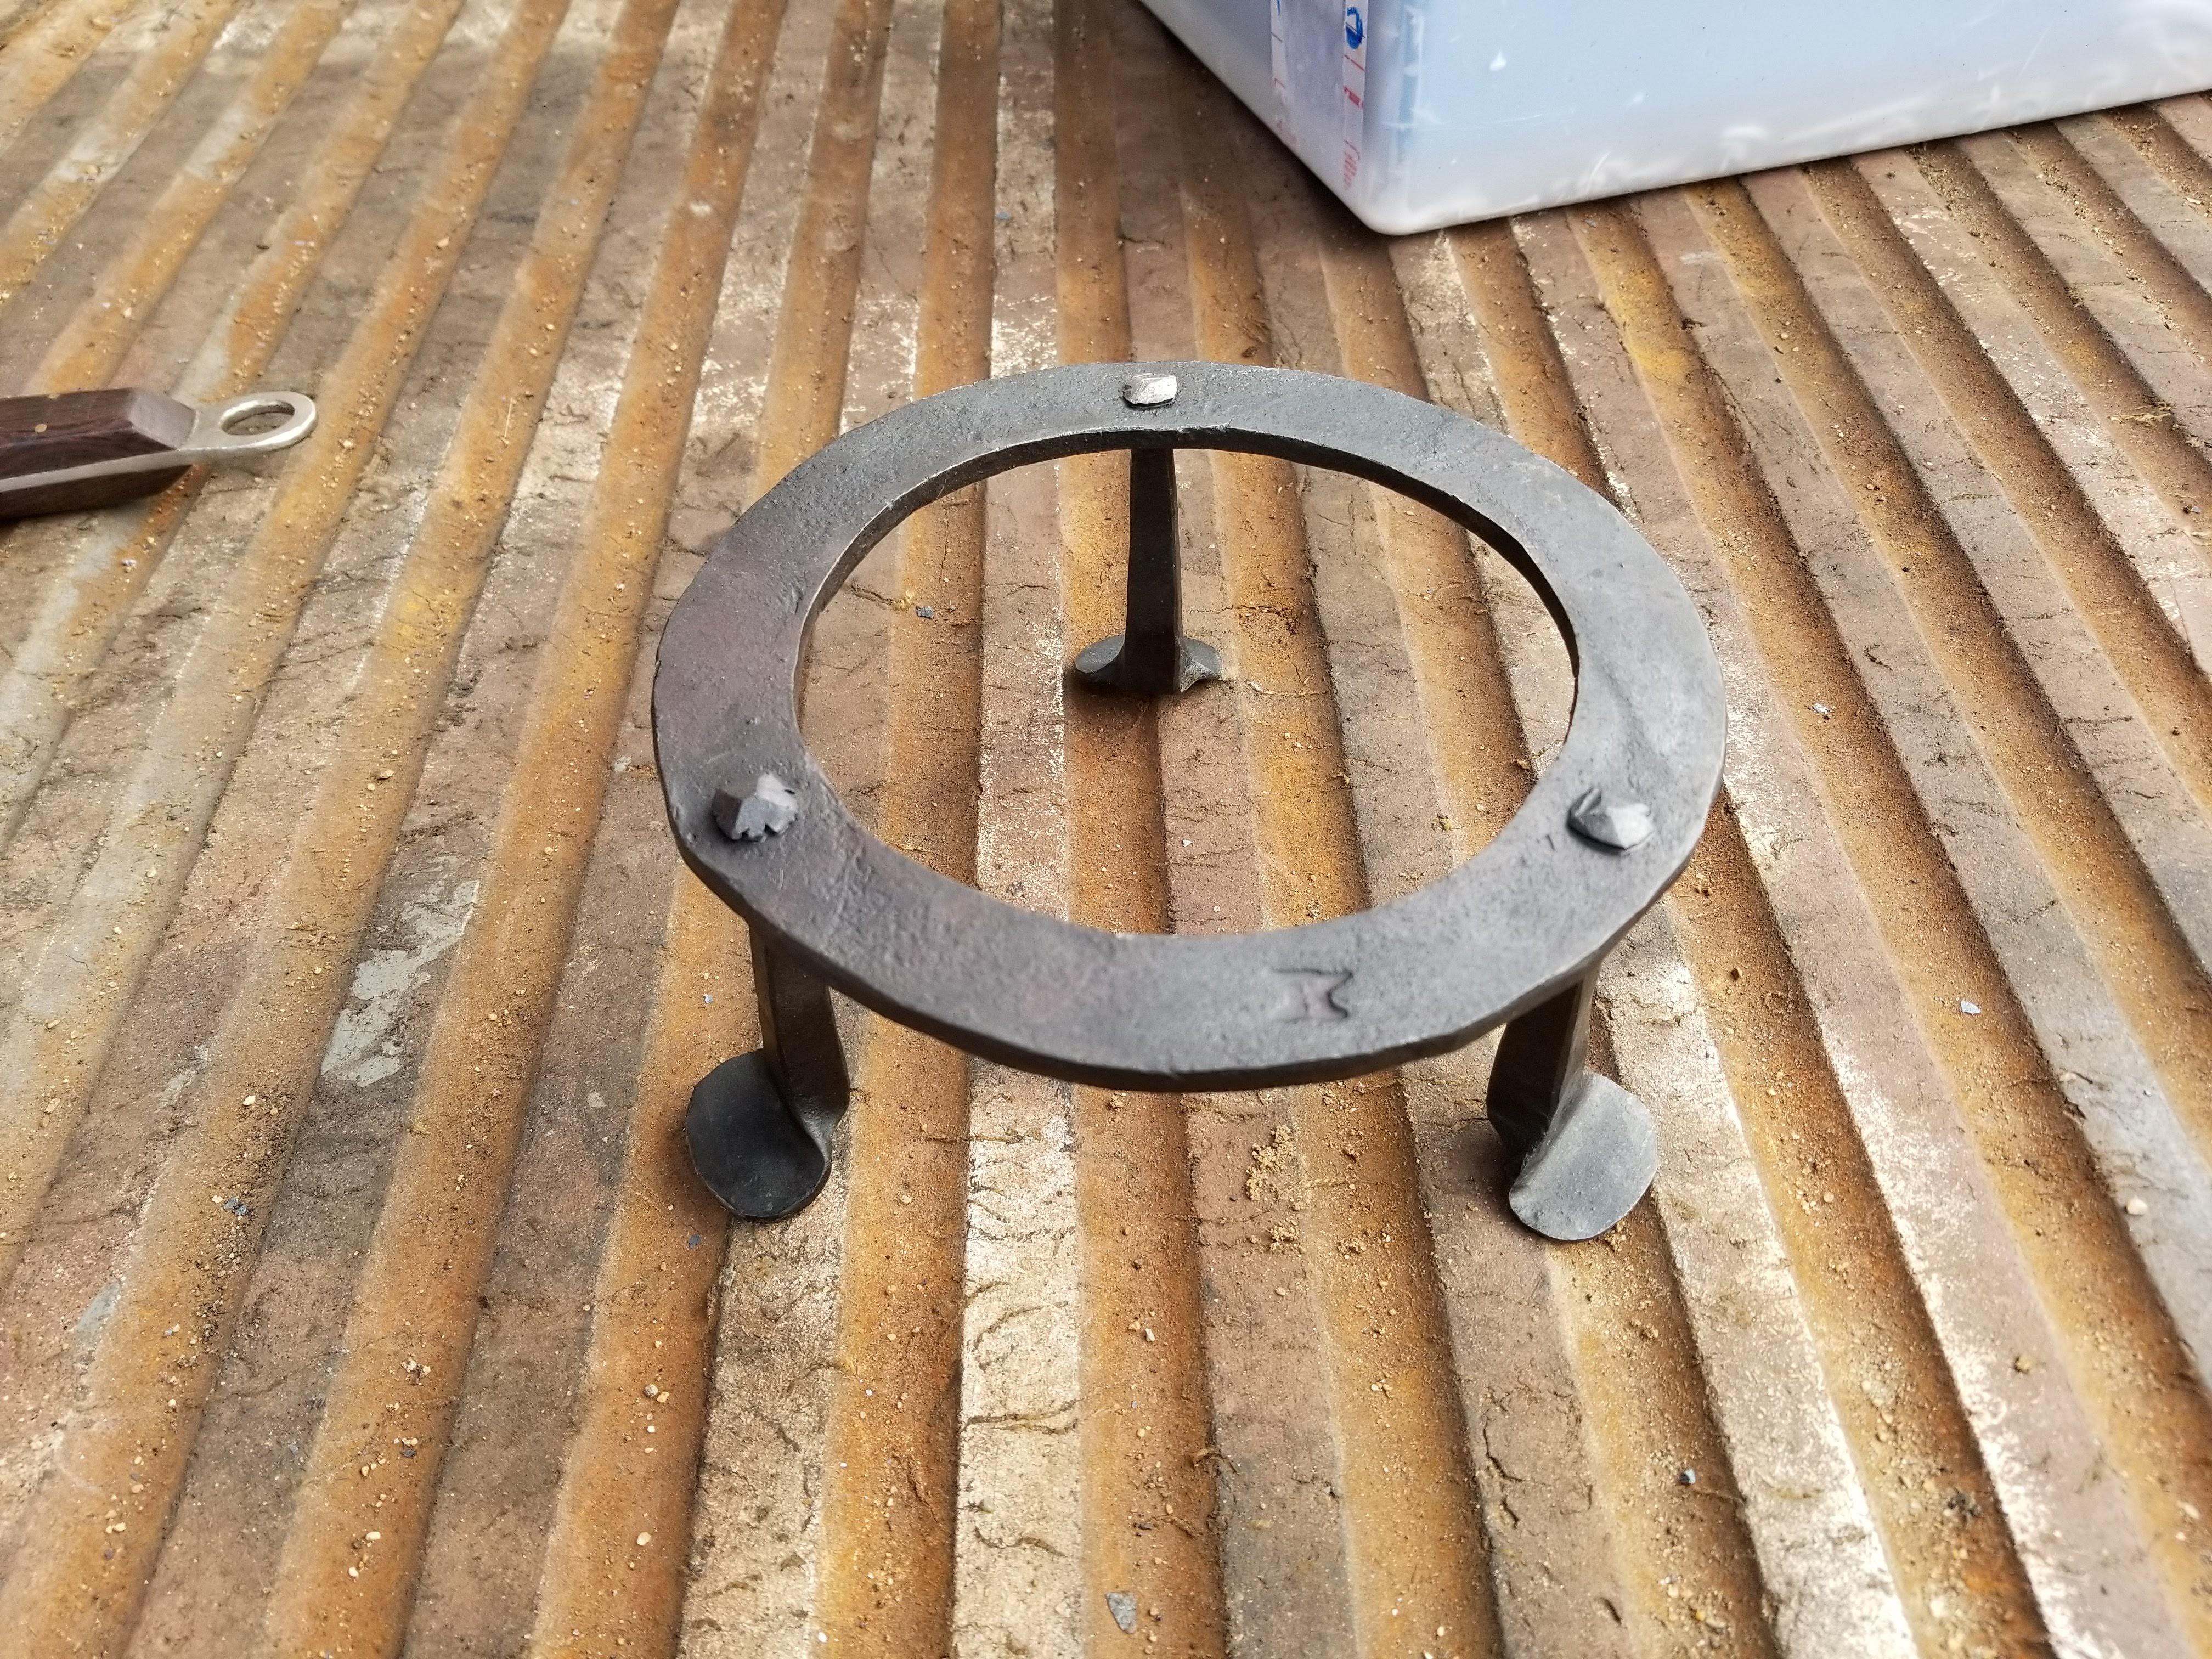
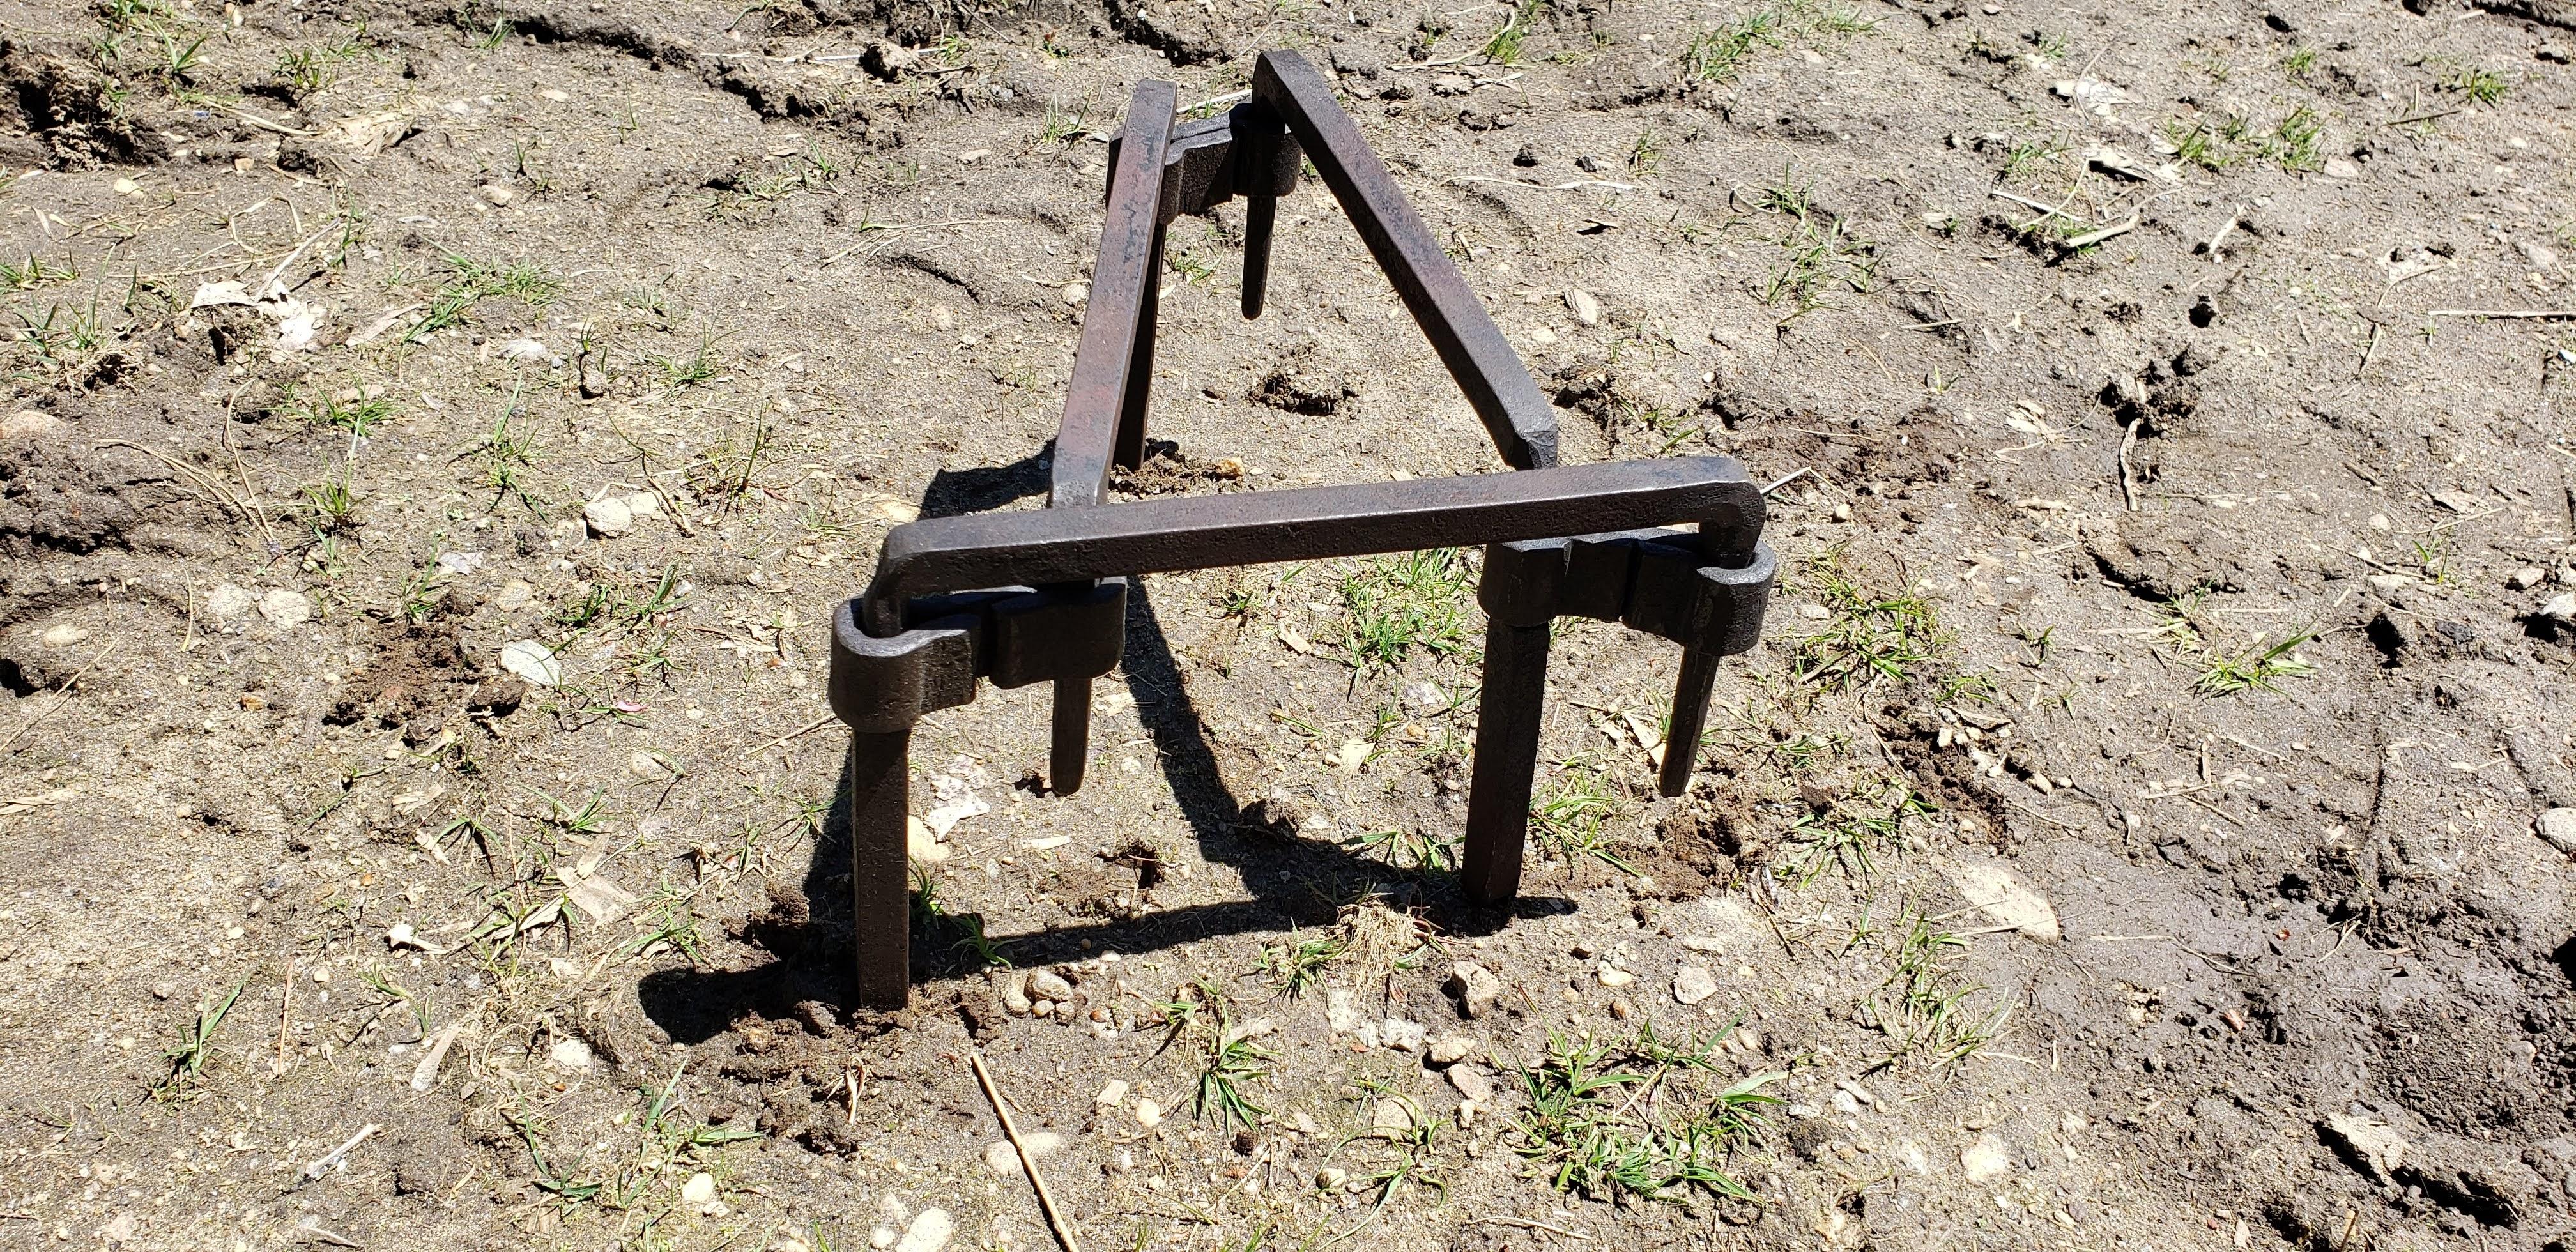
Frosty the folding up one is the item.. It was supposed to be for a bon fire type of deal. Large pot..
Anyhow.. Make what ever you want.. Be great to see what you come up with. -
Frosty please do design something.
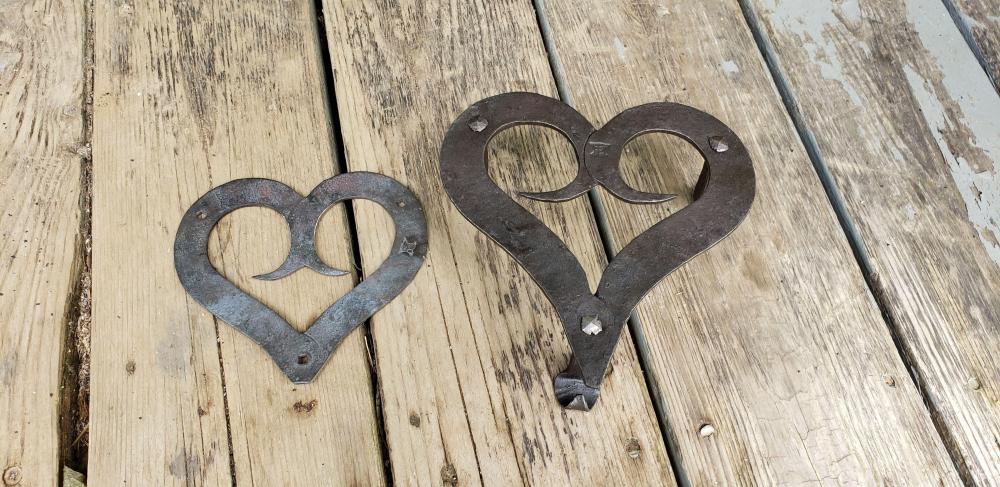
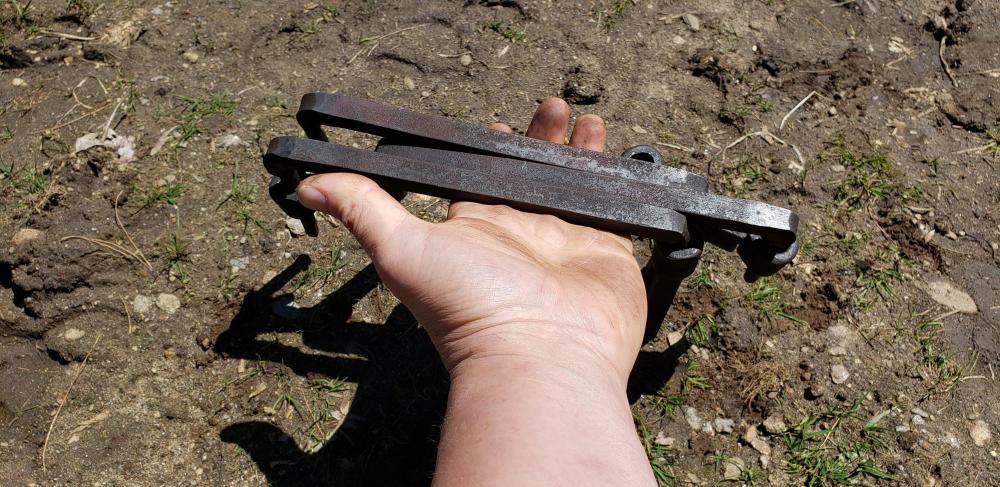
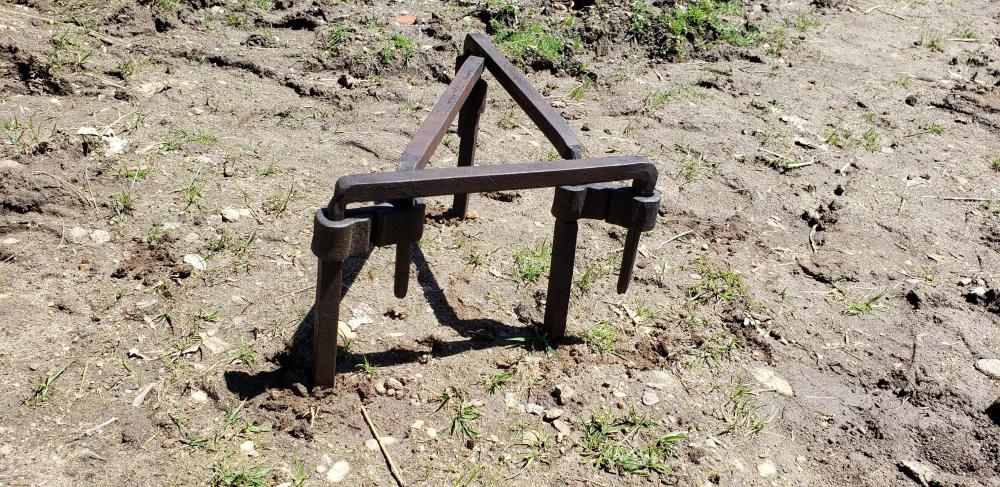
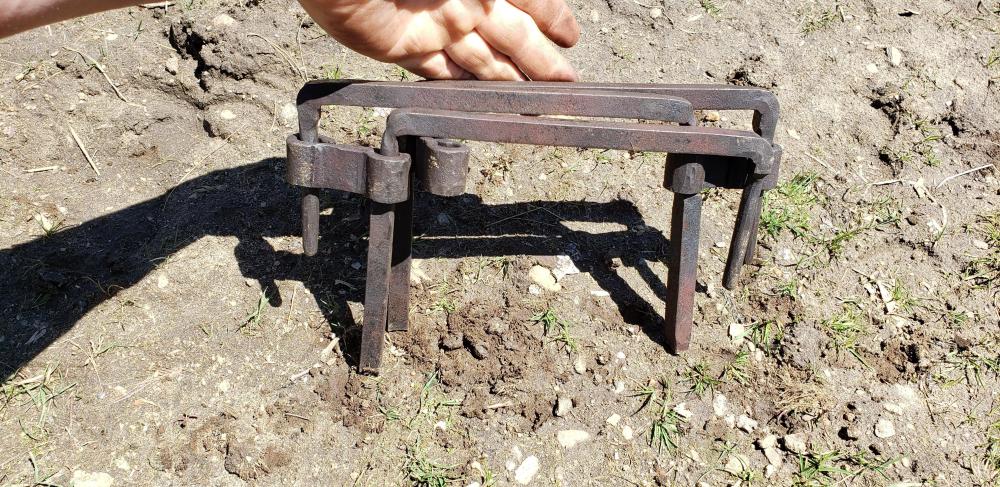
The caveat to the folding trivet I made was the person was complaining they could not forge weld so most options with traditional designs were off the table.
The design I came up with is sectional and adjustable and comes apart completely.
It can also be made larger with more sections though I don't see a need.
This model adjusts from about 3" to 12".
The only change of design would be some feet on the bottom for use on frozen ground.


-
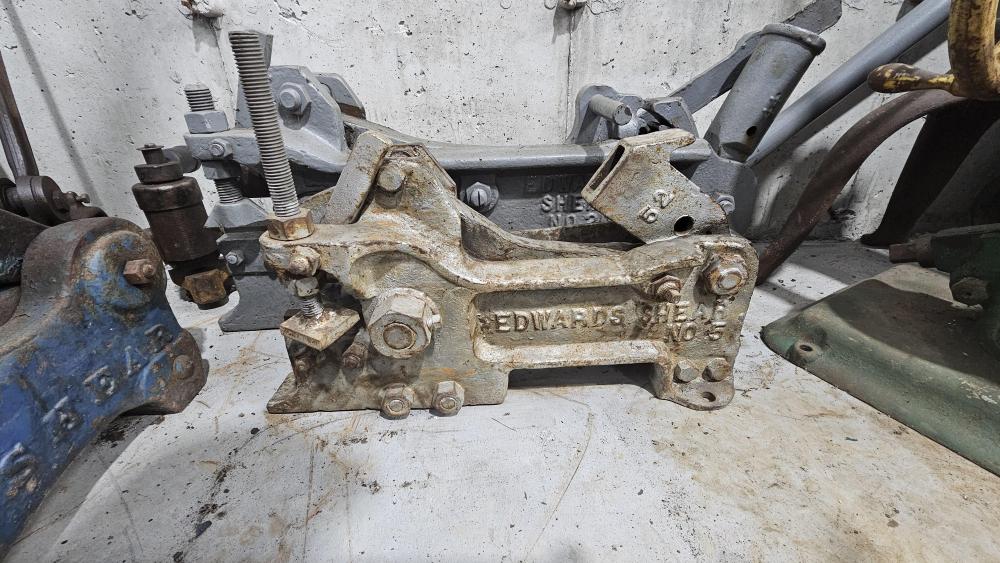
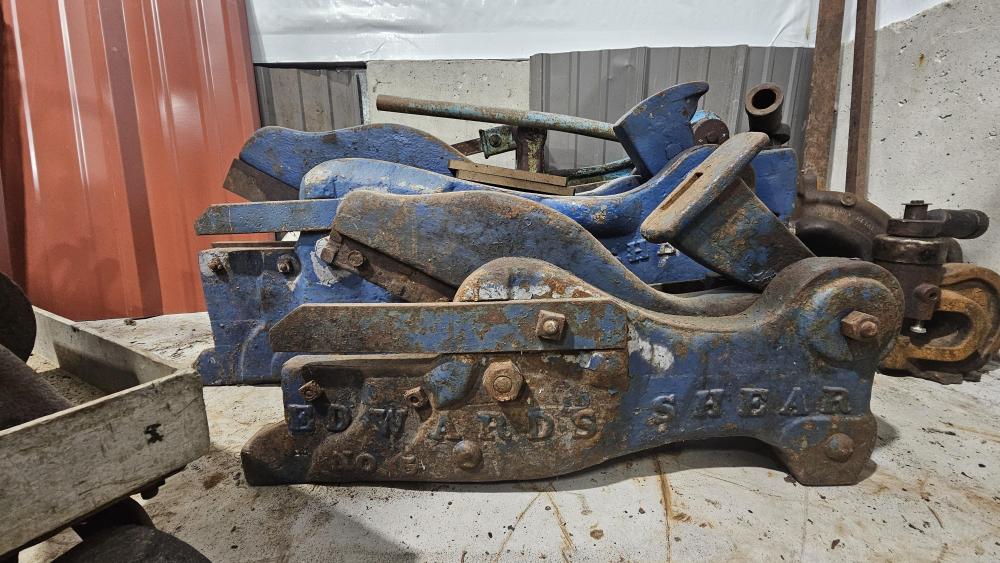
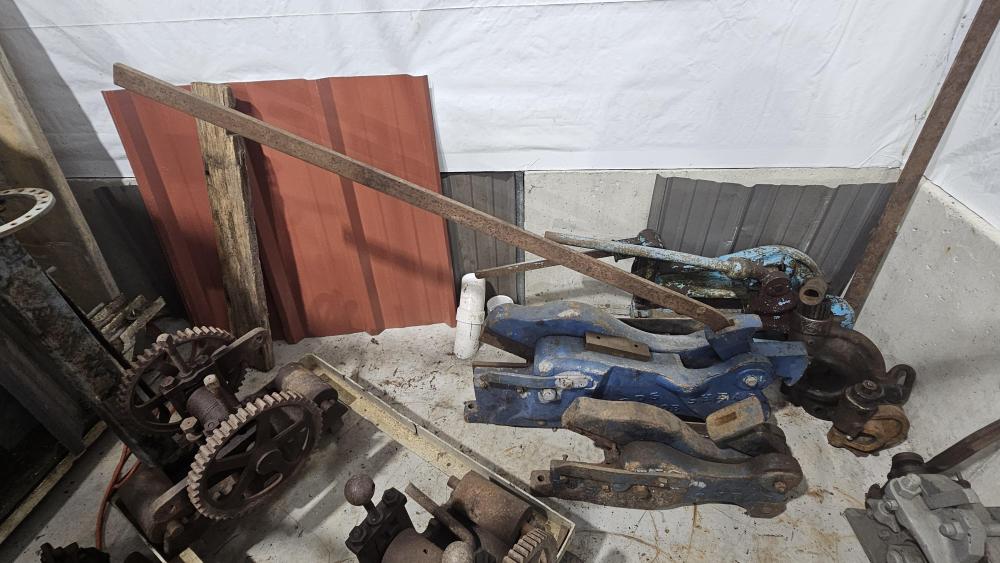
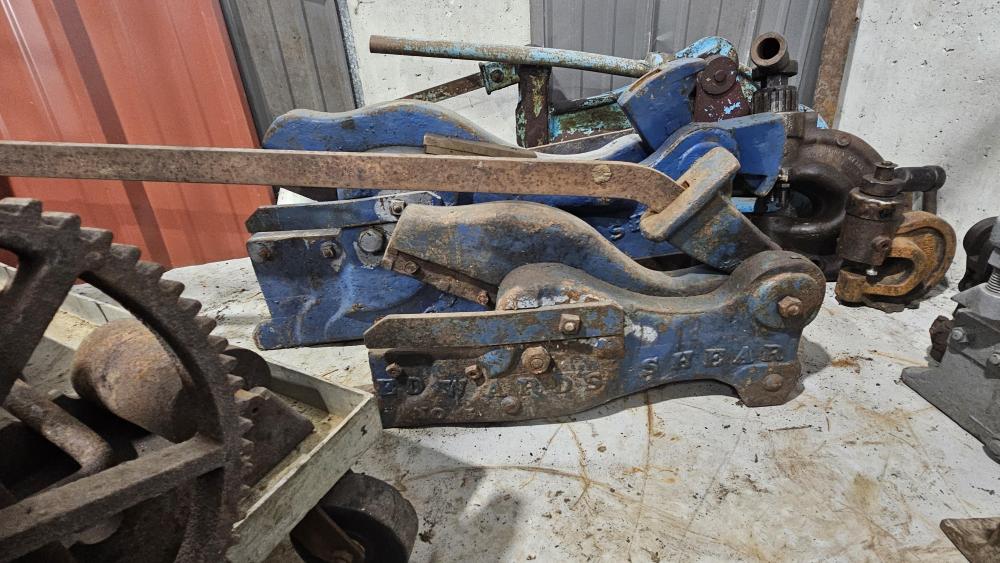
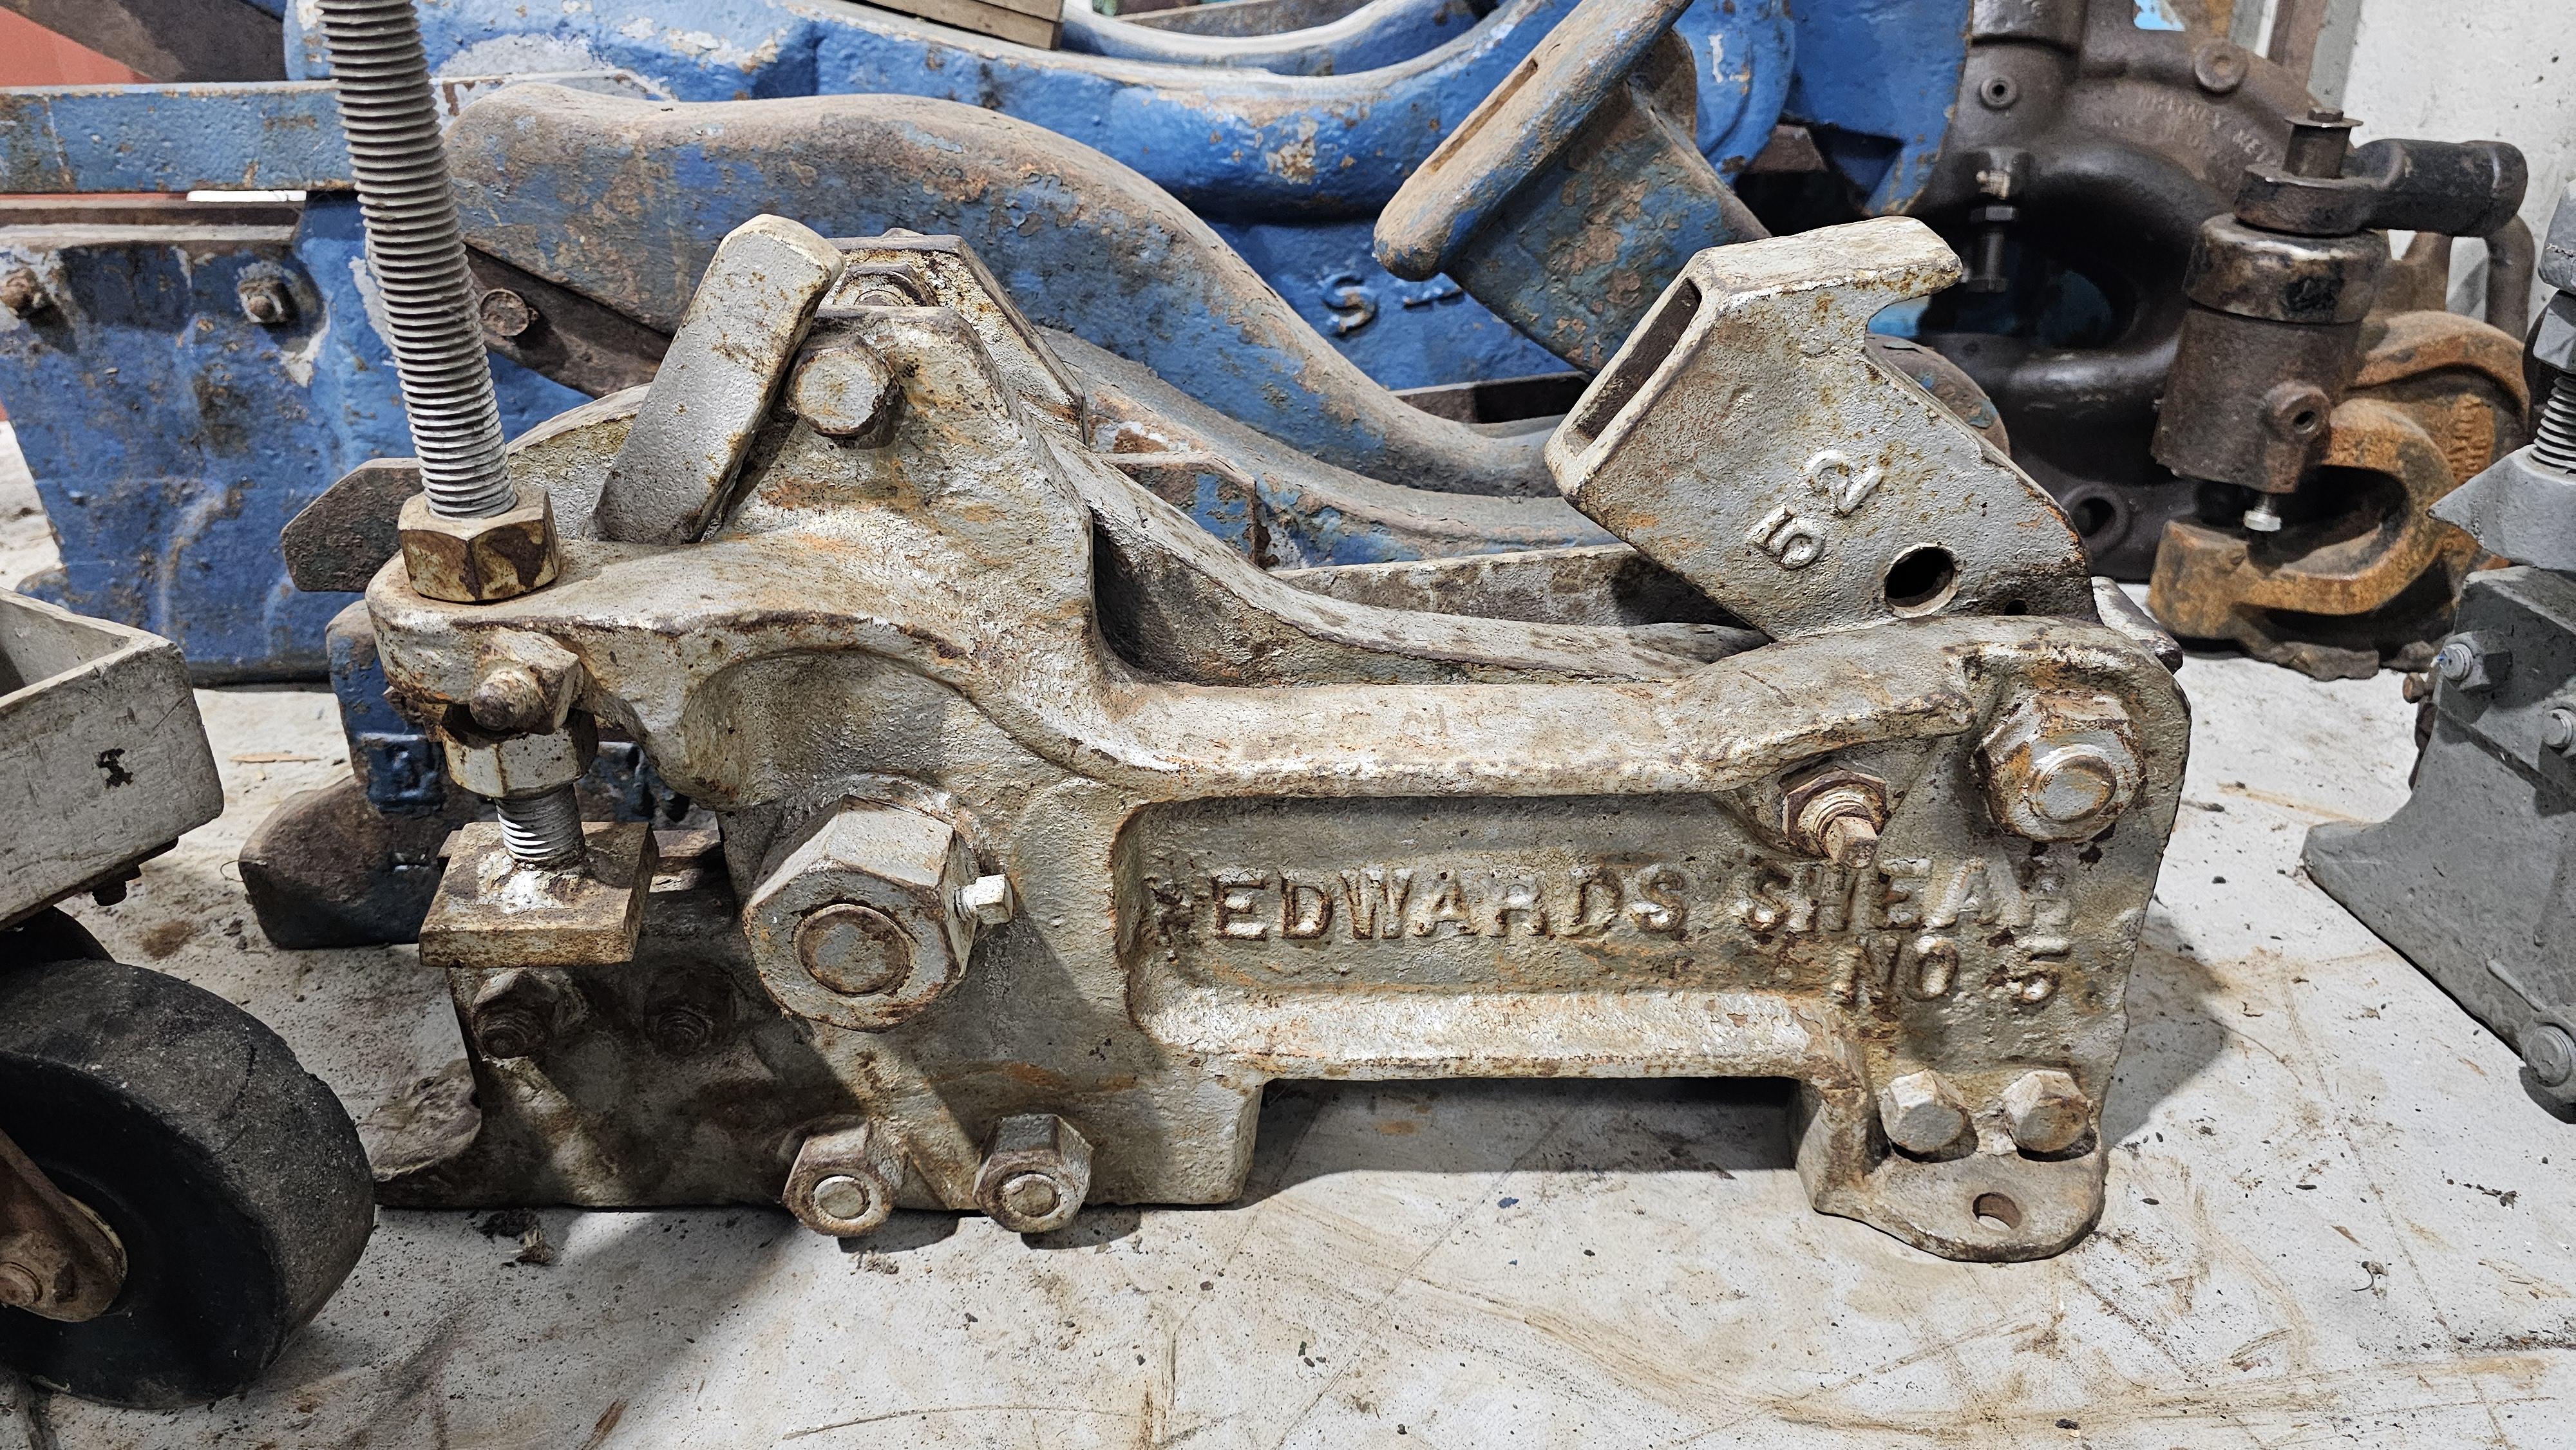
Have you been by the old Edwards factory site?
-
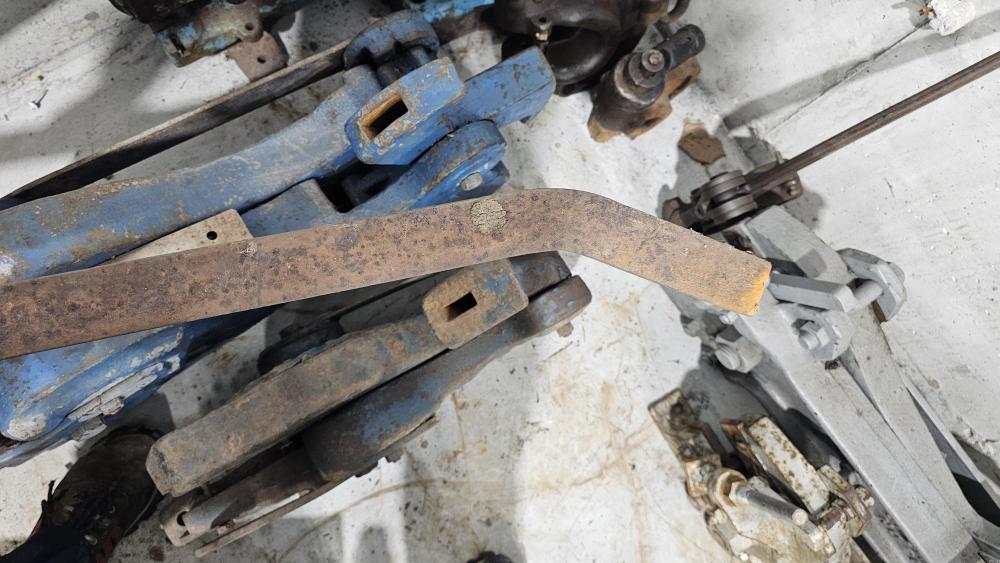
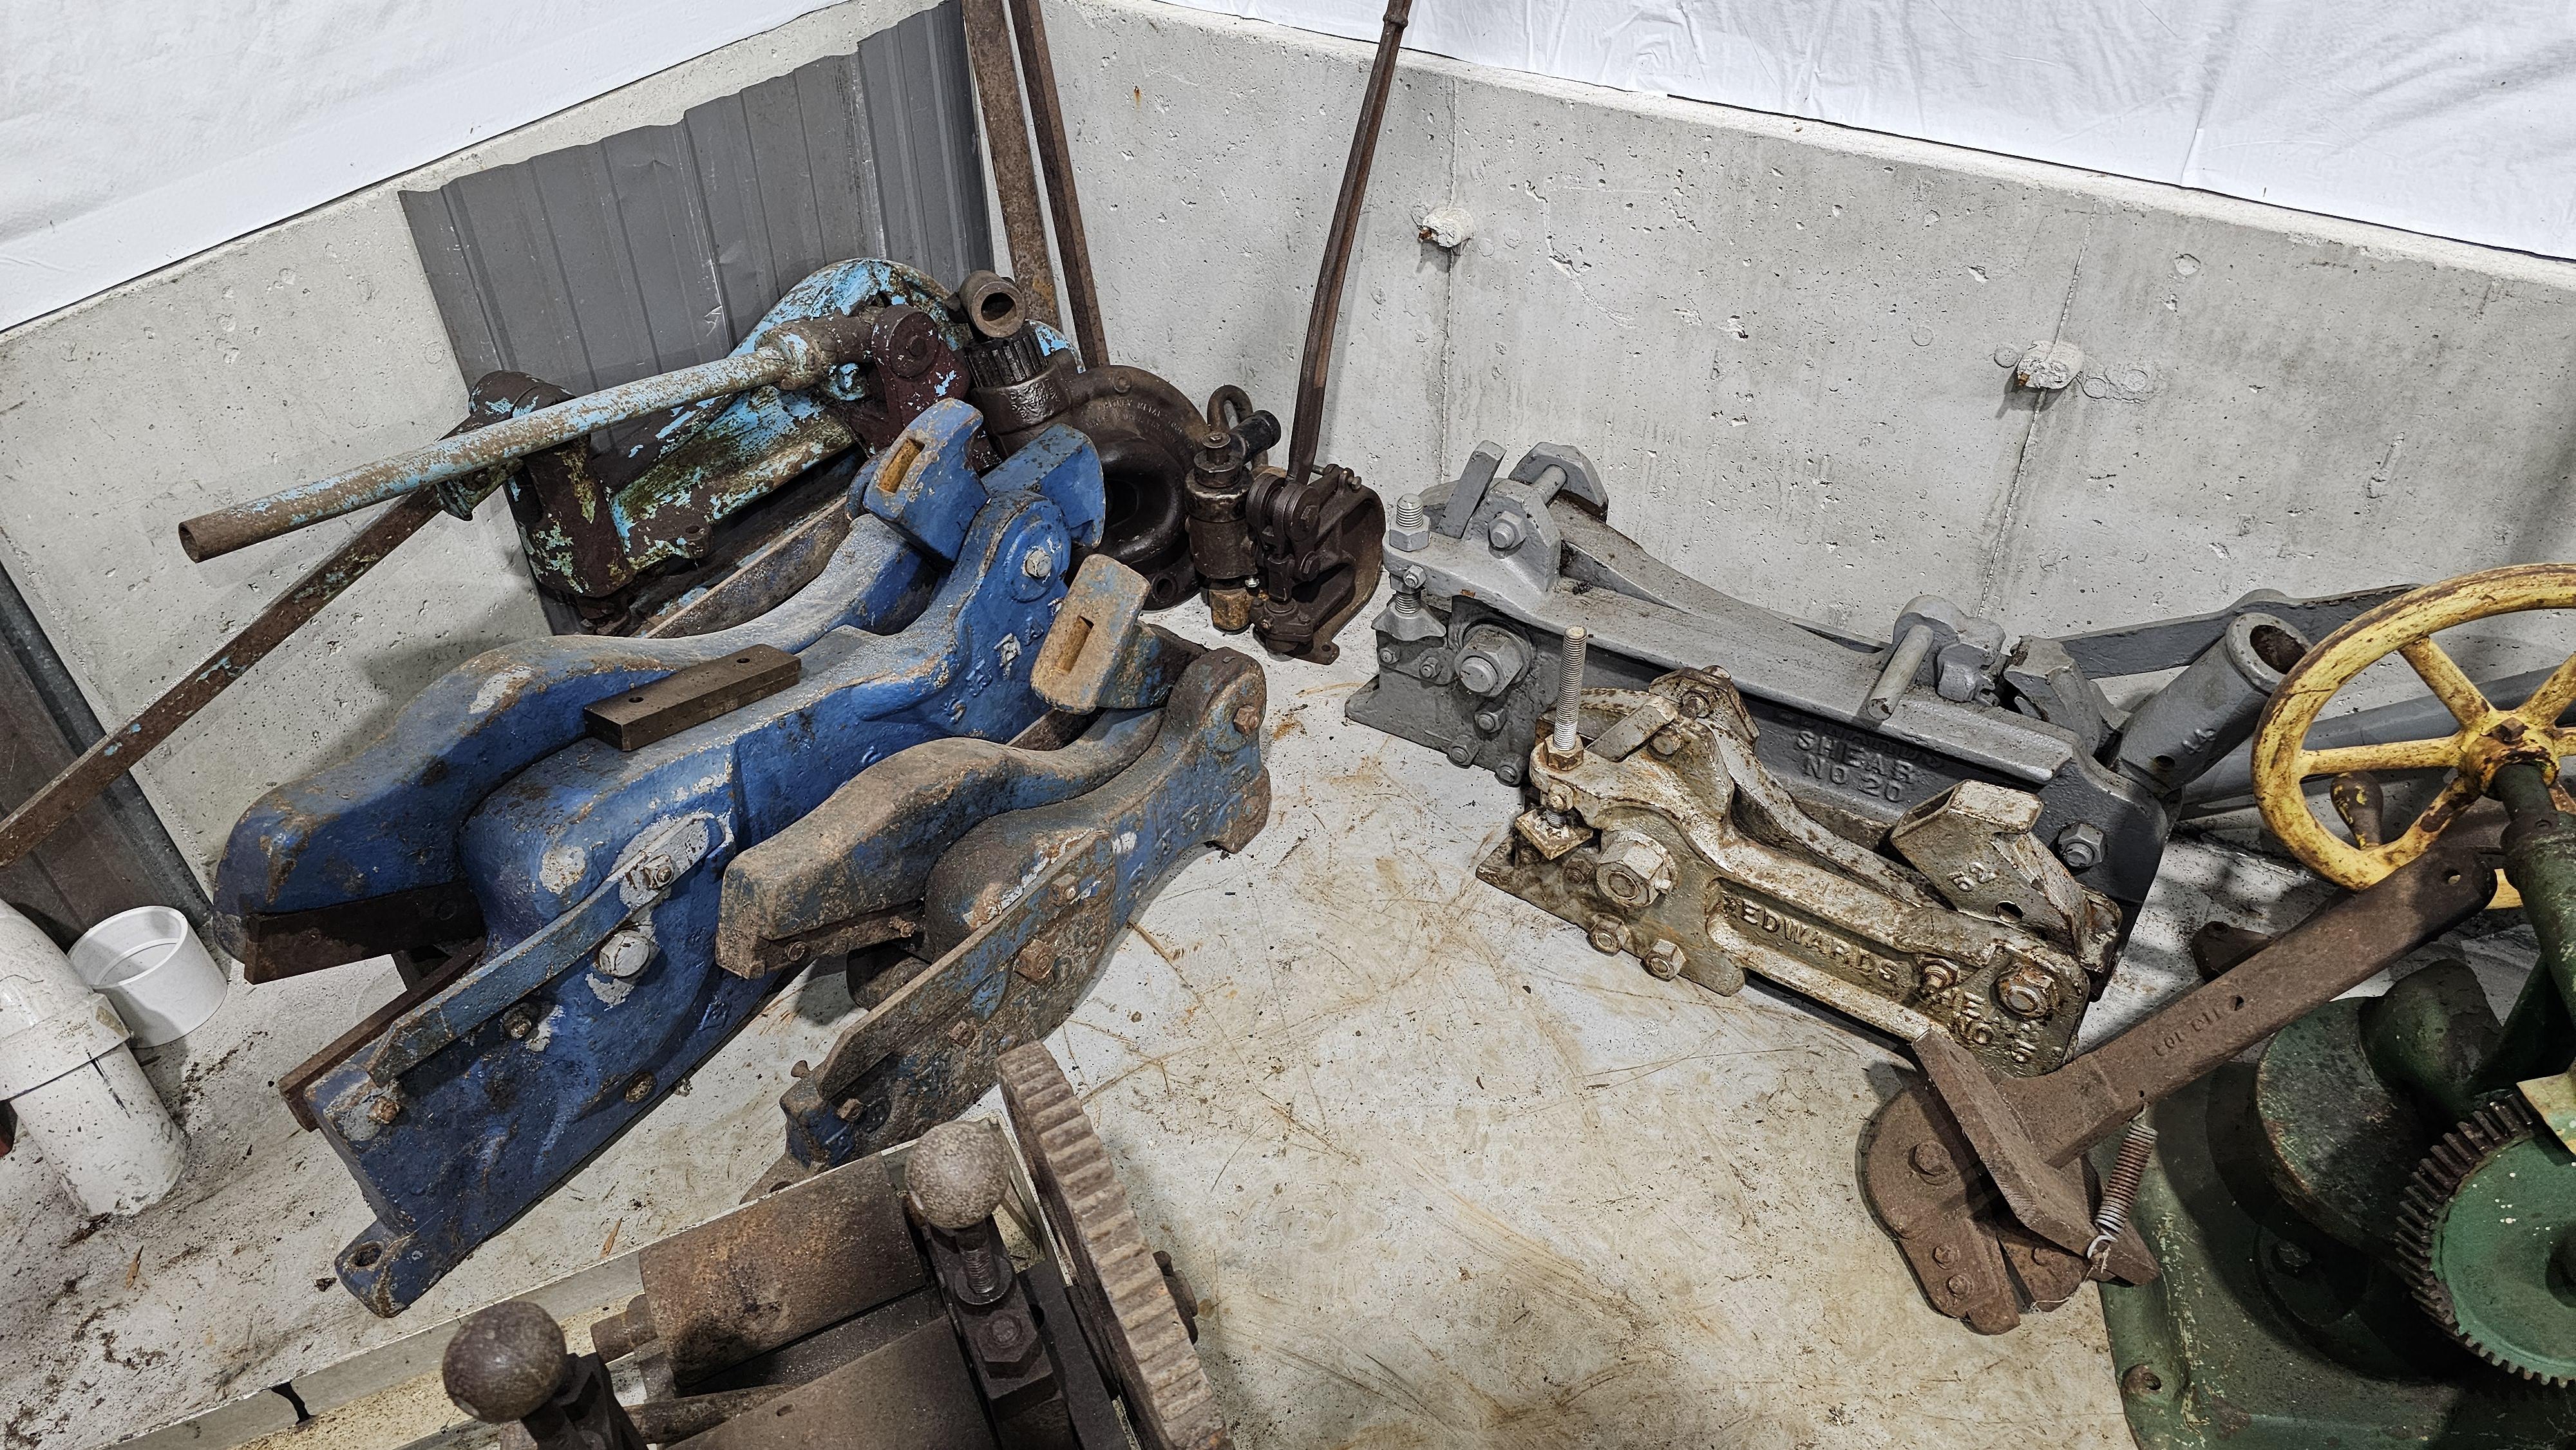
Larry, great finds.. Great info as well.. I wonder what were the differences between the Alligator 5 and 5A or if as you mentioned it was simply for "Alligator"..
The model 10 I have is a B and I know I've seen model 10E.
I'll see if I can find the "model chart" I stashed it away in a book to keep it flat and safe.. I moved nearly all the blacksmithing books and literature out to the school so now can't put my finger or brain onto where I stashed it. -
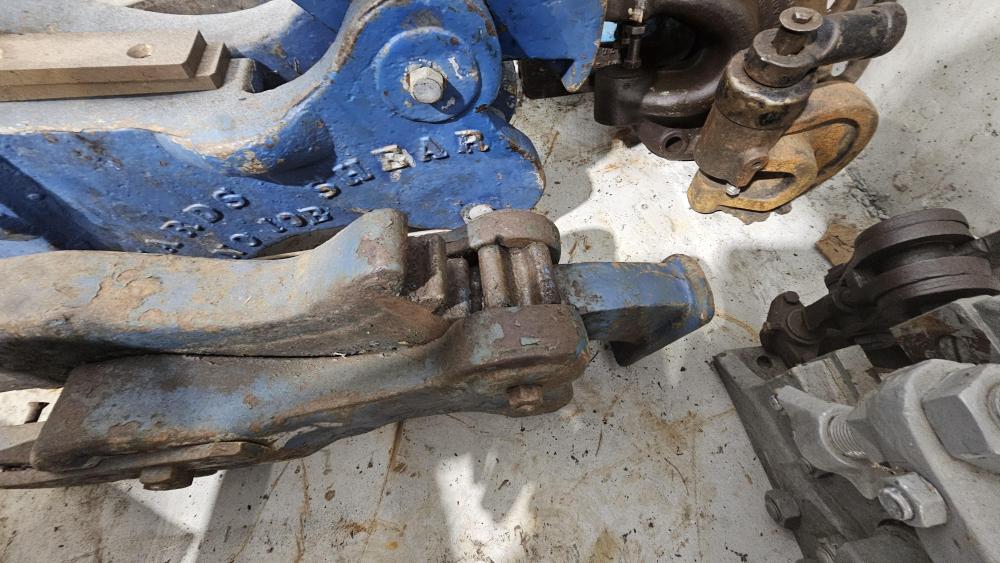
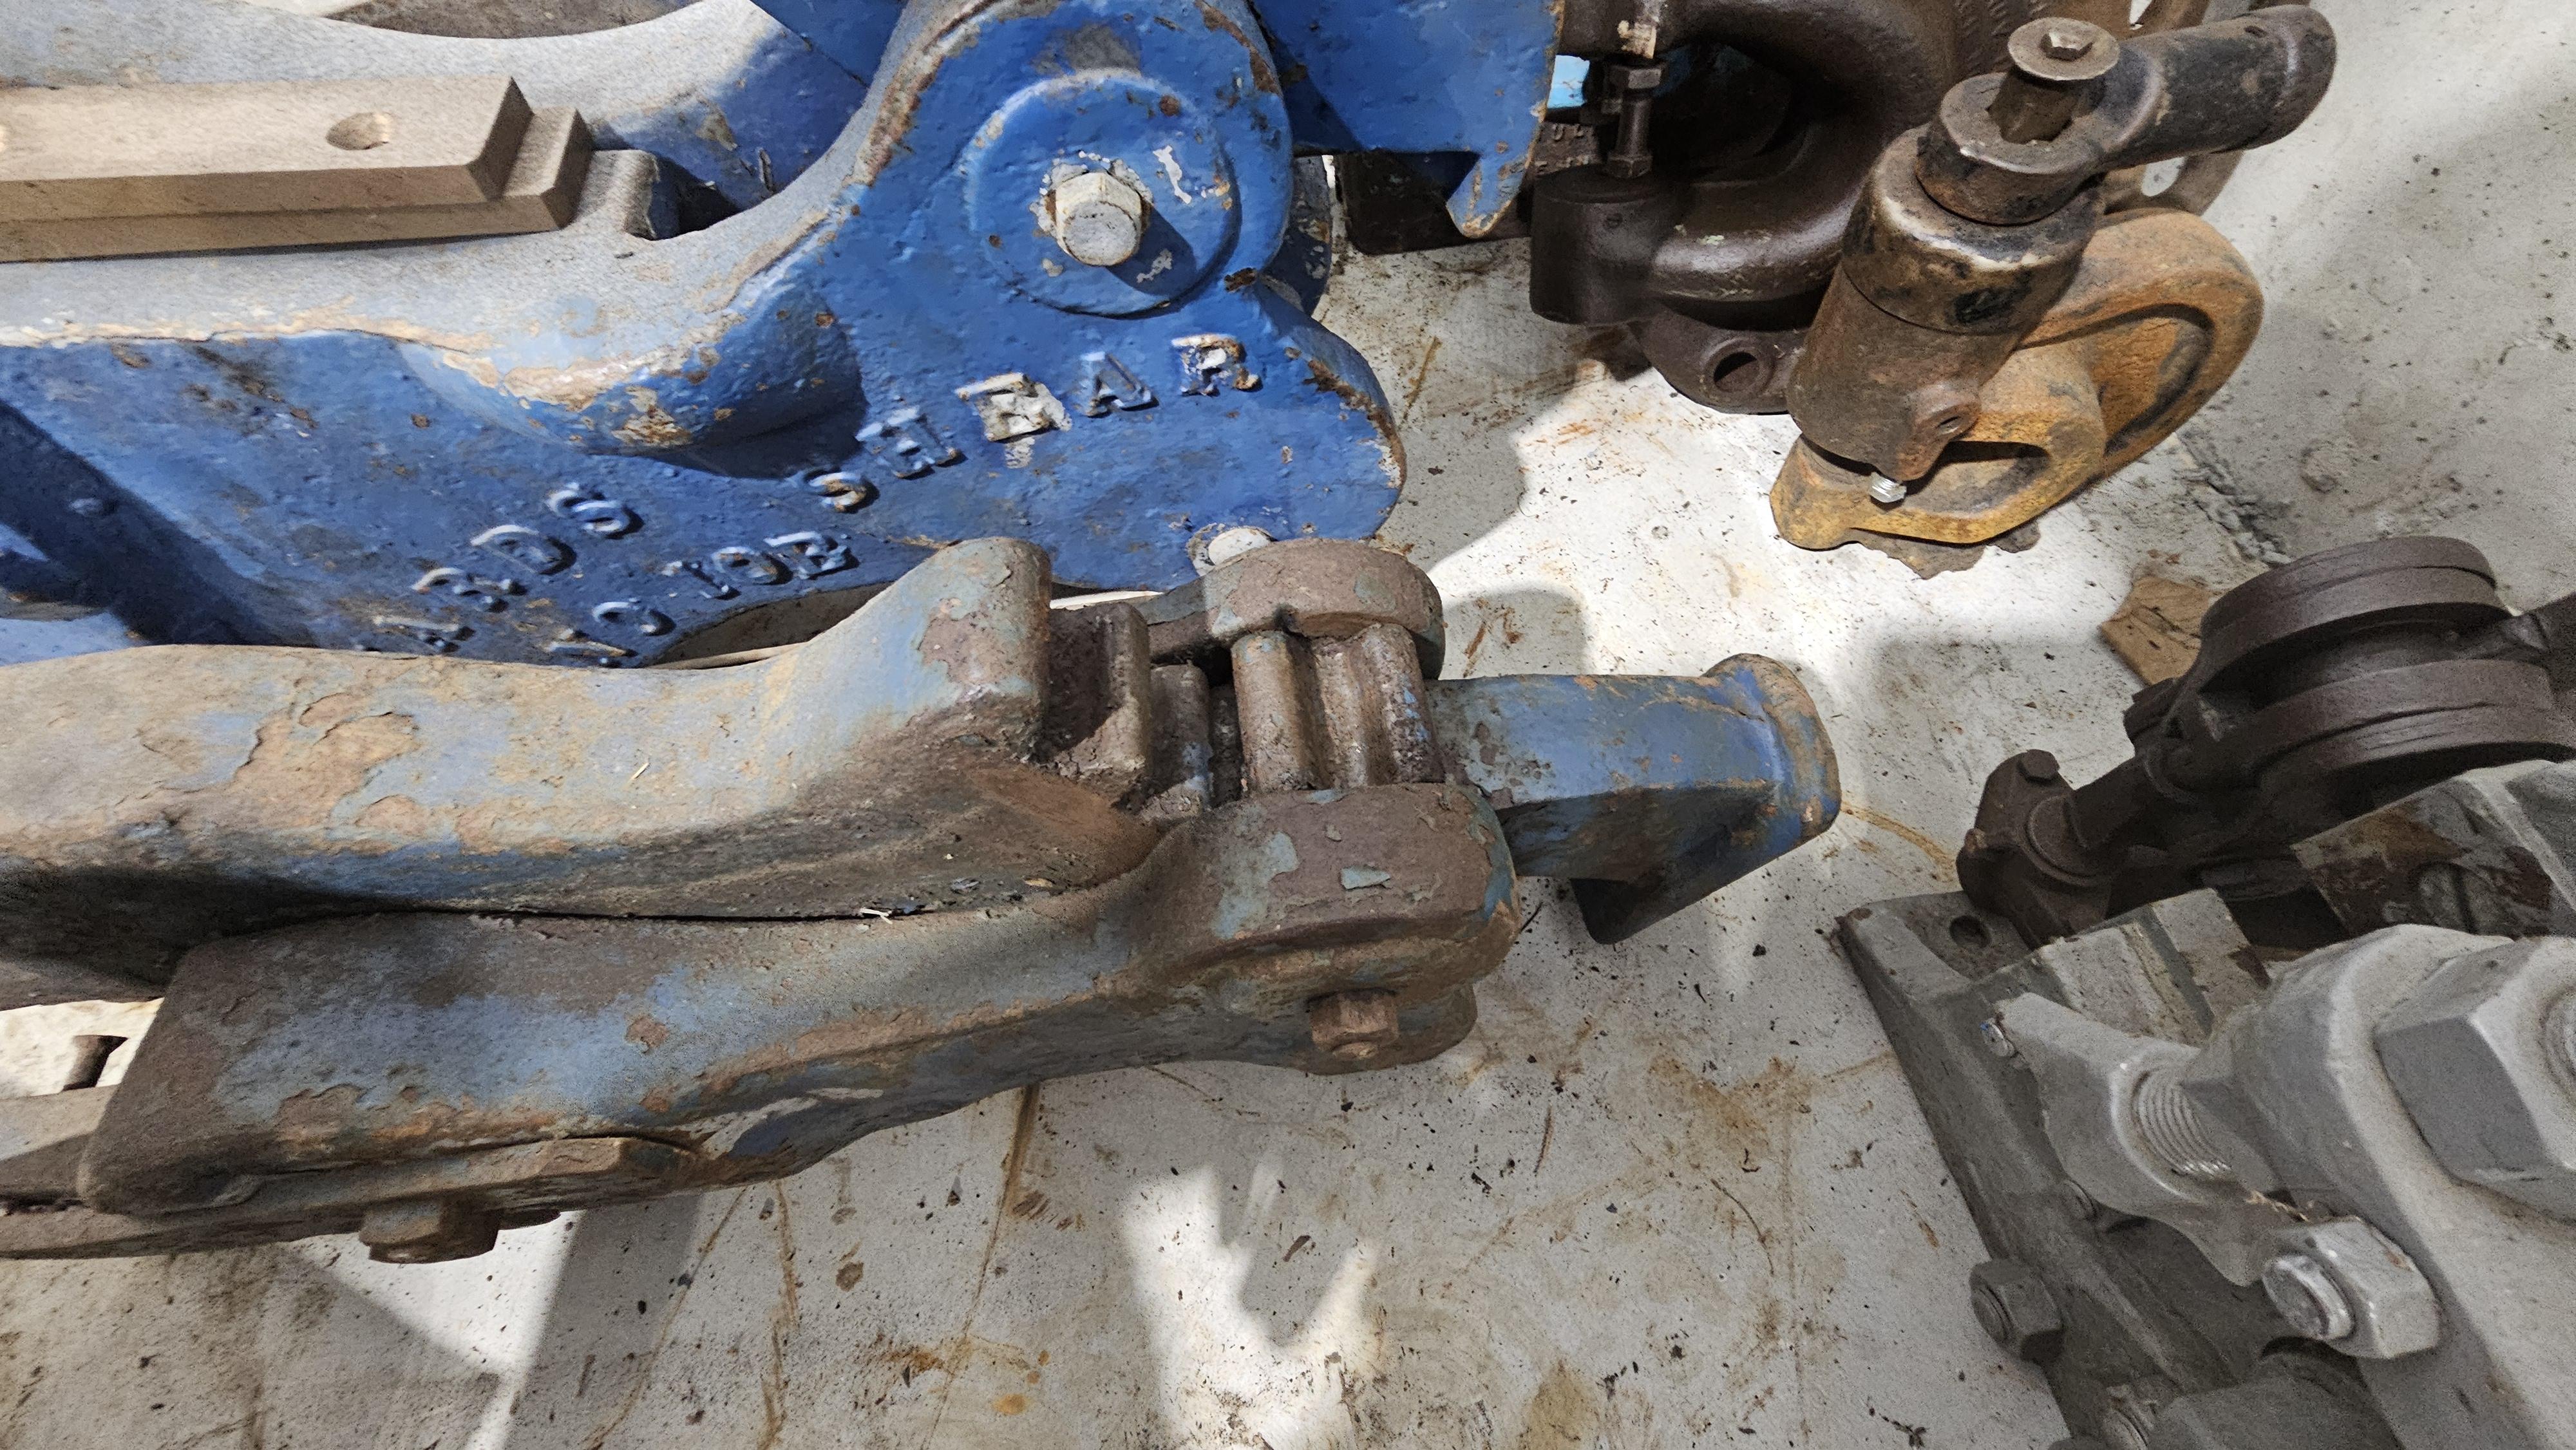
Larry the 5 and 10 alligator type are the oldest from what I can see of the Edwards lines.. They really were aimed it seems at the wagon tire market as their capacity was mention as such. 1/2X4, 3/4X6" etc, etc..
The Parrot jaw evolved as time moved forward and away from the conventional, older wagons and such. No need for the longer cut.. (after WWI technology spelled the end of the blacksmith) Cars vs wagons etc, etc.
The cut width was brought down to 3.5" on the shear and moved toward bar stock and cable cutting.. The parrot type was available with different jaw types.. Flat, and V from what I can tell..
there is also a flip down bar that moved the cutting action further away from the jaw base for smaller stock.
The alligator type of scissor action is not great at cutting cable unless the blades are very sharp or new (there is a new set of blades on top of the 10B just sitting there).
Also there is not way to increase the side clearance between the cutting jaws on the 5 or 10B..
This was addressed in newer parrot models with a side pressure screw.
The Newer Parrot jaw type shear is made from Semi-steel and about 2/3rds the weight for a great capacity.
The 10B is 370lbs with a 1" sq capacity and the 20 with 1 3/8Sq at 265lbs. -
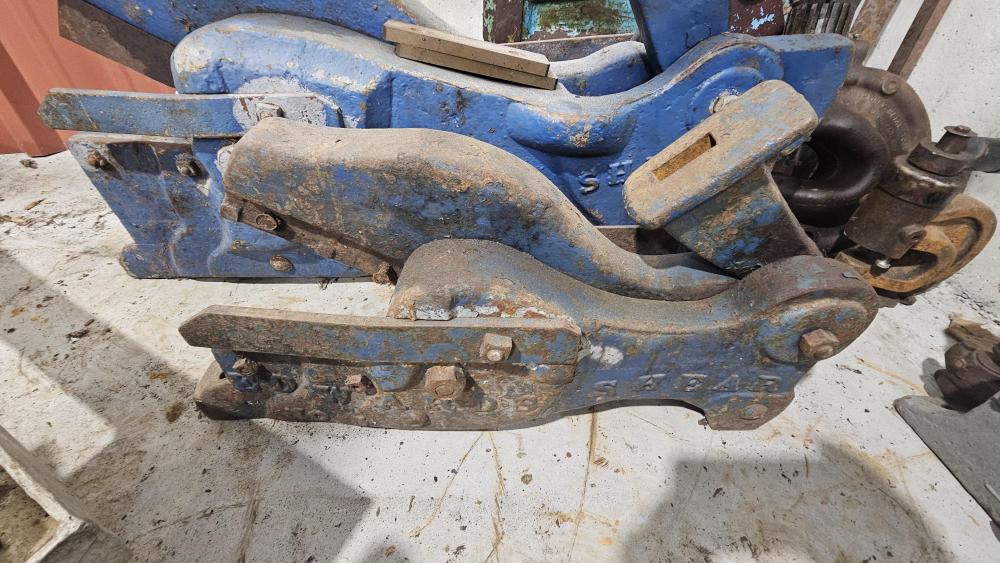
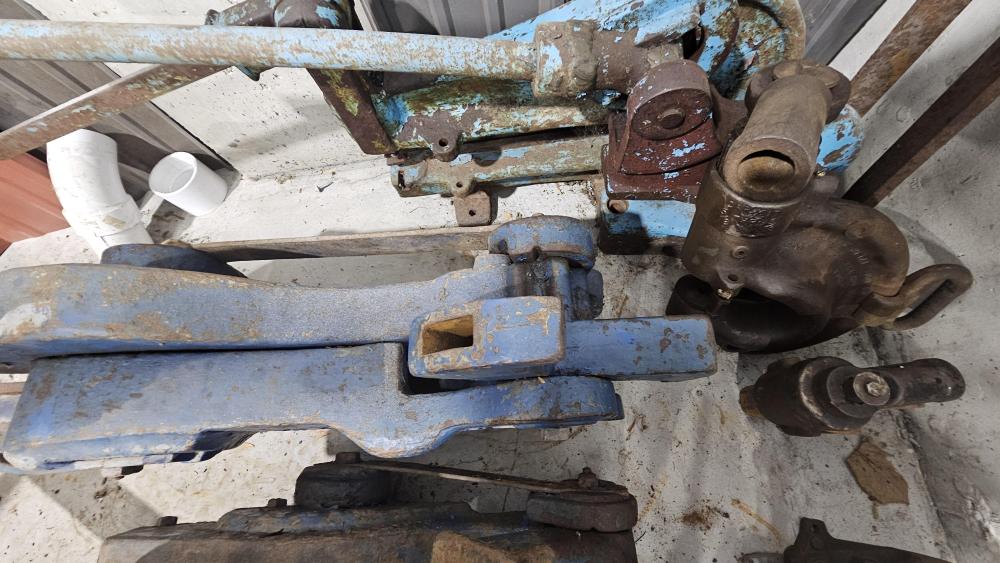
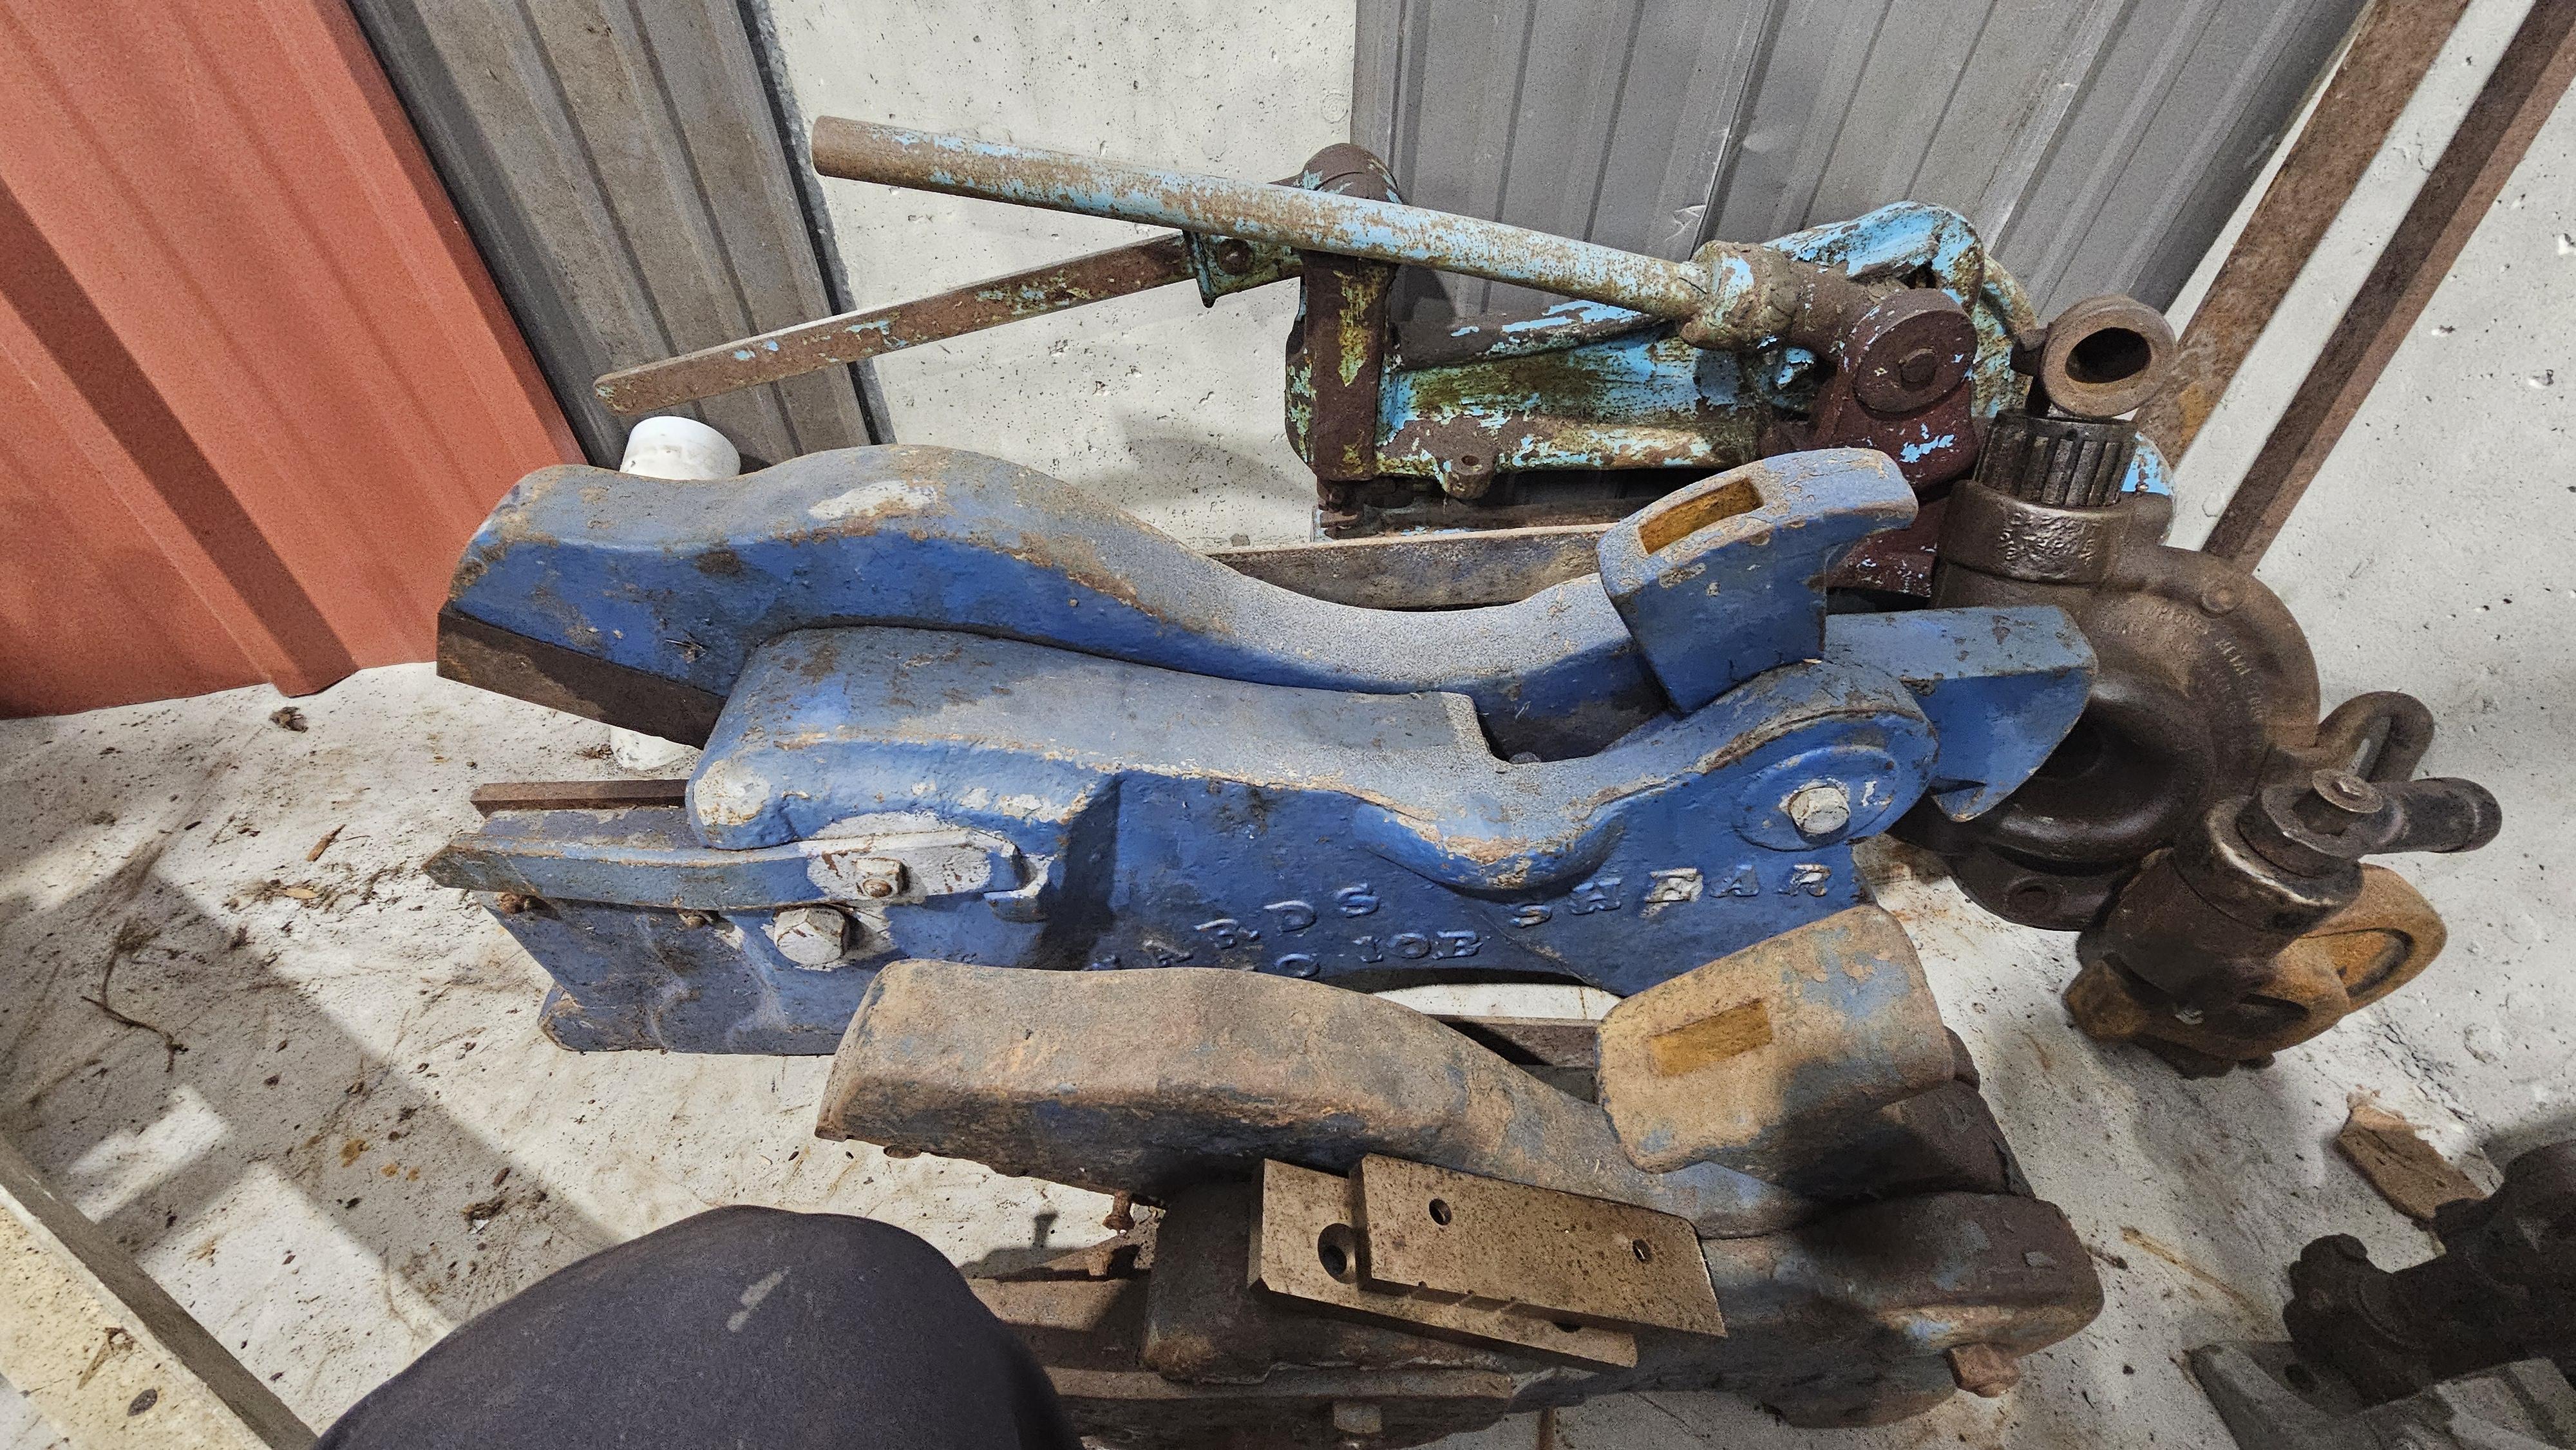
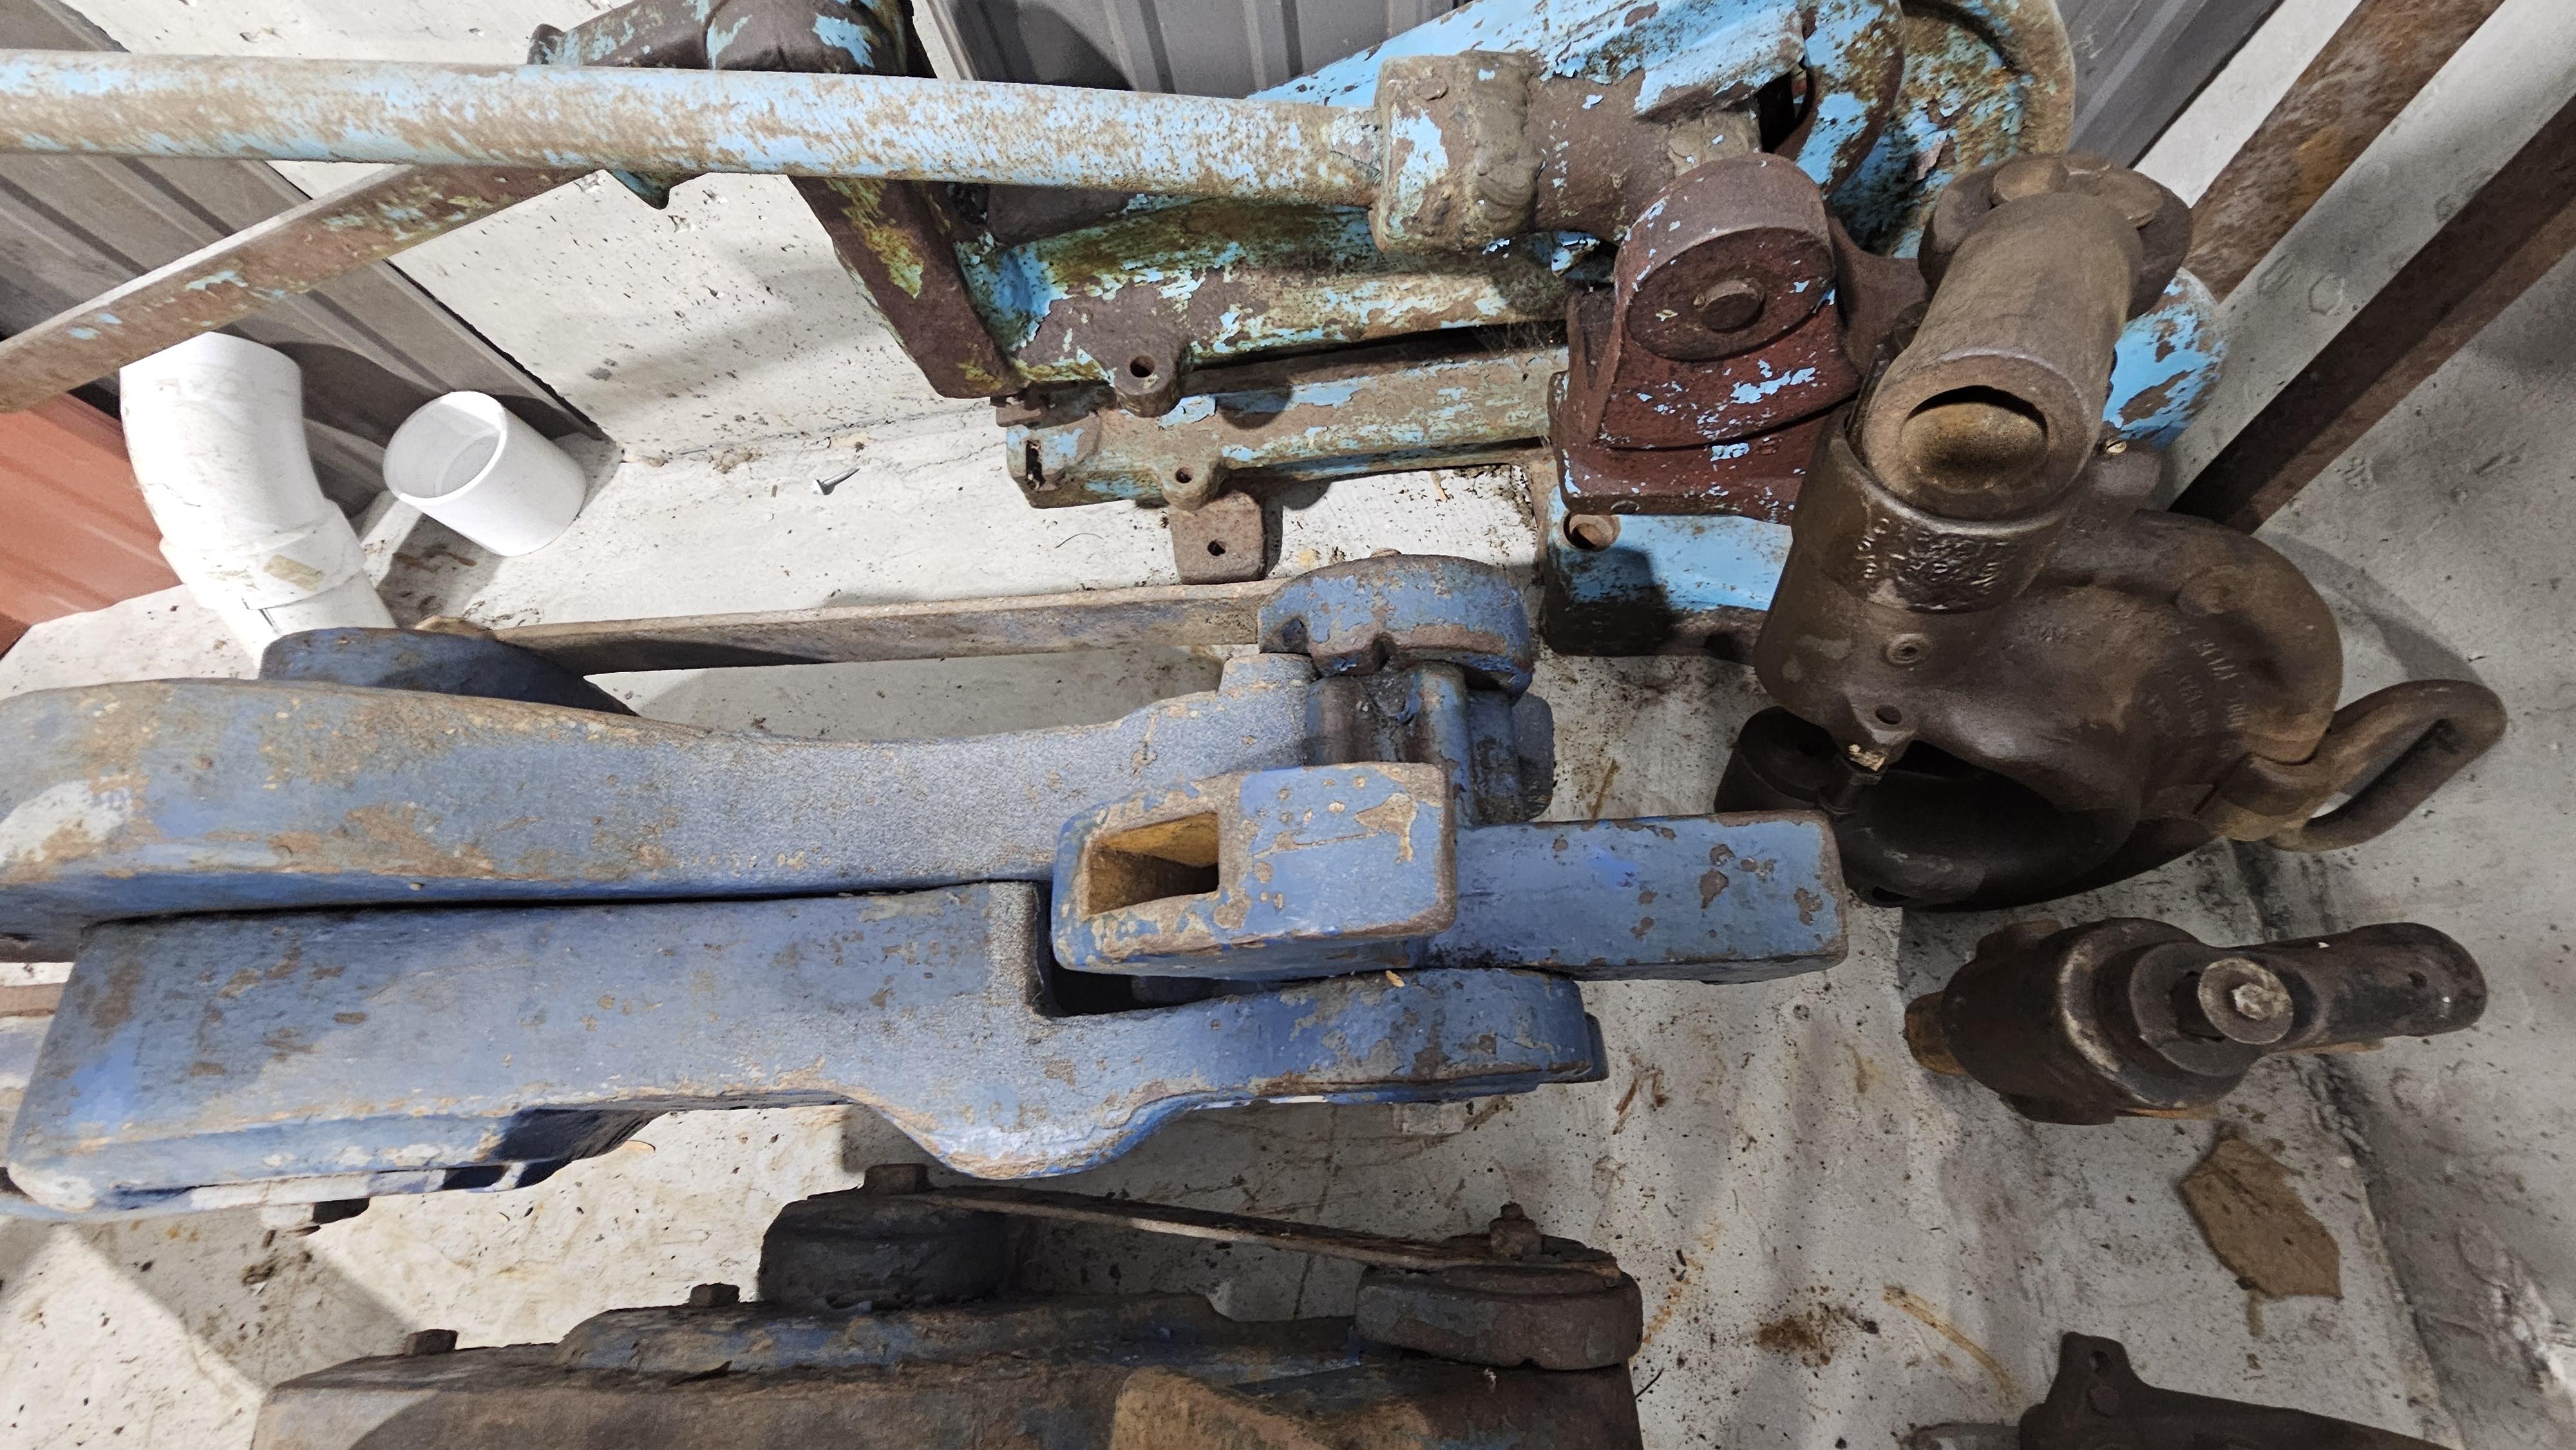
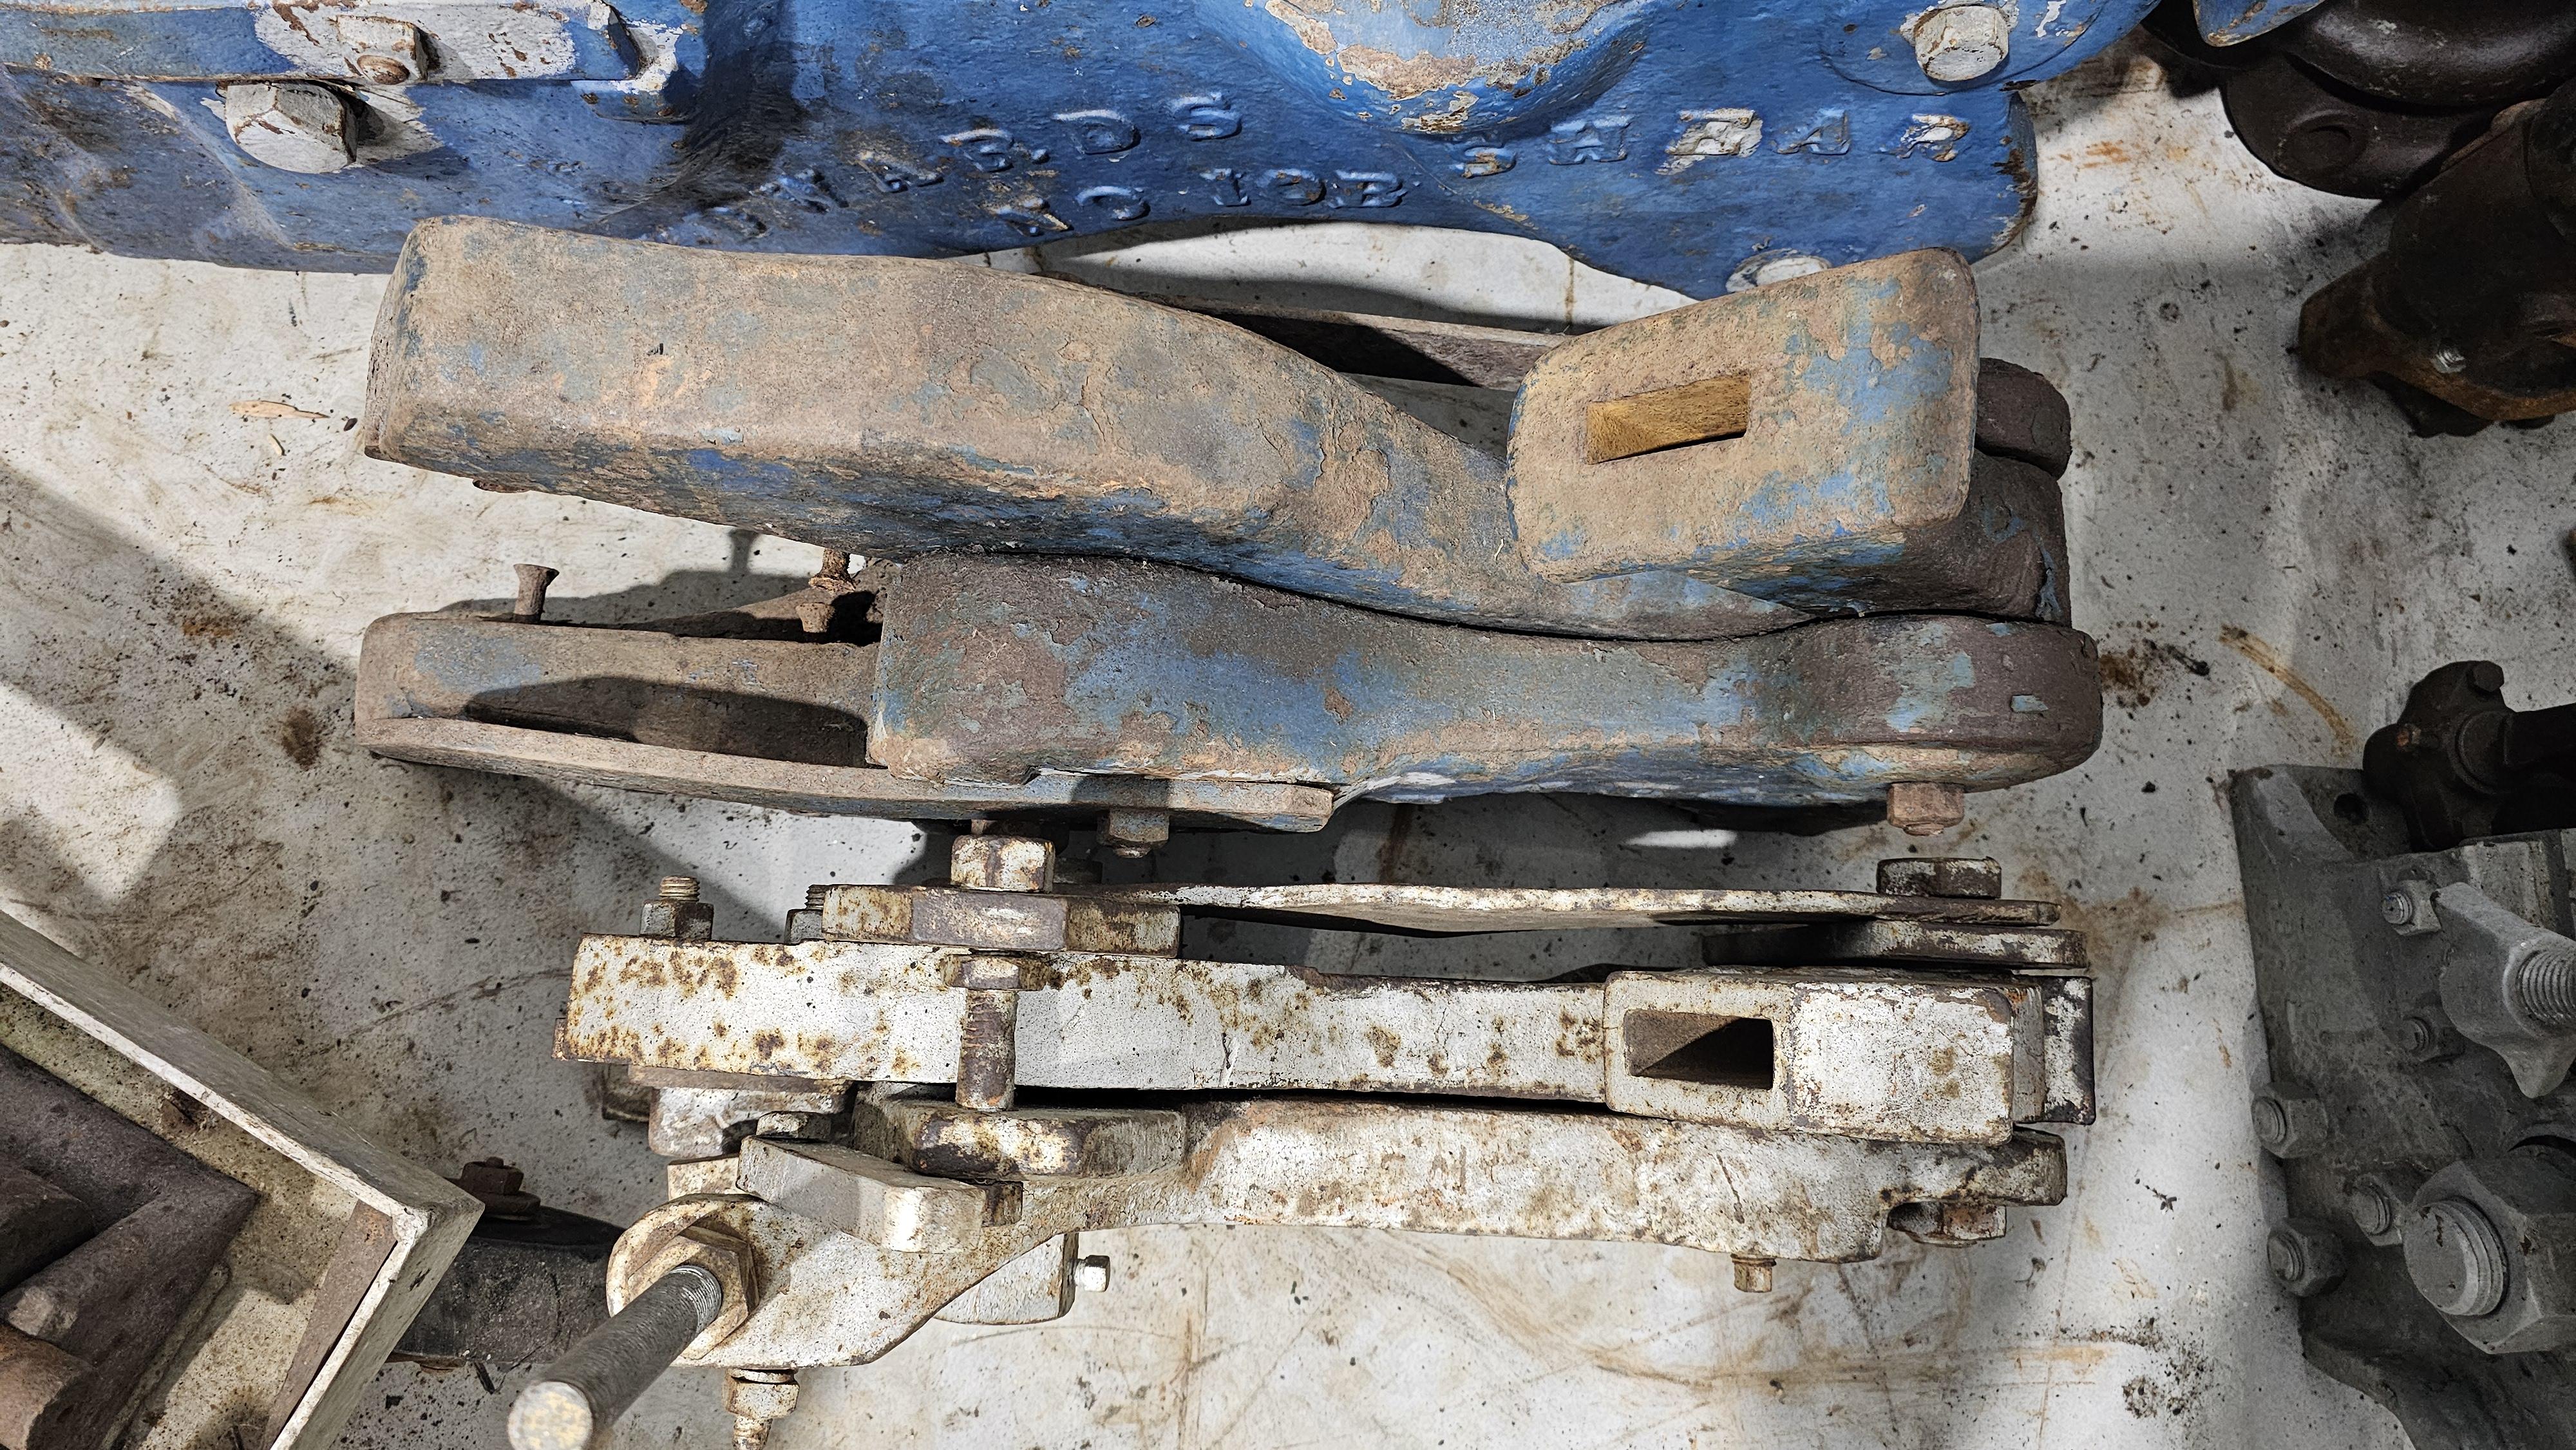
Here are a bunch of photos of the 10B, the 5 alligator, the 5 Parrot and the 20..
I lined them up for size comparison. ON the 10 your can see the 3 shoes for the lever.
The lever is bent at an angle so it sits level in the 5's and the 10B.
The 10B is out of sync handle wise from the last time I took it apart to clean it.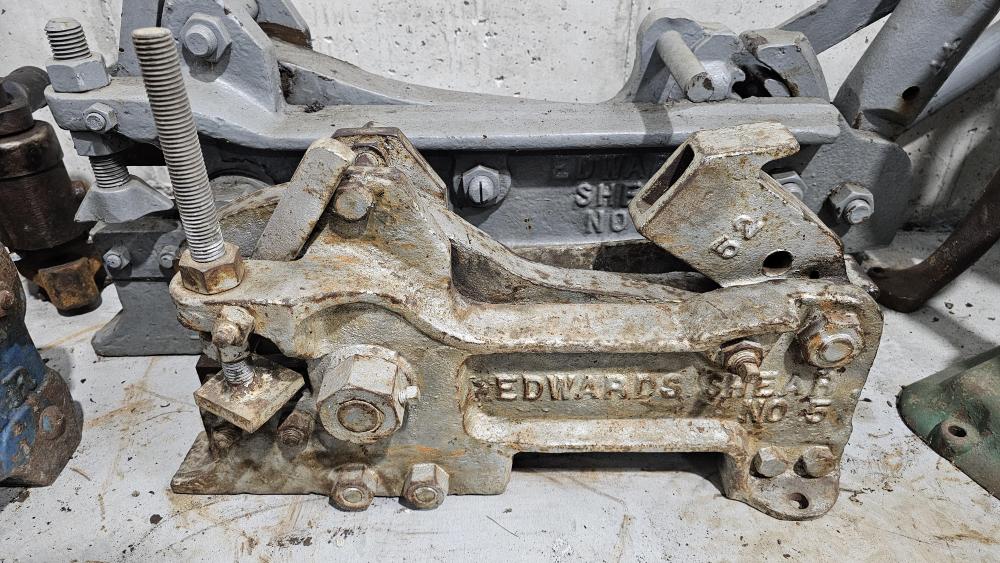


-
Maybe you will get lucky.. The 5's come up for sale often.. The 5 can be a great shear.. I own and used one a lot before I got the 10B.. had it about 5 years before the 10B, Having it well mounted (bolted down) is a must.. The 10B is 3 times the size so could handle some sizes of stock without being bolted down.
The 5 is a single throw shear.. Meaning the lever starts above the jaw and gets pulled 180 over the top or until the cut is made.
The 10B has 3 shoes and the handle is rotated over the top and re-incerted until the cut is made.
The 20 uses a ratchet system which is just up and down vs over the top 180.. Little more friendly..
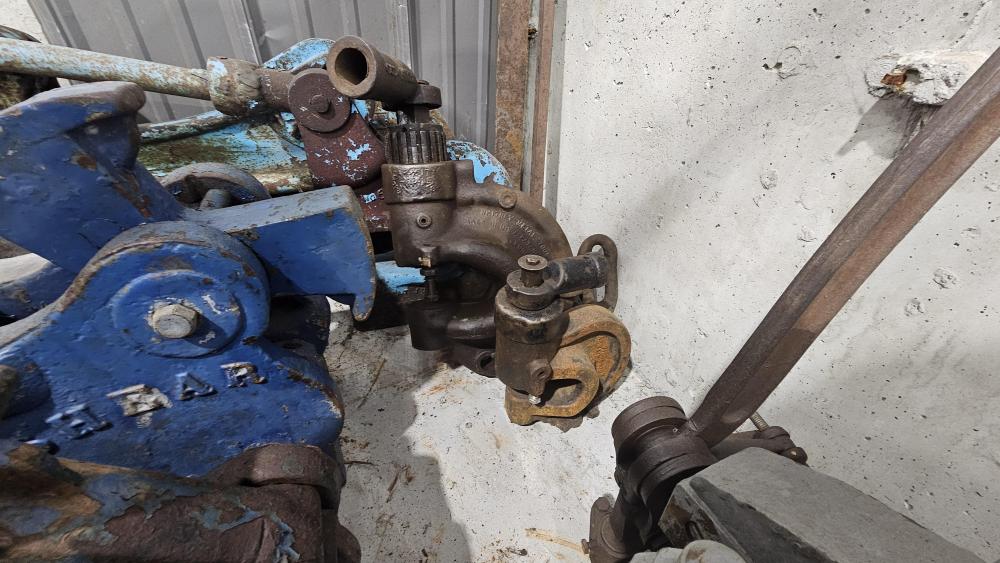
The Factory sold a 5 hydraulic and a 7 hydraulic.. The manual 5 would cut 3/4" and the hydraulic could cut 1"
They also made a #5 parrot jaw vs alligator Jaw but have never found any info on it. The guy I bought it from said it came from a rebar company. -
The number 20 is no longer produced.. They haven't been since the 80's is what I remember.
The number 20 shears can fetch a little higher price vs the older 10B/E..
They are way outdated in 90% of the modern shops.. With the low cost of bandsaws and such..
They shine with ease of use and quickness of cut and back in the day were a huge labor saver..
Have you run across one for sale or have one you are looking to sell?
I paid very little money for this one in very good condition.
-
Larry that's too funny..
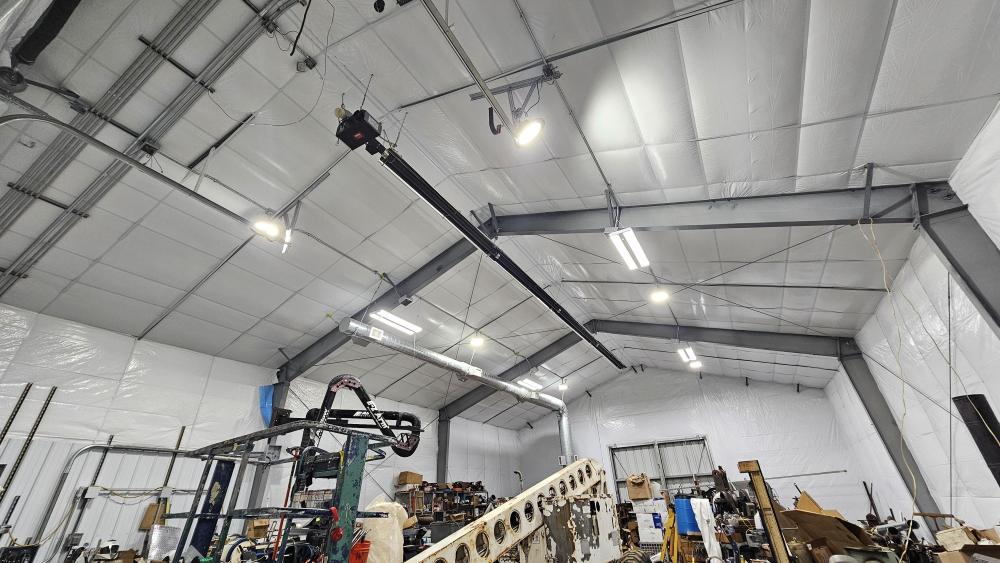
Went in the shop this morning to check out the lights..
Is there such a thing as to bright.. Ha, ha..
Still in newness mode. -
So I was able to get out there and figure out some of the wiring..
I also was able to get all the lights working..
I need to work a little bit more on the left side but as a test they are all switched at the moment.
I find it hard to believe I have enjoyed the 3 lights on the left for so long.. Thinking they were very bright with ample light..
After being able to switch from right to left separately I now understand the 10 lights rock..
The round UFO lights are controlled left to right, as are the 4, 4ft lights..
They are also dimmable separately so each light bank can be controlled and adjusted.
-
Ok, that is crazy David.. Wow..
It's like a stage for a play or movie rehearsal.
-
Welp, today was the first day back on the wiring.
I pulled the 2 extra white wires and installed 2 black in their stead.
I called it quits after wiring the switches.. Tomorrow I'll put the wires to the breaker panel..
Might have 8 of the 10 lights going tomorrow..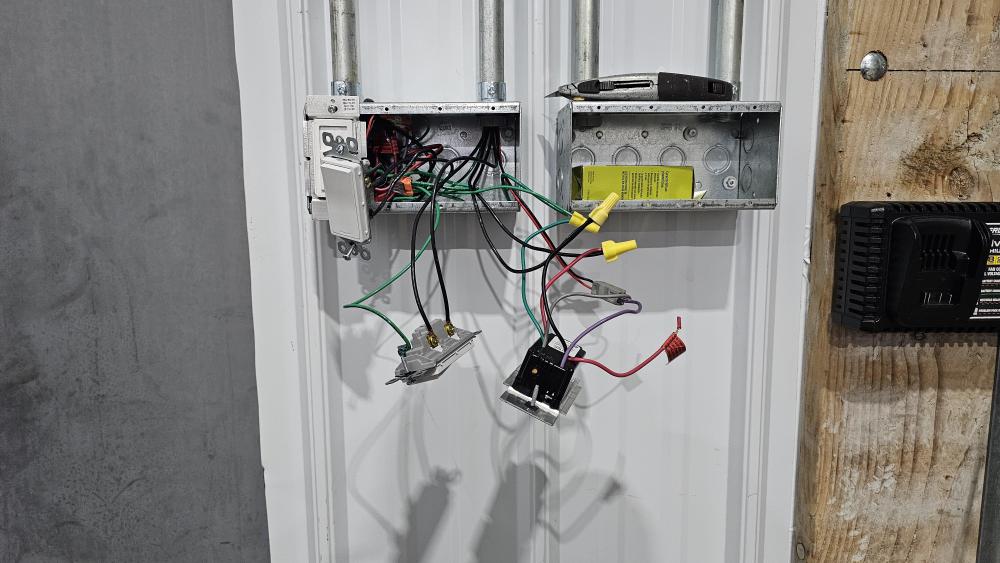
-
On 1/10/2024 at 12:28 AM, swedefiddle said:
Happy New Year,
Big trucks and busses use only one colour wire, they have little number tags for the different wires. The tags are small and wrap around a wire. Keep it simple (K.I.S.S).
Nothing worse than a Hood acting like a guillotine. If you had a stick holding it up and bumped the stick, same thing. Let Mother Nature mend your mittens, with time, slow time. Good Luck!!
Neil
Thanks Neil, Happy New Year..
My manlift uses all white wires with stamps and tags numbered.,. Makes it easy to follow for sure.
While the wiring in the school is super simple, I have to remember how my brain works.. This is key.. Understanding how one thinks of things..everyone learns differently and understands differently.. I'm not at the point in my learning cycle wiring wise that I can skip ahead to a place of knowing..
Like Steve wrote.., Using colored wires is super helpful, but it also becomes who you are working with.. I had mentioned using different colored wires and he was "NO". Just run the 2 blacks, 2 whites and 1 green.. From a circuit or straight run kind of deal I understand it..
Electrical is a lot like blacksmithing or Farrier work.. There are 1000's of ways of doing it (In someones mind there is only 1 way or 2 ways based on experience) and it still come out.
It's ok.. It will all work out.. I did pull red wires for the second series of lights on the left side.
Once it's all connected because I won't be using very many breakers in the service panels the wiring will be very simple.
I also have 2 sub panels.. One for 3ph at the end of the building on the left side and 1 for 1ph on the other side of the shop on the right side.
Yes, on the hood and guillotine.. it has a built in stop/hold open.. I moved it from it's bottom mount position to open the hood more.. It was locked but once the motor was running the vibration while I adjusted the carb is what got me.
Was lucky I had my coveralls on.. It stopped the wrist from being completely sheared off.. Had impact line of skin where the 1/8" thick metal was trying to go thru.
Went for xrays today.. I love seeing xrays of my bones and such.. It's amazing to me how dense my bones are and all the damage that has been done from all the rough and tumble years..
I spent over 30 years learning how to punch/strike and would practice on trees and other solid objects.. Was super cool seeing the extra bone mass behind my wrist.. That and all the damage to the joints.. -
Hello and thank you Julian, it's been a struggle and huge learning curve at the same time.. I'm so looking forwards to a point that I "don't" have to be out there working to finish it..
The last week has been net zero in terms of work.
Got a snow storm that dropped 12-14" (31cm-36cm) and this takes days to clean up..
The night of the storm I scrambled to get all the equipment ready of which the plow truck pump fried just after hooking up, then the mini dozer would not start so cleaned and carburetor and while adjusting it, the hood fell down nearly taking my right hand off..
So, have had to take off the last 3 days.. I'll take 2 more days since my wrist is pretty much toast.. I can't use a hoof knife.
I can swing a hammer though... it's the funniest thing..
gewoon ik, thanks.. Slow and steady..
I pulled both run of wires for the left side lights but I have to chase down the logic behind the wiring.
I was told by my electrician friend that I should pull 2 blacks and 2 whites and 1 green on each conduit.
Problem is I'm working by myself and my brain does not see the logic or routes of wires pulled that way..
The Neutral goes from the services panels to the lights only.. NOT to the switches.. The black wires run from the lights to the switches as does the ground.. So the problem is I need to figure out which series of wires are which..
So I'll have to spend the time to label the wires.. I should have ran 1 set of wires for each light set and then pulled the other wires.. Yes it's a pain, but would have been easier for me as it's less confusing.
![20240204_140855[1].jpg](https://www.iforgeiron.com/uploads/monthly_2024_02/20240204_1408551.jpg.0be9189d6c46bec325b0cea1f95433ff.jpg)


What did you do in the shop today?
in Blacksmithing, General Discussion
Posted
I have a demo coming up in a few weeks at the "Conneticut Blacksmiths Guild" which will be a the Mystic Seaport Museum. The shop there is a wonderful place for a visit.
I asked the person who reached out what they would like me to demo.. Interestingly she said "Forge welding".
This falls in line with the last class I did at PV and a future class coming up in ME a week before the ABANA meet in PA which is it's 50yrs celebration.
I will be there both competing in the group comp, but also demonstrating and teaching" Hinges"..
So since I nearly lopped off my right hand I figured I'd better make up some samples of what I'll be teaching/demoing at the CBG meet.. (Since certain motions are extremely difficult/painful.) This is kinda cool because it seems nearly all the demo/teaching events will revolve around the same basic skill of forge welding..
So yesterday I spent a few hours making a bolt, a welded socket, a leaf duo and a poker point.
My hammer swing is funky because of how maimed the wrist is, but still able to forge.. Just not peen that well. Will need more time with the hammer or choose a hammer with a larger/wider peen.
While the overall shape of the leaves are decent, the spine running down the middle and the veins are not what they should be.
I'll get in a few more practice sessions and try to dial it in more.