Teachagmech
-
Posts
25 -
Joined
-
Last visited
Content Type
Profiles
Forums
Articles
Gallery
Downloads
Events
Everything posted by Teachagmech
-
The one thing that’s obviously a wild card to me is your elevation. I’d be tempted to build a blown forge with a ribbon style burner if I lived that high up. That being said, I think you can still make a working forge, welding temps just might be really hard to reach. Like frosty said, change only one thing at a time and take notes. The first thing I would try is opening the door/taking it off. Then observe the difference in flame character from where it was in the last pics. Go from there. You’re probably still going to want to seal up around the burner tubes.
-
Does your forge have a way for gasses to get out? It looks sealed. You have to think of the whole thing like a tunnel not a tank. If you don’t have flow through the whole system, you’ll never draw in enough air to make it work correctly. I would seal up the gaps around the burner tubes as the jet of flames is consuming oxygen from around the air intake of the burners. when I want to hold in more heat, I set a brick in front to reflect the heat back, but still let’s the exhaust out. Using a refractory kiln wash also helps a lot with heat retention
-
Alright. I put together my stacked brick forge. Mounted the burners, cut two new mig tips to half the diameter of the tee for an air gap and fired it off. It's actually not too bad. Depending on if I have both ends open or not it will occasionally fall out of tune where the flame goes out and the gas is ignighted my the other burner. It's pretty hard to get a picture of that though so I put a video on youtube
-
I'll take some pics today when I get to work. We're on a pretty tight budget, so I don't have the kaowool and castable or the IR reflective coating to finish my "good" forge yet. I bought some hard bricks yesterday to make a little bench too cubby forge to make some stuff to hopefully sell at a craft fair coming up next month. I know they won't be as efficient, and the burners likely won't act te same as in the 20lb propane cylinder forge, but I'm just hoping to get a hang on how they're supposed to work. Buzzkill made a good point that I was overlooking: back pressure from the forge. I'll get an update and post back later today
-
Out. Forge isn't built yet.
-
Anywhere from 4-25. Nothing would stabilize unless I choked it. Choked it was very stable through the whole range, but it lacked "fury" if that means anything. I currently have 1" with 3/4" chase on them. I picked up the 3/4 on my way home. I won't get back to it until tomorrow.
-
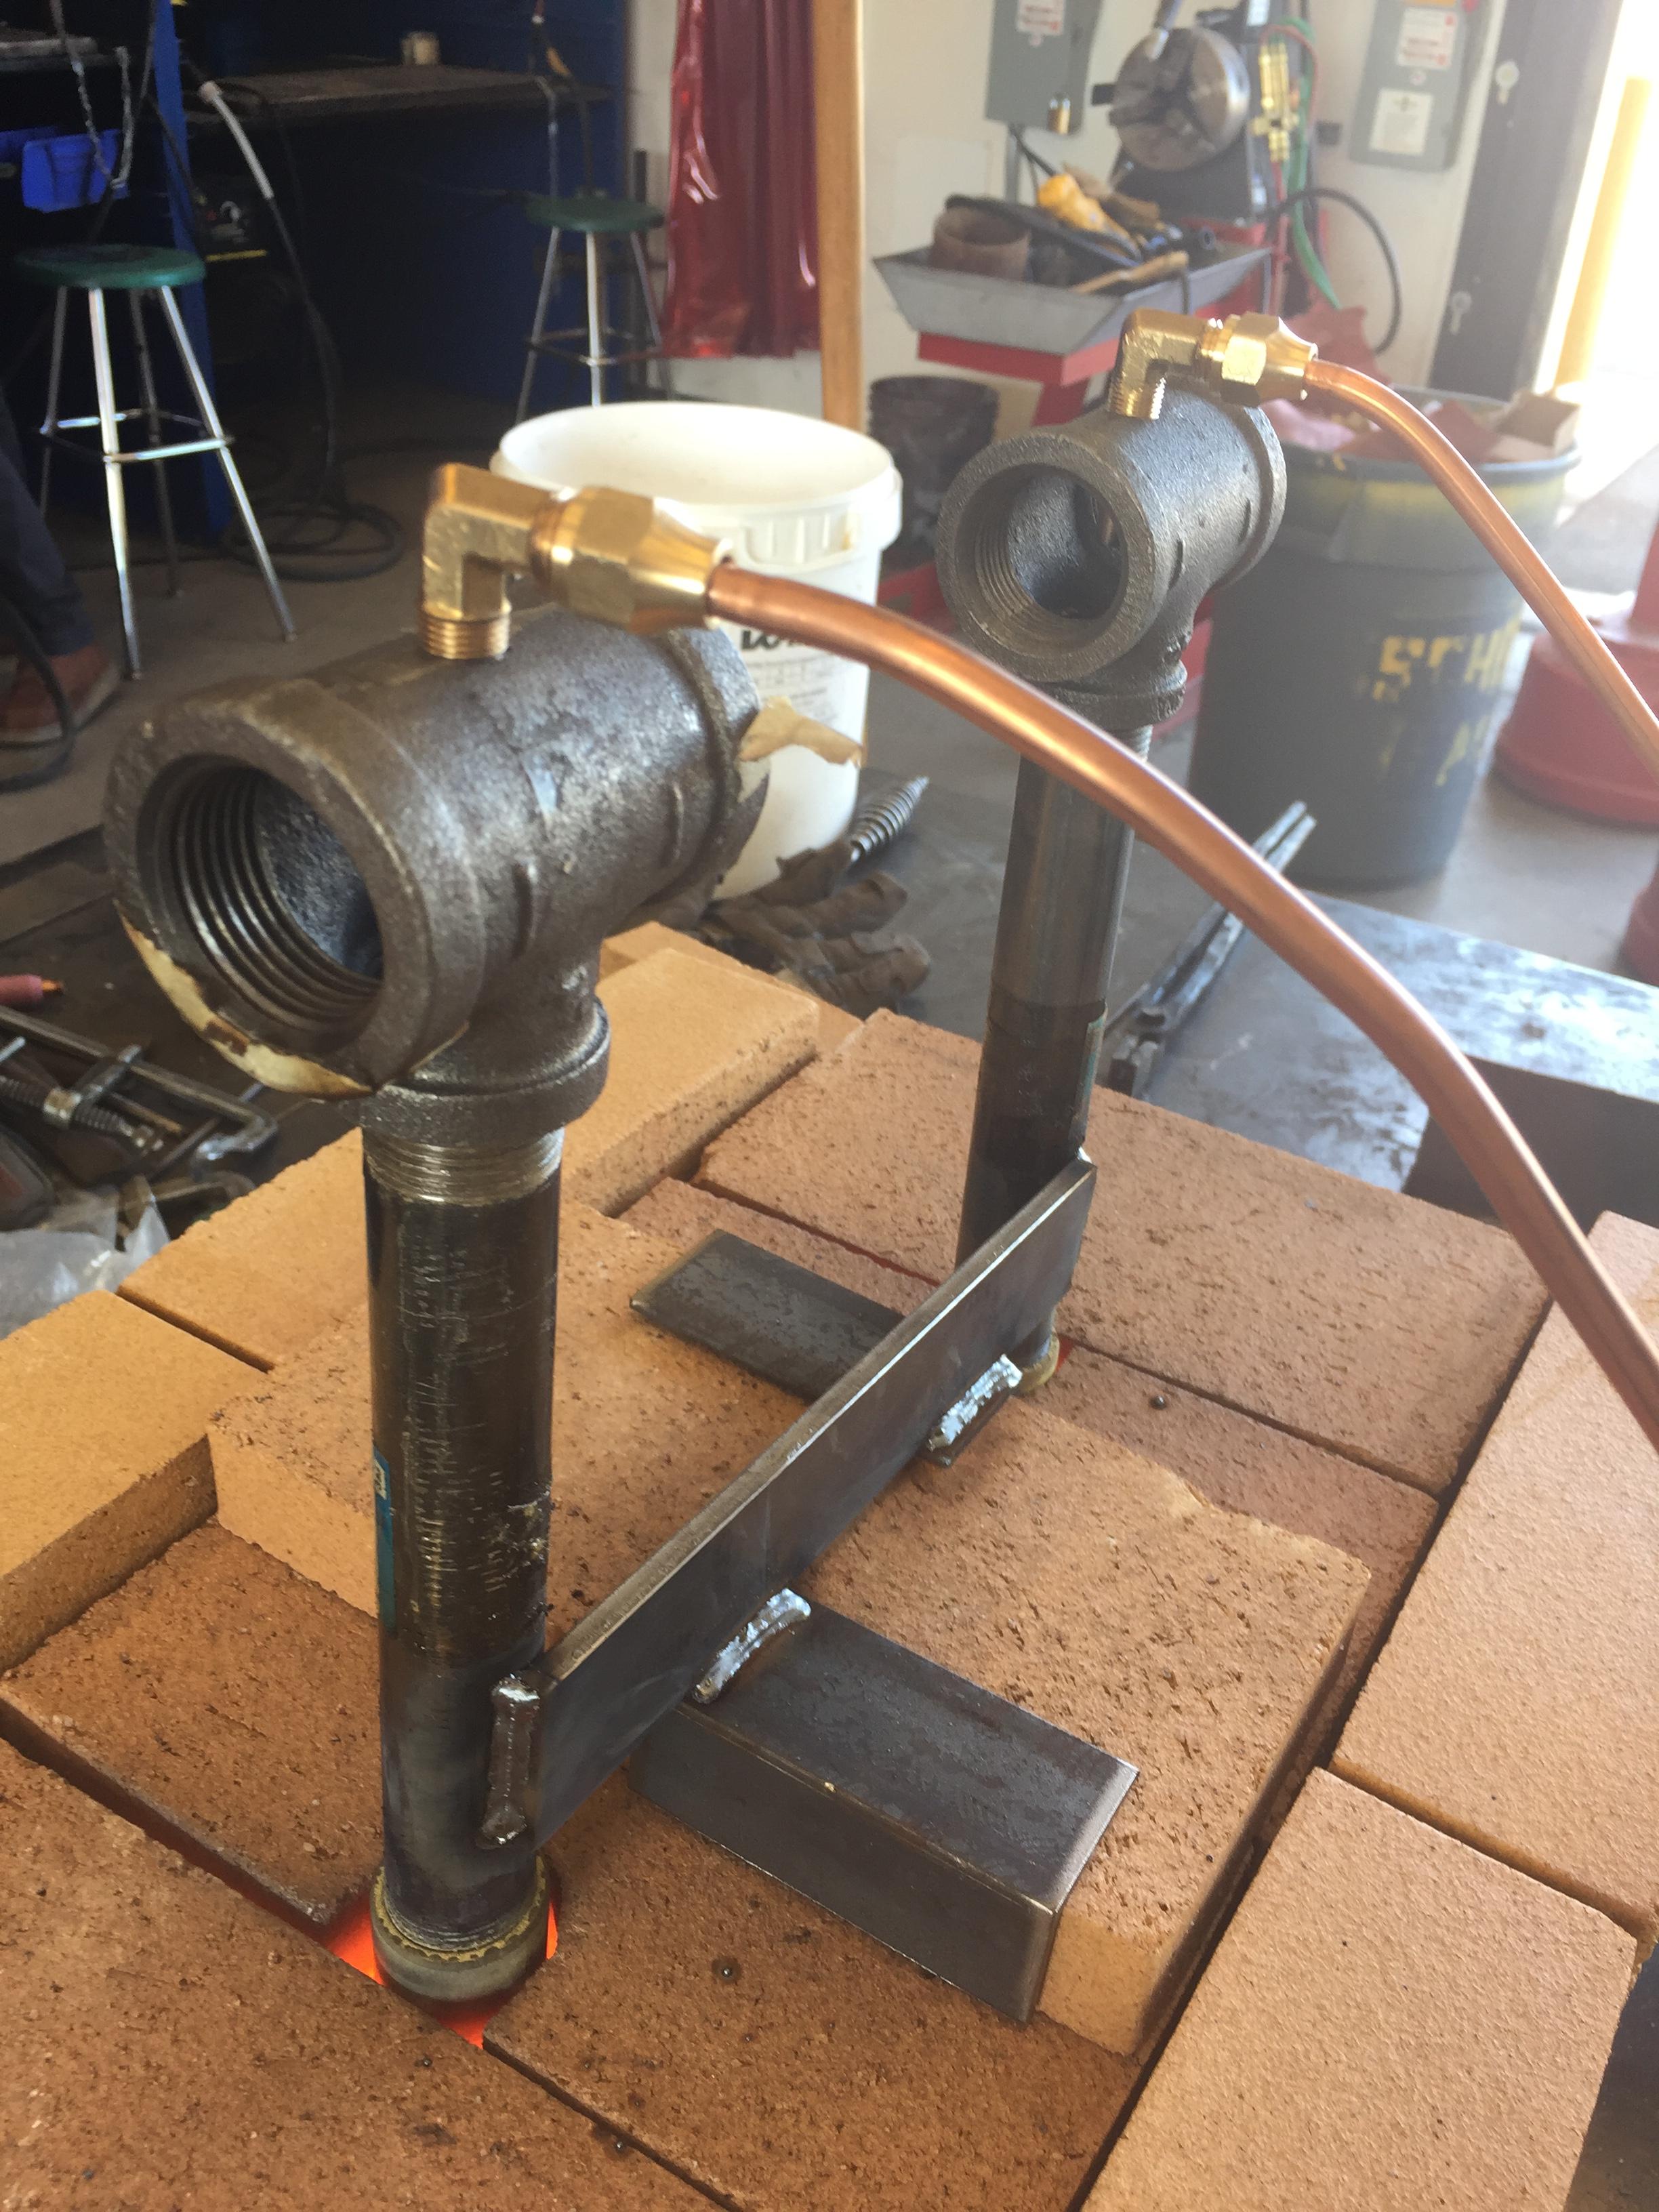
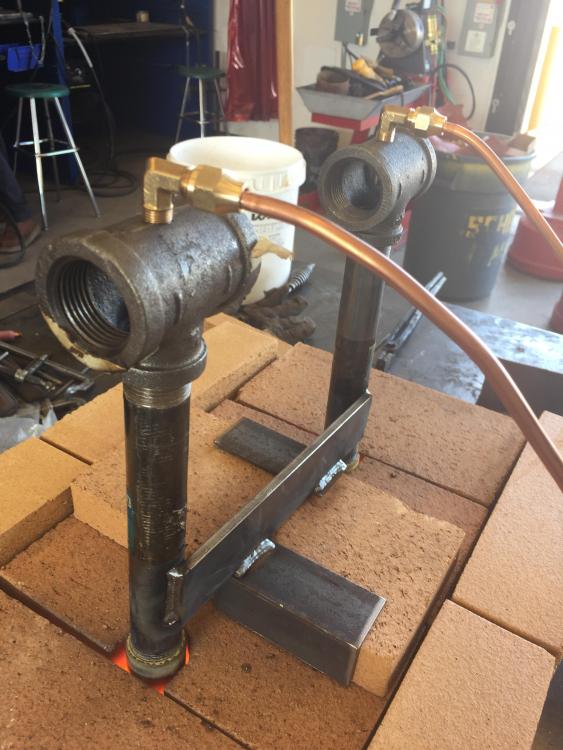
I'm going to drag up this dead thread to seek advice on my build. I am making 2 3/4" T burners. I built them directly off the plans, using tweco .035 mig tips. The only difference between what I have and the directions is the 1/8mipX1/4 flare adapters that were available were 90* elbows. I used a milling machine to drill the holes in the tees. Indicated a piece of pipe to center, threaded the tee on, drilled, and tapped before moving anything. The jets point directly down the middle of the burner tube. I forged out merchant couplers(thread protectors) to mimic the rough 1:12 taper for the flare nozzles. The problem I'm having is getting the flame to sustain off the end of the nozzle. I have to choke one side completly off and almost 20% of the other side to get it to stabilize. It seems like the gas orifice needs to be further into the burner tube. I tried trimming it down (in vain) thinking it needed more space to mix and more air. I trimmed it all the way down to about 3/8" from the face of the brass fitting. after fiddling with that for quite some time(including trying .030 and .045 mig tips since I had them) I finally pulled the gas apparatus out of the burner, pulled the tee off the end and held it in place in the burner tube while a few assistants helped with lighting and manning the gas valve. I was able to get a much bluer, louder flame. I'm at a loss. I bought some 3/4" tees hoping to get the mig too closer into the burner tube, but I'm not sure if they will work. I know YouTube is not a reliable source of info, but my flames do. It resemble those of other t burners I've seen. My flames look green. If I add more air(or choke less) the flames go out. Thanks!
-
what did you make the stand out of? sure looks pretty! I'm in the market for a new anvil for work
-
my first coal forge build-lots of pics
Teachagmech replied to Teachagmech's topic in Solid Fuel Forges
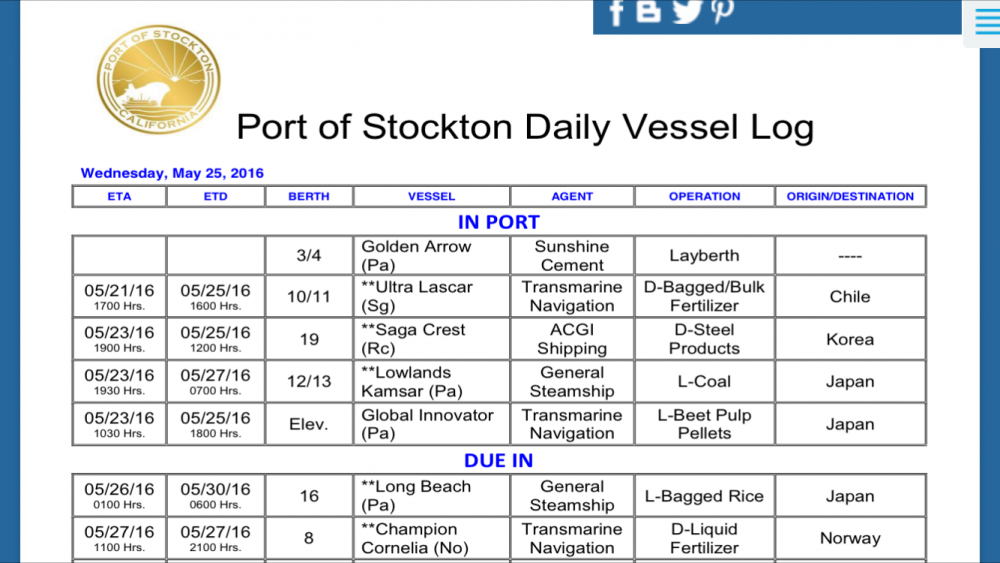
Well I called the port today to try to play the teacher card. I'd really like to bring forge work back to the high school shop. From my house, it 30 min to the yard in the port. I doubt they'd miss even 200lbs in a 55gal drum.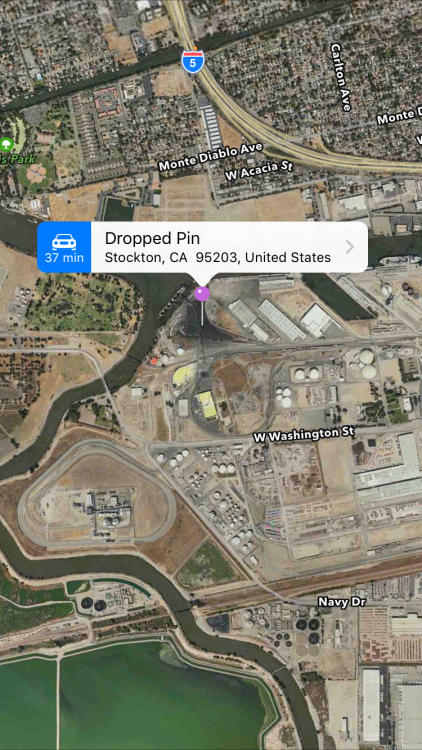
-
my first coal forge build-lots of pics
Teachagmech replied to Teachagmech's topic in Solid Fuel Forges
I know there used to be a coal seam about 50 miles from here, but it's all since been shut down by green do-gooders from San Francisco and Los Angeles. 30 years ago it'd be easy to get. And if liberating a few pounds off a railcar wasn't a felony I'd have a ton by now. There's a siding across the street from me that frequently overnights coal trains headed for the ports. Too bad they don't sell to the public. -
my first coal forge build-lots of pics
Teachagmech replied to Teachagmech's topic in Solid Fuel Forges
It seems like as soon as the fire fleas stop biting the charcoals gone. Around here my worry is set in the countryside on fire. The $25 a bag for Coalsounds like it's hard to be worth it too. Heck buy it from Centaur Forge for $50 a bag doesn't sound that bad for what I paid for the charcoal -
my first coal forge build-lots of pics
Teachagmech replied to Teachagmech's topic in Solid Fuel Forges
Alright, so it works! but man does it ever make a friggin mess! The ash fireflies are a real b&*[#! And they don't feel really good when they fall on your arms end of the hour I've decided I definitely need to cut the firepot down. It's way too deep. I can only get to about 5-6" of material in the heart of the fire. I really wish I had a bag of coal or coke to use. I went through 20lbs of charcoal in about 90 minutes. I also want to put a smaller fan on it. The blower is WAY too much air. As I thought. -
my first coal forge build-lots of pics
Teachagmech replied to Teachagmech's topic in Solid Fuel Forges
I've tried. I saw the thread, checked it out. No dice here. They can't even order it. Which kinda pizzed me off a bit since TSC is literally 12 miles from my house. Loomis is a solid 2 hours. Maybe I'll get a friend who's going to Colorado for deer season this year pick me up a couple 4-5 bags on his way home. I'm not super happy with my forge table right now. My last band saw blade bit the dust at work the other day, so building a real table isn't in the cards this school year. I've got it tacked to a makeshift repurposed table thing I pulled from the scrap bin. It's pretty bad and a tad short, but it'll work for now until I figure out how to swing a hammer. Well give 'er 'ell in the mornin tho -
my first coal forge build-lots of pics
Teachagmech replied to Teachagmech's topic in Solid Fuel Forges
I picked myself up a 20lb bag of mesquite lump charcoal for $12 today. I found a place to buy coal and coke for $25/50lb bag. It's about as good as I can find. If I ever get up by Loomis, CA I'll stop in and get a bag. I think the consumption of coal/coke would be less than that of charcoal and it's the same price. I also like that coal doesn't send off fireflies like charcoal does. Any my input would be helpful. If i like th charcoal and there's not much benefit to coal over charcoal, then I'll build a retort and make my own. -
my first coal forge build-lots of pics
Teachagmech replied to Teachagmech's topic in Solid Fuel Forges
I've used the oxy fuel method a lot at school, but it's a pricy heat source to say the least. -
That's why I host my pics on photobucket. I've had too many things lost to "updates". I'd like to try a smaller version-- say a 1/4 barrel size maybe
-
my first coal forge build-lots of pics
Teachagmech replied to Teachagmech's topic in Solid Fuel Forges
Me too! As I'm finding here in central California coal is nearly impossible to come by unless I want to pay extortionous amounts from centaur forge for a bag of coal. I think I'm going to keep the pot deep and use lump charcoal Sounds like some neat stuff to work with but I'm likely a long way from using any of it. I'm thinking of a table something close to this maybe without the lip? I'm not sure yet -
my first coal forge build-lots of pics
Teachagmech replied to Teachagmech's topic in Solid Fuel Forges
Seems to be a south-eastern thing. I've never heard of it. Looks really nice when it's all done up though. -
my first coal forge build-lots of pics
Teachagmech replied to Teachagmech's topic in Solid Fuel Forges
I'm not sure what you mean by Osage. It's a simple file knife. Applewood handles with copper pins. Cold chemical blue finish. -
my first coal forge build-lots of pics
Teachagmech replied to Teachagmech's topic in Solid Fuel Forges
Frosty: yes, table is to come, but like i said, I want to make sure the firepot is correct before the table goes down. TwistedCustoms: thanks. That's what I was thinking. From what I've read, charcoal forges require a deeper coal bed. is there any merit in building another false floor to brim the bottom up rather than cutting the top down? This way I could pull the mid-way plate out of the firepot and forge with charcoal? Just spit-balling wondering if my ideas will stick. On those same lines, would there be any advantage to increasing the air blast area if I did put a false floor in the firepot? For what it's worth, my first forge was a cap from a piece of 16" flange pipe with a chunk of pipe taped to a garden hose with a leaf blower taped to the other side. Made this file knife with it. there are a lot of things I'd like to improve on, so I need a new forge. -
Well, I'm new here, and so far, I've learned a TON of stuff from the forums here at IFI. I've always been fond of blacksmith work and the smell of coal burning. I've also taken an interest in bladesmithing(who hasn't in recent years) so I wanted to build a forge. A gas forge would have been neat, but the nostalgic draw of coal has brought me in that direction. At first I was going to build a hand crank centrifugal blower, but that ended up a bust when I found a half-broken 6" bench grinder motor. the shaft was true, but one side guard was broken and with it a healthy chunk of the bearing support. It wasn't going to be any good for a grinder, but it was a 1/2 HP motor for free...and who doesn't like free!?!!!???!!! so I dug up some stuff on the hand crank blower build thread here, went and did some of my own research, and sprinkled in some of my own ideas and this is what I came up with: then came the fire pot with a makeshift clinker breaker and a Tuyere then came the charge air pipe with an ash dump at the bottom I don't know how effective it will be, and I'm a little worried of fire pot being too deep, but I can always cut it down. If anyone has any input on that, I'd love to hear it since I'll be starting on the table on Monday and would like to be able to move forward without taking steps backward. at this moment, the pot is 4" deep, 9" wide at the top, and 13" long at the top. Hopefully I'm not too far from where I want to be(or where I should be). thanks in advance for all your help and suggestions
-
alright, well I have success! my blower Jr has a 7.5" diameter wheel. its driven off of a broken bench grinder motor. the smaller fan size allows the grinder motor to come off the start cycle, run at almost full rpm, and doesn't show many signs of getting hot. I've fixed a shroud around the motor to direct the intake air over the outside case of the motor to help aid in cooling. its a bit noisy when running open with no restriction, but quickly quiets down when a load is placed on it. Now to build the forge! as you can see below, the grinder motor has seen better days. the guard broke off and took a chunk of the bearing support with it. that side is pretty useless, so I just cut the end of the shaft off. The intake shroud is 22ga galvanized sheet that I had lying around. I hemmed the edge and sent it through the roller to kinda match the radius of the snail. the tab tack welded to the end was just to add a little load to the fan to quiet it down. i also recut the cover plate to restrict the intake air to the motor side. I ended up cutting the other opening larger. still to do: replace the power cord build the forge make fire shape metal!
-
Bewildering is an understatement! I'm fascinated by them. Don't know how variations do what they do, but it's neat to see. Update: the poor little bench grinder is gonna burn up before the fire ever gets hot. I bent the vanes about 30 degrees further, rebalanced the rotor, and noticed a pretty substantial pressure increase. Not as much air, but is much more resistant to cavitation. I'm gonna make a Jr version. Closer to 7" I think.
-
well judging by the calculations earlier in this thread, somewhere in the neighborhood of 2000 rpm. if I can get away with lower, i'll reduce the speed by either a speed control or rigging a jack shaft and belt drive. Like I said, if nothing else, its a fun project to say I've built one. Also, the backward spiral on the vane design can increase the air velocity at the tip of the fan blades, thus increasing pressure. I may end up going for a 3rd revision on the fan blade assembly and making an even steeper backward pitch to lessen the volume of air, but increase the pressure at the outlet. I'm not a fluid engineer either, but this is what my research has lead me to believe. The rotating portion of the fan is only made of 3/16" plate and weighs only slightly more than a new grinder wheel. If I burn up the grinder motor, I'll know it was too heavy. if it works well enough but is too big, I can always build another smaller version. Like I said originally this was going to be a hand cranked blower so I was looking for larger diameter to get the critical blade speed with lower RPM. Now that I'm putting a motor on it, I can easily go smaller which would be less strain on the motor which will let it run closer to its no load speed of 3600rpm.
-
Alright, nothing like reviving an otherwise dead thread for my first post! I'll start by introducing myself: im Mike. I am an agriculture mechanics teacher at a high school in central California. I'm not a blacksmith by trade, and that'll be pretty apparent if you see any smith work pics of mine. Ive wanted a forge for quite some time, and though I could probably build a gas forge, there's something really nostalgic about coal that peaks my interest. I'm looking to build a variant of the brake drum forge, and needed a fan, so in light of this thread (which is where I got the real motivation for this) I'm building the blower fan first. It's a 12" rotor which will likely have enough CFM at speed to keep a bounce house inflated. My first attempt/ design used a full backing plate with 7 veins. This is before it warped miserably from welding (14ga) So I chose to redesign mid way. The new design is an open paddle type fan. Still the same size and in the same shroud. not sure why I chose 7 veins, I guess I wanted an odd number and 5 didn't look like enough. And here is the rotor put together i plan to drive the fan with an old bench grinder motor. The air intake would come around the motor to keep it cool(hopefully)