Daswulf
-
Posts
9,762 -
Joined
-
Last visited
Content Type
Profiles
Forums
Articles
Gallery
Downloads
Events
Everything posted by Daswulf
-
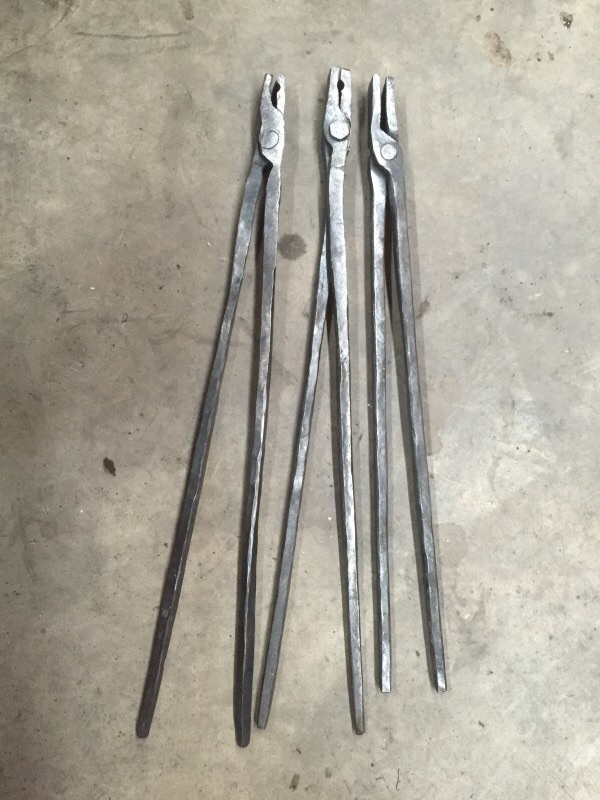
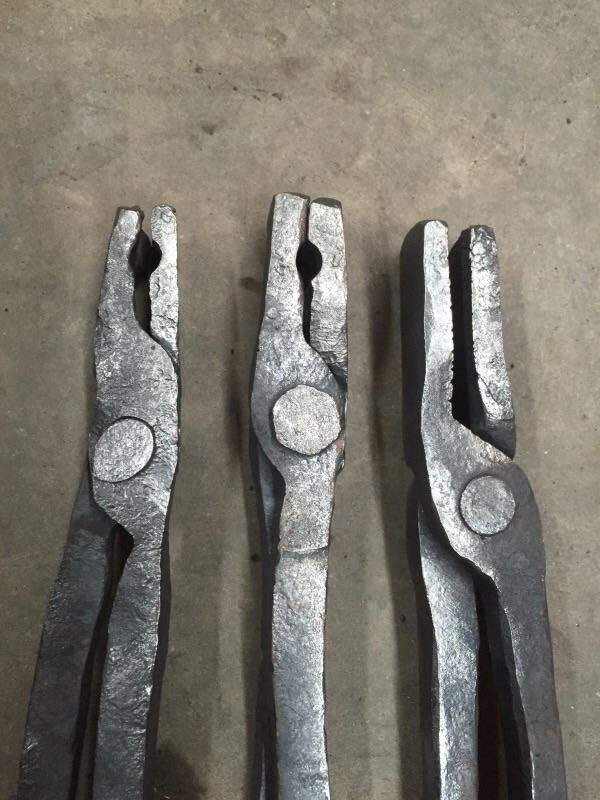
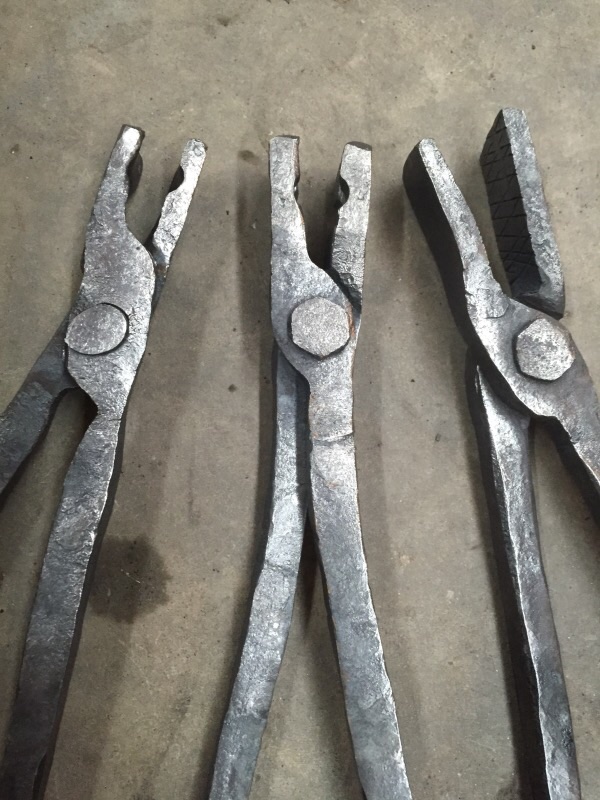
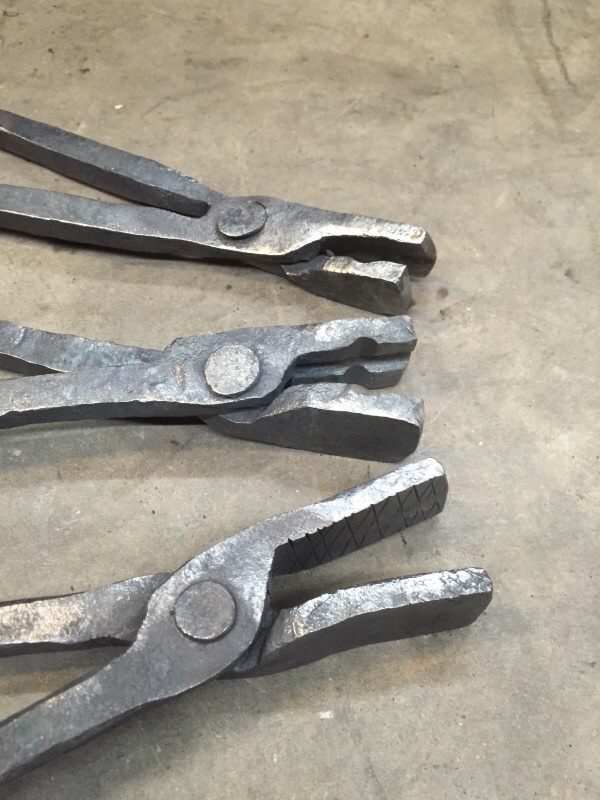
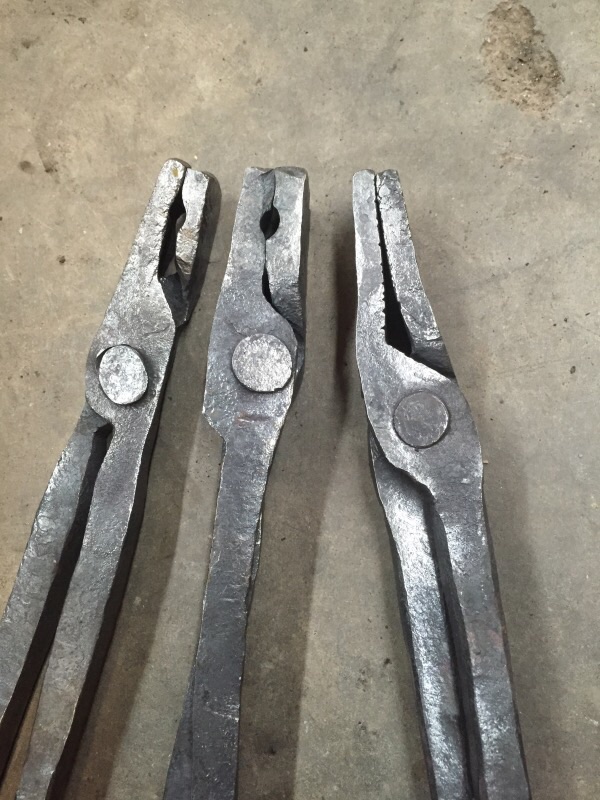
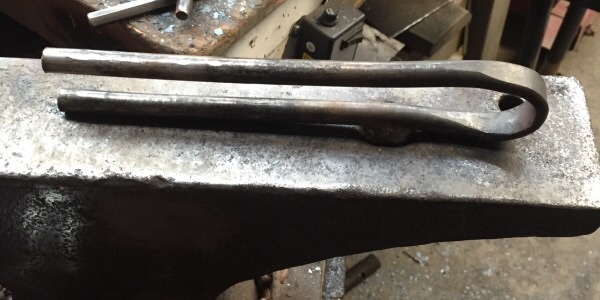
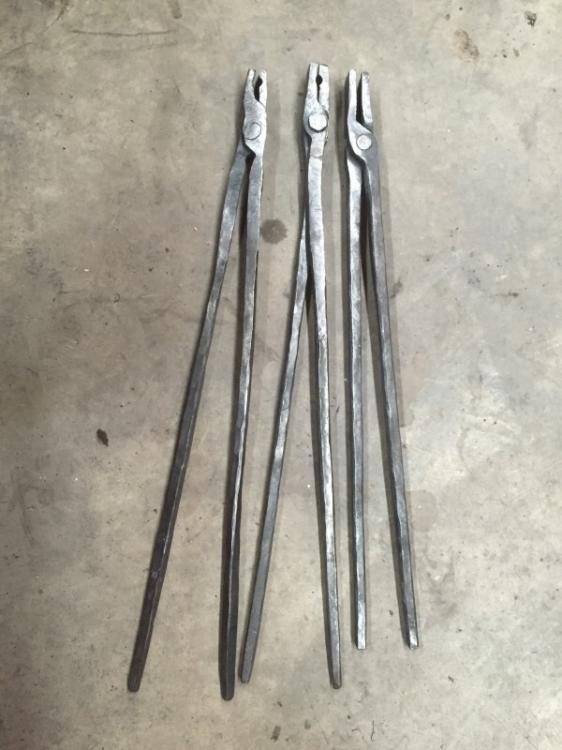
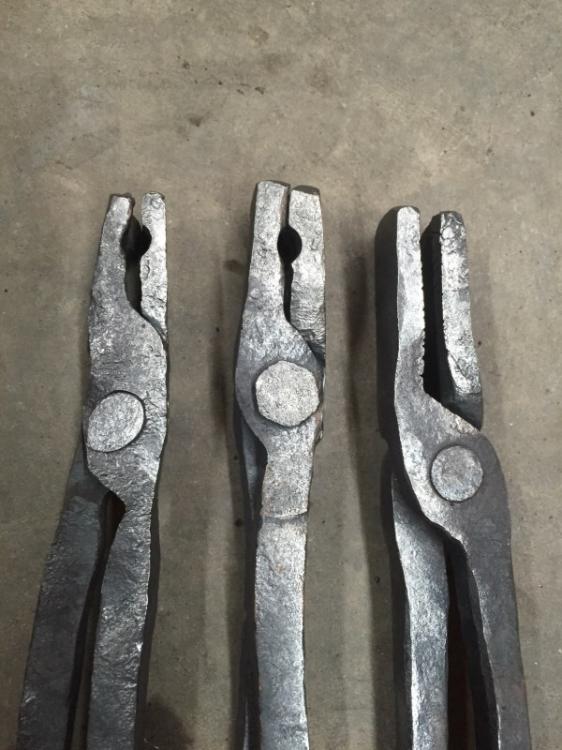
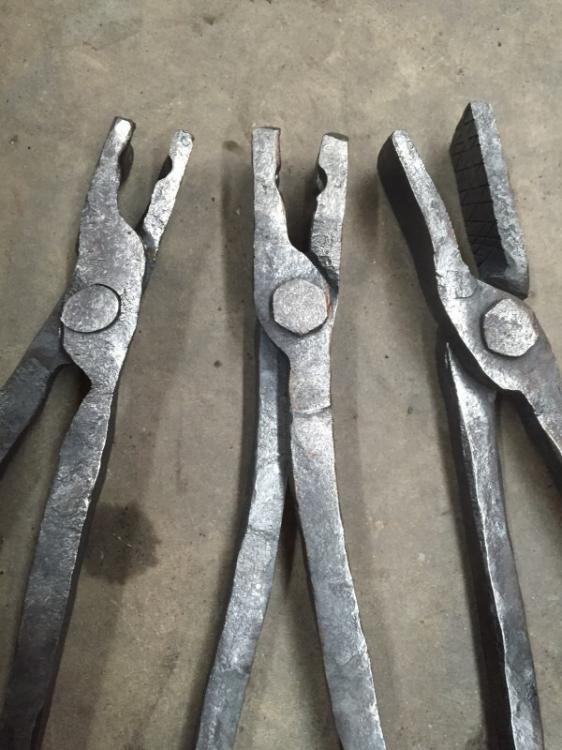
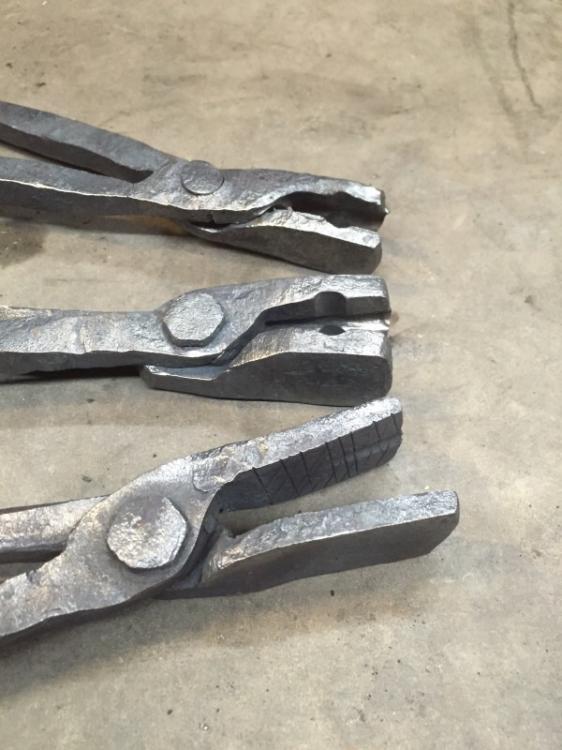
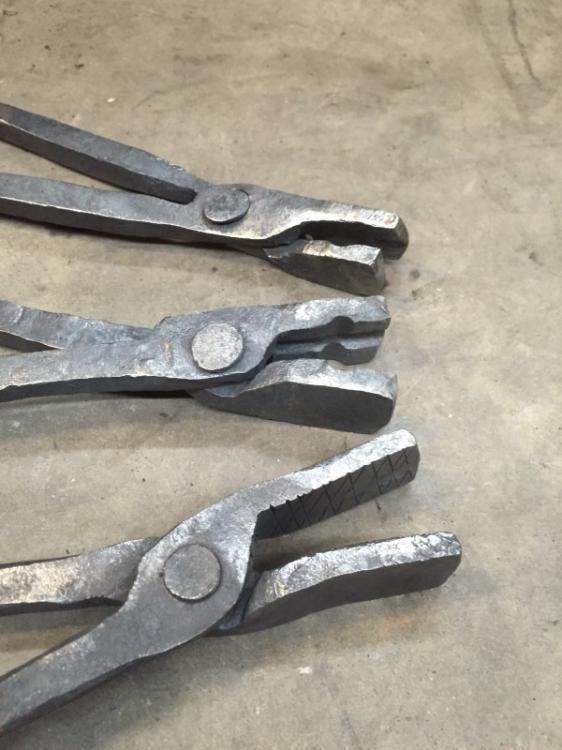
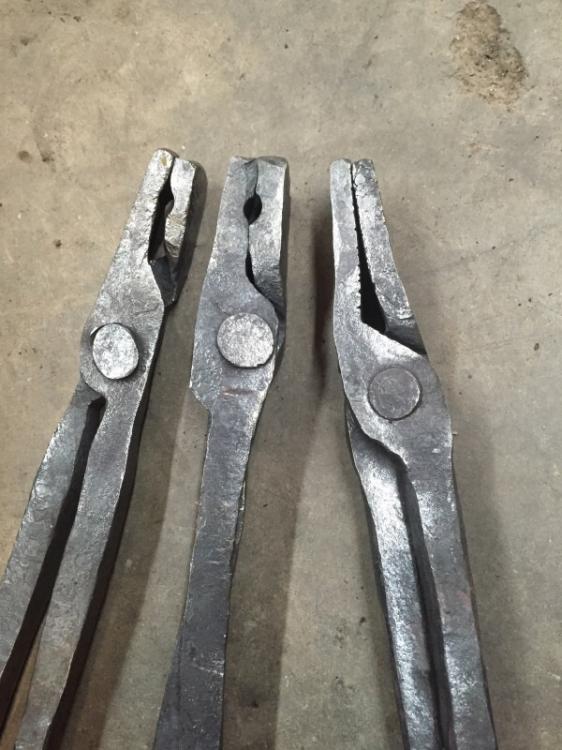
Ok the other night I completed a third pair of tongs. Didn't get pictures then as I was also doing an oil change and another repair in between. Got pics tonight. I changed the bit style and it didn't end up as I was wanting but I feel I got the reins "better". Newest tongs have the longer flat bit. I did chisel a cross hatch in them but after thinking figured that it wouldn't be of use. And did give it a sloppy strike with 1/4" stock before I realized that I hadn't wanted to. Ugh the price of being distracted from what your trying to do. The bits are off but I feel I improved on the basic form. I will continue the quest as well as others to improve my hammering.
-
Even with the big boys, you use what work for the job. That's a good lesson.
-
haha i'm not very envious, but a larger anvill then a 100# would be nice. i'm in no hurry tho. and i like the post vices i have so far. no big deal at least i have pretty good stuff i scrounged to start with. i'm happy so far tho i do want to improve my skills And equipment. skills/ knowledge are first.
-
Those are good ideas on that one. I really had no clue other then they look like the one half of box jaw tongs. Thank you for the ideas. i never would have thought of collars. Never know, thats why it's nice to get others opinions, guesses, ideas. On the longer piece, i had some ideas on uses but i'd hate to modify such a nice large piece only to find a better use for it later(has happened) when i could have made a simpler, smaller, solution earlier off.
-
that is what that appears to be.
-
Thank you for clearing it up for me. As others have said there is a lot of info on the Internet and a lot of it can be generalized or just partial info. Those are probably pretty large anvils. I also thought about it and am thinking it would be hard to guess a repurposing for these without knowing what I'd be doing. I'd settle for any ideas tho. there are things to be learned through everything.
-
sorry i meant the stems (part that would be held by vice i guess) are 1 1/2" . thought it would be a bit large for a hardy hole on most any anvil. just trying to describe them as the looked. I still have alot to learn and i was wrong in thinking just because it has a stem for holding like that it would be considered a hardy tool. and the obvious truth. We have an entire section devoted to tools, since it appears your busy schedule has prevented you from looking through the IFI forum to notice, I will relocate it for you.
-
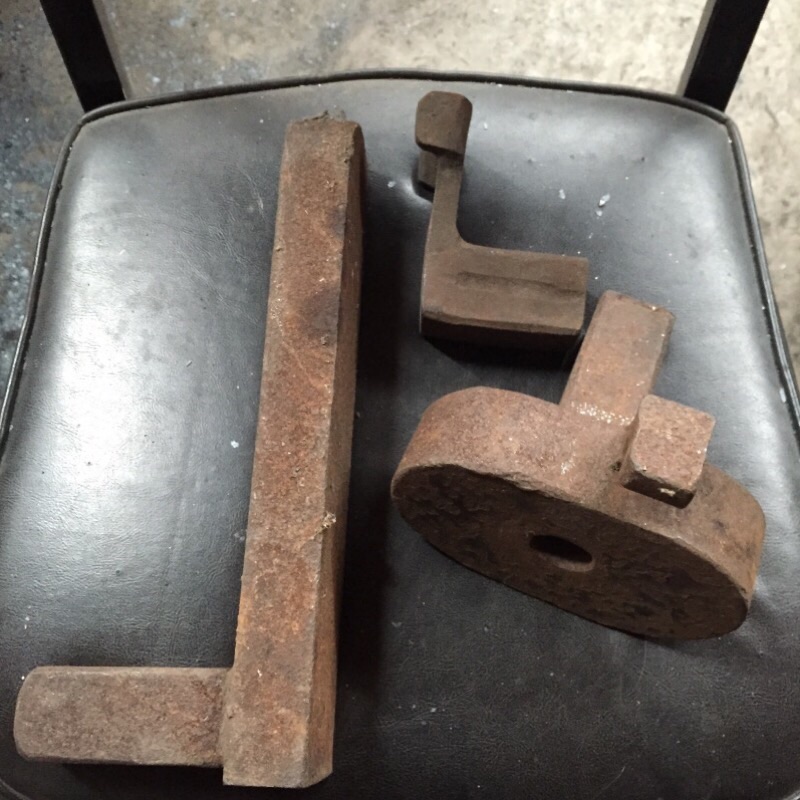
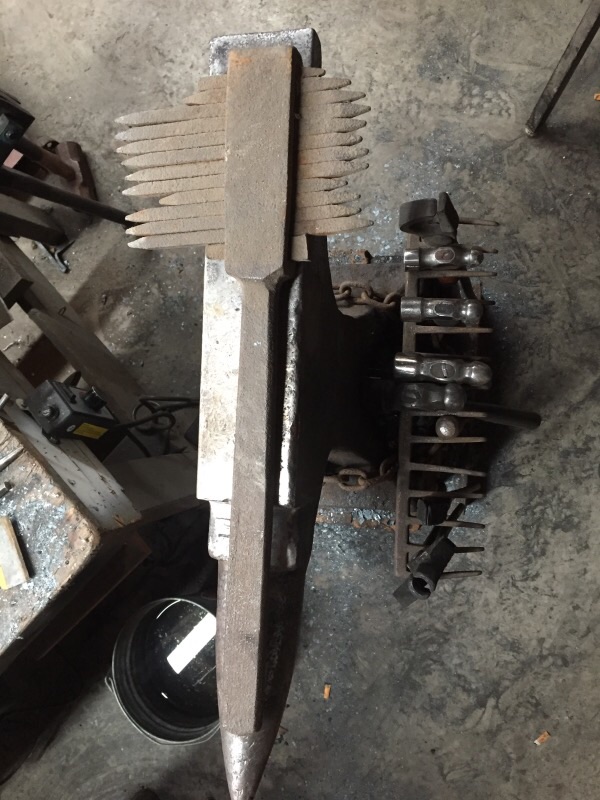
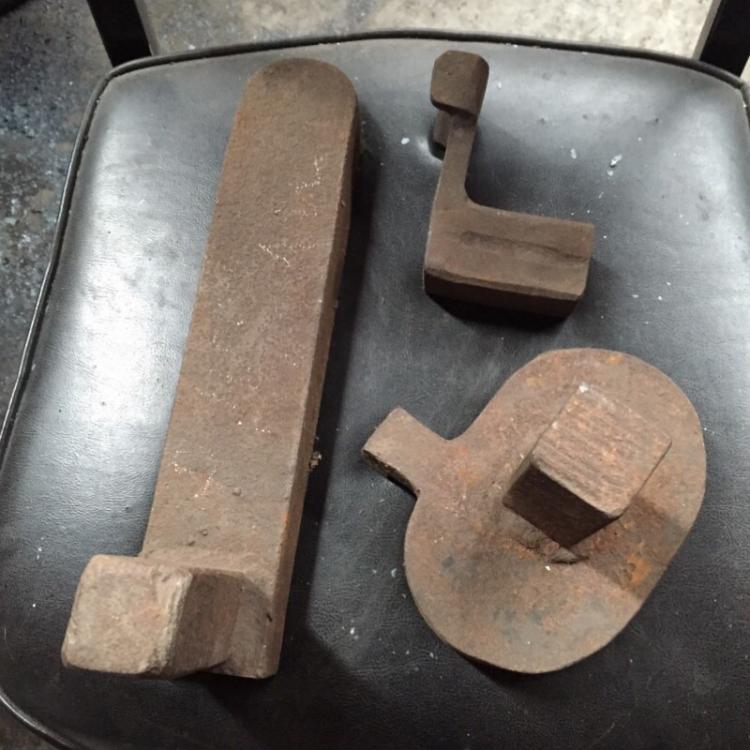
my brother often heads to some auctions I can't make it to and picked these guys up for me. The hardy is 1 1/2" so no good in my little hardy hole on my anvil but would work in a vice. I can tell oval shaped one in the lower right is for scrolling/bending. The other two have me baffled as to what they would really be intended for. The large one would make a nice small anvil top for in a vice but at the moment I don't see a need for it as that. I have absolutely no ideas on the little one up top. Anyone have any repurposing ideas or what I could use them for? Either way it's just some stuff I'll keep hanging on to till a purpose fits them.

-
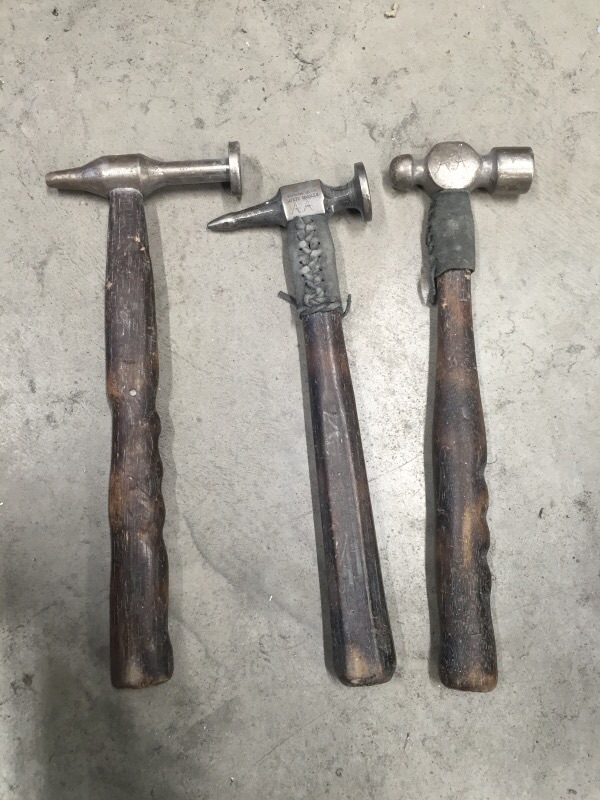
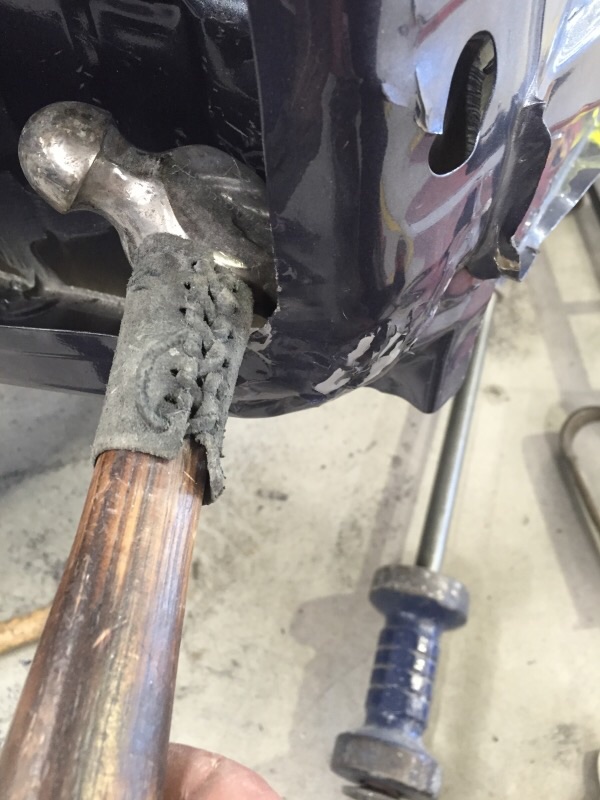
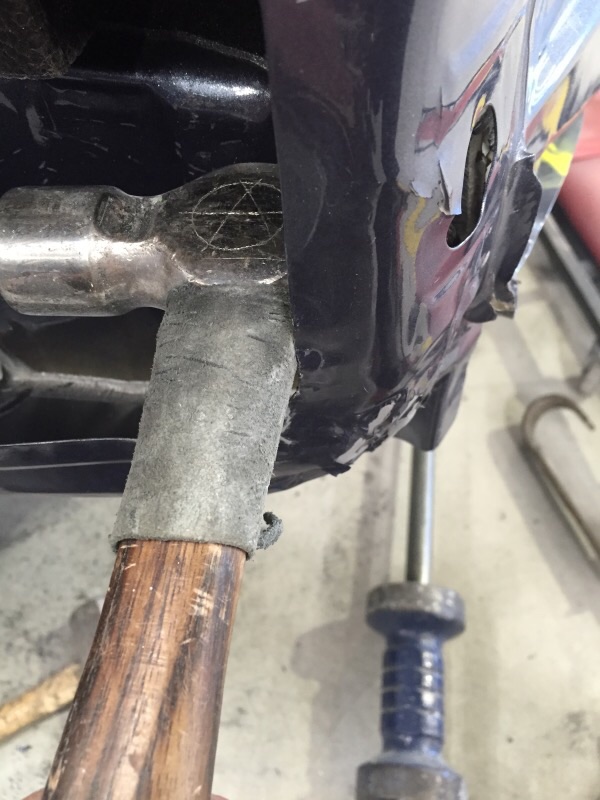
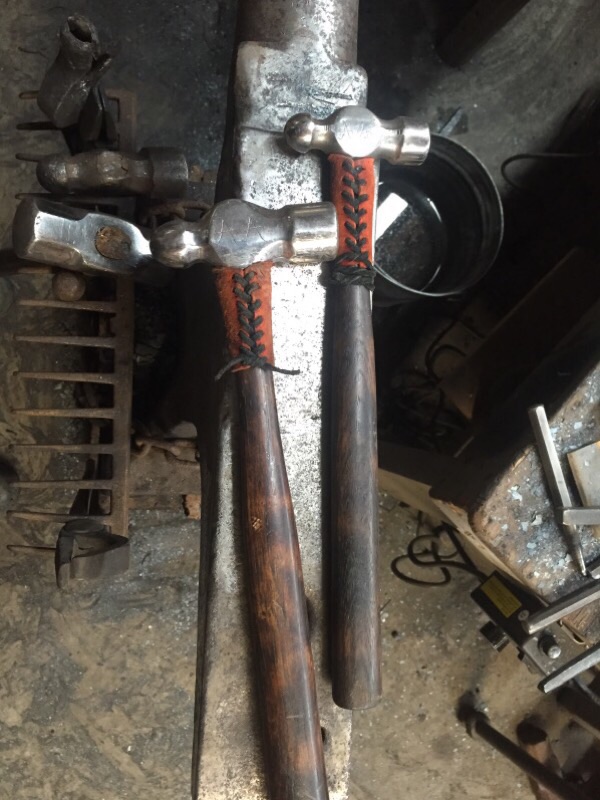
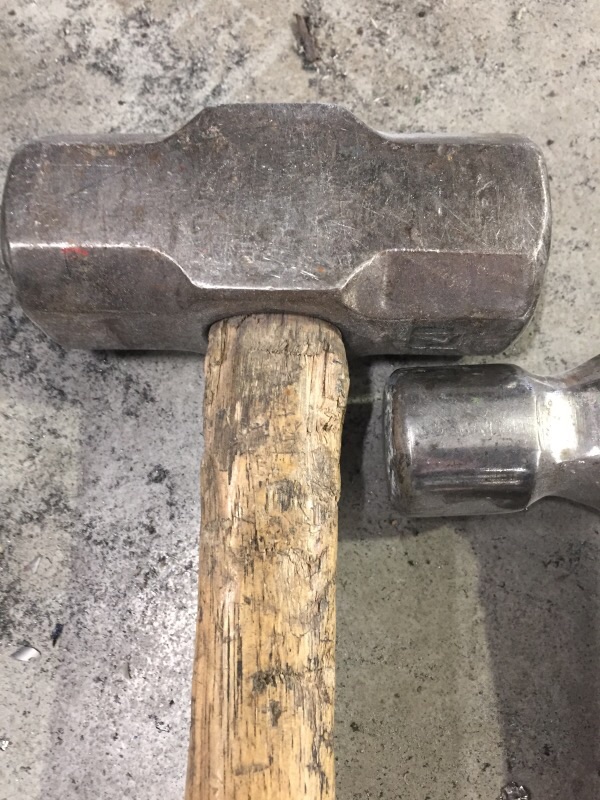
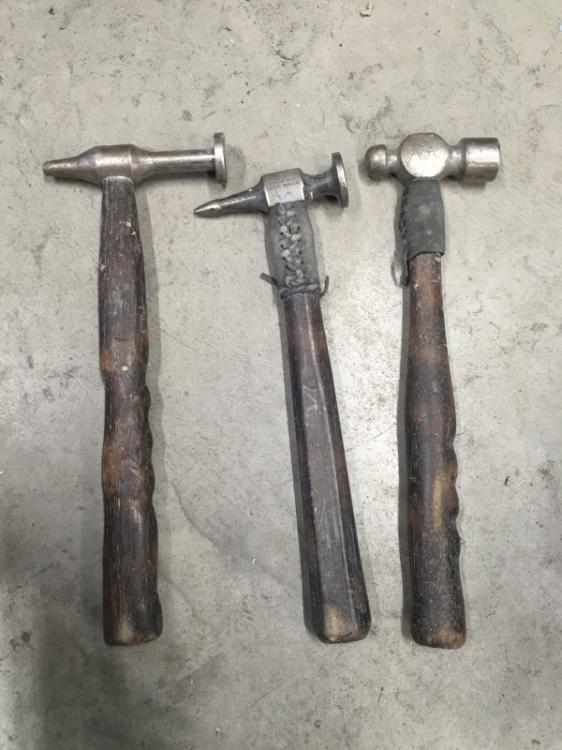
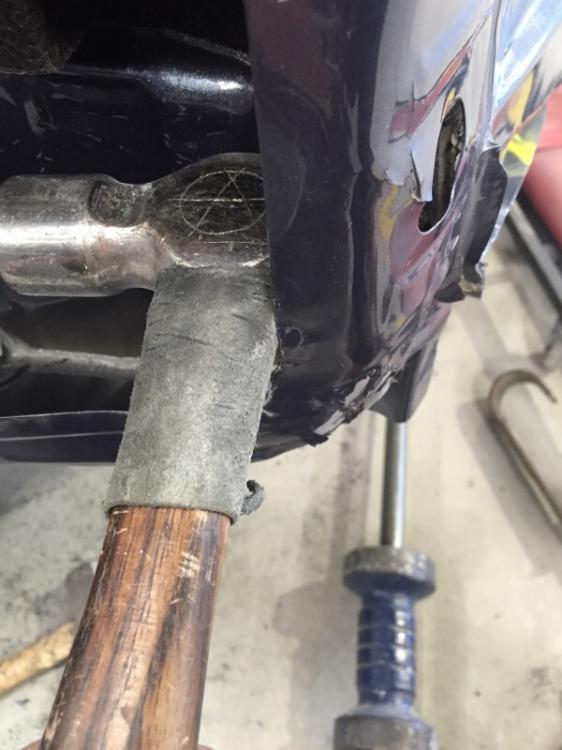
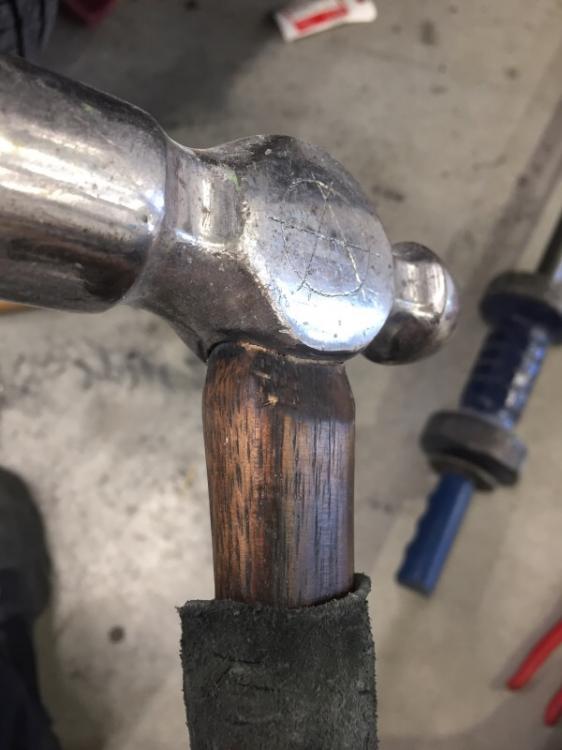
I recently replaced the handle of a ball pein hammer that has been with me from the start of my auto body career. I dressed up the new handle and got their junk off of it sanded it down and gave it a burned look as well as gave it a beeswax/linseed finish. After all this work and cleaning up the head ( since it had been such a good hammer to me) I thought about why I had to replace the handle in the first place. Over strikes! I don't know if this would happen much in black smithing but there could be times and it's simple to protect a nice new handle from certain unjust cruelty. The fix is simple. A section of leather around just under the head then punch some holes and lace it up. Sure you could wrap it in tape or something but where's the class in that. If you have a tool that's been good to you and you have a little down time why not give it some tlc. You can easily use tape around the hammer where you want the wrap then cut it to use as a pattern. punch some holes and lace it up with some leather cord. A touch of super glue will keep the finish knot snug. ( which I did on a friends I fixed up for him but some of mine need relaced because I didn't glue the knot no big deal.) point is it works. Here's some pictures explaining my point. Again I mainly deal with this with body work getting into tight spots, it's not like I over strike forging on the anvil just thought I'd share in case it could help someone that runs into the issue.


-
Well as long as your sure your good on em, cut em up and scrap em in pieces. Save the springs and axle rods and good bits for forging. And like Thomas said the ban would make a good storage shed of you needed it.
-
It's one heavy beast of a tool. I wouldn't want to swing that at stone too long. Well now it's a back scratcher. The Crandall cranium tamper.
-
You nailed it ThomasPowers! Mystery solved.
-
Nobody Special, I was looking on the what is this and after so many posts the pictures won't show up for me. And when ya don't know what something is, the picture is kind of important. JHCC, it would be one wicked and heavy back scratcher. Might scratch your back off.
-
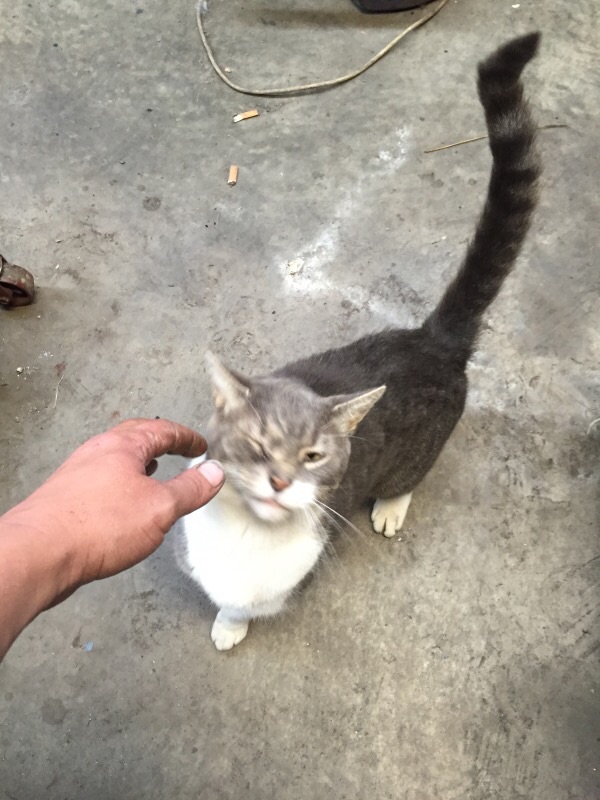
I draw square, then round. All good advice Frosty. I'll work on it. I do have off blows and wandering blows here and there, I'm sure i need to pay attention in control of the piece I'm hammering as well as my hammer blows. As for nails that's something I haven't researched yet, I'll look it up and give it a go. I had a longer post but this was the main stuff. and I never got a surprise in my shoe, but he is picky how ya pet him.
-
Forbidden
-
had to google that one, and it's a possibility but cant find another one like it so far.
-
ok so i've had some interesting ideas on another forum that's gone now but what is this? best idea someone posted was that it may be a gauge to check RR track as it's being made for uniformity. it has a wedge pin that can be loosened and tightened to "set" the pins where you want em. it's Heavy steel/iron. and it was too interesting to pass up at an auction i was at. i dont remember purchase price. i like it, who cares Any idea?
-
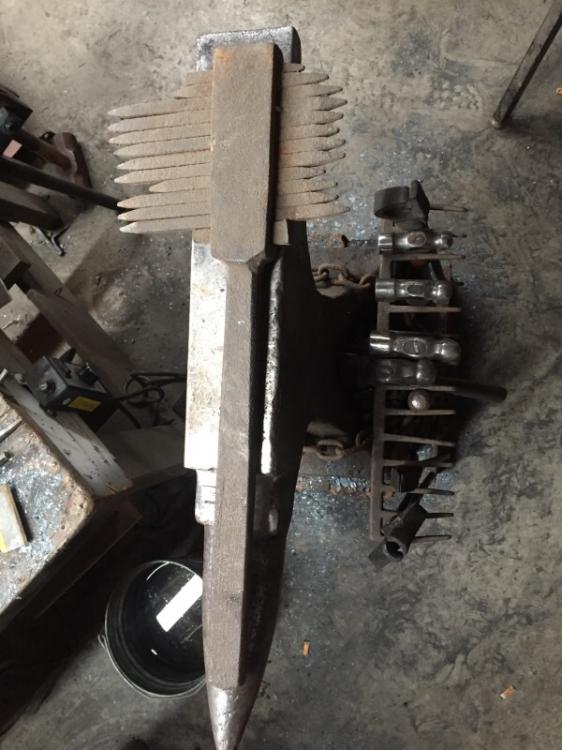
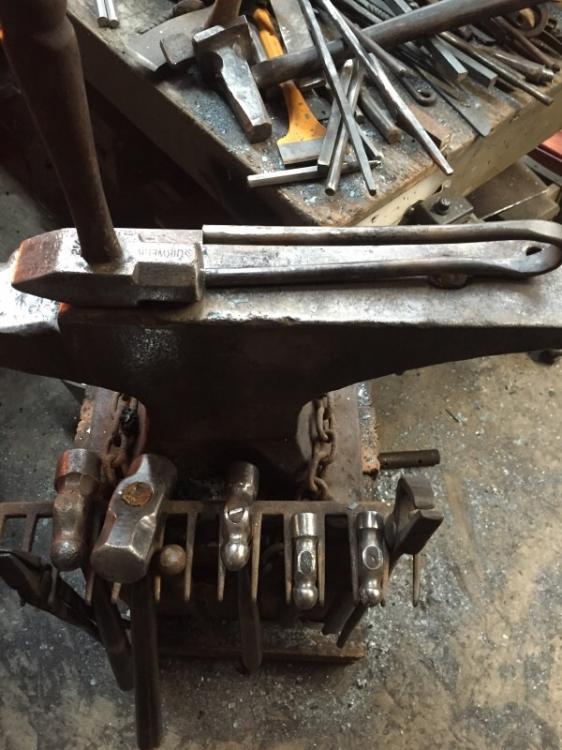
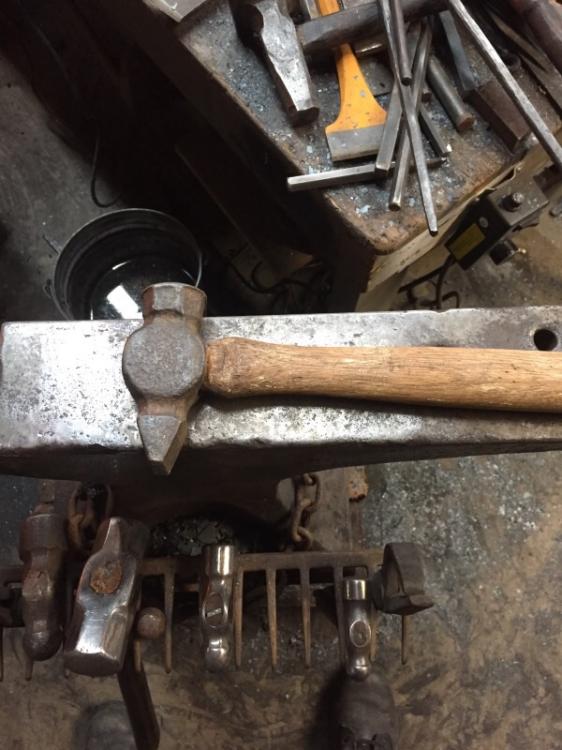
ok so alot of text i added ended up in the forbidden mist or something from left to right. drawn out on the anvil face edge, the anvil horn and cross pein hammer, and my fuller. the results for me were that the fuller won with the least deformation to the piece as i drew it out. not that it matters but i (feel) it was quicker and maybe better for me. both other methods worked about as quick with (for me) the anvil edge being the slowest. i used my 2 1/2 Quickwerk hammer for the first and last but switched to a lighter more broad cross pein for the anvil face which led to faster striking there. thats my spring fuller in the pic..any advice or improvement ideas are welcome. and i gatta include my annoying but ever bothersome shop cat Boots. gatta love him.( or sometimes not when he is annoying me)
-
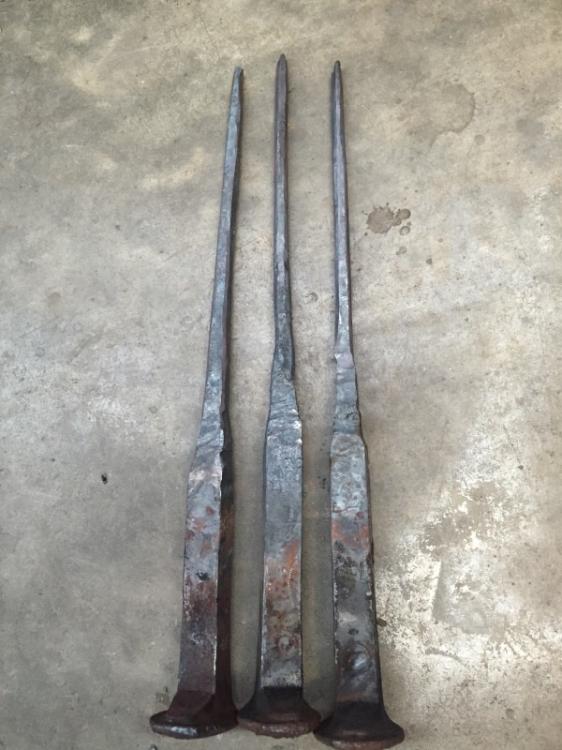
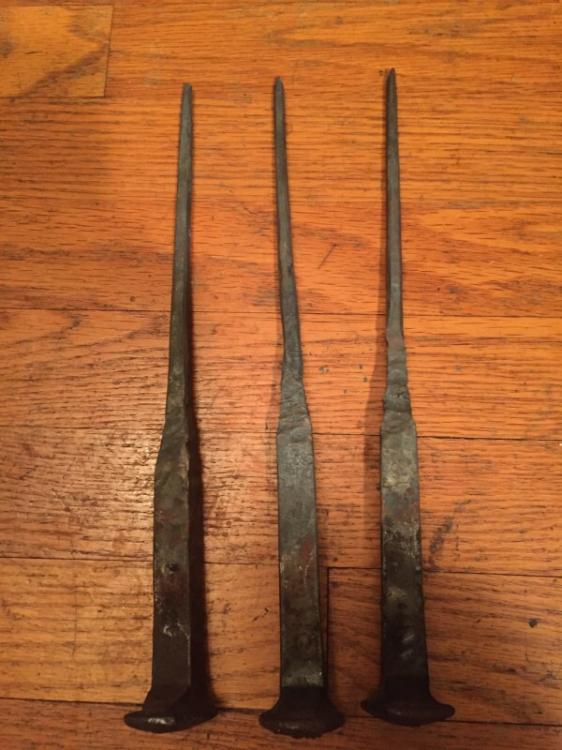
Well, in fear of forbidden I'll keep this short if I can. Instead of making tongs tonight and drawing them out in different methods I decided to experiment. I took 3 rr spikes and drew them out as close as possible in 3 different methods. In my fuller, on the anvil horn with a cross pein (it's what I got) and on the edge of the anvil face. Here are the results. Stop at the picture if you'd like to guess which is which. ( no cheating.)


-
wow looks simple and effective. hehe Smoosh-a-matic. how bout cut a groove on each side of the square pipe and add spring ears to the top die (off shoot pieces), and springs to either side to hold it open so you don't waste time lifting it to get the piece in? hammer will squish it all down anyway and the springs just need to be strong enough to hold the top die up. i'll add it to my memory banks. Thanks
-
I have a welder, and i have upset metal with success. i'll check it out.
-
All good suggestions, Thanks guys! It dosnt hurt to experiment a bit to see what works better for me. I dont have a straight pein yet tho i have enough hammers to modify one like i saw somewhere?. I've bought boxes of hammers cheap when at auctions or here and there at the fleamarket. chisels as well. I did make a spring fuller and like it, but have mainly been using it for isolating sections of metal, and could be using it to greater potential. There are a ton of tools i could be making to make my work easier, and if i look around i'm sure i have the material laying around to make them. i'll try the anvil horn and fuller next time and see which one works better for me. I was actually using the face edge because I had never tried the technique. Technicus Joe made it look easy, but i do want to try out other drawing methods and your two are pretty common sense that i should be trying. And i'd think less traumatic to the steel. I guess i was just following the instructions for the ones i was making, and after a successful (not perfect but usefull) pair i think i can try some different drawing methods. There's more then one way to skin a cat. (who skins cats anyway? who comes up with these sayings?)
-
Thanks TwistedCustoms, I'll keep at it and I need the practice anyway. Also will get pictures of the improvements. Might give others hope that are making their first pair to just keep at it.
-
Well spoken Frosty. It is a learning experience. I'm already mentally taking notes on how to do better next time. Good advice on the bits, that will be high on the list. I could have done better on the reins as well but I have to admit that that was due to my impatience to get em done. (Admittedly my hand was a bit sore too) That shouldn't ever be an excuse for poor finish work. I will keep the old ones hanging around as a reminder. And I'll continue to make more.
-
Thanks Mac, I will.