

MotoMike
-
Posts
554 -
Joined
-
Last visited
Content Type
Profiles
Forums
Articles
Gallery
Downloads
Events
Posts posted by MotoMike
-
-
thanks for the recommendation Marc
-
Thanks Frosty. all taken on and more work to do before I get to work.
-
OK, so these two fellows were walking along and they came upon a hole in the ground. Next to the hole was a large anvil. for reasons unknown they decided to push the anvil into the hole. while waiting to hear it hit the bottom, they heard instead, coming from behind, approaching hoof beats. They looked up just in time to see a goat charging them and they just managed to step aside as goat ran past them and into the hole. they stood there perplexed. soon there after, a farmer came to them and asked if they might have seen his goat. They told him that they were attacked by a goat that then jumped down that hole. The farmer said That's impossible. I had her tied to an anvil.
-
Frosty
I appreciate the quick response. I did not really want him to know I was doing it. so too many questions about the specifics of the design would be a give away. I guess I don't necessarily want an exact copy, but something that looks nice. Block letters is what I intend. my initial thought was to use 12 gauge copper wire or similarly sized stock. I quite like the idea of the sliver solder though. if forging copper wire or brass wire in, would you try to under cut the channel bottom, or is that too much fiddling about?
-
Hello friends:
If this is not the correct location for this, rest assured it was not placed here carelessly. I searched and did not find a thread on point, though I don't doubt there might be one.
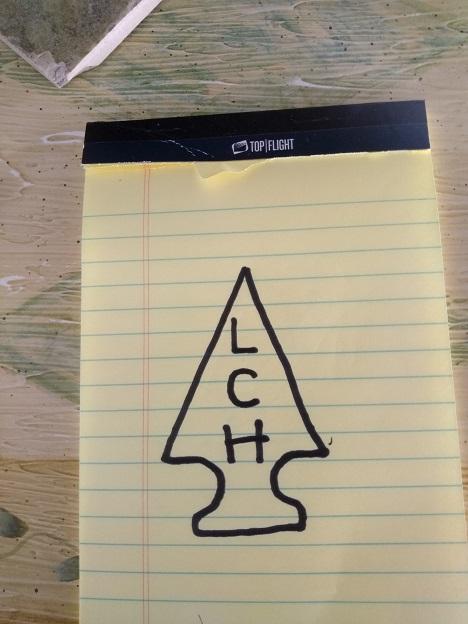
My uncle lost most all his possessions in Katrina. One of the items was a decorative arrow head that bore the initials of an ancestor. I did not see the arrow head and no photographs exist. I gather from discussions with him that it looks somewhat like the attached image, was a heavy metal probably steel, had a finish that sort of replicated knapped flint. I would like to recreate it for him. I will likely use mild steel but am not set on it. finished length would be in the 2 inch range. I would like to inlay the letters with some contrasting metal. copper, brass, stainless. would one make the arrow head first, chisel out the letters, place wire or other contrasting stock in the channels then lightly forge them into firm position? Or is there a different procedure to follow.
Your assistance is greatly appreciated.
-
-
concur. analogous to my choking the intake till I see a reducing dragon's breath corresponding to reduced scaling. Makes me wonder about the advantages of a blown forge
-
Hot tamale Looks great Tavis
-
using a venturi burner, I've noticed that when my intake choke is wide open, I get more scale than I do when I choke it down a bit till I start to see reducing dragons breath. I've thought about the blown designs and wondered if forcing more air into the forge might increase scaling.
-
Thanks John. I hope it all works out.
-
It is looking great. You do good and expeditious work. I have thought since going to the trouble of putting a hinge and latch on the front of mine, that it would have been fine to tack the front on in 4 places, then easy enough to knock off the tacks want I want to get into it.
I guess you are casting in the floor? one 9 inch split brick floor will eat up 54 cubic inches if my math is right and once the whole thing covered with a quarter inch plus or minus with refractory, you should be well under the 350 if as it sits you are at 380. At least that's what my calculations. I know the split hard brick will eat a bit of efficiency requiring heating but I coated mine with refractory and then the whole thing with IR wash and it doesn't seem to hurt me. I'd have used kiln shelf If I had a source at the time.
-
Got it tacked down and squared. Mocked it up just to gander at it. I know my welding leaves room for improvement.
-
I'd concur with the saw outperforming. the exception being that if once you took a bite your rotated it on the limb a bit then tightened it and repeated. like a big tubing cutter. Im just guessing too.
-
I do like that hammer and chisel and hammer. Nice work.
No forging for me. installed a 240 circuit for my grinder and welder.
-
The comment about the back opening being too large was not mine. I did however make my back opening smaller than the front. I love your drawings. they look to be the best forge I've seen if you bring it to fruition.
Burner count. I think the conventional wisdom is that for every 350 cubic inches you need one 3/4 inch burner. so calculate your interior volume to decide. Mikey I'm sure is right on that issue.
I set mine up so that the floor meets the bottom of the openings front and back. makes sliding things through the back easy. Don't know what the wisdom is here.
I'm interested in others thoughts on the porch height. I've got mine all level, front porch, forge floor, back porch. I've considered that it might be nice to have the front porch about a quarter lower than the floor. then when I drag work to the opening, it might make grabbing with tongs easier.
Don't know about refrigeration tubing. I used 1/8 inch tubing long enough to get the hose junction clear of the forge body.

-
Great news. A round nose punch is goof for making the tooth in a cap lifter.
-
Quote
That looks great Travo. I know what you mean about the boxes being a better mating surface for the bricks to sit against. My thoughts were that you can't close it off all the way anyway as the burner needs air. with my tank even though the ends are convex I can easily position them tight enough to starve the combustion. I don't like that unprotected metal always being hit with that heat.
I notice that your drawing with the burner installed shows the flare up in the burner mount. Don't know if that is intentional or not. I have my flare tip about 1/2 inch up in the wool. with it as shown, It might be tough to get your two rows of mounting bolts enough room to grip the burner pipe. I think you want them at least an inch separated vertically so that they have good solid strength against the burner pipe moving. also I think being separated vertically by at least an inch gives you better aiming ability by adjusting those bolts.
I'm really looking forward to seeing your build.
-
Upon re-reading my post I see that I said tilt the burners, I guess that is not really what I meant. in addition to being tilted to about 1:30 or 2:00 I would install the burner mounts at 1:30 or 2:00 as well. Your design looks like you've considered creating a nice swirl inside the forge. I failed to do that. On my next build I'll incorporate that feature. In a nutshell the goal is to move the intakes off to the side a bit so that the DB which because it is so hot will tend to rise quickly, won't be passing right by the intakes.
-
Travo
Very nice drafting work. or cad if that is what it is.
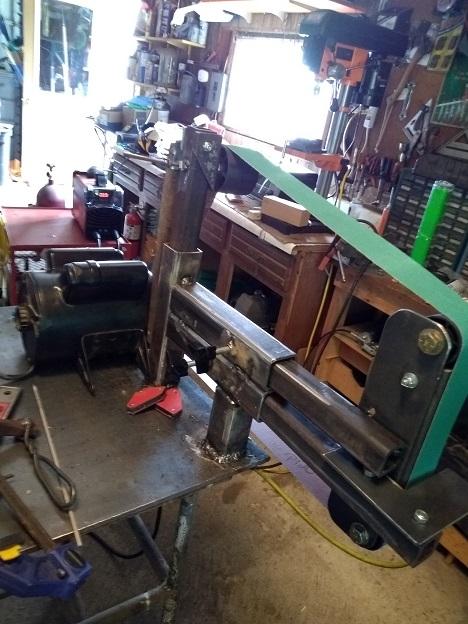
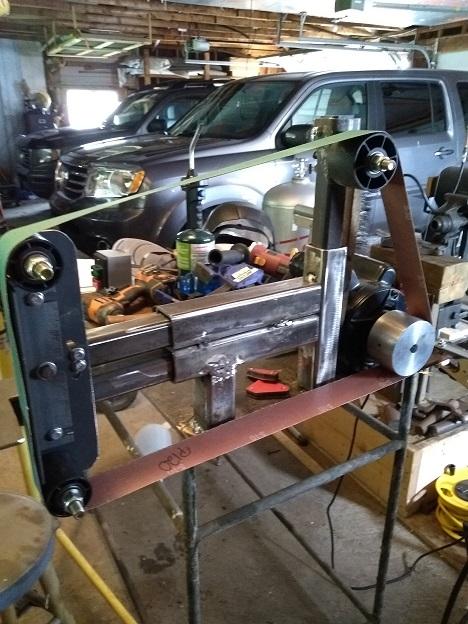
built a forge from a portable air tank. not an expert by any means but did learn from my build and exchanging posts with the resident experts here.
My forge if the air is still, occasionally will re-ingest the dragon's breath and falter. This I think is in large part due to the burner intake being straight up (12:00 O'CLOCK_. If I were to build it again, I'd tilt the burner (burners in your case) over to about the 1:30 or 2:00 o'clock position. not a big problem as I usually run a big furnace blower in the shop to move the air around with windows and garage roll ups open.
my initial build had the front work opening about the size of yours. I found I could not get my arm into the forge through the opening to slather on refractory. I'd make sure the front opening was big enough to get your arm in so you can reach the whole interior.
I don't know about the openings where you have designed boxes that are essentially tunnels moving the opening a bit futher from the body of the forge. I have had good luck with a porch welded to the body and just sitting hard bricks on as doors that I can move with no restrictions to change the opening size.
I put a hinge on the front and a latch on the other side. not to routinely open it, but to make future work easier.
That's my two cents. I think you are going to make a great forge.
Wasted excessive spaces removed
-
Can't wait to see her cleaned up a bit and mounted. congrats!
-
very nice. they all look posh to me.
-
what a monster. congrats
-
I wouldn't mind seeing some pictures. Any in progress pics?
-
As a guy who tried to work in the winter here in northern Illinois, in an uninsulated garage, I'd definitely recommend insulating it. I don't have coal forge experience, but a well insulated gas forge does not put much heat into the room. At least that is how it seems in the winter. Yesterday was a different story.

Horrible anvil joke
in Everything Else
Posted
Thanks Das. I stole it from Jay Leno.