Scrambler82
Members
-
Joined
-
Last visited
Everything posted by Scrambler82
-
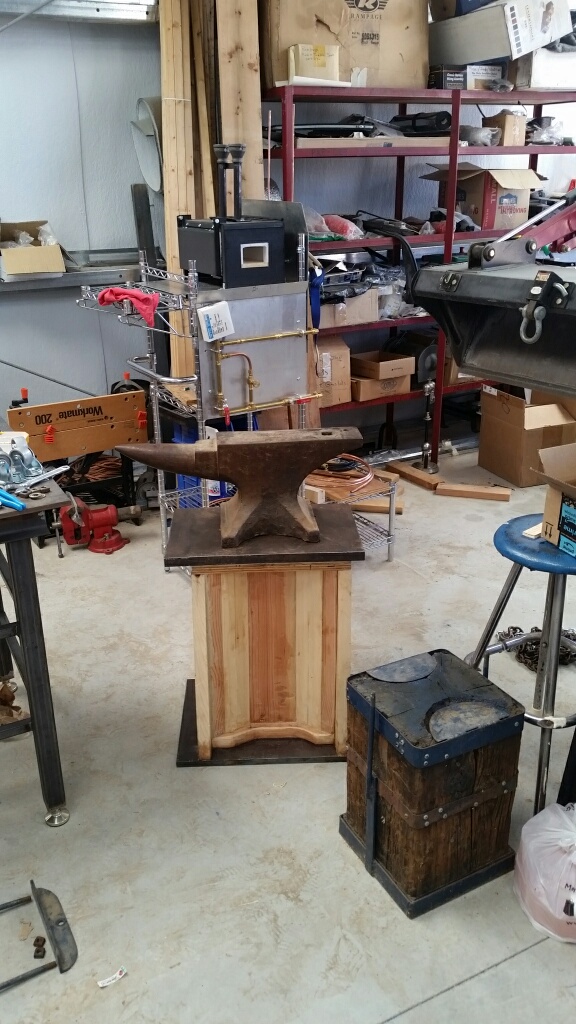
All I need to do is three things to finish up: 1) Add 2-6", 2x2 receivers under the horn area of the new stand. 2) Add Tool Rack, undetermined shape or size, under Tail Area of the new stand will be bolted on but maybe welded if I find bolting is a problem. 3) Clamp the Anvil down, again unknown method, thinking some 2.5" Angle with 1/4" wall, something from the scrape bin AGAIN ! The old stand is there for reference in height, I increased the height, one reason is for working lever, the second reason is from reading here on the site where it was suggest to to keep the height around knuckle to wrist height; right off the top of my head I do not know the actual amount so I won't post it until I remeasure to make sure. The wooden part of the New Stand was decent weight but I could move it around without too much trouble, once the top and bottom plates got put in place I decided to use the tractor to move the stand in place and then once quick movement to get the Anvil moved to her new home.

-
Thanks for the info. When I get back from the wedding I am going straight for the recycle yard and get some numbers flying and check to see if there are any indicators about material. Is one better than another ? If cheap enough I might buy more than one, someone may need one somewhere down the road ! Happy Anniversary to both of you guys, mine anniversary past a while back at 38 years.
-
Thanks Thomas, these aren't damaged in anyway. They are placed,on a pallet towards the rear of the recycle yard and looks like someone placed them there on purpose. I have a wedding this weekend to go to in LA with the wife, won't get back there until Monday, will ask then about the material and cost... we will see ! Thanks again, hope all is well with you !
-
I came across 5 Fork Lift Tines, 1.5 to 2" thick ! I have noticed some people make anvils out of them or stands for anvils. Im thinking one I will cut up to make a Hardie Hole Portable Block and the other four would be for resale ! What material are these things usually made of ? I have not asked about them yet but was hoping to get some idea what these things might be worth in SoCal before approaching the guy ! Does any one have a good idea of what I should pay for these things ? The yard is a recycle yard and usually sells things on the lower side but these are heavy and I was hoping not to pay for weight ! Please respond ASAP, I can pick them up tomorrow !
-
I have looked and looked and searched under every name/member I can think of but I can not for the life of me find the drawing I remember for an "Add On Hardie Hole" ! I remember the drawing was of a large round piece of steel anvil, with a Hardie Hole added to the side made from three pieces (I think) of 1" steel bar welded to the side; it made a perfect 1" Hardie Hole. (I do remember Thomas talking about it but I am not sure if he posted) If anyone remembers the thread or post, or wrote and posted the original post/thread, please let me know, I have told a number of members here on the site about it and wanted to post either the drawing or a link to the thread, so all can use the method of adding a Hardie hole to a chuck of Steel Anvil and getting more versatility out of their anvils ! Thanks to any and all that respond...
-
58er, Nice Mace/Fail... ! Love the Dragon's Head ! Not sure if I missed it or passed over the post but how much did the finished product weigh ? I know there was a release signed on this piece but can the blacksmith be held accountable for its use ?
-
He stated he was having trouble finding an Anvil in a dollar range he could afford so he build one. I too thought there should be more mass under the main plate but he was happy with it ! Since he teaches kids I almost offered my second anvil to him but NO, I looked too long for the ones I have !
-
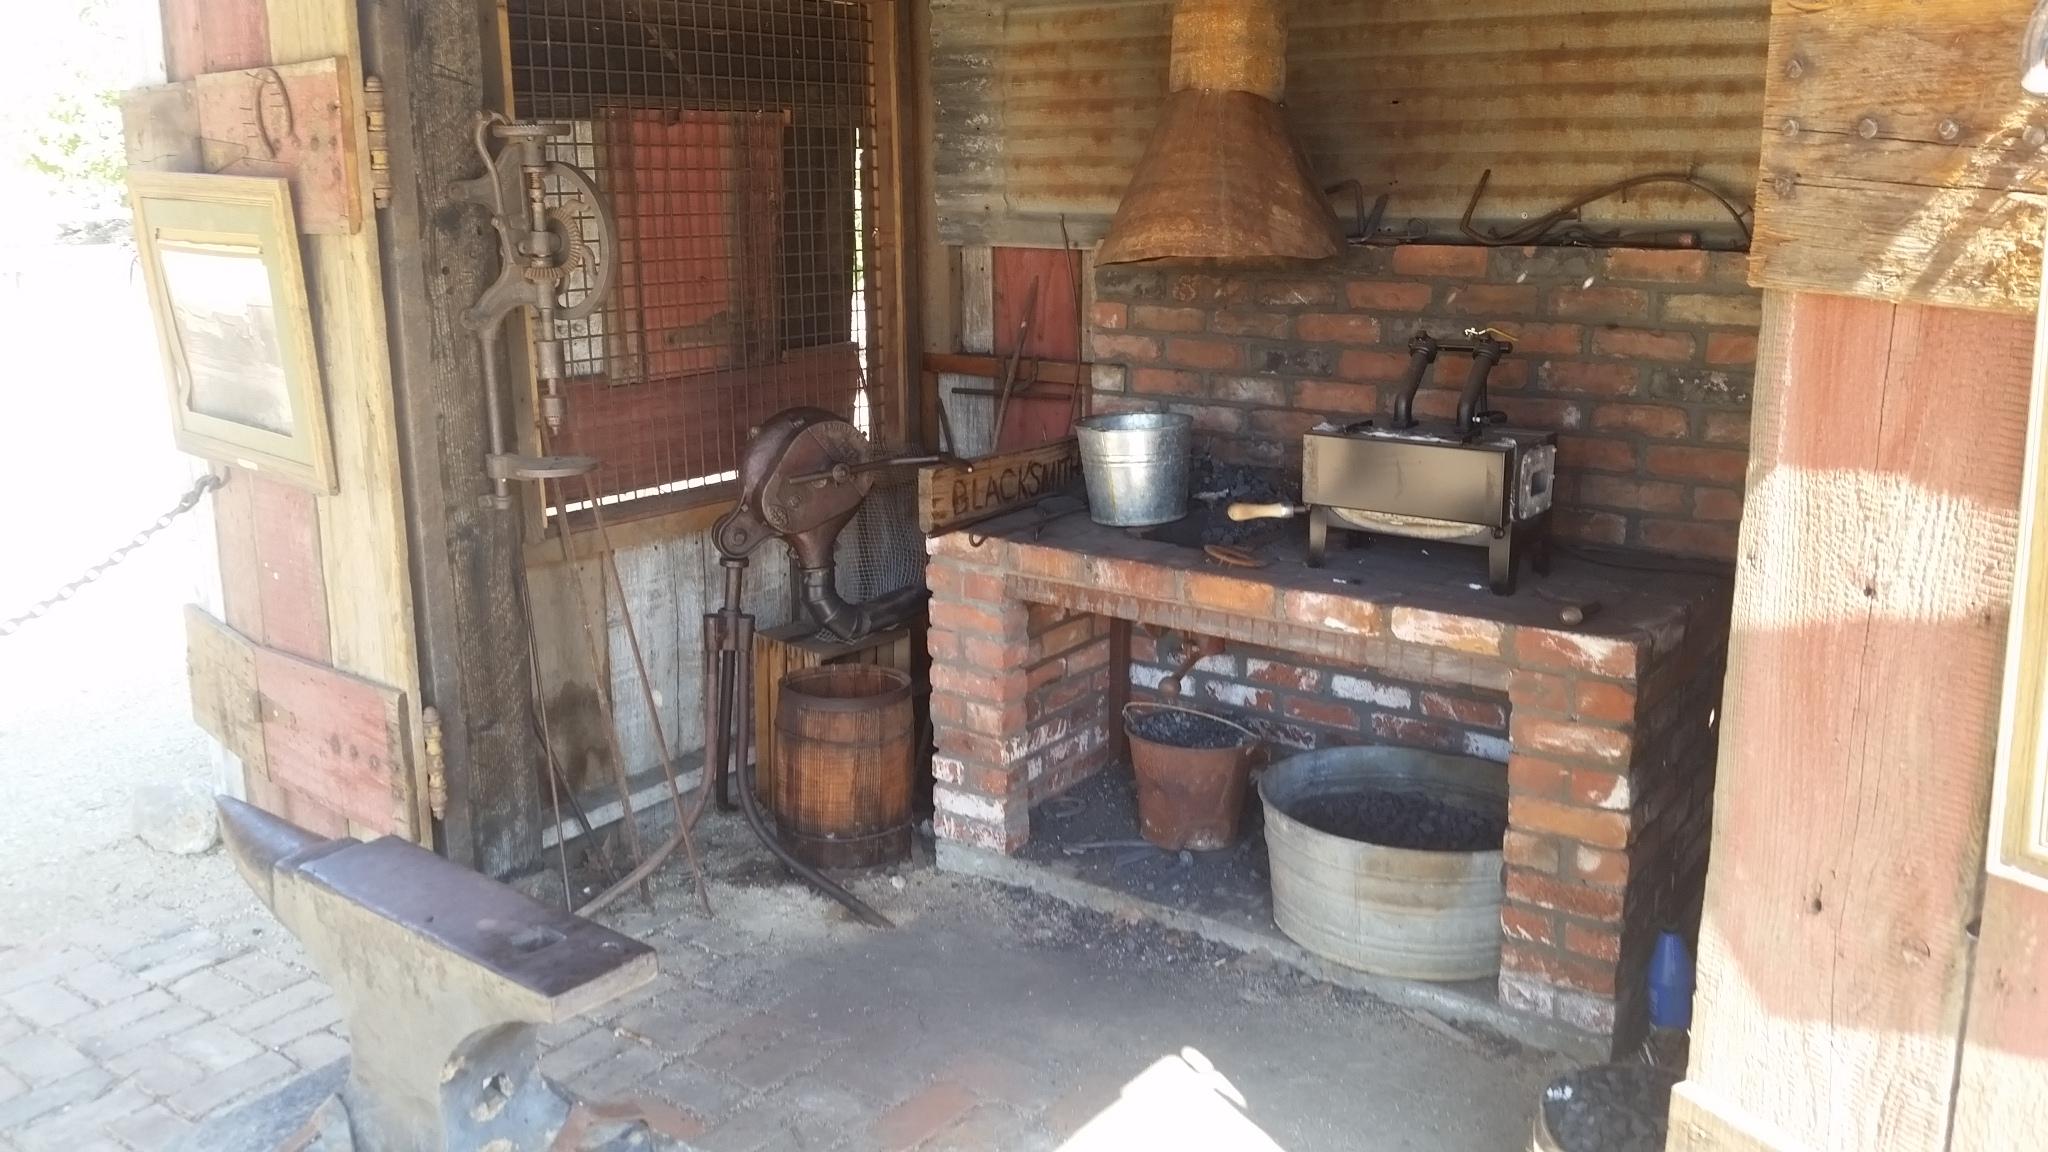
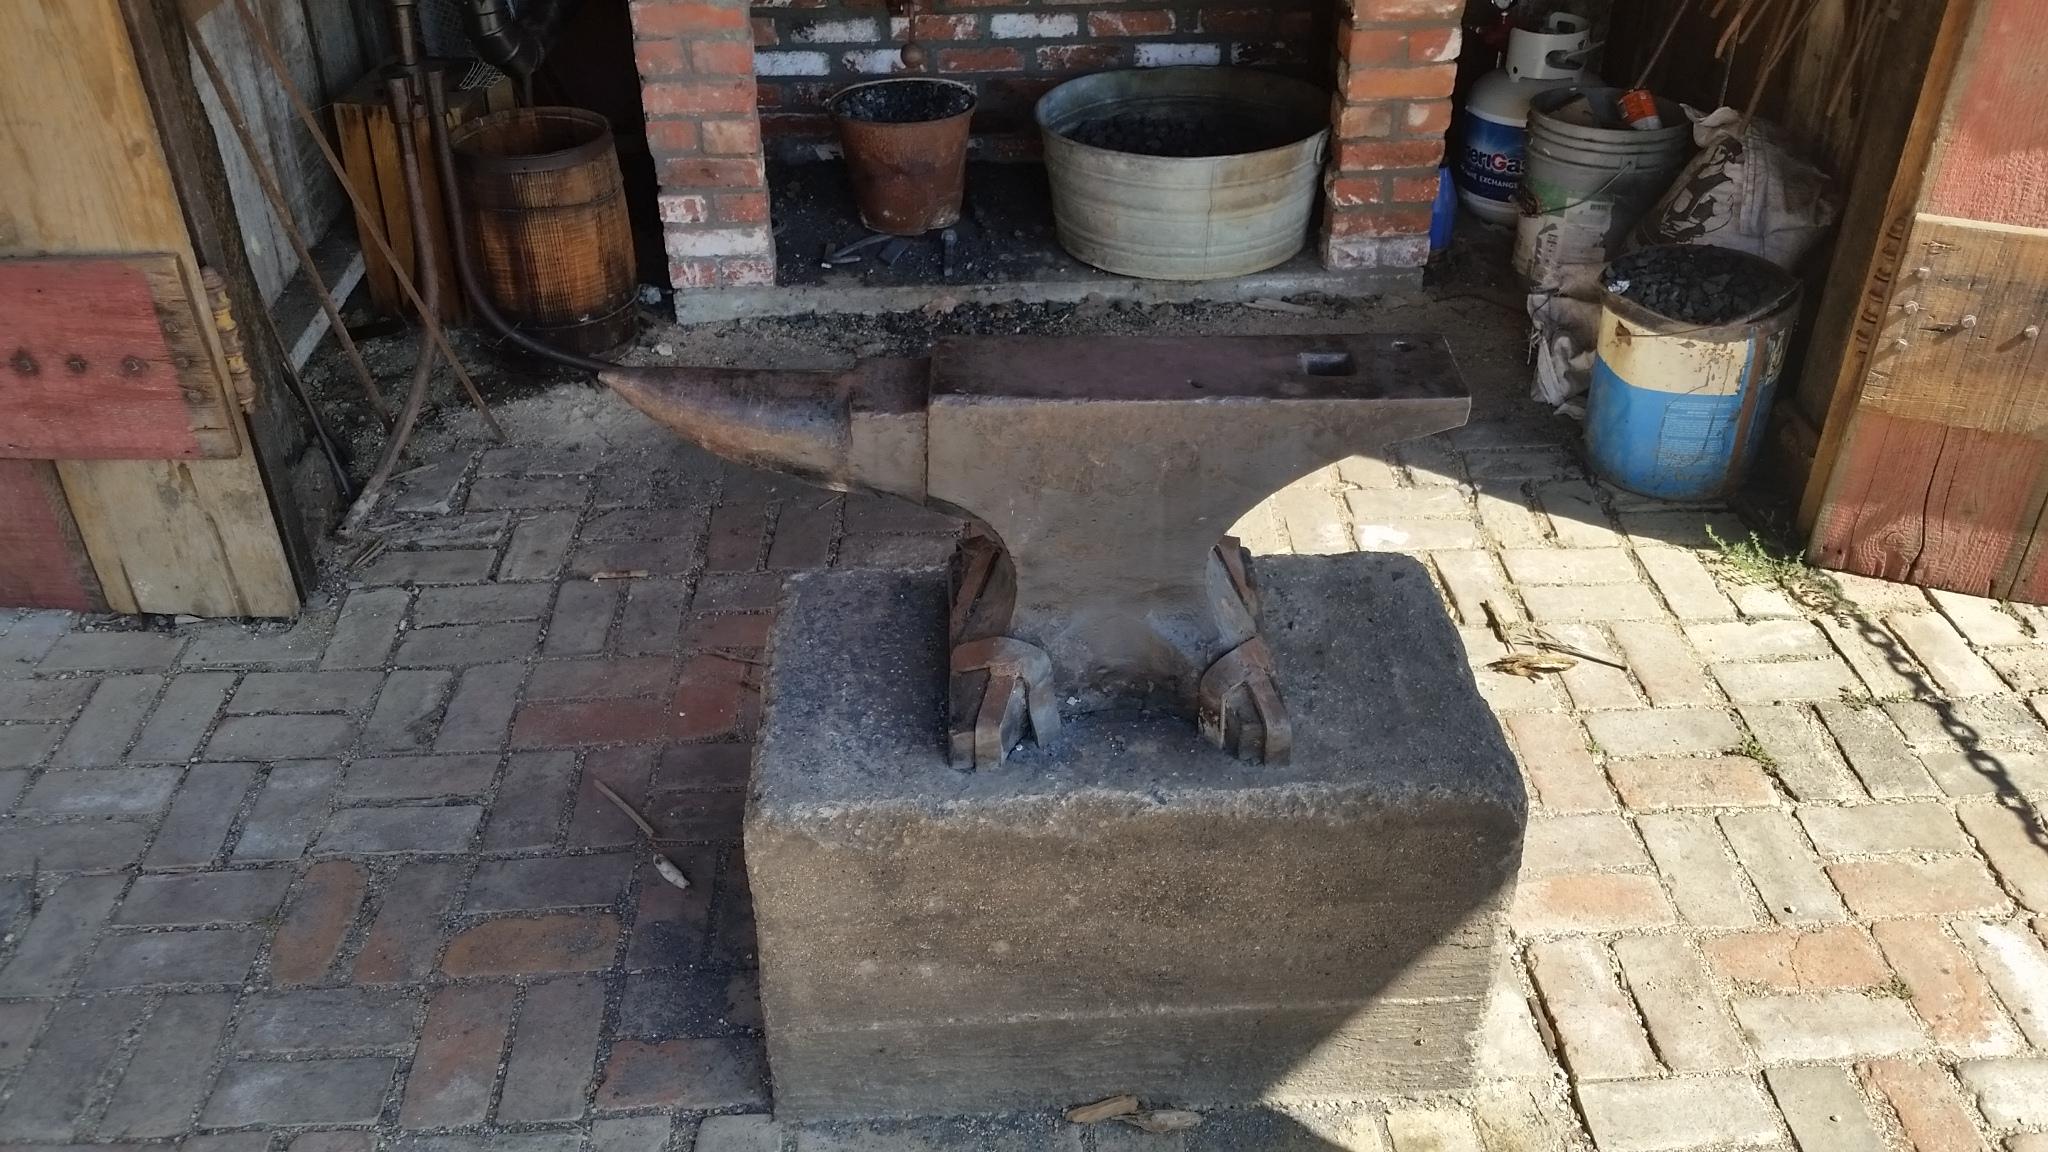
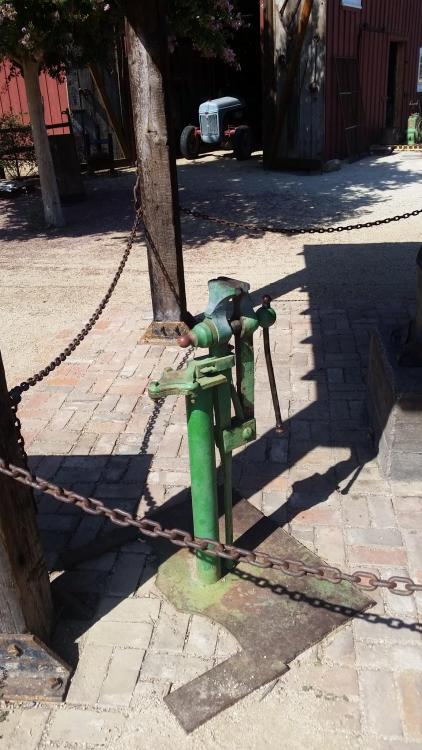
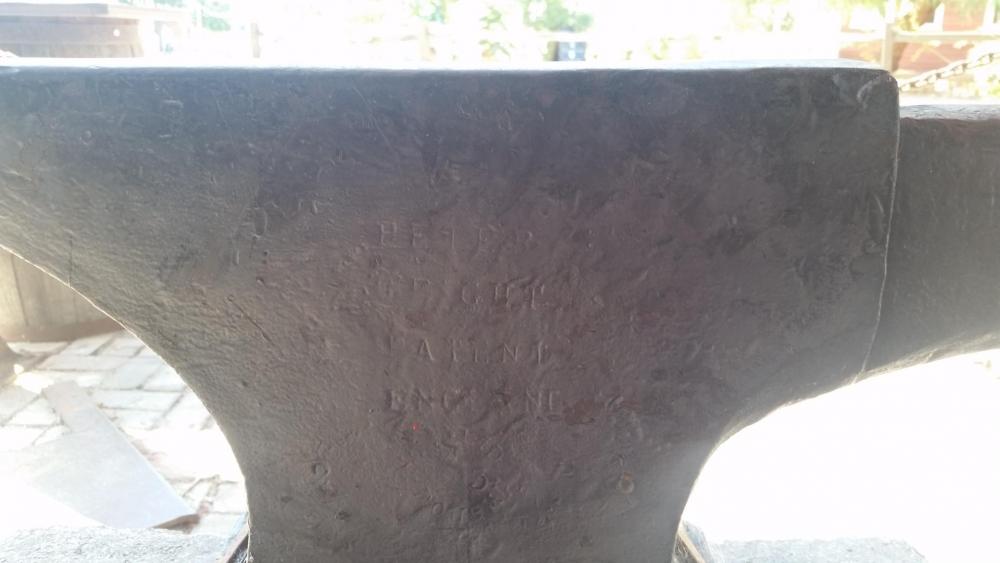
Was out walking on Sunday and came across small layout of an old western ranch, The Vale Ranch, not too far from my land. Took a few pictures but was both surprised and happy to find a good size Peter Wright sitting in the Smithy, had the "England" in the side markings and if I have read correctly on this site that would mean after 1910. Also weight markings were 2 - 3 - either 5 or 25 = (2 X 112) + (3 X 28) + 5 = 313 or 333 lbs. biggin ! Here are a couple of pictures: Demos every Tuesday... Guess where I will be on Tuesday next ! The Smithy Post Vice with 50's era Fordson Tractor in the back ground ! I think the propane forge is a little newer than the Smithy setup ! The Drill Press is nice ! The Peter Wright: Not in bad shape, didn't do a bounce test but it looked in good shape ! Climbed over the chain and got a close up ! Looks like 2 - 3 - 5 or 25, either 313 or 333 lbs, a good size Anvil !


-
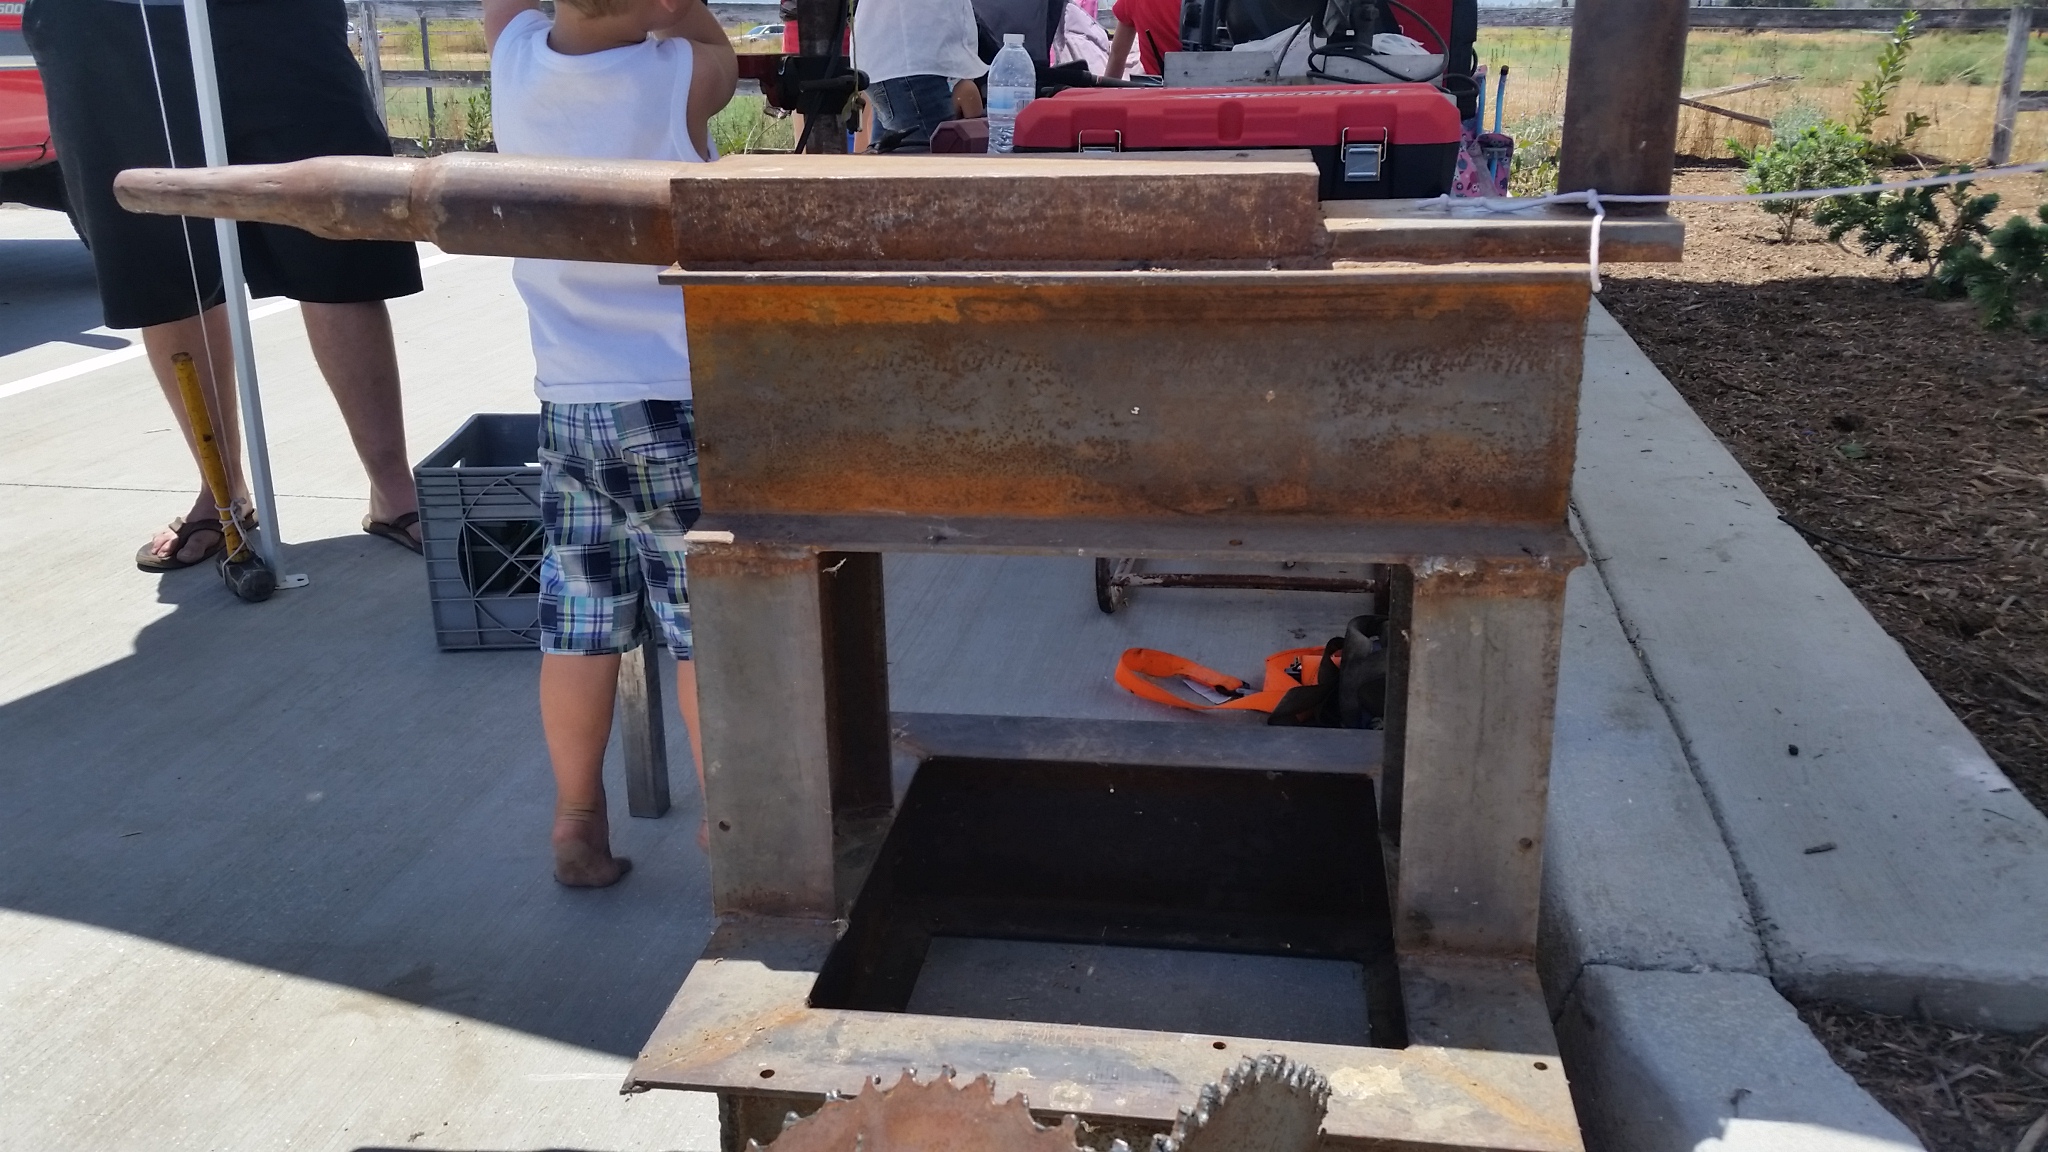
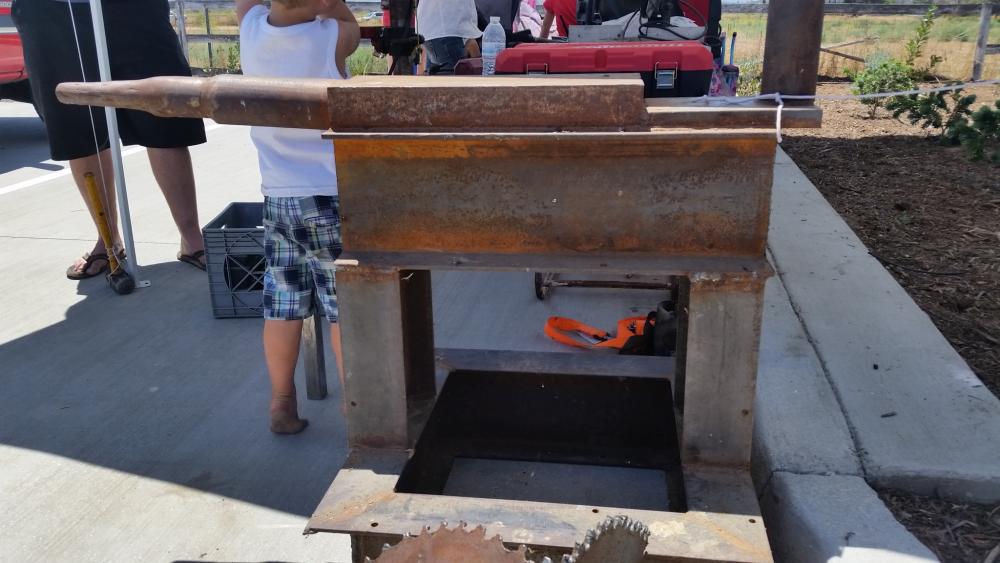
Local Tractor Supply had a Grand Opening with vendors and displays ! One of the 4-H Displays was a Blacksmith, he teaches kids only, the Blacksmith says they listen and do as directed ! Here is his Home made anvil, I though a great shape !
-
This one looks old, in its design, just looks older than the usual London Pattern. Me, I don't know one way or the other, I can read up on anvils but I don't, but I like the bulkiness of it. Nice find especially if you can get it for $100 off !
-
Ok it will do ! LoL ! Since the Double Female Connector is machine assembled, I thought it might be a good flare fitting. My problem is coming from not being able to locate any POLs except the valve of a Propane Tank ?!? I have been looking for POL Fittings, under many different names, under many different fitting types, and have not come up with anything except Tank Valves. Mikey, Please do me a favor and send me a message or post somewhere, the links necessary to do a proper POL connection in a Propane feed line ? Assume you are replacing a soft copper tubing feed line, from a manifold, with compression fittings on both ends. Also, at this juncture I do not need the actual brazing or soldering methods. I am not inept on the web, I have built many computers and operating systems, written a program or two, put together data base collection/retreval systems and have searched the web with good results for many items, BUT these POL Fittings are slippery little devils and I can not seem to get my hands on them. Thanks
-
-
TP, you have to wonder who is throwing the switches ! We were at the end of the latest remodel, phase II of III, the county throws in the monkey wrench... "You need another 5000gal fire water tank",. WHAT... 10k later, it's almost done and wham bam the well head pump take the deep six, needs replacing... Another 3k ! These aren't life and death but the idea is the same. Keep the chin up, God Bless !
-
Thks Steve, your method worked out well; I don't think my block would be as level without it. Any more ideas up your sleeves ? LoL ! Thomas, I was more comfortable with the larger holes, my problem arose... I think, from tightening unevenly. With the shape I didn't watch the outside edges, too much pressure and it caused the edges to bow and in turn twist the block but we will never really know, we can only use a different method next time, if there is one ! Didn't even think about not gluing, never thought there should be a reason to disassembly the stand, I guess it would sit better ! I like the idea of the end pieces being higher, helps to keep things in place but I wanted to get a top plate of steel, as thick as possible, within limits... and weld on some tool holders made out of pipe or I could use a heavy bar stock and be a blacksmith and make some hoops. This stand and anvil will stay put, in the new barn to stay, right now... it is sitting flat on the floor even moving it around. The company that did my floor/foundation work for the barn did a very good job, floor is as close perfect, more than I expected. Hope all is well with you, later
-
Thanks Thomas, I was wondering abou the pictures actually posting, I could see them but I wasn't sure otherwise. thougt abou drilling the through holes afterwards but I didn't have a bit that size and I worried about the bit going off at an angle. I figured, since the through bolts were to secure the block together, if he holes were large enough they would allow alignment... and I thought the alignment was pretty good going into the clamping stage. I put together a two piece wooden bean stand for my 100 lb Vulcan, I will be using it most of he time sitting down so is only 21" tall. IF I attemp anoher wooden sand I may uy he required bit and have a go at drillin through the whip thing. Thanks .
-
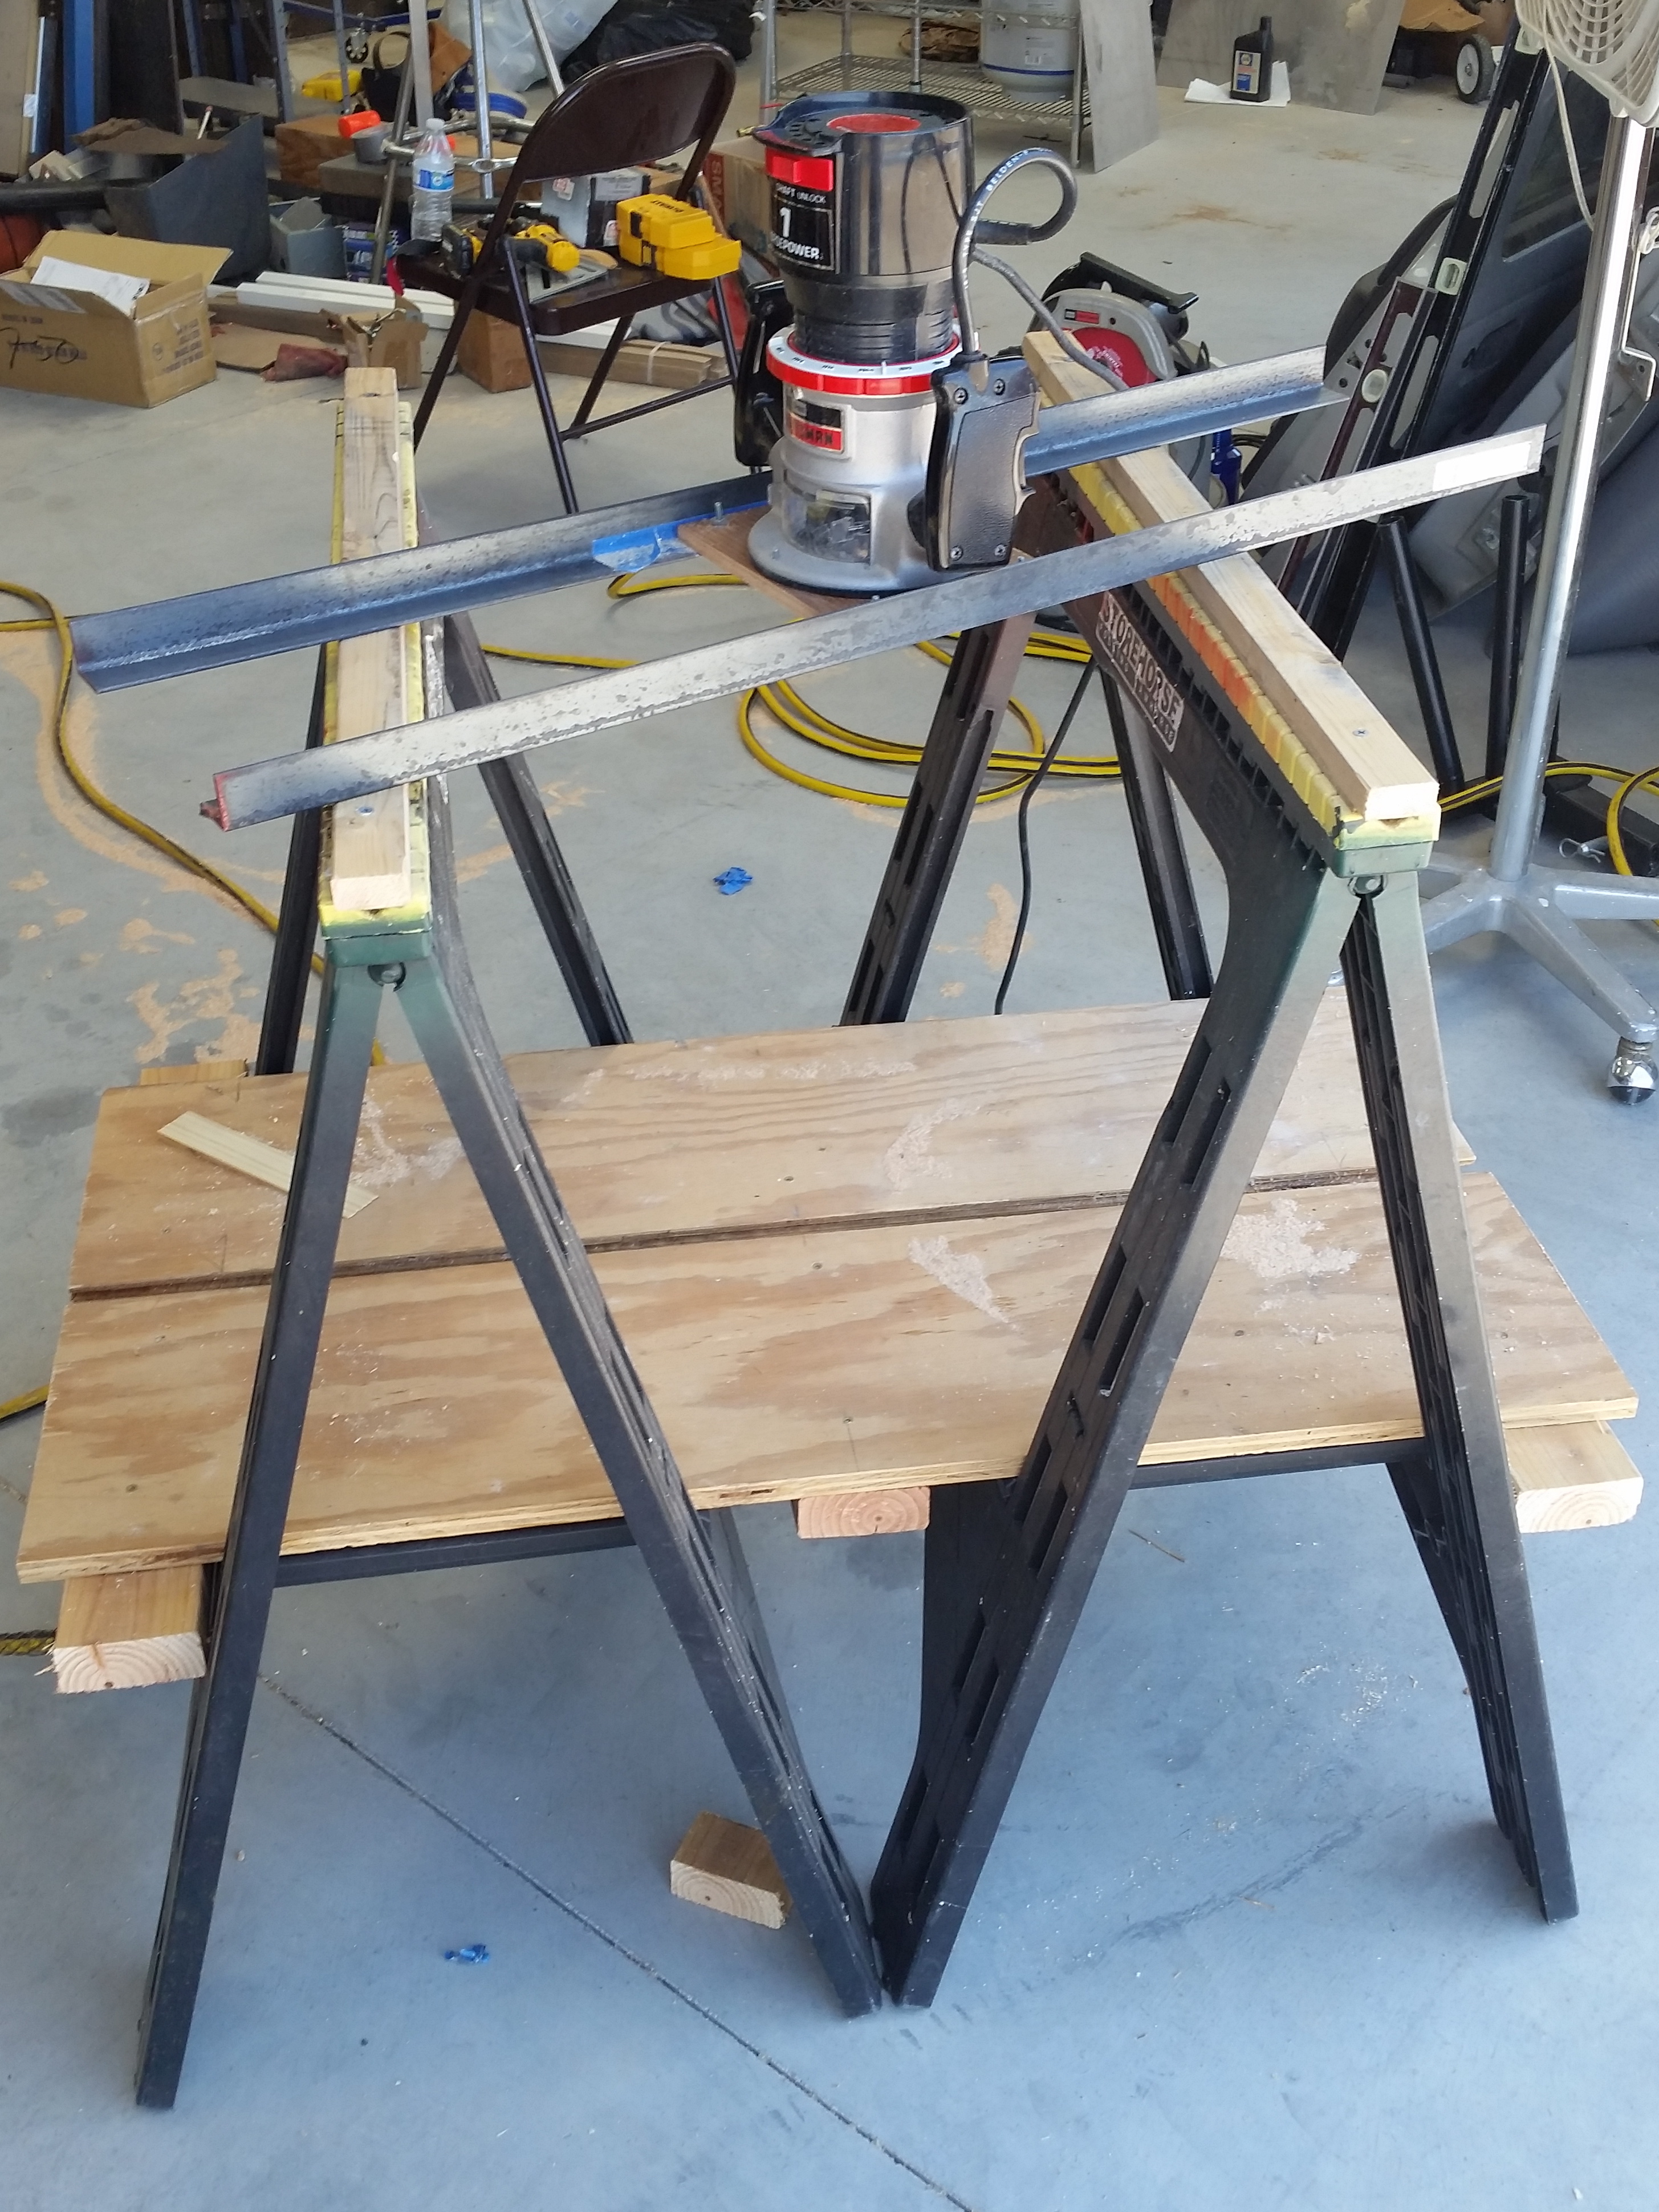
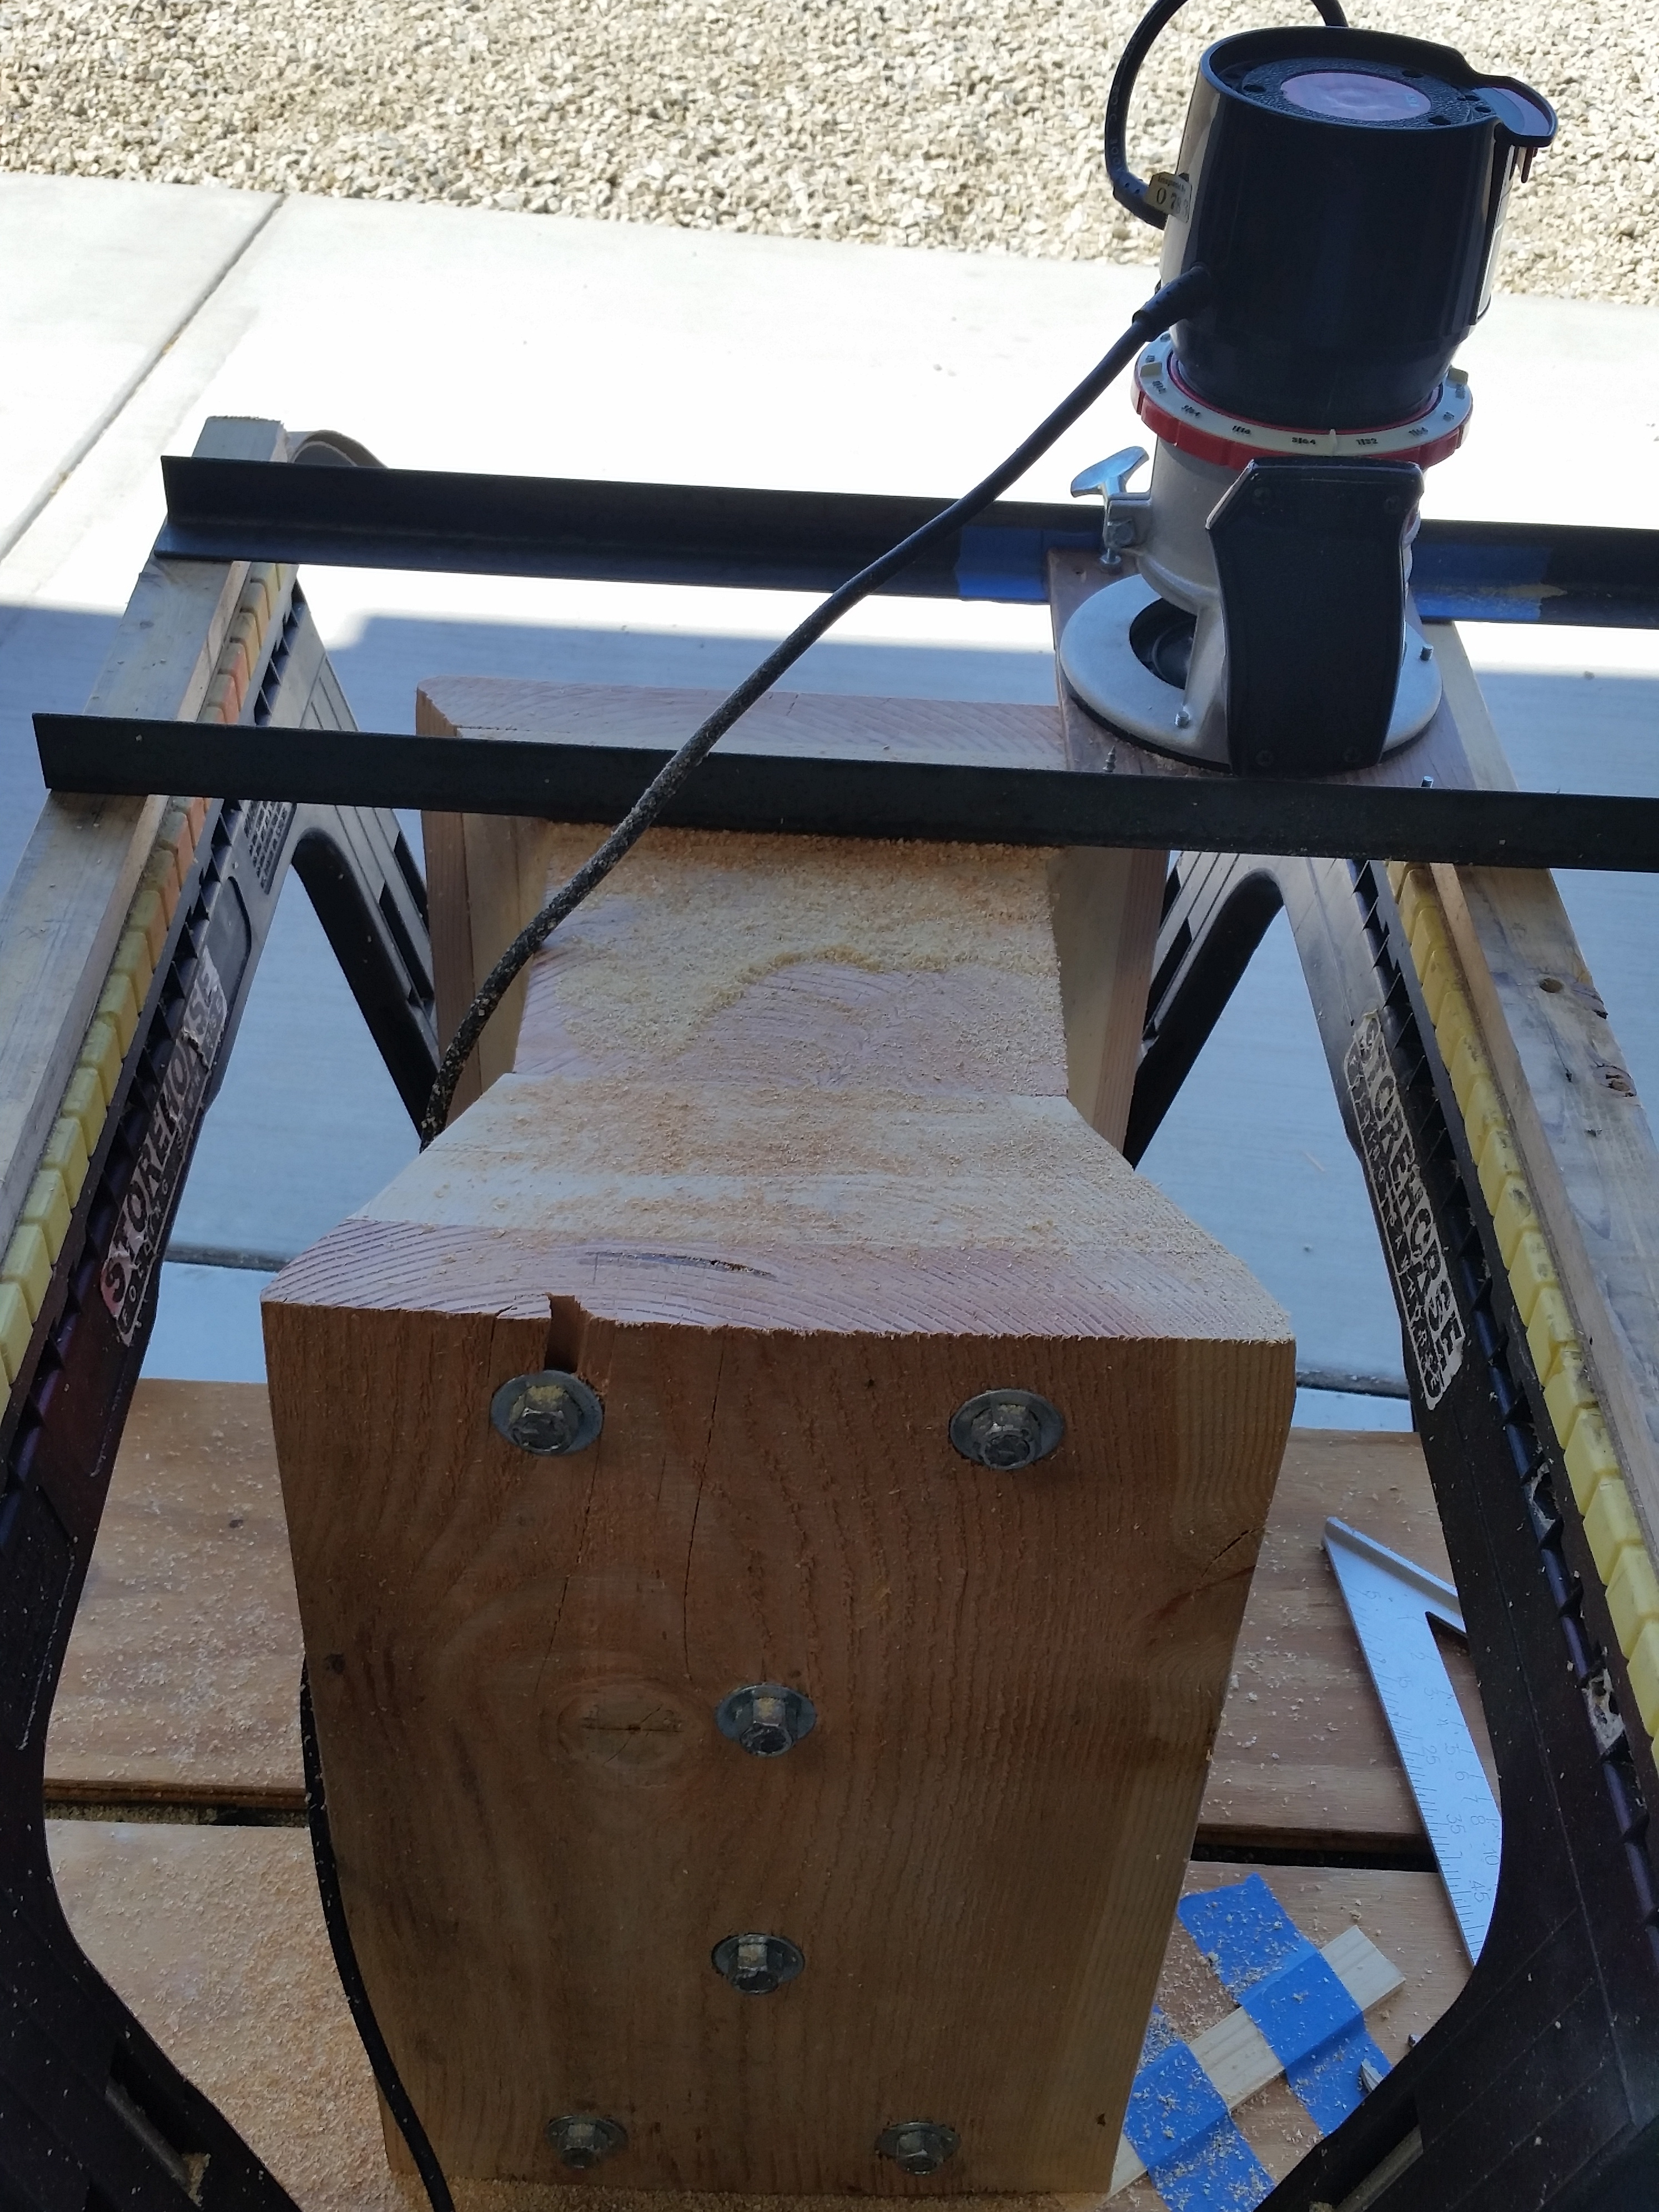
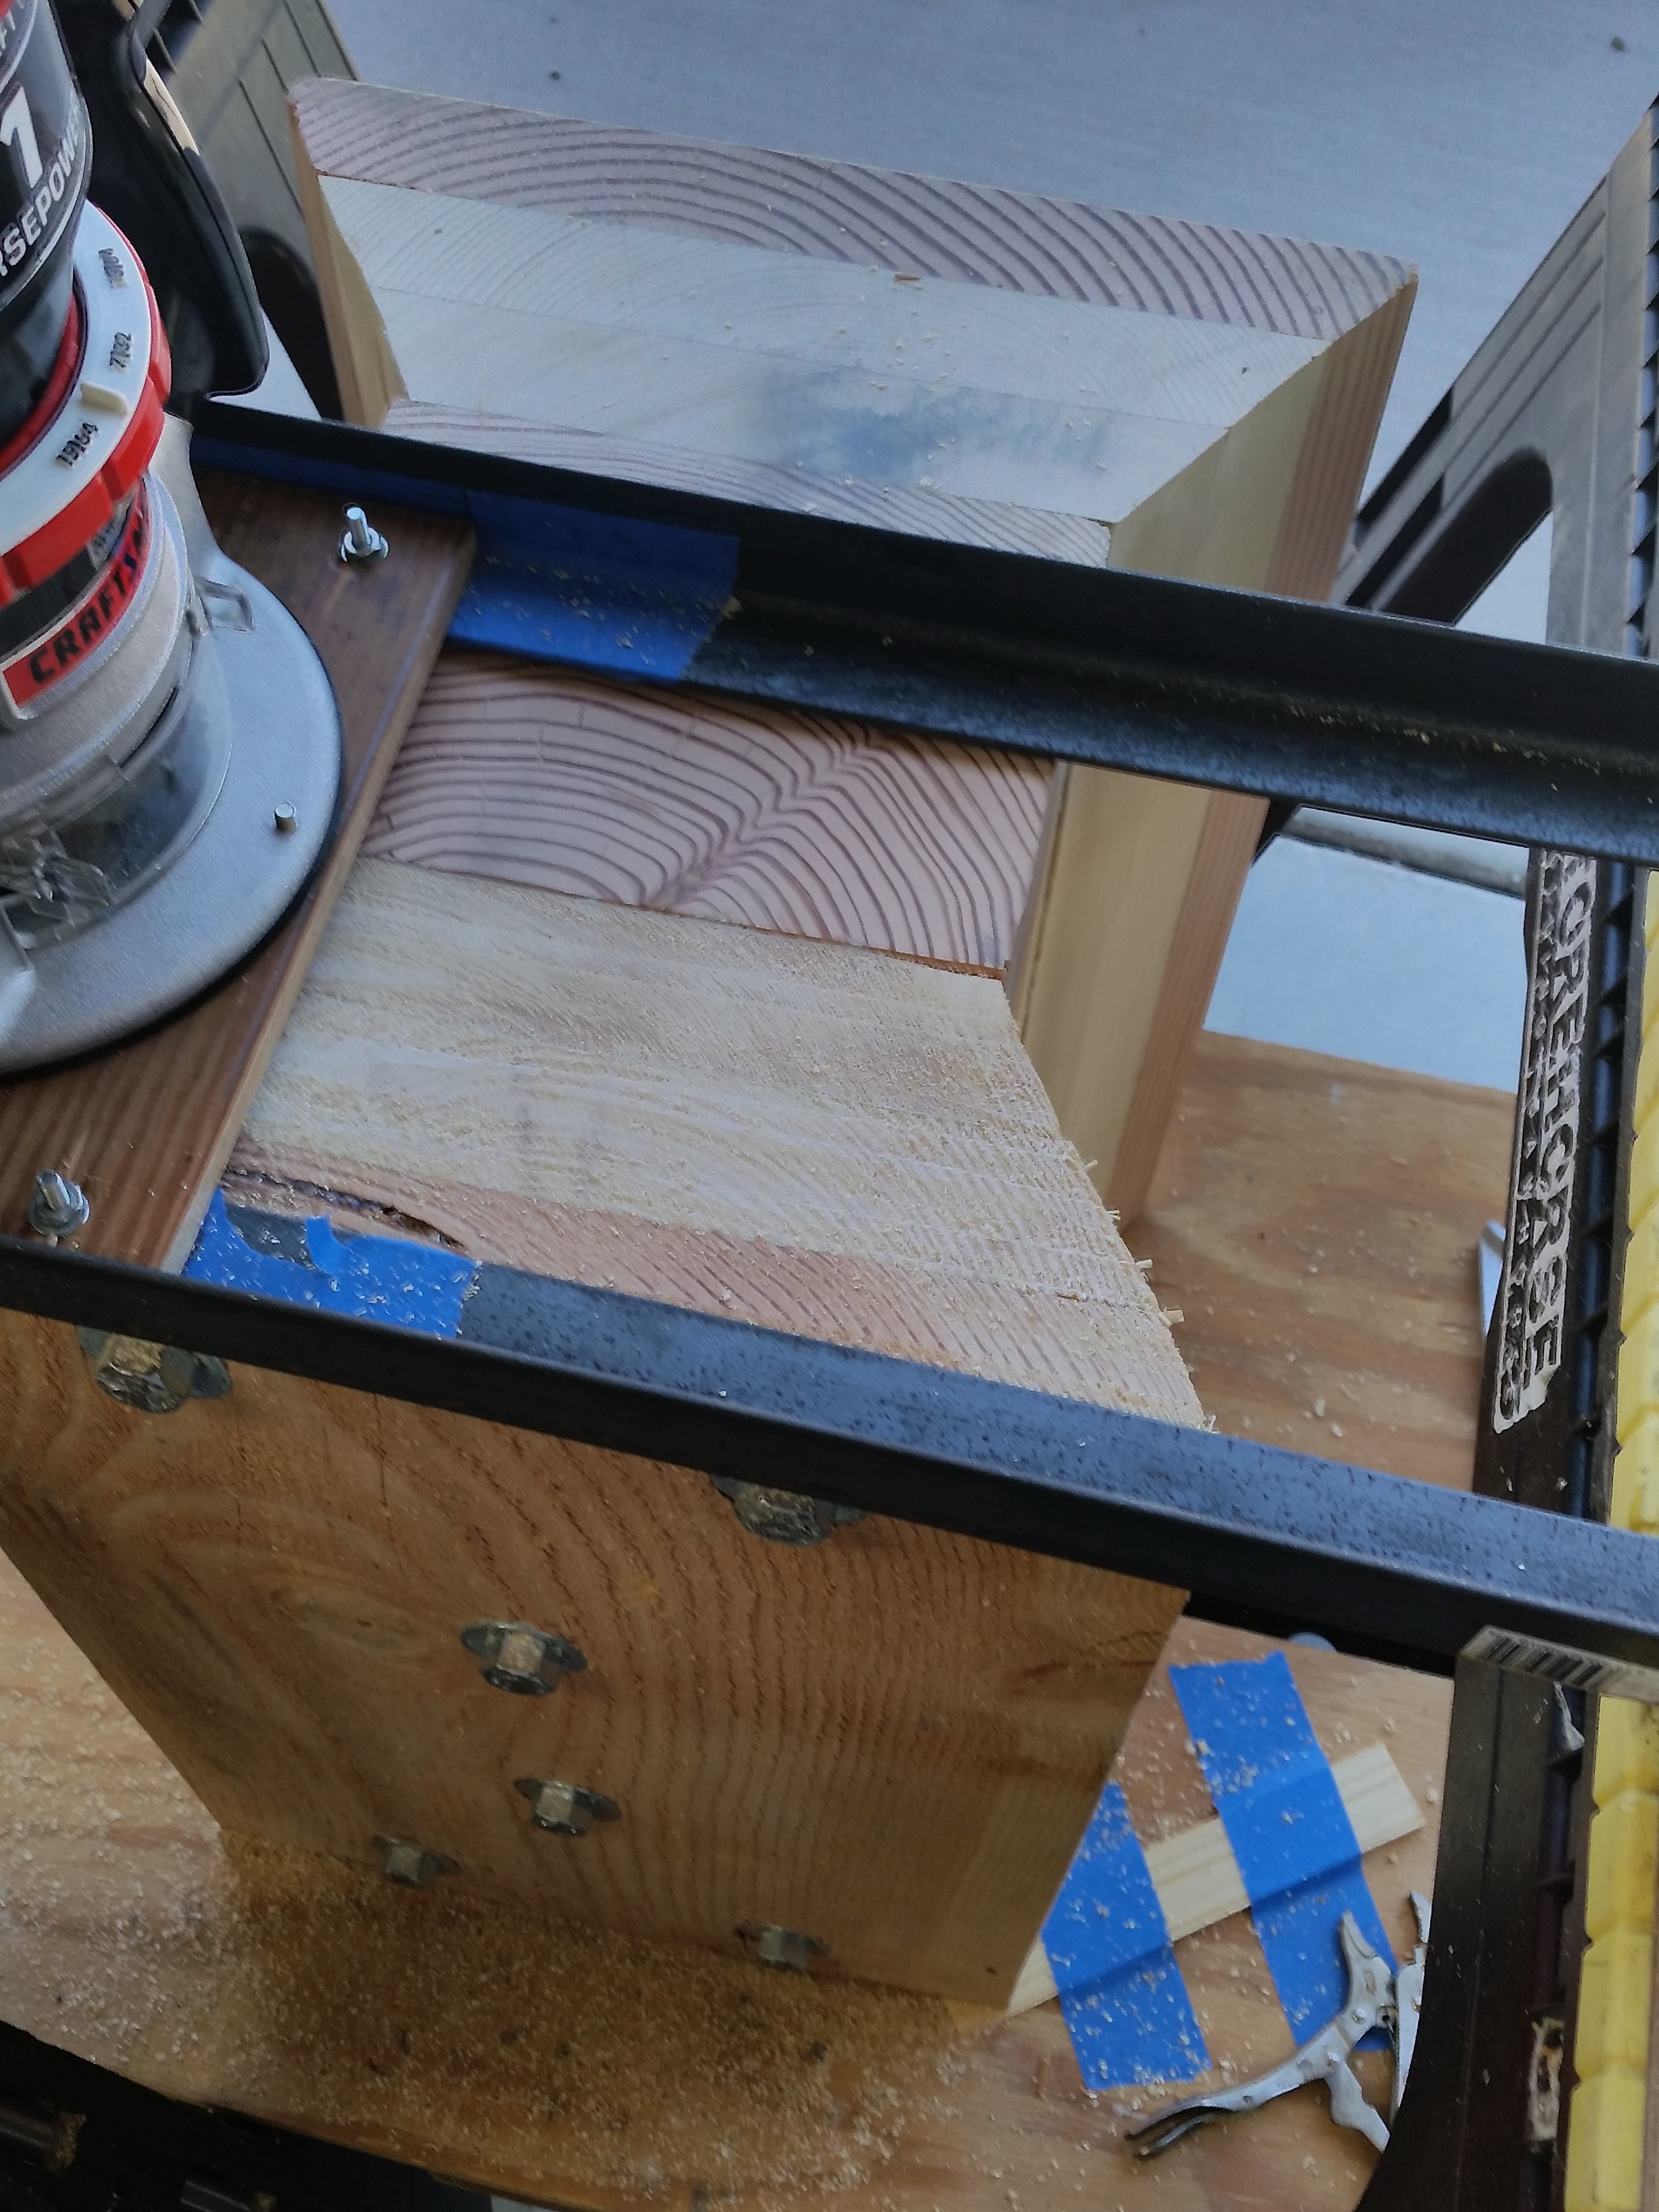
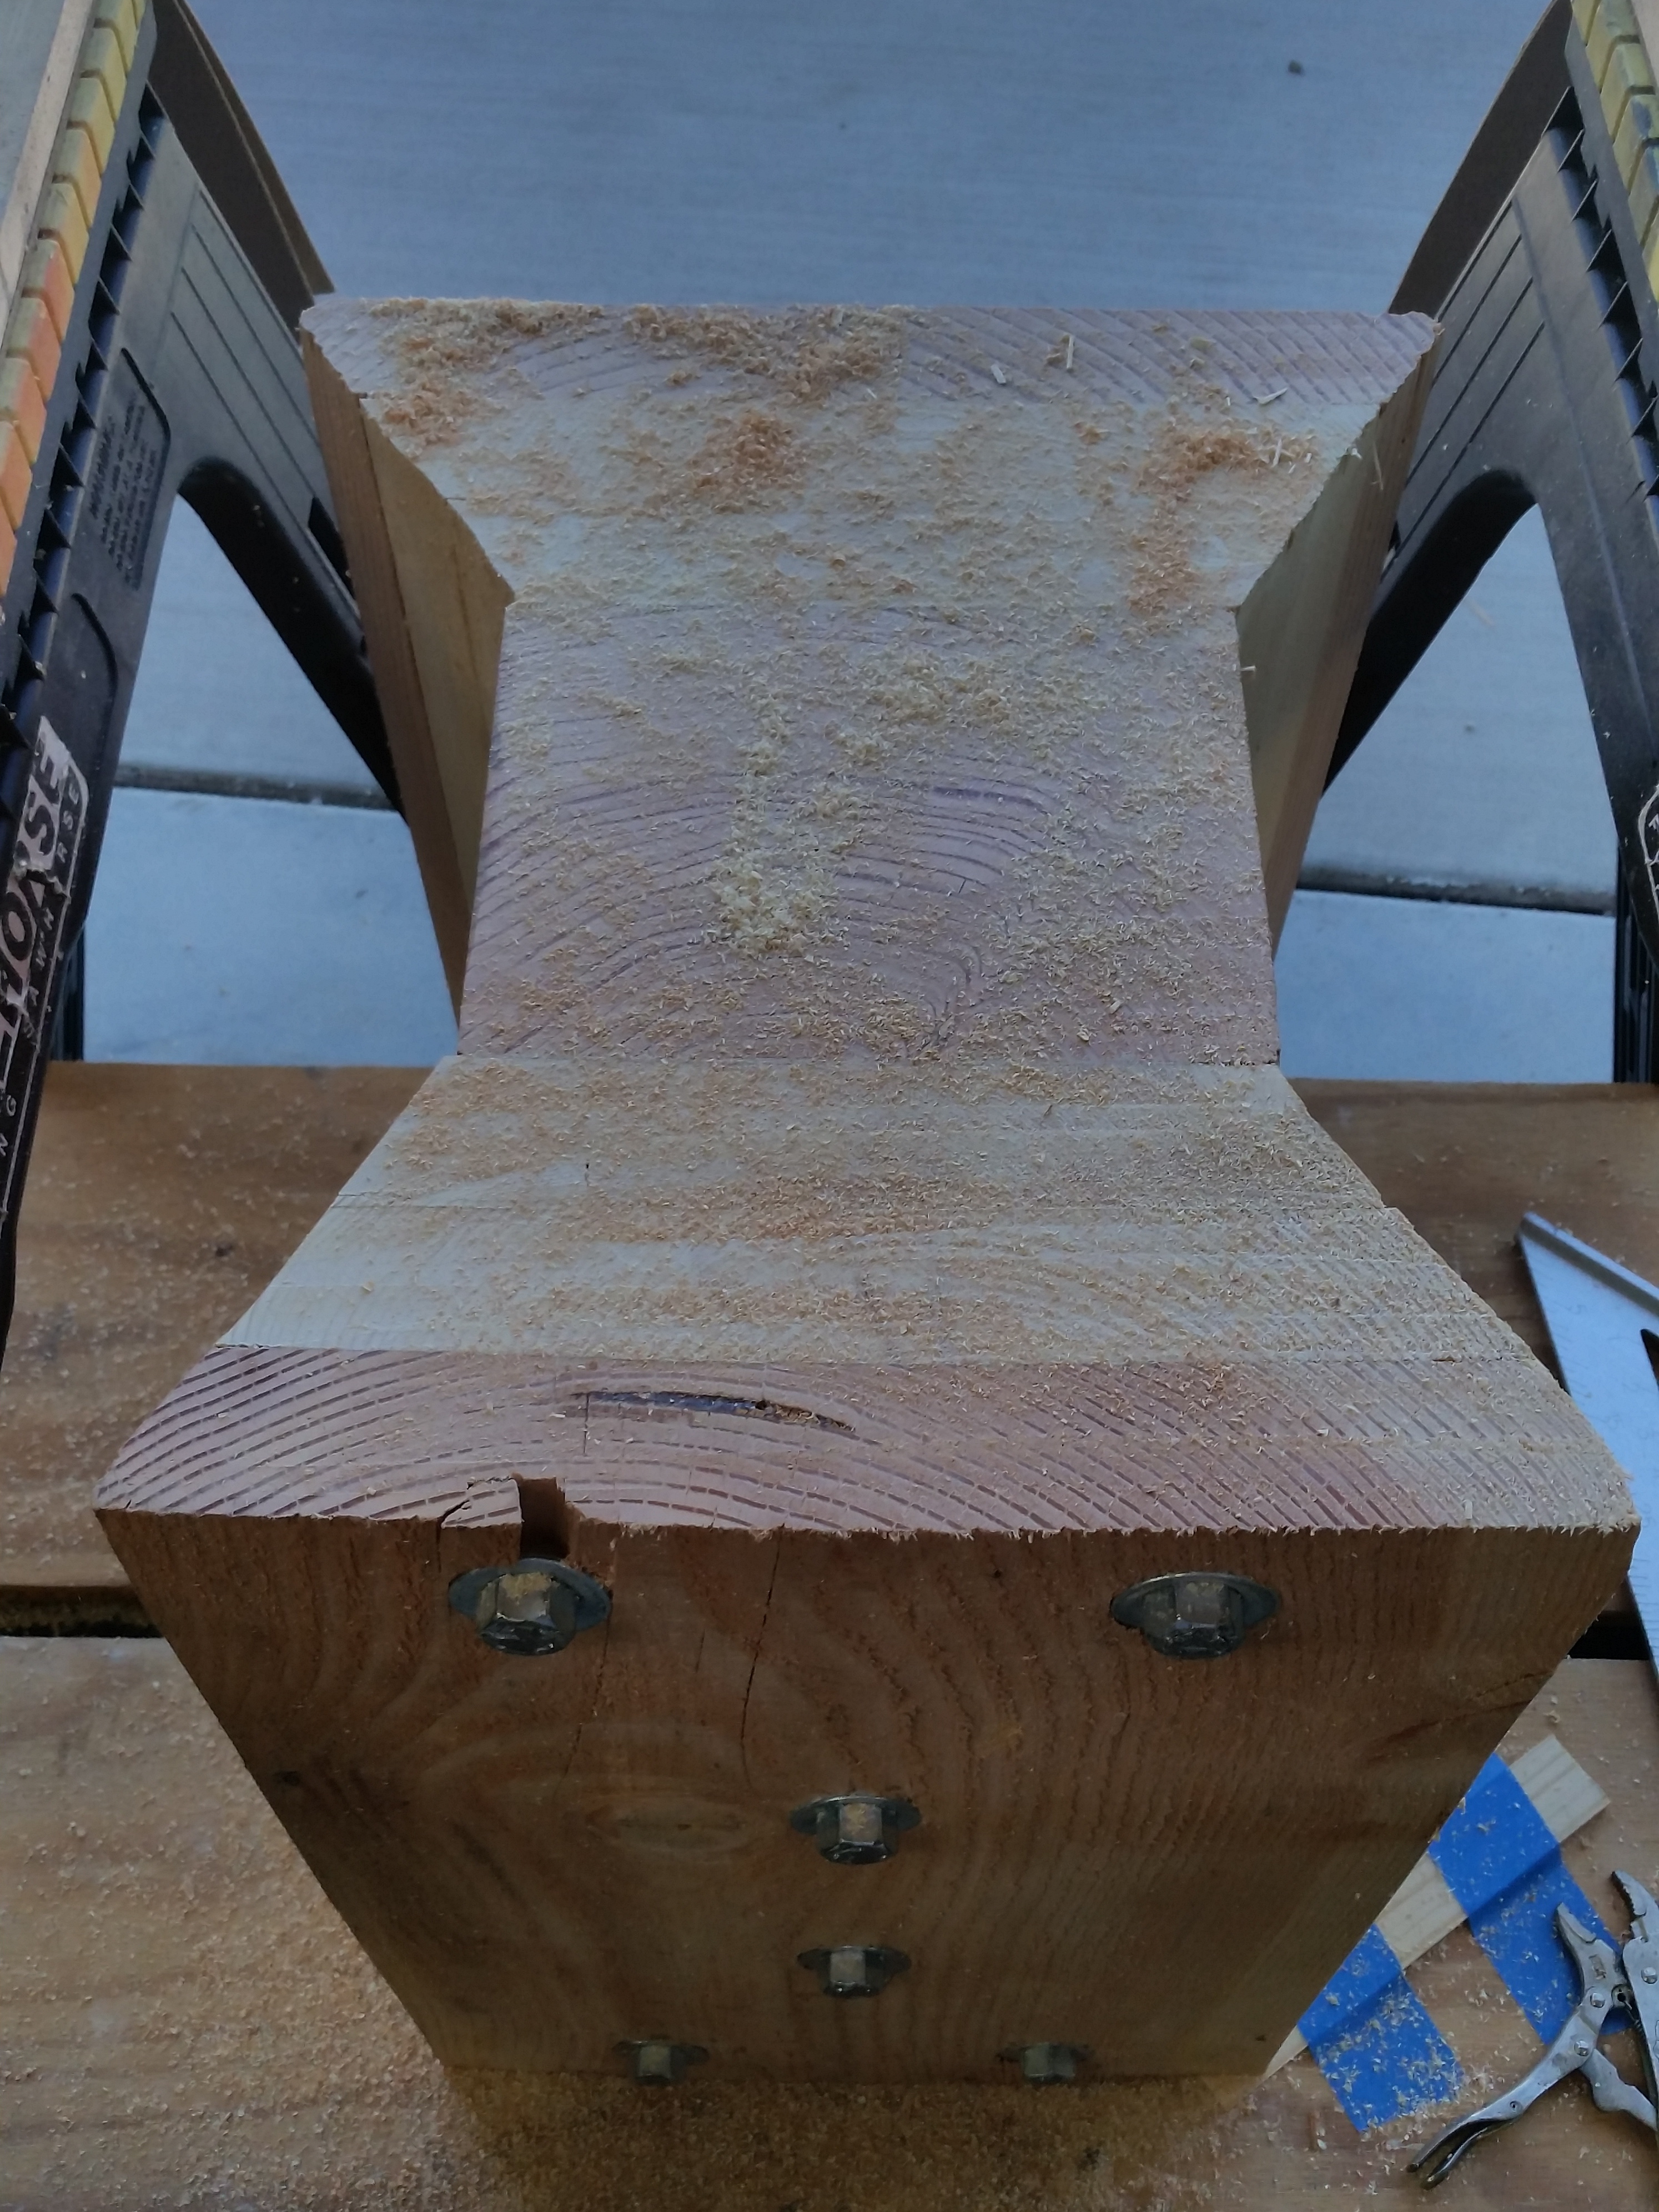
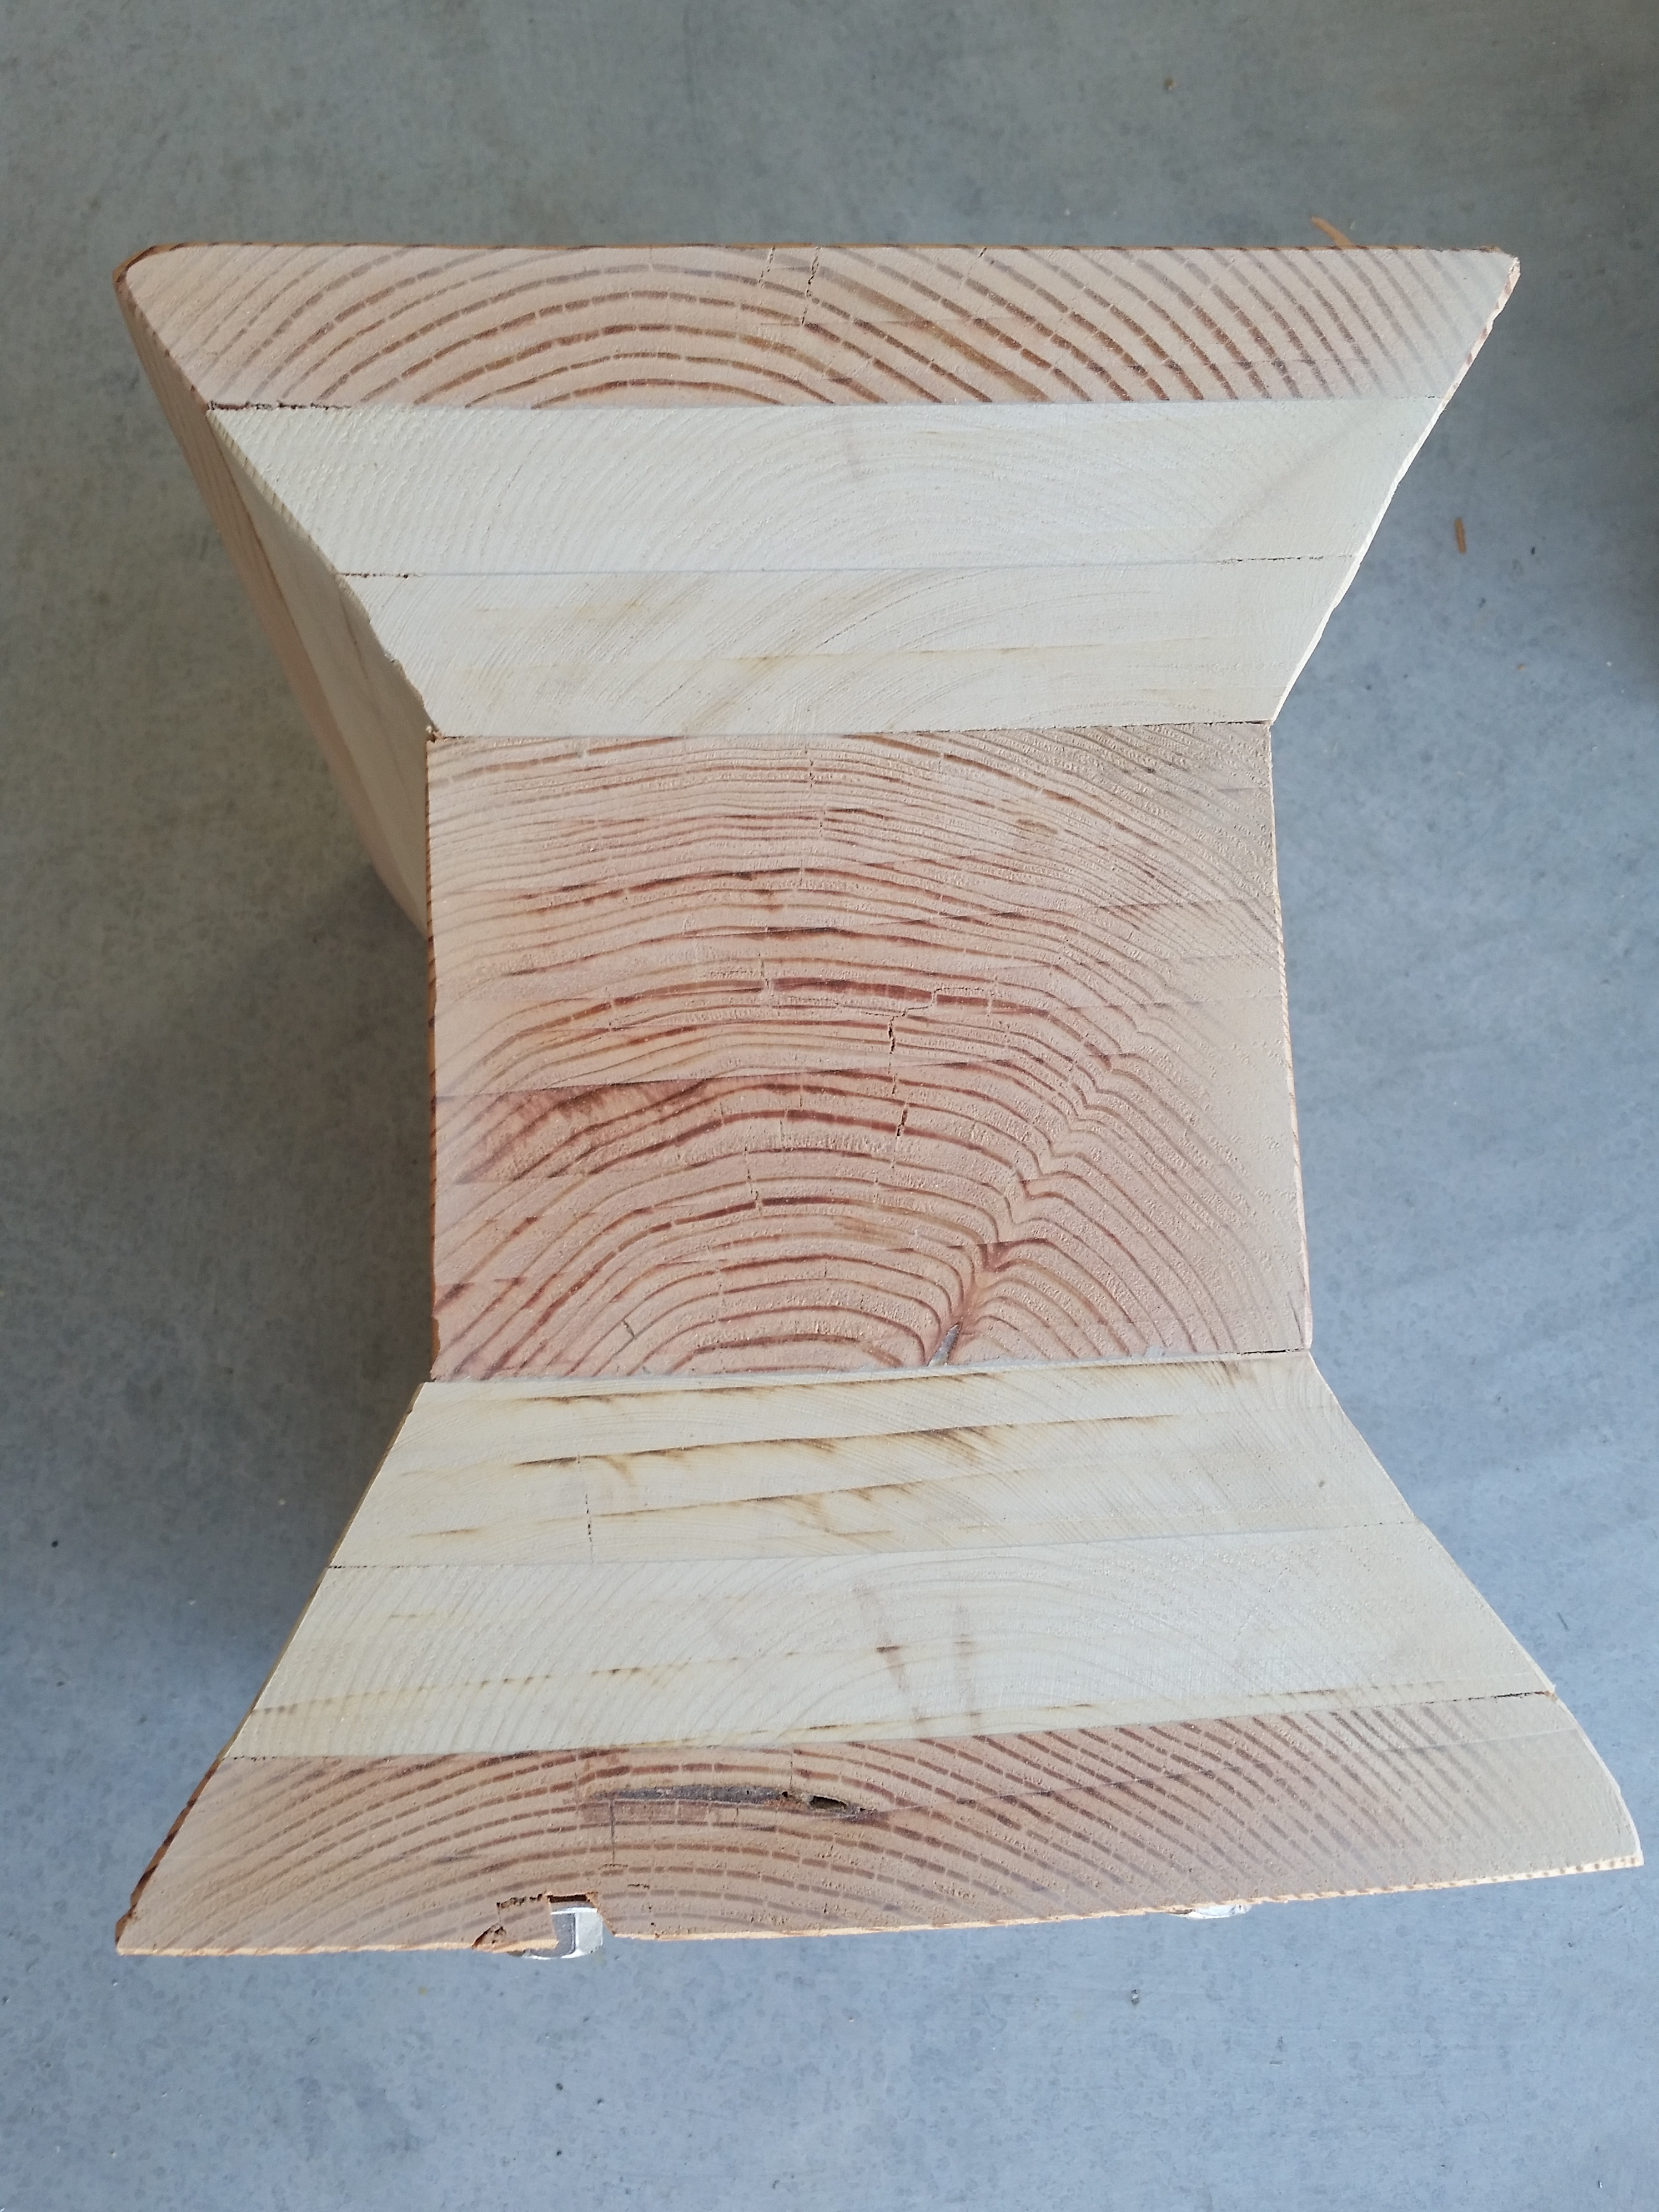
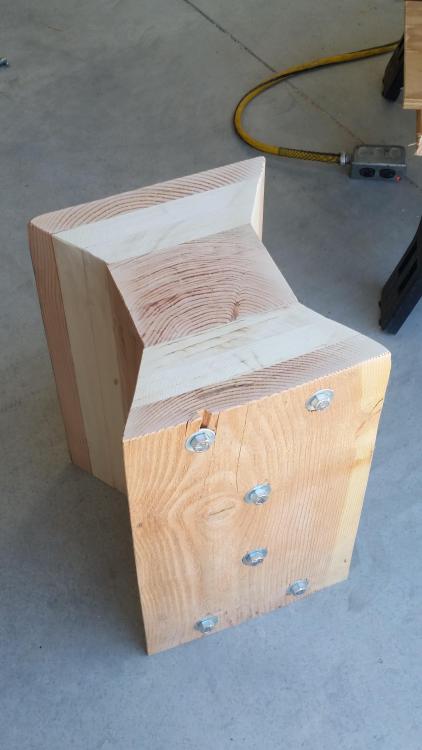
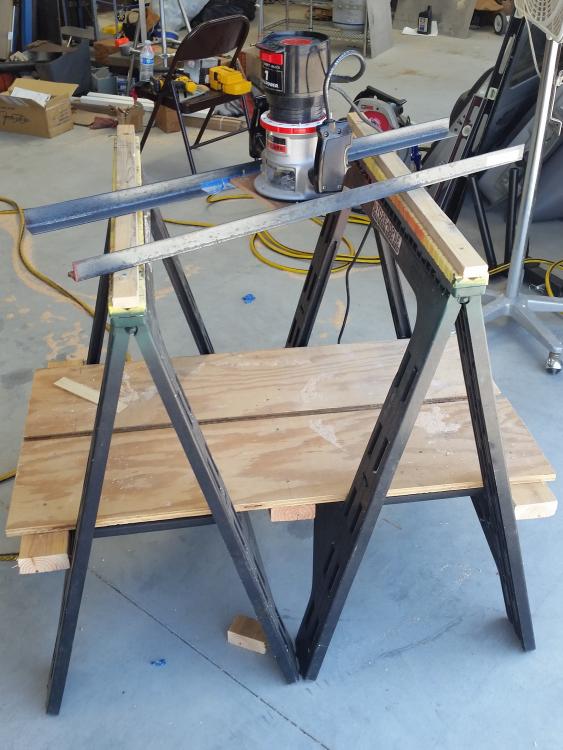
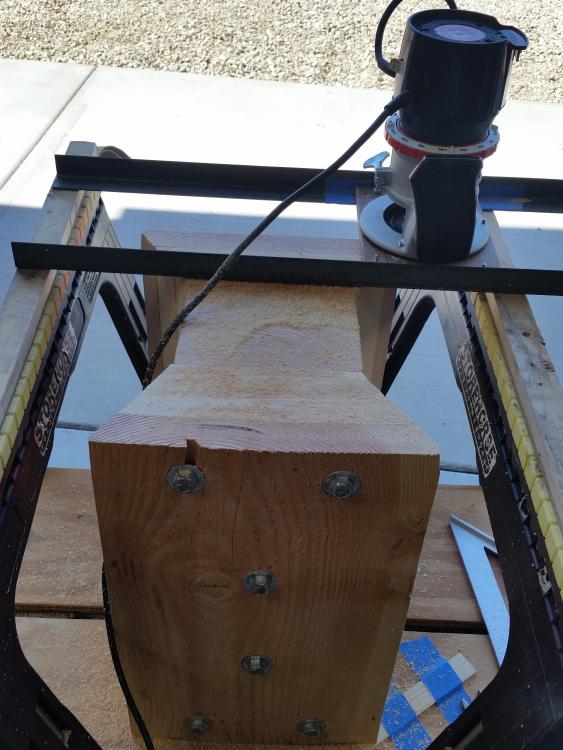
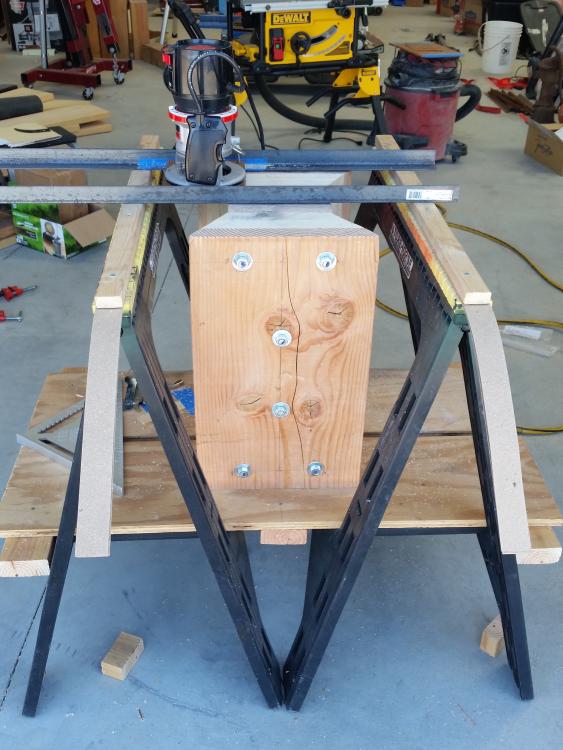
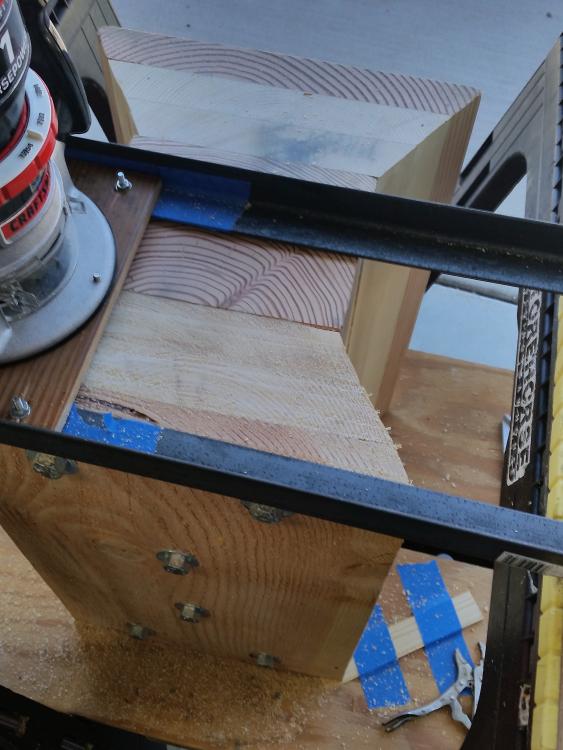
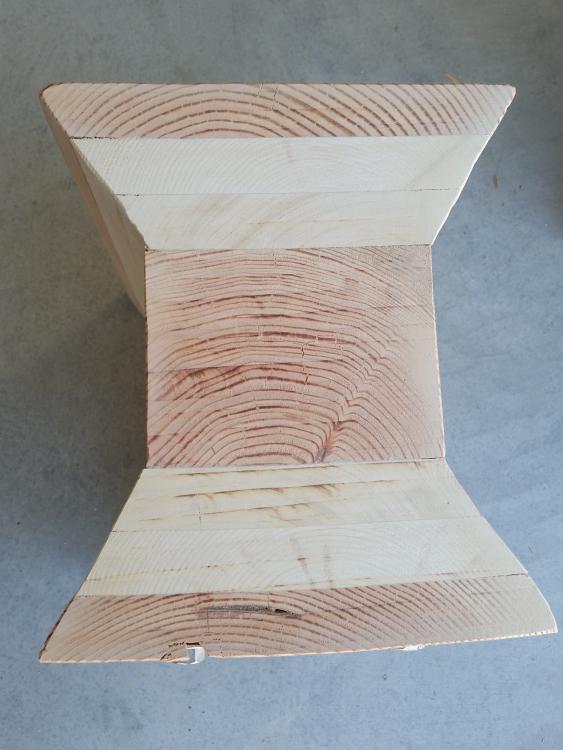
I finally started my new Anvil Stand, my existing one is about six inches too low and i wanted to upgrade. I read about Anvil Stand, wood vs metal, and decided it was my way to work with wood because there was a lot of it just laying around Building Sites, so wood won out. I may after using this one for a while decide it is time for a Steel Stand but for now wood it is ! This is a run down on how i did it based on a Thread by Stash/Steve. Cost, not sure: Wood was free, all the screws I used were left overs from the house remodel, I purchased is the Adhesive, the Threaded Rod w/Nuts, Flats and Locks and the Angle Iron for the Router Table. So this is my kind of project… Free or Almost Free Is For Me ! Leveling My Wooden Anvil Stand New picture finished block here (Not available at posting time) ! My thanks to Steve, aka Stash, for posting the method he used, it got me going; the Thread Name, “Leveling an Anvil Stand My Way”, located at: "https://www.iforgeiron.com/topic/51404-flattening-a-stump-sinatra-style/" ! I have been working on a new stand for my PW Anvil that I purchased two years ago and gathering dimensional lumber, from different Building Site including my own remodeling for awhile, and started thinking about how I was going to start the project. One thing, "I over-think everything", ok two things... "Everything takes me far longer to do than it should and I usually need most everything in place before I can even start a project" ! I picked up enough Dimensional Lumber to start my project, “My Wooden Anvil Stand”, I needed to keep Peter Wright happy and I needed to add six inches to my existing stand ! Tools Used to Mill the Bottom and Top of “My Wooden Anvil Stand”: 1) Saw Horse – qty. 2, I used the HD plastic units, I thought these might be a little shaky but once I added the wooden shelf they stood tall and firm. Wooden or Metal Units will work too ! 2) Router – I used a one-horse power unit I had in the cabinet, it worked well, (left over from my fathers tools, so he sort of helped out). 3) Router Table – Home Made from two pieces of angle iron sized for the spacing between the SH and 3/8” Plywood for a platform to mount the Router to the angle iron. The 3/8” Plywood Table, I made it just wide enough for the width of the Router’s bottom plate and long enough to allow for bolting it to the angle iron ! 4) The Lower Shelf – I used two pieces of ¾” Plywood cut to length that fit my table and used 2x4s to secure the shelf in place and in-between the SH to make the shelf more secure, see Figure 1. 5) Levels, qty. 2, a four foot and a two foot, the four foot was used to get a plumb on the sides in reference to the shelf and to find the highs and lows of the work surface; the two foot was a checking device for plumb and the checking of level of the milled surface after milling. 6) A dead blow Hammer – used to align the block. 7) Basic Tools for assembly, i.e. Hammer, Screw Gun and Hand Screw Driver, Drill, Drill Bits, Wrenches sized for your work. How I started out: I needed a level spot to build from and was thinking my garage floor should be level enough, I took a four foot level and a known six foot straight bar to check, seemed level, should be able to get the wood glued together and flat or at least close enough; that's a big step for me people... "Close enough" ! Cut the wood to length and marked the hole locations using the bottom of the boards and the center of the boards as a datum, (At this point I marker the boards for bottom). Made sense so all of the holes would be close to a good position for alignment. What’s that called in industry today… “Geometric Dimensioning and Tolerancing”. The next step was to drill the marked holes for the 1/2" Threaded Rod through bolts, a 5/8” hole would allow for adjustments of the pieces when aligning and making sure the boards are square to each other. Since the threaded rods are only being used to hold the boards together and would have large flat washers, lock washers, and nuts on each rod, using oversized holes to aligning the board seemed Iike a good idea. Got the threaded Rods, nuts, flats and locks, from Lowes, they even have a Hardware Package with nuts, flats and locks, needed for a two rod setup, x3 for me, let's get started. Laid out the boards, spread the construction adhesive, I chose a slower setting adhesive made by Loctite, to give me time to spread the adhesive, align the wood and tighten things up. At this time the nuts were just snugged up, not too tight yet, banged the boards with the dead blow hammer to make sure they were all sitting flat on the floor. Aligned the pieced on the sides, tightened the nuts and added clamps, all done right... WRONG ! After drying, the stand wobbled worse than if I didn't even try to square it up during the gluing and clamping process, what to do next ! Wait for it… Drum Roll Please ! In the Thread by Stash, "https://www.iforgeiron.com/topic/51404-flattening-a-stump-sinatra-style/", “Leveling an Anvil Stand My Way”... Stash, the OP, posted a method he used with a Home Made Stand and Router to level his Anvil Stand, a Tree Stump ! Thanks to Steve and his write up with pictures I attempted his posted method and it turned out very well, a level stand, so I would say that it worked and it is where we were headed, so that is good ! I thought Stash's method was as good as any, if my base was solid, it should work but the results I got… a level block, was far easier than I ever expected ! The Router/Miller Method: Home Made Miller - (HMM), Figure 1 This is what I did, similar to Steve’s method but with the tools and hardware I had available to work with ! Took two Saw Horses (SH) placed side by side with the tops parallel to each other. Made a reinforced lower shelf with two pieces of 3/4" plywood and some 2x4s to hold the shelf together and in place. See Figure 1 Figure 1 Home Made Milling Machine, crude but it worked out ok ! The HMM wasn’t going to have the height needed between the top of the work piece and the top of the SH, ¾” strips of wood were added to the tops of the SH to add the height needed, see Figure 1. Simple, straight forward, and gained extra height for Router adjustments and movement of the Slide Table. Figure 2 - Router Table with angle iron and plywood. Place the block of wood, The Anvil Stand, on the lower reinforced shelf, plumb the sides straight up, shimmed as needed. There was only one shim needed, it might move around and change the height pattern setup so it was secured using Builder’s Tape. I felt the block was heavy enough to stay put but I was worried the shims might vibrate loose and move. NOTE: If your stand/block is a lite-weight… secure it to something, if mine moved I would drive some screws up through the wooded shelf but the block held fast. Figure 3 shows the block in the HMM Next the part of the block being milled needed to be checked for high and low points and the surface marked. The low spot will be the starting and ending point; the high spot is to determining the amount you need to cut the block to make it close to level. To do this a known straight solid edge was used, a four foot level across the SH Top Edge. Measurements were made from the bottom of the straight edge to the block and by marking it down you can determine where it needs milling first. Once the low and the high spots are found, the difference between the lowest low and the highest high points was determined, the first cut was approximately one-third of the difference, it could be less, this is your call. The Rrouter was set for the first cut and started the process of moving the router back and forth on the block of wood, proceeding slowly, 3/8” cut widths across the block (half of my bit) and cutting from the same side each time, in the same direction. Figure 4 - The starting of the milling process. You can see the center screw on the router is where the cutting is taking place, almost half done. Luckily I only had to take a small amount off each side so you can see the cuts are small in depth and width. After the first three complete cuts to the whole surface, the bottom of the stand, which is facing up, had a reasonably flat surface. NOTE: The amount I cut was the difference between the low spot and the high spot plus a little more just to make sure the surface was level ! Figure 5 showing completed first surface The Block was flipped 180 degrees or putting the other side that needs cutting up ! In my case it was the top of the stand that was going to be milled next. Getting started on the new end of the block by checking the plumb of the block, shimming if needed, the block should be close to plumb without shims. I found the level bubble was within the level lines, and as it turned out it was off the same amount the SH were off, so I'm good to go ! NOTE: Make sure the Base that the piece sits on, and the Table Sliding Surface, is level/parallel to each other, or close to it ! The next step was repeating Steps 5 and 6, ref: low and high spot, locations and differences in height and then Steps 7 and 8, ref: Routing and Checking. Figure 6, Anvil Stand finished end. As it turns out it was a time consuming process, setting up the Milling Stand but ended up being easier than I thought to get it done, and I am a very happy metal bender with the results. In case the question is asked… “Using the belt sander method didn't work for me, sand here… better, sand there... uneven again”. I used a straight edge to find the lows and highs but once I started sanding I lost the points that needed sanding. The Router / SH / Milling Table, worked and worked well. Figure 7 Completed Center Core of “My New Wooden Anvil Stand”. I hope anyone reading this Thread can understand the process. Steve’s Posted Method worked and worked well enough to get me an Anvil Stand Core that is as close to level as I will ever get. I suggest anyone wanting a wooden, level stand and with the correct tooling and level of expertise, to give it a try ! Thanks for reading my write up, it is a long one ! Any comments are appreciated and expected ! Scrambler82 / GrevB

-
Now I can't edit because it has been too long ! Ive asked to have the thread deleted... I started another, that one isn't any better, the pictures, which I planned to edit are now gone... Where oh where did the pictures go ! Not happy with the site at the moment, some thing has to change on this edit time out thing !
-
I have been working on a new stand for my PW, since I purchased the anvil two years ago. I gathered the wood, construction lumber, and started thinking about how I was going to start the project. I started thinking my garage floor is level, checked with a level, should be able to get the wood glued together and flat. Predrilled over size holes to allow for adjustments, should work. Got some threaded Rod, nut, flats and locks, let's get started. Spread the construction adhesive, slide all of the pieces together, snugged up the nuts banged the boards to make sure they were all sitting flat, tightened the nuts and added clamps, all,done right... Wrong ! The stand wobbled worse than if I didn't even try to square it up during the gluing and clamping, what to do next ! In another thread about leveling an Anvil Stand, Steve posted a method he used with a router to level. Thanks to Steve and his write up with pictures I attempted his method and it turned out very well, a level stand. First I took a set of Saw Horses, reenforced the lower shelves with 3/4" plywood and some 2x4s to hold the shelf in place. I then added strips of wood to the tops of the saw horses to add height to the top to clear he Sand and setup the Router with angle iron slides so it can move back and forth on the wooden strips. I then placed the block of wood I call an Anvil Stand on the lower reenforced shelf, plumbed it and checked the bottom, facing upward, to find where the the high points were and marked the block low spot as the starting point. I set the router to one third the amount I wanted to remove and started the process of moving the router back and forth on the block of wood, proceeding slowly, three-eighths of an inch cuts across the block and cutting from the same side each time. Three passes on the bottom of the stand ended in a reasonably flat surface. From here the block was flipped so the top could be cut flat. Again we got started by checking the plumb of the block, it was not perfect but the bubble was within the level lines, and as it turned out it was off the same amount the Saw Hoirses were off, so I'm good, found the low point and marked it. After three passes with the router, taking one third cuts, all from the same side across the block, the top was flat and parallel to the bottom, great ! As it turns out it was a time consuming process, easier than I thought to get it done, and I am a very happy metal bender. This picture shows the direction I used in my milling process. This method worked out well, at this point I had a flat solid stand to use in my cement floored shop so it should stay flat. Take your time, slow movement, shallow cuts, and small side wards cuts, i.e. Half the blade width max. What ever you use for sliding rails, i.e. angle iron, get pieces long enough to move the router beyond the block edge, you don't need to be stop for lack of space and find you didn't make a complete cross cut. When I setup the block I attempted to find level, based on the shelf I made, I could get close but still had a rocking. I realized that I needed a datum to start from, my main piece of wood, the center core, was what I wanted to be straight up and square to the mass,so I plumbed the sides of the centerpiece of wood, shimmed it for perpendicular its to the shelf and started cutting/milling. I ended up, after the third pass, with a black with the sides of the center core perpendicular to the bottom. At this point I flipped the block and plumbed the sides to the to, before Illini, and found that the block was sitting flat on the shelf and the sides of the center core were plumb to the flat of the bottom. All I needed to do was level the top portion of the block and wham bam, I got my flat, non-rocking block. (I hope that isn't too confusingly) ! The block was flat on the ground, didn't rock, and I was happy but I needed to add some additional wood to the bottom, shouldn't be a biggy right ! I added the wood to the bottom and yes... It was-a-rock'n again ! Flipped the block over placed it in the make shift milling machine and raised the side to compensate for the extra wood on the bottom, AND started the router, proceeded to remove more wood to get it back to level again and it worked and worked well, again thank you Steve ! This method appears to be the easiest in the long run; a little more costly than a belt sander, that is if you don't have all of the pieces but it is by far the best way I have used to achieve flat parallel surfaces on my Wooden Anvil Stand ! Thanks for reading, hope you can understand what I am trying to say and don't disgaurd this method until you have tried it, it works great ! GrevB
-
The system shut me down, tells me the pic is too large.
-
I have been working on a new stand for my PW, since I purchased the anvil two years ago. I gathered the wood, construction lumber, and started thinking about how I was going to start the project. I started thinking my garage floor is level, checked with a level, should be able to get the wood glued together and flat. Predrilled over size holes to allow for adjustments, should work. Got some threaded Rod, nut, flats and locks, let's get started. Spread the construction adhesive, slide all of the pieces together, snugged up the nuts banged the boards to make sure they were all sitting flat, tightened the nuts and added clamps, all,done right... Wrong ! The stand wobbled worse than if I didn't even try to square it up during the gluing and clamping, what to do next ! In another thread about leveling an Anvil Stand, Steve posted a method he used with a router to level. Thanks to Steve and his write up with pictures I attempted his method and it turned out very well, a level stand. Note: My pictures are,too large to upload, I need to find a way to make them smaller. First I took a set of Saw Horses, reenforced the lower shelves with 3/4" plywood and some 2x4s to hold the shelf in place. Picture 1 goes here ! I then added strips of wood to the tops of the saw horses to add height to the top to clear he Sand and setup the Router with angle iron slides so it can move back and forth on the wooden strips. I then placed the block of wood I call an Anvil Stand on the lower reenforced shelf, plumbed it and checked the bottom, facing upward, to find where the the high points were and marked the block low spot as the starting point. I set the router to one third the amount I wanted to remove and started the process of moving the router back and forth on the block of wood, proceeding slowly, three-eighths of an inch cuts across the block and cutting from the same side each time. Picture 2 goes here ! Three passes on the bottom of the stand ended in a reasonably flat surface. From here the block was flipped so the top could be cut flat. Again we got started by checking the plumb of the block, it was not perfect but the bubble was within the level lines, and as it turned out it was off the same amount the Saw Hoirses were off, so I'm good, found the low point and marked it. After three passes with the router, taking one third cuts, all from the same side across the block, the top was flat and parallel to the bottom, great ! Picture 3 goes here ! Any other pictures go here ! As it turns out it was a time consuming process, easier than I thought to get it done, and I am a very happy metal bender. I will try to reduce the size of my pictures and ask an Admin to post them in the Thread... sorry ! GrevB
-
I watch for yard sales but haven't had much luck. Two main reasons, one, I don't know the area well enough yet for it to make sense in going to a yard sale that ends up 50 miles down the road and two, I don't seems to find postings on yard sales as frequently as I did I'm MA. I keep trying though !
-
-
Thanks
-
Had to lol that one up, "tautology - saying the same thing twice but differently" ! So I learned a new word today, no Blacksmithing info but a new word ! Why are so many people getting on the defensive side... I can't or won't quote what I am referencing for posts but tend to feel it in the words people are using. Let all take a step back, breathe deeply and relax, we are here doing the same thing, learning from others experiences and helping others. OK, newbie is done, get xxxx off if you want to ban me for putting in the "xxxx" word but slack off we only have so much time on this earth and why waste it getting angry at someone or just complaining ! If I have misinterpreted what is being said here, PLEASE except my apologies !
-
Latest response ! "No, I'm afraid we don't know of anyone producing it in this area. - Jon/PSH"